Pyro Chinese War Junk build
TimReynaga
 Associate Editor
California, United States
Joined: May 03, 2006
KitMaker: 2,500 posts
Model Shipwrights: 1,830 posts
Posted: Sunday, March 25, 2018 - 07:26 AM UTC
Thanks, Si!
After the airbrushed colors of the sails were dry, I brush painted the masts and battens with the same Tamiya XF-59 Desert Yellow acrylic previously used on the hull.
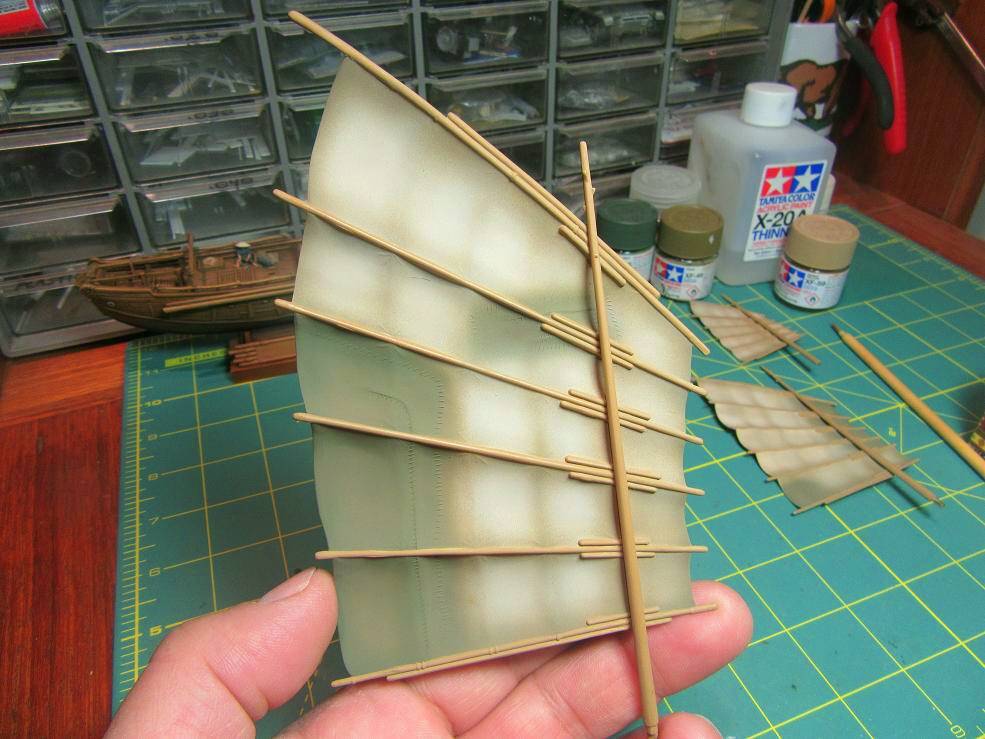
These were then overpainted with Grumbacher Raw Umber artists oils to leave the parts stained a nice wood color.
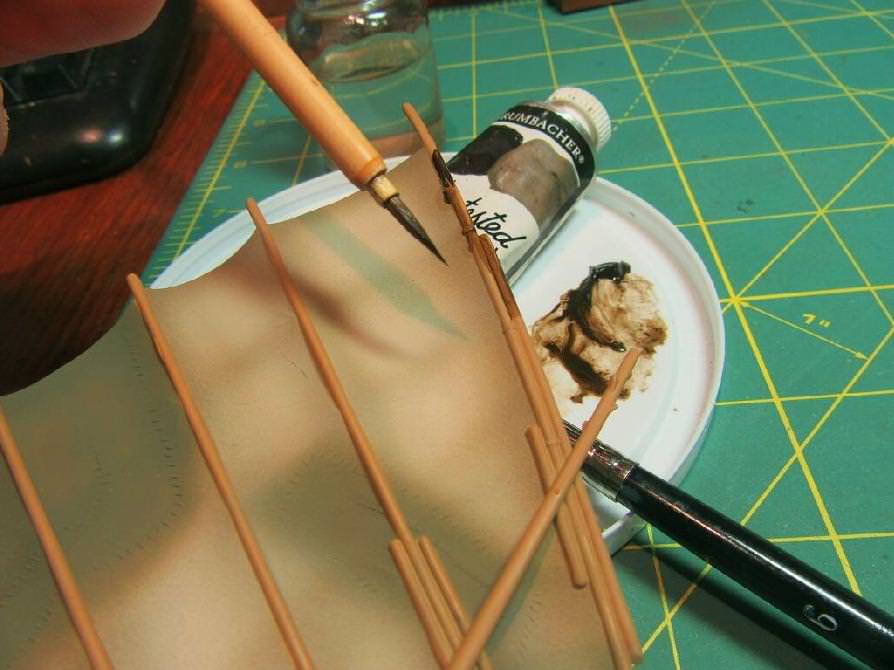
After leaving this for a few minutes to let the oils set a little, I slathered on more of the Raw Umber, this time highly thinned, over everything - the masts, battens, and the sails - to really grunge things up.
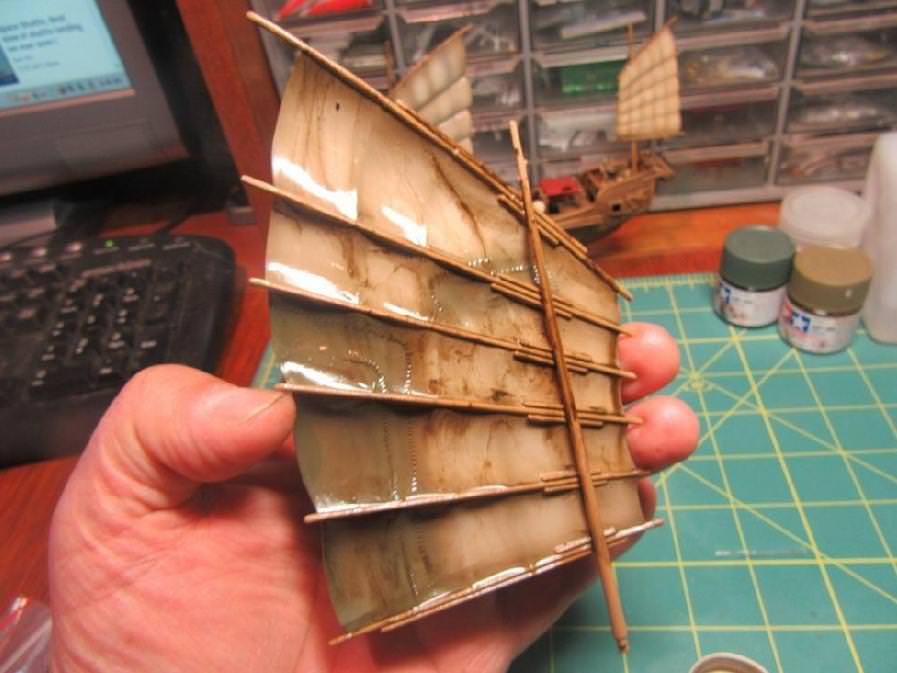
Wiping most of it away with a larger, flat brush reduced this mess to a soft, brownish filter with some dark pigment left to deepen recessses. I also added a little more of the thinned oil paint in touches around the patched sections to bring out the raised stitching detail.
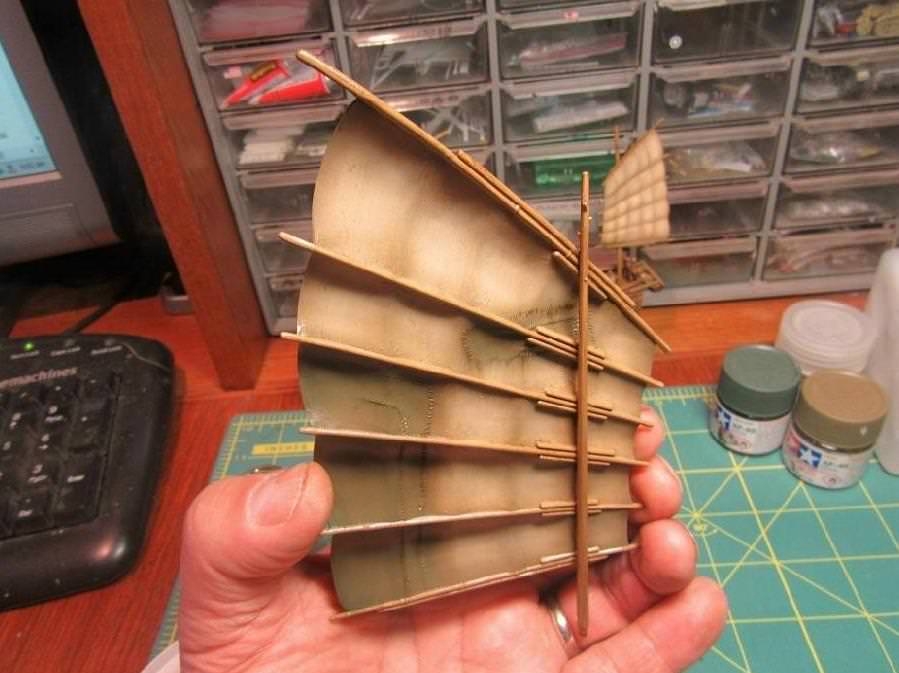
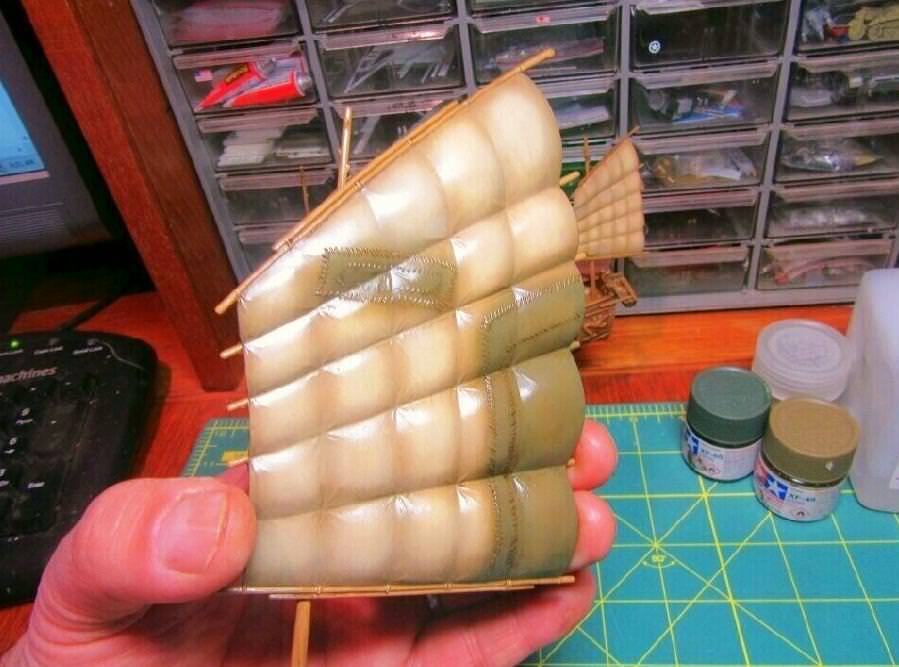
Once dry the finished sails should settle to a matte, dingy appearance suitable for my hard working, indifferently maintained junk!

#306
Victoria, Australia
Joined: June 27, 2010
KitMaker: 3,959 posts
Model Shipwrights: 2,777 posts
Posted: Sunday, March 25, 2018 - 03:33 PM UTC
Great to see you back on this one too, Tim

Amazing work you've done to a 2d part to really make it look like a 3d sail!

Stay home and build models!
In 1/72
Gloster Gladiator MkII for the Bi-planes Campaign
In 1/350
Airfix 1:350 Type 45 Destroyer
Washington, United States
Joined: August 03, 2008
KitMaker: 436 posts
Model Shipwrights: 31 posts
Posted: Sunday, March 25, 2018 - 11:27 PM UTC
Tim,
The sails look excellent.... hard worked and showing the strain.
Ok, I have an odd question that is a bit out in left field. Is there a way to save the entire Topic off as something like a PDF at one go? I have done some page by page, but that is a hassle. I could save the link, but after the PB image fiasco I don't really trust that for the long term.
This article, and your other one on the Pinta would be candidates as I found both informative, and full of excellent tips that can be used for a lot more than ships.
Thank you for both the journey and any possible answers....
Bob
TimReynaga
Associate Editor California, United States
Joined: May 03, 2006
KitMaker: 2,500 posts
Model Shipwrights: 1,830 posts
Posted: Monday, March 26, 2018 - 06:33 PM UTC
Quoted Text
Tim,
The sails look excellent.... hard worked and showing the strain.
Ok, I have an odd question that is a bit out in left field. Is there a way to save the entire Topic off as something like a PDF at one go? I have done some page by page, but that is a hassle. I could save the link, but after the PB image fiasco I don't really trust that for the long term.
This article, and your other one on the Pinta would be candidates as I found both informative, and full of excellent tips that can be used for a lot more than ships.
Thank you for both the journey and any possible answers....
Bob
Bob,
Thank you for your generous comments; I'm glad you find my build logs useful, and I am honored that you think they might even be worth preserving!
In answer to your question, I don't know, but I've passed your inquiry along to the KitMaker site administrators - I'll let you know what I find out.
Thanks again for coming along with me for the journey!
England - South East, United Kingdom
Joined: March 01, 2010
KitMaker: 7,078 posts
Model Shipwrights: 6,649 posts
Posted: Monday, March 26, 2018 - 11:10 PM UTC
Looking great Tim,
The effect on the woodwork ids excellent too.
Cheers
Si
#513
Alabama, United States
Joined: March 28, 2006
KitMaker: 554 posts
Model Shipwrights: 219 posts
Posted: Tuesday, March 27, 2018 - 02:35 AM UTC
Tim,
Those sails looks outstanding. I hope one day to tackle one of these old kits. I appreciate you describing your painting processes in such a detailed manner. I don't have an airbrush so it's just rattle cans and brushes for me but I'm going to try and emulate your painting effects as best I can. Keep the tutorials coming. Looking forward to your rigging.
Thanks
John
TimReynaga
Associate Editor California, United States
Joined: May 03, 2006
KitMaker: 2,500 posts
Model Shipwrights: 1,830 posts
Posted: Tuesday, March 27, 2018 - 07:47 AM UTC
Quoted Text
Great to see you back on this one too, Tim
Amazing work you've done to a 2d part to really make it look like a 3d sail!
Russ
________________________________________________________________________________
Looking great Tim,
The effect on the woodwork ids excellent too.
Cheers
Si
_________________________________________________________________________________
Tim,
Those sails looks outstanding. I hope one day to tackle one of these old kits. I appreciate you describing your painting processes in such a detailed manner. I don't have an airbrush so it's just rattle cans and brushes for me but I'm going to try and emulate your painting effects as best I can. Keep the tutorials coming. Looking forward to your rigging.
Thanks
John
Thanks Russ and Si. The sail is actually pretty convincingly 3D molded to start with, the paint job just highlights whats there... and the molded woodwork on these old Pyro beauties is so dramatic that it isnt at all hard to make them look interesting!
And John, thank you for your comments! I sometimes wonder if people might be finding these detailed descriptions of my construction methods to be obvious or uninteresting, so it is good to hear that they add some value.
As for the airbrush, it is a useful tool, but you could achieve the much same weathering effects on the sails with a stiff paintbrush stippling the darker colors in the folds. Most of the effect is from the interaction of the colors themselves and the oil based grunge wash can conceal a lot of imprecise brushwork!

TimReynaga
Associate Editor California, United States
Joined: May 03, 2006
KitMaker: 2,500 posts
Model Shipwrights: 1,830 posts
Posted: Friday, March 30, 2018 - 08:57 AM UTC
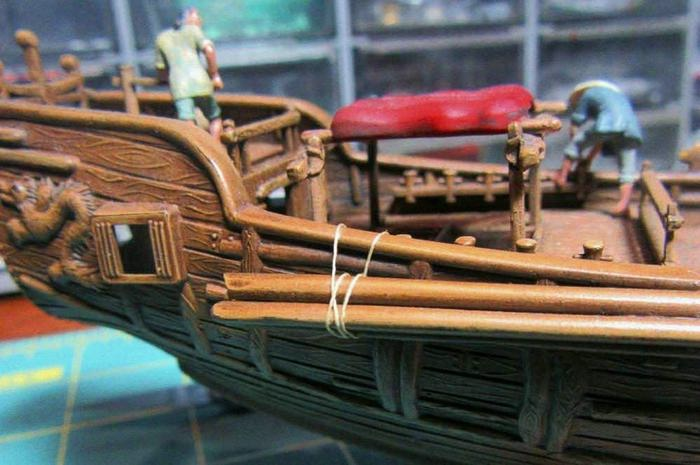
Before going any further it seemed like a good idea to take care of a few details on the hull which will be hard to reach once the masts and sails are in place. First among these were the timbers attached to the ships sides. As depicted in Pyros fanciful Chinese War Junk box illustration, the artist seemed to imagine them as a sort of makeshift appliqué armor for the gunners on deck.
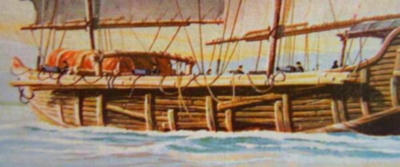
They were actually booms for fishing gear (here seen deployed on a Vietnamese fishing junk in 1965):

Although the box art does correctly show how these booms were stowed along the hull sides when not in use, the securing lines were oddly depicted as merely draped randomly over them.
It seems to me more logical that they would have been tied with care to firmly hold the large booms fast to the hull, so thats how I proceeded. Using some rigging thread looted from an old Revell Santa María kit, I looped a line around the booms and attached the ends to the belaying posts aft.
TimReynaga
Associate Editor California, United States
Joined: May 03, 2006
KitMaker: 2,500 posts
Model Shipwrights: 1,830 posts
Posted: Friday, March 30, 2018 - 08:47 PM UTC
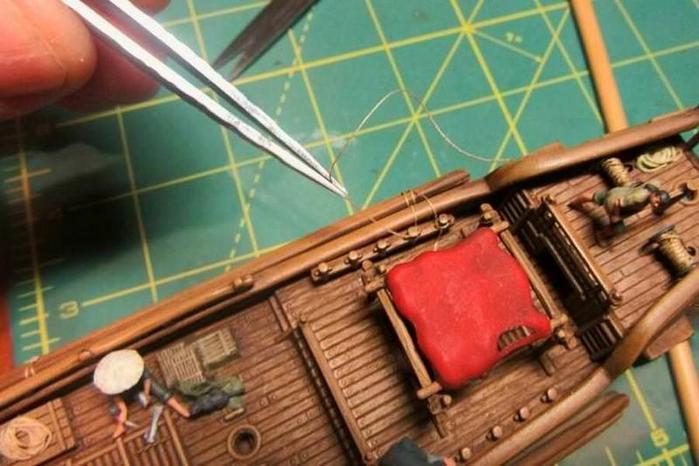
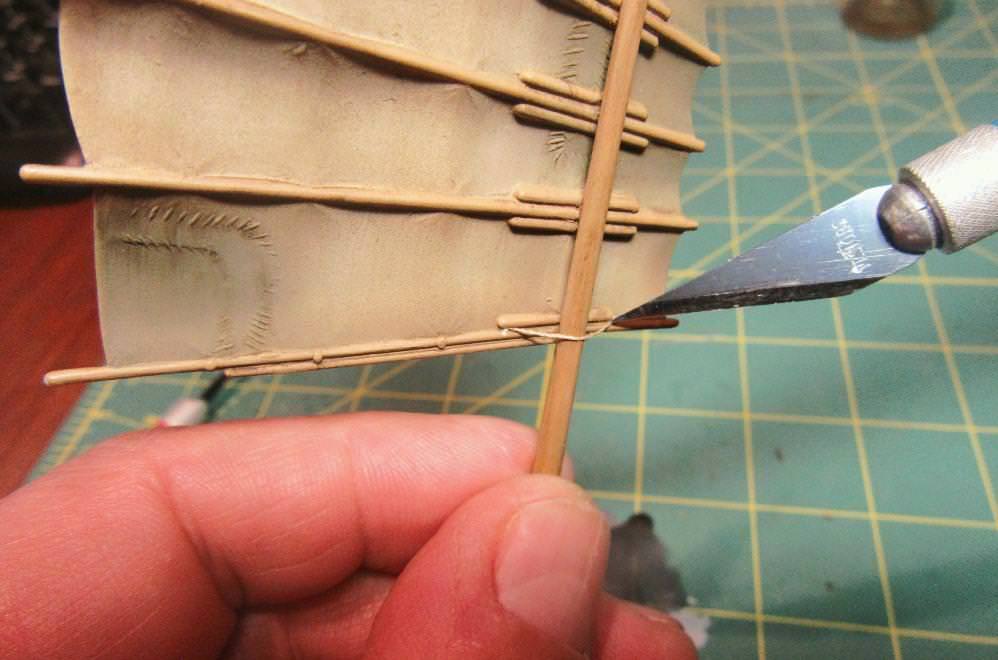
Further forward I did the same thing, but this time the ropes were tied to the side rails. Since these would be more visible I wanted to secure the ends with believable knots. Having no knowledge of traditional Chinese knotting practices, I decided to go with a simple knot I do know the humble clove hitch:

The clove hitch is a basic all-purpose knot, easy to tie and untie, and is good for binding. It can slip or come undone if the object it is tied to rotates or if constant pressure is not maintained on the line, but in the case of these heavy booms fastened to the ships sides I dont think this would have been a problem.
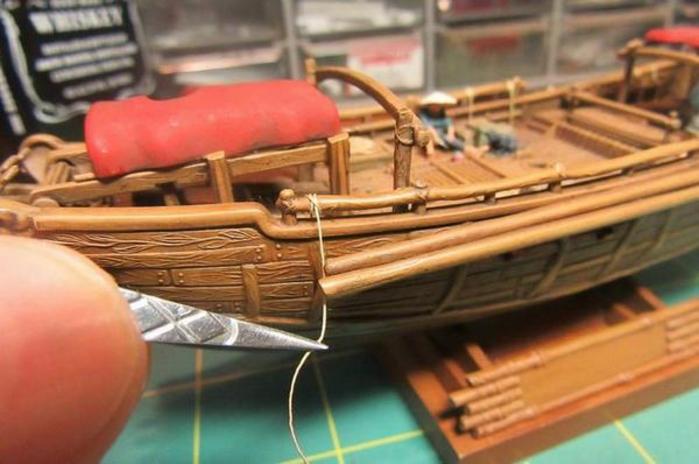

Even these simple knots were a challenge to tie in this small scale, but the miniature hitches looked reasonable and seemed to hold pretty well. Just to make sure, I brushed some diluted white PVA glue over them to prevent them from slipping on the model over time.
In the end the finished ties arent even all that prominent, but they do add just a bit of interest behind the action on deck.
England - South East, United Kingdom
Joined: March 01, 2010
KitMaker: 7,078 posts
Model Shipwrights: 6,649 posts
Posted: Saturday, March 31, 2018 - 01:10 AM UTC
Great stuff Tim,
It always makes me smile when I see a bit of proper seamanlike modelmaking!
Your clove hitches may not be the star of the show, but they deserve the Oscar for best knots in a supporting role. (sorry
)
Cheers

Si
TimReynaga
Associate Editor California, United States
Joined: May 03, 2006
KitMaker: 2,500 posts
Model Shipwrights: 1,830 posts
Posted: Sunday, April 01, 2018 - 08:30 AM UTC
TimReynaga
Associate Editor California, United States
Joined: May 03, 2006
KitMaker: 2,500 posts
Model Shipwrights: 1,830 posts
Posted: Sunday, April 01, 2018 - 08:30 AM UTC
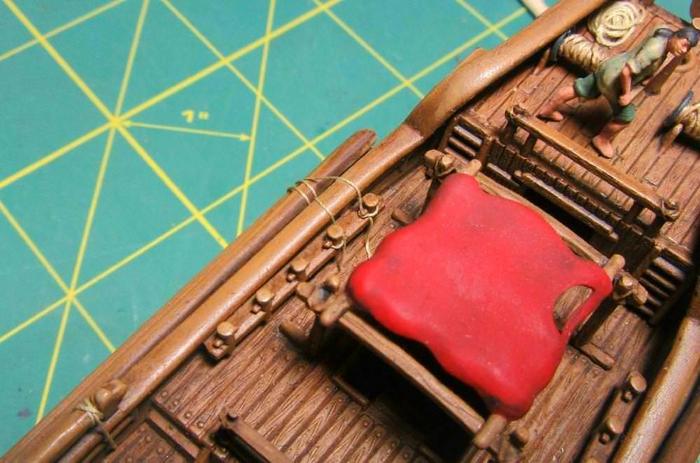
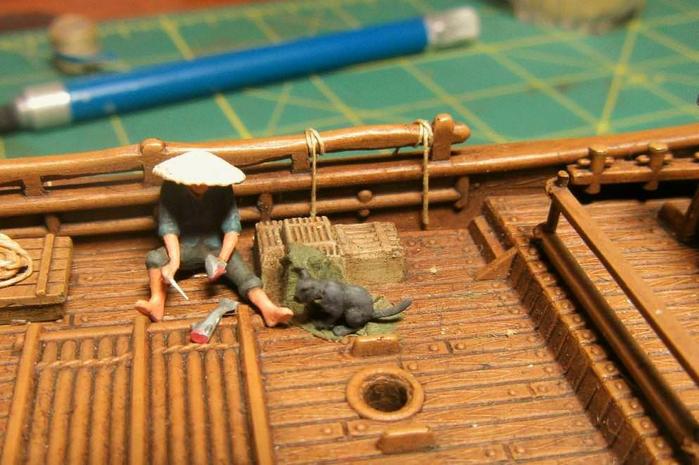
Heres an overall view showing the completed ties securing the stowed fishing net booms.
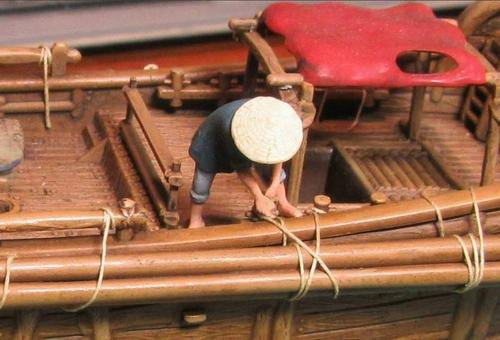
At least they are mostly completed; apparently one of our hard working sailors saw a need to further adjust them...
England - South East, United Kingdom
Joined: March 01, 2010
KitMaker: 7,078 posts
Model Shipwrights: 6,649 posts
Posted: Sunday, April 01, 2018 - 02:19 PM UTC
Great figure checking the lashings Tim, the three figures on deck, all doing something really work well together,
Cheers
Si
Washington, United States
Joined: August 03, 2008
KitMaker: 436 posts
Model Shipwrights: 31 posts
Posted: Sunday, April 01, 2018 - 10:26 PM UTC
Really like how the lashings turned out.... not the pristine look you would expect from them being molded in the kit, but very functional looking.
As impressive as many of the warship models are, this little build has a feel of being a functional, working vessel. The deck crew are all doing things that need to be done -- no comment on the ones in the cabin. For all of the exaggerations in the kit, this seems more "real" than many precision kits, mostly due to your little modifications and additions.
Not to mention just being a fun build....
Bob
#306
Victoria, Australia
Joined: June 27, 2010
KitMaker: 3,959 posts
Model Shipwrights: 2,777 posts
Posted: Monday, April 02, 2018 - 05:16 PM UTC
Looks great Tim! The clove hitches add that extra bit of pop!
Nothing like a good clove hitch-we still use'm to lash down stuff on our trailer!

Stay home and build models!
In 1/72
Gloster Gladiator MkII for the Bi-planes Campaign
In 1/350
Airfix 1:350 Type 45 Destroyer
TimReynaga
Associate Editor California, United States
Joined: May 03, 2006
KitMaker: 2,500 posts
Model Shipwrights: 1,830 posts
Posted: Monday, April 02, 2018 - 06:02 PM UTC
Thanks Guys, much appreciated!
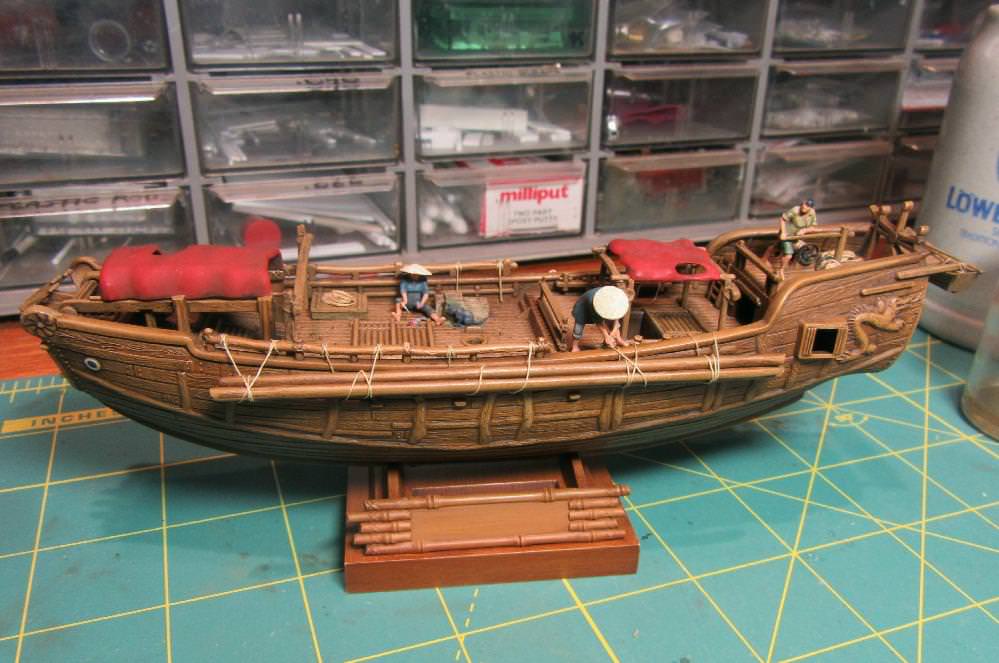
Finishing up the hull, I added some hawser to go with the stowed anchors. Just for fun, I also attached a water jar to one of the winch posts (this time with a good ole square knot).
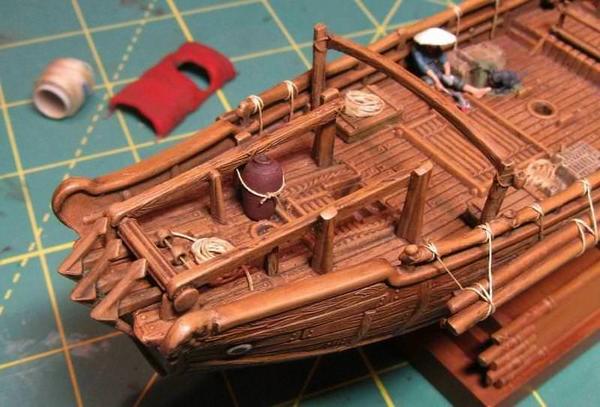
These details will be difficult to see once the red awning in the background is fitted over them and the foremast is in place, but its fun to leave little visual treats for those who take the time to look for them!
England - South East, United Kingdom
Joined: March 01, 2010
KitMaker: 7,078 posts
Model Shipwrights: 6,649 posts
Posted: Monday, April 02, 2018 - 11:50 PM UTC
very nice Tim,
All these little details really add depth.
Cheers
Si
#306
Victoria, Australia
Joined: June 27, 2010
KitMaker: 3,959 posts
Model Shipwrights: 2,777 posts
Posted: Tuesday, April 03, 2018 - 04:13 PM UTC
What Si said, Tim.
All those little details draw the eye in and engage the viewer!
Stay home and build models!
In 1/72
Gloster Gladiator MkII for the Bi-planes Campaign
In 1/350
Airfix 1:350 Type 45 Destroyer
Namabiiru
Associate Editor #399
Rhode Island, United States
Joined: March 05, 2014
KitMaker: 2,888 posts
Model Shipwrights: 73 posts
Posted: Tuesday, April 03, 2018 - 05:40 PM UTC
I thought you had finished the build, Tim, since it had been so long sinc ethe last update. So good to see you back at it!
The sails and ropework look fantasteriffic!

TimReynaga
Associate Editor California, United States
Joined: May 03, 2006
KitMaker: 2,500 posts
Model Shipwrights: 1,830 posts
Posted: Thursday, April 05, 2018 - 06:22 PM UTC
Si and Russ, I agree about the little stuff when I see a well made model, the things that stay with me tend to be the smaller, human details... so I always try to include some of these in my own builds when I can.
Mark, thank you! This build has dragged on much longer than usual even for me, but it is finally nearing the finish line. Now I dont know if I can sustain fantasteriffic level quality, but Ill do my best!
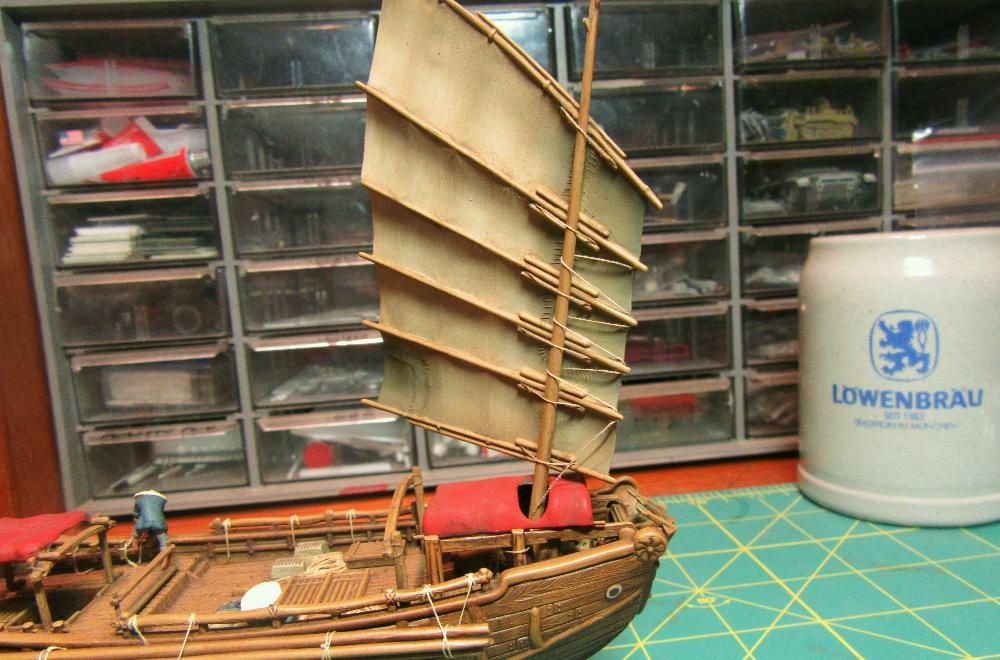
Returning to the sails, I started the rigging process by adding the batten parrels. These were short lines affixed to the battens (yards) which allowed the sails to swing back and forth while keeping them loosely attached to the mast. For a bit of variety I used a tan polyester sewing thread which was a bit finer and darker in color than the thread used for the booms.
After securing eighteen of these to the three masts with dabs of super glue, I attached the foremast to the ship.
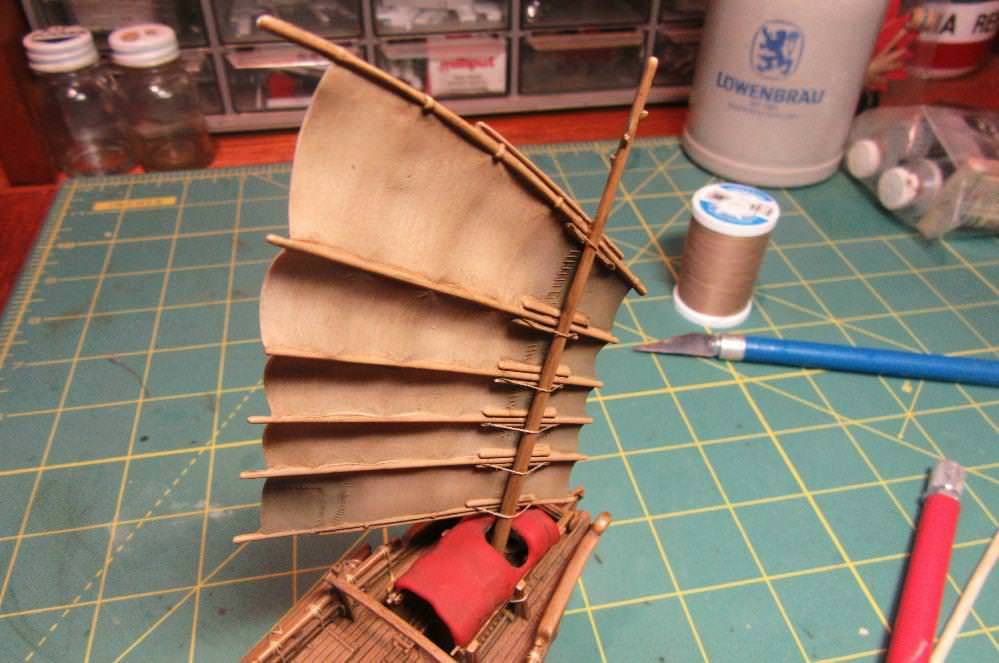
This deviated slightly from the kit design by following the traditional Chinese practice of angling the junks foremast forward.
TimReynaga
Associate Editor California, United States
Joined: May 03, 2006
KitMaker: 2,500 posts
Model Shipwrights: 1,830 posts
Posted: Friday, April 06, 2018 - 05:50 PM UTC
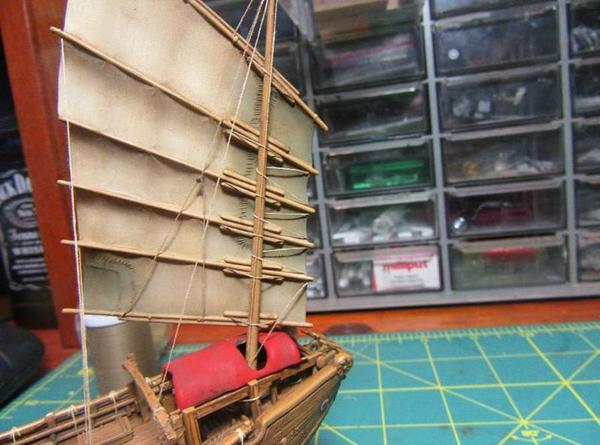
With the foremast in place, the next lines fitted were the zig-zag luff hauling parrels.
It isnt visible in this photo, but the lower end disappearing under the awning was super glued to the mast with some loops of thread over the attachment point to suggest coiled line another detail thats hard to see unless you really look for it!
TimReynaga
Associate Editor California, United States
Joined: May 03, 2006
KitMaker: 2,500 posts
Model Shipwrights: 1,830 posts
Posted: Saturday, April 07, 2018 - 08:52 AM UTC
Next came the topping lifts (used to reef the battens in order to shorten sail). These were the inverted V shaped lines running from the bottom batten to the masthead and back down to what the instructions call the midship rope guide aft of the foremast. According to Van Tilburgs Chinese Junks on the Pacific - Views from a Different Deck, these curved wood structures were known as peace oxen to the Chinese; their purpose was for tying down halyards and also to support the battens and sails when they were lowered from the mast.
The knots binding the topping lift lines at the Vs were concealed beneath round pulleys made from.039 inch discs punched from .010 inch plastic using a Waldron precision punch & die set.
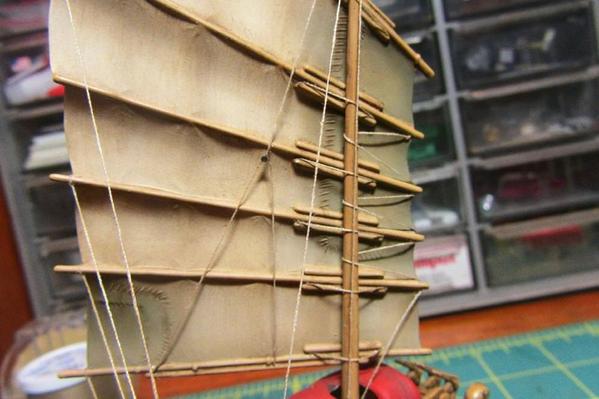
I imagine the real pulleys would have been made of wood, so these were painted accordingly.
#513
Alabama, United States
Joined: March 28, 2006
KitMaker: 554 posts
Model Shipwrights: 219 posts
Posted: Sunday, April 08, 2018 - 03:25 AM UTC
Tim,
The foremast and sail look great. I appreciate you providing close-ups of the rigging. I haven't been able to find any detailed illustrations or rigging plans. I have the ERTL/IMAI kit of a Chinese Junk and the Lindberg Barbary Pirate felucca kit in the stash. I'm itching to try your techniques on one of them. Haven't decided which though. Anyway, keep your tutorials coming. I'm learning so much.
John
TimReynaga
Associate Editor California, United States
Joined: May 03, 2006
KitMaker: 2,500 posts
Model Shipwrights: 1,830 posts
Posted: Sunday, April 08, 2018 - 09:22 AM UTC
Hi John,
I know what you mean about references for junks rigging; the various drawings out there dont seem to agree, and photos of real junks often show different rigs too. This drawing shows the basics:
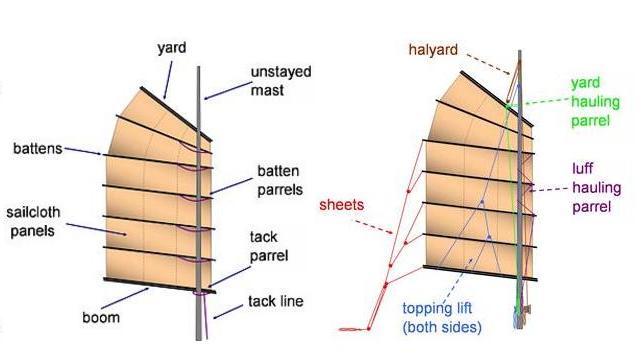
The various sources I found seem to share these lines in common ...but old photos of working junks sometimes show even simpler rig with fewer pulleys and blocks on the topping lifts and sheets. That is the route I am taking with the model.
I have a Lindberg (ex-Pyro) Barbary Pirate felucca in my stash too you should do that one!
#306
Victoria, Australia
Joined: June 27, 2010
KitMaker: 3,959 posts
Model Shipwrights: 2,777 posts
Posted: Sunday, April 08, 2018 - 04:46 PM UTC
Tim you definitely work magic on these kits!
I reckon the sailors of junks just went with what worked at the time and there was no hard n fast rule of rigging. So whatever you chose to do will be pretty amazing as always!
Stay home and build models!
In 1/72
Gloster Gladiator MkII for the Bi-planes Campaign
In 1/350
Airfix 1:350 Type 45 Destroyer