Pyro Chinese War Junk build
Namabiiru
 Associate Editor
#399
Rhode Island, United States
Joined: March 05, 2014
KitMaker: 2,888 posts
Model Shipwrights: 73 posts
Posted: Thursday, March 30, 2017 - 06:07 PM UTC
Brilliant idea, Tim, and superbly executed! Although in reality I doubt any article of clothing would have made it to a peg, given the context...


Tel Aviv-Yafo, Israel
Joined: June 03, 2014
KitMaker: 277 posts
Model Shipwrights: 171 posts
Posted: Thursday, March 30, 2017 - 09:04 PM UTC
Tim,
Just got caught up, great use of the figures and details to hide lack of details. I especially like the fish.
This is so COOL!
Bryan
#513
Alabama, United States
Joined: March 28, 2006
KitMaker: 554 posts
Model Shipwrights: 219 posts
Posted: Thursday, March 30, 2017 - 11:19 PM UTC
Tin,
Loving this build. The details are really coming together to tell the story. Really like how this is turning out.
John
TimReynaga
Associate Editor California, United States
Joined: May 03, 2006
KitMaker: 2,500 posts
Model Shipwrights: 1,830 posts
Posted: Saturday, April 01, 2017 - 12:40 AM UTC
Si, Mark, Bryan, and John, thanks for your comments!
Quoted Text
Brilliant idea, Tim, and superbly executed! Although in reality I doubt any article of clothing would have made it to a peg, given the context...
Mark, you might be right!
As you can see, although the jacket may have made it to the peg, other garments are just visible in a rather unseamanlike pile on the deck below...
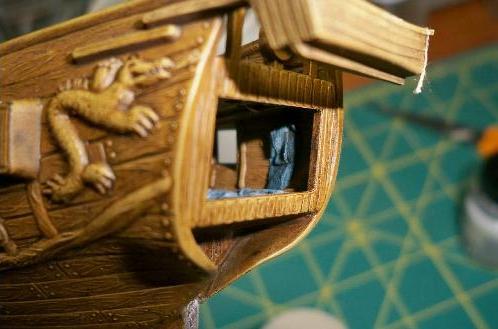
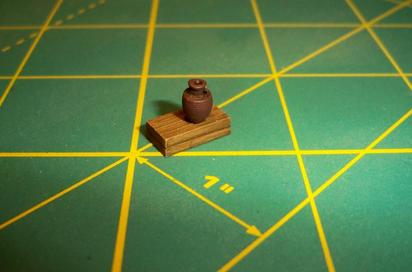
I noticed when I test fitted the two figures in the cabin that the interior to the left of them was a little bare. To fill in the space there, I added a small box and a jug from a 15mm wargaming accessories set.
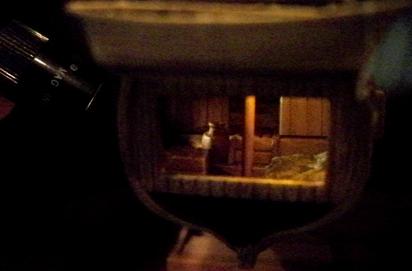
They arent much, but under the tiny light in the cabin they are pretty hard to see anyway. Even with the help of an extra light shining through the side window, the items appear only as vague shapes in the background.
Washington, United States
Joined: August 03, 2008
KitMaker: 436 posts
Model Shipwrights: 31 posts
Posted: Saturday, April 01, 2017 - 02:17 AM UTC
Tim,
I really like the way that the cabin is shaping up. It looks more and more like a space that is used and lived in. As for the coat on the peg... it could have been there for days.
This has to be one of my favorite builds from all my years lurking on Shipwrights.
Bob
Ohio, United States
Joined: January 28, 2008
KitMaker: 107 posts
Model Shipwrights: 26 posts
Posted: Sunday, April 09, 2017 - 03:41 AM UTC
Quoted Text
This has to be one of my favorite builds from all my years lurking on Shipwrights.
I cannot agree more. I have had more fun watching this build come together than anything else I have ever seen online. Tim is a master at the craft, but is a great story-teller also. Draws you right in, and keeps the interest level high!!
Great work, Tim!
David
I still have hopes that the project will turn out good, I just need to remind myself the goal is to always enjoy the process, improve when and where I can, but understand that if I only accept perfection, I will be detracting from the reason I build to be
Auckland, New Zealand
Joined: July 13, 2004
KitMaker: 2,169 posts
Model Shipwrights: 1,597 posts
Posted: Monday, April 10, 2017 - 12:17 AM UTC
Ahoy Tim
This build just gets better and better.
Cheers
Sean
England - South East, United Kingdom
Joined: March 01, 2010
KitMaker: 7,078 posts
Model Shipwrights: 6,649 posts
Posted: Monday, April 10, 2017 - 01:28 AM UTC
Hi Tim,
The work in the cabin is adding so much depth to the build. great stuff.
Cheers
Si
TimReynaga
Associate Editor California, United States
Joined: May 03, 2006
KitMaker: 2,500 posts
Model Shipwrights: 1,830 posts
Posted: Thursday, April 13, 2017 - 05:53 PM UTC
Bob, David, Sean, and Si, thank you for your comments Im having fun with this too!
Time to add the final members of the crew...
The prepainted figures looked reasonably good as provided, but I couldnt resist cleaning them up by sanding away the visible mold lines and gluing the two together to eliminate gaps.
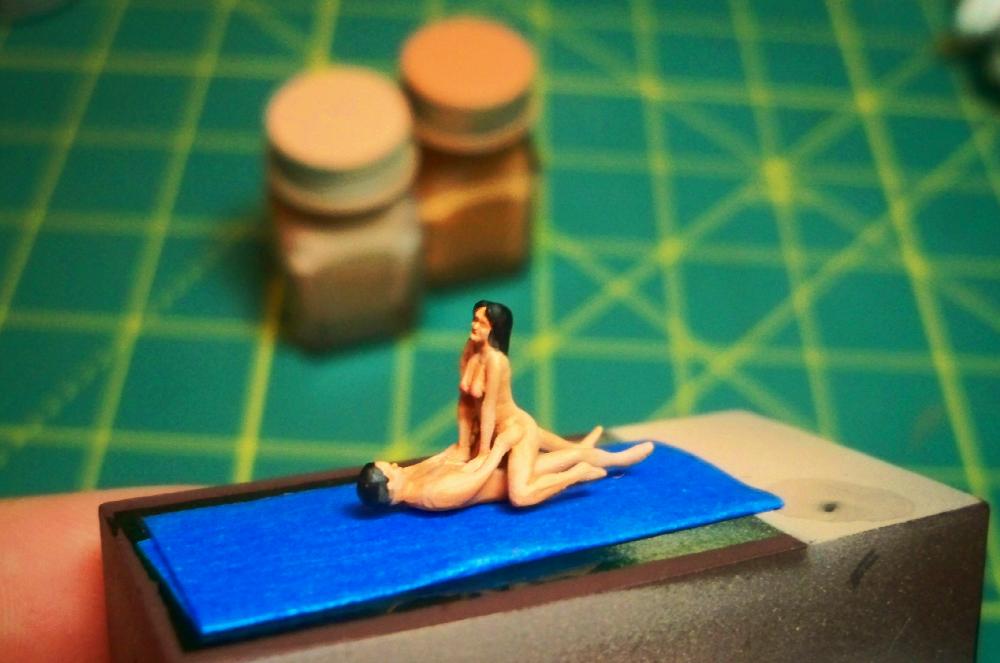
Rather than trying to touch up the now damaged finish, I completely repainted them with lightened Testors Light Tan enamel (11170) with straight Light Tan to deepen shadows (the colors are in the bottles behind the figures in this pic).

Once placed aboard inside the cabin these improvements arent really even visible under the dim light in there, but I still wanted to do justice to these delightful figures.
Next up: erecting the masts
Namabiiru
Associate Editor #399
Rhode Island, United States
Joined: March 05, 2014
KitMaker: 2,888 posts
Model Shipwrights: 73 posts
Posted: Thursday, April 13, 2017 - 10:48 PM UTC
"erecting the masts"....Shame on you, Tim!

I didn't realize from previous posts how anatomically correct that set really is!...or did you do more than just eliminate the mold seams?
Perfect display for a man-cave. Great work, Tim!
Washington, United States
Joined: August 03, 2008
KitMaker: 436 posts
Model Shipwrights: 31 posts
Posted: Monday, July 10, 2017 - 03:35 AM UTC
Tim,
You ever get the masts put in place? Or did this one get shuffled off to the side for a while?
Bob
TimReynaga
Associate Editor California, United States
Joined: May 03, 2006
KitMaker: 2,500 posts
Model Shipwrights: 1,830 posts
Posted: Monday, July 10, 2017 - 07:44 AM UTC
Quoted Text
"erecting the masts"....Shame on you, Tim!
I didn't realize from previous posts how anatomically correct that set really is!...or did you do more than just eliminate the mold seams?
Perfect display for a man-cave. Great work, Tim!
Mark
______________________________________________________________________________________________________
Tim,
You ever get the masts put in place? Or did this one get shuffled off to the side for a while?
Bob
Thanks Mark, and yes, you are right! Although beautifully rendered, the stock figures were anatomically
abbreviated. Before repainting them I added some small details the absence of which, given the viewing angle, would have been noticeable.
Hi Bob. I got so far as to attach the sails to the masts and to begin painting them, but it started to feel like work so I set it aside. Ill get back to it before too long thanks for asking!
Washington, United States
Joined: August 03, 2008
KitMaker: 436 posts
Model Shipwrights: 31 posts
Posted: Monday, July 10, 2017 - 11:09 PM UTC
Quoted Text
Quoted Text
"erecting the masts"....Shame on you, Tim!
I didn't realize from previous posts how anatomically correct that set really is!...or did you do more than just eliminate the mold seams?
Perfect display for a man-cave. Great work, Tim!
Mark
______________________________________________________________________________________________________
Tim,
You ever get the masts put in place? Or did this one get shuffled off to the side for a while?
Bob
Thanks Mark, and yes, you are right! Although beautifully rendered, the stock figures were anatomically
abbreviated. Before repainting them I added some small details the absence of which, given the viewing angle, would have been noticeable.
Hi Bob. I got so far as to attach the sails to the masts and to begin painting them, but it started to feel like work so I set it aside. Ill get back to it before too long thanks for asking!
This has to be one of my favorite builds not only on Shipwrights but the entire site. Not only does it have the hidden element in the cabin, but the entire build shows what can be done with older kits.... I have a lot of those.
I build armor, but this little build has not only been fun but I learned a great deal about Junks, and ships in general. I think that sometimes in pursuit of the "ultimate" kit we overlook the fun that can be had taking an older kit and just having fun building it. I like how you made it more realistic without counting a single rivet....
Bob
TimReynaga
Associate Editor California, United States
Joined: May 03, 2006
KitMaker: 2,500 posts
Model Shipwrights: 1,830 posts
Posted: Tuesday, July 11, 2017 - 09:05 AM UTC
Quoted Text
This has to be one of my favorite builds not only on Shipwrights but the entire site. Not only does it have the hidden element in the cabin, but the entire build shows what can be done with older kits.... I have a lot of those.
I build armor, but this little build has not only been fun but I learned a great deal about Junks, and ships in general. I think that sometimes in pursuit of the "ultimate" kit we overlook the fun that can be had taking an older kit and just having fun building it. I like how you made it more realistic without counting a single rivet....
Bob
Thanks, Bob, this build has been a kick for me too! I enjoy the newer wunderkits with their perfect dimensions and click-together fit as much as the next guy, but like you I seem to be drawn to older, less refined kits as well. Maybe it is because they harken back to the simpler builds of my childhood, or maybe because there is more of me in a model when I have to make creative changes to get a decent result.... whatever it is, I do have a lot of fun with them!
Im cranking away on a 72nd scale
Soviet ZIS-42 halftrack at the moment, but Ill get back to the junk soon, I promise!
England - South East, United Kingdom
Joined: March 01, 2010
KitMaker: 7,078 posts
Model Shipwrights: 6,649 posts
Posted: Tuesday, July 11, 2017 - 11:15 PM UTC
Not been paying attention, missed the last past.
The crew look good in place, very naughty,

but great job.
looking forward to you getting back to her.
Cheers
Si
#513
Alabama, United States
Joined: March 28, 2006
KitMaker: 554 posts
Model Shipwrights: 219 posts
Posted: Tuesday, July 11, 2017 - 11:43 PM UTC
Hi Tim,
I'm still following too. Hope to see getting back to this build soon.
John
#345
Niedersachsen, Germany
Joined: August 22, 2011
KitMaker: 1,835 posts
Model Shipwrights: 1,832 posts
Posted: Friday, July 14, 2017 - 12:41 AM UTC
Hi Tim,
I can jus second what was said - certainly one of the most entertaining and fun to follow build logs with some great inspiration from a basically simple old kit - and that makes it stand out!
I am still following, no doubt, but like Si, I realize that I was nor paying attention. This is getting better and better!
Cheers,
Jan
Canada
Joined: February 22, 2018
KitMaker: 1 posts
Model Shipwrights: 1 posts
Posted: Thursday, February 22, 2018 - 04:20 AM UTC
Is it possible to get a copy of your instructions, I have the aurora version but no instructions for the junk.
TimReynaga
Associate Editor California, United States
Joined: May 03, 2006
KitMaker: 2,500 posts
Model Shipwrights: 1,830 posts
Posted: Thursday, February 22, 2018 - 09:53 AM UTC
Quoted Text
Is it possible to get a copy of your instructions, I have the aurora version but no instructions for the junk.
You know that the Aurora junk is an entirely different model from the Pyro junk model I'm building here, right?
Anyway, here is a pic of the Aurora kit instructions:

Good luck with it!
TimReynaga
Associate Editor California, United States
Joined: May 03, 2006
KitMaker: 2,500 posts
Model Shipwrights: 1,830 posts
Posted: Thursday, March 22, 2018 - 07:49 AM UTC
Ok... I havent worked on the junk for nearly a year, so its high time to get back in and finish this thing!
When last I left the model the hull was finished, the crew was aboard, and it was time to erect the masts and sails. Having previously assembled and prepped them, I continued this week by shooting the sails with Tamiya Buff (XF-67) lightened with some flat white.
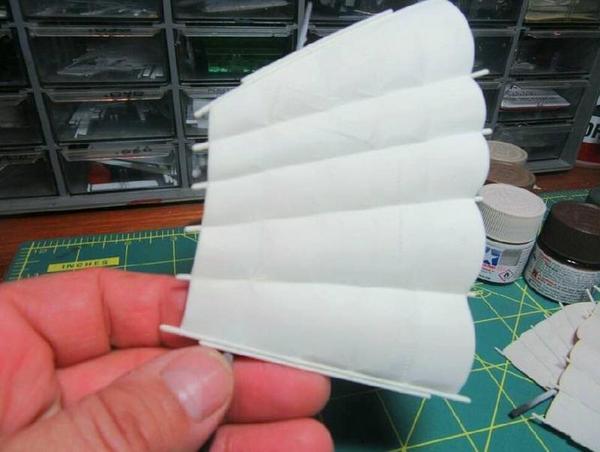
It looked just awful too clean, too bright!
I want to depict a well used, grungy old working junk. To suggest this and to give the plastic sails a more three-dimensional look, I airbrushed the concave areas of the folds with Tamiya Khaki (XF-49).
Thats better, nice and dirty!
#259
Massachusetts, United States
Joined: October 23, 2011
KitMaker: 2,265 posts
Model Shipwrights: 104 posts
Posted: Thursday, March 22, 2018 - 09:02 AM UTC
that is nice. It looks very like aged linen.
hard to believe it is that single injection molded slab of styrene you held up on page three.
#513
Alabama, United States
Joined: March 28, 2006
KitMaker: 554 posts
Model Shipwrights: 219 posts
Posted: Thursday, March 22, 2018 - 09:29 AM UTC
Tim,
Glad to see you back on this build. The sails look great.
John
Washington, United States
Joined: August 03, 2008
KitMaker: 436 posts
Model Shipwrights: 31 posts
Posted: Thursday, March 22, 2018 - 11:15 PM UTC
Tim,
Glad to see my favorite build back for a finish. The sails look amazing, as does the rest of the build. Might have to see what I have along this line....
Bob
TimReynaga
Associate Editor California, United States
Joined: May 03, 2006
KitMaker: 2,500 posts
Model Shipwrights: 1,830 posts
Posted: Friday, March 23, 2018 - 09:02 AM UTC
Thanks guys, its good to get back to this one. In the home stretch now!
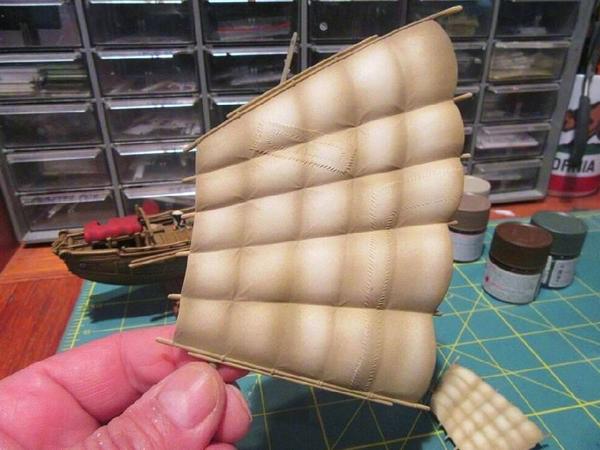
Traditional Chinese junks used strong natural fiber sails, but with constant use in the harsh environment of the sea they were prone to staining, rot, and wind damage. They were repaired frequently, and photos show that these repairs often resulted in an uneven, patchwork appearance.
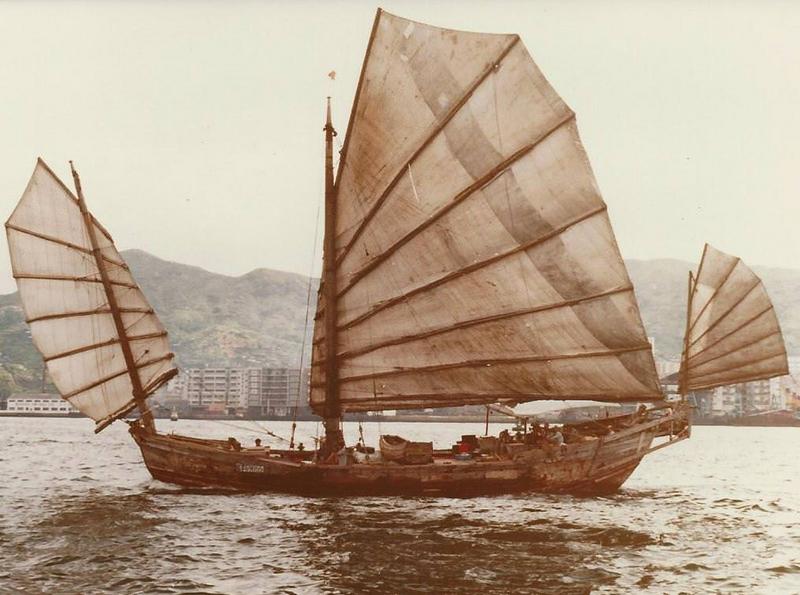
Hong Kong 1982
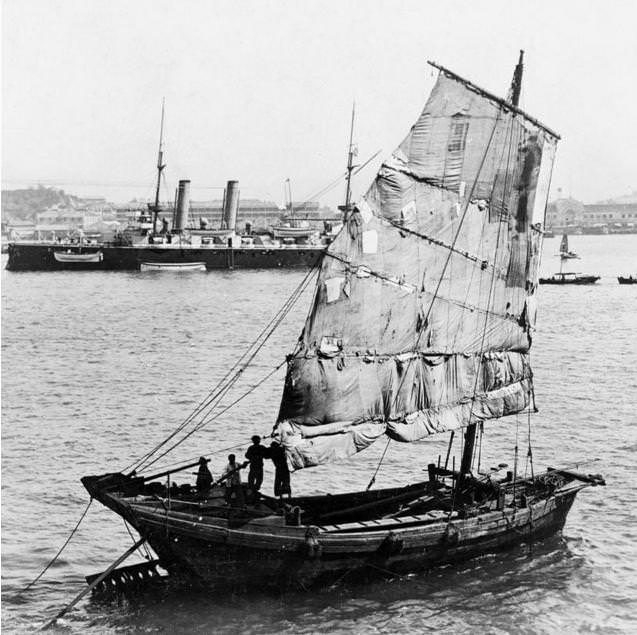
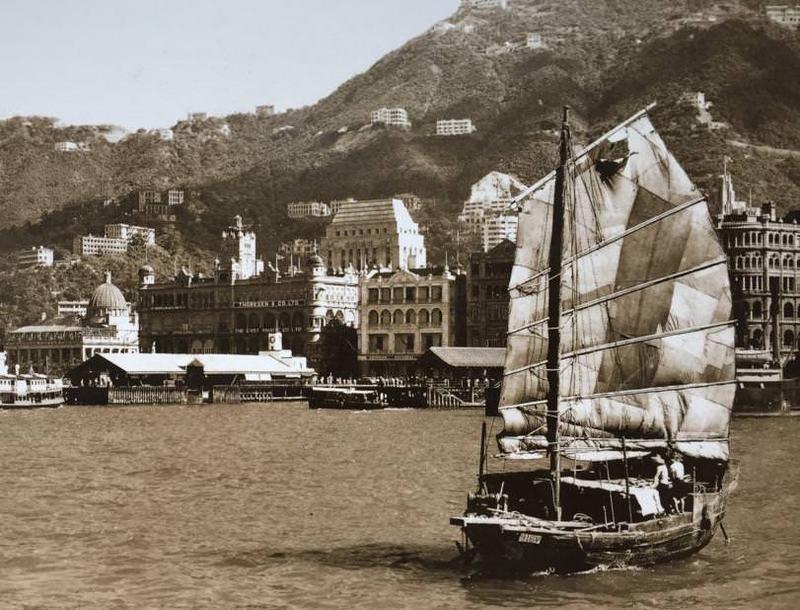
Hong Kong early 1900s
Pyro faithfully simulated this patchwork with stitched sections on the fore and main sails.
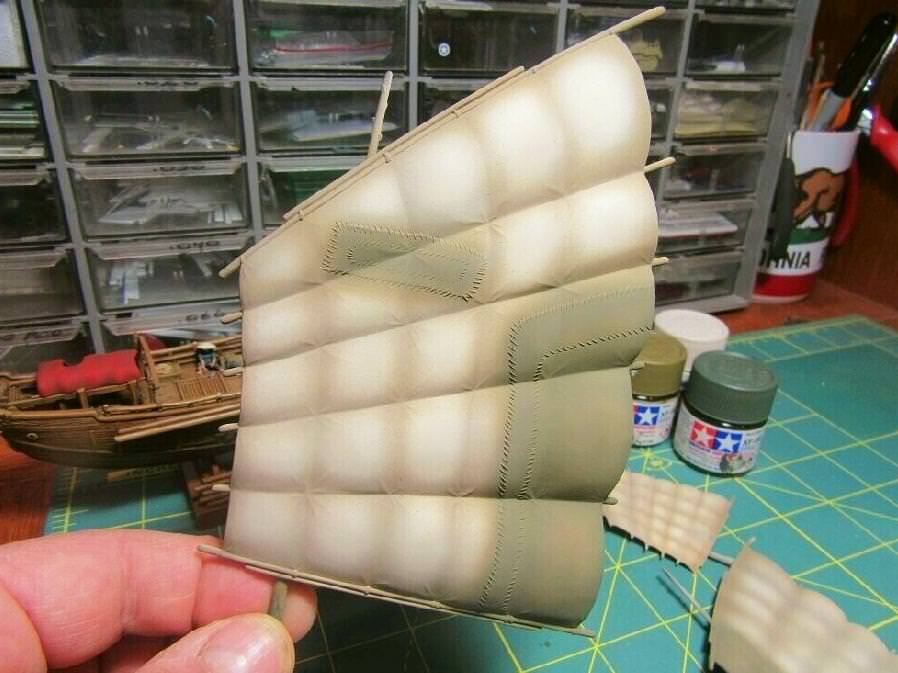
To make these repaired areas stand out, I airbrushed the replacement panels with Tamiya Field Grey (XF-65), a medium green. I then went over the green in a light cloud pattern with the same Tamiya Khaki (XF-49) that Id used on the folds. This mutes the effect a bit and better integrates the panels with the surrounding sails.
England - South East, United Kingdom
Joined: March 01, 2010
KitMaker: 7,078 posts
Model Shipwrights: 6,649 posts
Posted: Saturday, March 24, 2018 - 12:15 AM UTC
Hi Tim,
Very nice job indeed, patchwork looks excellent, the paint job really brings the patched sails to life.
Good to see some progress on this build again,
Cheers
Si