Ships by Class/Type: Sailing Vessels
This forum is for sailing ships both civilian and military of any era.
Pyro Chinese War Junk build
bwiber
Visit this Community
Washington, United States
Joined: August 03, 2008
KitMaker: 436 posts
Model Shipwrights: 31 posts
Posted: Friday, November 27, 2015 - 02:53 AM UTC

Quoted Text


I must admit, Chinese design remains mostly a mystery to me – the masts were not only shallowly anchored, but they apparently had no standing rigging to support them, either – but at least it frees up the cabin space below for other activities!


One of the reasons I am loving this build.... I am learning all kinds of stuff that I would never have known. That method of mounting a mast just seems like it would be a lot of problems... but it must have worked or they would have changed it.

Looking forward to what happens next....

Bob
JPTRR
Staff MemberManaging Editor
RAILROAD MODELING
#051
Visit this Community
Tennessee, United States
Joined: December 21, 2002
KitMaker: 7,772 posts
Model Shipwrights: 476 posts
Posted: Friday, November 27, 2015 - 03:42 AM UTC

Quoted Text

I found these unconventional HO scale figures


Hi Tim,

Giddy up!

Are these from NOCH?

http://www.noch.com/en/product-categories/figures-and-decoration/figures/sexy-scenes.html
TimReynaga
Staff MemberAssociate Editor
MODEL SHIPWRIGHTS
Visit this Community
California, United States
Joined: May 03, 2006
KitMaker: 2,500 posts
Model Shipwrights: 1,830 posts
Posted: Friday, November 27, 2015 - 09:02 PM UTC
Those are the ones!
Removed by original poster on 01/21/17 - 01:42:33 (GMT).
BobSolo
Visit this Community
United Kingdom
Joined: August 30, 2014
KitMaker: 331 posts
Model Shipwrights: 14 posts
Posted: Saturday, November 28, 2015 - 07:34 PM UTC
Really enjoying this build, nice work on the light looks very real, i would have gone for a table lantern in the corner and put the cable straight down into the floor/hull as trying to hide the cable above deck would have kept me awake at night

I have no idea what most of these nautical names mean, can you explain how they get the masts to stay up please? Im guessing its a giant wooden clamp aroung the base of the mast, thats then bolted down onto or inside the deck?

That stip bar made me
TimReynaga
Staff MemberAssociate Editor
MODEL SHIPWRIGHTS
Visit this Community
California, United States
Joined: May 03, 2006
KitMaker: 2,500 posts
Model Shipwrights: 1,830 posts
Posted: Sunday, November 29, 2015 - 07:12 AM UTC

Quoted Text

Really enjoying this build, nice work on the light looks very real, i would have gone for a table lantern in the corner and put the cable straight down into the floor/hull as trying to hide the cable above deck would have kept me awake at night... Bob


You are right; I haven’t been able to effectively conceal the wires on deck. Too bad, since I liked the even light diffusion when the light was positioned overhead. Oh, well. The pics below show my experiments with placing a “lantern” on a box to one side (the wires are leading up now, but I’ll bore a hole in the box and snake them out of sight underneath later, as you suggested).

The white column is the (as yet unpainted) rudder post leading through to the poop deck above where the tiller will eventually go.
BobSolo
Visit this Community
United Kingdom
Joined: August 30, 2014
KitMaker: 331 posts
Model Shipwrights: 14 posts
Posted: Monday, November 30, 2015 - 08:26 PM UTC
The lamp works better than i thought it would, makes some cool shadows and her shadow on the wall along with the way the light shows off her figure, makes her look more 3D and real.

Are you going to cover the lamp with something? id be so tempted to experiment, like put it in a lil box or maybe just put a lil lid on top of the led and a bit round the base to make it look like a carry lantern, just to see what lighting effects you can get.
TimReynaga
Staff MemberAssociate Editor
MODEL SHIPWRIGHTS
Visit this Community
California, United States
Joined: May 03, 2006
KitMaker: 2,500 posts
Model Shipwrights: 1,830 posts
Posted: Sunday, December 06, 2015 - 03:32 AM UTC

Quoted Text

...I have no idea what most of these nautical names mean, can you explain how they get the masts to stay up please? Im guessing its a giant wooden clamp aroung the base of the mast, thats then bolted down onto or inside the deck? Bob


I don’t really know, but your guess sounds right. Unlike Westen designs, the deck rather than the keel was the main strength structure of the junk, so the deck beams would have been a solid base upon which to anchor the mast partners.

Here’s a pic of the crew of the replica junk Lü Meimao Zhujiajian raising the sail. The masts are unstayed; the main mast consists of two pieces, held together by iron rings. The frames are 28 cm deep and 15 cm wide, the floor-timbers 40 cm deep and 18 cm wide.

Apparently this type of arrangement, which allows the masts to be lowered and raised easily, evolved in the East because of the need to be able navigate beneath the numerous bridges over China’s extensive inland waterways.
BobSolo
Visit this Community
United Kingdom
Joined: August 30, 2014
KitMaker: 331 posts
Model Shipwrights: 14 posts
Posted: Sunday, December 06, 2015 - 06:52 AM UTC
Interesting reading, when i saw that picture i thought they were raising the whole mast as if hinged at the deck, not just the sail on a slanted mast, i was like damn theyre strong! With people to scale it that Junk is made from huge pieces of thick wood, the front end could be used as a battering ram.

After seeing the picture below posted before, the rear mast is attached to the deck and it also shows the main mast appearing to be attched to the deck not the keel. Is that the main mast to the right sticking out the deck or is it something else?


In the latest link you showed http://thomashoppe.net/junks/luemeimao.php there are drawings of two Junks showing their main and front masts both going to the keel. I wonder if the first drawing is more a deplanked junk rather than a true centerline cutaway.
BobSolo
Visit this Community
United Kingdom
Joined: August 30, 2014
KitMaker: 331 posts
Model Shipwrights: 14 posts
Posted: Sunday, December 06, 2015 - 11:23 PM UTC
After doing some research, i believe all knowledge of the ancient Junks is lost in time and remains a mystery, in more recent times these few remaining old masters would have all the answers!

https://www.youtube.com/watch?v=XZP9fFyitn4
berndm
Visit this Community
Niedersachsen, Germany
Joined: March 26, 2014
KitMaker: 844 posts
Model Shipwrights: 151 posts
Posted: Monday, December 07, 2015 - 06:31 PM UTC
Great start, Tim ! Old kits have their own charm and i am shure you will turn your junk into a master piece.
The kits rendition of wood will look great after painting and weathering.
JJ1973
#345
Visit this Community
Niedersachsen, Germany
Joined: August 22, 2011
KitMaker: 1,835 posts
Model Shipwrights: 1,832 posts
Posted: Tuesday, December 08, 2015 - 10:41 AM UTC
This blog continues to amaze!!!

The picture with the folks turning the capstan - - uhhhh, always stepping over the rope...that can be painful, not only if you slip...

Cheers,
Jan
YellowHammer
#513
Visit this Community
Alabama, United States
Joined: March 28, 2006
KitMaker: 554 posts
Model Shipwrights: 219 posts
Posted: Friday, January 29, 2016 - 12:22 PM UTC
Hi Tim,
Just checking in after being out of the country for a while. Any updates to share? Hope you're doing well.
John
TimReynaga
Staff MemberAssociate Editor
MODEL SHIPWRIGHTS
Visit this Community
California, United States
Joined: May 03, 2006
KitMaker: 2,500 posts
Model Shipwrights: 1,830 posts
Posted: Friday, January 20, 2017 - 06:06 AM UTC

Quoted Text

Hi Tim,
Just checking in after being out of the country for a while. Any updates to share? Hope you're doing well.
John


Hi John,
Sorry for the late response (a year late!), but with all the messing around trying to rig up the interior lighting on what was intended to be a quick out of the box build, I got irritated with the project and just put it away.

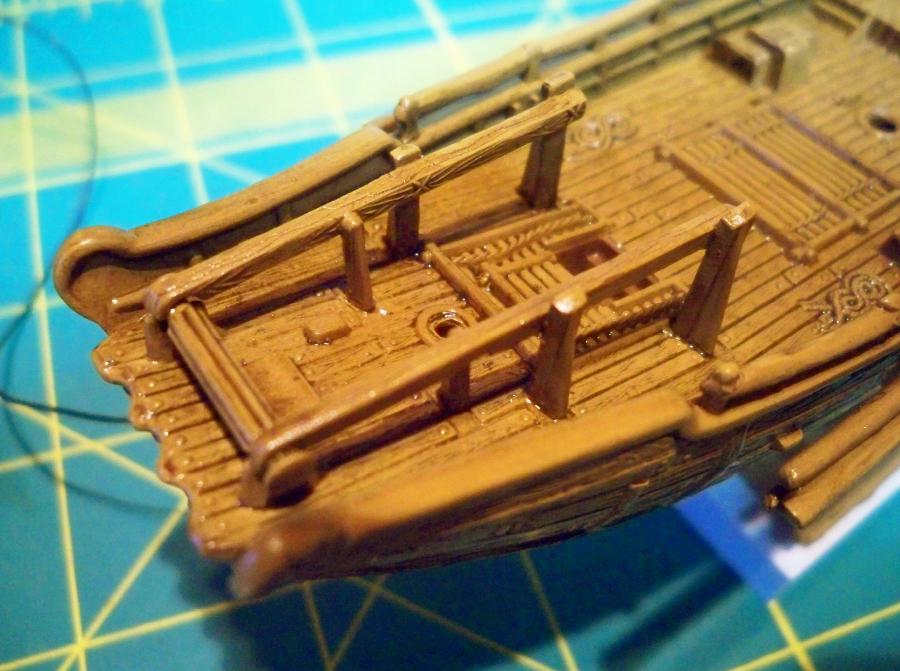
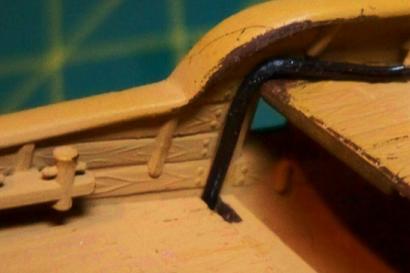
It had reached the point where the lighting looked good, but I couldn’t figure out how to effectively hide the wiring. My original solution of snaking the wires along the upper edges of the aft deck wasn’t really satisfactory – they were just too visible there!

Worse, with the hull and deck solidly cemented together and no access to the interior, and I had no idea how to get the wires entering the main deck aft out again through the tiny holes in the keel amidships to the battery below.

And that’s where I left things a year ago.

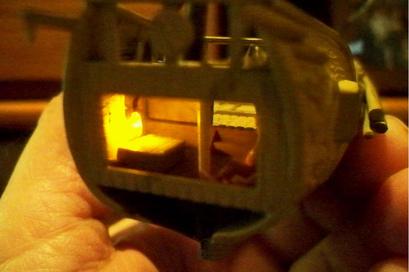
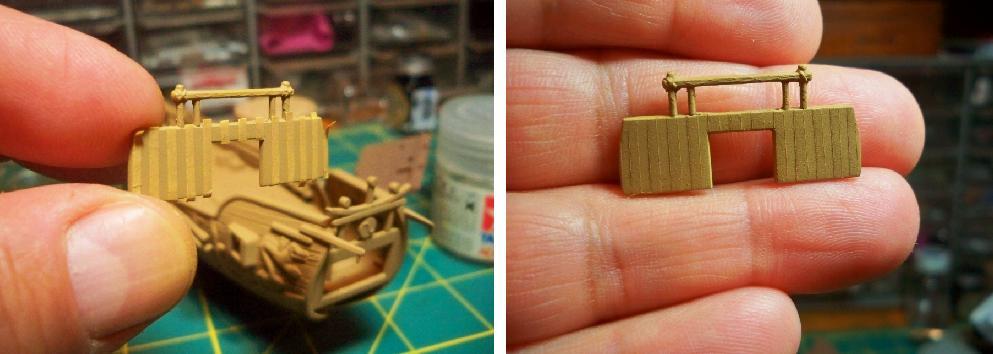
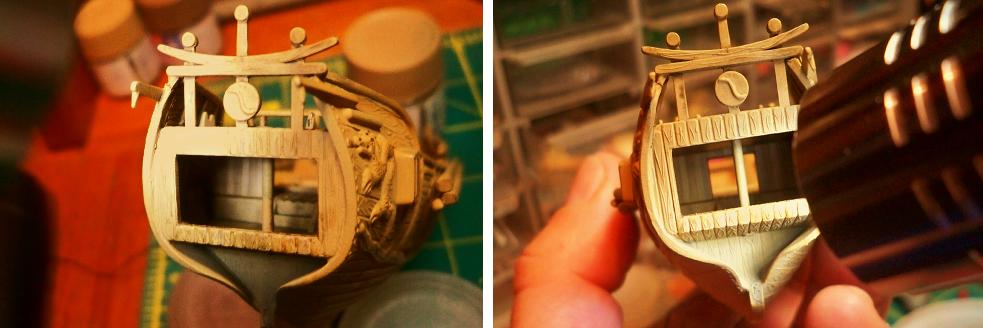
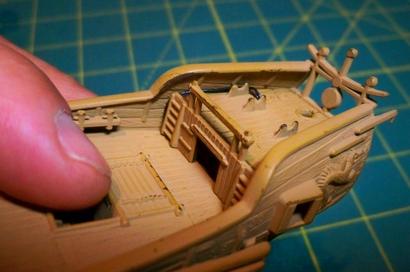
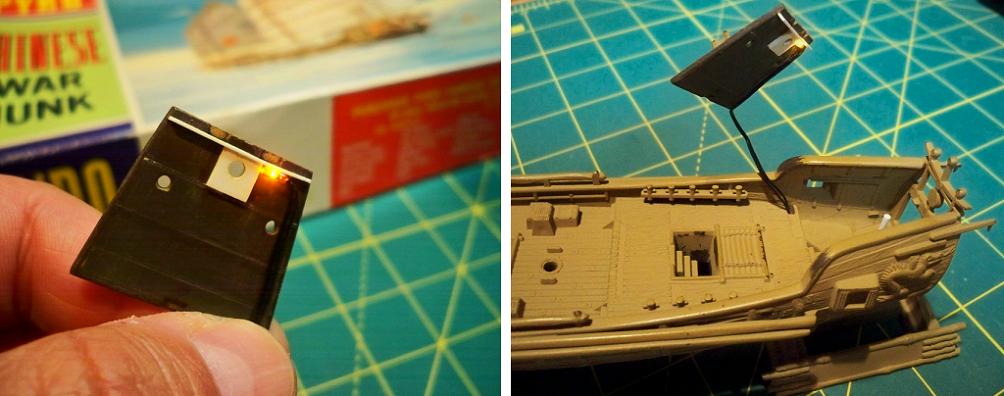
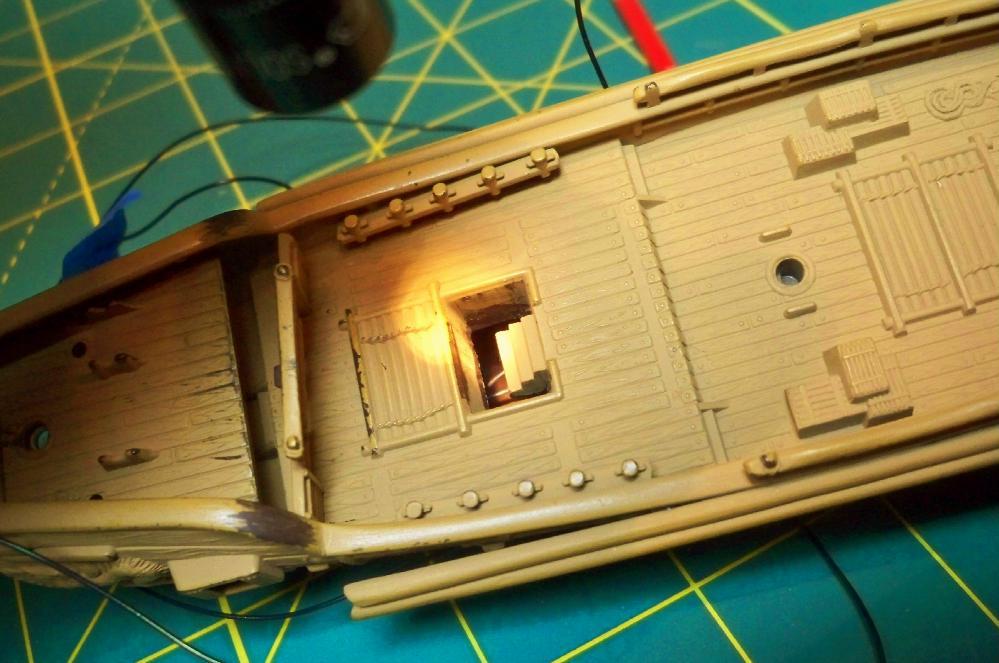
Taking up the model again, this time I super glued the wires to the underside of the aft deck. The light bulb itself is partially concealed behind a sheet plastic strip “beam,” leaving a nicely diffuse illumination inside the cabin from above. This approach turned out to be pretty simple, and it will better hide the wires from view, at least from the outside.

As for getting the wires through the keel, this was actually easier than I had feared. Having carved out the solid bottom of the main hatch under the stairs to gain access to the inside of the hull, I was able to grab the wires with tweezers and pull them out through the hatch. I also pulled out some sewing threads I had passed through holes in the keel from outside.

Attaching the lighting wires to the threads enabled me to draw them out through the keel to reach the battery in the stand below.


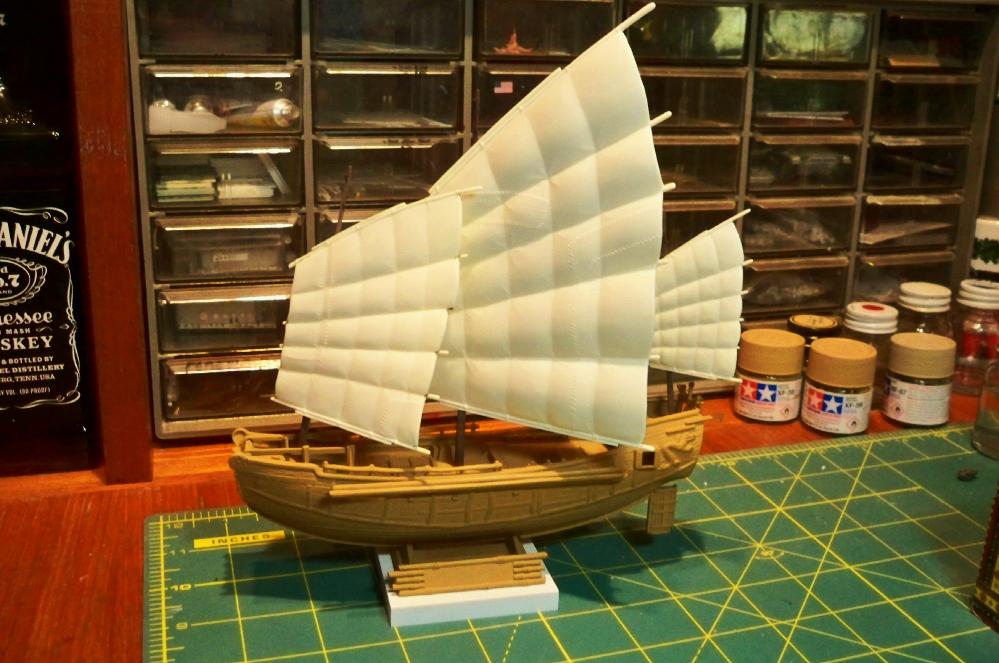
With all this done, the only exterior evidence of the lighting system will be the box under the stand containing the battery.

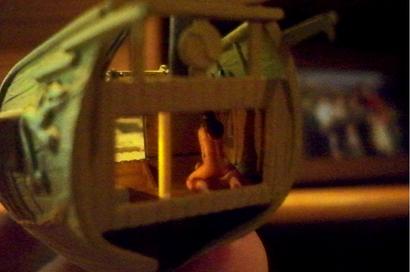
While functional components like this may not be my favorites among modelling tasks...


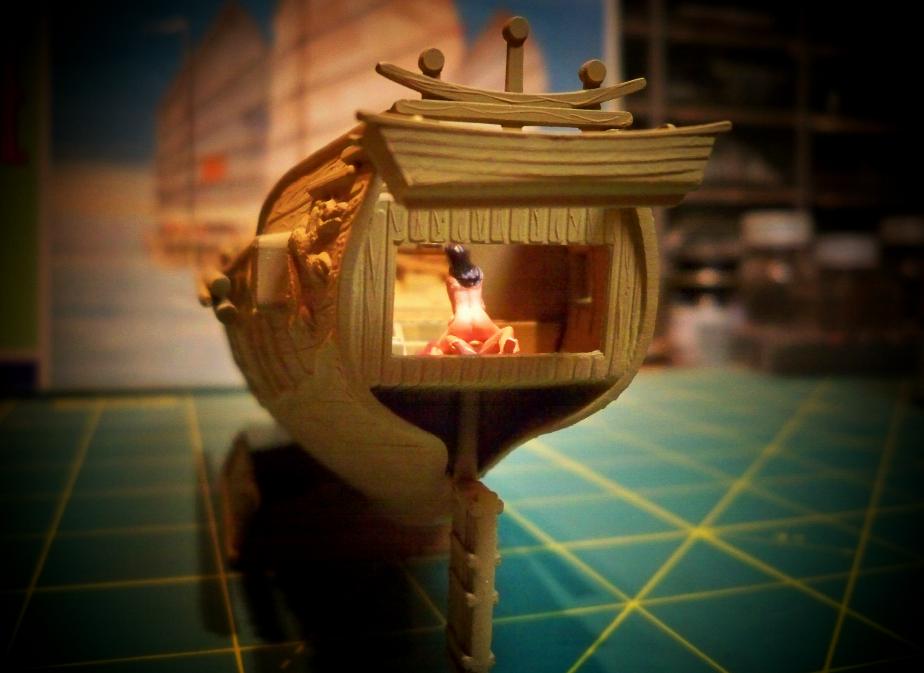
...in the end the illuminated cabin will help highlight the amusing surprise in store for viewers aft!
JPTRR
Staff MemberManaging Editor
RAILROAD MODELING
#051
Visit this Community
Tennessee, United States
Joined: December 21, 2002
KitMaker: 7,772 posts
Model Shipwrights: 476 posts
Posted: Friday, January 20, 2017 - 06:41 AM UTC
Tim,

I was wondering what happened to the "jolting junk".

The lighting solution is effective. The bamboo poles on the sides look good, too.

What's the next step?
TimReynaga
Staff MemberAssociate Editor
MODEL SHIPWRIGHTS
Visit this Community
California, United States
Joined: May 03, 2006
KitMaker: 2,500 posts
Model Shipwrights: 1,830 posts
Posted: Saturday, January 21, 2017 - 10:47 AM UTC
Thanks Frederick; "jolting junk" - I like that!

Next will be painting up the cabin interior before securing the front bulkhead and the deck overhead.

Starting with the bulkhead part, it is well detailed on the outside, but the inside surface is flat and featureless. Even though it won’t be very visible inside the cabin, I improved it with some stripes of layered paint to suggest wood planking.
RussellE
#306
Visit this Community
Victoria, Australia
Joined: June 27, 2010
KitMaker: 3,959 posts
Model Shipwrights: 2,777 posts
Posted: Saturday, January 21, 2017 - 04:52 PM UTC
Great to see you back on this one Tim!

Nice solution with the wiring too
Blespooky
Visit this Community
Tel Aviv-Yafo, Israel
Joined: June 03, 2014
KitMaker: 277 posts
Model Shipwrights: 171 posts
Posted: Monday, January 23, 2017 - 07:39 PM UTC
Awesome!!

I just got caught up. You need to put a NSFW banner at the beginning, almost got in trouble at the office here. Those silly little details make this static hobby really move.

Watching with great interest,
Bryan
Fright
Visit this Community
Georgia, United States
Joined: December 26, 2015
KitMaker: 200 posts
Model Shipwrights: 186 posts
Posted: Tuesday, January 24, 2017 - 03:20 AM UTC
Tim Reynaga - 1st off, let me congratulate you an your light-hearted approach to life on board a ship. I want to thank you for posting the company. I hope to use one of their figures for my build of the Ghostbuster's Ecto into an ambulance/hearse conversion I've got going on the side burner. My wife and I own a 66' Olds 98 black hearse with two-tone grey brocade interior. It's our special 'special occasion' vehicle to go out in!

2nd - I agree with you that model companies need to branch out from their 'trendy' mold of churning out warships produced over and over. WTH can't they issue a WWll Troop Transport ship? Does everyone think our troops just 'beamed over' to fight in the war? Come on!

3rd - I can't wait to see the completed model of this Chinese ship! Thanks for posting
JJ1973
#345
Visit this Community
Niedersachsen, Germany
Joined: August 22, 2011
KitMaker: 1,835 posts
Model Shipwrights: 1,832 posts
Posted: Tuesday, January 24, 2017 - 09:56 AM UTC
Hi Tim,

great to see you are back on this one and pushing to finish her!! I always liked all your Pyro- (and ancient small kit) build logs, the way you are dealing with them is very inspiring and entertaining!!

Looking forward to follow your last steps on the nice litte War Junk with her little 'extras'...

Cheers,
Jan
TimReynaga
Staff MemberAssociate Editor
MODEL SHIPWRIGHTS
Visit this Community
California, United States
Joined: May 03, 2006
KitMaker: 2,500 posts
Model Shipwrights: 1,830 posts
Posted: Tuesday, January 24, 2017 - 07:51 PM UTC
Thanks for your comments guys!

Russell, that wiring almost made me toss the project... if I use lighting in future I now know to figure it out BEFORE I seal the hull up!

Bryan, LOL! Good point – this is just a little more risqué than your average model ship build!

Robert, I like the idea of a family hearse, very cool. And working on a ship’s cabin interior myself, I appreciate how you included a picture of you and your wife in the cabin of your U.S.S. Constitution build. I hope it will still be visible when it is completed!

Jan, I’m glad you find my builds entertaining. I’ve finally recovered my modeling mojo for this one and I’m finding it fun again too! You are right, it is not too far from completion – just the staining of the hull and dealing with the masts, sails, and rig.

This past weekend I finished applying the acrylics in the cabin and oil stained the interior surfaces Monday. Last night I attached the overhead and bulkhead, so the basic cabin interior is now finished.

It is pretty bare in there at the moment – I’ll add the figures and an accessory or two later on.
Namabiiru
Staff MemberAssociate Editor
MODEL SHIPWRIGHTS
#399
Visit this Community
Rhode Island, United States
Joined: March 05, 2014
KitMaker: 2,888 posts
Model Shipwrights: 73 posts
Posted: Tuesday, January 24, 2017 - 08:02 PM UTC
Tim,
So glad to see you back at this!

I love your cabin vignette, which brings a whole new spin to the term 'junk'!

TimReynaga
Staff MemberAssociate Editor
MODEL SHIPWRIGHTS
Visit this Community
California, United States
Joined: May 03, 2006
KitMaker: 2,500 posts
Model Shipwrights: 1,830 posts
Posted: Saturday, January 28, 2017 - 06:30 AM UTC
Thanks Mark! I've lately been so focused on the cabin and its figures, lighting, painting, etc., that it'll be nice to get back to the build as a whole.

Tonight I applied a wash of Grumbacher Raw Umber artist’s oil over the acrylic Tamiya Desert Yellow (XF-59) painted hull.

This part is fun since it is now that the wood grain really starts to pop... but unlike acrylics, artist’s oils take days to dry, so I’ll have to be patient for a while.

It is just as well; my daughter’s 13th birthday party/sleepover is tonight, and the house will be full of squealing teenage girls...

YellowHammer
#513
Visit this Community
Alabama, United States
Joined: March 28, 2006
KitMaker: 554 posts
Model Shipwrights: 219 posts
Posted: Saturday, January 28, 2017 - 10:31 AM UTC
Tim,
Glad you're well and back on this build. I really like the solutions you've developed for the lighting and the cabin. I picked up a Pyro Junk kit off ebay last year with the intent of using your build as inspiration and a tutorial. Now that you're back on this build I see my kit moving up in my queue. I'm really looking forward to your progress, especially in the area of rigging. It's great watching a master at work.
John
TimReynaga
Staff MemberAssociate Editor
MODEL SHIPWRIGHTS
Visit this Community
California, United States
Joined: May 03, 2006
KitMaker: 2,500 posts
Model Shipwrights: 1,830 posts
Posted: Sunday, January 29, 2017 - 06:37 AM UTC
Thanks, John. Cool that you are thinking of building one of these classic beauties too – I rarely see these old war junk kits, and I don’t think I’ve ever seen one actually built. Be sure to post some pictures; maybe I can pick up some pointers from you!

As for being a “master”...well, that would be easier to credit if I weren’t spending so much time making and fixing my own modeling mistakes!