Pyro Chinese War Junk build
TimReynaga
 Associate Editor
California, United States
Joined: May 03, 2006
KitMaker: 2,500 posts
Model Shipwrights: 1,830 posts
Posted: Thursday, March 02, 2017 - 06:46 AM UTC
Russ, Sean, & Jan, I appreciate your comments - after a bit of a slump, this project is getting fun again!
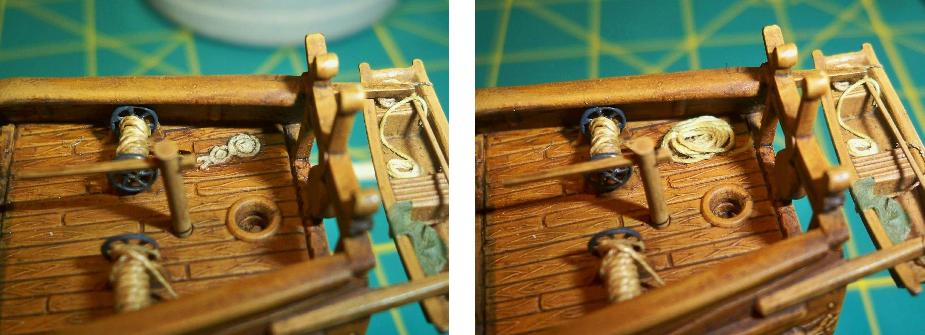
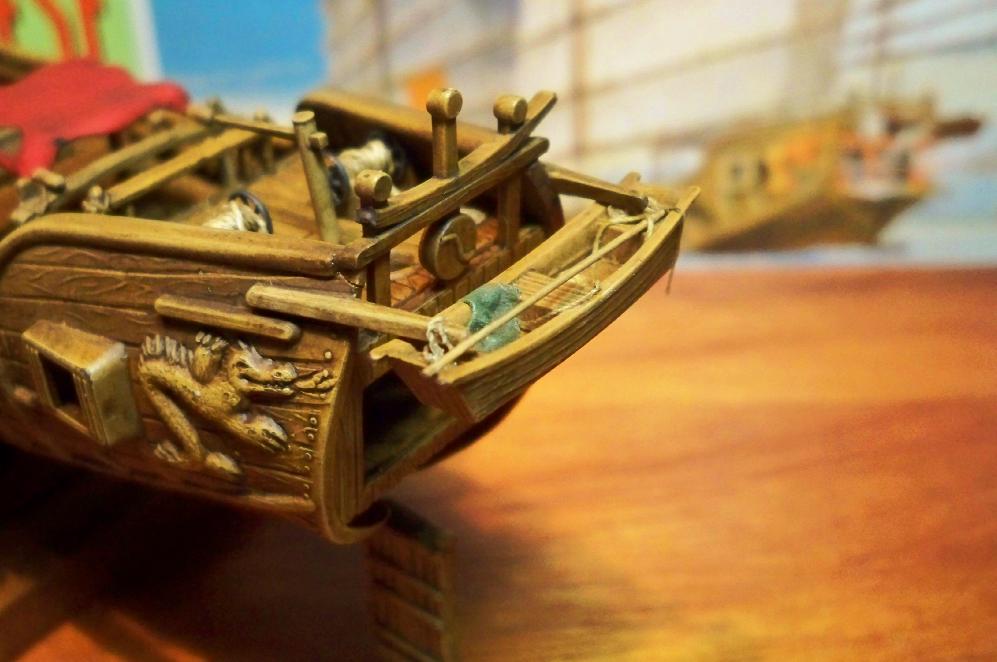
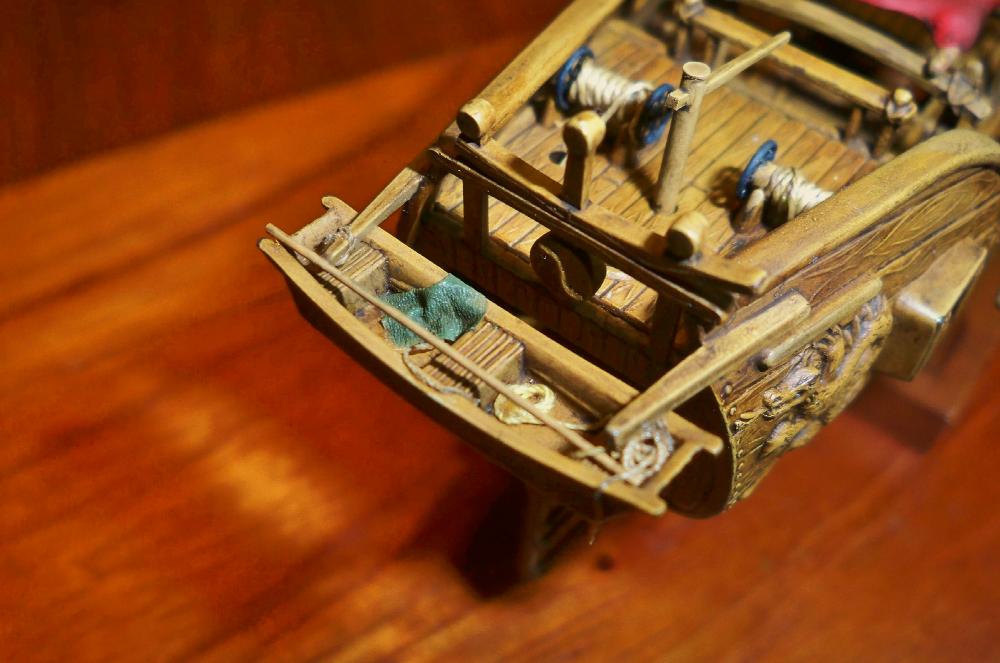
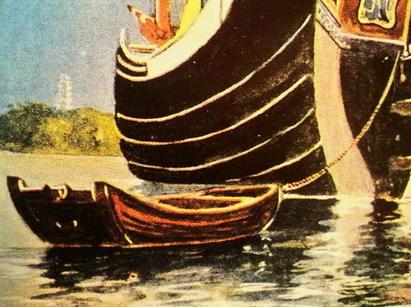
The sampan at the stern is next. Chinese small boats were squarish, flat bottomed craft apparently intended for calm inland waterways and harbors. This 1976 image from Hong Kong shows a typical sampan of the type carried aboard larger junks:

Pyros version, molded as a single piece, is a reasonable but simplified representation. It received the same tan acrylic and Raw Umber oil stain as the hull.
Mounted aboard, the little sampan was busied up with a pole, some tan thread ropes, and a random piece of fabric made from a white glue-soaked bit of facial tissue painted Tamiya Field Grey.
Gotta love the atmosphere of these old Pyro kits!

#513
Alabama, United States
Joined: March 28, 2006
KitMaker: 554 posts
Model Shipwrights: 219 posts
Posted: Thursday, March 02, 2017 - 07:27 AM UTC
Tim,
I really like what you did with the sampan. Appropriately busy. It really fits in with the rest of the boat. Looking forward to the masts and rigging. Have you decided if the sails will be furled or deployed? Either way it's looking great!
John
Namabiiru
Associate Editor #399
Rhode Island, United States
Joined: March 05, 2014
KitMaker: 2,888 posts
Model Shipwrights: 73 posts
Posted: Thursday, March 02, 2017 - 05:58 PM UTC
Also further obscures the view in the cabin window to prevent anyone from "accidentally" seeing inside...
You'd really have to be looking for it....


England - South East, United Kingdom
Joined: March 01, 2010
KitMaker: 7,078 posts
Model Shipwrights: 6,649 posts
Posted: Friday, March 03, 2017 - 01:05 AM UTC
Very tidy job on the sampan Tim,
Simple but looks just right.
Cheers
Si
#377
Texas, United States
Joined: June 27, 2010
KitMaker: 1,481 posts
Model Shipwrights: 1,332 posts
Posted: Friday, March 03, 2017 - 02:32 AM UTC
Tim,
Really amazing work. The Sampan looks great, busing it up makes it look the part.
Really enjoying watching this build.
Dave
In Dry Dock #1: 1/350 IJN SHOKAKU (Fujimi)
In Dry Dock #2: 1/350 IJN Tama (Aoshima)
TimReynaga
Associate Editor California, United States
Joined: May 03, 2006
KitMaker: 2,500 posts
Model Shipwrights: 1,830 posts
Posted: Saturday, March 04, 2017 - 07:53 AM UTC
#306
Victoria, Australia
Joined: June 27, 2010
KitMaker: 3,959 posts
Model Shipwrights: 2,777 posts
Posted: Saturday, March 04, 2017 - 02:47 PM UTC
Your attention to detail is just brilliant, Tim!

Stay home and build models!
In 1/72
Gloster Gladiator MkII for the Bi-planes Campaign
In 1/350
Airfix 1:350 Type 45 Destroyer
England - South East, United Kingdom
Joined: March 01, 2010
KitMaker: 7,078 posts
Model Shipwrights: 6,649 posts
Posted: Monday, March 06, 2017 - 02:28 AM UTC
Nice work Tim,
The canvas to cover the dated moulding is classic, looks great.
cheers
Si
TimReynaga
Associate Editor California, United States
Joined: May 03, 2006
KitMaker: 2,500 posts
Model Shipwrights: 1,830 posts
Posted: Saturday, March 11, 2017 - 11:31 PM UTC
Back when I settled on the scale of this Junk, I bought some figures to make up a crew. Although there are a ton of 1/87 HO scale railroad figures available, the closest thing I could find to Chinese sailors was this set of female agricultural workers from Preiser:

These beautifully sculpted figures came neatly assembled and prepainted, but the bent over harvesting poses would be a challenge to adapt to shipboard use. I started with the walking figure.
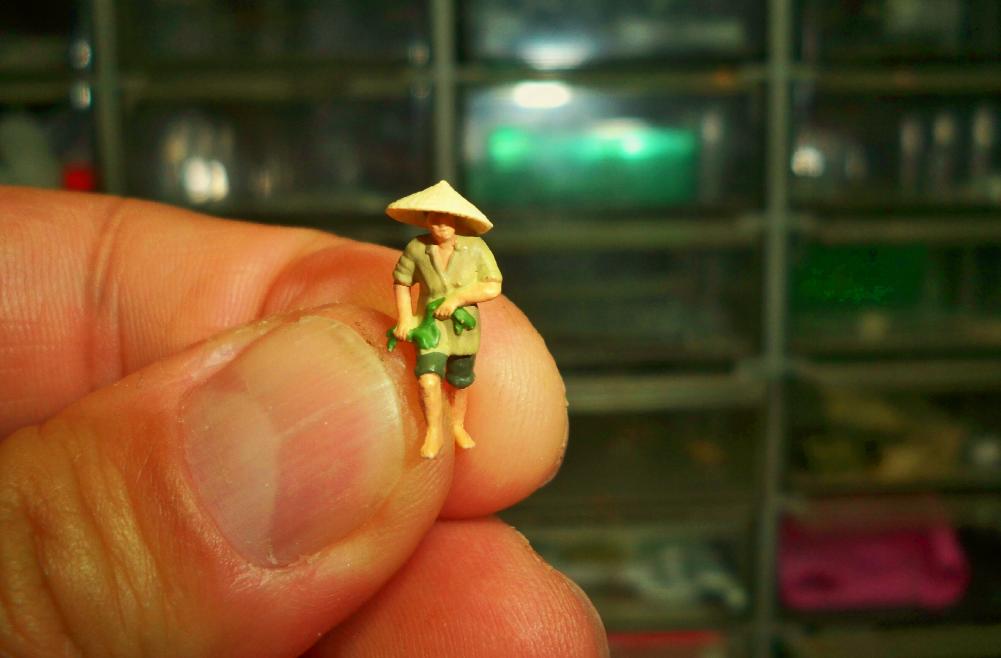
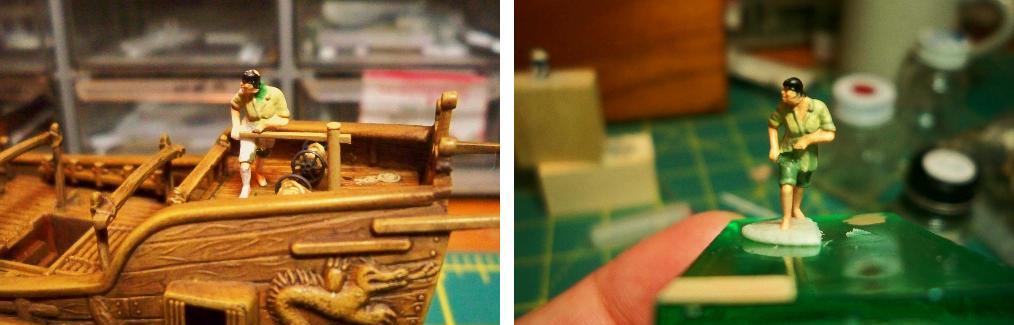
After cutting away the plants in her hands and test fitting the figure in various places on the deck, I found she fit pretty well at the helm. I cleaned up the mold seams and turned the head to give her a more dynamic stance. Since the colors provided on the figures were good, I just repaired the paint damage done by my alterations and and added some shadows and highlights.
The hat, which I knocked off during clean-up, tended to hide the beautifully sculpted face on the figure, so I left it off.
Placed back aboard, my dedicated helmswoman leans into the tiller to put the junk into a starboard turn.
Washington, United States
Joined: August 03, 2008
KitMaker: 436 posts
Model Shipwrights: 31 posts
Posted: Sunday, March 12, 2017 - 02:28 AM UTC
Tim....
This has to be one of my favorite build blogs of all time, and from a confirmed armor guy that is saying something. I love the combination of great building, fun and education that make it one of the things I look forward to reading.
As for the ladies bent over harvesting.... how about reaching down for one of the ropes you just so carefully placed on the deck? or straightening out the tarp that is working its way off of the boxes?
The young lady at the tiller definitely looks the part, and is more realistic than, yet another, German tank commander pointing "that a way"...
Whatever you do with them.. I am looking forward to the result.
Bob
#345
Niedersachsen, Germany
Joined: August 22, 2011
KitMaker: 1,835 posts
Model Shipwrights: 1,832 posts
Posted: Sunday, March 12, 2017 - 09:35 AM UTC
Tim,
I missed out on a couple of your updates - awesome work!! This is really artwork, they way you are transforming this rather basic kit into something very special!! I just love this build log of yours!!
Cheers,
Jan
England - South East, United Kingdom
Joined: March 01, 2010
KitMaker: 7,078 posts
Model Shipwrights: 6,649 posts
Posted: Monday, March 13, 2017 - 01:11 AM UTC
Hi Tim,
Nice job with the figure, the pose looks just right for someone leaning on a heavy tiller.
Cheers
Si
#306
Victoria, Australia
Joined: June 27, 2010
KitMaker: 3,959 posts
Model Shipwrights: 2,777 posts
Posted: Monday, March 13, 2017 - 02:50 AM UTC
great work on the helmswoman Tim!
I wonder if she knows what's going on below deck
Stay home and build models!
In 1/72
Gloster Gladiator MkII for the Bi-planes Campaign
In 1/350
Airfix 1:350 Type 45 Destroyer
TimReynaga
Associate Editor California, United States
Joined: May 03, 2006
KitMaker: 2,500 posts
Model Shipwrights: 1,830 posts
Posted: Wednesday, March 15, 2017 - 07:47 AM UTC
Bob, Si, Jan, and Russ thank you!
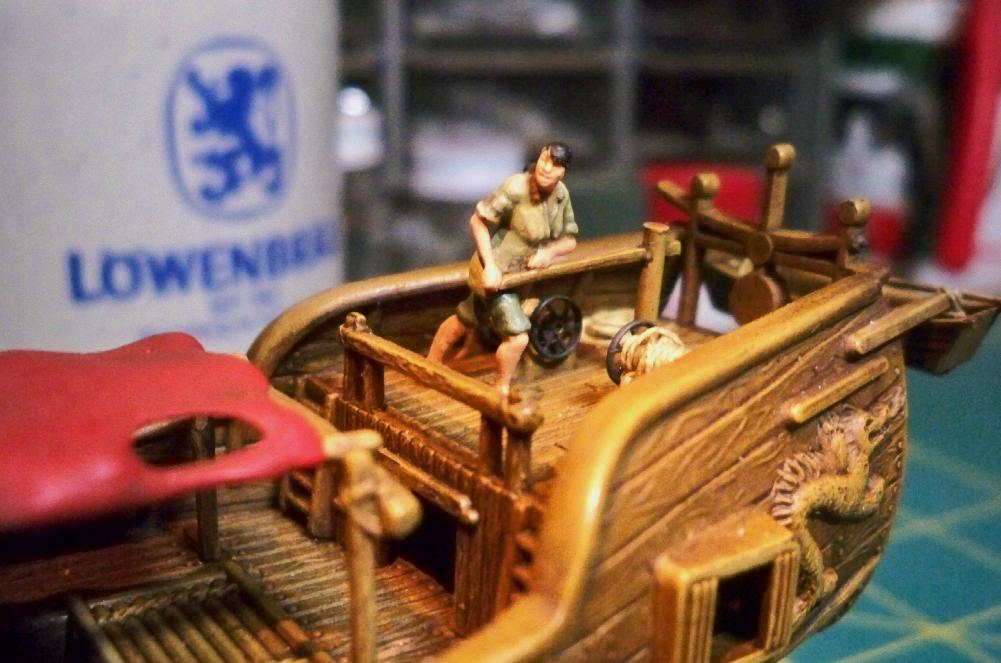
Figure number two was supplied bending over pulling up plants.
After removing the plants, cleaning up the mold seams and touching up the paint, I set her to work securing a line to the belaying posts.
Placing a foot on the raised post rack helps make her look a little less like shes harvesting crops!
TimReynaga
Associate Editor California, United States
Joined: May 03, 2006
KitMaker: 2,500 posts
Model Shipwrights: 1,830 posts
Posted: Friday, March 17, 2017 - 05:01 AM UTC
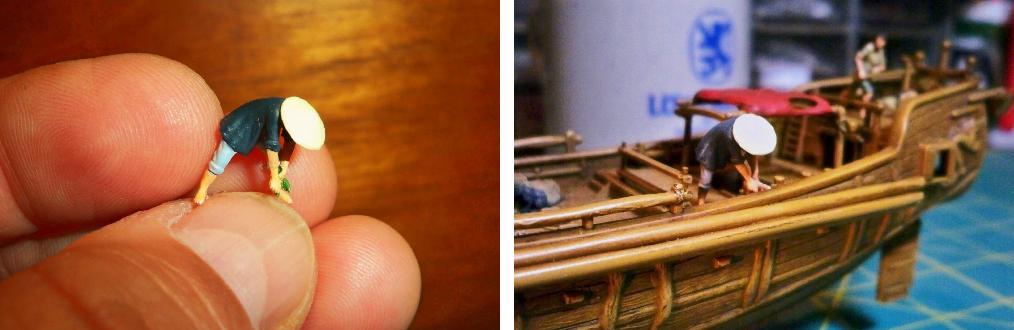
The third figure was also depicted bending over pulling up plants, but this one could be rotated into a natural-looking sitting position.
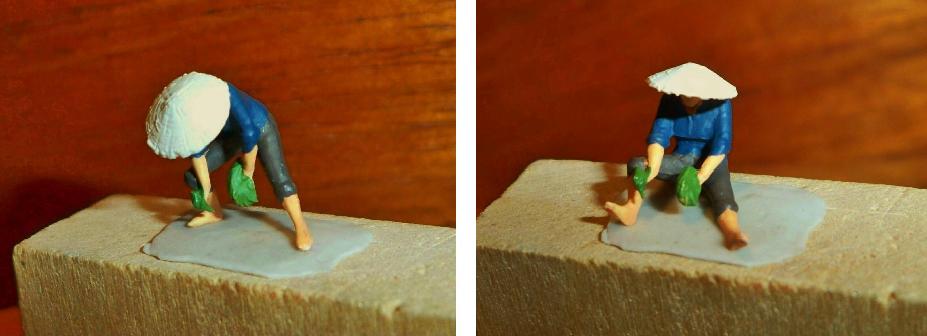
Id thought to show her sitting there mending nets or rope or something, but while trimming away the plants I noticed that the remnant in the left hand started to resemble a fish head... so I went with that, scratchbuilding a tiny fish body to go along with it.

Adding a knife to the figures other hand, this agricultural worker becomes a sailor preparing a nice salmon dinner for the crew!
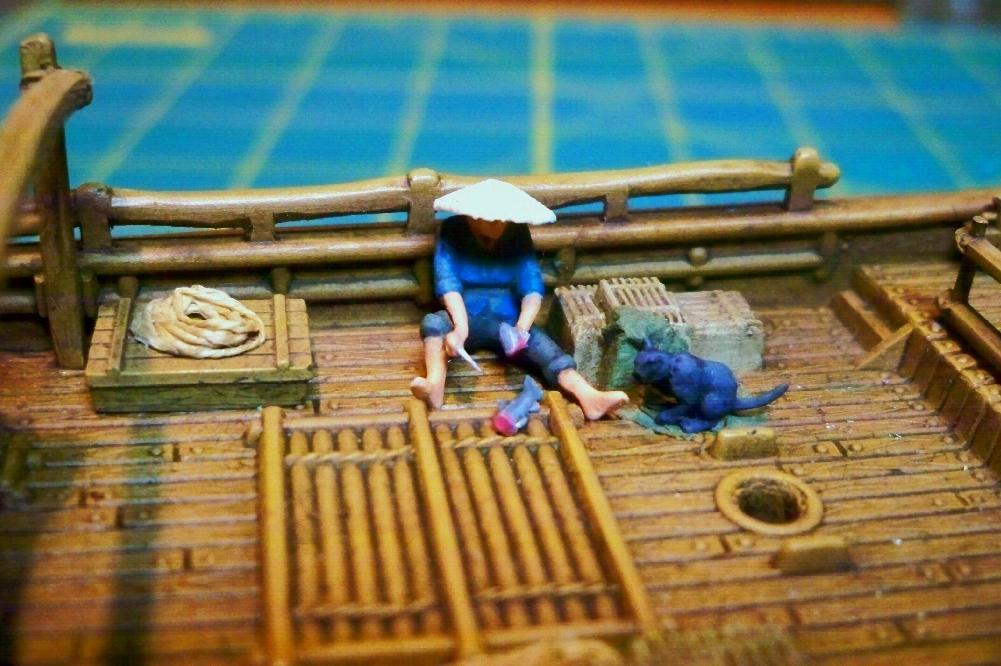
The ships cat looks on with interest.

Namabiiru
Associate Editor #399
Rhode Island, United States
Joined: March 05, 2014
KitMaker: 2,888 posts
Model Shipwrights: 73 posts
Posted: Friday, March 17, 2017 - 06:03 AM UTC
Tim,
So cool what you're doing with all those figures. Looking like an all female crew so I guess the Cap'n's on top...

TimReynaga
Associate Editor California, United States
Joined: May 03, 2006
KitMaker: 2,500 posts
Model Shipwrights: 1,830 posts
Posted: Friday, March 17, 2017 - 07:27 AM UTC
Quoted Text
Tim,
So cool what you're doing with all those figures. Looking like an all female crew so I guess the Cap'n's on top...
Thanks Mark - you're probably right. There is one male coming aboard presently... but he's definitely not on top!
Washington, United States
Joined: August 03, 2008
KitMaker: 436 posts
Model Shipwrights: 31 posts
Posted: Friday, March 17, 2017 - 10:22 AM UTC
Tim,
This just keeps getting better and better.... I love how you are not only making the crew members fit in by actually doing something useful, but how they actually fit the spaces you have them in. Each of the last 3 crew fit the deck and fittings like they were made for those locations.
Oh, excellent fish.... and I am sure that the cat won't miss out on a bit either.
Bob
Namabiiru
Associate Editor #399
Rhode Island, United States
Joined: March 05, 2014
KitMaker: 2,888 posts
Model Shipwrights: 73 posts
Posted: Saturday, March 18, 2017 - 04:50 PM UTC
Tim,
The base you did looks great, but with all this action on deck, having it sitting in the water would really make it come to life. Have you considered doing something like that?
#345
Niedersachsen, Germany
Joined: August 22, 2011
KitMaker: 1,835 posts
Model Shipwrights: 1,832 posts
Posted: Sunday, March 19, 2017 - 10:29 AM UTC
Tim,
what shall I say?? That's just marvellous, your creativity on playing with those figures!! Fantastic and great fun to watch!!
Cheers,
Jan
England - South East, United Kingdom
Joined: March 01, 2010
KitMaker: 7,078 posts
Model Shipwrights: 6,649 posts
Posted: Monday, March 20, 2017 - 12:22 AM UTC
Real character in crew Tim,
The cat in a superb touch too.
Cheers
Si
#306
Victoria, Australia
Joined: June 27, 2010
KitMaker: 3,959 posts
Model Shipwrights: 2,777 posts
Posted: Monday, March 20, 2017 - 01:26 AM UTC
Quoted Text
Quoted Text
Tim,
So cool what you're doing with all those figures. Looking like an all female crew so I guess the Cap'n's on top...
Thanks Mark - you're probably right. There is one male coming aboard presently... but he's definitely not on top!

who'd have thought the world of modelmaking could have so much double entendre? absolutely hilarious and brightened my day!
Stay home and build models!
In 1/72
Gloster Gladiator MkII for the Bi-planes Campaign
In 1/350
Airfix 1:350 Type 45 Destroyer
TimReynaga
Associate Editor California, United States
Joined: May 03, 2006
KitMaker: 2,500 posts
Model Shipwrights: 1,830 posts
Posted: Wednesday, March 22, 2017 - 02:46 AM UTC
Mark, Bob, Jan, Si, & Russ thanks for your comments about the figures. I actually lucked out with the crew; Preisers HO scale figures are all first rate, and with just a little coaxing those farm workers turned out to be handy little sailors as well!
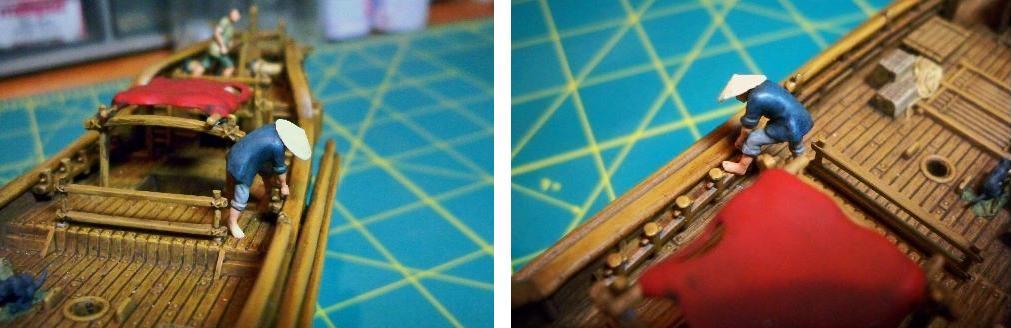
Heres an overall shot showing the all-girl deck crew in action:
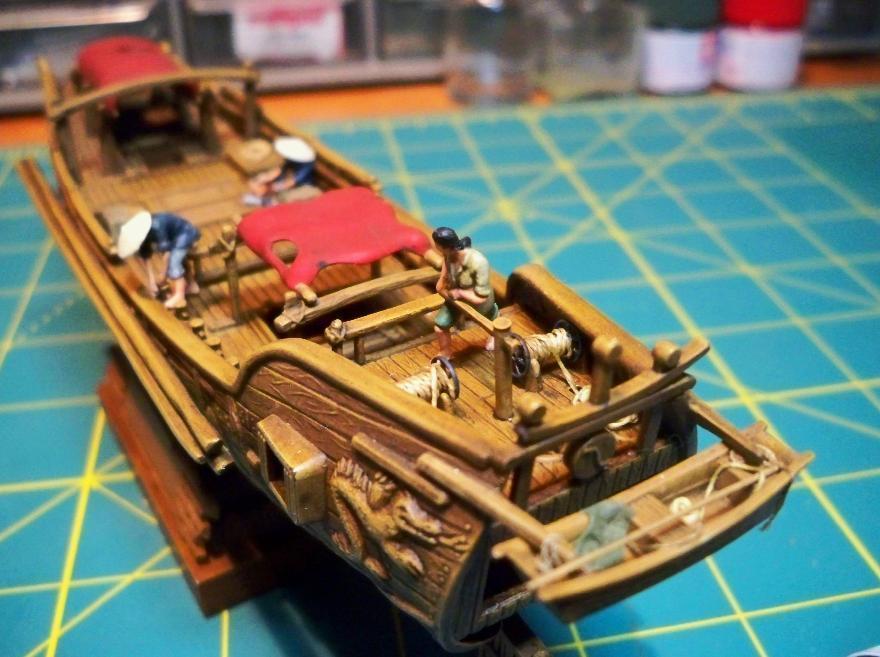
Next up: the action below
TimReynaga
Associate Editor California, United States
Joined: May 03, 2006
KitMaker: 2,500 posts
Model Shipwrights: 1,830 posts
Posted: Thursday, March 30, 2017 - 07:51 AM UTC
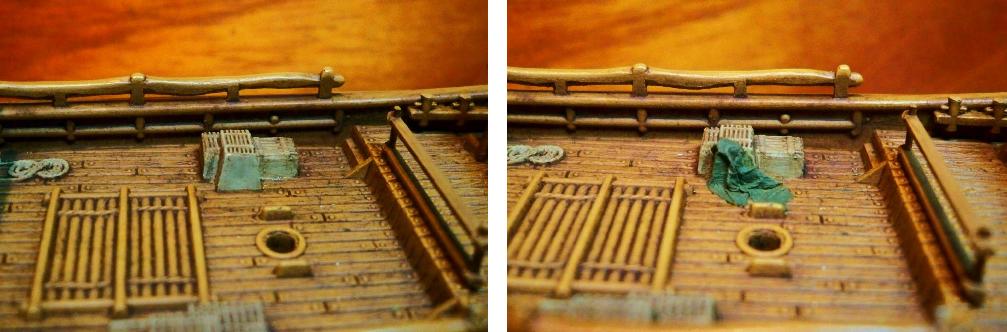
As I prepared to place the figures inside the cabin, I noticed a visible knock out pin mark that I had missed before.
Doh!
Way too late to repair at this point, my thought was to conceal it; I hit upon the idea of a jacket hanging on a peg.

Cutting out a bit of facial tissue to about the right size and shape, I crinkled it a little and soaked it in a thin solution of water and white glue. While it was still wet, I added another smaller piece to it to depict a sleeve, and another over the end of the sleeve to suggest a cuff.
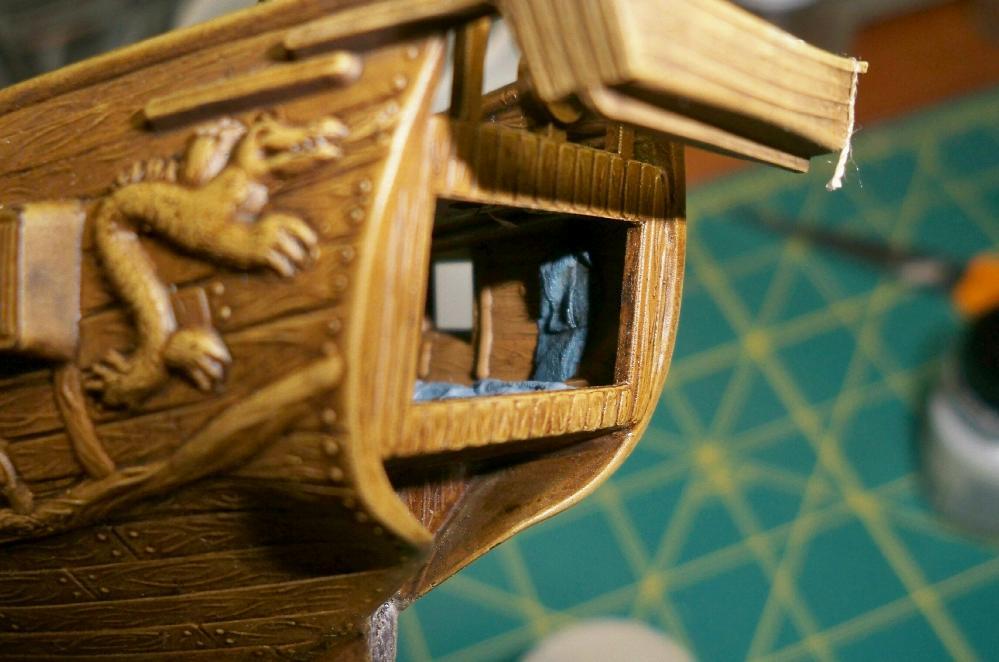
The shapes are pretty basic, but once dry and painted they become a passable representation of a hanging jacket.
England - South East, United Kingdom
Joined: March 01, 2010
KitMaker: 7,078 posts
Model Shipwrights: 6,649 posts
Posted: Thursday, March 30, 2017 - 01:05 PM UTC
Looking very good Tim,
Excellent save with the jacket, adds more character to the stern cabin too.
Cheers
Si