


Go to modelshipwrights.com for the current dynamic site!
Hosted by Steve Joyce
HMS Repulse May 1941

TRM5150

Joined: January 03, 2010
KitMaker: 2,159 posts
Model Shipwrights: 1,400 posts

Posted: Saturday, March 26, 2016 - 05:47 PM UTC
Nice, a little Sunday painting!

RedDuster

Joined: March 01, 2010
KitMaker: 7,078 posts
Model Shipwrights: 6,649 posts

Posted: Saturday, March 26, 2016 - 10:03 PM UTC
Hi Todd,
Sunday painting done, haven't had time to upload yet, but will post the update later.
(All went well, reasonably anyway, one slight bit of overspray that's all)
Cheers
Si
Sunday painting done, haven't had time to upload yet, but will post the update later.
(All went well, reasonably anyway, one slight bit of overspray that's all)
Cheers
Si
RedDuster
Joined: March 01, 2010
KitMaker: 7,078 posts
Model Shipwrights: 6,649 posts
Posted: Sunday, March 27, 2016 - 02:21 AM UTC
Finally got the pictures downloaded.
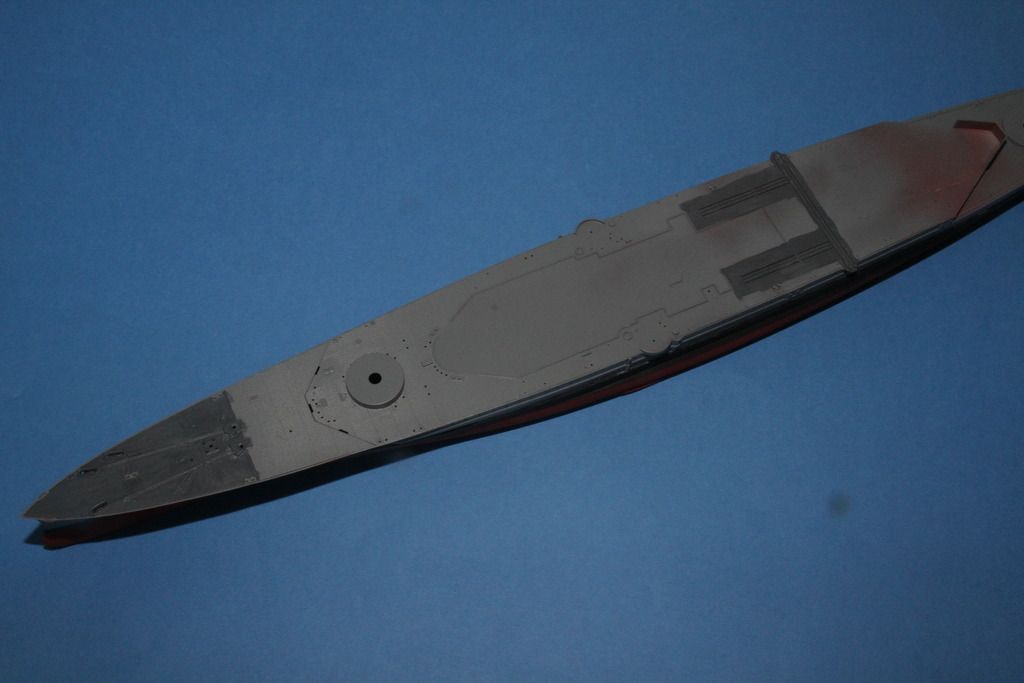
The anti fouling masked and sprayed.
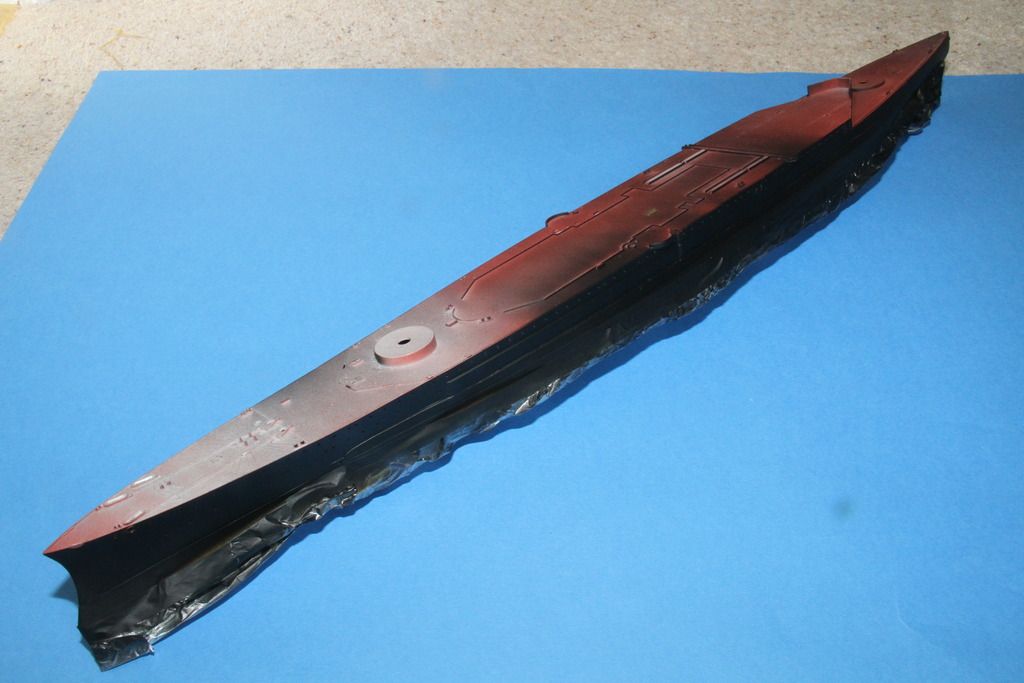
The boot topping masked off, to the correct height for the post 1936 refit. (the level shown in the kit painting looks way too low for the 1936 refit)
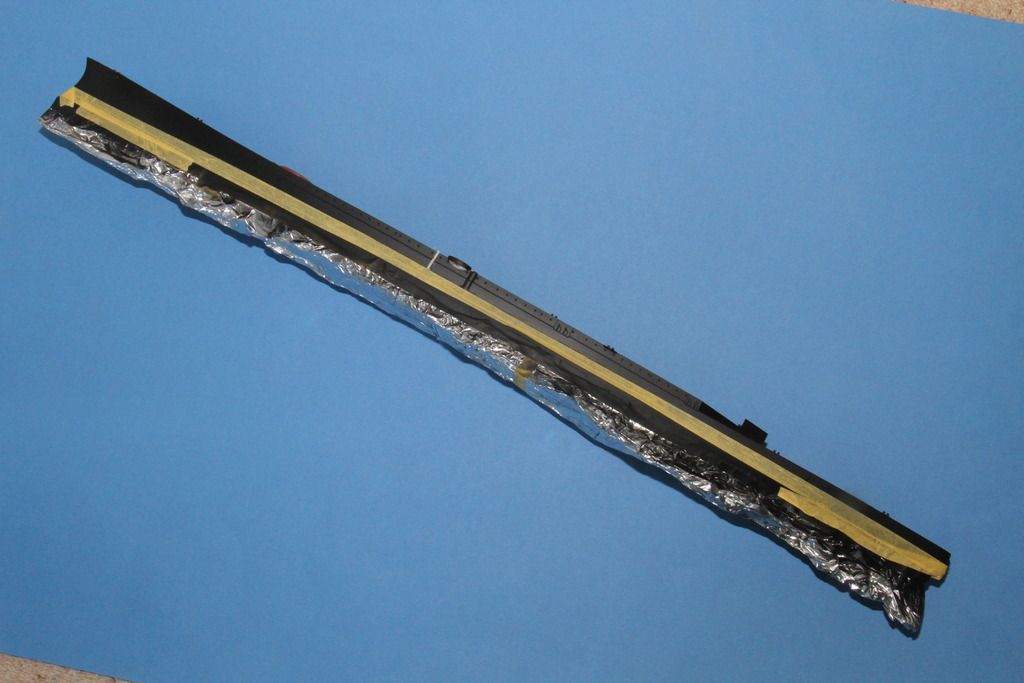
Sprayed AP507b, well Tamiya TS66 Kure Arsenal Grey, which is quite close.
And the masking off.
More soon
Si
The anti fouling masked and sprayed.

The boot topping masked off, to the correct height for the post 1936 refit. (the level shown in the kit painting looks way too low for the 1936 refit)

Sprayed AP507b, well Tamiya TS66 Kure Arsenal Grey, which is quite close.

And the masking off.

More soon
Si
RedDuster
Joined: March 01, 2010
KitMaker: 7,078 posts
Model Shipwrights: 6,649 posts
Posted: Sunday, March 27, 2016 - 09:55 PM UTC
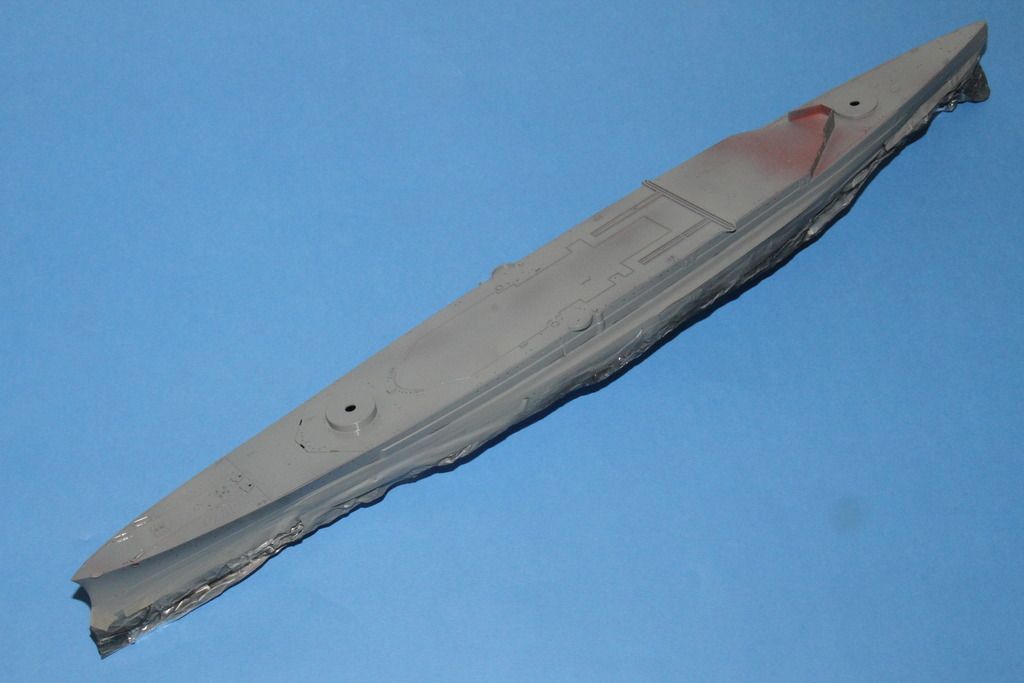
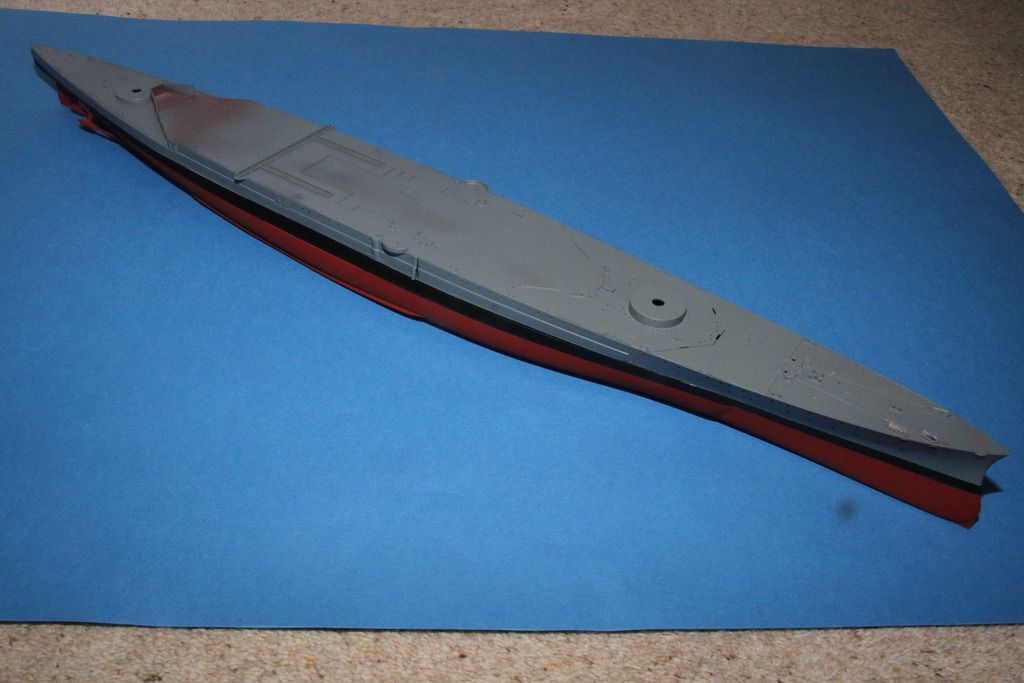
A bit more today.
The steel deck areas painted dark grey.
The basic assembly of the shelter deck level of the main superstructure put together.
The forward wooden deck section down, the hangers have been added to the shelter deck, the doors are blue tacked in place for the time being, at least one will be open.
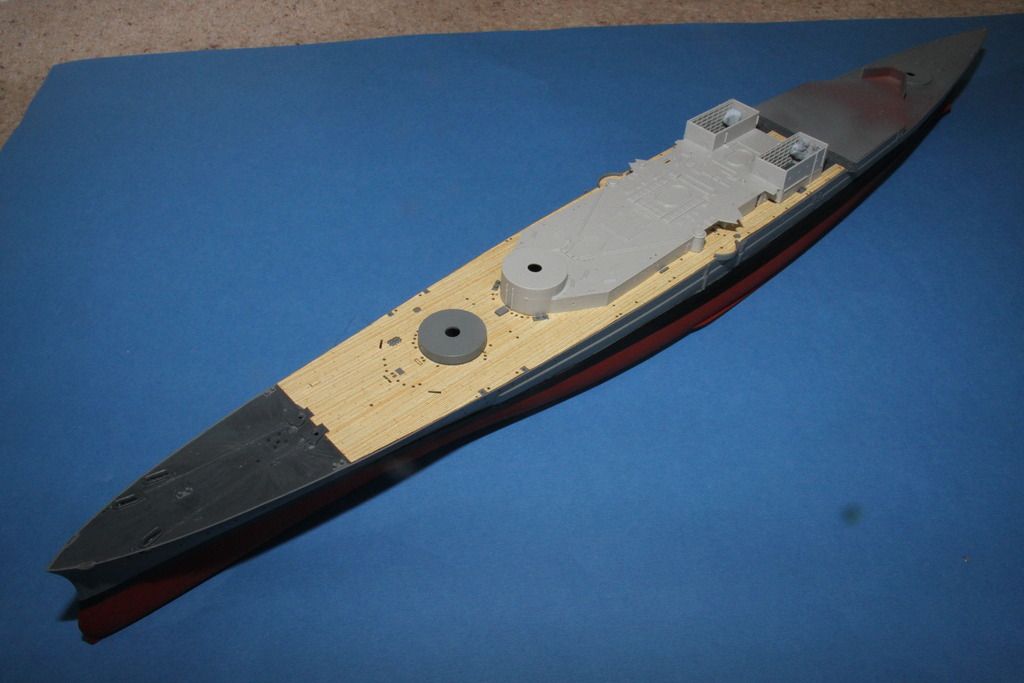
The deck section around the after superstructure will be fun, as at will need to be reshaped to fit around the Admiralty Modelworks after superstructure.
Cheers
Si
The steel deck areas painted dark grey.

The basic assembly of the shelter deck level of the main superstructure put together.

The forward wooden deck section down, the hangers have been added to the shelter deck, the doors are blue tacked in place for the time being, at least one will be open.

The deck section around the after superstructure will be fun, as at will need to be reshaped to fit around the Admiralty Modelworks after superstructure.
Cheers
Si

mgrummitt
Joined: January 07, 2014
KitMaker: 133 posts
Model Shipwrights: 105 posts

Posted: Sunday, March 27, 2016 - 10:37 PM UTC
Looking good!! Always love watching your builds!
RedDuster
Joined: March 01, 2010
KitMaker: 7,078 posts
Model Shipwrights: 6,649 posts
Posted: Monday, March 28, 2016 - 01:50 AM UTC
Thanks Mike,
Appreciate you looking in.
Cheers.
Si
Appreciate you looking in.
Cheers.
Si

JJ1973

#345

Joined: August 22, 2011
KitMaker: 1,835 posts
Model Shipwrights: 1,832 posts

Posted: Thursday, March 31, 2016 - 01:27 AM UTC
Si,
once you start withe a new project, you start running ahead full speed!! Amazing progress since I checked in last time and I was barley a week away...
Your hull with the corrected bulge looks great, fantastic work there
And I fully agree with the position of your waterline, that's a thing I realized way to late for my build. This is going to be a very special and great Repulse! I still love that model, just wonderful lines...
Your 507B medium gray, i.e. the Tamiya TS 66 - is the TS basically the same color as the XF, only one in a glass and one in a can? ...just thinking ahead, I will need quite some 507B for my Hood for the Bismarck campaign. I haven't done any research or matching (or mixing) yet...
Cheers,
Jan
RedDuster
Joined: March 01, 2010
KitMaker: 7,078 posts
Model Shipwrights: 6,649 posts
Posted: Thursday, March 31, 2016 - 12:26 PM UTC
Hi Jan,
I was helped in the start by 2 days sat on the London modellers stand at Southern Expo and a four day weekend, which adds up to at least a month's work at normal rates
The rattlecan TS66 is basically the same as XF75. It is not 100% for fresh out the pot AP507b, but for me close enough for slightly faded version.
By the by just ordered some quad 0.5" from North Star, and some RN bridge equipment, look pretty tasty.
Cheers.
Si

Cosimodo
#335

Joined: September 03, 2013
KitMaker: 1,808 posts
Model Shipwrights: 871 posts

Posted: Friday, April 01, 2016 - 02:48 PM UTC
Hi Si,
Great paint job. You make it look so easy .
.
Once you get your quad 50s from North Star post some photos. I would love to see your opinion of them.
cheers
Michael
Great paint job. You make it look so easy
.Once you get your quad 50s from North Star post some photos. I would love to see your opinion of them.
cheers
Michael
RedDuster
Joined: March 01, 2010
KitMaker: 7,078 posts
Model Shipwrights: 6,649 posts
Posted: Friday, April 01, 2016 - 11:39 PM UTC
Thanks Michael,
Will do. If they are as good as the pompom directors they will be excellent.
The painting is just to planning and cheating, by starting at the bottom and working up it saves double masking, and the Halfords red primer is a great surface and close enough RN anti fouling red to not need a top coat.
Cheers
Si
RedDuster
Joined: March 01, 2010
KitMaker: 7,078 posts
Model Shipwrights: 6,649 posts
Posted: Saturday, April 02, 2016 - 12:33 AM UTC
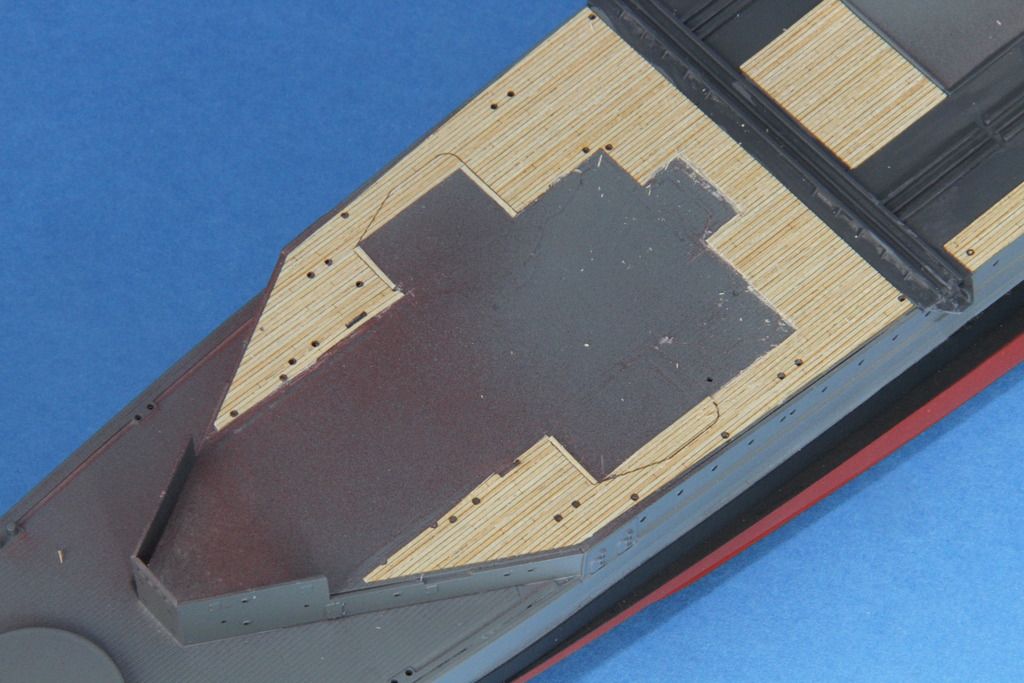
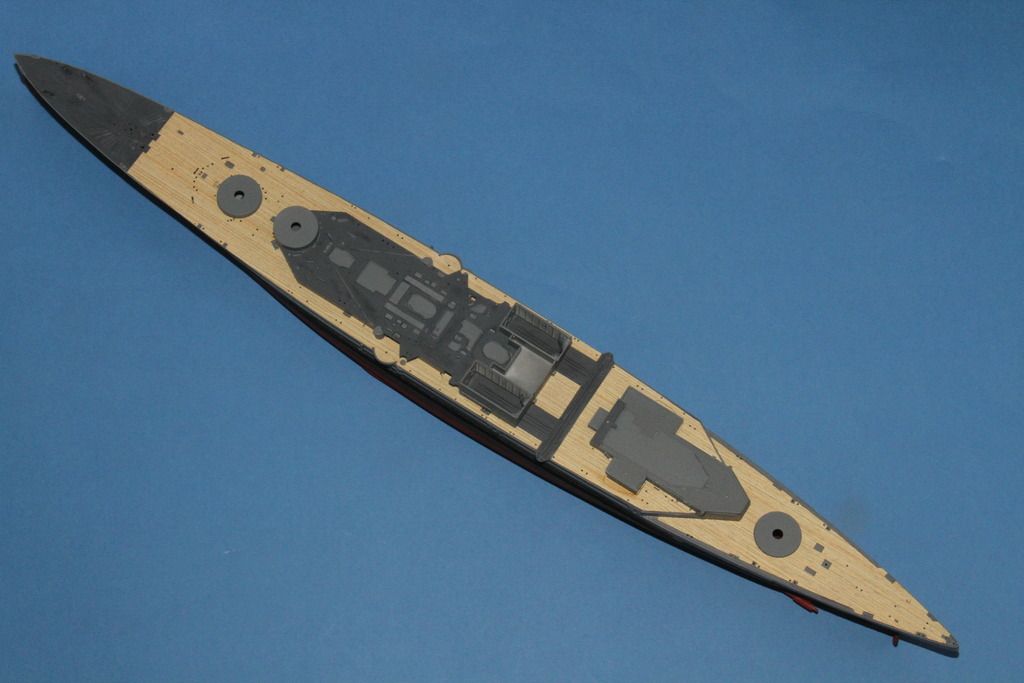
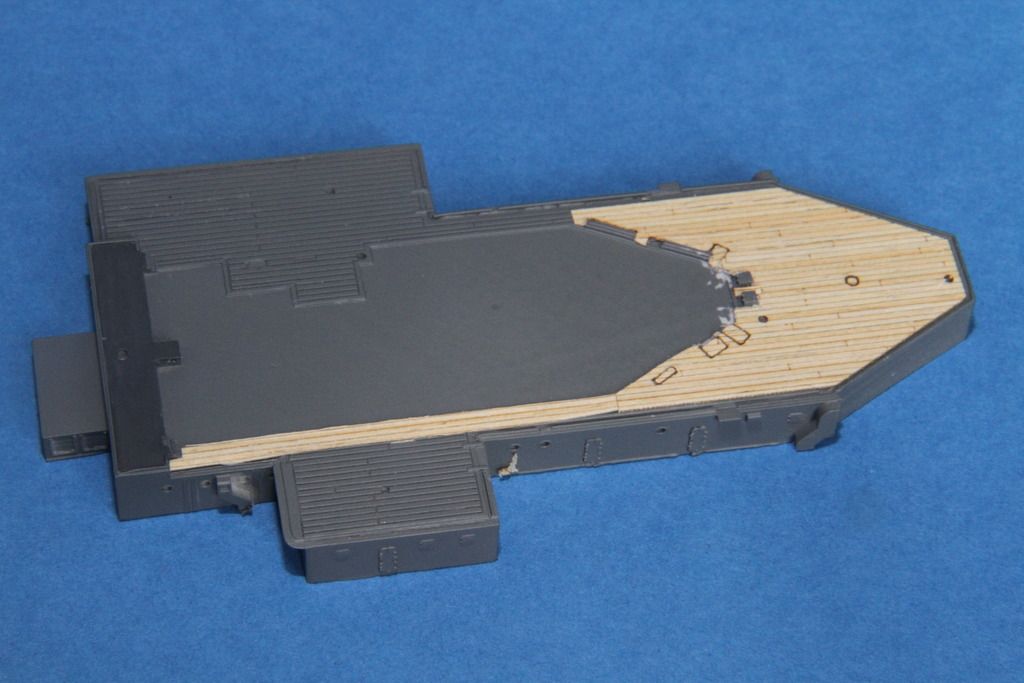
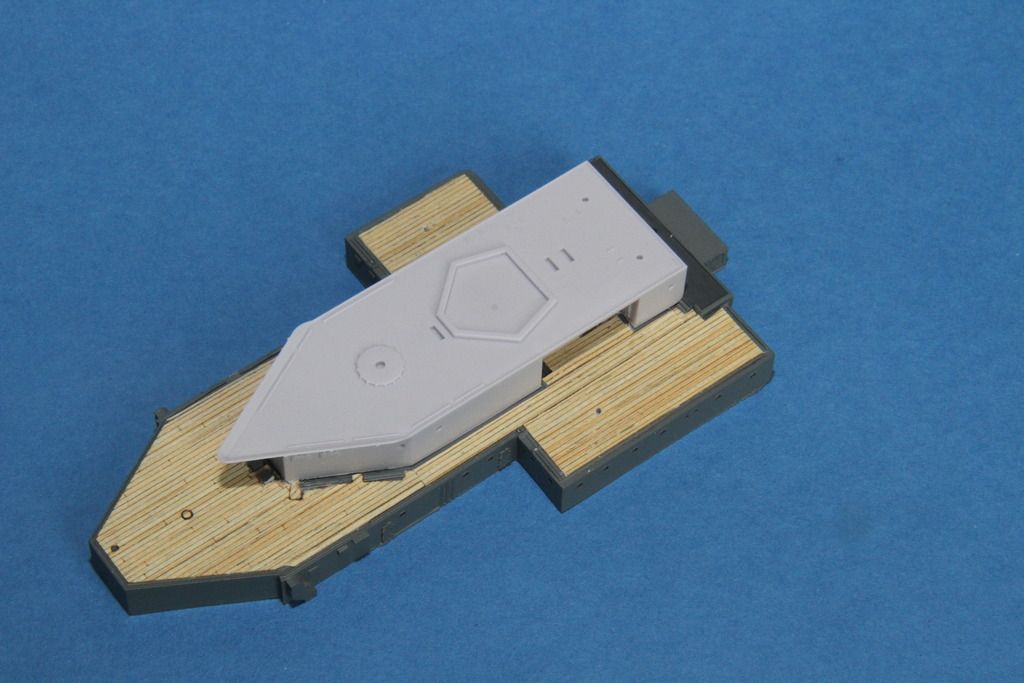
Todays update.
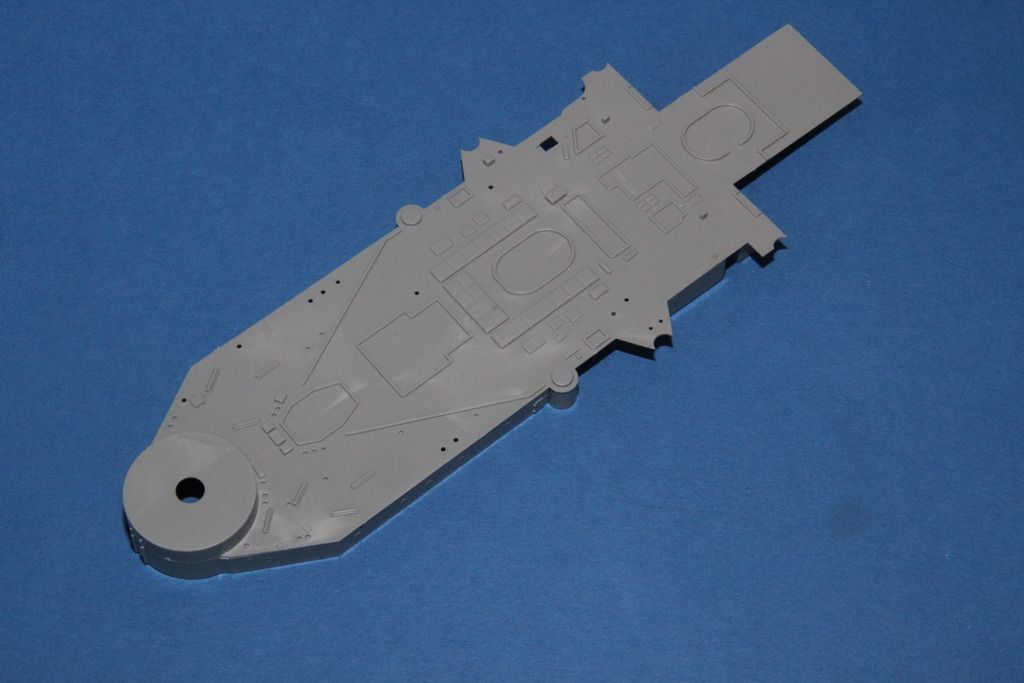
The rest of the wood deck, including the tricky bit, making the deck fit the corrected after superstructure.
The after end of the fo'c's'le deck down.

The replacement after superstructure dropped over the deck.
The wood deck modified so the after superstructure fits.
The after superstructure test fitted.
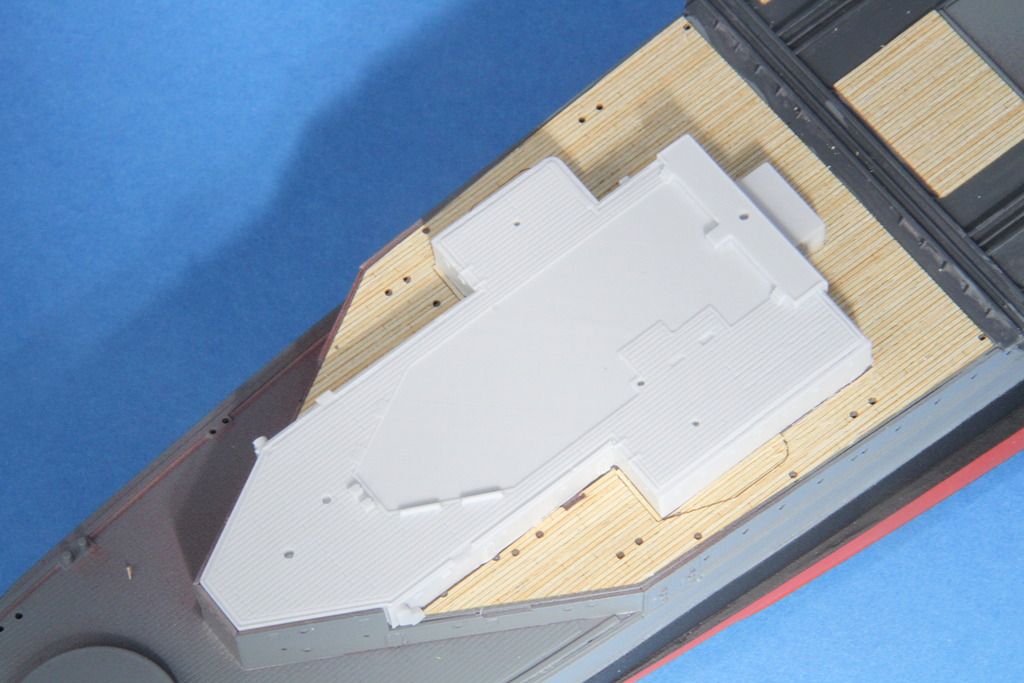
Not bad, a little blending with paint will fade the joins and the black lines.
The superstructure units painted, in the case of the for'd section, the deck painted in too.
Test fitted in place.
More soon.
Si
The rest of the wood deck, including the tricky bit, making the deck fit the corrected after superstructure.
The after end of the fo'c's'le deck down.

The replacement after superstructure dropped over the deck.

The wood deck modified so the after superstructure fits.

The after superstructure test fitted.

Not bad, a little blending with paint will fade the joins and the black lines.
The superstructure units painted, in the case of the for'd section, the deck painted in too.
Test fitted in place.

More soon.
Si

warshipbuild

Joined: June 06, 2006
KitMaker: 222 posts
Model Shipwrights: 207 posts

Posted: Saturday, April 02, 2016 - 05:27 PM UTC
Si,
Who do you order the North Star stuff from?
Do you go through a UK dealer?
Who do you order the North Star stuff from?
Do you go through a UK dealer?
RedDuster
Joined: March 01, 2010
KitMaker: 7,078 posts
Model Shipwrights: 6,649 posts
Posted: Saturday, April 02, 2016 - 09:16 PM UTC
Hi Dave,
I ordered them direct from North Star, There isn't a UK dealer handling them that I know of.
I have ordered directly from the before, the stuff came within about 10 days, well packed and intact, also got email notification that it had been posted, so I had no worries going to them again.
Cheers.
Si
I ordered them direct from North Star, There isn't a UK dealer handling them that I know of.
I have ordered directly from the before, the stuff came within about 10 days, well packed and intact, also got email notification that it had been posted, so I had no worries going to them again.
Cheers.
Si
JJ1973
#345
Joined: August 22, 2011
KitMaker: 1,835 posts
Model Shipwrights: 1,832 posts
Posted: Saturday, April 02, 2016 - 10:27 PM UTC
Very nice job on the deck Si, particularly that tricky part around the after superstructure!
Watching your build and seeing Repulse's distinctive lines I could start all over again!! Could somebody please do an 1/350 Renown, late version after re-construction, please? I would be in at once... But Hood already nocking at my shipyard's door has about the same grace and beauty!
I am truly enjoying your build!!
Cheers,
Jan
RedDuster
Joined: March 01, 2010
KitMaker: 7,078 posts
Model Shipwrights: 6,649 posts
Posted: Saturday, April 02, 2016 - 10:35 PM UTC
Thanks Jan,
Any alterations when you are dealing with a wood deck are fun. I got the after superstructure deck done this afternoon, will post that update shortly,
Totally agree with you regarding Renown, a post refit Renown sat next to Repulse that would really look good.
Cheers.
Si
Any alterations when you are dealing with a wood deck are fun. I got the after superstructure deck done this afternoon, will post that update shortly,
Totally agree with you regarding Renown, a post refit Renown sat next to Repulse that would really look good.
Cheers.
Si
RedDuster
Joined: March 01, 2010
KitMaker: 7,078 posts
Model Shipwrights: 6,649 posts
Posted: Sunday, April 03, 2016 - 12:53 AM UTC
Finally today's update.
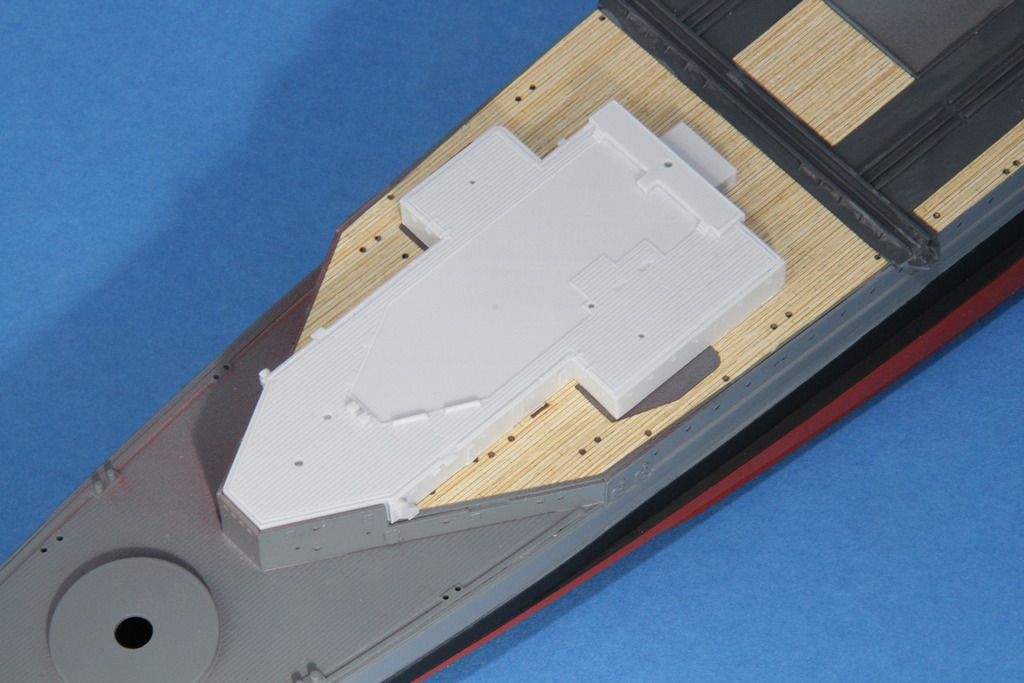
The trickier bit of making the wood deck fit the admiralty modelworks parts. The aftermost section of the artworx deck was used, slightly modified.
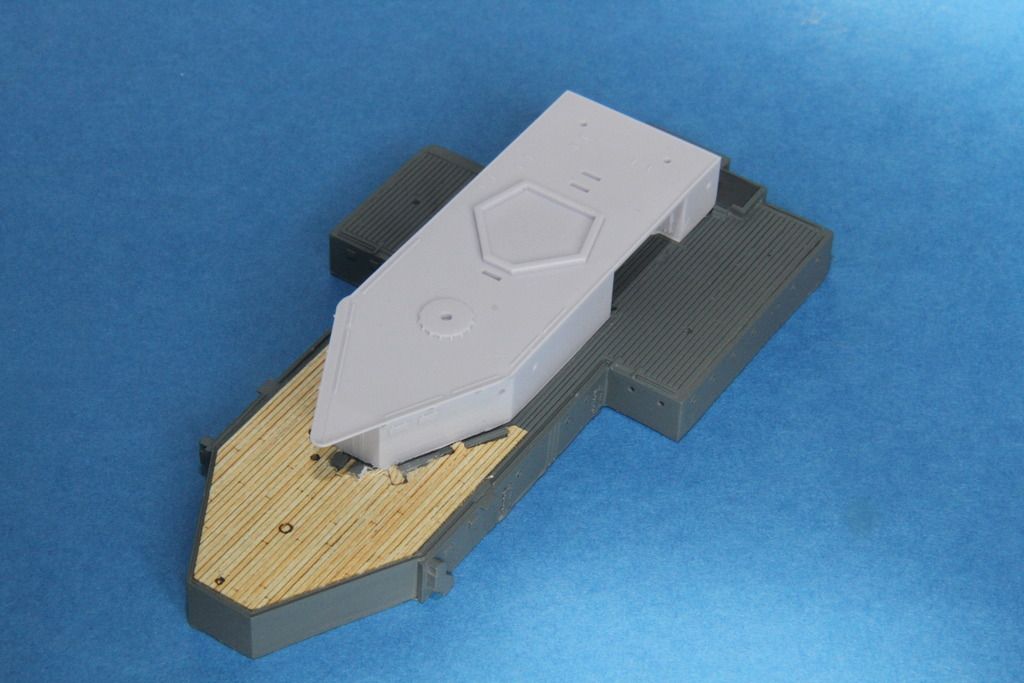
First of the new section cut from leftovers of the artworx sheet. One trick I have found very useful, I leave the backing sheet on the section until am sure of the fit.

In place.
Done, the remains of the section to fit the kit after superstructure is top right.
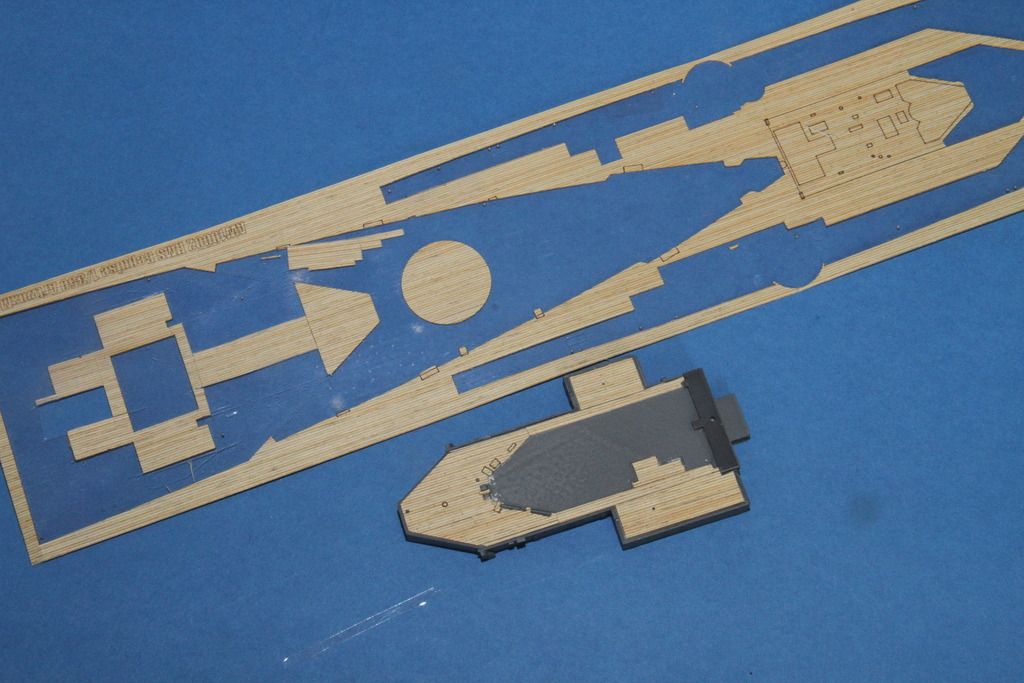
The replacement after superstructure test fitted.
Next step, deck detail. Starting forward and working aft.
Kit anchors, along with left over stocks from the Scharnhorts fitted to the modified hawse pipes.
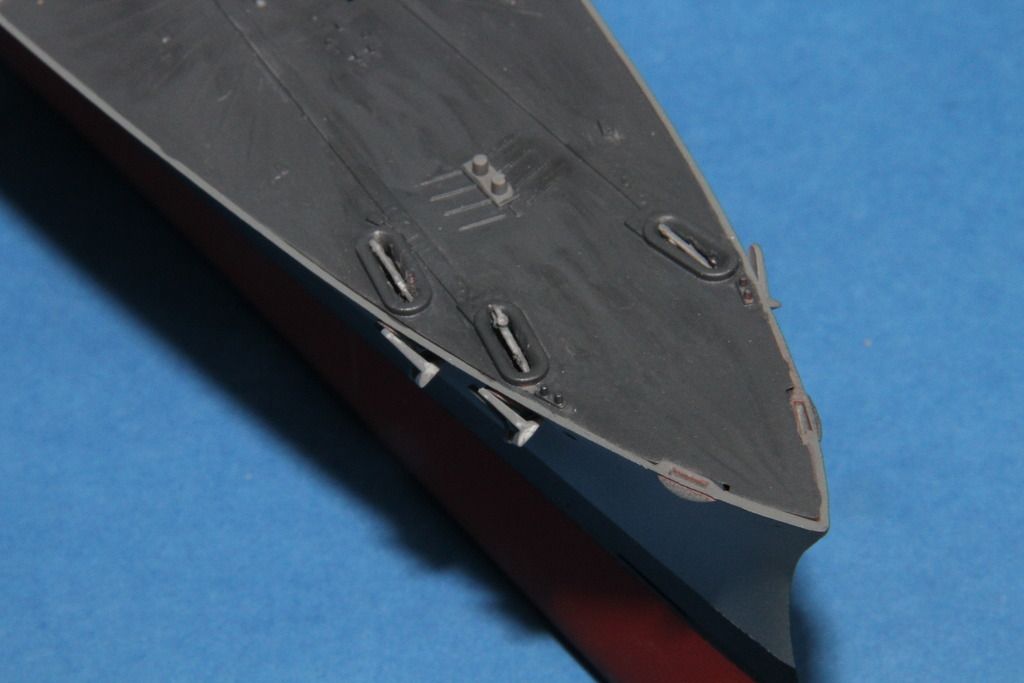
The Fo'c's'le head detail on, the cable supplied with the artworx deck, the chain stoppers come are from the white ensign set.
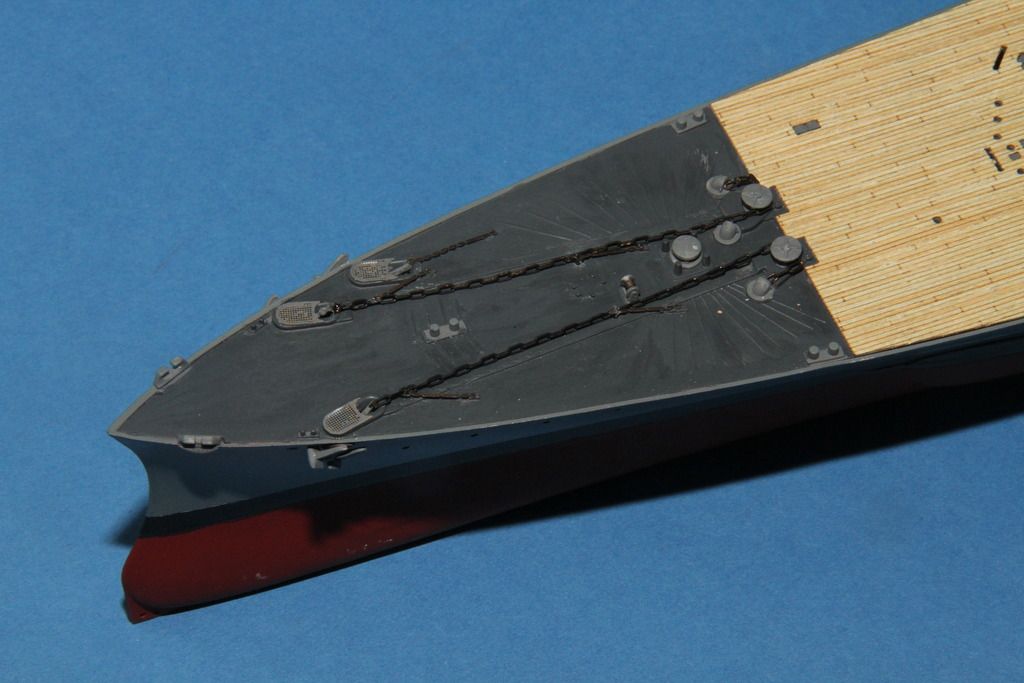
More soon.
Si
The trickier bit of making the wood deck fit the admiralty modelworks parts. The aftermost section of the artworx deck was used, slightly modified.

First of the new section cut from leftovers of the artworx sheet. One trick I have found very useful, I leave the backing sheet on the section until am sure of the fit.

In place.

Done, the remains of the section to fit the kit after superstructure is top right.

The replacement after superstructure test fitted.

Next step, deck detail. Starting forward and working aft.
Kit anchors, along with left over stocks from the Scharnhorts fitted to the modified hawse pipes.

The Fo'c's'le head detail on, the cable supplied with the artworx deck, the chain stoppers come are from the white ensign set.

More soon.
Si
JJ1973
#345
Joined: August 22, 2011
KitMaker: 1,835 posts
Model Shipwrights: 1,832 posts
Posted: Sunday, April 03, 2016 - 10:09 PM UTC
Nice work on the wood, Si!!
While you are still early on - the PomPom base on the aft superstructure is about 2 - 3 mm to much forward (towards the bow), the the PomPom mount will not fit. I realized that too late and had to drill some ugly spare hole and glue the mount in place, so that it more or less covers the base, which then of course if off center. That's one of the misfits of the kit...maybe you can come up with a better solution than I
Cheers,
Jan
RedDuster
Joined: March 01, 2010
KitMaker: 7,078 posts
Model Shipwrights: 6,649 posts
Posted: Sunday, April 03, 2016 - 11:42 PM UTC
Hi Jan,
Thanks for you kind comment, messing about with the wood is part of the "fun" when going over and above the kit, or what comes with the wood.
appreciate the heads up with the pompom fit.
Be interesting to see if Admiralty Modelworks made the same mistake.
I will assemble a pompom and test fit it against the after superstructure and the base of after fire control before applying paint, or gluing anything down.
Cheers
Si
JJ1973
#345
Joined: August 22, 2011
KitMaker: 1,835 posts
Model Shipwrights: 1,832 posts
Posted: Monday, April 04, 2016 - 09:27 AM UTC
Ah, I see - both levels of the after superstructure are from Admiralty Modelworks, I mistook the upper deck for already assembled Trumpi parts. But of course, there were almost more issues with that deck than with the one below...
Indeed interesting to see wether they 'copied' that mistake.
The PomPom mount would block against the vent that needs to go between the gun mounting and the fire control base. Seems like Trumpi forgot about the vent when they first designed that part...
I had to drill an extra hole into the extreme end of the gun base. I checked back in my old build log, but I omitted that part, only found some old pics I never uploaded - no tale of glory there...
Cheers,
Jan
RedDuster
Joined: March 01, 2010
KitMaker: 7,078 posts
Model Shipwrights: 6,649 posts
Posted: Monday, April 04, 2016 - 11:15 AM UTC
No Worries Jan,
It looks lie there is a slot to take the vent behind the pompom mount, I don't think Admiralty have got it wrong (if they have, wouldn't be the first after market manufacturer to copy a kit error in an upgrade set). But better to be safe than sorry.
Thanks again mate.
Cheers.
Si
It looks lie there is a slot to take the vent behind the pompom mount, I don't think Admiralty have got it wrong (if they have, wouldn't be the first after market manufacturer to copy a kit error in an upgrade set). But better to be safe than sorry.
Thanks again mate.
Cheers.
Si
Cosimodo
#335
Joined: September 03, 2013
KitMaker: 1,808 posts
Model Shipwrights: 871 posts
Posted: Monday, April 04, 2016 - 02:51 PM UTC
Very nice work with the detailing on the wooden deck to fit around the new parts. Shows the benefits and drawbacks of using the tailored made wooden decks.
cheers
Michael
cheers
Michael

RussellE
#306

Joined: June 27, 2010
KitMaker: 3,959 posts
Model Shipwrights: 2,777 posts
Posted: Monday, April 04, 2016 - 02:51 PM UTC
Wow Si!
An absolute cracking pace. Following along
An absolute cracking pace. Following along

RedDuster
Joined: March 01, 2010
KitMaker: 7,078 posts
Model Shipwrights: 6,649 posts
Posted: Monday, April 04, 2016 - 05:19 PM UTC
Hi Michael,
Thanks mate, learnt a lot from Tim Reynaga's build of the USS Olympia a year or so back on adapting Custom wood decks, This is first project where I have done more than fill in the gaps made by cutting off "Aztec temple" steps.
The good thing, on most decks you get quite a bit of spare to practice with.
Cheers
Si
RedDuster
Joined: March 01, 2010
KitMaker: 7,078 posts
Model Shipwrights: 6,649 posts
Posted: Monday, April 04, 2016 - 05:21 PM UTC
Thanks Russ,
Been lucky with free time of late, don't know how long that is going to last.
Cheers for looking in.
Si
Been lucky with free time of late, don't know how long that is going to last.
Cheers for looking in.
Si
RedDuster
Joined: March 01, 2010
KitMaker: 7,078 posts
Model Shipwrights: 6,649 posts
Posted: Friday, April 08, 2016 - 11:44 PM UTC
Bit more progress, and a slight interlude.
Just for fun I built up the kit after superstructure to compare with the admiralty parts.
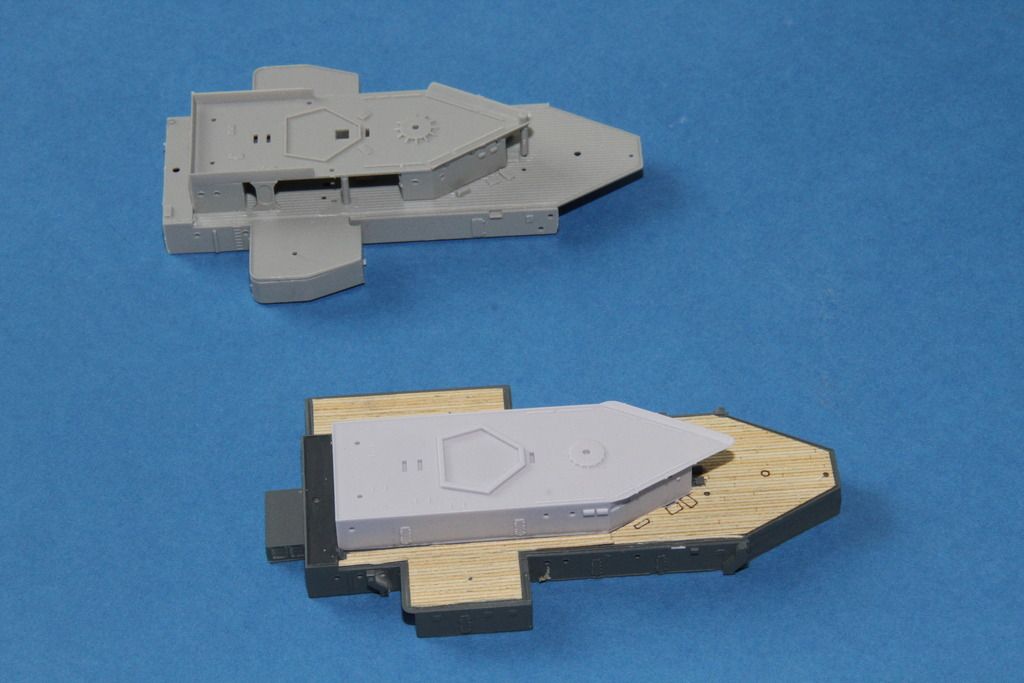
The kit parts look pretty good for 1936-38 period, but not so good for 1941.
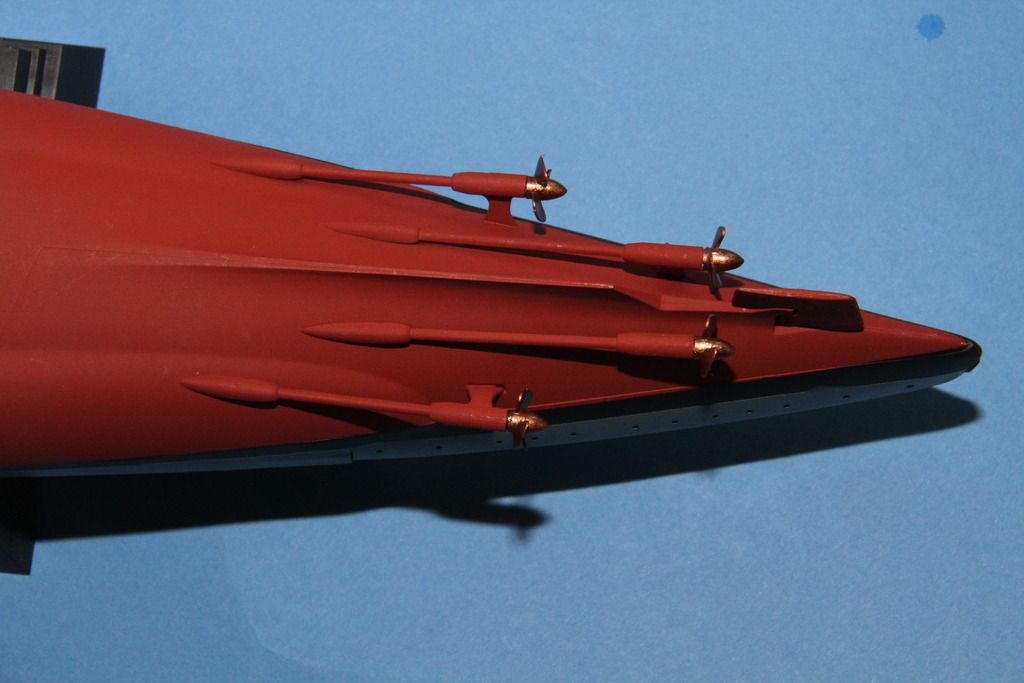
The props on, before turning her on her back gets tricky.
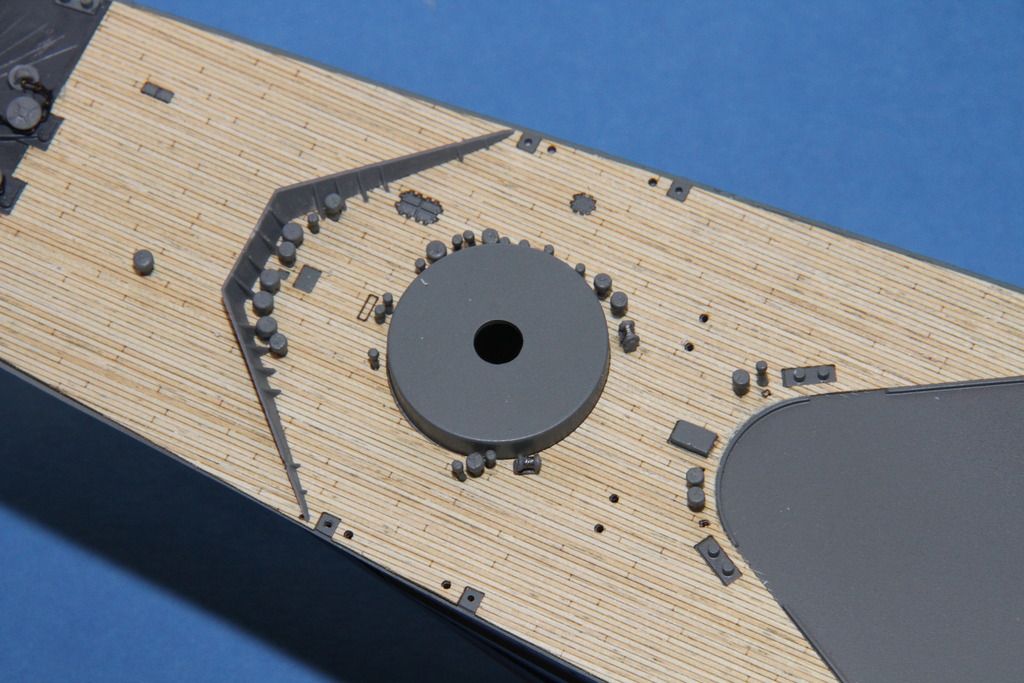
The vents around the breakwater and A and B barbettes in place.
More soon
Si
Just for fun I built up the kit after superstructure to compare with the admiralty parts.

The kit parts look pretty good for 1936-38 period, but not so good for 1941.
The props on, before turning her on her back gets tricky.

The vents around the breakwater and A and B barbettes in place.

More soon
Si
 |

WEB HOSTING BY


Copyright ©2021 Model Shipwrights and Kitmaker Network, a subsidiary of Silver Star Enterprises
All Rights Reserved. Please read our Conditions of Use and Privacy Policy.
All Rights Reserved. Please read our Conditions of Use and Privacy Policy.