

Tim,
just as Mark and Russ say, the bridge with all the fantastic detail you put on it simply looks awesome!
Cheers
Jan


Go to modelshipwrights.com for the current dynamic site!
Hosted by Jim Starkweather
1/200 Nichimo Hatsuzuki build

JJ1973

#345

Joined: August 22, 2011
KitMaker: 1,835 posts
Model Shipwrights: 1,832 posts

Posted: Friday, August 07, 2020 - 08:49 AM UTC

GazzaS
#424

Joined: April 23, 2015
KitMaker: 4,648 posts
Model Shipwrights: 249 posts

Posted: Friday, August 07, 2020 - 01:55 PM UTC
That bridge looks great! I love how busy it looks!
This for me is the hardest thing about warship modelling: Finding the references to fill up all of the spaces the kit maker leaves empty.
Bravo, Tim!
This for me is the hardest thing about warship modelling: Finding the references to fill up all of the spaces the kit maker leaves empty.
Bravo, Tim!

TimReynaga

Joined: May 03, 2006
KitMaker: 2,500 posts
Model Shipwrights: 1,830 posts
Posted: Sunday, August 09, 2020 - 04:47 AM UTC
Thanks guys!
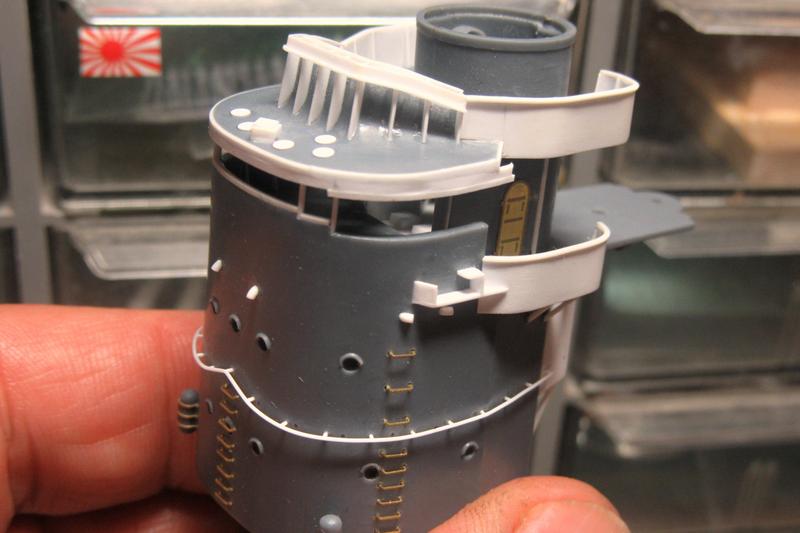
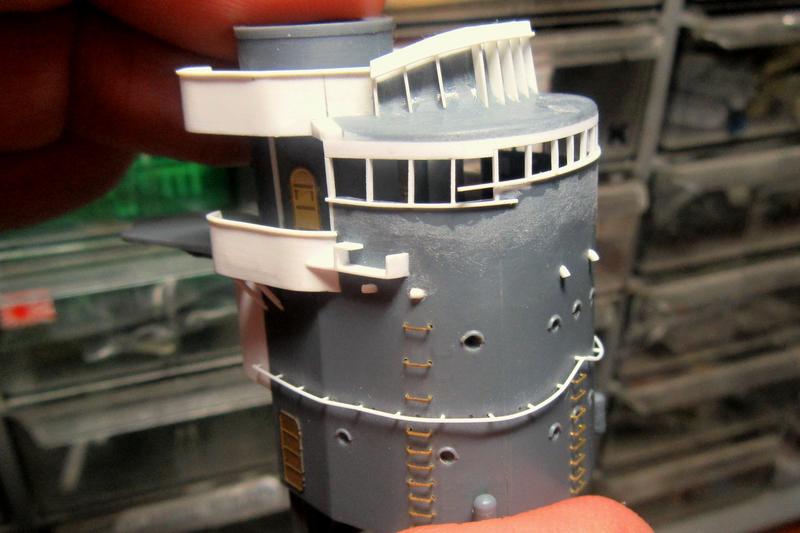
Gary, I know what you mean about finding references to answer all the questions that come up. For example, although I could find no photographs, there apparently were a group of small discs on top of the pilothouse roof. They would have been too small for a man to get through, but the 1/100 scale model in IJN Akizuki-class Destroyers Pacific War Series book shows them to open like little hatches. I suppose they must have been for ventilation.
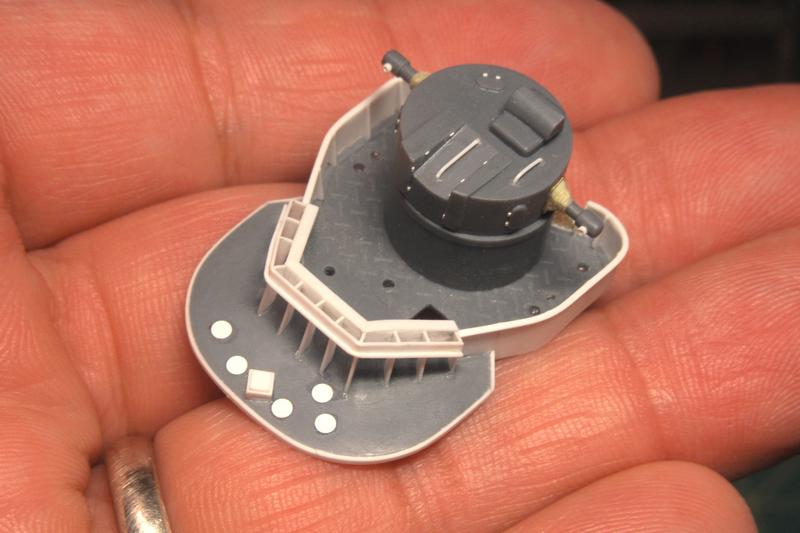
Whatever their purpose, I added five .063 inch discs (punched from paper-thin .005 inch plastic) to the navigation bridge roof.
There were also a pair of signalmans platforms on the navigation bridge roof edges.
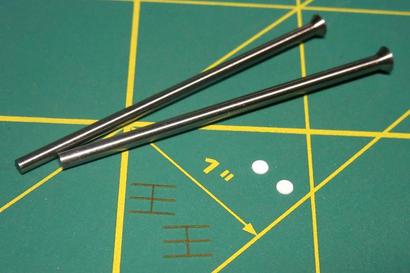
These were made with small sections of brass handrail from Gold Medal Models 1/200 IJN 2-Bar Railing set and .089 inch discs cut from .010 inch plastic sheet.
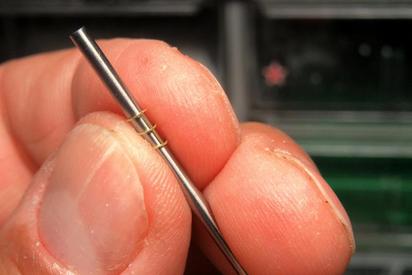
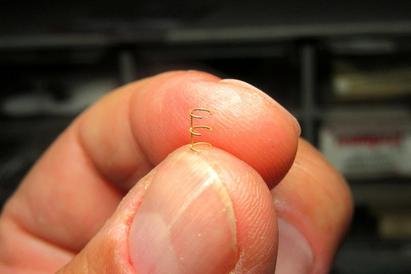
Rolled around the tap used to make the disc, the rails were formed into neat cylinder shapes. Then I wrapped them around the next smaller tap to help the brass to grip the disc bases when fitted over them.
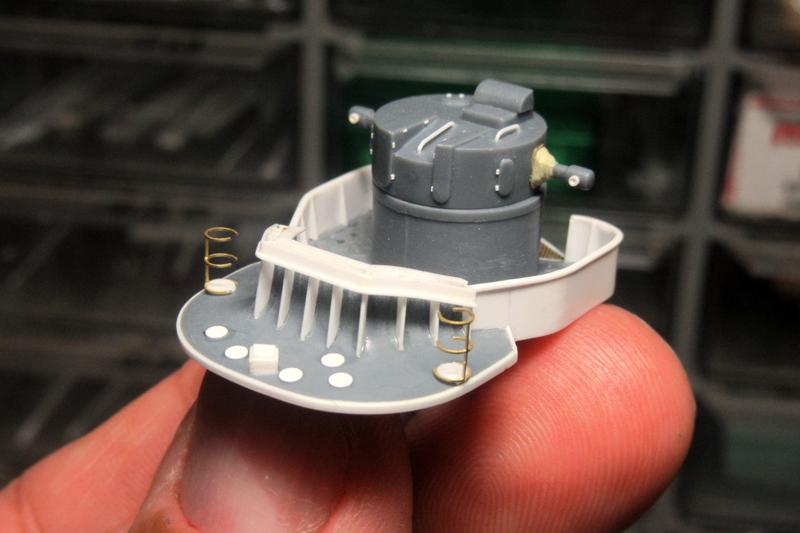

Perched on the extreme edges of the pilothouse roof, these little cages provided a modicum of safety for the signalmen in these precarious positions high above the main deck.
Gary, I know what you mean about finding references to answer all the questions that come up. For example, although I could find no photographs, there apparently were a group of small discs on top of the pilothouse roof. They would have been too small for a man to get through, but the 1/100 scale model in IJN Akizuki-class Destroyers Pacific War Series book shows them to open like little hatches. I suppose they must have been for ventilation.
Whatever their purpose, I added five .063 inch discs (punched from paper-thin .005 inch plastic) to the navigation bridge roof.
There were also a pair of signalmans platforms on the navigation bridge roof edges.
These were made with small sections of brass handrail from Gold Medal Models 1/200 IJN 2-Bar Railing set and .089 inch discs cut from .010 inch plastic sheet.
Rolled around the tap used to make the disc, the rails were formed into neat cylinder shapes. Then I wrapped them around the next smaller tap to help the brass to grip the disc bases when fitted over them.
Perched on the extreme edges of the pilothouse roof, these little cages provided a modicum of safety for the signalmen in these precarious positions high above the main deck.


RedDuster

Joined: March 01, 2010
KitMaker: 7,078 posts
Model Shipwrights: 6,649 posts

Posted: Sunday, August 09, 2020 - 06:30 AM UTC
Hi Tim,
The bridge roof is nice and busy. The signalman's positions look good, will you be adding the two end verticals and the top bar in the opening?
Cheers
Si
The bridge roof is nice and busy. The signalman's positions look good, will you be adding the two end verticals and the top bar in the opening?
Cheers
Si
TimReynaga
Joined: May 03, 2006
KitMaker: 2,500 posts
Model Shipwrights: 1,830 posts
Posted: Sunday, August 09, 2020 - 06:52 AM UTC
Quoted Text
Hi Tim,
The bridge roof is nice and busy. The signalman's positions look good, will you be adding the two end verticals and the top bar in the opening?
Cheers
Si
Definitely, especially the openable horizontal retainer on the top bar - we don't want our brave signalmen falling off now, do we?

TimReynaga
Joined: May 03, 2006
KitMaker: 2,500 posts
Model Shipwrights: 1,830 posts
Posted: Thursday, August 13, 2020 - 12:19 PM UTC
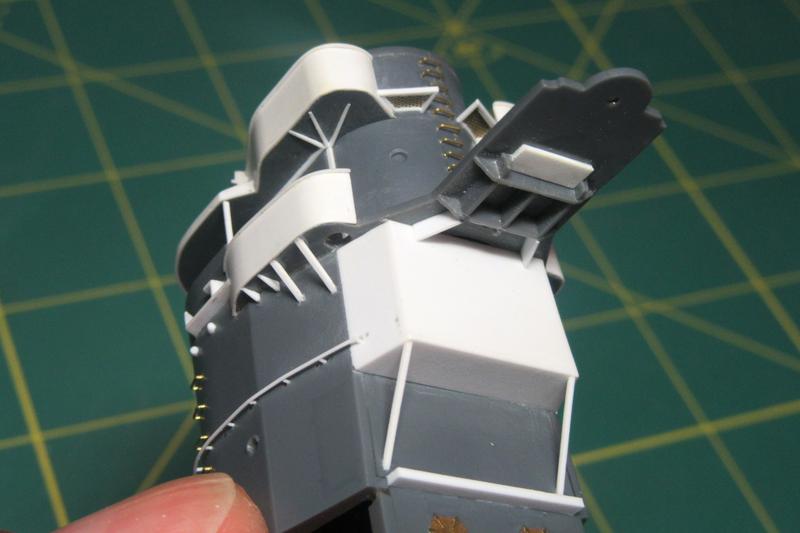
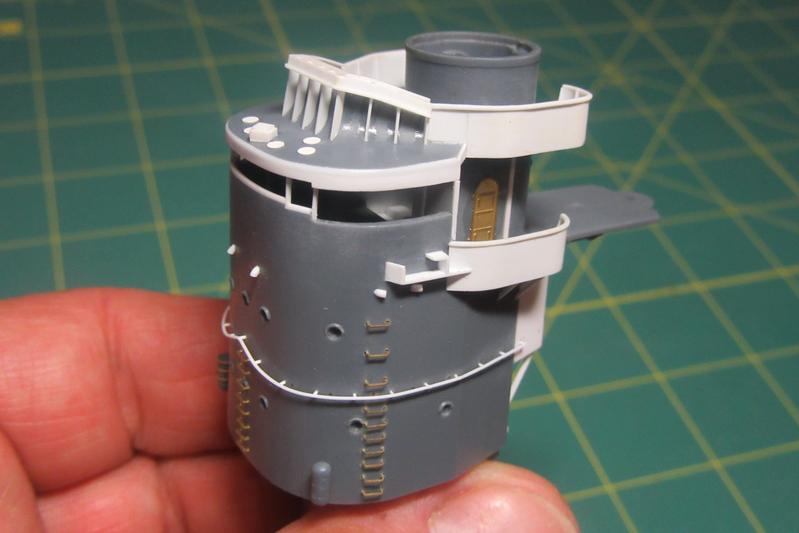
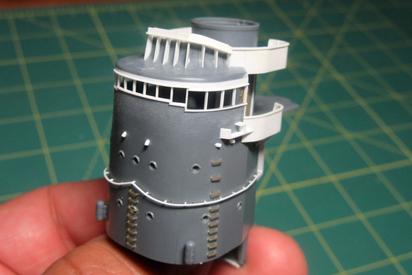
Having already added braces under the bridge wings, it seemed right to add a few under the upper air defense station too.
Next up: the bridge windows
RedDuster
Joined: March 01, 2010
KitMaker: 7,078 posts
Model Shipwrights: 6,649 posts
Posted: Friday, August 14, 2020 - 06:23 AM UTC
Glad to see your taking the health and safety of your crew into account. 
The structure all around the bridge looks very good indeed, nice and busy.
Cheers
Si
The structure all around the bridge looks very good indeed, nice and busy.
Cheers
Si

bwiber
Joined: August 03, 2008
KitMaker: 436 posts
Model Shipwrights: 31 posts
Posted: Saturday, August 15, 2020 - 08:59 AM UTC
Quoted Text
Though not as easy to work as styrene plastic, the new 3D printed parts go a long way to update Nichimos basic injection molded shapes.
Of course, all that white styrene does nothing towards updating the basic molded shapes... right?
Actually, you probably could have broken this down into several "kits". I mean you are adding enough detail to the bridge to make it almost a stand alone kit by itself. However, have to admit I am enjoying the heck out of this one.
Love the signal positions, not that I would be in a hurry to hop into one of them. Not that I would fit anymore...
Bob

Kevlar06
Joined: March 15, 2009
KitMaker: 3,670 posts
Model Shipwrights: 173 posts

Posted: Saturday, August 15, 2020 - 10:50 AM UTC
What I want to know is how often Tim has to visit the optometrist. Id go cross eyed putting all that detail into a ship kit at the rate he builds this stuff. He must also have tweezers for fingers, cause theres no way Id be able to handle detail like the PE signal posts without crushing them in my fat fingers. Bravo Tim!
VR, Russ
VR, Russ

RussellE
#306
Joined: June 27, 2010
KitMaker: 3,959 posts
Model Shipwrights: 2,777 posts
Posted: Sunday, August 16, 2020 - 01:07 PM UTC
Wow Tim! This will look amazing when it's all assembled 

TimReynaga
Joined: May 03, 2006
KitMaker: 2,500 posts
Model Shipwrights: 1,830 posts
Posted: Tuesday, August 18, 2020 - 03:07 PM UTC
Quoted Text
What I want to know is how often Tim has to visit the optometrist. Id go cross eyed putting all that detail into a ship kit at the rate he builds this stuff. He must also have tweezers for fingers, cause theres no way Id be able to handle detail like the PE signal posts without crushing them in my fat fingers. Bravo Tim!
VR, Russ
You will laugh, but my high tech optical boost system consists of a pair of Dollar Store reading glasses with lenses from a second pair taped over them to double the magnification.
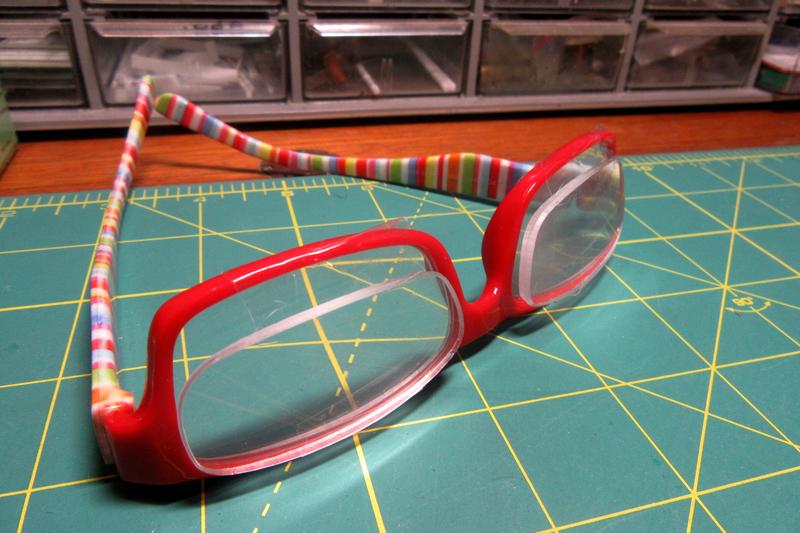
Really, these are what I use!

GazzaS
#424
Joined: April 23, 2015
KitMaker: 4,648 posts
Model Shipwrights: 249 posts
Posted: Tuesday, August 18, 2020 - 07:01 PM UTC
Love the supports. I wish they were modeled more often.

Ripster

Joined: June 01, 2005
KitMaker: 970 posts
Model Shipwrights: 446 posts

Posted: Tuesday, August 18, 2020 - 07:24 PM UTC
Quoted Text
You will laugh, but my high tech optical boost system consists of a pair of Dollar Store reading glasses with lenses from a second pair taped over them to double the magnification.
Really, these are what I use!
Nice, restrained colour scheme there!
TimReynaga
Joined: May 03, 2006
KitMaker: 2,500 posts
Model Shipwrights: 1,830 posts
Posted: Thursday, August 20, 2020 - 01:28 AM UTC
Quoted Text
Quoted Text
You will laugh, but my high tech optical boost system consists of a pair of Dollar Store reading glasses with lenses from a second pair taped over them to double the magnification.
Really, these are what I use!
Nice, restrained colour scheme there!
I know - my 16 year old daughter just shakes her head...
TimReynaga
Joined: May 03, 2006
KitMaker: 2,500 posts
Model Shipwrights: 1,830 posts
Posted: Thursday, August 20, 2020 - 02:00 AM UTC
Quoted Text
Actually, you probably could have broken this down into several "kits". I mean you are adding enough detail to the bridge to make it almost a stand alone kit by itself. However, have to admit I am enjoying the heck out of this one.
Bob
Thanks Bob. You are right, in this larger scale it seems every assembly seems to turn into a mini project unto itself!
Speaking of which... with the basics of the bridge structure in place, I made a start on the windows.

I initially thought this would be a simple matter of inserting window frames from .010X.020 strip... but when test fitted they just didnt look quite right. Comparing it with photos, I realized the windows were too tall and too uniform especially at the top.
Part of the solution was to add a shim to the underside of the roof...
Shims were also added to the lower parts of the front windows and an additional shim added to the roof of each side.
These measures did reduce the various windows to the correct heights, but now that I've smoothed and faired everything in it has become evident that my changes also created an inaccurate overhang, giving the bridge face a sort of heavy brow ridge. Yuck.


d6mst0
#453
Joined: August 28, 2016
KitMaker: 1,925 posts
Model Shipwrights: 1,298 posts

Posted: Thursday, August 20, 2020 - 02:21 AM UTC
Tim,
Your modification for the windows sure reduced the view looking out from the bridge. Was that the design of the ship? Kinda reminds me of the low windows on a Chrysler 300 sedan.
Mark
Your modification for the windows sure reduced the view looking out from the bridge. Was that the design of the ship? Kinda reminds me of the low windows on a Chrysler 300 sedan.
Mark
TimReynaga
Joined: May 03, 2006
KitMaker: 2,500 posts
Model Shipwrights: 1,830 posts
Posted: Thursday, August 20, 2020 - 05:10 AM UTC
Quoted Text
Tim,
Your modification for the windows sure reduced the view looking out from the bridge. Was that the design of the ship? Kinda reminds me of the low windows on a Chrysler 300 sedan.
Mark
Mark, yes, the smaller windows forward were how the ship was designed. Take a look at this pic of near-sister Harutzuki:
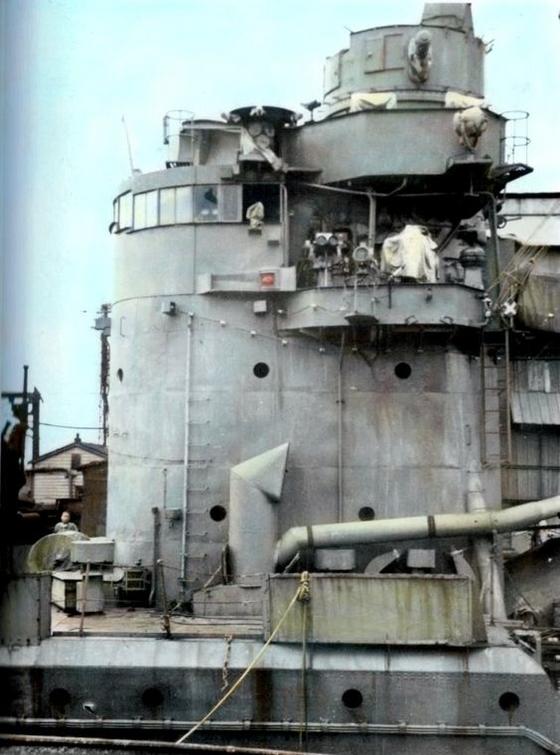
You can see that the windows are largest at the sides and they get smaller going towards the bow.
Unfortunately, you can also see that my changes on the model made an inaccurate overhang... I'll have to figure out how to fix that!

JJ1973
#345
Joined: August 22, 2011
KitMaker: 1,835 posts
Model Shipwrights: 1,832 posts
Posted: Thursday, August 20, 2020 - 07:25 AM UTC
Wow Tim,
this is simply amazing! As was said by everyone before... Just brilliant how you look into every single detail! I hope you'll find a solution to the overhang - your bridge looks just marvelous!
Cheers
Jan
this is simply amazing! As was said by everyone before... Just brilliant how you look into every single detail! I hope you'll find a solution to the overhang - your bridge looks just marvelous!
Cheers
Jan
RussellE
#306
Joined: June 27, 2010
KitMaker: 3,959 posts
Model Shipwrights: 2,777 posts
Posted: Thursday, August 20, 2020 - 08:38 PM UTC
Quoted Text
These measures did reduce the various windows to the correct heights, but now that I've smoothed and faired everything in it has become evident that my changes also created an inaccurate overhang, giving the bridge face a sort of heavy brow ridge. Yuck.
Ooo, tough dilemma, Tim... Short of pulling off the plastic sheeting and recessing it back in, I can't think of anything...

TimReynaga
Joined: May 03, 2006
KitMaker: 2,500 posts
Model Shipwrights: 1,830 posts
Posted: Friday, August 21, 2020 - 02:09 AM UTC
Quoted Text
Wow Tim,
this is simply amazing! As was said by everyone before... Just brilliant how you look into every single detail! I hope you'll find a solution to the overhang - your bridge looks just marvelous!
Cheers
Jan
Quoted Text
Ooo, tough dilemma, Tim... Short of pulling off the plastic sheeting and recessing it back in, I can't think of anything...
Thanks Jan & Russ. Even though the job on the bridge window frames was pretty much done and mostly correct, I just couldnt think of a clever solution to that ugly overhang so last night I cut away all the shims on the roof ...

My workday begins soon this morning, but this weekend (after I regain my composure!) Ill hit it again.
Kevlar06
Joined: March 15, 2009
KitMaker: 3,670 posts
Model Shipwrights: 173 posts
Posted: Friday, August 21, 2020 - 05:44 AM UTC
Quoted Text
Quoted TextWhat I want to know is how often Tim has to visit the optometrist. Id go cross eyed putting all that detail into a ship kit at the rate he builds this stuff. He must also have tweezers for fingers, cause theres no way Id be able to handle detail like the PE signal posts without crushing them in my fat fingers. Bravo Tim!
VR, Russ
You will laugh, but my high tech optical boost system consists of a pair of Dollar Store reading glasses with lenses from a second pair taped over them to double the magnification.
Really, these are what I use!
Tim,
Looking good! Necessity is the mother of invention they say. I think theyre great! Do you play Elton John music while wearing them? I used to have an optivisor, but I also wear trifocals, and found the combination a real pain to manage. In fact, Id take my glasses off to work small details with (Im nearsighted), but lately, as Ive gotten even older, Ive found I need something else, so like you, I have the same kind of set up. I bought a cheap pair of +3 reading magnifiers, and a set of +2 and +3 clip ons from Micro-Mark that I just clip over the cheapo magnifiers, that way I can flip them up when I need to change the diopter. But I have to admit, theyre not as stylish as yours
As for the windows, I think theyre fine as is, but, knowing you are a detail and fashion perfectionist now (by seeing your glasses), Im sure youve thought about it already, but you could trim it all off, and place the styrene strip on the underside of the overhang, rather than the edge. That would bring the trim down, with no overbite. But if you look at the windows in the photo, I think theyre all the same size its just the ones facing the bow are placed higher than the ones to port or starboard, so youd only need to have the trim on the overhang on the port and starboard side, with no trim facing the bow, and then run a strip under the bow windows to raise them. My two cents worth. This is going to really be something when finished.
VR, Russ
TimReynaga
Joined: May 03, 2006
KitMaker: 2,500 posts
Model Shipwrights: 1,830 posts
Posted: Friday, August 21, 2020 - 09:02 AM UTC
Quoted Text
Tim,
Looking good! Necessity is the mother of invention they say. I think theyre great! Do you play Elton John music while wearing them? I used to have an optivisor, but I also wear trifocals, and found the combination a real pain to manage. In fact, Id take my glasses off to work small details with (Im nearsighted), but lately, as Ive gotten even older, Ive found I need something else, so like you, I have the same kind of set up. I bought a cheap pair of +3 reading magnifiers, and a set of +2 and +3 clip ons from Micro-Mark that I just clip over the cheapo magnifiers, that way I can flip them up when I need to change the diopter. But I have to admit, theyre not as stylish as yours
LOL! I actually have another pair of Dollar Store readers with rhinestones that my wife refuses to let me wear...
TimReynaga
Joined: May 03, 2006
KitMaker: 2,500 posts
Model Shipwrights: 1,830 posts
Posted: Friday, August 21, 2020 - 09:06 AM UTC
Quoted Text
As for the windows... you could trim it all off, and place the styrene strip on the underside of the overhang, rather than the edge. That would bring the trim down, with no overbite. But if you look at the windows in the photo, I think theyre all the same size its just the ones facing the bow are placed higher than the ones to port or starboard, so youd only need to have the trim on the overhang on the port and starboard side, with no trim facing the bow, and then run a strip under the bow windows to raise them. My two cents worth. This is going to really be something when finished.
VR, Russ
Thanks Russ, I think you have the right idea to attach the styrene strip on the underside of the overhang rather than on the edge. Oddly, the forward windows really were a bit smaller. Check out this view of Harutzuki:
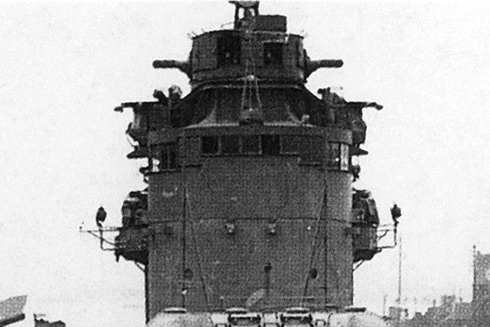
Anyway, Ive already done the tear-down... I just need get up the gumption to build it all back up again.

Kevlar06
Joined: March 15, 2009
KitMaker: 3,670 posts
Model Shipwrights: 173 posts
Posted: Friday, August 21, 2020 - 10:05 AM UTC
Tim,
Yes, that bow shot of the bridge does tell the story better, those windows are smaller and look square in comparison to the port and starboard windows, which look rectangular. But I have no doubt you'll figure it out. Can't wait till you show us how you did it.
I think you you should save the rhinestone glasses for special occasions, like when you place the last bit of detail onto the model! I have a celebratory ritual that I go through-- I have a special hat I put on to let my family know I've finished it. It's a baseball hat given to me by the Commander of the Japanese 6th Infantry Division in 1988, during a trip to Sendai Japan. It's significantly gaudy with lots of "scrambled eggs" and braid. I call it my "Triumphant Admiral of the Horse Marines Cap", and wear it when I place the last finishing detail. That way my family knows its safe to approach, and the swearing will stop.
VR Russ
TimReynaga
Joined: May 03, 2006
KitMaker: 2,500 posts
Model Shipwrights: 1,830 posts
Posted: Sunday, August 23, 2020 - 03:33 PM UTC
Russ, I love your crazy completion ceremonial cap - brilliant! I'll have to institute something similar myself so - as you say - my family will know that the swearing has stopped and it is safe to approach!
As for Hatsuzuki, it will be a while until that day, but I am making progress
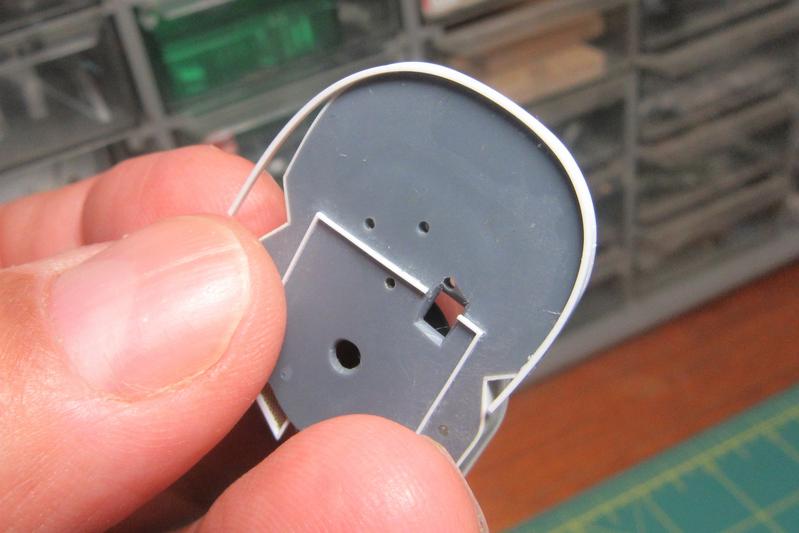
Taking another look at the roof after removing the shims, I was able to identify the mistake I had made:
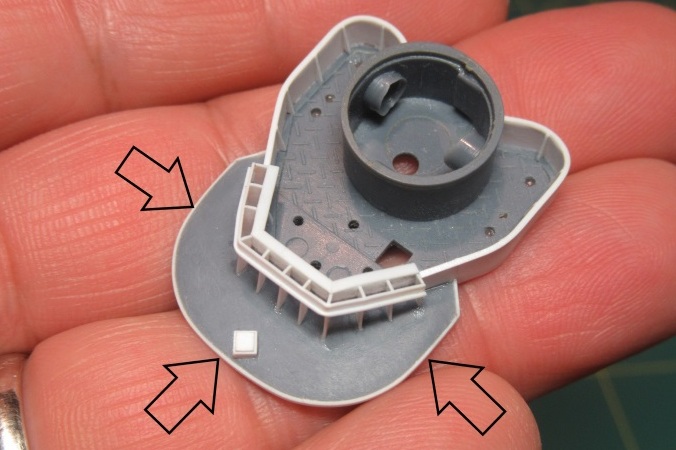
I'd previously added a thin strip around the perimeter of the roof to sharpen the outline, but in doing so I had also disrupted the geometry of the structure. This became painfully evident when I started to add the windows!
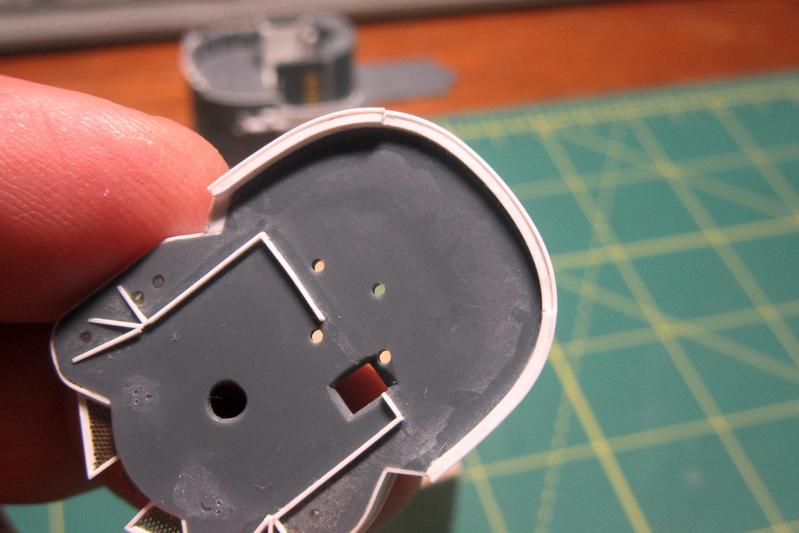
After trimming the roof edge to even it up again with the lower part of the structure, I fitted new shims. Now things line up perfectly. This time I also included a small ridge fitted to the outer edge of the roof shim from .010X.010 strip.
This new shim would stand a modest .010 (two scale inches) proud of the structure to frame the windows. I also added similar pieces to the lower frames.

Cleaned up and test fitted with the vertical frames in place, the assembly captures the look of the Hatsuzukis windows much more successfully than my first attempt!
As for Hatsuzuki, it will be a while until that day, but I am making progress
Taking another look at the roof after removing the shims, I was able to identify the mistake I had made:
I'd previously added a thin strip around the perimeter of the roof to sharpen the outline, but in doing so I had also disrupted the geometry of the structure. This became painfully evident when I started to add the windows!
After trimming the roof edge to even it up again with the lower part of the structure, I fitted new shims. Now things line up perfectly. This time I also included a small ridge fitted to the outer edge of the roof shim from .010X.010 strip.
This new shim would stand a modest .010 (two scale inches) proud of the structure to frame the windows. I also added similar pieces to the lower frames.
Cleaned up and test fitted with the vertical frames in place, the assembly captures the look of the Hatsuzukis windows much more successfully than my first attempt!
 |

WEB HOSTING BY


Copyright ©2021 Model Shipwrights and Kitmaker Network, a subsidiary of Silver Star Enterprises
All Rights Reserved. Please read our Conditions of Use and Privacy Policy.
All Rights Reserved. Please read our Conditions of Use and Privacy Policy.