Ships by Class/Type: Destroyers
This forum covers all types of destroyers from all eras.
1/200 Nichimo Hatsuzuki build
TimReynaga
Staff MemberAssociate Editor
MODEL SHIPWRIGHTS
Visit this Community
California, United States
Joined: May 03, 2006
KitMaker: 2,500 posts
Model Shipwrights: 1,830 posts
Posted: Monday, July 13, 2020 - 01:41 AM UTC
Thanks guys! I'm not fond of rework, but sometimes it is worth the effort.

Nichimo had provided molded-in doors on the bridge structure – including one inaccurately placed on the portside at foredeck level which would have been impossible to use due to the discharge and vent pipes located there! Anyway, all the doors were a little crude, so I removed them.

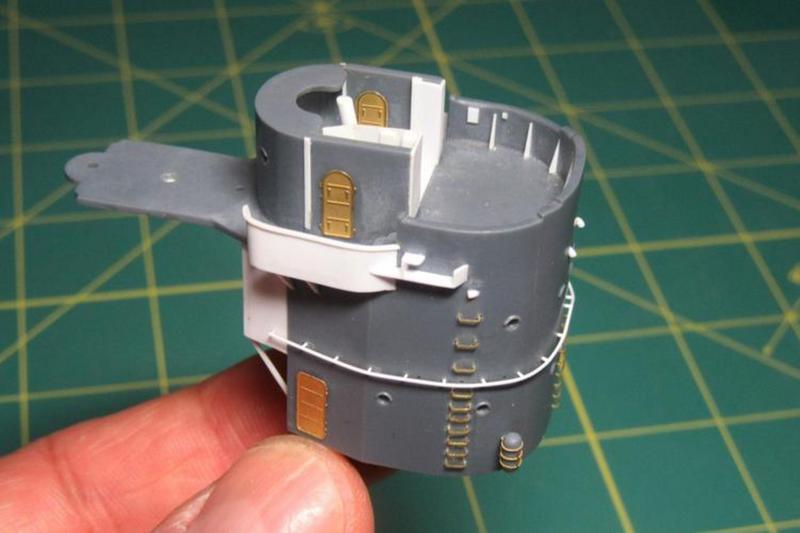
Replacing these are photoetch brass doors from Tom’s Modelworks 1/200 IJN Doors set (No. 2017). I also installed one to represent the inner face of the door in the chartroom. It will be almost impossible to see in the dark space in there through those small bridge windows, but why not?


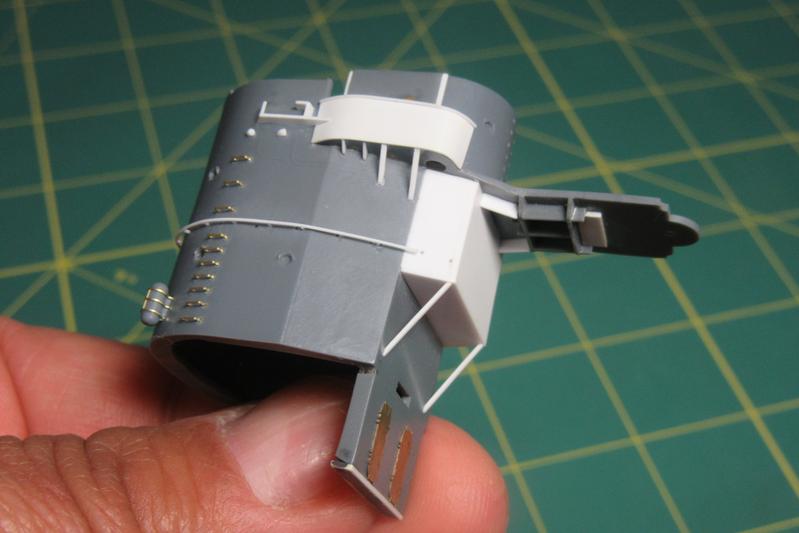
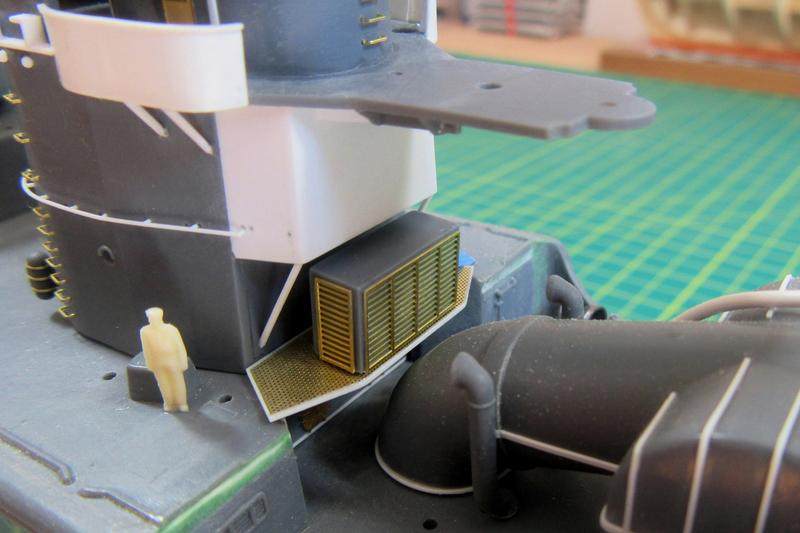
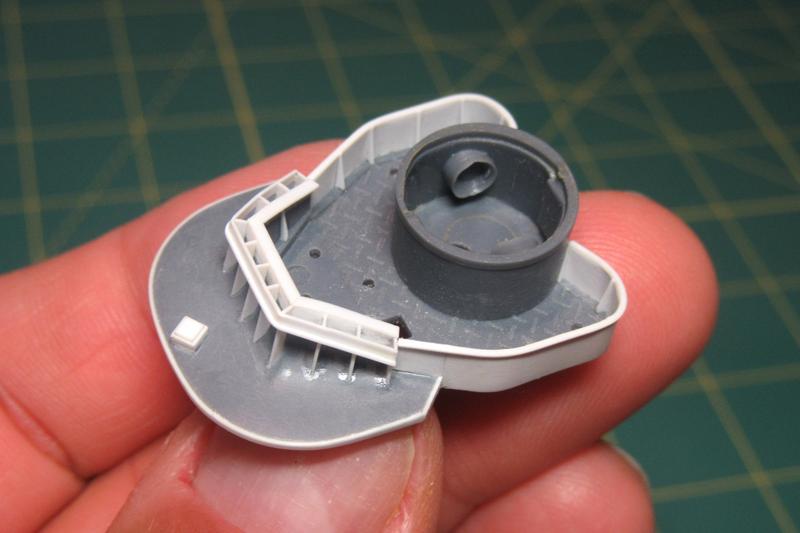
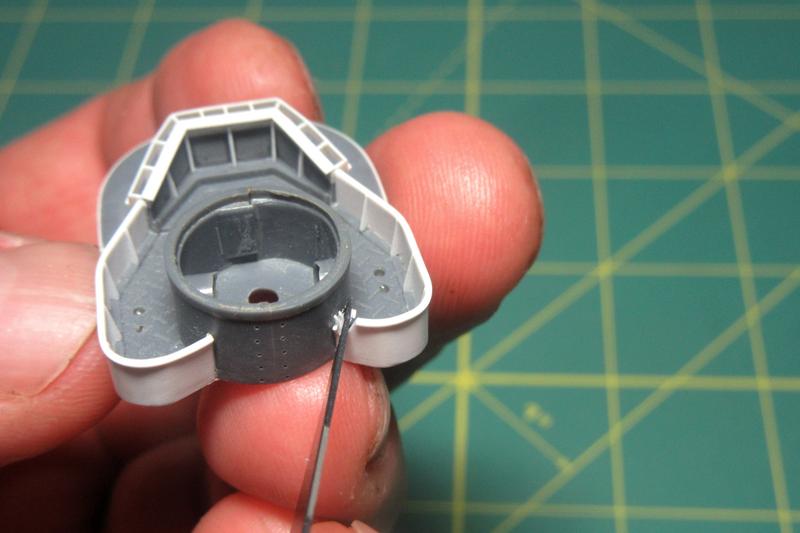
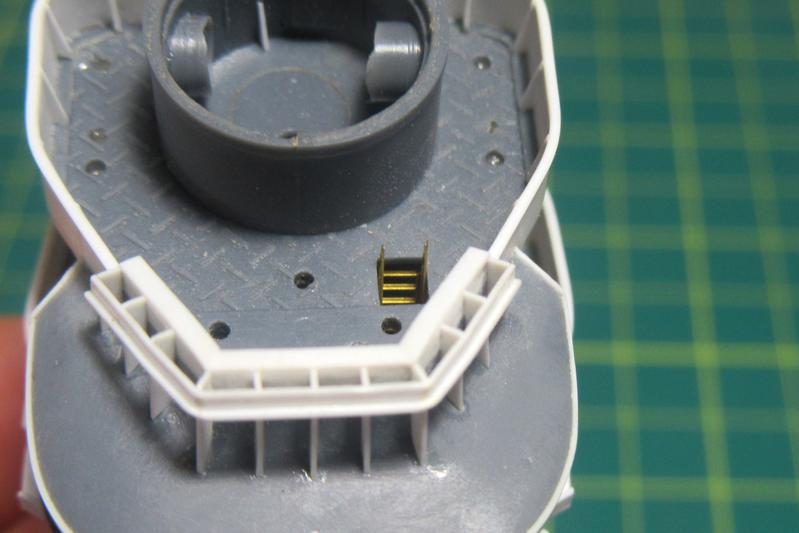
Also added were the various supports under the bridge wing platforms and beneath the radar room aft. These supports varied among ships of the class, and they aren’t discernable on the only surviving photo of Hatsuzuki. I followed the configuration of the bridge wing supports on her sister Akizuki with the forward two being wedges and the next two being free standing buttresses.


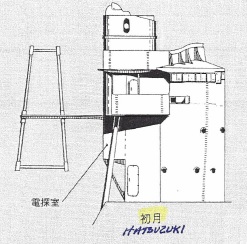
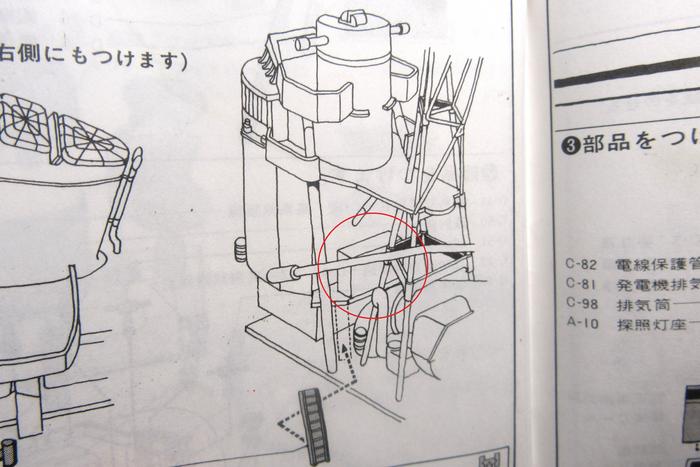
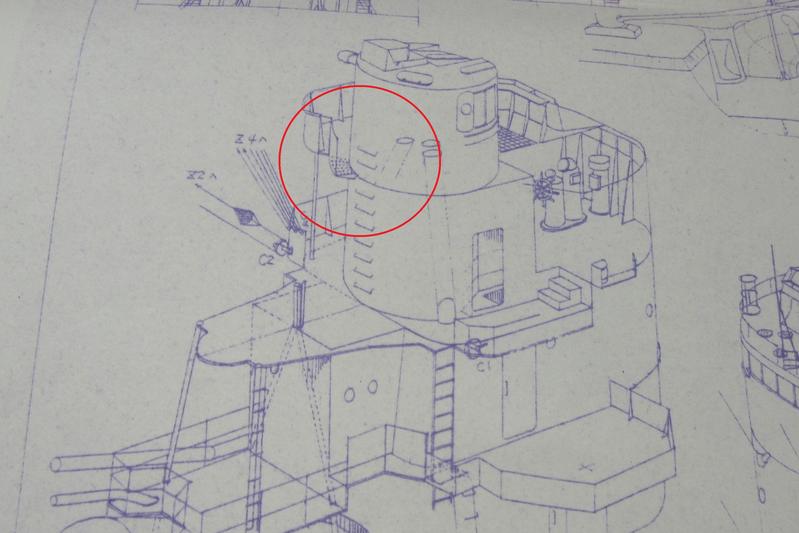
As for the supports for the overhanging “electric searching room” (radar room), I followed the above drawing from IJN Akizuki-class Destroyers Pacific War Series Volume 23, Gakken Reikishi-Gunzo (ISBN 4-05-602063-9 C9421).
RedDuster
Visit this Community
England - South East, United Kingdom
Joined: March 01, 2010
KitMaker: 7,078 posts
Model Shipwrights: 6,649 posts
Posted: Monday, July 13, 2020 - 05:45 AM UTC
Nice work Tim,

The scratchbuilt hand / foot rail is a great improvement, the bridge structure is really coming together.

Cheers

Si

Sleepwalker71
Visit this Community
Singapore / 新加坡
Joined: August 30, 2012
KitMaker: 265 posts
Model Shipwrights: 5 posts
Posted: Monday, July 13, 2020 - 12:39 PM UTC
Tim, you glued on thin styrene rail to the stanchions with Tamiya Extra Thin glue. How did you do this? From my experience when I tried similarly approach the thin styrene rod was breaking down instantly once I applied the glue. My wild guess is a minimal amount of the glue used at the moment, so the rod is not getting melted instantly.
TimReynaga
Staff MemberAssociate Editor
MODEL SHIPWRIGHTS
Visit this Community
California, United States
Joined: May 03, 2006
KitMaker: 2,500 posts
Model Shipwrights: 1,830 posts
Posted: Monday, July 13, 2020 - 02:09 PM UTC

Quoted Text

Tim, you glued on thin styrene rail to the stanchions with Tamiya Extra Thin glue. How did you do this? From my experience when I tried similarly approach the thin styrene rod was breaking down instantly once I applied the glue. My wild guess is a minimal amount of the glue used at the moment, so the rod is not getting melted instantly.


Hi Damian,

Exactly! The Tamiya extra thin stuff is quite powerful, so I brush on only the absolute minimum necessary on those delicate (.010 inch!) bits of polystyrene rod. I like it because, despite is difficulties, it creates great chemical welds on those tiny plastic parts. Once dry the assemblies are surprisingly tough.
GazzaS
#424
Visit this Community
Queensland, Australia
Joined: April 23, 2015
KitMaker: 4,648 posts
Model Shipwrights: 249 posts
Posted: Monday, July 13, 2020 - 04:14 PM UTC
Beautiful work, Tim!
RussellE
#306
Visit this Community
Victoria, Australia
Joined: June 27, 2010
KitMaker: 3,959 posts
Model Shipwrights: 2,777 posts
Posted: Friday, July 17, 2020 - 01:18 AM UTC
continuing to add awesome details Tim
TimReynaga
Staff MemberAssociate Editor
MODEL SHIPWRIGHTS
Visit this Community
California, United States
Joined: May 03, 2006
KitMaker: 2,500 posts
Model Shipwrights: 1,830 posts
Posted: Sunday, July 19, 2020 - 11:54 AM UTC
Tucked in at the back of Hatsuzuki’s bridge structure below the radar room was a large box on a small platform.

Nichimo’s instruction sheet shows it in place, but the unfamiliar language left me clueless as to what it was. Fortunately, my Japanese friend enlightened me – it was a vegetable locker! It may seem strange to keep food in storage outside the ship like that, but in an era before refrigeration was common this arrangement on ships was not unusual.


The kit parts look reasonable enough, but an item of such vital importance deserves an upgrade!


I started with the platform. Rather than reworking the kit part, I simply used it as a guide to cut a piece of perforated .5mm etched brass sheet from Special Shapes (item SSM-15) and then framed it with Evergreen .010 X .020 inch plastic strip.


As for the locker itself, the kit part seemed too plain. I couldn’t find any pictures of a Japanese version, but this image of the spud locker on the USS Arizona wreck (it is the box under the flag platform) shows it to have been louvered. Japanese vegetable lockers differed in style, but they too would undoubtedly have had vents to enable air circulation.


To simulate louvered vents, I borrowed screens from the Gold Medal Models 1/200 scale Gold Plus Yamato Details set.


Test fitted and placed under temporary guard, the little veg locker stands ready to victual Hatsuzuki’s 300 men!
rdt1953
Visit this Community
New Jersey, United States
Joined: February 06, 2015
KitMaker: 1,098 posts
Model Shipwrights: 34 posts
Posted: Sunday, July 19, 2020 - 12:52 PM UTC
Yoku dekimashita Tim-san
d6mst0
#453
Visit this Community
Texas, United States
Joined: August 28, 2016
KitMaker: 1,925 posts
Model Shipwrights: 1,298 posts
Posted: Sunday, July 19, 2020 - 09:21 PM UTC
Tim,

Gold Metal Model PE kit for the Liberty ship kit from Trumpeter comes with a potato bin that sits on the upper deck of the superstructure. Looks a lot like your bin.

Mark
McRunty
#491
Visit this Community
Missouri, United States
Joined: April 06, 2016
KitMaker: 602 posts
Model Shipwrights: 349 posts
Posted: Monday, July 20, 2020 - 02:31 AM UTC


Awesome attention to detail!
RedDuster
Visit this Community
England - South East, United Kingdom
Joined: March 01, 2010
KitMaker: 7,078 posts
Model Shipwrights: 6,649 posts
Posted: Monday, July 20, 2020 - 06:34 AM UTC
Nice detail up job Tim,

That will add depth to look of the model.

Cheers

Si
TimReynaga
Staff MemberAssociate Editor
MODEL SHIPWRIGHTS
Visit this Community
California, United States
Joined: May 03, 2006
KitMaker: 2,500 posts
Model Shipwrights: 1,830 posts
Posted: Friday, July 24, 2020 - 03:22 PM UTC
Thanks guys!

Moving along to the top of the bridge structure, I took another look at the improvements previously made to the upper air defense station.

I’d followed Nichimo’s original depiction and enclosed the bulwarks just behind the round mount for the type 94 fire director.


Unfortunately, a closer look at the Miyuki-Kai plans revealed that the real bulwarks there were actually open aft to allow access from the level below... so a bit of revision was needed.


It’s never fun slicing into previous construction work!


With the bulwarks opened up, I added small access platforms cut from the same perforated .5mm etched brass sheet from Special Shapes that I had used for the vegetable locker platform. As with that larger platform, these were framed with Evergreen .010 X .020 inch plastic strip.


With the ladder rungs in place the logic of this arrangement is evident; without the access platforms and bulwark openings, a ladder in that location wouldn’t have made much sense!


rdt1953
Visit this Community
New Jersey, United States
Joined: February 06, 2015
KitMaker: 1,098 posts
Model Shipwrights: 34 posts
Posted: Friday, July 24, 2020 - 08:50 PM UTC
Tim - more nice work ! Really enjoy following your build .
I am curious- are turned brass barrels available for the weapons ?
d6mst0
#453
Visit this Community
Texas, United States
Joined: August 28, 2016
KitMaker: 1,925 posts
Model Shipwrights: 1,298 posts
Posted: Friday, July 24, 2020 - 09:48 PM UTC
Tim,
Good catch,I didn't notice the platform until you pointed it out. Nice work on placing those ladder rungs.

Mark
SpeedyJ
Visit this Community
Bangkok, Thailand / ไทย
Joined: September 17, 2013
KitMaker: 1,617 posts
Model Shipwrights: 44 posts
Posted: Saturday, July 25, 2020 - 12:26 AM UTC
Great work Tim. I have to get me a ship some where, some how, some time. You really got me hanging on.
RussellE
#306
Visit this Community
Victoria, Australia
Joined: June 27, 2010
KitMaker: 3,959 posts
Model Shipwrights: 2,777 posts
Posted: Sunday, July 26, 2020 - 12:50 PM UTC

Quoted Text

It’s never fun slicing into previous construction work!


But you make it look so easy, Tim

And the results speak for themselves! Excellent!
TimReynaga
Staff MemberAssociate Editor
MODEL SHIPWRIGHTS
Visit this Community
California, United States
Joined: May 03, 2006
KitMaker: 2,500 posts
Model Shipwrights: 1,830 posts
Posted: Sunday, July 26, 2020 - 02:36 PM UTC

Quoted Text

Tim - more nice work ! Really enjoy following your build. I am curious - are turned brass barrels available for the weapons?


Thanks Richard! Turned brass barrels for old kits, particularly in 1/200 scale, aren’t easy to come by, but in this case I was lucky:


Several years ago Fukuya of Japan released a set of 10cm barrels especially for this kit.


Even better, Veteran Models has recently released some spectacular 25mm triple mounts. The kit parts are reasonable, but these parts are definitely next-level!


TimReynaga
Staff MemberAssociate Editor
MODEL SHIPWRIGHTS
Visit this Community
California, United States
Joined: May 03, 2006
KitMaker: 2,500 posts
Model Shipwrights: 1,830 posts
Posted: Sunday, July 26, 2020 - 02:39 PM UTC

Quoted Text

Tim,
Good catch,I didn't notice the platform until you pointed it out. Nice work on placing those ladder rungs.

Mark


Thanks Mark. The jig for locating the ladder rungs included with the Gold Medal Models etch set was a godsend!
TimReynaga
Staff MemberAssociate Editor
MODEL SHIPWRIGHTS
Visit this Community
California, United States
Joined: May 03, 2006
KitMaker: 2,500 posts
Model Shipwrights: 1,830 posts
Posted: Sunday, July 26, 2020 - 02:40 PM UTC

Quoted Text

Great work Tim. I have to get me a ship some where, some how, some time. You really got me hanging on.


Welcome to the wet-side, Robert!

TimReynaga
Staff MemberAssociate Editor
MODEL SHIPWRIGHTS
Visit this Community
California, United States
Joined: May 03, 2006
KitMaker: 2,500 posts
Model Shipwrights: 1,830 posts
Posted: Sunday, July 26, 2020 - 02:42 PM UTC

Quoted Text


Quoted Text

It’s never fun slicing into previous construction work!


But you make it look so easy, Tim

And the results speak for themselves! Excellent!


Thanks Russ. I guess construction does look easy when prettied up and posted online – and no one has to listen to all the harsh language which attended the re-work!

GazzaS
#424
Visit this Community
Queensland, Australia
Joined: April 23, 2015
KitMaker: 4,648 posts
Model Shipwrights: 249 posts
Posted: Sunday, July 26, 2020 - 09:30 PM UTC
Looking good, Tim! Love the details!
TimReynaga
Staff MemberAssociate Editor
MODEL SHIPWRIGHTS
Visit this Community
California, United States
Joined: May 03, 2006
KitMaker: 2,500 posts
Model Shipwrights: 1,830 posts
Posted: Wednesday, July 29, 2020 - 01:55 AM UTC

Quoted Text

Looking good, Tim! Love the details!


Thanks Gary - the fun never seems to end!

The other means of access to the upper air defense station was from inside the navigation bridge.

Nichimo omitted this detail, so I cut an opening in the upper deck to accommodate an inclined ladder.


The inclined ladder is an etched brass part from Gold Medal Models’ 1/350 scale USS Hornet set. The scale should make the part undersized for 1/200, but it has great detail and fits pretty well with my 1/200 sailor, so why not?


Here the ladder is test fitted in the navigation bridge. The plans I consulted showed a couple of supports in there too, so these were added from .010”X.020” strip.
d6mst0
#453
Visit this Community
Texas, United States
Joined: August 28, 2016
KitMaker: 1,925 posts
Model Shipwrights: 1,298 posts
Posted: Wednesday, July 29, 2020 - 02:08 AM UTC
Tim,

Really nice work. At first I thought the ladder was glued in and was wonder what product you used to have such a clean setting. I switched to Gator glue from CA as it seems easier to work with.

Mark
RedDuster
Visit this Community
England - South East, United Kingdom
Joined: March 01, 2010
KitMaker: 7,078 posts
Model Shipwrights: 6,649 posts
Posted: Wednesday, July 29, 2020 - 03:34 AM UTC
Hi Tim,

Nice progress, the 1/350th ladder looks pretty good in place.

The veteran triple 25mm look a bit good too.

Cheers

Si
TimReynaga
Staff MemberAssociate Editor
MODEL SHIPWRIGHTS
Visit this Community
California, United States
Joined: May 03, 2006
KitMaker: 2,500 posts
Model Shipwrights: 1,830 posts
Posted: Wednesday, July 29, 2020 - 07:23 AM UTC

Quoted Text

Tim,

Really nice work. At first I thought the ladder was glued in and was wonder what product you used to have such a clean setting. I switched to Gator glue from CA as it seems easier to work with.

Mark


Hi Mark,

The ladder was actually just temporarily tacked in place with white glue for the photographs. There is quite a bit of work still to do in this area and I don't want to damage it! When the time comes I'll probably use cyanoacrylate; admittedly it is not the easiest adhesive to use, but the bonds are tough and last essentially forever.