

Loving the detail work Tim. You make it look so easy. I know there's probably a lot of redo's and choice words involved too. Just enjoying watching a master at work.
John


Go to modelshipwrights.com for the current dynamic site!
Hosted by Jim Starkweather
1/200 Nichimo Hatsuzuki build

YellowHammer

#513

Joined: March 28, 2006
KitMaker: 554 posts
Model Shipwrights: 219 posts

Posted: Monday, March 30, 2020 - 03:59 PM UTC

RussellE

#306

Joined: June 27, 2010
KitMaker: 3,959 posts
Model Shipwrights: 2,777 posts

Posted: Monday, March 30, 2020 - 09:37 PM UTC
Quoted Text
Quoted Texthand rails, hand grabs, new oxygen pipes! Oh my!
No kidding... can you tell I've been shut in all weekend?


TimReynaga
Joined: May 03, 2006
KitMaker: 2,500 posts
Model Shipwrights: 1,830 posts
Posted: Tuesday, March 31, 2020 - 05:05 AM UTC
Quoted Text
Nice progress Tim,
What the other guys have said, I do like the individual steps on the iron ladders, and the handrails look very impressive. The screens on the vents look pretty good, I think they will blend in under a coat of paint.
Enjoying the watching the build come on.
Cheers
Si
Thanks, Si, I agree they'll probably look better under paint, but those screens just don't quite work for me...

TimReynaga
Joined: May 03, 2006
KitMaker: 2,500 posts
Model Shipwrights: 1,830 posts
Posted: Tuesday, March 31, 2020 - 05:14 AM UTC
Quoted Text
...I know there's probably a lot of redo's and choice words involved too...
John
Thanks John, you are right about both!
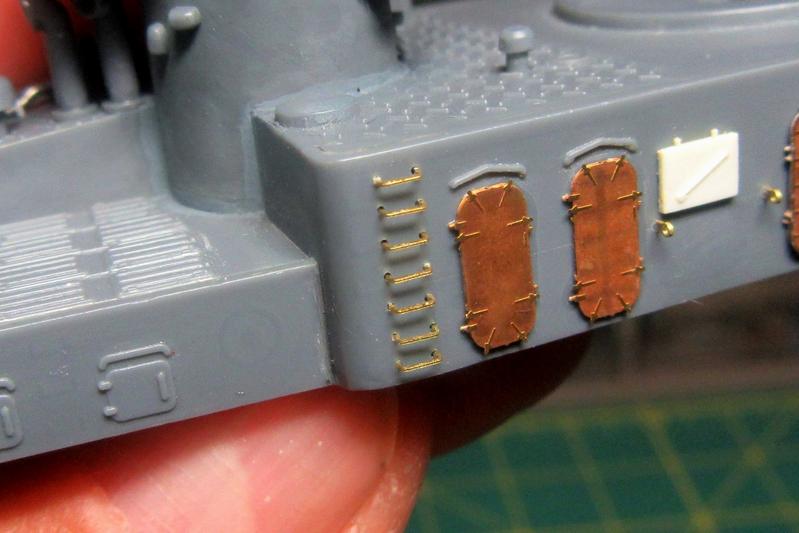
I had installed the screens for the vents included in the Toms Modelworks IJN Destroyer set, but in the end they struck me as just a bit heavy. I have since replaced them with finer-mesh screens made from repurposed GMM 1/350 floater net basket parts.
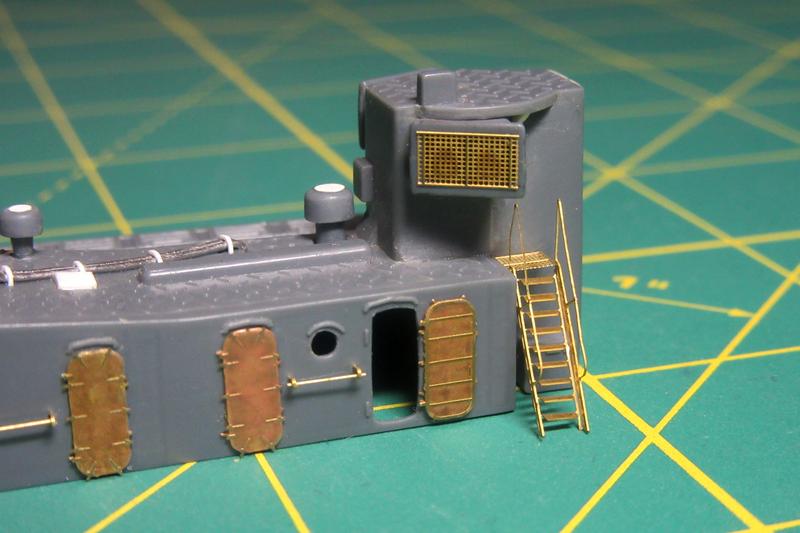
The Toms Modelworks etched stairs to the emergency steering station, on the other hand, are beautifully delicate and MUCH better than the kit stairs.
TimReynaga
Joined: May 03, 2006
KitMaker: 2,500 posts
Model Shipwrights: 1,830 posts
Posted: Thursday, April 02, 2020 - 03:48 PM UTC
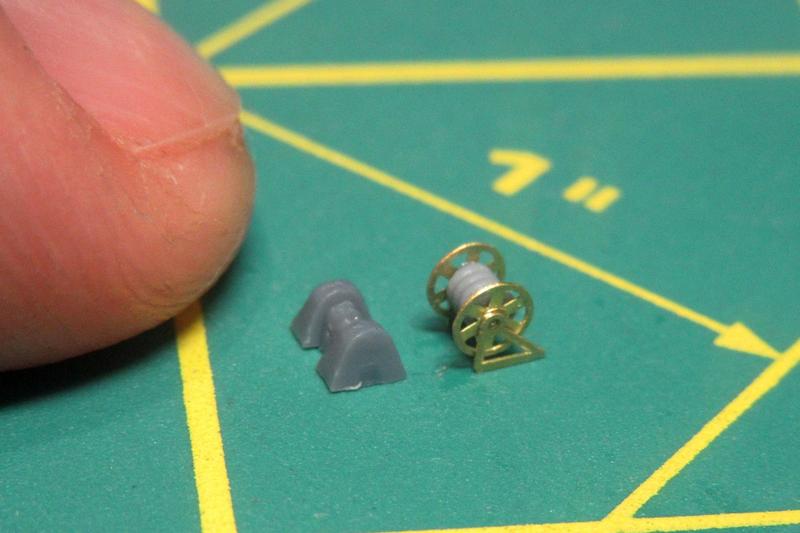
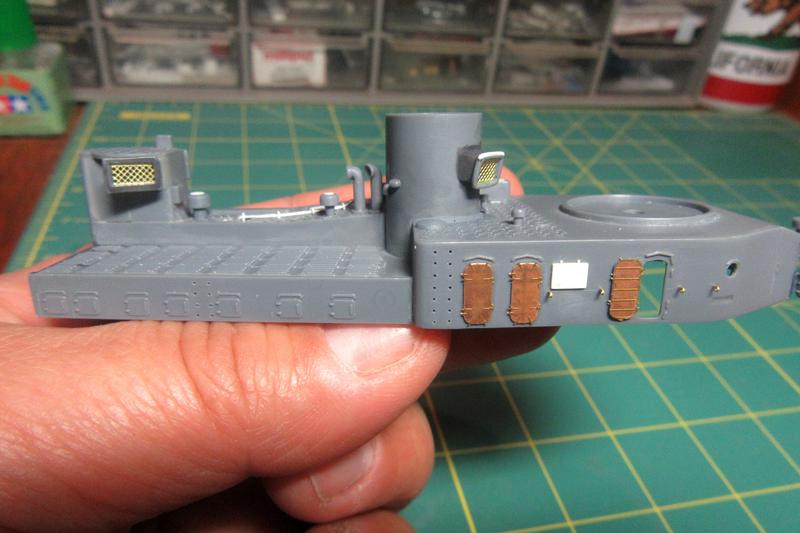
The kit-provided hose reels for the aft deckhouse were little more than indistinct lumps; I replaced them with new ones from Gold Medal Models 1/350 scale Assorted Cable Reels set.
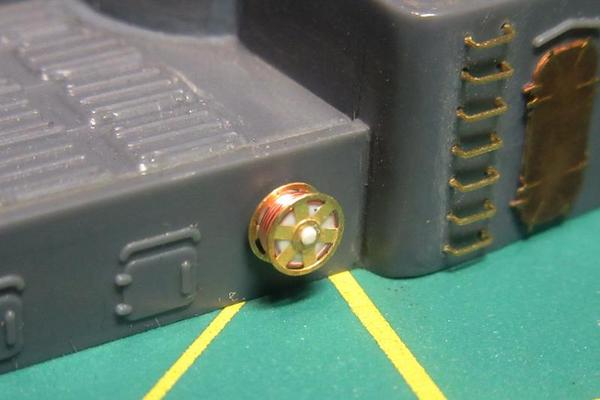
GMM parts also replace a reel that had been vaguely molded into the side of the torpedo reload bank.

The drums are from the Cable Drums for Cable Reels resin set from North Star.
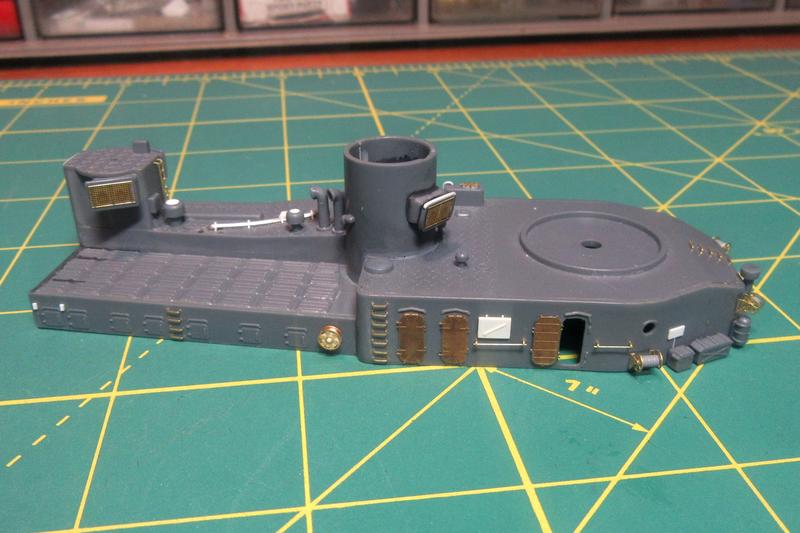
Set in place, these little reels look good, but they do tend to disappear a bit into the surrounding detail!

JJ1973
#345

Joined: August 22, 2011
KitMaker: 1,835 posts
Model Shipwrights: 1,832 posts
Posted: Friday, April 03, 2020 - 01:19 AM UTC
Very nice work, Tim!
It's really cool to see your 'micro-scale-trained' skills work on 1/200, those details look fantastic!
Cheers
Jan
It's really cool to see your 'micro-scale-trained' skills work on 1/200, those details look fantastic!
Cheers
Jan
TimReynaga
Joined: May 03, 2006
KitMaker: 2,500 posts
Model Shipwrights: 1,830 posts
Posted: Saturday, April 04, 2020 - 07:34 AM UTC
Quoted Text
Very nice work, Tim!
It's really cool to see your 'micro-scale-trained' skills work on 1/200, those details look fantastic!
Cheers
Jan
Thanks Jan. This larger scale presents a different kind of challenge for me. Details I can get away with simply suggesting in smaller scales can actually be seen in 1/200, so each surface needs extra attention! It is still fun, though.
The minesweeping paravane in the kit is an example. The part is accurate but incomplete.
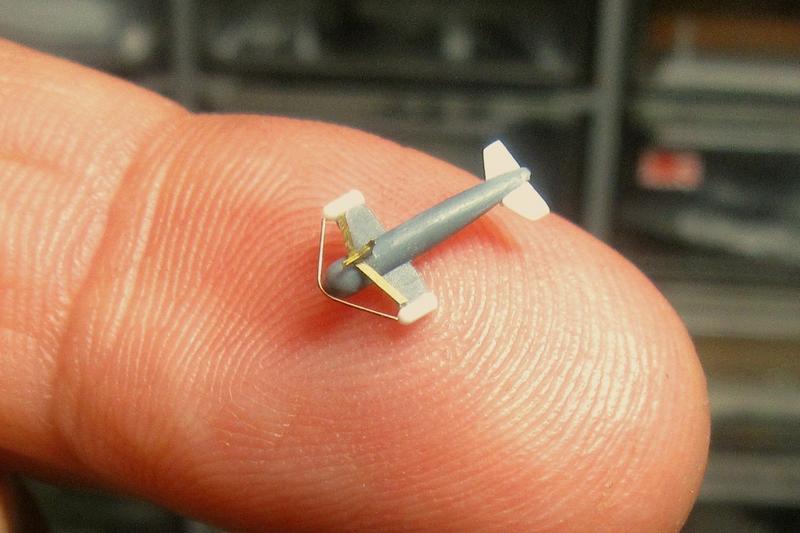
I dressed it up with plastic tail fins and floats as well as other details from photoetch scraps and wire.
As far as Ive been able to determine, the Akizuki-class destroyers carried only one of these, which seems strange as paravanes were normally used in pairs to simultaneously sweep both sides of the ship. Anyway, it looks the part stowed on the bulkhead.

d6mst0
#453
Joined: August 28, 2016
KitMaker: 1,925 posts
Model Shipwrights: 1,298 posts

Posted: Saturday, April 04, 2020 - 05:06 PM UTC
Tim,
Nice work on those cable reels. What did you use to simulate the cables?
Mark
Nice work on those cable reels. What did you use to simulate the cables?
Mark
TimReynaga
Joined: May 03, 2006
KitMaker: 2,500 posts
Model Shipwrights: 1,830 posts
Posted: Saturday, April 04, 2020 - 11:24 PM UTC
Quoted Text
Tim,
Nice work on those cable reels. What did you use to simulate the cables?
Mark
Thanks Mark. The drums are from the 'Cable Drums for Cable Reels' resin set from North Star Models. These come as ribbed resin rods an inch or so in length which can be cut to fit inside the reels. The drum for the narrow reel on the side of the torpedo bank is a plastic disc wrapped with wire.

RedDuster

Joined: March 01, 2010
KitMaker: 7,078 posts
Model Shipwrights: 6,649 posts

Posted: Sunday, April 05, 2020 - 03:34 AM UTC
Nice work Tim,
all the additional scratchbuilt detail is adding anther layer of depth, very nicely done too.
Cheers
Si
all the additional scratchbuilt detail is adding anther layer of depth, very nicely done too.
Cheers
Si

rolltide31
#377
Joined: June 27, 2010
KitMaker: 1,481 posts
Model Shipwrights: 1,332 posts

Posted: Sunday, April 05, 2020 - 03:39 AM UTC
Tim,
Amazing work, the improved details really add to the look. Nice work on the scratch building as well. Looking forward to a time that I can begin working 1/200 scale ships.
Dave
Amazing work, the improved details really add to the look. Nice work on the scratch building as well. Looking forward to a time that I can begin working 1/200 scale ships.
Dave
RussellE
#306
Joined: June 27, 2010
KitMaker: 3,959 posts
Model Shipwrights: 2,777 posts
Posted: Monday, April 06, 2020 - 07:30 PM UTC
As always Tim, continuing to school us in how to detail our models in simple yet very effective ways!
Keep those updates coming
Keep those updates coming

timmyp
Joined: May 18, 2008
KitMaker: 496 posts
Model Shipwrights: 404 posts

Posted: Tuesday, April 07, 2020 - 10:01 PM UTC
Quoted Text
Quoted Text...I know there's probably a lot of redo's and choice words involved too...
John
Thanks John, you are right about both!
I had installed the screens for the vents included in the Toms Modelworks IJN Destroyer set, but in the end they struck me as just a bit heavy. I have since replaced them with finer-mesh screens made from repurposed GMM 1/350 floater net basket parts.
The Toms Modelworks etched stairs to the emergency steering station, on the other hand, are beautifully delicate and MUCH better than the kit stairs.
Tim,
Yep, the finer mesh duct coverings look much better. And that PE ladder looks incredible!
Tim
TimReynaga
Joined: May 03, 2006
KitMaker: 2,500 posts
Model Shipwrights: 1,830 posts
Posted: Thursday, April 09, 2020 - 01:10 AM UTC
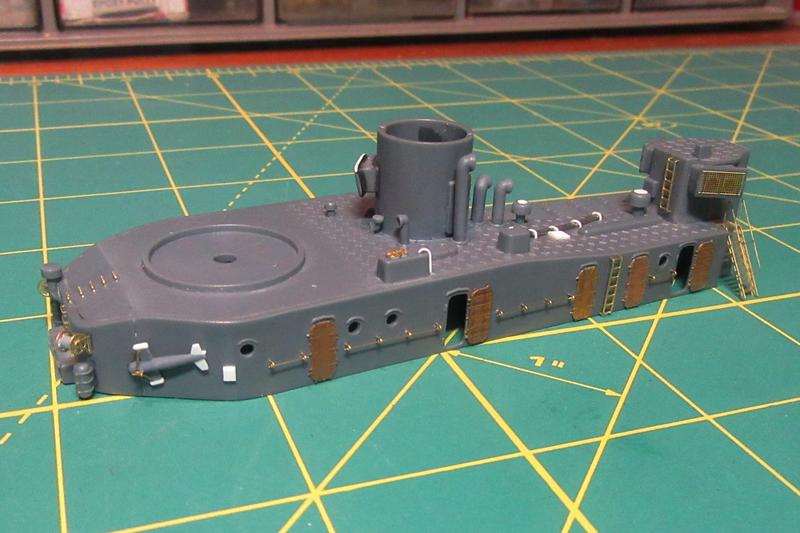
Si, David, Russ, and Tim thanks! I really like this kit. It is a solid representation of the prototype, but there is enough room for detail improvements that I can still add something to it.
Nichimos Hatsuzuki kit is actually a retooled version of their earlier Akizuki release with additional parts reflecting changes the real ships underwent in service. As built, the Akizuki-class ships, including Hatsuzuki, had a second Type 94 main battery director mounted on the aft deckhouse tower. This was later replaced with an additional Type 96 25mm triple antiaircraft mount.
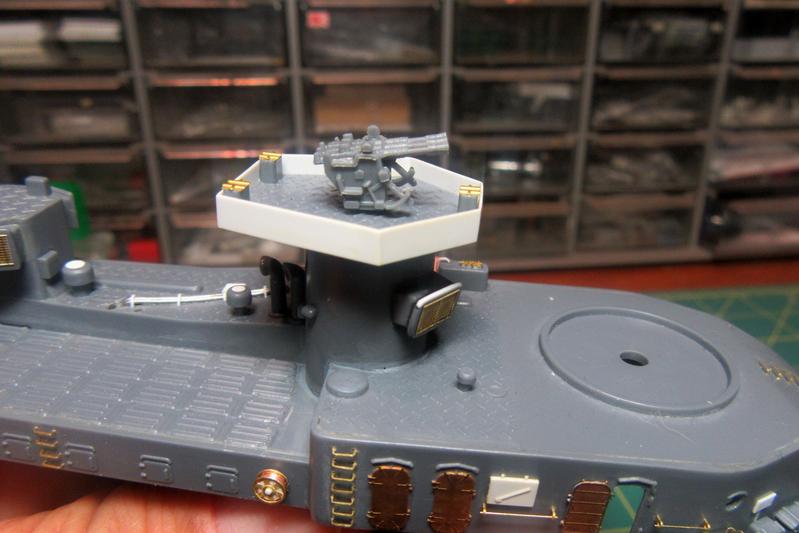
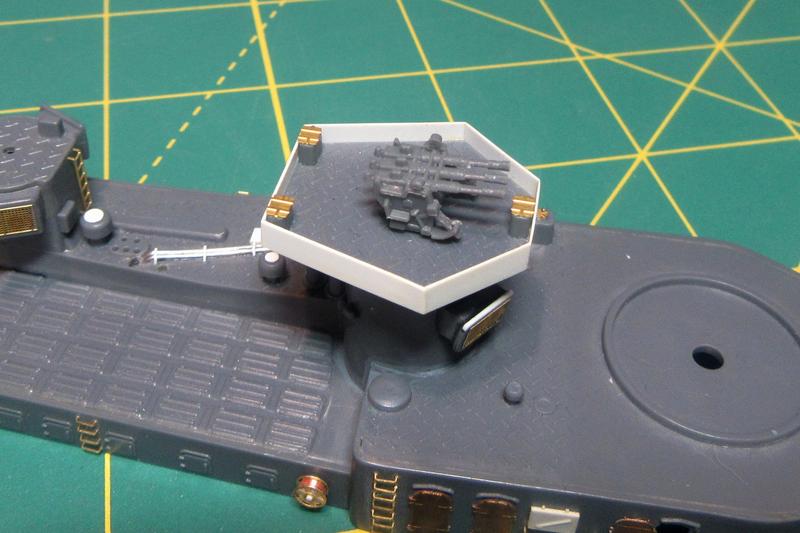
The gun platform part provided by Nichimo isnt bad, but I sharpened up the shields with .010X.125 inch plastic strip. The ammunition box covers are from the GMM Gold Plus Yamato Details set.
Nichimos Hatsuzuki kit is actually a retooled version of their earlier Akizuki release with additional parts reflecting changes the real ships underwent in service. As built, the Akizuki-class ships, including Hatsuzuki, had a second Type 94 main battery director mounted on the aft deckhouse tower. This was later replaced with an additional Type 96 25mm triple antiaircraft mount.
The gun platform part provided by Nichimo isnt bad, but I sharpened up the shields with .010X.125 inch plastic strip. The ammunition box covers are from the GMM Gold Plus Yamato Details set.
TimReynaga
Joined: May 03, 2006
KitMaker: 2,500 posts
Model Shipwrights: 1,830 posts
Posted: Saturday, April 11, 2020 - 12:55 AM UTC
Also, as in this postwar view of near-sister Haruzuki, there should be some additional supports under the aft AA platform:
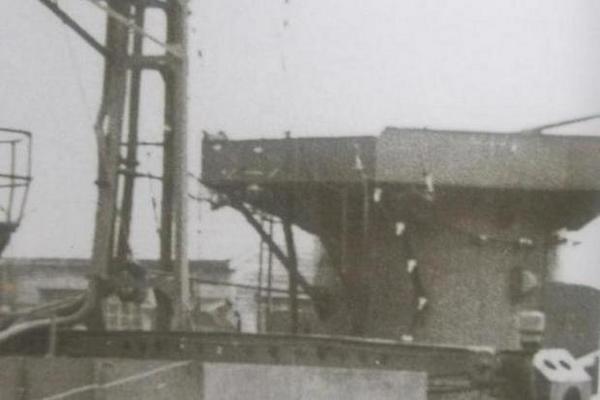
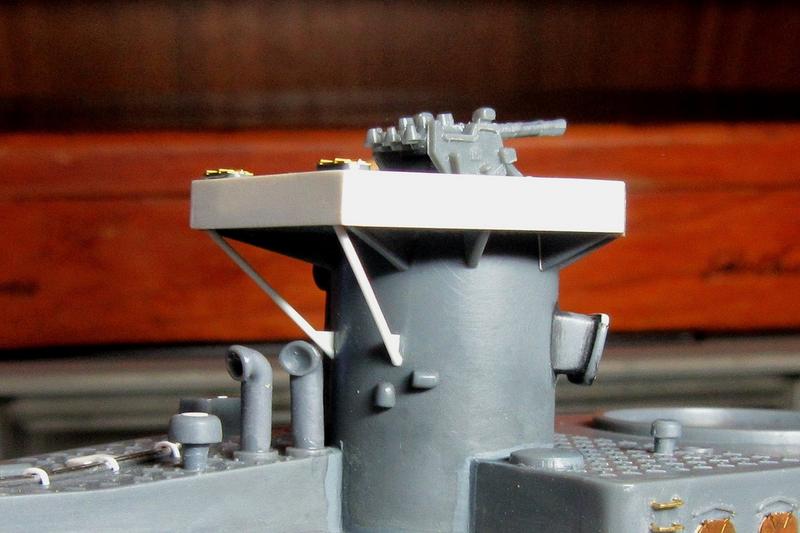
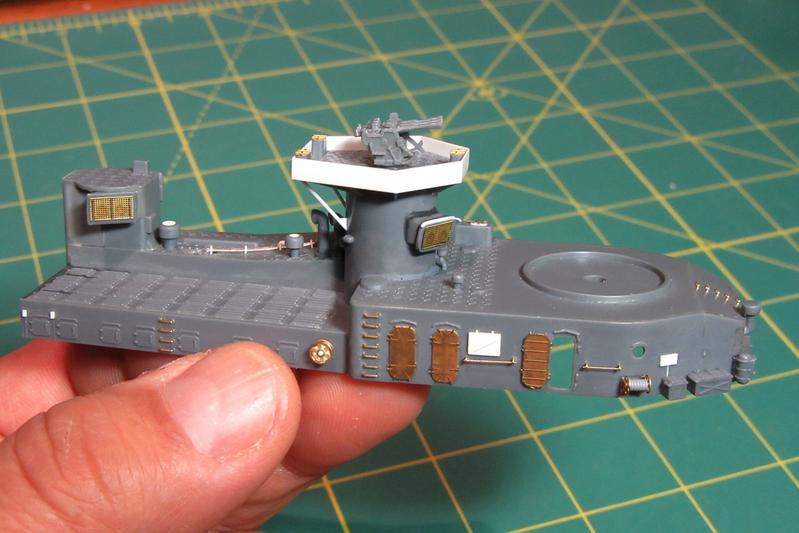
These supports were omitted by Nichimo, so I added them with plastic rod and strip.
Next up: the funnel assembly.
These supports were omitted by Nichimo, so I added them with plastic rod and strip.
Next up: the funnel assembly.
d6mst0
#453
Joined: August 28, 2016
KitMaker: 1,925 posts
Model Shipwrights: 1,298 posts
Posted: Saturday, April 11, 2020 - 02:35 AM UTC
Tim,
Really nice work creating those supports. In the photo what is that cable that is hanging below the platform? Looks like insulators or a float device?
Mark
Really nice work creating those supports. In the photo what is that cable that is hanging below the platform? Looks like insulators or a float device?
Mark
TimReynaga
Joined: May 03, 2006
KitMaker: 2,500 posts
Model Shipwrights: 1,830 posts
Posted: Saturday, April 11, 2020 - 06:55 AM UTC
Quoted Text
Tim,
Really nice work creating those supports. In the photo what is that cable that is hanging below the platform? Looks like insulators or a float device?
Mark
Thanks Mark. I have no idea what those things hanging on that cable might have been; they look like insulators to me too...but they could be floats, or even lamps - who knows?
The photo is after the surrender (note the lack of a 25mm mount on the platform) and many surviving IJN ships received unusual temporary modifications during postwar repatriation service. I haven't seen this feature elsewhere so it could be some odd one-off. There isn't much to go on, so at the moment I don't plan to duplicate it on Hatsuzuki.
Kevlar06
Joined: March 15, 2009
KitMaker: 3,670 posts
Model Shipwrights: 173 posts

Posted: Saturday, April 11, 2020 - 05:08 PM UTC
Tim,
Excellent work so far (but I wouldnt expect differently from you). Tell us how you made those tiny, minuscule, virus and sub-atomic sized hand grabs they must have taken some real talent to bend them and line them up so perfectly theyre great!
VR, Russ
Excellent work so far (but I wouldnt expect differently from you). Tell us how you made those tiny, minuscule, virus and sub-atomic sized hand grabs they must have taken some real talent to bend them and line them up so perfectly theyre great!
VR, Russ
TimReynaga
Joined: May 03, 2006
KitMaker: 2,500 posts
Model Shipwrights: 1,830 posts
Posted: Sunday, April 12, 2020 - 02:53 AM UTC
Quoted Text
Tim,
Excellent work so far (but I wouldnt expect differently from you). Tell us how you made those tiny, minuscule, virus and sub-atomic sized hand grabs they must have taken some real talent to bend them and line them up so perfectly theyre great!
VR, Russ
Thanks Russ! I'd love to take credit for those handgrabs, but the credit goes to Loren Perry of Gold Medal Models:
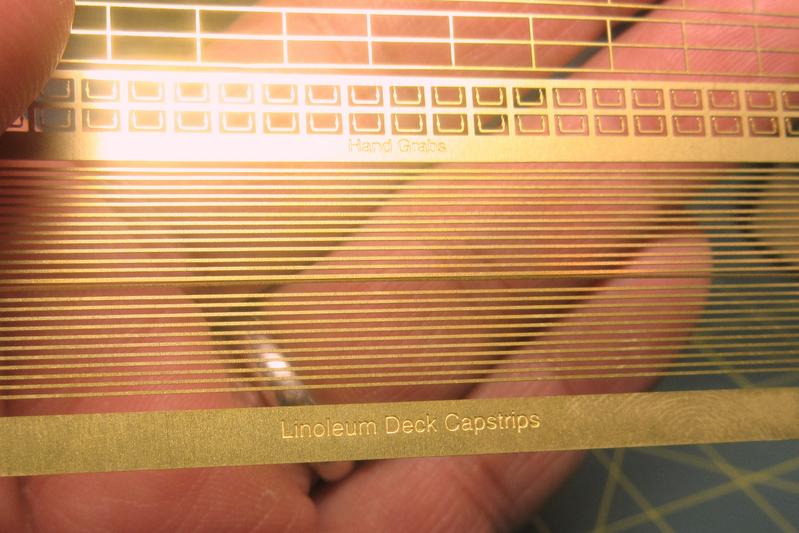
The grabs are part of his 1/200 scale Two-Bar I.J.N. Railing photoetch brass set. They are wonderful, and the placement jig he supplies with the set makes getting them lined up straight a snap!
Kevlar06
Joined: March 15, 2009
KitMaker: 3,670 posts
Model Shipwrights: 173 posts
Posted: Sunday, April 12, 2020 - 06:03 AM UTC
Quoted Text
Quoted TextTim,
Excellent work so far (but I wouldnt expect differently from you). Tell us how you made those tiny, minuscule, virus and sub-atomic sized hand grabs they must have taken some real talent to bend them and line them up so perfectly theyre great!
VR, Russ
Thanks Russ! I'd love to take credit for those handgrabs, but the credit goes to Loren Perry of Gold Medal Models:
The grabs are part of his 1/200 scale Two-Bar I.J.N. Railing photoetch brass set. They are wonderful, and the placement jig he supplies with the set makes getting them lined up straight a snap!
Tim Yes, but you had to glue them on somehow tell us how you managed that. I always end up sticking mine either to the jig, the end of my tweezers, or my finger. Ive spent many frustrating minutes looking around for a detail part all over the bench or the floor, only to find it stuck on the end of my thumb or forefinger. 😝
VR, Russ
TimReynaga
Joined: May 03, 2006
KitMaker: 2,500 posts
Model Shipwrights: 1,830 posts
Posted: Sunday, April 12, 2020 - 11:24 AM UTC
Quoted Text
Tim Yes, but you had to glue them on somehow tell us how you managed that. I always end up sticking mine either to the jig, the end of my tweezers, or my finger. Ive spent many frustrating minutes looking around for a detail part all over the bench or the floor, only to find it stuck on the end of my thumb or forefinger. 😝
VR, Russ
LOL! I guess you are right, Russ; even though well made, these handgrabs are a bit fussy to apply.

To place them precisely, I first tape the jig to the plastic part where the grabs will go. Then I nick the grab attachment spots on the plastic with the tip of my #11 X-acto before removing the jig.
Then, with a tiny #80 bit fitted into my X-acto, I use the nicks to guide the bit and hand twist the holes in the correct places.
The handgrabs are then inserted individually with tweezers (I use Revlon; beauty products are usually superior to tools made for modelers!) After that I apply a small drop of Tamiya extra thin cement to hold each in place. The cement doesnt work on the brass, but it does melt the plastic which lightly grabs the brass. While the cement is still setting, I use the tweezers to gently adjust the grabs into their final positions.
Once the cement dries, I use the tip of the X-acto to apply miniscule dabs of cyanoacrylate to fill the gaps around the handgrabs and fix them in place.
No special technique - just slow, methodical work!
d6mst0
#453
Joined: August 28, 2016
KitMaker: 1,925 posts
Model Shipwrights: 1,298 posts
Posted: Sunday, April 12, 2020 - 02:48 PM UTC
Tim,
Those handrails look great, nice work!
Mark
Those handrails look great, nice work!
Mark
Kevlar06
Joined: March 15, 2009
KitMaker: 3,670 posts
Model Shipwrights: 173 posts
Posted: Sunday, April 12, 2020 - 06:41 PM UTC
Tim, Thanks for the brilliant hand grab tutorial! Ill try your technique next time (I have a Revell Tai Chi Buckley Class kit with a Toms Modelworks detail set that I stopped building years ago because of issues like hand grabs time to dig it out again. I always manage to get mine stuck to my fingers (as I mentioned above), cockeyed, bent or just FUBARed to the point where the model gets aimed at the imaginary dart board on my concrete wall (well, not that bad, but close). So it always helps to know others techniques. I never thought of the temporary stick with Tamiya thin, thats a brilliant idea.
VR, Russ
VR, Russ
RussellE
#306
Joined: June 27, 2010
KitMaker: 3,959 posts
Model Shipwrights: 2,777 posts
Posted: Monday, April 13, 2020 - 10:00 AM UTC
continuing the great work Tim
TimReynaga
Joined: May 03, 2006
KitMaker: 2,500 posts
Model Shipwrights: 1,830 posts
Posted: Tuesday, April 14, 2020 - 05:44 AM UTC
Quoted Text
continuing the great work Tim
Quoted Text
Tim, Thanks for the brilliant hand grab tutorial! VR, Russ
Thanks guys. I'm a bit conflicted about these fittings, actually; they look nice, but they seem a bit heavy too. It is probably just that I'm still getting used to the unusually large scale (for me)

 |

WEB HOSTING BY


Copyright ©2021 Model Shipwrights and Kitmaker Network, a subsidiary of Silver Star Enterprises
All Rights Reserved. Please read our Conditions of Use and Privacy Policy.
All Rights Reserved. Please read our Conditions of Use and Privacy Policy.