Ships by Class/Type: Destroyers
This forum covers all types of destroyers from all eras.
1/200 Nichimo Hatsuzuki build
RussellE
#306
Visit this Community
Victoria, Australia
Joined: June 27, 2010
KitMaker: 3,959 posts
Model Shipwrights: 2,777 posts
Posted: Wednesday, April 15, 2020 - 09:28 PM UTC

Quoted Text


Quoted Text

continuing the great work Tim


Quoted Text

Tim, Thanks for the brilliant “hand grab tutorial”! VR, Russ


Thanks guys. I'm a bit conflicted about these fittings, actually; they look nice, but they seem a bit heavy too. It is probably just that I'm still getting used to the unusually large scale (for me)…


The scale looks fine to me, Tim
TimReynaga
Staff MemberAssociate Editor
MODEL SHIPWRIGHTS
Visit this Community
California, United States
Joined: May 03, 2006
KitMaker: 2,500 posts
Model Shipwrights: 1,830 posts
Posted: Thursday, April 16, 2020 - 04:27 AM UTC

Quoted Text

The scale looks fine to me, Tim


Thanks Russ! Guess I need to just relax about it and get on with things.

With the aft deckhouse mostly finished, it is on the the funnel. The Hatsuzuki’s distinctive single funnel assembly is dimensionally accurate and goes together quickly, but I added some improvements.

The uptake tops were molded flat to accommodate solid plastic caps which I don’t intend to use, so I thinned the sides and lined the openings with sheet plastic shaped to rounded edges. Photoetch brass funnel cap gratings from the Tom’s Modelworks IJN Destroyer set will go over these later. The raised piece around the circumference of the stack replaces a kit representation of this feature which I’d damaged during assembly.


The solid kit air intake duct gratings were replaced with etched brass upgrades from the Tom’s Modelworks set.
RussellE
#306
Visit this Community
Victoria, Australia
Joined: June 27, 2010
KitMaker: 3,959 posts
Model Shipwrights: 2,777 posts
Posted: Thursday, April 16, 2020 - 09:40 PM UTC
nice progress Tim

It can clearly be seen how the designers of the ship trunked all 3 uptakes into the one funnel
rolltide31
#377
Visit this Community
Texas, United States
Joined: June 27, 2010
KitMaker: 1,481 posts
Model Shipwrights: 1,332 posts
Posted: Friday, April 17, 2020 - 02:14 AM UTC
Tim,

I echo Russell's thoughts regarding the scale, it does look good.

Nice work on the improvements for the funnel. Your really bringing this build to life. It has me excited about the future when I can finally dive into the 1/200 scale world.

Keep up the great work!!

David
d6mst0
#453
Visit this Community
Texas, United States
Joined: August 28, 2016
KitMaker: 1,925 posts
Model Shipwrights: 1,298 posts
Posted: Friday, April 17, 2020 - 09:10 AM UTC

Quoted Text

Tim,

I echo Russell's thoughts regarding the scale, it does look good.

Nice work on the improvements for the funnel. Your really bringing this build to life. It has me excited about the future when I can finally dive into the 1/200 scale world.

Keep up the great work!!

David


DITTO!

Mark
rdt1953
Visit this Community
New Jersey, United States
Joined: February 06, 2015
KitMaker: 1,098 posts
Model Shipwrights: 34 posts
Posted: Friday, April 17, 2020 - 12:03 PM UTC
Hi Tim - Enjoying this build very much - please keep it going to the end !
surfsup
Visit this Community
Queensland, Australia
Joined: May 20, 2010
KitMaker: 1,230 posts
Model Shipwrights: 1,212 posts
Posted: Friday, April 17, 2020 - 06:17 PM UTC
That is some very impressive Detail Work you have done so far Tim. Am loving it.....Cheers mark
TimReynaga
Staff MemberAssociate Editor
MODEL SHIPWRIGHTS
Visit this Community
California, United States
Joined: May 03, 2006
KitMaker: 2,500 posts
Model Shipwrights: 1,830 posts
Posted: Saturday, April 18, 2020 - 09:45 AM UTC
Russ, David, Mark, Richard, and Mark - thank you all for your kind comments!

Even though I'm home all the time now COVID-19 shelter in place teleworking, my home shipyard time seems to be getting harder and harder to come by.


Still, some progress:

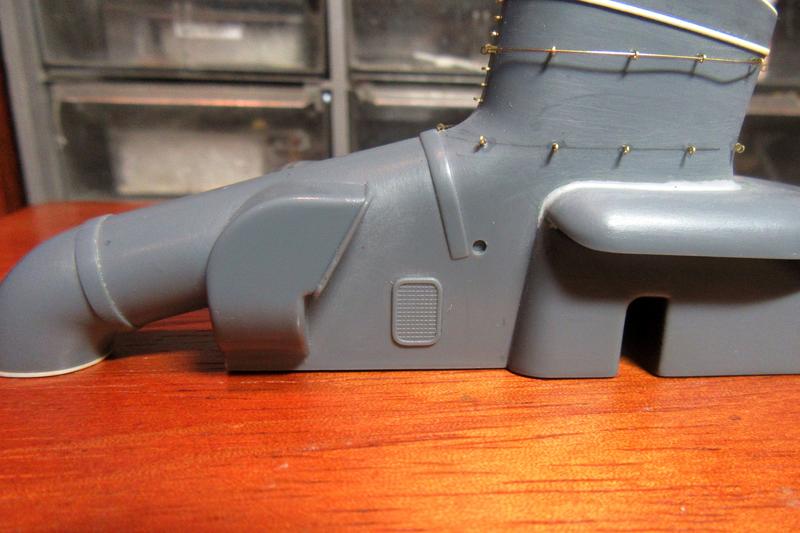
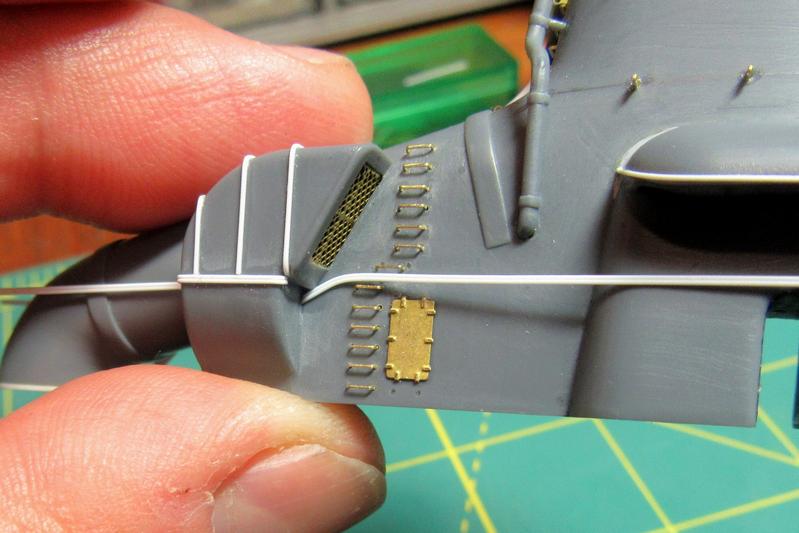
The kit funnel sides came with faint footrails molded in them, but I scraped these off in preparation for better ones from the Gold Medal Models 1/200 IJN 2-Bar Railing etched brass set.

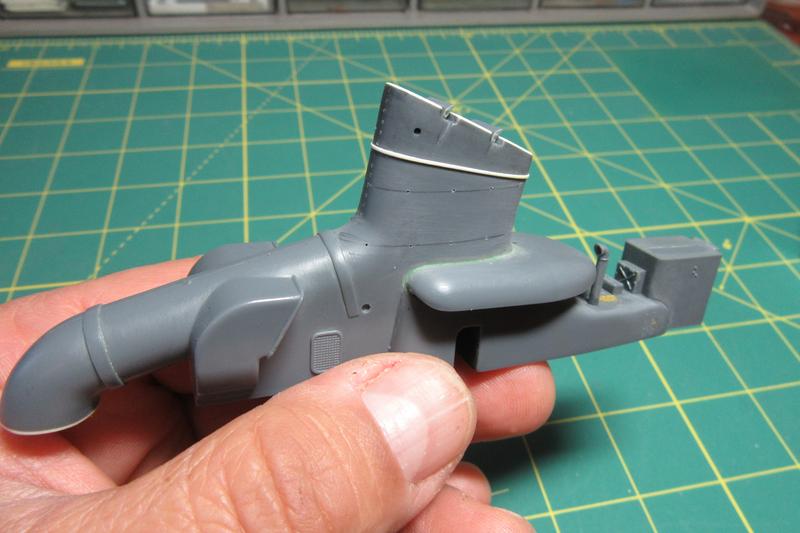
After marking out the locations, I opened the locator holes for the support fittings with my smallest (a No. 80) drill bit. I also drilled out the holes for the line of handgrabs at the front of the funnel.


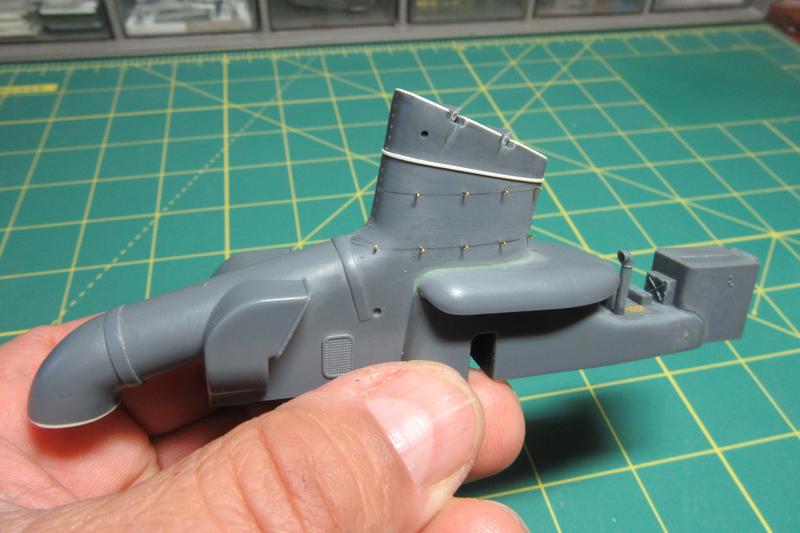
The footrail supports were fit into the holes and held temporarily with plastic cement; once I was confident with the positioning they were secured more permanently with tiny dabs of super glue.


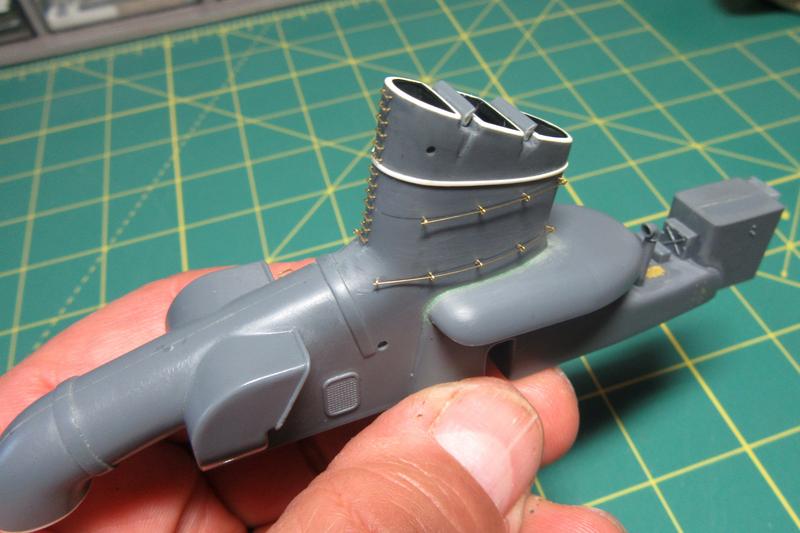
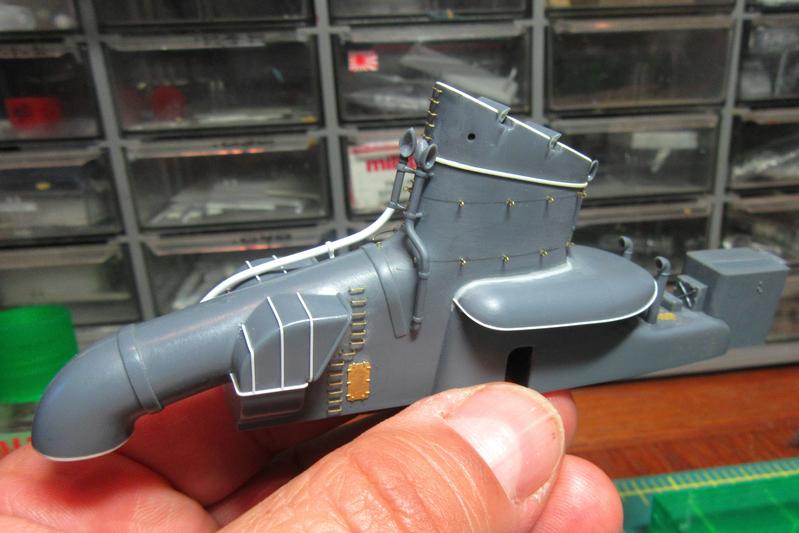
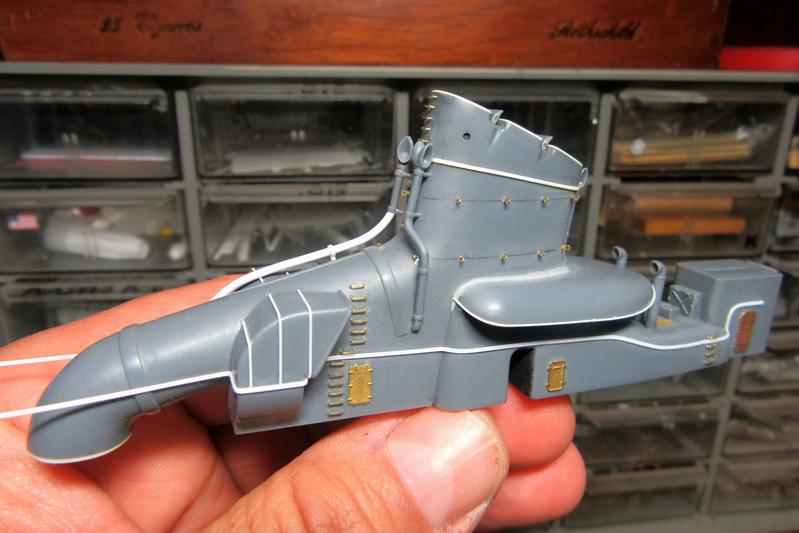
The individual handgrabs were secured in the same way. This photo also shows the 34 gauge brass wire footrails test fitted through the supports (I have since installed additional supports to enable the footrails to go completely around the funnel).


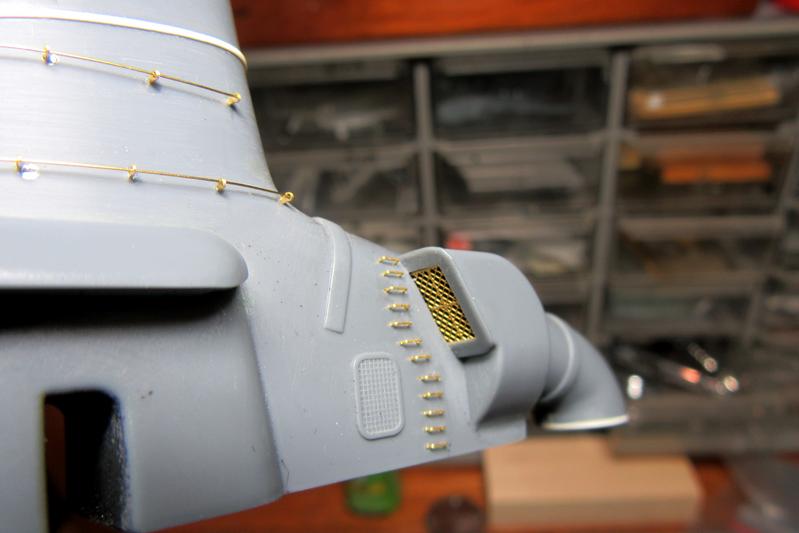
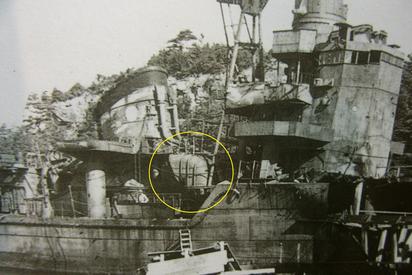
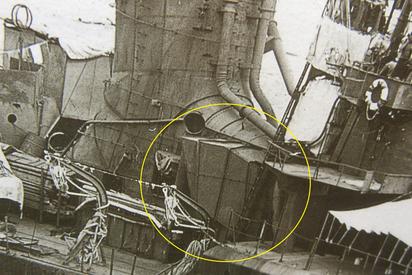
More handgrabs were attached to the funnel side. The way they curve around the vent grate may seem odd, but that arrangement is well attested in the Gakken Reikishi-Gunzo IJN Akizuki-class Destroyers book and both the Miyukikai and Kagero scale plans I consulted. Go figure.

d6mst0
#453
Visit this Community
Texas, United States
Joined: August 28, 2016
KitMaker: 1,925 posts
Model Shipwrights: 1,298 posts
Posted: Saturday, April 18, 2020 - 11:47 AM UTC
Tim,

Nice updates to the funnel, those rails really add detail along with those handrails. Very nice work.

Mark
RussellE
#306
Visit this Community
Victoria, Australia
Joined: June 27, 2010
KitMaker: 3,959 posts
Model Shipwrights: 2,777 posts
Posted: Saturday, April 18, 2020 - 09:50 PM UTC
OMG! Very nice brass work, Tim
Black_sheep
Visit this Community
Bayern, Germany
Joined: December 11, 2009
KitMaker: 823 posts
Model Shipwrights: 551 posts
Posted: Saturday, April 18, 2020 - 10:03 PM UTC
May I touch it just one time? Just kidding - great work on that small pe stuff. You must have the eyes of a hawk and the fingers of a brain surgeon. I am deeply impressed
TimReynaga
Staff MemberAssociate Editor
MODEL SHIPWRIGHTS
Visit this Community
California, United States
Joined: May 03, 2006
KitMaker: 2,500 posts
Model Shipwrights: 1,830 posts
Posted: Sunday, April 19, 2020 - 04:36 AM UTC
Thanks guys! I'm grateful that Gold Medal Models provided those tiny handgrabs in photoetch. The alternative of making them all individually from wire isn't something enjoyable to contemplate...!

It is always interesting to compare model manufacturers' take on things to scale plans and photos. For example, what Nichimo interpreted as small grilles on the sides of the funnel trunking were in fact access hatches.


I trimmed them away and replaced them with parts from the GMM 1/200 scale Yamato detail set.
d6mst0
#453
Visit this Community
Texas, United States
Joined: August 28, 2016
KitMaker: 1,925 posts
Model Shipwrights: 1,298 posts
Posted: Monday, April 20, 2020 - 12:25 AM UTC
Tim,

I was wondering about that, could it been a life raft? Thanks for clearing up that question.

Mark
RussellE
#306
Visit this Community
Victoria, Australia
Joined: June 27, 2010
KitMaker: 3,959 posts
Model Shipwrights: 2,777 posts
Posted: Tuesday, April 21, 2020 - 09:43 AM UTC

Quoted Text


It is always interesting to compare model manufacturers' take on things to scale plans and photos. For example, what Nichimo interpreted as small grilles on the sides of the funnel trunking were in fact access hatches.


Never trust model companies
TimReynaga
Staff MemberAssociate Editor
MODEL SHIPWRIGHTS
Visit this Community
California, United States
Joined: May 03, 2006
KitMaker: 2,500 posts
Model Shipwrights: 1,830 posts
Posted: Tuesday, April 21, 2020 - 03:52 PM UTC

Quoted Text

Never trust model companies


You have a point, Russ - they make at least as many mistakes as I do! Half the fun of modeling for me is the research. I guess I spend almost as much time at that as I do actually building. Sometimes more!

RussellE
#306
Visit this Community
Victoria, Australia
Joined: June 27, 2010
KitMaker: 3,959 posts
Model Shipwrights: 2,777 posts
Posted: Tuesday, April 21, 2020 - 09:38 PM UTC

Quoted Text


Quoted Text

Never trust model companies


You have a point, Russ - they make at least as many mistakes as I do! Half the fun of modeling for me is the research. I guess I spend almost as much time at that as I do actually building. Sometimes more!


tell me about it Tim... Often times I end up spending more on books about the subject than the subject itself
TimReynaga
Staff MemberAssociate Editor
MODEL SHIPWRIGHTS
Visit this Community
California, United States
Joined: May 03, 2006
KitMaker: 2,500 posts
Model Shipwrights: 1,830 posts
Posted: Wednesday, April 22, 2020 - 09:44 AM UTC

Quoted Text

nice progress Tim

It can clearly be seen how the designers of the ship trunked all 3 uptakes into the one funnel


You are right, Russ. That design is so distinctive, I am reminded of the awful racist doggerel included with the wartime U.S Office of Naval Intelligence Identification and Characteristics Section publication on Japanese warships (ONI 41-42I):


The similarity of the Akizuki-class design may be part of the reason Hatsuzuki was misidentified as a cruiser during her final battle.
RussellE
#306
Visit this Community
Victoria, Australia
Joined: June 27, 2010
KitMaker: 3,959 posts
Model Shipwrights: 2,777 posts
Posted: Wednesday, April 22, 2020 - 11:30 PM UTC
It seems there was no holding back on that Propanganda piece
TimReynaga
Staff MemberAssociate Editor
MODEL SHIPWRIGHTS
Visit this Community
California, United States
Joined: May 03, 2006
KitMaker: 2,500 posts
Model Shipwrights: 1,830 posts
Posted: Friday, April 24, 2020 - 05:01 PM UTC
More progress with the funnel; the various steam and discharge pipes have been added.

The kit pipes come with solid openings which I reamed out before installation. The port and aft parts come as single pieces, and the longer discharge pipe on the starboard side came in two parts. The upper part was good enough, but the longer lower portion was molded so badly out of round that I couldn’t make it presentable no matter how much I worked with it. I finally just replaced it with a Plastruct 1.3mm (.050”) styrene rod (part No. 90857). Also, the small pipe around the edge of the big saddle air intake duct abaft funnel was added using Plastruct .3mm (.010”) styrene rod (90850).
d6mst0
#453
Visit this Community
Texas, United States
Joined: August 28, 2016
KitMaker: 1,925 posts
Model Shipwrights: 1,298 posts
Posted: Saturday, April 25, 2020 - 02:59 AM UTC
Tim,

Nice updates to the funnel assembly.

Mark
JJ1973
#345
Visit this Community
Niedersachsen, Germany
Joined: August 22, 2011
KitMaker: 1,835 posts
Model Shipwrights: 1,832 posts
Posted: Saturday, April 25, 2020 - 07:14 AM UTC
Wow Tim,

that's just fantastic work, you extend your love for detail from the micro scales just into 1/200 with an unbelievable precision and cleanliness.

If I may add to 'spending time on...' , especially with my current project I spend as much time on research and building as on searching for pieces that snipped away and landed with or without noise somewhere. And of course have no replacement...

Great work Tim!

Cheers
Jan
TimReynaga
Staff MemberAssociate Editor
MODEL SHIPWRIGHTS
Visit this Community
California, United States
Joined: May 03, 2006
KitMaker: 2,500 posts
Model Shipwrights: 1,830 posts
Posted: Tuesday, May 05, 2020 - 02:53 AM UTC
Thanks Mark and Jan! Working in this larger than usual scale is an interesting departure for me; since everything seems to be visible, I find there is so much more detail I want to add.

The large air intake ducts on either side of forward funnel uptakes are an example. Nichimo accurately portrayed the shape of the ducts, but they are rather plain. On the real Akizuki-class destroyers these large intakes were sectional with the components secured together with prominent vertical joins. Not many close up pictures have survived, but you can see this feature on postwar images of near-sisters Suzutzuki and Natsuzuki.


Nichimo omitted the joins, so I added them using Plastruct .3mm (.010”) square styrene (90709).
d6mst0
#453
Visit this Community
Texas, United States
Joined: August 28, 2016
KitMaker: 1,925 posts
Model Shipwrights: 1,298 posts
Posted: Tuesday, May 05, 2020 - 07:19 AM UTC
Tim,

Nice attention to detail, but I was wondering in the second photo were it looks like the duct work attaches inside of the middle duct if adding a layer of thin plastic card in the center would have matched it better?

Mark
TimReynaga
Staff MemberAssociate Editor
MODEL SHIPWRIGHTS
Visit this Community
California, United States
Joined: May 03, 2006
KitMaker: 2,500 posts
Model Shipwrights: 1,830 posts
Posted: Tuesday, May 05, 2020 - 08:07 AM UTC

Quoted Text

Tim,

Nice attention to detail, but I was wondering in the second photo were it looks like the duct work attaches inside of the middle duct if adding a layer of thin plastic card in the center would have matched it better?

Mark


Hi Mark,

You might be right, but Natsuzuki, although a near-sister, was of the simplified second series Akizuki-class (the Fuyutzuki group). Hatsuzuki was a member of the original Akizuki group which differed in many details from the Fuyutzukis.

I modeled the ducts based more on Suzutzuki, which was of the first group with ducts that followed the original pattern... but who knows?


In the only known photo of Hatsuzuki the duct is obscured by the whaleboat.
TimReynaga
Staff MemberAssociate Editor
MODEL SHIPWRIGHTS
Visit this Community
California, United States
Joined: May 03, 2006
KitMaker: 2,500 posts
Model Shipwrights: 1,830 posts
Posted: Thursday, May 07, 2020 - 03:02 PM UTC
Another detail is the doubled cabling alongside the funnel.

These cables are only discernable in a few photos and I don’t know what they might have been for, but I replicated what plans in Kagero’s The Japanese Destroyer Akizuki and in the Gakken Reikishi-Gunzo IJN Akizuki-class Destroyers books indicated.

The cabling, applied to both sides, was made with two lengths of Plastruct .3mm (.010”) styrene rod (90850) glued together side by side and then set into place in segments to cover the complex shapes of the structure.