

Go to modelshipwrights.com for the current dynamic site!


Hosted by Jim Starkweather
1/200 Nichimo Hatsuzuki build

GazzaS

#424

Joined: April 23, 2015
KitMaker: 4,648 posts
Model Shipwrights: 249 posts

Posted: Friday, September 04, 2020 - 04:39 PM UTC
The reworked rails and supports look great, Tim. Better to conquer a problem then skip over and have it nag you later.

rdt1953

Joined: February 06, 2015
KitMaker: 1,098 posts
Model Shipwrights: 34 posts

Posted: Saturday, September 05, 2020 - 07:37 AM UTC
Once again another refit has proven the right thing to do.
Very nice work Tim !
Very nice work Tim !

d6mst0
#453
Joined: August 28, 2016
KitMaker: 1,925 posts
Model Shipwrights: 1,298 posts

Posted: Saturday, September 05, 2020 - 02:04 PM UTC
Tim,
Amazing work replacing those rails. I did like the look of the old ones but you were right they did not match the rails with the bridge.
Mark
Amazing work replacing those rails. I did like the look of the old ones but you were right they did not match the rails with the bridge.
Mark

bwiber
Joined: August 03, 2008
KitMaker: 436 posts
Model Shipwrights: 31 posts

Posted: Sunday, September 06, 2020 - 07:08 AM UTC
Forgive the silly question, but I do armor not ships...
Anyway, these foot rails, are they actually there to "walk" on? I can see it working on the funnel as you could grasp the one above, or the top of the funnel, in order to keep your balance. The ones on the bridge structure don't have anything I can see to grab onto. I know that without a sturdy handhold I would be hitting the deck before the 4th step onto them.
Bob

TimReynaga
Joined: May 03, 2006
KitMaker: 2,500 posts
Model Shipwrights: 1,830 posts
Posted: Sunday, September 06, 2020 - 02:22 PM UTC
Quoted Text
Forgive the silly question, but I do armor not ships...
Anyway, these foot rails, are they actually there to "walk" on? I can see it working on the funnel as you could grasp the one above, or the top of the funnel, in order to keep your balance. The ones on the bridge structure don't have anything I can see to grab onto. I know that without a sturdy handhold I would be hitting the deck before the 4th step onto them.
Bob
Good point, Bob! These rails were used for both maintenance access for the crew as well as to secure canvas canopies for heat lagging; Japanese ships of the era didnt have air conditioning, and direct sun on steel must have made things uncomfortable! I think that was the main purpose of those rails on the bridge front hence the rise in the center.

mat

Joined: November 18, 2003
KitMaker: 894 posts
Model Shipwrights: 44 posts

Posted: Sunday, September 06, 2020 - 07:38 PM UTC
great work Tim, you really know how to turn a basic kit into a museum quality model. I am enjoying each post that you make about your progress
rdt1953
Joined: February 06, 2015
KitMaker: 1,098 posts
Model Shipwrights: 34 posts
Posted: Monday, September 07, 2020 - 11:00 AM UTC
So do you need to now redo the grab rails around the deckhouse that you did on page one of your blog ?

RedDuster

Joined: March 01, 2010
KitMaker: 7,078 posts
Model Shipwrights: 6,649 posts

Posted: Tuesday, September 08, 2020 - 05:13 AM UTC
Hi Tim,
The Bridge and Funnel structures look excellent in place with all the details matching,
cheers
Si
The Bridge and Funnel structures look excellent in place with all the details matching,
cheers
Si
TimReynaga
Joined: May 03, 2006
KitMaker: 2,500 posts
Model Shipwrights: 1,830 posts
Posted: Wednesday, September 09, 2020 - 12:37 AM UTC
Quoted Text
So do you need to now redo the grap rails around the deckhouse that you did on page one of your blog ?
Richard, thats a good question.
While these rails arent consistent with the footrails, they were also a different type; they were handrails. Contemporary photos show the waist-high handrails to have been a slightly different design from the footrails that were located higher up on the funnel and forward superstructure.
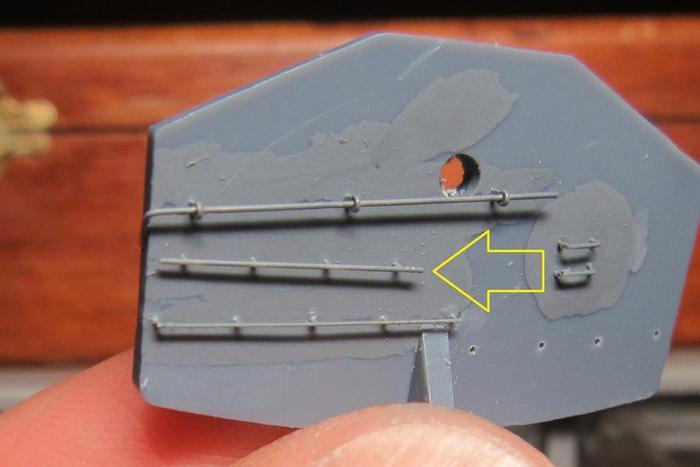
On the test piece, the brass handrails (top) with the Gold Medal Models etched brass mounts do appear a bit larger than the plastic footrails (arrow), but they are the right design and are within the expected size range, so they should still be good.
RedDuster
Joined: March 01, 2010
KitMaker: 7,078 posts
Model Shipwrights: 6,649 posts
Posted: Thursday, September 10, 2020 - 08:17 AM UTC
Hi Tim,
As the brass rails have a different purpose adds a little depth if they are different to the footrails.
I reckon they look rather good.
Cheers
Si
As the brass rails have a different purpose adds a little depth if they are different to the footrails.
I reckon they look rather good.
Cheers
Si
TimReynaga
Joined: May 03, 2006
KitMaker: 2,500 posts
Model Shipwrights: 1,830 posts
Posted: Thursday, September 10, 2020 - 12:13 PM UTC
Quoted Text
Hi Tim,
As the brass rails have a different purpose adds a little depth if they are different to the footrails.
I reckon they look rather good.
Cheers
Si
Thanks Si! I don't need much of an excuse to avoid rework, that's for sure!


YellowHammer

#513
Joined: March 28, 2006
KitMaker: 554 posts
Model Shipwrights: 219 posts

Posted: Thursday, September 10, 2020 - 02:47 PM UTC
Tim,
I've been lurking for a while as I've been dealing with family issues. Awesome work going on my friend. I continue to be amazed at your talent and attention to detail. I'm trying not to drool on my keyboard.
John
I've been lurking for a while as I've been dealing with family issues. Awesome work going on my friend. I continue to be amazed at your talent and attention to detail. I'm trying not to drool on my keyboard.
John
TimReynaga
Joined: May 03, 2006
KitMaker: 2,500 posts
Model Shipwrights: 1,830 posts
Posted: Sunday, September 13, 2020 - 05:23 AM UTC
Quoted Text
Tim,
I've been lurking for a while as I've been dealing with family issues. Awesome work going on my friend. I continue to be amazed at your talent and attention to detail. I'm trying not to drool on my keyboard.
John
LOL! Thanks, John. I don't know that it is drool-worthy, but I'm certainly having fun with it!
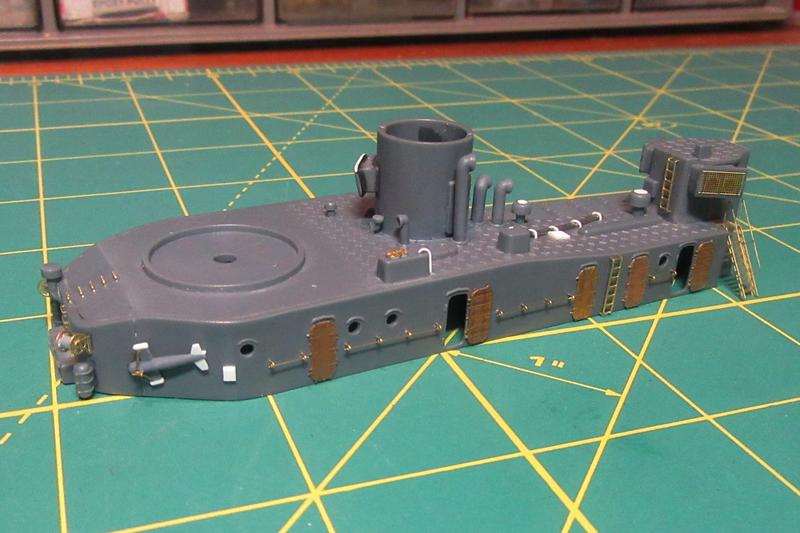
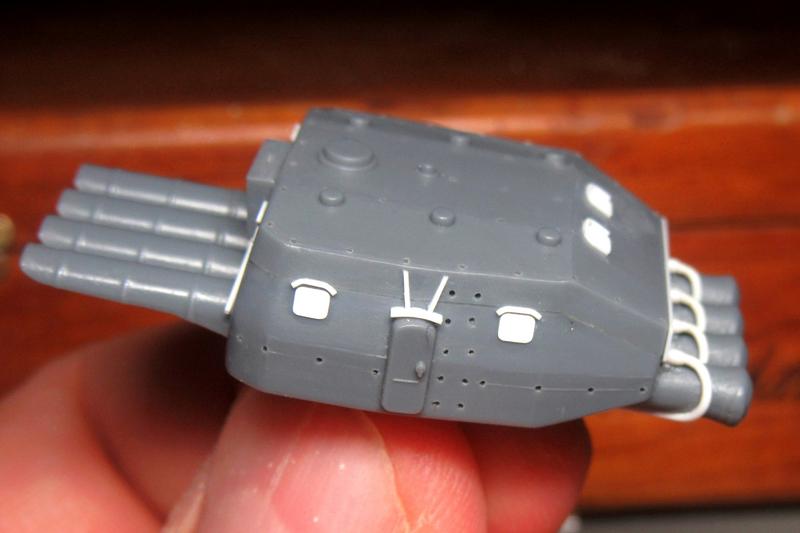
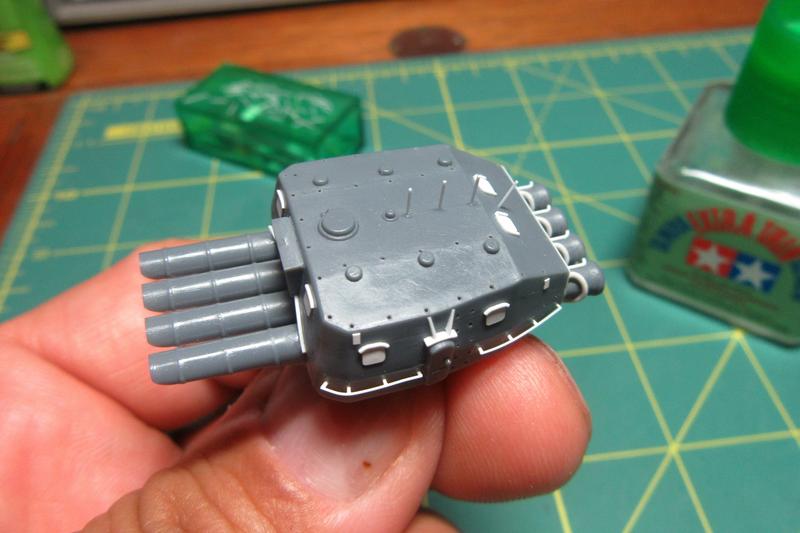
Now that the basic structures are mostly complete, it is time for the weapons!
Ill start with the ships Type 92 torpedo launcher.
Conceived as pure antiaircraft escorts, the Akizuki class was initially designed without torpedo armament, but the Imperial Japanese Navy General Staff ordered the inclusion of torpedo attack capability to make the ships better all-around destroyers. This proved useful for Hatsuzuki; although she never actually hit an enemy with her torpedoes, at Leyte Gulf the fearsome reputation of these weapons enabled her to single handedly hold off an entire force of U.S. cruisers and destroyers for over an hour while she made real and feint torpedo runs at them.
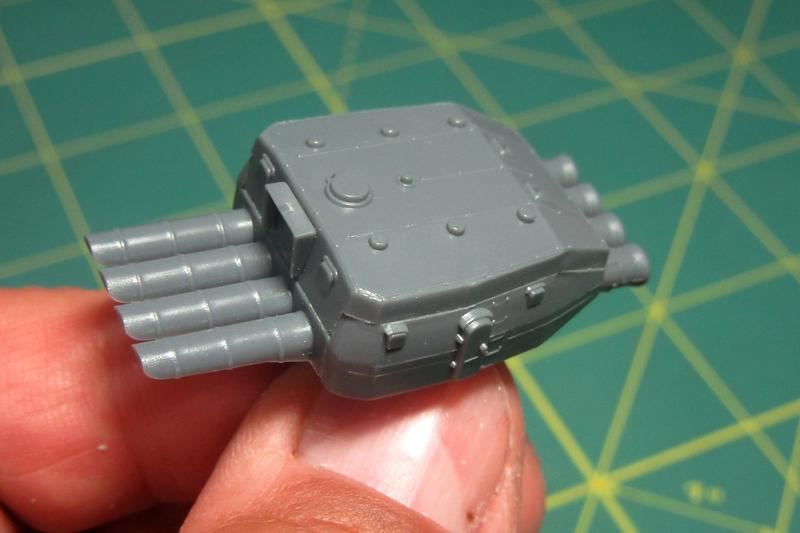
Anyway, Nichimos kit part is a solid representation of the Type 92 launcher with all its major features credibly reproduced. My only gripe would be that the top, made as a separate part, doesnt fit precisely on to the structure and leaves an inaccurate step where the sides and top join.
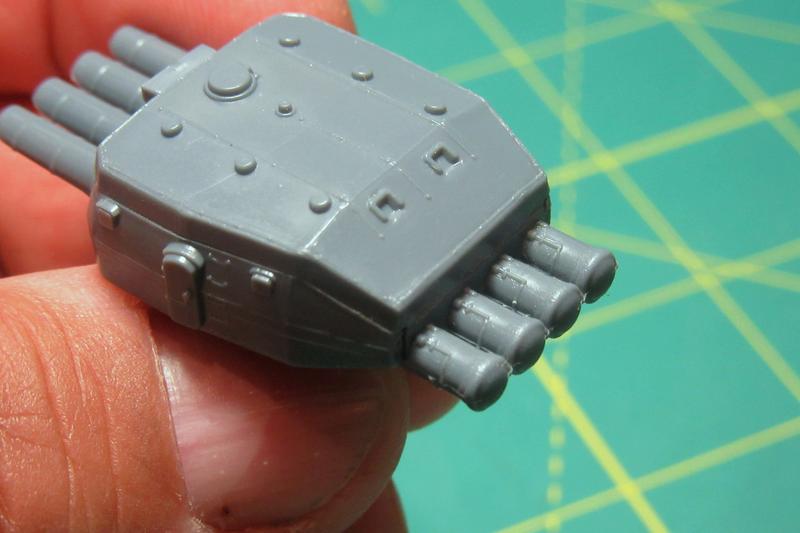
After filling in the steps with super glue and leveling them up on both sides, I turned my attention to the compressed air lines connected to the tubes aft. There are faint molded representations of them on the kit tubes, but they are undersized. These lines fed the pressurized air that launched the 6,000 pound torpedoes, and they were in fact quite substantial.
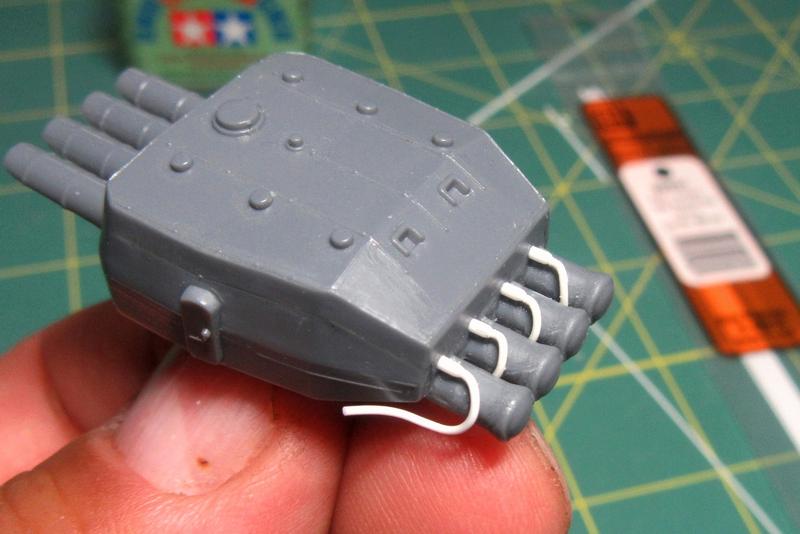
I scraped away the molded feed lines and added new ones from .040 and .020 inch plastic rod.

RussellE
#306
Joined: June 27, 2010
KitMaker: 3,959 posts
Model Shipwrights: 2,777 posts
Posted: Sunday, September 13, 2020 - 12:37 PM UTC
continuing the high standard, Tim 

d6mst0
#453
Joined: August 28, 2016
KitMaker: 1,925 posts
Model Shipwrights: 1,298 posts
Posted: Monday, September 14, 2020 - 02:02 AM UTC
Tim,
Nice modifications but I feel you are not quite done with this weapon system.
Mark
Nice modifications but I feel you are not quite done with this weapon system.
Mark
RedDuster
Joined: March 01, 2010
KitMaker: 7,078 posts
Model Shipwrights: 6,649 posts
Posted: Monday, September 14, 2020 - 06:31 AM UTC
Nice work on the TTs Tim,
The feed lines look so much better than than the shallow molded detail.
Great build
Cheers
Si
The feed lines look so much better than than the shallow molded detail.
Great build
Cheers
Si
TimReynaga
Joined: May 03, 2006
KitMaker: 2,500 posts
Model Shipwrights: 1,830 posts
Posted: Thursday, September 17, 2020 - 09:11 PM UTC
Russ and Si, thanks!
You are right, Mark - in this scale everything is so visible it seems that there is always more to do!
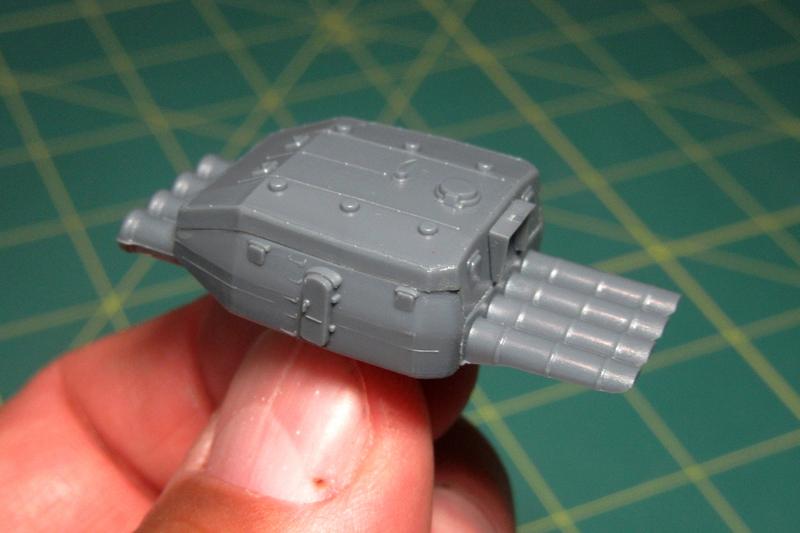
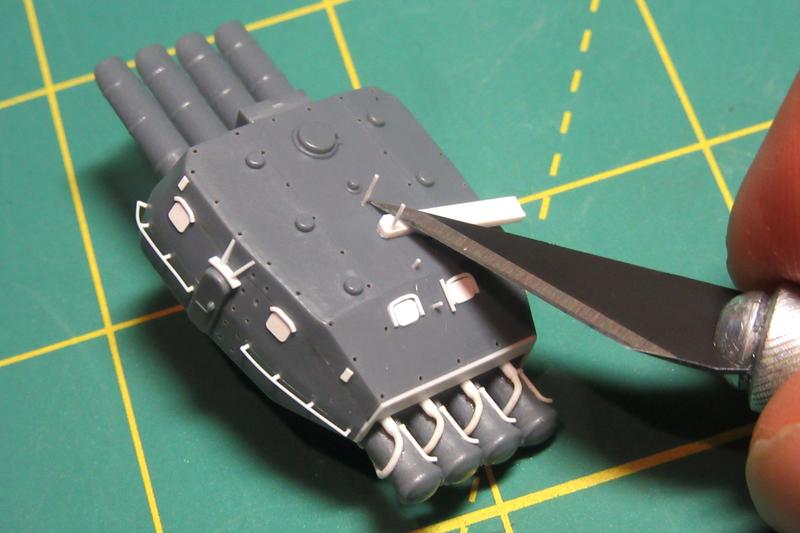
With the body shape corrected and the compressed air feed lines secured, I drilled out the locator holes for the handgrabs and side rails.
The 16 rail holes along the launcher sides were drilled with a #80 bit using a scrap of old 1/500 scale railing as a jig to ensure uniform spacing. The 10 holes for the ladder were drilled using the spacing tool included with the AKA Model 1/350 etched brass ladder steps (PD3503).
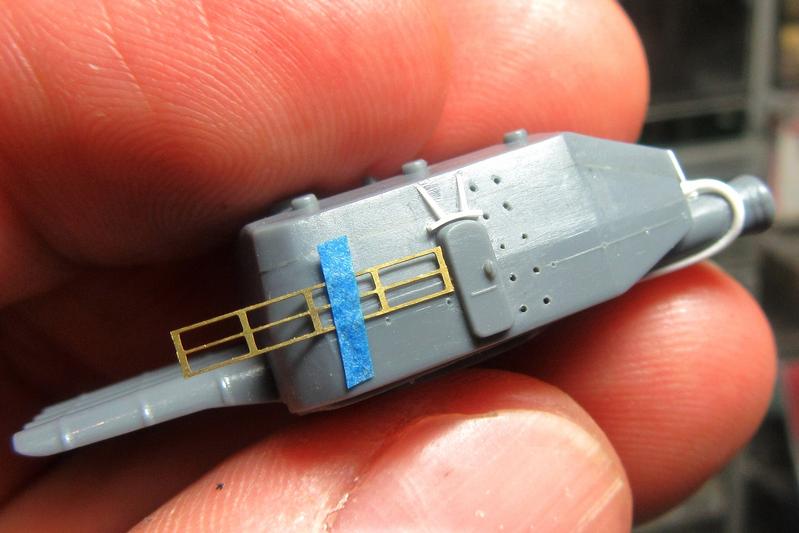
After drilling the holes, I replaced the 9 viewports with new ports cut from .005 plastic with .010X.010 rainguards. I also rebuilt the rainguard assemblies over the doors.
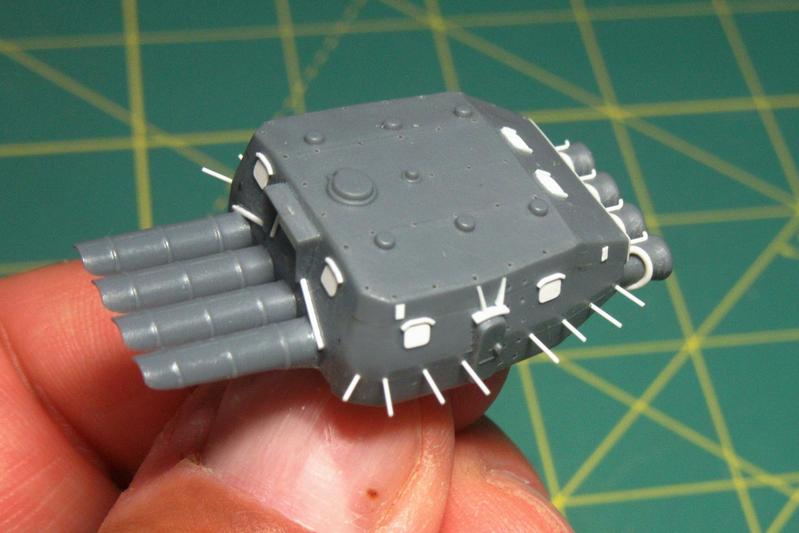
As with the footrails on the bridge structure and funnel, I glued in the stanchions...
...trimmed them down to .015 inch lengths, and then attached the horizontal grabrails.
Quoted Text
Tim,
Nice modifications but I feel you are not quite done with this weapon system.
Mark
You are right, Mark - in this scale everything is so visible it seems that there is always more to do!
With the body shape corrected and the compressed air feed lines secured, I drilled out the locator holes for the handgrabs and side rails.
The 16 rail holes along the launcher sides were drilled with a #80 bit using a scrap of old 1/500 scale railing as a jig to ensure uniform spacing. The 10 holes for the ladder were drilled using the spacing tool included with the AKA Model 1/350 etched brass ladder steps (PD3503).
After drilling the holes, I replaced the 9 viewports with new ports cut from .005 plastic with .010X.010 rainguards. I also rebuilt the rainguard assemblies over the doors.
As with the footrails on the bridge structure and funnel, I glued in the stanchions...
...trimmed them down to .015 inch lengths, and then attached the horizontal grabrails.
d6mst0
#453
Joined: August 28, 2016
KitMaker: 1,925 posts
Model Shipwrights: 1,298 posts
Posted: Thursday, September 17, 2020 - 09:21 PM UTC
Tim,
Sweet! Really nice enhancements, simple and effective.
Mark
Sweet! Really nice enhancements, simple and effective.
Mark
GazzaS
#424
Joined: April 23, 2015
KitMaker: 4,648 posts
Model Shipwrights: 249 posts
Posted: Thursday, September 17, 2020 - 10:21 PM UTC
That torpedo launcher looks excellent!
YellowHammer
#513
Joined: March 28, 2006
KitMaker: 554 posts
Model Shipwrights: 219 posts
Posted: Friday, September 18, 2020 - 01:25 PM UTC
Awesome detailing Tim
TimReynaga
Joined: May 03, 2006
KitMaker: 2,500 posts
Model Shipwrights: 1,830 posts
Posted: Tuesday, September 22, 2020 - 03:39 PM UTC
Mark, Gary, and John, thanks!
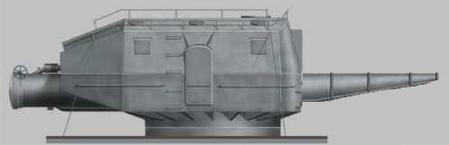
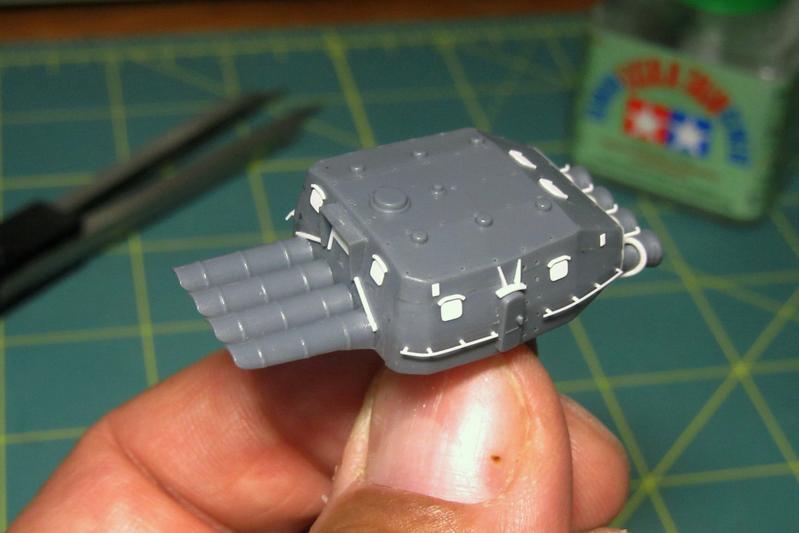
In addition to the side rails, Japanese torpedo launchers had short safety rails on their tops as well.
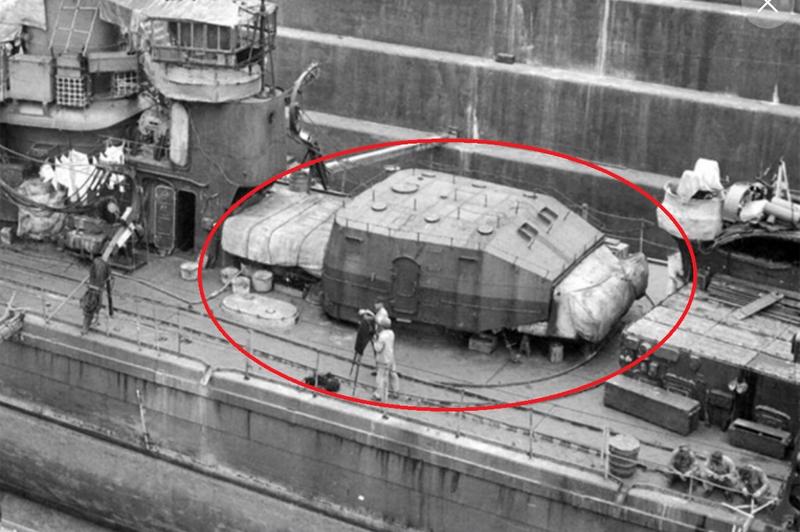
The rails are visible in this image of a launcher aboard Shiranui. Not only were there rails along the edges, but there were three rows of them in the center too.
After drilling out the 43 top stanchion locator holes, the safety rails were installed in the same way as the handrails on the sides. These things were crowded in there pretty closely, so my construction sequence was to build them up beginning with the center groups in an effort to minimize damage while working on rails along the outer edges.
For these slightly taller vertical safety rails I used a thicker .020 tool to help cut the stanchions to uniform heights.
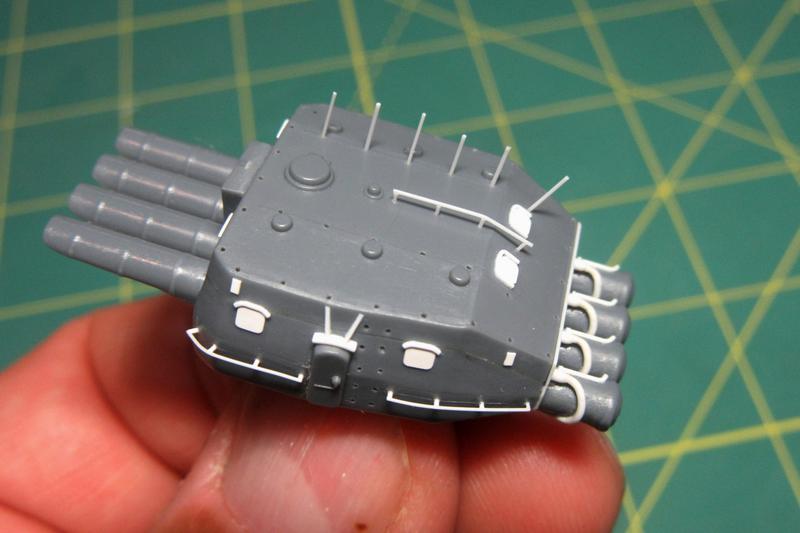
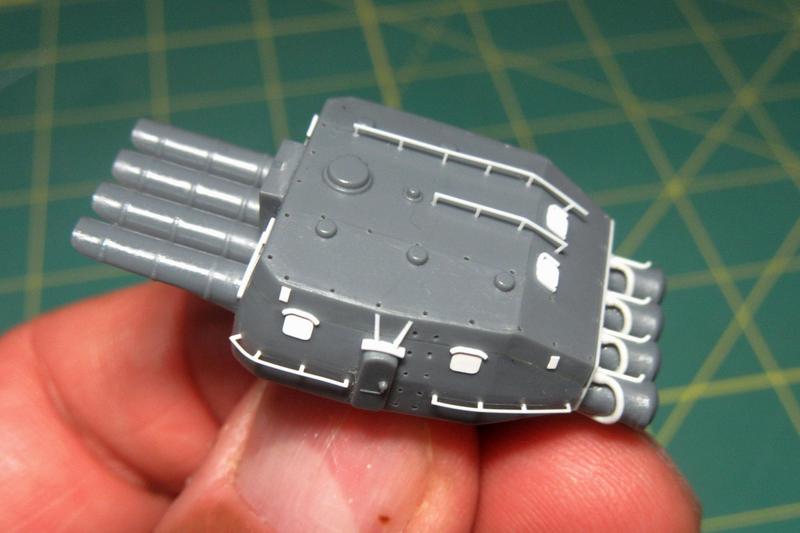
Finally, the rails were secured to the tops of the stanchions with careful applications of Tamiya Extra Thin cement.
In addition to the side rails, Japanese torpedo launchers had short safety rails on their tops as well.
The rails are visible in this image of a launcher aboard Shiranui. Not only were there rails along the edges, but there were three rows of them in the center too.
After drilling out the 43 top stanchion locator holes, the safety rails were installed in the same way as the handrails on the sides. These things were crowded in there pretty closely, so my construction sequence was to build them up beginning with the center groups in an effort to minimize damage while working on rails along the outer edges.
For these slightly taller vertical safety rails I used a thicker .020 tool to help cut the stanchions to uniform heights.
Finally, the rails were secured to the tops of the stanchions with careful applications of Tamiya Extra Thin cement.

Kevlar06
Joined: March 15, 2009
KitMaker: 3,670 posts
Model Shipwrights: 173 posts

Posted: Tuesday, September 22, 2020 - 03:47 PM UTC
Ok, Im going to go and bury all my models in the backyard now. Tim, how the heck do you drill holes that small? Ive broken dozens, maybe hundreds of steel, tungsten and hardened brass drill bits in my sixty years of modeling. Ive used pin vices, variable speed drills, even tiny drill presses, but I couldnt get consistent holes like youve done. Show us your secret. Do you have a secret NASA titanium set of tiny drill bits and a sub miniature electric drill?
VR, Russ
VR, Russ
RussellE
#306
Joined: June 27, 2010
KitMaker: 3,959 posts
Model Shipwrights: 2,777 posts
Posted: Tuesday, September 22, 2020 - 10:59 PM UTC
Tim, your attention to detail is always so impressive!
Surely this will take centre place in your "fleet"display when completed!
Russ, I find when drilling holes, it pays to "spot" them prior to drilling them with some sort of sharp pointer, that way you get the location exactly where you want it when you position the drill...
Surely this will take centre place in your "fleet"display when completed!
Quoted Text
Ok, Im going to go and bury all my models in the backyard now. Tim, how the heck do you drill holes that small? Ive broken dozens, maybe hundreds of steel, tungsten and hardened brass drill bits in my sixty years of modeling. Ive used pin vices, variable speed drills, even tiny drill presses, but I couldnt get consistent holes like youve done. Show us your secret. Do you have a secret NASA titanium set of tiny drill bits and a sub miniature electric drill?
VR, Russ
Russ, I find when drilling holes, it pays to "spot" them prior to drilling them with some sort of sharp pointer, that way you get the location exactly where you want it when you position the drill...
d6mst0
#453
Joined: August 28, 2016
KitMaker: 1,925 posts
Model Shipwrights: 1,298 posts
Posted: Wednesday, September 23, 2020 - 12:11 AM UTC
Tim,
Nice work on adding those railings to the torpedo housing.
Now don't think I am a bean counter because I am not but those railings seem thick compared to the photo. Was wondering if using a generic PE railing set trimmed down would worked better? It would seem to be the way to go at the 350 scale I work at.
Mark
TimReynaga
Joined: May 03, 2006
KitMaker: 2,500 posts
Model Shipwrights: 1,830 posts
Posted: Wednesday, September 23, 2020 - 12:55 AM UTC
Quoted Text
Tim,
Nice work on adding those railings to the torpedo housing.
Now don't think I am a bean counter because I am not but those railings seem thick compared to the photo. Was wondering if using a generic PE railing set trimmed down would worked better? It would seem to be the way to go at the 350 scale I work at.
Thanks Mark, and you are right - the white plastic rails do look thick in those close-up photos. I did experiment with etch, but what works in 1/350 can look odd in 1/200; the two-dimensionality of the etched brass rails was just too obvious in the larger scale. Fortunately, the bright white plastic railing did look much finer when I painted it gray on my test piece, so I hope this solution will work. Anyway, I'm committed now...!
 |

WEB HOSTING BY


Copyright ©2021 Model Shipwrights and Kitmaker Network, a subsidiary of Silver Star Enterprises
All Rights Reserved. Please read our Conditions of Use and Privacy Policy.
All Rights Reserved. Please read our Conditions of Use and Privacy Policy.