Ships by Class/Type: Cruisers
Topics covering cruisers both past and present.
Revell Olympia build
TimReynaga
Staff MemberAssociate Editor
MODEL SHIPWRIGHTS
Visit this Community
California, United States
Joined: May 03, 2006
KitMaker: 2,500 posts
Model Shipwrights: 1,830 posts
Posted: Saturday, November 26, 2011 - 01:16 PM UTC

Quoted Text

HI Tim!

You said you "borrowed" the smaller guns from the Varyag kit. Do you have brass barrels on order for the final build, or will Admiral Dewey be in a pickle when 1:350 Russians come calling wanting their guns back?

--Karl


Yeah, those little Russians are outa luck; sometimes it just sucks to be 1/350 in a 1/232 world!
CaptSonghouse
Visit this Community
California, United States
Joined: August 08, 2008
KitMaker: 1,274 posts
Model Shipwrights: 1,236 posts
Posted: Sunday, November 27, 2011 - 07:19 AM UTC
Wow, a disarmed Varyag??? Maybe you can use the kit for a launching scene?

--Karl
surfsup
Visit this Community
Queensland, Australia
Joined: May 20, 2010
KitMaker: 1,230 posts
Model Shipwrights: 1,212 posts
Posted: Wednesday, November 30, 2011 - 02:13 PM UTC
Very nive work my Friend. Will keep note when it comes around to my turn to build her......Cheers Mark
TimReynaga
Staff MemberAssociate Editor
MODEL SHIPWRIGHTS
Visit this Community
California, United States
Joined: May 03, 2006
KitMaker: 2,500 posts
Model Shipwrights: 1,830 posts
Posted: Friday, December 02, 2011 - 01:58 AM UTC

Can’t seem to get done with that superstructure. I missed it before, but the kit openings for the 5 inch guns were off. This wasn’t noticeable until I tried to test fit those lovely new guns in there, which wouldn’t sit properly as a result. The kit-provided casemate openings were too low to the deck and didn’t come up high enough.


So I trimmed the upper portions of the openings to open them up above and and added plastic strip shims to the lower edges to raise them up from the deck level. Not the most complex procedure, but it was important to get things even and smooth. And it had to be repeated ten times....


The end result is not even dramatically different, but at least now the 5 inch guns will sit correctly.
TAFFY3
Visit this Community
New York, United States
Joined: January 21, 2008
KitMaker: 2,531 posts
Model Shipwrights: 1,244 posts
Posted: Friday, December 02, 2011 - 04:22 AM UTC
Hello Tim, the modifications you have been making sure do make a difference and certainly improve the looks of the old girl. I'm really looking forward to seeing how she turns out. Al
RedDuster
Visit this Community
England - South East, United Kingdom
Joined: March 01, 2010
KitMaker: 7,078 posts
Model Shipwrights: 6,649 posts
Posted: Sunday, December 04, 2011 - 03:07 PM UTC
Nice work Tim, really breathing life into the old girl.

Si
TimReynaga
Staff MemberAssociate Editor
MODEL SHIPWRIGHTS
Visit this Community
California, United States
Joined: May 03, 2006
KitMaker: 2,500 posts
Model Shipwrights: 1,830 posts
Posted: Tuesday, December 06, 2011 - 06:56 PM UTC

Quoted Text

Hello Tim, the modifications you have been making sure do make a difference and certainly improve the looks of the old girl. I'm really looking forward to seeing how she turns out.

Al

Nice work Tim, really breathing life into the old girl.

Si


Thanks guys, I'm really having some fun with this one. BTW, I happened to see a nicely built Olympia at a model contest this past weekend, basically out of the box with Tom's Modelworks photoetch and some rigging added. Even though I'm going a bit overboard with mine, that model was a reminder that this kit builds up attractively even without my (probably excessive) mods. But I just cant stop...!
TimReynaga
Staff MemberAssociate Editor
MODEL SHIPWRIGHTS
Visit this Community
California, United States
Joined: May 03, 2006
KitMaker: 2,500 posts
Model Shipwrights: 1,830 posts
Posted: Saturday, December 10, 2011 - 04:35 AM UTC
Did some more work on the superstructure, added those strange paned glass windows to the after 5 inch casemate openings. When I first saw these in photos of the preserved ship I assumed they were additions made for the museum, since it seemed so silly to put such obvious hazards near the 5 inch weapons...


Turns out they are original! To my surprise, I found a picture from 1895 showing them in place. After a little research I learned that while the spaces behind the windows housed 5 inch guns, they also accommodated the Captain’s and Admiral’s cabins and staff rooms (Olympia was built as a flagship). Apparently the windows, along with the beautiful interior wood furniture and paneling, were designed to be removed and stowed prior to combat, a common practice on ships of the era. Today, these original interior furnishings and fancy wooden wall (bulkhead) panels are unique: In 1898 as the fleet approached Manila Bay for its showdown with the Spanish Squadron, Admiral Dewey ordered all ships to detach these fire hazards and toss them over the side in preparation for battle. The single exception was his flagship, the Olympia. I guess he liked the gorgeous interior appointments so much he was willing to risk it! Anyway, as the fleet returned after the battle, Olympia was the only one that still had her wooden furnishings intact. Much of this is still aboard the museum ship today. I haven’t seen it in person, but photos of these spaces show what look like typically ornate 19th Century drawing rooms with 5 inch guns in them!
Unfortunately, on the model these interior areas won’t be very visible at all, so I’ll just paint the bare bulkheads dark brown.


As for the outside windows, I replicated these using K & S Engineering 3/64 inch square photoetched brass mesh, bent over a pen to get the rounded shape of the casemates. I still think they look strange, and they somewhat obscure those nice guns inside, but oh, well. They are authentic, and they do add interest...
RedDuster
Visit this Community
England - South East, United Kingdom
Joined: March 01, 2010
KitMaker: 7,078 posts
Model Shipwrights: 6,649 posts
Posted: Sunday, December 11, 2011 - 11:33 PM UTC
Very Interesting regarding the windows and furnishings.

There is a well known photograph of Admiral Fisher in his day cabin aboard HMS Renown when in CinC Mediteranean fleet around the same period, and the cabin does have the look of an English country house.

The etched mesh looks good, a nice point of interest.

Si
windysean
Visit this Community
Wisconsin, United States
Joined: September 11, 2009
KitMaker: 1,917 posts
Model Shipwrights: 54 posts
Posted: Monday, December 12, 2011 - 03:34 AM UTC

Quoted Text

In 1898 as the fleet approached Manila Bay for its showdown with the Spanish Squadron, Admiral Dewey ordered all ships to detach these fire hazards and toss them over the side in preparation for battle. The single exception was his flagship, the Olympia. I guess he liked the gorgeous interior appointments so much he was willing to risk it! Anyway, as the fleet returned after the battle, Olympia was the only one that still had her wooden furnishings intact.


"Do as I say, not as I do." Et tu, Admiral Dewey?
CaptSonghouse
Visit this Community
California, United States
Joined: August 08, 2008
KitMaker: 1,274 posts
Model Shipwrights: 1,236 posts
Posted: Tuesday, December 13, 2011 - 08:23 AM UTC

Quoted Text


Quoted Text

In 1898 as the fleet approached Manila Bay for its showdown with the Spanish Squadron, Admiral Dewey ordered all ships to detach these fire hazards and toss them over the side in preparation for battle. The single exception was his flagship, the Olympia. I guess he liked the gorgeous interior appointments so much he was willing to risk it! Anyway, as the fleet returned after the battle, Olympia was the only one that still had her wooden furnishings intact.


"Do as I say, not as I do." Et tu, Admiral Dewey?


This one may be on Captain Gridley. Flag Captains are especially sensitive to the whims of their hosted flag officers and this sounds suspiciously like Gridley wanting to retain the Commodore's furnishings.

At any rate, they got away with it at Manila Bay and Santiago, so plush interiors in wardrooms and the like were standard until the Astoria, Quincy, and Vincennes learned the hard way what it means to be Battle Ready off Savo.

--Karl
TimReynaga
Staff MemberAssociate Editor
MODEL SHIPWRIGHTS
Visit this Community
California, United States
Joined: May 03, 2006
KitMaker: 2,500 posts
Model Shipwrights: 1,830 posts
Posted: Friday, December 16, 2011 - 01:51 AM UTC
With the superstructure exterior together and the interior detailed up I thought I was starting to make some great progress, but after looking at my references it was clear that the forward deck needed more attention. The Revell kit designers had correctly depicted this open deck as planked, but unfortunately it is otherwise devoid of detail other than the foremast which penetrates it just behind the armored citadel. In fact, there was quite a bit going on here. To start with, there was a dual up-down stairway through the deck just forward the funnel; the first pic shows the hole marked off in pencil pror to cutting it out.

After cutting out the hole through the deck and framing it with plastic strip, I test fit the stairs. As you can see, the photoetch parts (from the Gold Medal Models Olympia set) look very cool from above. Unfortunately, they won’t be visible from that angle because of the bridge deck to go overhead later, but at least they will be visible through the open 5 inch gun casemates. They’ll be hard to see in the dim interior space behind the guns, but judicious use of the penlight will be rewarded!

I also scratchbuilt the various square and cylindrical vent trunks located on the open superstructure deck using old plans and photos of the preserved ship as guides. The shapes were built up from plastic sheet and rod; the tops of the mushroom vents are parts taken from a 1/350th scale Tamiya New Jersey. Like the stairs, these fittings will be obscured from overhead by the bridge deck above them, but they’ll still remain visible from the sides. It is strange that Revell neglected to provide them, but I guess they were going for basic fidelity and buildability rather than total accuracy. Tucked away on that planked deck behind safety railing, the new parts should make the area under the bridge look nice and busy.

Next up: the bridge deck and pilothouse.

regards,
Tim
TimReynaga
Staff MemberAssociate Editor
MODEL SHIPWRIGHTS
Visit this Community
California, United States
Joined: May 03, 2006
KitMaker: 2,500 posts
Model Shipwrights: 1,830 posts
Posted: Tuesday, December 20, 2011 - 01:22 PM UTC
surfsup
Visit this Community
Queensland, Australia
Joined: May 20, 2010
KitMaker: 1,230 posts
Model Shipwrights: 1,212 posts
Posted: Thursday, December 29, 2011 - 01:55 PM UTC
Looking forward to seeing more. Beautiful work so far.....Cheers Mark
TimReynaga
Staff MemberAssociate Editor
MODEL SHIPWRIGHTS
Visit this Community
California, United States
Joined: May 03, 2006
KitMaker: 2,500 posts
Model Shipwrights: 1,830 posts
Posted: Tuesday, January 03, 2012 - 03:23 PM UTC
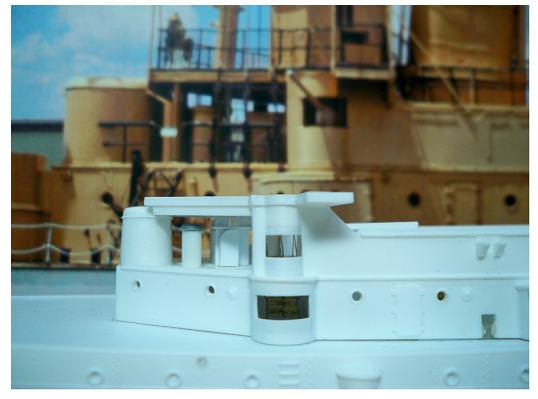
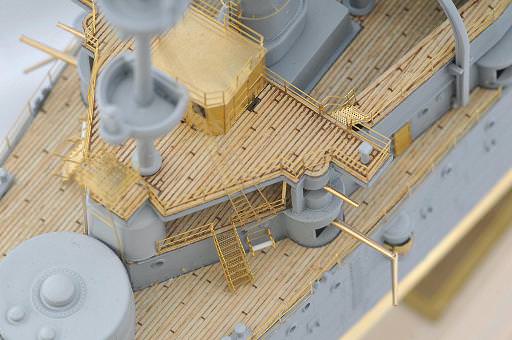
After all that work on the forward superstructure deck I was anxious to cover it all up... so it was on to the bridge deck!
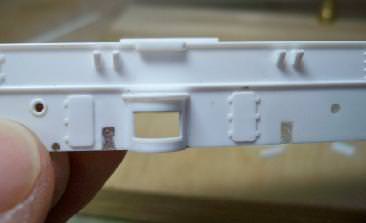
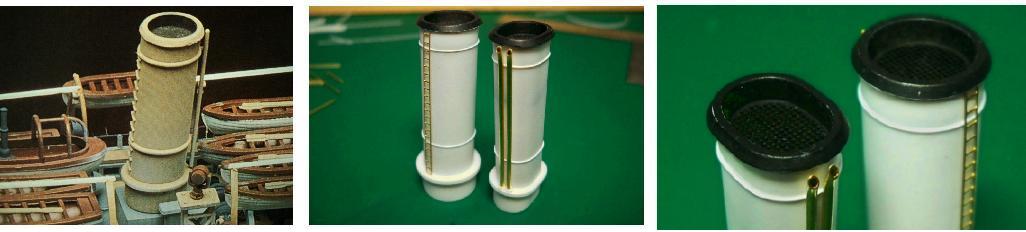
Even though Revell’s 1959 model comes from the very dawn of plastic model ship kits, it really is quite good, something of a masterpiece of the early kit designer’s art. The pattern makers did make some rather odd design choices on it, though. One of these was the pilothouse and bridge deck. Instead of taking the obvious approach of building the little pilothouse structure out of bulkheads and an overhead to be then placed on a solid bridge deck, Revell opted to mold the overhead deck and corner frames for the pilothouse directly to the bridge deck, forming what looks like a little table over a hole. The pilothouse sides, back, and front then fit around this framework. The approach works, but the pilothouse and bridge deck under it end up having no floor! Weird. (The main deck and superstructure sides were also designed this way, and also leave a large unnecessary hole in the main deck under the superstructure. Go figure.)
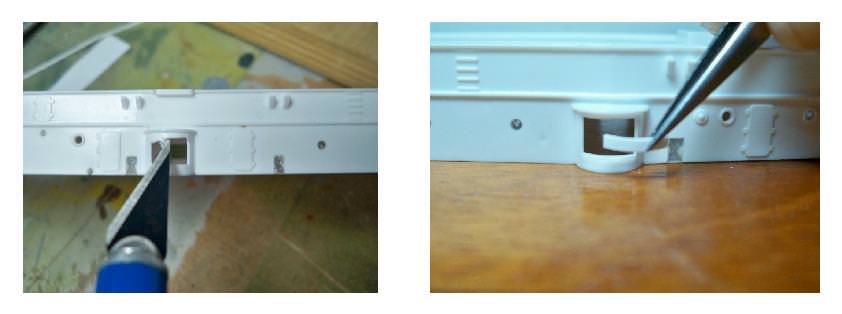
Anyway, fixing this wasn’t a problem. A little piece of sheet plastic on the bottom of the bridge deck did the trick. The top had lovely raised planking detail, but other than that silly hole, the underside of the deck was featureless. So after patching the hole I added some strip plastic support girders on the underside to give it a little interest. You have to get down low to see them, but they’ll be visible up in there if you look.

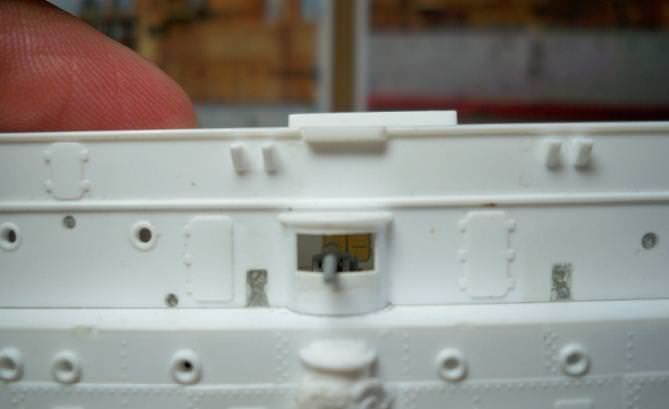
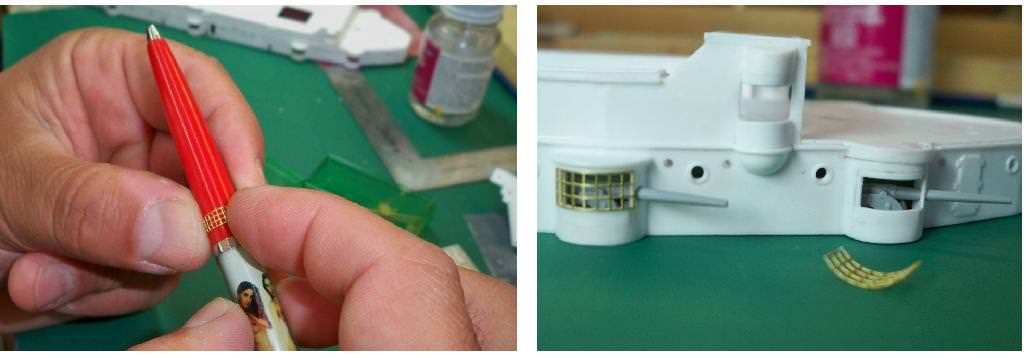
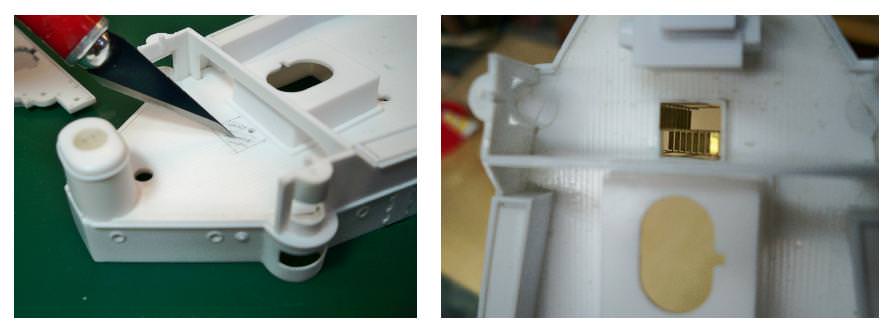
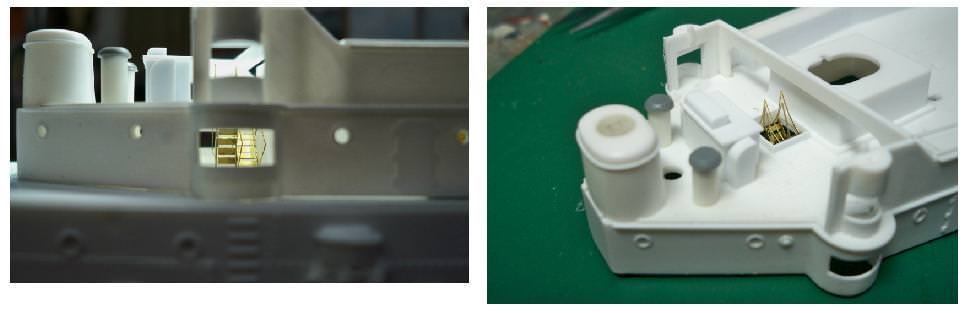
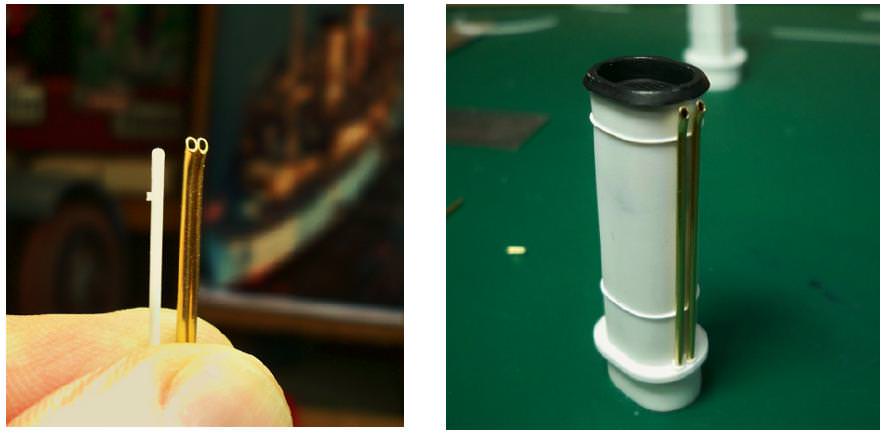
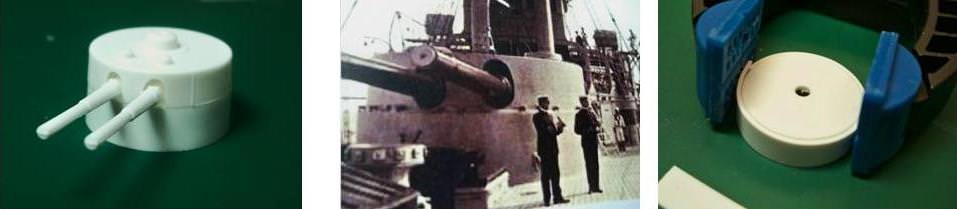
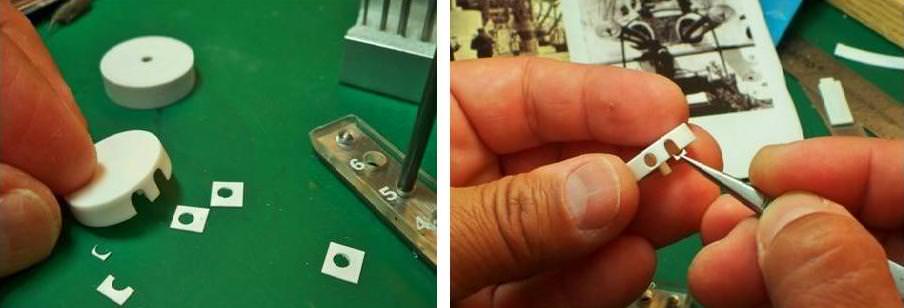
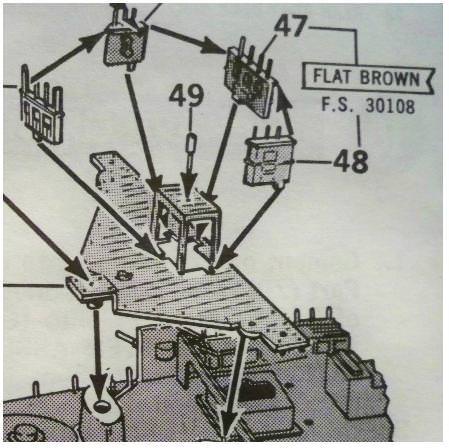
Next came the pilothouse. The tiny structure (about the size of a U.S. dime) looks reasonable as is, but Revell didn’t include any detail in there (and no deck to put it on anyway). The windows are molded open, though, so I added a piece of scribed plastic for the deck, replaced the window frames with more in-scale pieces, and built up interior door frames from plastic strip. A little chart table, binnacle and helm completed the pilothouse appointments. The ship’s wheel is from the Gold Medal Models photoetch set with a plastic rod/sheet column, the table is made from sheet plastic. I made the binnacle from the modified head of a 1/35th scale German Panzerfaust anti tank weapon and .010 inch sheet plastic bits. The little balls (in real life solid iron spheres to help isolate the magnetic compass from the steel structure of the ship) were taken from ball point pens.
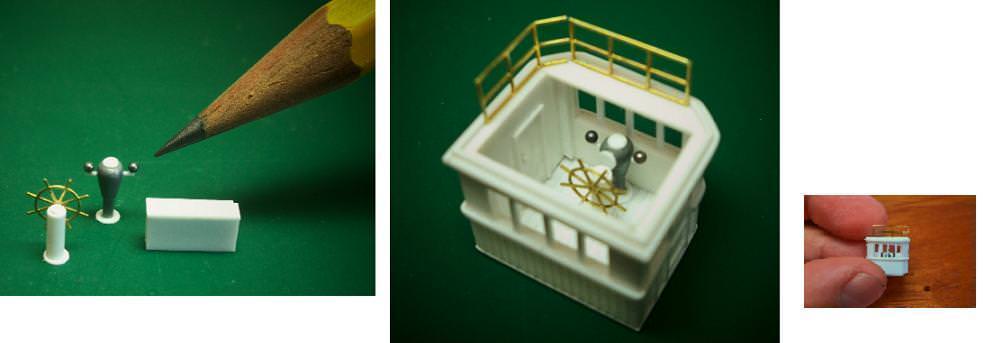
All that detail looks nice, but I’m afraid most of it will be quite hard to see once installed on the ship with the pilothouse overhead in place. Still, it will be visible through the windows if you get out the penlight and really look for it.

I guess anything worth doing is worth overdoing!
RedDuster
Visit this Community
England - South East, United Kingdom
Joined: March 01, 2010
KitMaker: 7,078 posts
Model Shipwrights: 6,649 posts
Posted: Tuesday, January 03, 2012 - 09:14 PM UTC
great work on the pilot house Tim, I doesn't matter how much fo the detail can be seen, you know it's there! But what can be seen will add real depth to the finished project.

Si
Alanroy
Visit this Community
Pennsylvania, United States
Joined: March 27, 2006
KitMaker: 65 posts
Model Shipwrights: 2 posts
Posted: Wednesday, January 04, 2012 - 08:31 AM UTC
Mr. Reynaga,
Will you be addressing the rudder issue? When I built mine 25 or so years ago, I took the simple expediant of slicing off the extension, gluing it to the cut-out in the hull, and filling and sanding.

http://www.navsource.org/archives/04/c6/c0646.jpg

I have to say yours is WAY better than mine ever was!
Best regards,
Alan
amillen at seic dot com
TimReynaga
Staff MemberAssociate Editor
MODEL SHIPWRIGHTS
Visit this Community
California, United States
Joined: May 03, 2006
KitMaker: 2,500 posts
Model Shipwrights: 1,830 posts
Posted: Thursday, January 05, 2012 - 02:06 AM UTC

Quoted Text

Mr. Reynaga,
Will you be addressing the rudder issue? When I built mine 25 or so years ago, I took the simple expediant of slicing off the extension, gluing it to the cut-out in the hull, and filling and sanding.

http://www.navsource.org/archives/04/c6/c0646.jpg

I have to say yours is WAY better than mine ever was!
Best regards,
Alan


Thanks for the compliment, Alan. Your comments about the rudder show that your Olympia was clearly superior to mine in at least that respect; I hadn't planned to address the rudder issue. Why? For the simple reason that I hadn't noticed it! Can't believe I missed that. The picture you provided (and the plans I have, now that I look at them with greater care) clearly show the difference. Doh!

The model is otherwise pretty accurate... what could the Revell guys have been thinking? Could the ship have had the Revell rudder configuration at some point? I’ve been pawing through my references trying to find a way to justify leaving as it is, but so far no luck. Grasping at straws, I know. Guess I’ll have to go back and fix it.

Your solution sounds good though. Thanks for the heads up!

Tim
TAFFY3
Visit this Community
New York, United States
Joined: January 21, 2008
KitMaker: 2,531 posts
Model Shipwrights: 1,244 posts
Posted: Thursday, January 05, 2012 - 02:53 AM UTC
Hello Tim, I love the detail you added to the pilothouse. The picture of you holding it shows how tiny it is. If that had been me in that photo, I would probably have fumble-fingered it. It would have been launched onto the floor to maim or lose the handrail, at which point a lurking cat would have pounced on it and batted it across the room and under the nearest piece of furniture. Or, I would simply have stepped on it while searching for it. I am really enjoying following this build and the great job you are doing. Al
TimReynaga
Staff MemberAssociate Editor
MODEL SHIPWRIGHTS
Visit this Community
California, United States
Joined: May 03, 2006
KitMaker: 2,500 posts
Model Shipwrights: 1,830 posts
Posted: Friday, January 06, 2012 - 01:50 AM UTC

Quoted Text

Hello Tim, I love the detail you added to the pilothouse. The picture of you holding it shows how tiny it is. If that had been me in that photo, I would probably have fumble-fingered it. It would have been launched onto the floor to maim or lose the handrail, at which point a lurking cat would have pounced on it and batted it across the room and under the nearest piece of furniture. Or, I would simply have stepped on it while searching for it. I am really enjoying following this build and the great job you are doing. Al


LOL! I did just that! Dropped the thing on the garage floor as I was holding the camera in the other hand, had to destroy another pen to replace one of the spheres which rolled off to parts unknown. As for the cat, we have an agreement: she doesn't mess with my models and I keep her supplied with Meow Mix. Of course, HER understanding of the agreement is that I keep the bowl full and she sleeps in my model box whenever it suits her!
TimReynaga
Staff MemberAssociate Editor
MODEL SHIPWRIGHTS
Visit this Community
California, United States
Joined: May 03, 2006
KitMaker: 2,500 posts
Model Shipwrights: 1,830 posts
Posted: Tuesday, January 24, 2012 - 01:18 AM UTC
Haven’t got much done in the past couple of weeks, but the funnels at least are ready for action.

The funnels are reasonably accurate as they come in the kit, but I thought they could use a little refinement. First, the heavy bands molded around the kit parts, though accurately placed, are too heavy. The photoetch replacement parts supplied with the new Encore reissue posted on the Squadron webpage (which has yet to appear on my porch!) depict these as Japanese-style standoff funnel footropes, but the real ones were actually more like what Revell depicted, just finer. Anyway, I trimmed the kit bands off and replaced them with new ones made from Plastruct 0.3mm styrene rod (No. 90850) which look closer to scale.
Next, the solid molded funnel tops were opened up and capped with the open mesh funnel grill parts from the Gold Medal Models Olympia photoetch set. I had also smoothed the insides of the funnels and removed the molded-in locator guides there, then painted the smokestack interior flat black. I thought the interior might be visible through that mesh, but it turns out you can’t really see anything in there after everything is together and painted black. Oh well. GMM also provided the ladders which replaced the odd looking rungs molded onto the kit parts. A simple upgrade, but SO much better!

I also replaced the long vent pipes at the rear of both funnels. The kit depicted these as single solid rods with rounded tops cast directly to the funnel parts. This was a reasonable representation, but the real pipes were actually doubles on each funnel, slightly curved at the top, and of course open. I used Lion Roar 1.0mm brass pipe (LT0019) to make these. The delicate Lion Roar aftermarket brass pipes are beautiful, precisely machined and perfect for scratchbuilding. Still, I had the devil’s own time getting the subtle bends at the top for the four pipes. Finally, after wasting most of an entire pack of these (some eighteen inches of tiny pipe!), I managed to get four good vents. Kind of a pain, but they look muuuch better than those simplified kit parts.

Next up: the main 8 inch turrets with those gorgeous B & D brass replacement barrels, yeah!
TimReynaga
Staff MemberAssociate Editor
MODEL SHIPWRIGHTS
Visit this Community
California, United States
Joined: May 03, 2006
KitMaker: 2,500 posts
Model Shipwrights: 1,830 posts
Posted: Tuesday, January 31, 2012 - 02:31 AM UTC
The latest work on the Olympia has been on the main turrets. The kit parts are not too bad, with the turrets measuring out correctly in diameter and height. The barrels weren’t very good, but I had the B & D brass replacements to take care of those, so no problem there! The main issue was the turret bases, which Revell depicted as the same diameter as the turrets themselves. These were actually somewhat wider than the turrets. Not too difficult a fix, really; I just bonded a band of thick sheet plastic around the kit bases to bring them to the correct diameter.


The turrets themselves were pretty plain in real life. Revell had dressed them up with some delicately raised vertical lines along the sides, apparently intended to suggest weld lines. Unfortunately, they were not evident on photos of the real ship, so I removed them. Another small discrepancy was the barrel openings on the turrets, which were shown as U-shaped apertures, open at the bottom. This style of representation was fairly common on older ship model kits (and on some newer ones too!), but it is not correct. These were actually oval openings, so I filled in the bottoms with parts made from .010 inch plastic sheet.

RedDuster
Visit this Community
England - South East, United Kingdom
Joined: March 01, 2010
KitMaker: 7,078 posts
Model Shipwrights: 6,649 posts
Posted: Tuesday, January 31, 2012 - 09:27 PM UTC
Hi Tim

Nice work on the Funnels & Turrets.

Si
warreni
Visit this Community
South Australia, Australia
Joined: August 14, 2007
KitMaker: 5,926 posts
Model Shipwrights: 2,624 posts
Posted: Thursday, February 02, 2012 - 10:15 AM UTC
Looking great Tim!!

Your build has prompted me to buy the new release deluxe version of the Olympia... Wrong scale but oh well!

Cheers
Warren
TimReynaga
Staff MemberAssociate Editor
MODEL SHIPWRIGHTS
Visit this Community
California, United States
Joined: May 03, 2006
KitMaker: 2,500 posts
Model Shipwrights: 1,830 posts
Posted: Sunday, February 05, 2012 - 03:10 AM UTC
Hi Si and Warren, thanks for the compliments. I ordered the Encore Premium Edition kit too, just for the upgrade parts. Wish it had been available when I started the thing. That KA wood deck on the Squadron Facebook page looks especially enticing:
http://www.facebook.com/SquadronShop#!/photo.php?fbid=10150380015418618&set=pu.325219133617&type=1&theater

Been hesitant to do much more on the model until the new parts arrive!
Tim