

Great stuff Tim, the work with the wooden deck is very interesting, I haven't used one yet, so am watching closely.
Si


Go to modelshipwrights.com for the current dynamic site!
Hosted by Jim Starkweather
Revell Olympia build

RedDuster

Joined: March 01, 2010
KitMaker: 7,078 posts
Model Shipwrights: 6,649 posts

Posted: Tuesday, April 17, 2012 - 09:34 PM UTC

surfsup

Joined: May 20, 2010
KitMaker: 1,230 posts
Model Shipwrights: 1,212 posts

Posted: Tuesday, April 17, 2012 - 11:11 PM UTC
I love what you are doing Tim. Fantastic work.....Cheers Mark

TimReynaga

Joined: May 03, 2006
KitMaker: 2,500 posts
Model Shipwrights: 1,830 posts

Posted: Saturday, April 21, 2012 - 04:49 AM UTC
More pre-attachment adjustments to the wood deck. The original kit masts had large locating ring-blobs at the bases where they were to attach to the decks, so the wood veneer parts have relatively big holes designed to accommodate them. The kit masts would have filled the spaces well enough, but my finer brass replacements seemed lost in them. To improve things, I cut out a small section of the wood around the hole, then cut another to replace it from the scrap around the wood parts. The new part received a smaller .120 inch hole using punch #5 from a Waldron Model Products precision punch and die set (one of my favorite tools!)

I used the same procedure to adjust the apertures for the foremast through the superstructure and forward bridge decks.
Next up: the skylights
I used the same procedure to adjust the apertures for the foremast through the superstructure and forward bridge decks.
Next up: the skylights

TimReynaga
Joined: May 03, 2006
KitMaker: 2,500 posts
Model Shipwrights: 1,830 posts
Posted: Sunday, April 29, 2012 - 01:48 AM UTC

A small diversion: After seeing those nice wide bilge keels in the Squadron photoetched brass fret, I took another look at my references and realized Id made my plastic ones (.020 X .080 inch) too narrow. So off they came, to be replaced by wider (.020 X .125 inch) keels that better matched the historical pics. Not much of a difference really, but it wasnt too difficult a fix and it would have bothered me had I left it.
RedDuster
Joined: March 01, 2010
KitMaker: 7,078 posts
Model Shipwrights: 6,649 posts
Posted: Sunday, April 29, 2012 - 09:24 PM UTC
great stuff Tim,
especially interested in all the adaptaions to the wood decking. I have a couple of builds I have decks for, hope I don't need to hack them about, but thanks to your clear pics & guidance.
Si
especially interested in all the adaptaions to the wood decking. I have a couple of builds I have decks for, hope I don't need to hack them about, but thanks to your clear pics & guidance.
Si
TimReynaga
Joined: May 03, 2006
KitMaker: 2,500 posts
Model Shipwrights: 1,830 posts
Posted: Friday, May 04, 2012 - 12:44 AM UTC
Quoted Text
great stuff Tim,
especially interested in all the adaptaions to the wood decking. I have a couple of builds I have decks for, hope I don't need to hack them about, but thanks to your clear pics & guidance.
Si
Si,
I don't think you will have to do all this deck hacking if you do an Olympia. I made a mess of things because I changed course midway through; I had intended to plank her decks using individual HO scale 2 x 4 lumber lengths and so didn't worry about keeping precisely true to the original kit dimensions. Most of the adjusting I've had to do is because of alterations to the plastic like the new masts, the adjusted pilothouse deck, new winch mounts, etc. If you avoid all that and just build the thing, the new wood deck would fit very well as is.

TimReynaga
Joined: May 03, 2006
KitMaker: 2,500 posts
Model Shipwrights: 1,830 posts
Posted: Wednesday, May 23, 2012 - 12:46 AM UTC
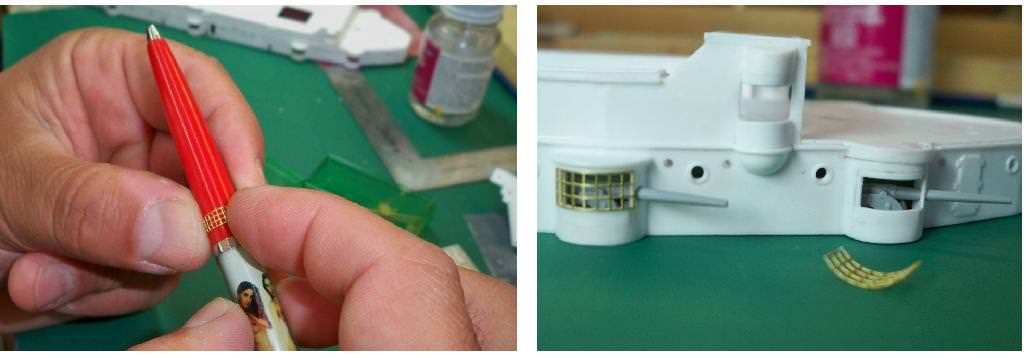
The plastic skylights in the original kit are pretty good, and Id planned to use them without alterationthat is, until I saw the photoetch skylight gratings that came in the Squadron premium edition kit. They are absolutely superb! Designed to be mounted in the closed position directly over the plastic parts, the photoetch gratings are a straightforward but effective upgrade. As usual, though, I couldnt resist turning a simple detail into something more complicated. To show off those great photoetch parts to better advantage, I carved away the molded on gratings from the plastic skylight parts.

It was supposed to be just be a simple matter of opening up the skylights to better show off the delicate photoetch top parts, but in test fitting the new gratings I realized you can look through them and see the solid deck below... so the deck had to be opened up too. I cut out sections of the solid wood veneer, followed by openings cut in the plastic deck. It looked good, so I decided to position the gratings open too, as if the crew were venting the ship while in port. It was a bit more work than originally envisioned, but the opened up skylights do look more interesting, even before installing the photoetch gratings.


With the covers open, the deck and some of the bulkheads below will now be dimly visible through the skylights. This is cool, but showing them open will mostly serve to highlight those gorgeous brass gratings. Cant wait to get them painted and installed, cause with the new covers on, the skylights are gonna look great. Thank you Squadron!


It was supposed to be just be a simple matter of opening up the skylights to better show off the delicate photoetch top parts, but in test fitting the new gratings I realized you can look through them and see the solid deck below... so the deck had to be opened up too. I cut out sections of the solid wood veneer, followed by openings cut in the plastic deck. It looked good, so I decided to position the gratings open too, as if the crew were venting the ship while in port. It was a bit more work than originally envisioned, but the opened up skylights do look more interesting, even before installing the photoetch gratings.
With the covers open, the deck and some of the bulkheads below will now be dimly visible through the skylights. This is cool, but showing them open will mostly serve to highlight those gorgeous brass gratings. Cant wait to get them painted and installed, cause with the new covers on, the skylights are gonna look great. Thank you Squadron!

TAFFY3
Joined: January 21, 2008
KitMaker: 2,531 posts
Model Shipwrights: 1,244 posts

Posted: Wednesday, May 23, 2012 - 05:27 AM UTC
Oh boy Tim, have you got it bad!  But I do love what you're doing with this kit.
  Al
Al
But I do love what you're doing with this kit. AlRedDuster
Joined: March 01, 2010
KitMaker: 7,078 posts
Model Shipwrights: 6,649 posts
Posted: Wednesday, May 23, 2012 - 09:30 PM UTC
Hi Tim,
Etched skylights look really good, can see why you could not resist using them.
with them open it will add another dimension of depth to the finished model.
Si
Etched skylights look really good, can see why you could not resist using them.
with them open it will add another dimension of depth to the finished model.
Si
TimReynaga
Joined: May 03, 2006
KitMaker: 2,500 posts
Model Shipwrights: 1,830 posts
Posted: Tuesday, May 29, 2012 - 12:28 AM UTC

Threw some paint on the old girl this weekend, did up the hull with Model Master semi-gloss White and Insignia Red enamels. The red-brown section you can see up top will be the interior decks. Test fitting the superstructure, those red-brown decks and white interior structures will be only dimly visible through the casemate openings past the five inch guns. Its pretty dark in there; I might have wasted my time on all that extra detail. Still, for those taking a penlight and getting down low, there will be something to see!

More visible will be the photoetched federal shield on the bow and the crest at the stern. Though very small to paint, these relief-etched parts from the Squadron/Encore photoetched brass set really stand out on that white hull.


RedDuster
Joined: March 01, 2010
KitMaker: 7,078 posts
Model Shipwrights: 6,649 posts
Posted: Tuesday, May 29, 2012 - 08:29 PM UTC
Tidy paint job on the crest and the nameplate Tim.
Doesn't matter how much detail you can see through the casemates, firstly and most importantly, you know it's there and you enjoyed putting it there and secondly, whatever can be seen gives far more depth to the model.
Great stuff
Si
Doesn't matter how much detail you can see through the casemates, firstly and most importantly, you know it's there and you enjoyed putting it there and secondly, whatever can be seen gives far more depth to the model.
Great stuff
Si
surfsup
Joined: May 20, 2010
KitMaker: 1,230 posts
Model Shipwrights: 1,212 posts
Posted: Wednesday, May 30, 2012 - 08:32 PM UTC
They look great my Firnd. Am really enjoying your build.....Cheers Mark
TimReynaga
Joined: May 03, 2006
KitMaker: 2,500 posts
Model Shipwrights: 1,830 posts
Posted: Wednesday, June 20, 2012 - 02:52 PM UTC

I got most of the buff structures painted up (Floquil SP Armor Yellow) and put the first of the wood down on the superstructure deck and on the superstructure catwalks. This is the first time Ive used press-on wood decks, and man am I a convert! Even though these decks needed adjusting after my alterations of the plastic parts, this was so easy, and the end product looks better than anything I had EVER achieved using paint. Wohoo!


surfsup
Joined: May 20, 2010
KitMaker: 1,230 posts
Model Shipwrights: 1,212 posts
Posted: Thursday, June 21, 2012 - 08:03 AM UTC
Those Decks look great Tim. WIll have to try them soon myself.....Cheers Mark
TimReynaga
Joined: May 03, 2006
KitMaker: 2,500 posts
Model Shipwrights: 1,830 posts
Posted: Saturday, June 23, 2012 - 03:54 PM UTC

Heres the after bridge (which, interestingly, actually looks like a bridge... is that the origin of the term?)
The underside will be somewhat visible on the finished model so I added some bracing girders. I installed it and painted it up with the rest of the superstructure, leaving the underside in white. Its awkward to view, but the white bracing detail is just visible if you really get down low to look up at it. I gotta stop detailing areas that just dont show!
TAFFY3
Joined: January 21, 2008
KitMaker: 2,531 posts
Model Shipwrights: 1,244 posts
Posted: Sunday, June 24, 2012 - 12:48 AM UTC
[Quoted text] Heres the after bridge (which, interestingly, actually looks like a bridge... is that the origin of the term?)
Actually, yes it is. I'm enjoying your build very much, great work. Al
Actually, yes it is. I'm enjoying your build very much, great work.
Al
bigal07

Joined: January 07, 2009
KitMaker: 887 posts
Model Shipwrights: 575 posts
Posted: Wednesday, June 27, 2012 - 08:54 PM UTC
Just gone through the review of this model, while you're having to scratch build an awful lot, you've gone from bath tub model to super display subject, swapping pieces for more advanced looking parts is something I'll try my hand at, while the instructions call for something, common sense takes over and you make that adjustment to get a better look, you're really doing a great job of this, and no doubt those that follow you, will use this thread as a start point to their attempt.
Scratch building the old boy sitting in his deck chair would be something, have you thought of that ?
A great build so far, I'll keep myself glued.
Scratch building the old boy sitting in his deck chair would be something, have you thought of that ?
A great build so far, I'll keep myself glued.

Gremlin56
Joined: October 30, 2005
KitMaker: 3,897 posts
Model Shipwrights: 3,301 posts
KitMaker: 3,897 posts
Model Shipwrights: 3,301 posts
Posted: Friday, June 29, 2012 - 04:54 AM UTC
A very sexy build Tim. I have learnt a lot following your build so far.
Excellent,
Cheers,
julian
Excellent,
Cheers,
julian
TimReynaga
Joined: May 03, 2006
KitMaker: 2,500 posts
Model Shipwrights: 1,830 posts
Posted: Wednesday, July 04, 2012 - 12:56 AM UTC
Thanks Alec and Julian, I appreciate your kind comments... but common sense isnt exactly how Id describe my efforts here! Seems every time I work on the Oly I end up digging a deeper hole for myself to climb out of. And sexy? Well, what can I say... cant argue with those elegant cruiser lines!
Got the superstructure mostly done, getting ready to attach it.
Unfortunately, the completed gun assemblies wont fit through the embrasure openings once the superstructure is secured to the deck, so before attaching it I installed the four aft 5 inch guns and those goofy paned windows.


As for the rest of the 5 inchers, I glued the gun mounts (without the guns) to the deck before I fit the superstructure down over them. The guns themselves will be attached to their mountings sometime later.
Tomorrow I take my seventeen year old for her driving test for her license. If I survive, next up for Olympia will be the main wood deck.
Got the superstructure mostly done, getting ready to attach it.
Unfortunately, the completed gun assemblies wont fit through the embrasure openings once the superstructure is secured to the deck, so before attaching it I installed the four aft 5 inch guns and those goofy paned windows.
As for the rest of the 5 inchers, I glued the gun mounts (without the guns) to the deck before I fit the superstructure down over them. The guns themselves will be attached to their mountings sometime later.
Tomorrow I take my seventeen year old for her driving test for her license.
If I survive, next up for Olympia will be the main wood deck.RedDuster
Joined: March 01, 2010
KitMaker: 7,078 posts
Model Shipwrights: 6,649 posts
Posted: Wednesday, July 04, 2012 - 10:44 PM UTC
Great stuff Tim, the guns in the casemates look very effective.
Keep up the good work,
Si
Keep up the good work,
Si
surfsup
Joined: May 20, 2010
KitMaker: 1,230 posts
Model Shipwrights: 1,212 posts
Posted: Thursday, July 05, 2012 - 08:50 AM UTC
Lovely work Tim. I am really enjoying this Build.....Cheers Mark
TimReynaga
Joined: May 03, 2006
KitMaker: 2,500 posts
Model Shipwrights: 1,830 posts
Posted: Thursday, July 12, 2012 - 03:22 PM UTC

The superstructure is now attached to the plastic main deck, and the main wood deck is down. I dont know what kind of wood Encore used for the deck material, but the rather light shade of the decking is just beautiful. At first I was concerned that it is noticeably lighter than teak, which I assumed had been used on the Olympia. However, it is correct. According to Benjamin Franklin Coolings USS Olympia: Herald of Empire (p.16), during Olympias construction the Navy Department had ordered substitution of Oregon pine for the usual teakwood decking as a cost saving measure.

When I started the build I had planned to go with suitably painted Evergreen scribed plastic deck; you can see a bit of it through the open superstructure door in the picture above. I works pretty well for painted decks, but the real wood is SO much better for the natural wood areas! Despite my tinkering with the plastic model deck back before I knew that a wood deck was to become available, the fit of the new deck is good overall. Gotta love these Encore wood decks!
RedDuster
Joined: March 01, 2010
KitMaker: 7,078 posts
Model Shipwrights: 6,649 posts
Posted: Thursday, July 12, 2012 - 07:04 PM UTC
Great stuff Tim, the real wood does look so effective.
Keep up the good work.
Si
Keep up the good work.
Si
surfsup
Joined: May 20, 2010
KitMaker: 1,230 posts
Model Shipwrights: 1,212 posts
Posted: Friday, July 13, 2012 - 04:34 PM UTC
Just love the clean Lines you have achieved so far Tim.....Cheers Mark
TimReynaga
Joined: May 03, 2006
KitMaker: 2,500 posts
Model Shipwrights: 1,830 posts
Posted: Thursday, July 26, 2012 - 01:01 AM UTC
Nice as they are, not all is beer and skittles in the world of wood decks...

The fit of the main deck is mostly good but it isnt perfect, leaving hard to hide curved gaps around some of the sponsons. As you can see, my attempts to camouflage this with paint were less than satisfactory.
So to fix this I trimmed out a larger than needed section around the problem curve, replacing it with a new and better fitting piece I had cut from some of the wood scrap. Replacing a larger section breaks up the seams and moves the join lines between the new and main parts away from the embrasure, making the repair less noticeable.

Heres how it looks with the new deck section in place. The test fitted photoetch shows how the rails will eventually hide the little repair job even more.
The fit of the main deck is mostly good but it isnt perfect, leaving hard to hide curved gaps around some of the sponsons. As you can see, my attempts to camouflage this with paint were less than satisfactory.
So to fix this I trimmed out a larger than needed section around the problem curve, replacing it with a new and better fitting piece I had cut from some of the wood scrap. Replacing a larger section breaks up the seams and moves the join lines between the new and main parts away from the embrasure, making the repair less noticeable.
Heres how it looks with the new deck section in place. The test fitted photoetch shows how the rails will eventually hide the little repair job even more.
 |

WEB HOSTING BY


Copyright ©2021 Model Shipwrights and Kitmaker Network, a subsidiary of Silver Star Enterprises
All Rights Reserved. Please read our Conditions of Use and Privacy Policy.
All Rights Reserved. Please read our Conditions of Use and Privacy Policy.