

Go to modelshipwrights.com for the current dynamic site!


Hosted by Jim Starkweather
Revell Olympia build
Removed by original poster on 10/08/12 - 13:04:05 (GMT).

TimReynaga

Joined: May 03, 2006
KitMaker: 2,500 posts
Model Shipwrights: 1,830 posts

Posted: Monday, October 08, 2012 - 01:03 AM UTC
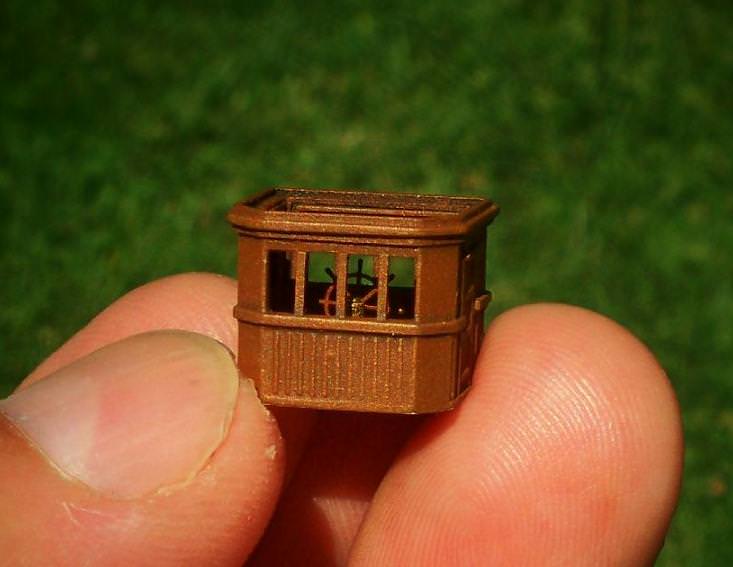
Finished and installed the pilothouse this past weekend, but I made a few changes from the basic assembly I did back in December. 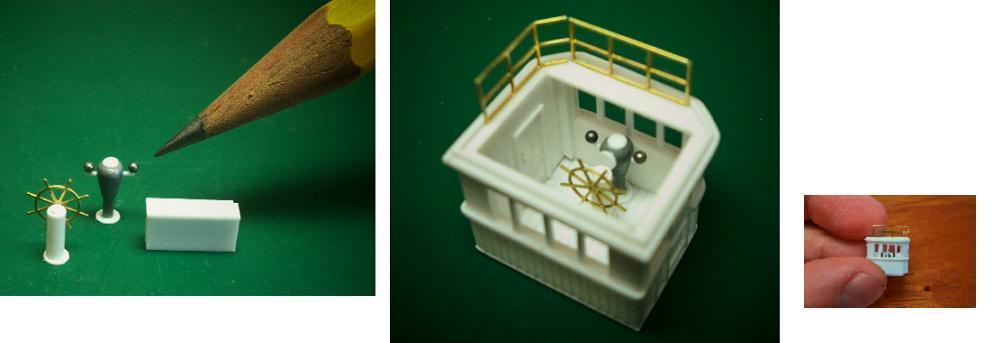
The first change was to install wood decking inside. I had initially intended to paint the inside deck maroon as in the museum ship, but after painting the brown of the structure it ended up pretty dark in there. So I opted instead to use a lighter look to help make detail a little more visible in that dim interior space.

Covering the scribed plastic deck with leftover bits from the Squadron/Encore wood decking did brighten things up slightly, but even with the lighter deck that dark helm and chart table are still awfully hard to see through those tiny windows!
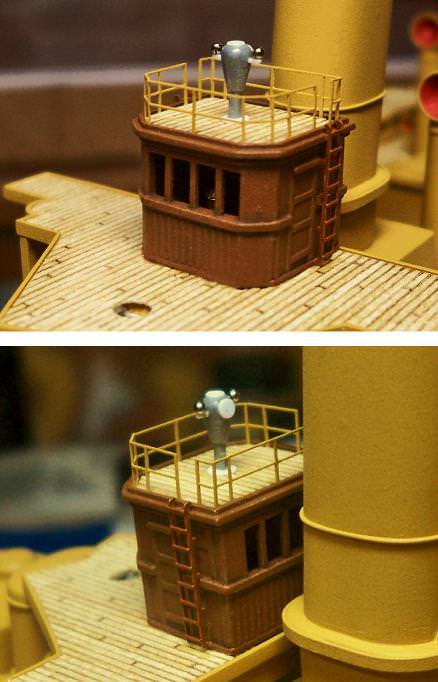
I also decided to move the binnacle from inside the pilothouse (where it is in the museum ship today) to the pilothouse roof. It makes sense that the compass would have been right next to the ships wheel, but photos from the 1890s show it to have been located on top of the little wooden structure. Similarly, the smaller auxiliary compass aft is on top of the aft bridge while the emergency helm associated with it is on the deck below. My guess is that these somewhat awkward arrangements were attempts to reduce magnetic interference with the compasses by moving them away from the main steel structure of the ship. Anyway, I didnt mind the change as it makes the binnacle more visible on the model!

The first change was to install wood decking inside. I had initially intended to paint the inside deck maroon as in the museum ship, but after painting the brown of the structure it ended up pretty dark in there. So I opted instead to use a lighter look to help make detail a little more visible in that dim interior space.
Covering the scribed plastic deck with leftover bits from the Squadron/Encore wood decking did brighten things up slightly, but even with the lighter deck that dark helm and chart table are still awfully hard to see through those tiny windows!
I also decided to move the binnacle from inside the pilothouse (where it is in the museum ship today) to the pilothouse roof. It makes sense that the compass would have been right next to the ships wheel, but photos from the 1890s show it to have been located on top of the little wooden structure. Similarly, the smaller auxiliary compass aft is on top of the aft bridge while the emergency helm associated with it is on the deck below. My guess is that these somewhat awkward arrangements were attempts to reduce magnetic interference with the compasses by moving them away from the main steel structure of the ship. Anyway, I didnt mind the change as it makes the binnacle more visible on the model!


RussellE

#306

Joined: June 27, 2010
KitMaker: 3,959 posts
Model Shipwrights: 2,777 posts
Posted: Monday, October 08, 2012 - 08:43 PM UTC
Very nice work Tim!


MrMox

Joined: July 18, 2003
KitMaker: 3,377 posts
Model Shipwrights: 985 posts

Posted: Tuesday, October 09, 2012 - 08:02 AM UTC
Very nice closeups - everything is so neat and clean - impressive!
Cheers/Jan
Cheers/Jan


surfsup
Joined: May 20, 2010
KitMaker: 1,230 posts
Model Shipwrights: 1,212 posts

Posted: Wednesday, October 10, 2012 - 10:28 PM UTC
She is looking fantastic my Friend.....Cheers mark

RedDuster

Joined: March 01, 2010
KitMaker: 7,078 posts
Model Shipwrights: 6,649 posts

Posted: Friday, October 12, 2012 - 08:52 AM UTC
Hi Tim
Pilot house looks amazing, real depth, first class build
Si
Pilot house looks amazing, real depth, first class build
Si
TimReynaga
Joined: May 03, 2006
KitMaker: 2,500 posts
Model Shipwrights: 1,830 posts
Posted: Sunday, October 14, 2012 - 03:37 AM UTC
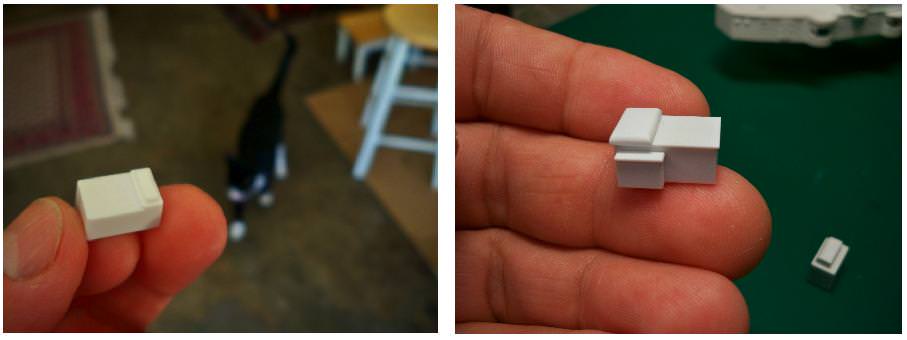
On to the boats... sort of.
Started with those goofy, barely identifiable rafts. I couldnt find any references for them except for some overall photos of the ship showing them mounted on the superstructure sides. Not much detail is identifiable in the pics, so I just cut away the solid molded detail on the inside and built up an open framework with strip plastic.

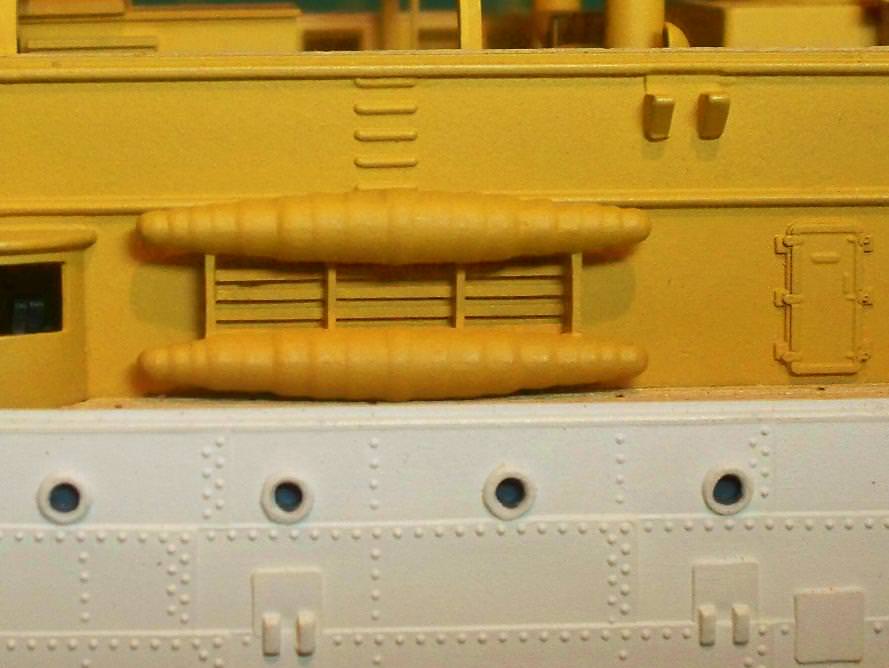
Better, I guess, but those things are still damn ugly.
Started with those goofy, barely identifiable rafts. I couldnt find any references for them except for some overall photos of the ship showing them mounted on the superstructure sides. Not much detail is identifiable in the pics, so I just cut away the solid molded detail on the inside and built up an open framework with strip plastic.
Better, I guess, but those things are still damn ugly.
TimReynaga
Joined: May 03, 2006
KitMaker: 2,500 posts
Model Shipwrights: 1,830 posts
Posted: Tuesday, November 13, 2012 - 06:24 PM UTC
Before taking on Olympias formidable array of boats it made sense to prepare the ship to accommodate them by installing the boat racks that span the superstructure deck. The kit assemblies seemed straightforward enoughsimple arched supports connected by narrow walkwaysso I hadnt bothered to test fit them until now.
Big mistake! I dont know how I managed it, but the completed inner superstructure sides somehow ended up too narrow to fit the kit boat racks.
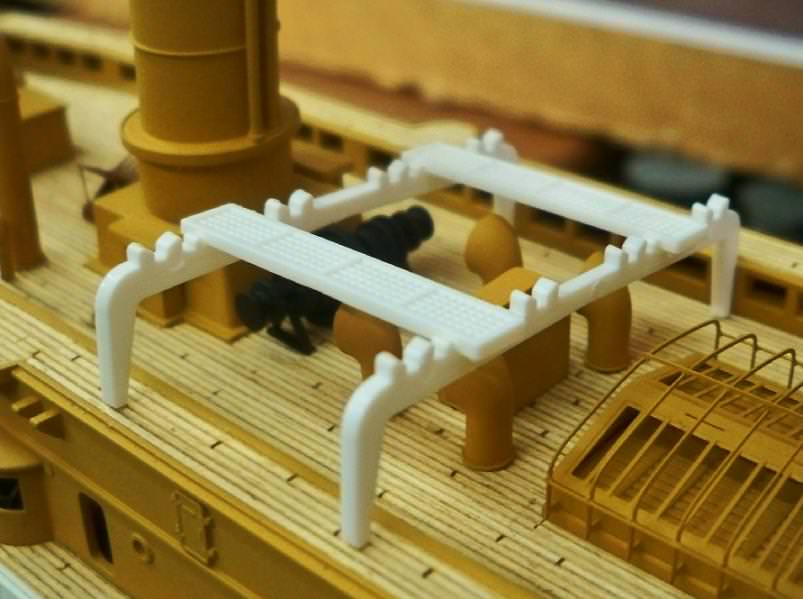
Doh!
Too late to adjust the superstructure, I built up new, slightly narrower racks from .040 X .040 inch Evergreen styrene strip instead. Photoetch mesh working platforms came from the Gold Medal Models Olympia set.
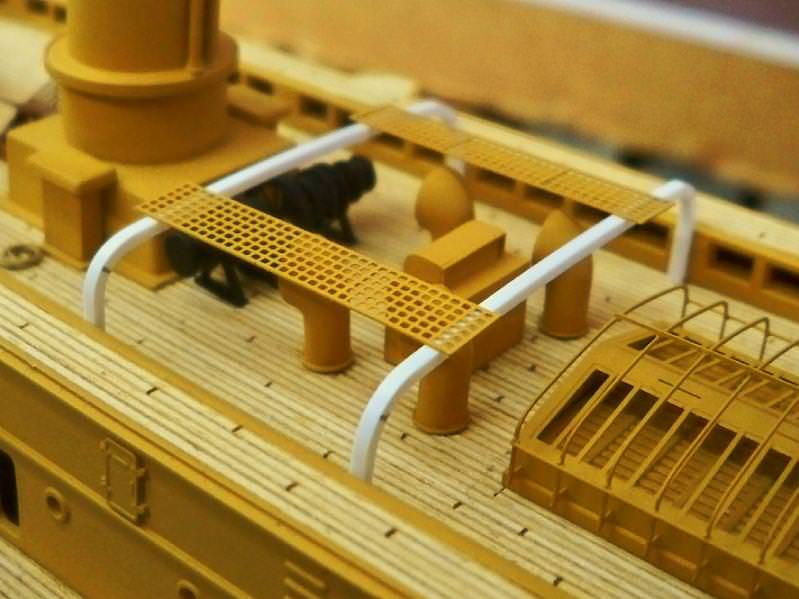
Getting the widths and heights of the bends even and consistent on these things was surprisingly tedious, but the new racks do look finer than the kit parts would have, so I guess it's all to the good. And those GMM walkways were a huge improvement over the old solid plastic kit parts!
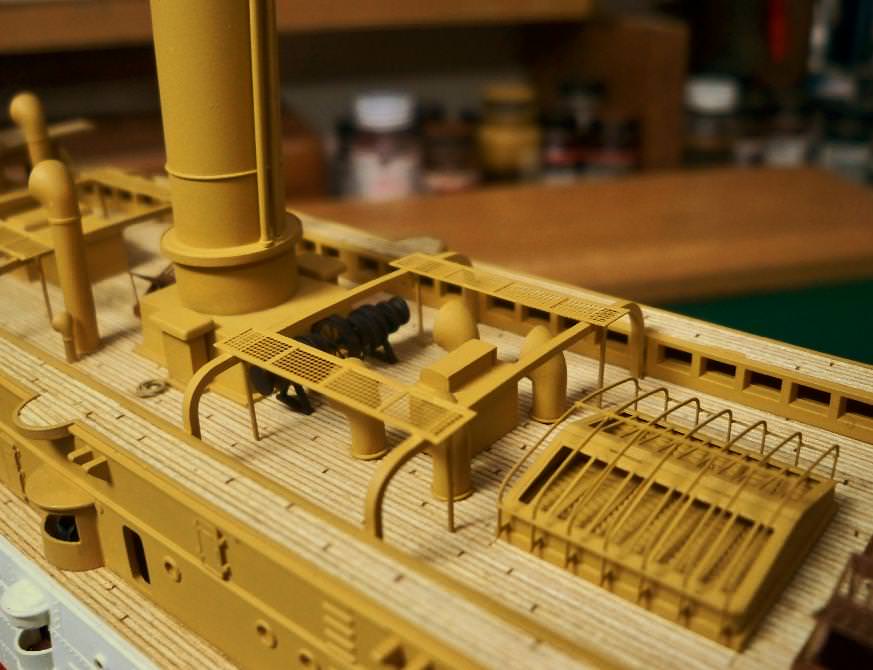
After securing the racks in place I finished them off with .19 inch brass wire supports. I also opted to replace the GMM photoetch walkways with parts from the Squadron/Encore set, which were even better than the GMM parts. Painted up to match the superstructure, the racks are now ready for the boats.
Big mistake! I dont know how I managed it, but the completed inner superstructure sides somehow ended up too narrow to fit the kit boat racks.
Doh!
Too late to adjust the superstructure, I built up new, slightly narrower racks from .040 X .040 inch Evergreen styrene strip instead. Photoetch mesh working platforms came from the Gold Medal Models Olympia set.
Getting the widths and heights of the bends even and consistent on these things was surprisingly tedious, but the new racks do look finer than the kit parts would have, so I guess it's all to the good. And those GMM walkways were a huge improvement over the old solid plastic kit parts!
After securing the racks in place I finished them off with .19 inch brass wire supports. I also opted to replace the GMM photoetch walkways with parts from the Squadron/Encore set, which were even better than the GMM parts. Painted up to match the superstructure, the racks are now ready for the boats.
surfsup
Joined: May 20, 2010
KitMaker: 1,230 posts
Model Shipwrights: 1,212 posts
Posted: Tuesday, November 13, 2012 - 07:43 PM UTC
She is looking better and better each time I see her Tim. Beautiful work.....Cheers mark
RedDuster
Joined: March 01, 2010
KitMaker: 7,078 posts
Model Shipwrights: 6,649 posts
Posted: Tuesday, November 13, 2012 - 11:50 PM UTC
Great stuff Tim.
Your scratchbuilt boat rack is a vast improvement over the kit item.
Si
Your scratchbuilt boat rack is a vast improvement over the kit item.
Si
MrMox
Joined: July 18, 2003
KitMaker: 3,377 posts
Model Shipwrights: 985 posts
Posted: Wednesday, November 14, 2012 - 02:19 AM UTC
Again i´m stunned with the neatness and quality of your work Tim - a utterly beautiful build.
Cheers/Jan
Cheers/Jan

TAFFY3
Joined: January 21, 2008
KitMaker: 2,531 posts
Model Shipwrights: 1,244 posts

Posted: Wednesday, November 14, 2012 - 03:54 AM UTC
She looks more impressive with each update, can't wait to see the end result.  Al
Al
AlTimReynaga
Joined: May 03, 2006
KitMaker: 2,500 posts
Model Shipwrights: 1,830 posts
Posted: Wednesday, November 21, 2012 - 02:11 PM UTC
Quoted Text
... can't wait to see the end result.
Me too Al! I've had a lot of fun with her so far, but I must admit to being anxious to finish. Boats await my attention...
TimReynaga
Joined: May 03, 2006
KitMaker: 2,500 posts
Model Shipwrights: 1,830 posts
Posted: Wednesday, November 28, 2012 - 02:21 PM UTC
Time to take on Olympias formidable array of boats! Typical of ships of her era, she sported quite a few. They include:
4 whaleboats
2 lifeboats
2 26-foot cutters
1 28-foot cutter
1 sailing launch
1 barge
1 steam launch
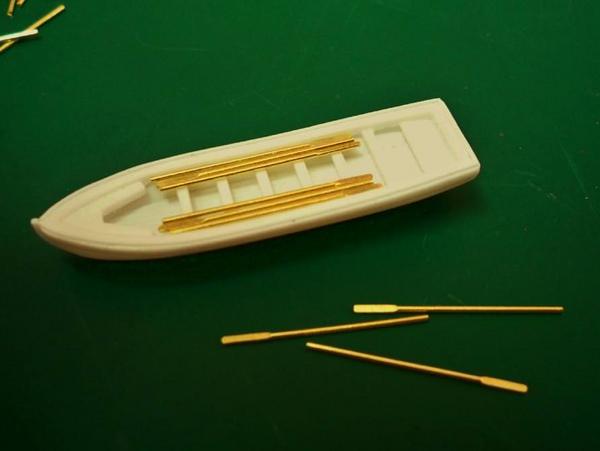
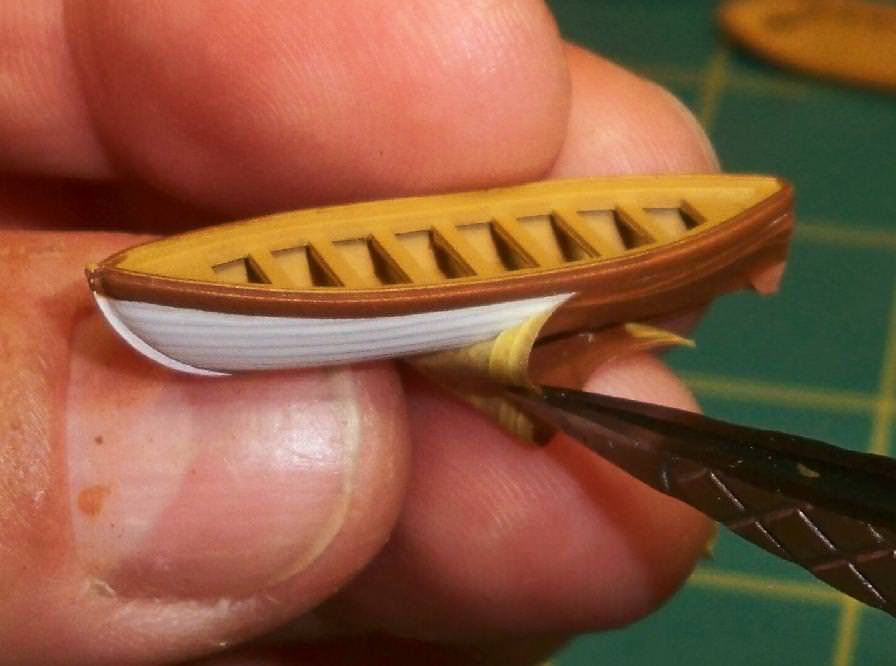
The pulling boats supplied in the kit consist of hulls and thwart/gunwale parts, plus separate stacked oars. The completed assemblies look reasonably good right out of the box, with accurate shapes and even some nice planking detail on the outer hulls. Still, since all those boats will be so prominently perched atop the superstructure, I decided to improve them.
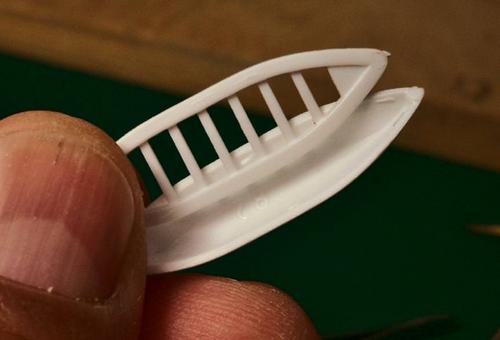
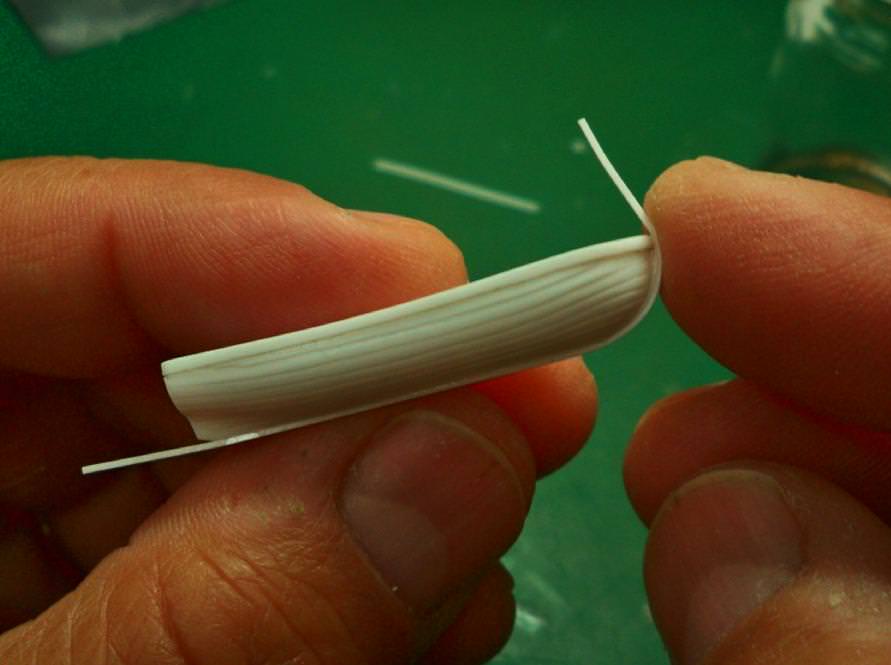
The first upgrade was to add rudimentary interiors to the plain boats in the form of scribed plastic sheet floor planking. Using Evergreen (#2030) .030 inch spacing V-groove .020 inch thick sheet, I shaped pieces to fit the individual hull interiors, beveling the undersides to achieve a snug fit inside each of the different sized boats.

Seen beneath the thwarts (seats) and stacked oars on the completed boats, these simple floors add a little complexity to plain kit interiors. They also serve to cover the raised part numbers molded inside each of the kit hulls! After the floors, the kit thwart/gunwale parts were attached. These parts are generally accurate but the wide, plain gunwales are simplified. I added strips of Plastruct (#90709) .010 X .010 inch plastic strip along the gunwale tops to give them a little more finesse.

Another weak area of the boats was the keels, which were only rather vaguely depicted on the kit parts. After scraping away Revells molded representations with my X-acto, each boat received a new keel made from Evergreen .015 X .020 inch plastic.


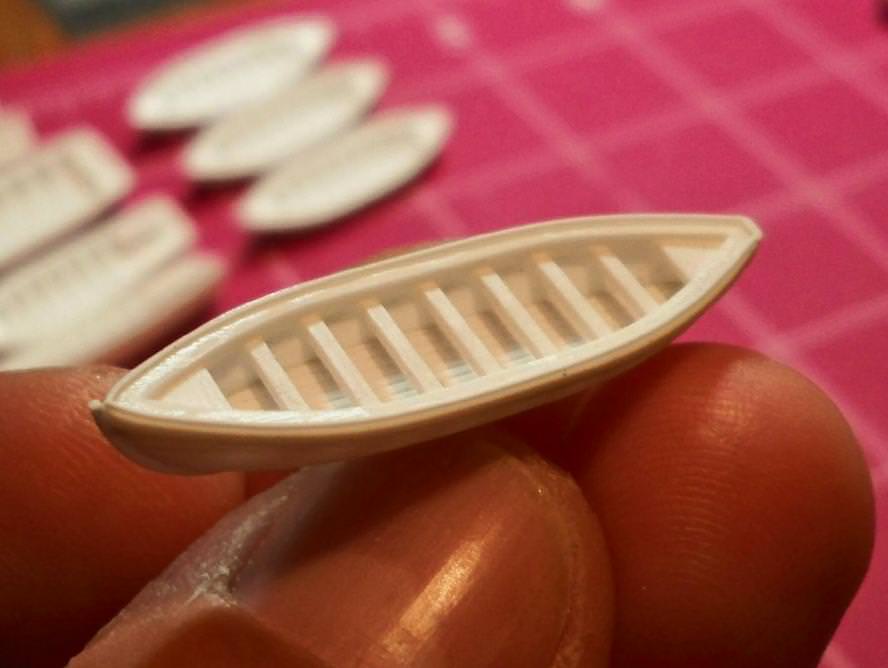
The new keels, gunwale strips, and scribed plastic floors help give the boats a sharper appearance.

4 whaleboats
2 lifeboats
2 26-foot cutters
1 28-foot cutter
1 sailing launch
1 barge
1 steam launch
The pulling boats supplied in the kit consist of hulls and thwart/gunwale parts, plus separate stacked oars. The completed assemblies look reasonably good right out of the box, with accurate shapes and even some nice planking detail on the outer hulls. Still, since all those boats will be so prominently perched atop the superstructure, I decided to improve them.
The first upgrade was to add rudimentary interiors to the plain boats in the form of scribed plastic sheet floor planking. Using Evergreen (#2030) .030 inch spacing V-groove .020 inch thick sheet, I shaped pieces to fit the individual hull interiors, beveling the undersides to achieve a snug fit inside each of the different sized boats.
Seen beneath the thwarts (seats) and stacked oars on the completed boats, these simple floors add a little complexity to plain kit interiors. They also serve to cover the raised part numbers molded inside each of the kit hulls! After the floors, the kit thwart/gunwale parts were attached. These parts are generally accurate but the wide, plain gunwales are simplified. I added strips of Plastruct (#90709) .010 X .010 inch plastic strip along the gunwale tops to give them a little more finesse.
Another weak area of the boats was the keels, which were only rather vaguely depicted on the kit parts. After scraping away Revells molded representations with my X-acto, each boat received a new keel made from Evergreen .015 X .020 inch plastic.
The new keels, gunwale strips, and scribed plastic floors help give the boats a sharper appearance.
TAFFY3
Joined: January 21, 2008
KitMaker: 2,531 posts
Model Shipwrights: 1,244 posts
Posted: Wednesday, November 28, 2012 - 04:07 PM UTC
Definitely worth it, quite an improvement on those boats, Tim. Al
Alsurfsup
Joined: May 20, 2010
KitMaker: 1,230 posts
Model Shipwrights: 1,212 posts
Posted: Wednesday, November 28, 2012 - 07:20 PM UTC
Ditto. Great job on the Boats Tim.....Cheers mark
TimReynaga
Joined: May 03, 2006
KitMaker: 2,500 posts
Model Shipwrights: 1,830 posts
Posted: Friday, November 30, 2012 - 01:36 AM UTC
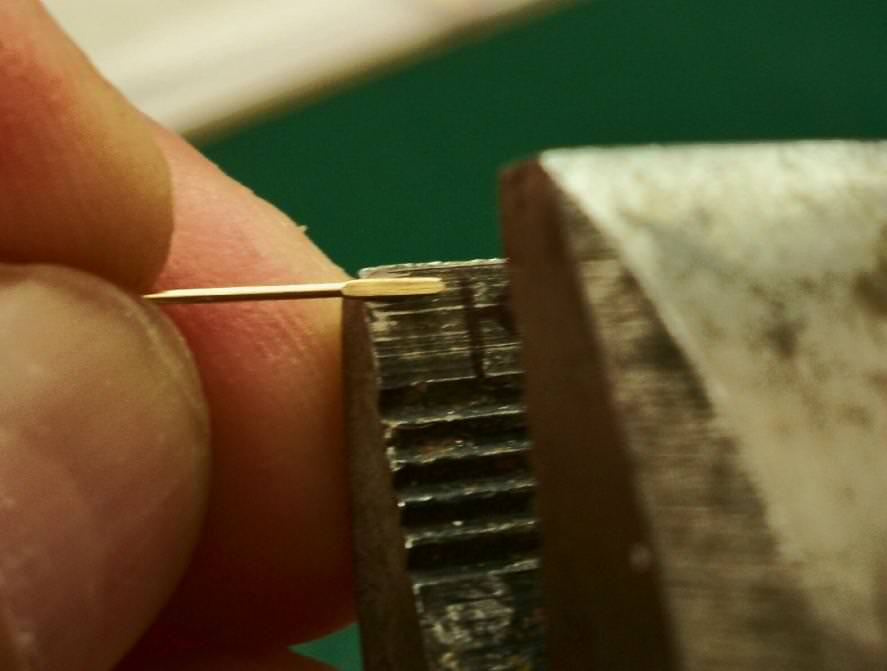
The kit-provided stacked boat oars werent bad, but since I had improved the boats I decided to upgrade these as well. One option could have been to use the photoetch parts from the Gold Medal Models Olympia upgrade set, but these looked too flat to me in this relatively large scale, and the exaggerated blades seemed more like paddles than oars anyway. I finally opted to make new ones from wire.

Making these new parts was pretty simple. Using Detail Associates.022 inch brass wire (#2507), I trimmed each piece to length, making blades by crimping the ends with pliers. After sanding the blade tips to make rounded edges instant oars!
Ive used this method before; heres how similar oars look once painted and in place on my Revell 1/303 scale USCGC Taney model:

Test fitted in the completed Olympia boats, the new oars definitely look more in-scale than the kit parts.
Next up: the steam launch
Making these new parts was pretty simple. Using Detail Associates.022 inch brass wire (#2507), I trimmed each piece to length, making blades by crimping the ends with pliers. After sanding the blade tips to make rounded edges instant oars!
Ive used this method before; heres how similar oars look once painted and in place on my Revell 1/303 scale USCGC Taney model:
Test fitted in the completed Olympia boats, the new oars definitely look more in-scale than the kit parts.
Next up: the steam launch

warreni
Joined: August 14, 2007
KitMaker: 5,926 posts
Model Shipwrights: 2,624 posts

Posted: Friday, November 30, 2012 - 06:46 AM UTC
I am basically a little lazy so I am hoping all this extra stuff is already in the Encore release.. 
Doing a great job mate! Keep it up. I know what you mean about getting anxious to finish stuff. I seem to get it all the time when it comes to the end.
Doing a great job mate! Keep it up. I know what you mean about getting anxious to finish stuff. I seem to get it all the time when it comes to the end.
RedDuster
Joined: March 01, 2010
KitMaker: 7,078 posts
Model Shipwrights: 6,649 posts
Posted: Friday, November 30, 2012 - 08:59 PM UTC
Loving the work on the boats Tim, The Oars look really excellent, giving me some ideas for when I get on to Varyags open boats.
Keep it up, Inspirational build!
Si
Keep it up, Inspirational build!
Si
surfsup
Joined: May 20, 2010
KitMaker: 1,230 posts
Model Shipwrights: 1,212 posts
Posted: Saturday, December 01, 2012 - 10:25 AM UTC
Top notch work Tim. Looking forward to seeing more.....Cheers mark
TimReynaga
Joined: May 03, 2006
KitMaker: 2,500 posts
Model Shipwrights: 1,830 posts
Posted: Tuesday, December 04, 2012 - 02:37 PM UTC
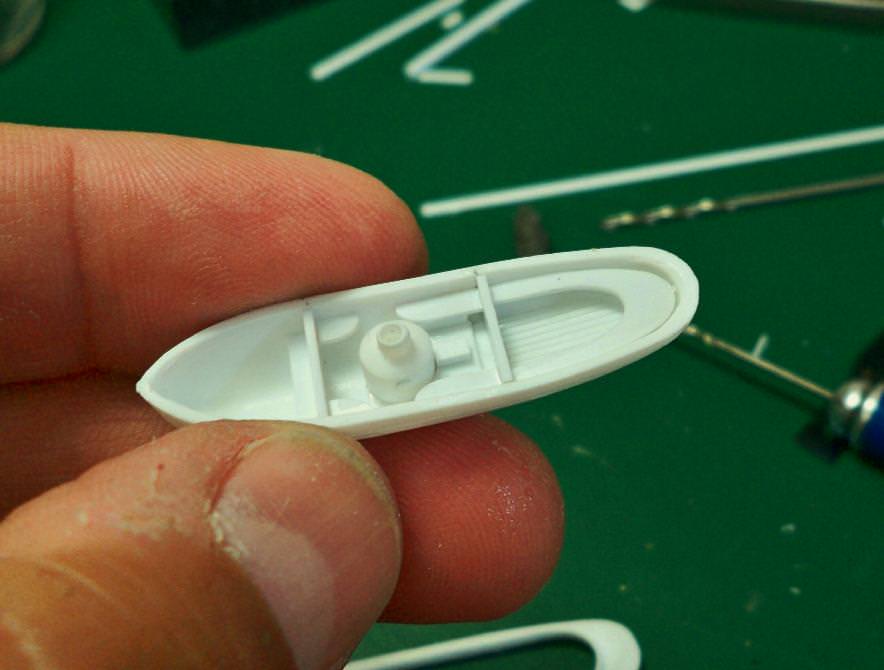
The steam launch was the most interesting and complex of the boats carried aboard Olympia. Revells representation of it is very basic, consisting of the hull, upper deck, and a boiler. The parts combine into an almost comically toylike little tub with almost no detail apart from the cylindrical boiler/smokestack and some very heavy sunshade frames. It looks like something out of the Theodore Tugboat TV series my kids watched when they were little!

I started improvements with the interior, building up the inside space with sheet plastic bulkheads, curved bench seats, and a scribed plastic floor. Apart from the kit-provided boiler part (here minus the smokestack), everything inside the boat had to be added.
With the interior in place it was time to fit the deck, but my references showed that the inside edge on the fore part of the deck on the kit part was too short and curved. I formed a new edge with a piece of .010 inch strip plastic, filled in the area in with cyanoacrylate (super glue) to the correct dimensions and sanded it smooth. The sanding obliterated the molded lip around the inside edge of the deck, so I replaced it with .015 inch plastic strip before attaching the deck to the hull. The new smokestack was a length of K & S Engineering 1/16th X .014 inch brass tube (#1251). The real pipe was brass too, so this replacement was a natural. Interestingly, that nice little lip around the top of the funnel was an unintentional remnant formed as I roll-cut the tube with my X-actoa happy accident!

The goofy looking steam launch carried a formidable looking 1-pounder gun on its foredeck. I assumed the gun would have been removed and stowed when the boat was secured on board in its cradle, but contemporary photos show that the gun was left in place. So much the better for me, as it makes the little launch more interesting! The 1-pounder gun was copped from my derelict 1/350 scale Varyag kit and attached to a mount made from plastic strip. The miniscule helm came from White Ensign Models 1/700-1/350 ships wheels brass photoetch (set #PE 736).
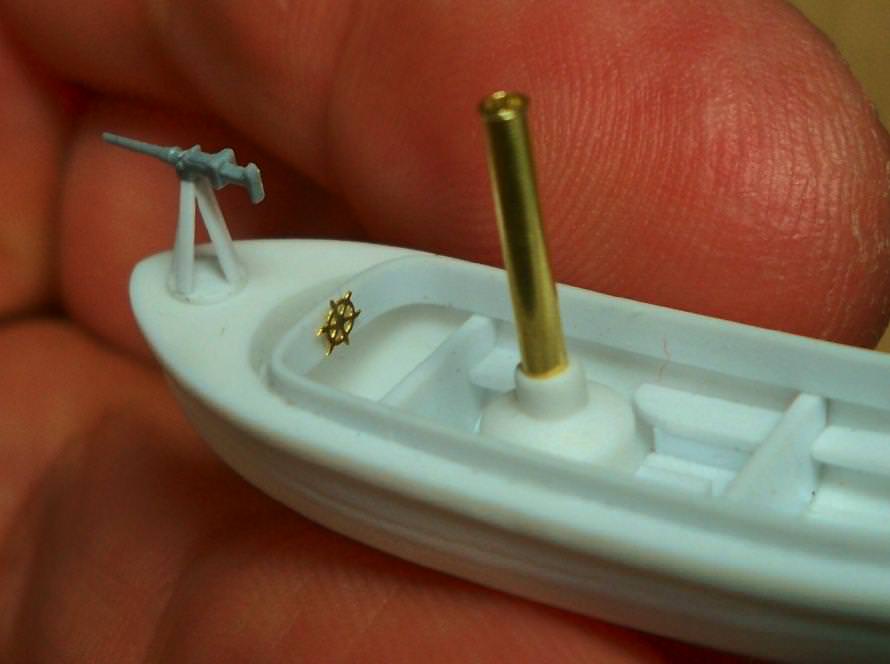
Sunshade frames were fabricated from brass wire, as were the tiller and flagstaff. A small floor grating was a photoetch bit cut from the Gold Medal Models N-scale tank car walkway grate set (#160-23) which had also contributed parts for Olympias windlass assembly earlier.

Like the pulling boats, the steam launch received a new strip plastic keel. In this case I added to and reshaped the existing kit keel to better replicate the unusual curved shape. In addition, since Revell hadnt included any rudder or propeller detail, I scratchbuilt these from sheet plastic and wire. It is hard to see, but the propeller was made from three tiny discs punched from .010 inch sheet plastic formed into a circle around a .015 inch central disc attached to the propshaft.

My references show that the Revell depiction of the steam launch is basically accurate, and the added detailing does help make the boat a little more convincing... but I cant help thinking that it would still look quite at home with Theodore Tugboat and his friends in their miniature Halifax harbor!

I started improvements with the interior, building up the inside space with sheet plastic bulkheads, curved bench seats, and a scribed plastic floor. Apart from the kit-provided boiler part (here minus the smokestack), everything inside the boat had to be added.
With the interior in place it was time to fit the deck, but my references showed that the inside edge on the fore part of the deck on the kit part was too short and curved. I formed a new edge with a piece of .010 inch strip plastic, filled in the area in with cyanoacrylate (super glue) to the correct dimensions and sanded it smooth. The sanding obliterated the molded lip around the inside edge of the deck, so I replaced it with .015 inch plastic strip before attaching the deck to the hull. The new smokestack was a length of K & S Engineering 1/16th X .014 inch brass tube (#1251). The real pipe was brass too, so this replacement was a natural. Interestingly, that nice little lip around the top of the funnel was an unintentional remnant formed as I roll-cut the tube with my X-actoa happy accident!
The goofy looking steam launch carried a formidable looking 1-pounder gun on its foredeck. I assumed the gun would have been removed and stowed when the boat was secured on board in its cradle, but contemporary photos show that the gun was left in place. So much the better for me, as it makes the little launch more interesting! The 1-pounder gun was copped from my derelict 1/350 scale Varyag kit and attached to a mount made from plastic strip. The miniscule helm came from White Ensign Models 1/700-1/350 ships wheels brass photoetch (set #PE 736).
Sunshade frames were fabricated from brass wire, as were the tiller and flagstaff. A small floor grating was a photoetch bit cut from the Gold Medal Models N-scale tank car walkway grate set (#160-23) which had also contributed parts for Olympias windlass assembly earlier.
Like the pulling boats, the steam launch received a new strip plastic keel. In this case I added to and reshaped the existing kit keel to better replicate the unusual curved shape. In addition, since Revell hadnt included any rudder or propeller detail, I scratchbuilt these from sheet plastic and wire. It is hard to see, but the propeller was made from three tiny discs punched from .010 inch sheet plastic formed into a circle around a .015 inch central disc attached to the propshaft.
My references show that the Revell depiction of the steam launch is basically accurate, and the added detailing does help make the boat a little more convincing... but I cant help thinking that it would still look quite at home with Theodore Tugboat and his friends in their miniature Halifax harbor!
RedDuster
Joined: March 01, 2010
KitMaker: 7,078 posts
Model Shipwrights: 6,649 posts
Posted: Tuesday, December 04, 2012 - 11:55 PM UTC
Great stuff Tim, you have made the steam launch a real work of art, excellent step by step pics too.
Si
Si
TimReynaga
Joined: May 03, 2006
KitMaker: 2,500 posts
Model Shipwrights: 1,830 posts
Posted: Thursday, January 10, 2013 - 05:43 PM UTC
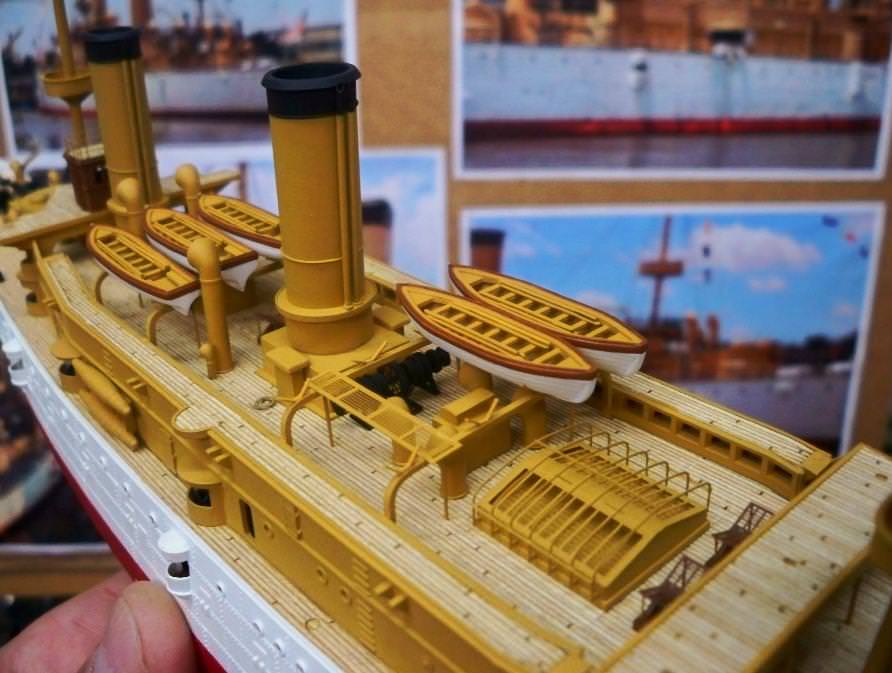
Ive just finished the task of masking and airbrushing up the boats. Kind of a slow operation with the multiple colors, but in the end they look sharper than if I had hand painted them.
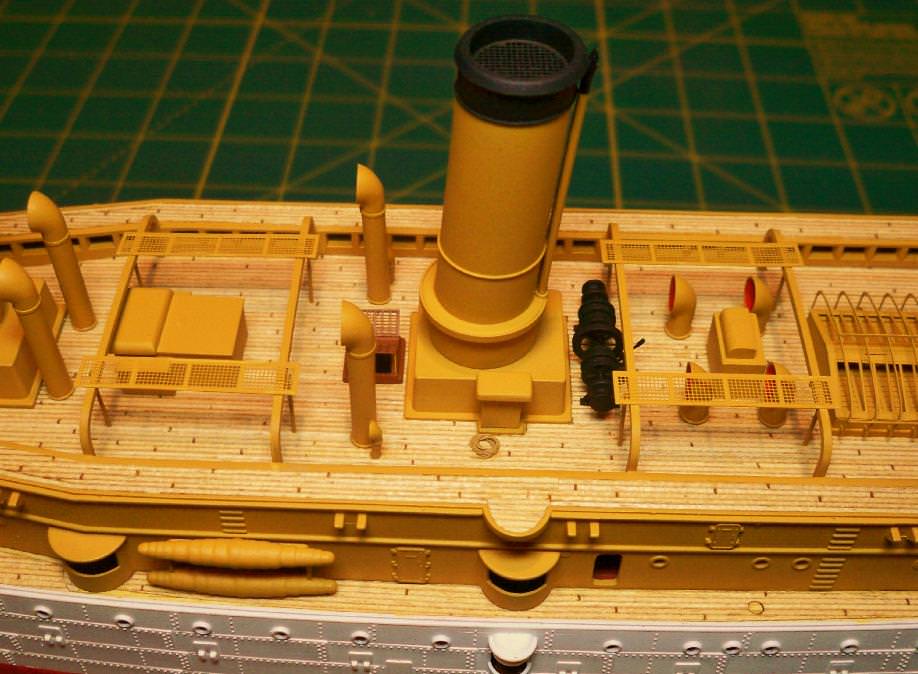
Test fitting the pulling boats on the racks, they look good... but unfortunately they are packed so closely together that they also conceal details on the superstructure deck below. The main water tank/vent box, for example, for which I had scratchbuilt a more accurate replacement
is now almost completely hidden from view under the forward boats:

I couldnt bear to hide the scratchbuilt winch and aft vent box under yet more boats, so to keep them visible I elected to leave off a couple. This also allows the viewer to see a bit of the boat rack and one of those lovely photoetch mesh walkways too.
Test fitting the pulling boats on the racks, they look good... but unfortunately they are packed so closely together that they also conceal details on the superstructure deck below. The main water tank/vent box, for example, for which I had scratchbuilt a more accurate replacement
is now almost completely hidden from view under the forward boats:
I couldnt bear to hide the scratchbuilt winch and aft vent box under yet more boats, so to keep them visible I elected to leave off a couple. This also allows the viewer to see a bit of the boat rack and one of those lovely photoetch mesh walkways too.
warreni
Joined: August 14, 2007
KitMaker: 5,926 posts
Model Shipwrights: 2,624 posts
Posted: Thursday, January 10, 2013 - 07:22 PM UTC
And better still it meant you didn't have to do more of those pesky boats!
RussellE
#306
Joined: June 27, 2010
KitMaker: 3,959 posts
Model Shipwrights: 2,777 posts
Posted: Thursday, January 10, 2013 - 08:22 PM UTC
Great work as always Tim!
 |

WEB HOSTING BY


Copyright ©2021 Model Shipwrights and Kitmaker Network, a subsidiary of Silver Star Enterprises
All Rights Reserved. Please read our Conditions of Use and Privacy Policy.
All Rights Reserved. Please read our Conditions of Use and Privacy Policy.