

North Star make some very handy stuff.
Looking great Tim.


Go to modelshipwrights.com for the current dynamic site!
Hosted by Jim Starkweather
Revell Olympia build

warreni

Joined: August 14, 2007
KitMaker: 5,926 posts
Model Shipwrights: 2,624 posts

Posted: Sunday, March 17, 2013 - 08:13 AM UTC

TimReynaga

Joined: May 03, 2006
KitMaker: 2,500 posts
Model Shipwrights: 1,830 posts

Posted: Monday, March 25, 2013 - 03:18 PM UTC
Getting ready to rail the main deck, I have on hand the Toms Modelworks, Gold Medal Models, and Squadron/Encore photoetch brass sets. Each offers excellent main deck drooped chain railings designed specifically for this kit.
First is the Toms Modelworks offering, which is an accurately designed and well executed set in beautifully thin brass. If this were the only choice available I would have had no problem at all using it. Since there are other options, though, I could be a little more selective. Although a very good set, the simplified two-dimensional rendering and lack of link detail on the chain deck rails put the Toms photoetch in third place behind the other two.
Next is the Gold Medal Models set. The brass is a little bit thicker than the others, but the etching is just as sharp. It offers the advantages of link detail on the rails (credibly represented by the wavy surface on the drooped chains) and relief-etched chocks attached directly to the railing runs in the appropriate places. Though not as petite as the other railings, the slightly more robust look harmonizes well with the old-school Revell kit parts.
Finally, there is the brass which came with the 2012 Squadron/Encore Premium Edition Olympia kit. This set, being the newest of the three, is also the most finely executed. Made from a thinner brass like the Toms set, Squadron/Encores offering is even more sharply cut and sports some very delicate 3-D etching too. The drooped chain railings, similar in design to the Gold Medal Models offering, are very close to scale and actually have discernable individual links amazing!
Heres a comparison of the GMM rails (top) and the Squadron/Encore rails (below):
I test fit small sections of each railing to the bow to see which would look better. The delicate Squadron/Encore rails with those individual links (left) and the GMM rails with their chocks (right) both looked the part.


In the end I went with the GMM rails. Id already cut away the oversized chocks molded to the hull of the Revell kit, so a big plus for the GMM set was the inclusion of new ones (Squadron/Encore had taken the approach of simply omitting sections of the lower rail to accommodate the overlarge kit fittings). I could have used the Squadron/Encore rails along with the chocks cut from the GMM set, but those missing lower rail sections were a problem. Squadron/Encore provided exactly enough railing with absolutely none to spare, so I had no way to replace those missing lengths. While the large open spaces would look ok over the outsized kit chocks, they would have been obviously too much over the correctly-sized GMM chocks. Even an extra inch of railing in the set would have made it possible to replace these, but there was exactly enough railing provided in the set to outfit the ship and no more. I even called the folks at Squadron, but they wouldnt sell me just the photoetch parts without the rest of the kit... so I used the Gold Medal Models rails. The GMM photoetch was well designed and fit perfectly, so the railing went on quickly.


The only adjustment needed was with the spaces over the anchor rests on each side. I figure these would have been spanned by temporary safety chains (disconnected when the anchors were dropped or taken back aboard). I added some railing cut from extra parts in the GMM set. These were about twice as long as the other lengths between stanchions, so I took two spans and cut out the stanchions in the middle. After reshaping them to the correct droop, I glued them into place (still unpainted brass when I took the close-up photo).

Next up: fitting the masts
First is the Toms Modelworks offering, which is an accurately designed and well executed set in beautifully thin brass. If this were the only choice available I would have had no problem at all using it. Since there are other options, though, I could be a little more selective. Although a very good set, the simplified two-dimensional rendering and lack of link detail on the chain deck rails put the Toms photoetch in third place behind the other two.
Next is the Gold Medal Models set. The brass is a little bit thicker than the others, but the etching is just as sharp. It offers the advantages of link detail on the rails (credibly represented by the wavy surface on the drooped chains) and relief-etched chocks attached directly to the railing runs in the appropriate places. Though not as petite as the other railings, the slightly more robust look harmonizes well with the old-school Revell kit parts.
Finally, there is the brass which came with the 2012 Squadron/Encore Premium Edition Olympia kit. This set, being the newest of the three, is also the most finely executed. Made from a thinner brass like the Toms set, Squadron/Encores offering is even more sharply cut and sports some very delicate 3-D etching too. The drooped chain railings, similar in design to the Gold Medal Models offering, are very close to scale and actually have discernable individual links amazing!
Heres a comparison of the GMM rails (top) and the Squadron/Encore rails (below):
I test fit small sections of each railing to the bow to see which would look better. The delicate Squadron/Encore rails with those individual links (left) and the GMM rails with their chocks (right) both looked the part.
In the end I went with the GMM rails. Id already cut away the oversized chocks molded to the hull of the Revell kit, so a big plus for the GMM set was the inclusion of new ones (Squadron/Encore had taken the approach of simply omitting sections of the lower rail to accommodate the overlarge kit fittings). I could have used the Squadron/Encore rails along with the chocks cut from the GMM set, but those missing lower rail sections were a problem. Squadron/Encore provided exactly enough railing with absolutely none to spare, so I had no way to replace those missing lengths. While the large open spaces would look ok over the outsized kit chocks, they would have been obviously too much over the correctly-sized GMM chocks. Even an extra inch of railing in the set would have made it possible to replace these, but there was exactly enough railing provided in the set to outfit the ship and no more. I even called the folks at Squadron, but they wouldnt sell me just the photoetch parts without the rest of the kit... so I used the Gold Medal Models rails. The GMM photoetch was well designed and fit perfectly, so the railing went on quickly.
The only adjustment needed was with the spaces over the anchor rests on each side. I figure these would have been spanned by temporary safety chains (disconnected when the anchors were dropped or taken back aboard). I added some railing cut from extra parts in the GMM set. These were about twice as long as the other lengths between stanchions, so I took two spans and cut out the stanchions in the middle. After reshaping them to the correct droop, I glued them into place (still unpainted brass when I took the close-up photo).
Next up: fitting the masts


surfsup
Joined: May 20, 2010
KitMaker: 1,230 posts
Model Shipwrights: 1,212 posts

Posted: Monday, March 25, 2013 - 10:01 PM UTC
Superb detail work Tim. I love it.....Cheers mark

skeena59

Joined: September 18, 2011
KitMaker: 4 posts
Model Shipwrights: 4 posts

Posted: Tuesday, March 26, 2013 - 05:21 AM UTC
Tim, simply stunning!

RedDuster

Joined: March 01, 2010
KitMaker: 7,078 posts
Model Shipwrights: 6,649 posts

Posted: Tuesday, March 26, 2013 - 09:43 AM UTC
Very tidy work on the etch Tim, start of the rigging looking first class too.
Brilliant Build, thanks for sharing
Si
Brilliant Build, thanks for sharing
Si

Gremlin56
Joined: October 30, 2005
KitMaker: 3,897 posts
Model Shipwrights: 3,301 posts
KitMaker: 3,897 posts
Model Shipwrights: 3,301 posts
Posted: Wednesday, March 27, 2013 - 03:50 AM UTC
Absolutely fantastic Tim, makes me feel like packing my builds up and taking up knitting or embroidery 
Cheers,
Julian

Cheers,
Julian
TimReynaga
Joined: May 03, 2006
KitMaker: 2,500 posts
Model Shipwrights: 1,830 posts
Posted: Friday, March 29, 2013 - 02:35 PM UTC
Quoted Text
Absolutely fantastic Tim, makes me feel like packing my builds up and taking up knitting or embroidery
Cheers,
Julian
LOL Julian! Especially after watching your beautiful Bismarck take shape. Awesome...
This week I attached the masts I had scratchbuilt way back a year ago.

They were painted and ready to go, but there was the small additional task of concealing the gaps where they penetrate the decks. The Squadron/Encore wood decks as provided had large holes to accommodate the original oversized Revell kit mast bases. I had corrected the wood decks back when I applied them, but the fit of the masts through the decks was still a bit too loose for my taste.

I solved this with small bases made from .010 inch thick discs with the centers reamed out to the diameter of the masts.

Applied at each of the three places where the masts enter the decks, these nondescript details mostly disappear once in placebut had I just left them those ugly gaps would have certainly drawn the eye, I am sure!

The previously prepared 1-pounder guns and searchlights also took their places on the mast platforms.

 Now on to the rigging!
MrMox

Joined: July 18, 2003
KitMaker: 3,377 posts
Model Shipwrights: 985 posts

Posted: Friday, March 29, 2013 - 08:08 PM UTC
Sharp and accurate work as always - this is turning into a true jewel Sir!


TAFFY3
Joined: January 21, 2008
KitMaker: 2,531 posts
Model Shipwrights: 1,244 posts

Posted: Saturday, March 30, 2013 - 01:47 AM UTC
Hello Tim, Seeing you holding the Olympia reminded me just how small this model is, making your work doubly impressive.  Al
Al
Alskeena59
Joined: September 18, 2011
KitMaker: 4 posts
Model Shipwrights: 4 posts
Posted: Saturday, March 30, 2013 - 03:14 AM UTC
Yes, it truly is a tiny masterpiece!
RedDuster
Joined: March 01, 2010
KitMaker: 7,078 posts
Model Shipwrights: 6,649 posts
Posted: Saturday, March 30, 2013 - 07:53 AM UTC
Absolutley superb Tim, good luck with the rigging.
Si
Si
TimReynaga
Joined: May 03, 2006
KitMaker: 2,500 posts
Model Shipwrights: 1,830 posts
Posted: Tuesday, April 02, 2013 - 01:04 PM UTC
We had a busy Easter weekend, but I found time during the Cèsar Chàvez holiday yesterday to get some more work done on Olympias rigging. I love the look of the ships complex rig, but capturing it convincingly on the model is a challenge!

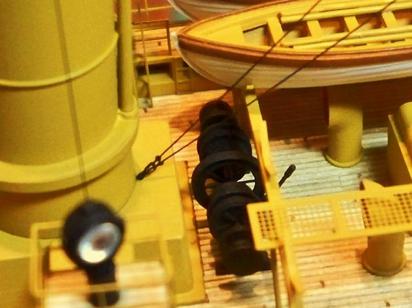
I wanted to replicate the intricate look of the ship without making myself crazy, so Ive tried to approach things logically. It made sense to work from the centerline out as much as possible. Since the funnels are centered and at the lowest level of the rigging, rigging began with the funnel stays; the area would have been hard to reach had the higher up lines been done first. This time the objective would be to finish up the standing rigging (that is, the fixed structural support lines) with the stays for the masts.


The mast lines were rigged with the same copper wire used for the funnel supports. The rigging scheme follows period photos, but the ships rigging changed over time, so it was difficult to get a complete picture for the period the model represents (after the Spanish American War but before the ships major November 1899 refit). I did the best I could to reconcile the various references.


The stays attached to the masts at mid and upper points fore and aft, and, like the funnel stays, were secured to the ships structure below with turnbuckles.

The ratlines were also installed at this point. The Toms Modelworks, Gold Medal Models, and the Squadron/Encore Olympia brass detail sets all provided nice etched ratlines, each slightly different. I chose the parts from the Squadron/Encore set. In the first two photos you can see the benefit of the bridge deck correction done earlier in construction; the forward ratlines, which fouled on the oversized bridge deck on the original unaltered kit part, now fit perfectly.


I wanted to replicate the intricate look of the ship without making myself crazy, so Ive tried to approach things logically. It made sense to work from the centerline out as much as possible. Since the funnels are centered and at the lowest level of the rigging, rigging began with the funnel stays; the area would have been hard to reach had the higher up lines been done first. This time the objective would be to finish up the standing rigging (that is, the fixed structural support lines) with the stays for the masts.
The mast lines were rigged with the same copper wire used for the funnel supports. The rigging scheme follows period photos, but the ships rigging changed over time, so it was difficult to get a complete picture for the period the model represents (after the Spanish American War but before the ships major November 1899 refit). I did the best I could to reconcile the various references.
The stays attached to the masts at mid and upper points fore and aft, and, like the funnel stays, were secured to the ships structure below with turnbuckles.
The ratlines were also installed at this point. The Toms Modelworks, Gold Medal Models, and the Squadron/Encore Olympia brass detail sets all provided nice etched ratlines, each slightly different. I chose the parts from the Squadron/Encore set. In the first two photos you can see the benefit of the bridge deck correction done earlier in construction; the forward ratlines, which fouled on the oversized bridge deck on the original unaltered kit part, now fit perfectly.
RedDuster
Joined: March 01, 2010
KitMaker: 7,078 posts
Model Shipwrights: 6,649 posts
Posted: Friday, April 05, 2013 - 08:58 AM UTC
Great start on the rigging Tim,
Looking forward to seeing more
Si
Looking forward to seeing more
Si
CanberraBazza
Joined: February 03, 2013
KitMaker: 5 posts
Model Shipwrights: 5 posts
Posted: Friday, April 05, 2013 - 11:36 AM UTC
Just superb Tim - a beautiful build.
Looking forward to more!!
Best wishes
Brian
Looking forward to more!!
Best wishes
Brian

vonHengest
Joined: June 29, 2010
KitMaker: 5,854 posts
Model Shipwrights: 350 posts
Posted: Friday, April 05, 2013 - 12:11 PM UTC
I've been watching this, along with several of the other fantastic builds that are going on here, and I can't help but wish I bought the deluxe kit when it came out most recently. Those turnbuckles really look great!
TimReynaga
Joined: May 03, 2006
KitMaker: 2,500 posts
Model Shipwrights: 1,830 posts
Posted: Friday, April 05, 2013 - 04:32 PM UTC
Thanks guys!
Jeremy, the turnbuckles actually didn't come with the kit, although North Star did a great job with them. The premium edition kit is terriffic, but even with the upgrades the original plastic is so old it still needs quite a lot of TLC to make it shine... but that's what makes this hobby fun, right?
Currently struggling with the ridiculously fragile wire I'm using for the rigging...
surfsup
Joined: May 20, 2010
KitMaker: 1,230 posts
Model Shipwrights: 1,212 posts
Posted: Saturday, April 06, 2013 - 10:32 AM UTC
Superb job you are doing Tim......Cheers Mark

RussellE

#306
Joined: June 27, 2010
KitMaker: 3,959 posts
Model Shipwrights: 2,777 posts
Posted: Saturday, April 06, 2013 - 11:11 PM UTC
Great start on the rigging Tim. What gauge copper line are you using and what's your source? 

TimReynaga
Joined: May 03, 2006
KitMaker: 2,500 posts
Model Shipwrights: 1,830 posts
Posted: Sunday, April 07, 2013 - 05:21 AM UTC
Hey Russell,
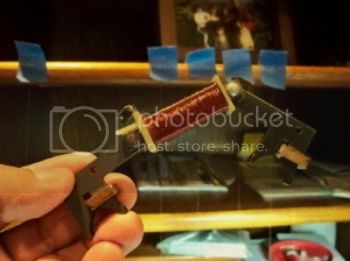
I dont know what gauge the wire is, but it is fine stuff. Im using two sizes a fine one for the standing rigging and a very fine one for the halyards. The source of the standing rigging wire is a braided copper wire cord I stripped from an old desk telephone. The finer wire is from a copper spool I literally found in the street near my home.

I have no idea what this thing was originally, but the wire in the spool is very fine. Ive been using it for rigging since I found it while on a walk with my then-toddler (who is in college now)!

I dont know what gauge the wire is, but it is fine stuff. Im using two sizes a fine one for the standing rigging and a very fine one for the halyards. The source of the standing rigging wire is a braided copper wire cord I stripped from an old desk telephone. The finer wire is from a copper spool I literally found in the street near my home.
I have no idea what this thing was originally, but the wire in the spool is very fine. Ive been using it for rigging since I found it while on a walk with my then-toddler (who is in college now)!
TimReynaga
Joined: May 03, 2006
KitMaker: 2,500 posts
Model Shipwrights: 1,830 posts
Posted: Friday, April 12, 2013 - 02:09 PM UTC

After completing the standing rigging I moved on to the signal halyards and running rigging. These lines were cut from the finer of the two copper wire sizes I was using. In contrast to the heavier black (tarred) standing rigging, these were painted tan (Model Master Armor Sand FS 30277) to represent lighter manila rope. I started with the halyards, which attached to the yardarm footropes provided in the Gold Medal Models set. The photoetched brass parts, which I had previously attached to the spars, have miniscule rings for attaching the hoists.

To help each halyard to attach, I bent tiny a hook in the end of the wire and inserted it into the hole. Lightly secured with PVA glue (polyvinyl acetate that is, Elmers white glue), the hoists could hang freely to be adjusted individually before the glue set.


When satisfactorily positioned they were made fast to the railings below. To these I attached little rope coils for the tie-off points. These were made by wrapping wires around a small rod and flattening them slightly to oval shapes to give them a more natural hang. Once in place, they impart an illusion of looped ends of the signal hoists secured to the railing.

I applied thirteen of these coils in all one at the base of each of the nine signal hoist halyards, and four for the deck level attachment points of the running rigging for the gaffs. These simple details enhance the 19th Century feel of the ship, and from a normal viewing distance blend nicely into the surrounding detail.

RussellE
#306
Joined: June 27, 2010
KitMaker: 3,959 posts
Model Shipwrights: 2,777 posts
Posted: Friday, April 12, 2013 - 10:39 PM UTC
Quoted Text
Hey Russell,
I dont know what gauge the wire is, but it is fine stuff. Im using two sizes a fine one for the standing rigging and a very fine one for the halyards. The source of the standing rigging wire is a braided copper wire cord I stripped from an old desk telephone. The finer wire is from a copper spool I literally found in the street near my home.
I have no idea what this thing was originally, but the wire in the spool is very fine. Ive been using it for rigging since I found it while on a walk with my then-toddler (who is in college now)!
Hehe, it's funny what turns up when you least expect it!

RedDuster
Joined: March 01, 2010
KitMaker: 7,078 posts
Model Shipwrights: 6,649 posts
Posted: Sunday, April 14, 2013 - 06:31 AM UTC
Great job Tim, really like the coils on the railings at the bottom of the halyards, top attention to detail.
Si
Si
britbitter
Joined: February 20, 2013
KitMaker: 55 posts
Model Shipwrights: 55 posts
Posted: Monday, April 15, 2013 - 05:38 AM UTC
A beautiful model and a beautiful build. You've inspired me. I just ordered one for my stash. Hope it's the right/same one...
TimReynaga
Joined: May 03, 2006
KitMaker: 2,500 posts
Model Shipwrights: 1,830 posts
Posted: Tuesday, April 16, 2013 - 11:59 AM UTC

The last element of the rigging installed was the running rigging. Olympias rig was interesting; built at a transitional time between the old 19th Century sail navy and the modern 20th Century steam navy, the ship was thoroughly modern in most respects, but the rigging still resembled that of a sailing ship. The extensive tarred mast stays, old fashioned ratlines and crows nests would have been familiar to any 19th Century sailor, as would have been the sails. Thats right SAILS! According to Benjamin Franklin Coolings USS Olympia: Herald of Empire (p.18): Like other of the new steel ships, she would carry a complement of sail in this case a seldom-used two-masted schooner auxiliary sail rig. Apparently the Navy just couldnt yet bring themselves to fully trust the newfangled steam technology!
This arrangement was evident even at a distance due to the angled gaffs protruding from the masts:


I applied a simplified running rig, including only those lines that I could identify in drawings and that were most visible in contemporary photographs. I started with the topping lifts (the highest lines running from the gaff tips to the mast tops) which helped support the weight of the gaffs. The peak halyards (used to lift the gaffs) came below these, and finally the gaff vangs, which were used to exert lateral force on the gaffs to control the shape of the sails. Each gaff vang extended in an inverted V off the gaff end to port and starboard, tying off at superstructure and main deck levels below.
 On the model most of the lines were attached directly to the masts and gaffs, but I did add pulley blocks through which the gaff vangs run. These blocks are really tiny with their shackles, the pulley blocks are about the same size as the .028 inch brass wire gaffs from which they hang.
The pulley blocks came from the 4type RiggingBlocks for 1:200 ship model 3D-printed parts set (by the designer Shingo) from Shapeways, a rapid prototyping company. http://www.shapeways.com/model/394026/4type-riggingblocks-for-1-200-ship-model.html

The resin frosted ultra detail parts capture the complex shape of the block pulleys in absolutely wonderful, sharp detail. And at about US$15, the 90 blocks in the set come to just under 17 cents apiece, which is pretty affordable if you happen to do ship models in 1/200 scale.

These things have to be seen to be believed!
TimReynaga
Joined: May 03, 2006
KitMaker: 2,500 posts
Model Shipwrights: 1,830 posts
Posted: Friday, May 03, 2013 - 10:58 AM UTC
The boat booms (spars that could be swung out from the sides of the ship to which boats could be temporarily secured) were replaced with new ones made from brass tube. The kit parts werent bad, but cleaning up the mold lines and hiding the attachment pegs and corresponding holes in the hull would have been nearly as much effort as simply replacing them with sharper-looking scratchbuilt pieces.

I made the new booms from Lion Roar 1mm (LT0019) brass tubes with shorter 1.5mm (LT0021) tubes slipped over them to form the heavier girth of the spar centers. The ends were plastic discs punched from .015 inch plastic sheet, and securing straps were cut from photoetch brass scrap.


The kit instructions advise painting the spars wood tan, but every picture Ive seen of the Olympia (except when she was painted gray for war) shows them painted white.
I made the new booms from Lion Roar 1mm (LT0019) brass tubes with shorter 1.5mm (LT0021) tubes slipped over them to form the heavier girth of the spar centers. The ends were plastic discs punched from .015 inch plastic sheet, and securing straps were cut from photoetch brass scrap.
The kit instructions advise painting the spars wood tan, but every picture Ive seen of the Olympia (except when she was painted gray for war) shows them painted white.
 |

WEB HOSTING BY


Copyright ©2021 Model Shipwrights and Kitmaker Network, a subsidiary of Silver Star Enterprises
All Rights Reserved. Please read our Conditions of Use and Privacy Policy.
All Rights Reserved. Please read our Conditions of Use and Privacy Policy.