

Go to modelshipwrights.com for the current dynamic site!


Hosted by Jim Starkweather
Revell Olympia build

ejhammer

Joined: June 10, 2008
KitMaker: 230 posts
Model Shipwrights: 136 posts

Posted: Thursday, July 26, 2012 - 03:43 AM UTC
Wow, really nice. You're convincing me I need to try a wood deck on one of my aircraft carriers.

RedDuster

Joined: March 01, 2010
KitMaker: 7,078 posts
Model Shipwrights: 6,649 posts

Posted: Sunday, August 05, 2012 - 03:59 AM UTC
Great work of perseverance Tim, real depth in detail, looking very good.
Si
Si

surfsup

Joined: May 20, 2010
KitMaker: 1,230 posts
Model Shipwrights: 1,212 posts

Posted: Wednesday, August 08, 2012 - 11:12 AM UTC
Love watching your build of her Tim. Impressive stuff.....Cheers mark

TimReynaga
Joined: May 03, 2006
KitMaker: 2,500 posts
Model Shipwrights: 1,830 posts

Posted: Sunday, September 02, 2012 - 05:25 AM UTC
Thanks guys. Havent done much modeling lately, Ive been distracted sending my little girl off to England (!) for college. Tried to talk her into accepting nearby UC Berkeley, but she turned them down and opted for adventure abroad instead. Cant really blame her, but it is sooo far away... 
Anyway, Olympia still awaits!

I had finished installing the wood decks and making corrections to them back in July, so when I returned to the model a few days ago I could finally start putting some of the subassemblies aboard. The previously corrected, detailed, and painted 8-inch turrets, funnels, funnel pipe vents, box vents, and 20 cowl vents went on rapidly. Theres still a good deal of work to do, but I just love this part when things start coming together!


I also installed the five opened-up skylights with their raised gratings from the Squadron/Encore photoetch set. Not knowing how much interior might be visible under the opened-up gratings I had added some white bulkheads, red-brown decks and rudimentary details under them. In the end not much can be seen through the small openings, but the shapes hint at structures below for anyone taking the trouble to look inside. Even without trying to look in, those delicate photoetch gratings topside look great. Way to go Squadron/Encore!
Anyway, Olympia still awaits!
I had finished installing the wood decks and making corrections to them back in July, so when I returned to the model a few days ago I could finally start putting some of the subassemblies aboard. The previously corrected, detailed, and painted 8-inch turrets, funnels, funnel pipe vents, box vents, and 20 cowl vents went on rapidly. Theres still a good deal of work to do, but I just love this part when things start coming together!
I also installed the five opened-up skylights with their raised gratings from the Squadron/Encore photoetch set. Not knowing how much interior might be visible under the opened-up gratings I had added some white bulkheads, red-brown decks and rudimentary details under them. In the end not much can be seen through the small openings, but the shapes hint at structures below for anyone taking the trouble to look inside. Even without trying to look in, those delicate photoetch gratings topside look great. Way to go Squadron/Encore!


TRM5150
Joined: January 03, 2010
KitMaker: 2,159 posts
Model Shipwrights: 1,400 posts

Posted: Sunday, September 02, 2012 - 10:35 AM UTC
What an epic build Tim!!! Played catch-up from the beginning just now...wow, well done so far, very enjoyable to watch!!

Dano48
Joined: September 04, 2012
KitMaker: 1 posts
Model Shipwrights: 1 posts

Posted: Monday, September 03, 2012 - 01:10 PM UTC
This is definitely a work of passion. I wonder if I had seen this build thread before my purchase of this (Encore premium version) kit if I would have proceeded. It looks like I"ll need another sheet or two of etched parts!
I really have to thank you Tim for all the exhaustive research you have done on the Olympia. I'm quite sure I would have missed 90% of the fixes you have made to the kit.
I am seriously considering building as combat version painted gray as at Manila Bay. But it's been hard to come by reference material. Any information anyone can share will be gratefully appreciated.
By the way, this will be my first kit in 40+ years. If I try to follow in your footsteps, I may not live to finish this monster.

crossracer
Joined: April 26, 2005
KitMaker: 117 posts
Model Shipwrights: 1 posts

Posted: Wednesday, September 05, 2012 - 11:08 AM UTC
This has been a great build. I have really enjoyed learning all the fixes you have found.
This is a model i am keen to try one day.
Thanks for all the hard work.
Bill
This is a model i am keen to try one day.
Thanks for all the hard work.
Bill

vonHengest
Joined: June 29, 2010
KitMaker: 5,854 posts
Model Shipwrights: 350 posts
Posted: Wednesday, September 05, 2012 - 03:41 PM UTC
I agree, you are tempting me even more to build one of these.... if my wallet ever decides to put on some weight
RedDuster
Joined: March 01, 2010
KitMaker: 7,078 posts
Model Shipwrights: 6,649 posts
Posted: Saturday, September 08, 2012 - 04:15 AM UTC
Looking superb, really love all the little touches like the open skylights, adds so much depth to model.
Great stuff Tim, glad to see you back building.
Si
Great stuff Tim, glad to see you back building.
Si
TimReynaga
Joined: May 03, 2006
KitMaker: 2,500 posts
Model Shipwrights: 1,830 posts
Posted: Wednesday, September 12, 2012 - 12:09 PM UTC
Working on the main skylight, thought Id give you all a look at whats going on.


The first picture is the Squadron/Encore photoetch skylight test fitted. The second picture is the same assembly with the kit plastic skylight part inserted inside (the little holes on the sides will attach arched photoetch sunshade frames in either case). The first option has the advantage of a cool look-through effect to the interior, but the second has lots of dense detail and more closely resembles photos of the real thing which has those little fore-aft longitudinal stringers as depicted in the original kit part. They both look good...
Which should I do...?

TAFFY3
Joined: January 21, 2008
KitMaker: 2,531 posts
Model Shipwrights: 1,244 posts

Posted: Wednesday, September 12, 2012 - 03:52 PM UTC
Hello Tim, looks great. I'd cast my vote for the open view. I think it's more visually interesting. The kit part almost looks as if the surrounding deck continues under the skylight.  Al
Al
Al
MrMox

Joined: July 18, 2003
KitMaker: 3,377 posts
Model Shipwrights: 985 posts

Posted: Wednesday, September 12, 2012 - 06:42 PM UTC
I´m with Al on this - it looks like it just sits on the deck on the second photo.
Super sharp work!
Cheers/Jan
Super sharp work!
Cheers/Jan

RedDuster
Joined: March 01, 2010
KitMaker: 7,078 posts
Model Shipwrights: 6,649 posts
Posted: Saturday, September 15, 2012 - 09:39 AM UTC
Make that 3 votes for the open look, gives real depth, that sort of thing can really lift a model. Not that your Olympia needs any help Tim.
Si
Si
TimReynaga
Joined: May 03, 2006
KitMaker: 2,500 posts
Model Shipwrights: 1,830 posts
Posted: Saturday, September 15, 2012 - 03:14 PM UTC
Thanks again, guys! Got the skylights done now, so most of the basic superstructure fittings are aboard. Main deck gack is next. I started this build before the KA Models wood deck in the Squadron/Encore release became available, so by the time it appeared I had already replaced the kit plastic wood deck with scribed styrene and removed details attached to itwasted effort, as it turned out! At least the original kit anchor rests, small skylights and chain guides were reasonably detailed and easy to reinstall on the foredeck.

The two kit capstans (parts # 24), however, were inaccurate. Located in a spot where you might expect to find capstans, drawings in Olympia's Booklet of General Plans and photos of the ship reveal that these objects were actually large bollards used to assist handling and securing the ground tackle. There was a capstan on the fantail, but there were none forward; the winch for raising the anchors was located inside the square structure in front of turrret one. Too bad, because the kit capstan parts (left side in the picture) are more interesting than my more accurate scratchbuilt replacements on the right!

Also, I plan to replace the kit mooring bitts with better aftermarket resin parts from Paper-Lab Publishing (http://www.paperlab.com) . The kit parts (left) are not horrible, but they are poorly molded off-round, covered in flash, and too big. The Paper-Lab 1/350 battleship bitts (right) are much better castings and more to scale.
The two kit capstans (parts # 24), however, were inaccurate. Located in a spot where you might expect to find capstans, drawings in Olympia's Booklet of General Plans and photos of the ship reveal that these objects were actually large bollards used to assist handling and securing the ground tackle. There was a capstan on the fantail, but there were none forward; the winch for raising the anchors was located inside the square structure in front of turrret one. Too bad, because the kit capstan parts (left side in the picture) are more interesting than my more accurate scratchbuilt replacements on the right!
Also, I plan to replace the kit mooring bitts with better aftermarket resin parts from Paper-Lab Publishing (http://www.paperlab.com) . The kit parts (left) are not horrible, but they are poorly molded off-round, covered in flash, and too big. The Paper-Lab 1/350 battleship bitts (right) are much better castings and more to scale.

Mgunns
Joined: December 12, 2008
KitMaker: 1,423 posts
Model Shipwrights: 99 posts

Posted: Tuesday, September 18, 2012 - 05:12 AM UTC
Hello Tim:
I normally reside on Aeroscale in the Early Aviation section, but I do like ship models and have built quite a few. I built this kit back in 1959 or 1960. My Gramma got it for a Christmas present and during a time when Revell was going to the "Picture Fleet" it was neat to have the original boxing of this kit molded in three authentic colors. I have been following your build for some time, and I am impressed with your focus on the small items of detail, your photo's and comment, very enlightening and straightforward. I am toying with getting the Encore kit with all the bells and whistles. I do have a later release of the Revell kit and the GMM P.E. for it. Your build is inspiring to write the least and I look forward to more and will refer to your build when such time I build the thing.
Best
Mark
TimReynaga
Joined: May 03, 2006
KitMaker: 2,500 posts
Model Shipwrights: 1,830 posts
Posted: Tuesday, September 18, 2012 - 07:13 AM UTC
Thanks for your comments, Mark, I'm glad my notes can be of use to you! I too started with the old 1959 Revell Olympia kit (1999 release) and the GMM photoetch. Hesitated to buy the Squadron/Encore re-release midway through the build just for the extras, but those gorgeous real wood decks just sucked me in. It seemed extravagant, but man was it worth it! The wood decks are awesome, and although the GMM photoetch is very good, the Squadron/Encore brass etch is even better. These plus the turned brass barrels, resin upgrades, anchor chain, brass pedestals and wood base make the Squadron/Encore premium edition a great deal even if you already have the basic kit. If you ever get around to doing an Olympia, I'd definitely recommend it.
regards,
Tim
p.s. by the way Mark, I too am a biker; my ride's a 2000 Harley Davidson FXDWG
regards,
Tim
p.s. by the way Mark, I too am a biker; my ride's a 2000 Harley Davidson FXDWG
Mgunns
Joined: December 12, 2008
KitMaker: 1,423 posts
Model Shipwrights: 99 posts
Posted: Friday, September 21, 2012 - 04:57 AM UTC
Hello Tim:
You convinced me. I am going to get the Encore Deluxe release of the kit. It has always been one of my favorite and it will be fun to work on.
I will continue to "lurk" here on MSW and watch your updates.
Just got a 2013 non anniversary Road King Classic. The 103" 6 speed is sweet.
Best
Mark
You convinced me. I am going to get the Encore Deluxe release of the kit. It has always been one of my favorite and it will be fun to work on.
I will continue to "lurk" here on MSW and watch your updates.
Just got a 2013 non anniversary Road King Classic. The 103" 6 speed is sweet.
Best
Mark
TimReynaga
Joined: May 03, 2006
KitMaker: 2,500 posts
Model Shipwrights: 1,830 posts
Posted: Friday, September 21, 2012 - 12:22 PM UTC
In addition to the bollards, I also replaced the small cranes for handling the ships anchors. The kit-provided parts were useable, but Revell had depicted them as simple bent poles. In reality, these cranes were a little thicker at the base and gently tapered. To replicate this look I adapted a couple of spare 5 in/40cal gun barrels from the B & D brass barrels set. I had used their excellent 8 inch guns on the main turrets, but B & Ds smaller 5 inchers were surplus. I already had on hand the Master-Model brass barrels for the Varyag replacement guns, and the Squadron/Encore kit came with 5 inch brass barrels too.

I started by bending two barrels to the angle of the cranes. Then I filled in the steps with JB Weld epoxy, sanding them down to form the smoothed, tapered cranes. Small wires looped around the ends and attached with superglue formed the bands evident in photographs. Adding square baseplates from sheet plastic, I painted them up and glued them down to the wood deck forward.

These cranes, along with the new bollards, bitts, and other components from the kit, give the foredeck a nice busy look. It will look even busier once the photetch railing is attached to the deck edge and and block-and-tackle added to the cranes.

I started by bending two barrels to the angle of the cranes. Then I filled in the steps with JB Weld epoxy, sanding them down to form the smoothed, tapered cranes. Small wires looped around the ends and attached with superglue formed the bands evident in photographs. Adding square baseplates from sheet plastic, I painted them up and glued them down to the wood deck forward.
These cranes, along with the new bollards, bitts, and other components from the kit, give the foredeck a nice busy look. It will look even busier once the photetch railing is attached to the deck edge and and block-and-tackle added to the cranes.
RedDuster
Joined: March 01, 2010
KitMaker: 7,078 posts
Model Shipwrights: 6,649 posts
Posted: Friday, September 21, 2012 - 09:23 PM UTC
Excellent stuff Tim, the adapting of the spare gun barrel to make the crane is genius.
Si
Si
surfsup
Joined: May 20, 2010
KitMaker: 1,230 posts
Model Shipwrights: 1,212 posts
Posted: Sunday, September 23, 2012 - 08:34 PM UTC
She is looking awesome. Beautiful job so far.....Cheers mark

gator
Vendor

#027
Joined: April 13, 2005
KitMaker: 5,422 posts
Model Shipwrights: 5,079 posts
Posted: Monday, September 24, 2012 - 08:47 AM UTC
Wonderful work Tim!

TimReynaga
Joined: May 03, 2006
KitMaker: 2,500 posts
Model Shipwrights: 1,830 posts
Posted: Friday, September 28, 2012 - 12:24 AM UTC
I completed a few more details on the superstructure, painting up and putting aboard the windlass I had scratchbuilt back in February.
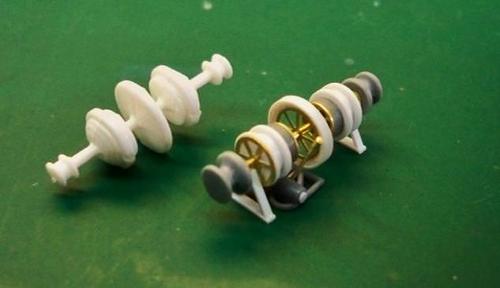

I also installed the auxiliary helm under the aft bridge. The kit part was reasonable, if a little large, but since Squadron/Encore supplied beautiful photoetched spoked wheels for it I made a new unit using them, plastic strip, and disc.

Next up: the pilothouse
By the way, if any of you guys also like armor models, I have posted a piece on a 1/72 scale Korean War Sherman on Armorama at
http://armorama.kitmaker.net/features/4562
regards,
Tim
I also installed the auxiliary helm under the aft bridge. The kit part was reasonable, if a little large, but since Squadron/Encore supplied beautiful photoetched spoked wheels for it I made a new unit using them, plastic strip, and disc.
Next up: the pilothouse
By the way, if any of you guys also like armor models, I have posted a piece on a 1/72 scale Korean War Sherman on Armorama at
http://armorama.kitmaker.net/features/4562
regards,
Tim
RedDuster
Joined: March 01, 2010
KitMaker: 7,078 posts
Model Shipwrights: 6,649 posts
Posted: Saturday, September 29, 2012 - 07:38 AM UTC
Windlass really looks the bussiness in place, as does the etched ships wheel.
Great work Tim.
Si
Great work Tim.
Si
JWLacy
Joined: September 29, 2012
KitMaker: 5 posts
Model Shipwrights: 5 posts
Posted: Saturday, September 29, 2012 - 09:54 AM UTC
Having cut my (modeling) teeth on the Revell Missouri, I remember this kit when it was first issued and have a couple of the mid-70's reissue in the box. It was an outstanding kit for it's time, and not bad for now. Watching your build and a recent one on Britmodeller has given me the urge, since I've the Tom's PE and the Artwox deck. The detail you've put in is first rate and a little beyond my ambition. One thing, while the ship was painted grey for the war, the paint before and after was white with buff funnels and masts. Check The American Steel Navy (USNI Press) for a picture captioned Hong Kong, Feb, 1898 and another Boston, 1899. The old Revell instructions have this scheme, while the Encore reissue has the post 1900 white and buff.
surfsup
Joined: May 20, 2010
KitMaker: 1,230 posts
Model Shipwrights: 1,212 posts
Posted: Saturday, September 29, 2012 - 09:44 PM UTC
I have got her in my stash also so watching and enjoying this one with great interest.....Cheers mark
 |

WEB HOSTING BY


Copyright ©2021 Model Shipwrights and Kitmaker Network, a subsidiary of Silver Star Enterprises
All Rights Reserved. Please read our Conditions of Use and Privacy Policy.
All Rights Reserved. Please read our Conditions of Use and Privacy Policy.