Ships by Class/Type: Cruisers
Topics covering cruisers both past and present.
Revell Olympia build
TimReynaga
Staff MemberAssociate Editor
MODEL SHIPWRIGHTS
Visit this Community
California, United States
Joined: May 03, 2006
KitMaker: 2,500 posts
Model Shipwrights: 1,830 posts
Posted: Friday, January 11, 2013 - 02:57 AM UTC

Quoted Text

And better still it meant you didn't have to do more of those pesky boats!


You would think so... but I'd already assembled, upgraded, and painted them before realizing I wouldn't be using all twelve!

Gremlin56
Joined: October 30, 2005
KitMaker: 3,897 posts
Model Shipwrights: 3,301 posts
Posted: Friday, January 11, 2013 - 03:23 AM UTC
A very powerful build Tim, looks a real museum piece. I am very happy you made a real steamer out of Theodore
Cheers,
Julian
surfsup
Visit this Community
Queensland, Australia
Joined: May 20, 2010
KitMaker: 1,230 posts
Model Shipwrights: 1,212 posts
Posted: Friday, January 11, 2013 - 06:13 PM UTC
Superb work so far Tim. I am really enjoying your work.....Cheers mark
RedDuster
Visit this Community
England - South East, United Kingdom
Joined: March 01, 2010
KitMaker: 7,078 posts
Model Shipwrights: 6,649 posts
Posted: Sunday, January 13, 2013 - 08:37 AM UTC
Great stuff Tim, The boats look superb in their stowage, well worth all the hard work.

Si
warreni
Visit this Community
South Australia, Australia
Joined: August 14, 2007
KitMaker: 5,926 posts
Model Shipwrights: 2,624 posts
Posted: Sunday, January 13, 2013 - 08:45 AM UTC

Quoted Text


Quoted Text

And better still it meant you didn't have to do more of those pesky boats!


You would think so... but I'd already assembled, upgraded, and painted them before realizing I wouldn't be using all twelve!


I am going to follow your method for my boats when I get around to my Encore edition Tim. You can send me some as examples if you want. I will pay postage..

Cheers mate
TimReynaga
Staff MemberAssociate Editor
MODEL SHIPWRIGHTS
Visit this Community
California, United States
Joined: May 03, 2006
KitMaker: 2,500 posts
Model Shipwrights: 1,830 posts
Posted: Sunday, January 13, 2013 - 03:41 PM UTC

Quoted Text

I am going to follow your method for my boats when I get around to my Encore edition Tim...


Warren,

My method for the boats works, but honestly, I tend to do too much. It is slow work, and you can still get really nice results with careful clean up and painting just using the kit parts. If you want to go crazy, though... I understand!
TimReynaga
Staff MemberAssociate Editor
MODEL SHIPWRIGHTS
Visit this Community
California, United States
Joined: May 03, 2006
KitMaker: 2,500 posts
Model Shipwrights: 1,830 posts
Posted: Wednesday, January 16, 2013 - 07:53 PM UTC
Here’s the steam launch, painted up and ready to go aboard. The delicate looking brass structures are removable supports for temporary canvas sunshades. Some photos of these craft on Great White Fleet-era battleship and cruiser boatracks show the supports deployed, some stowed. I thought they looked cool so I showed them in place.


The steam launch also carried a gun (the Maxim-Nordenfelt 37mm, adopted by the U.S. Navy just before the 1898 Spanish-American War as the 1-pounder Mk. 6). I would have thought that the 1-pounder mounted on the launch foredeck would have been stowed away after the boat was hoisted aboard, but pics show them to have been left in place. I guess they wanted to have them immediately available if the boat needed to be deployed quickly in an emergency.


Anyway, the gun gives the little launch a nice scrappy look as she sits nestled beside the pulling boats!
TimReynaga
Staff MemberAssociate Editor
MODEL SHIPWRIGHTS
Visit this Community
California, United States
Joined: May 03, 2006
KitMaker: 2,500 posts
Model Shipwrights: 1,830 posts
Posted: Saturday, January 19, 2013 - 03:48 PM UTC
Time to take on the superstructure searchlights. Here are the kit parts, such as they are:

I already upgraded the searchlights when I built up the masts, and the Squadron/Encore detailing set includes nice little wood decks for the platforms. Many of us here in the States have a three day weekend (Martin Luther King Holiday Monday, yeah!), so I’ll have a little time to do something about those towers too.

RedDuster
Visit this Community
England - South East, United Kingdom
Joined: March 01, 2010
KitMaker: 7,078 posts
Model Shipwrights: 6,649 posts
Posted: Sunday, January 20, 2013 - 12:18 AM UTC
Steam launch looks excellent in the stowage Tim,

Will be interested to see what you do with the searchight towers.

Si
TimReynaga
Staff MemberAssociate Editor
MODEL SHIPWRIGHTS
Visit this Community
California, United States
Joined: May 03, 2006
KitMaker: 2,500 posts
Model Shipwrights: 1,830 posts
Posted: Tuesday, January 22, 2013 - 01:47 AM UTC
Those kit towers were just too crude, so I decided to fix things up a bit.
I began the searchlight towers by constructing the open tower structure from.019 inch brass wire (Detail Associates #2506). The platform is .015 inch plastic sheet with the wood deck from the Squadron/Encore set on top. The wood looks nice, but for some reason Squadron/Encore chose to depict the planking running at 90 degrees beam to beam instead of end to end like the rest of the ship. Photos show this to be wrong. Still, the wood parts looked good, so I decided to go ahead and use them.

Well... in the end I just couldn’t live with those wrong-way decks! I took the last of the wood deck scraps and made new ones for the platforms. I don’t know that anyone will notice the difference, but they do look nice with the photoetch railings on.

I placed them on top of the frames along with the searchlights I had made using 1/350 USS Missouri parts back in April.


Cross piece support frames from .030 inch brass rod (Detail Associates #90853) added to the platforms completed the assemblies.
TAFFY3
Visit this Community
New York, United States
Joined: January 21, 2008
KitMaker: 2,531 posts
Model Shipwrights: 1,244 posts
Posted: Tuesday, January 22, 2013 - 03:59 AM UTC
Betterer and betterer, Tim. Those searchlight platforms are a big improvement, and the steam launch is a little model unto itself. Al
TimReynaga
Staff MemberAssociate Editor
MODEL SHIPWRIGHTS
Visit this Community
California, United States
Joined: May 03, 2006
KitMaker: 2,500 posts
Model Shipwrights: 1,830 posts
Posted: Thursday, January 24, 2013 - 04:39 PM UTC
The searchlight towers had small hose/cable reels mounted at their bases. The Squadron/Encore set included several beautiful 3/32 inch (2mm) etched brass reel ends, to which I added .030 inch (.8mm) plastic rod centers.


Tucked away within the interior frames, they replicate these hard to see details nicely.
RedDuster
Visit this Community
England - South East, United Kingdom
Joined: March 01, 2010
KitMaker: 7,078 posts
Model Shipwrights: 6,649 posts
Posted: Friday, January 25, 2013 - 09:39 PM UTC
Great work on the searchlight towers Tim, massive improvement over the kit parts.

Si
TimReynaga
Staff MemberAssociate Editor
MODEL SHIPWRIGHTS
Visit this Community
California, United States
Joined: May 03, 2006
KitMaker: 2,500 posts
Model Shipwrights: 1,830 posts
Posted: Monday, January 28, 2013 - 03:58 PM UTC
She’s not ready to case-up yet, but since the assemblies are getting to the point of being vulnerable to damage I went ahead and ordered the wood base and acrylic cover.

I've heard that a good rule of thumb for ship model cases is to add an inch to each end for every foot in model length, but I like to actually see what a case might look like before committing to specific dimensions. So to help visualize the end result I test fit the masts and made this mock-up from paper. It looks dopey, but it gave me confidence to order the real case from Grandpa's Cabinets. Can't wait for it to arrive!
RussellE
#306
Visit this Community
Victoria, Australia
Joined: June 27, 2010
KitMaker: 3,959 posts
Model Shipwrights: 2,777 posts
Posted: Monday, January 28, 2013 - 05:47 PM UTC
Nah not dopey at all Tim! Best to be safe than sorry & check these things out. The cases being pricey and all.
YellowHammer
#513
Visit this Community
Alabama, United States
Joined: March 28, 2006
KitMaker: 554 posts
Model Shipwrights: 219 posts
Posted: Tuesday, January 29, 2013 - 05:00 AM UTC
Tim,
I'm one of the lurkers who have been following your build in awe. You have an absolute talent.
Being a newbie to shipbuilding and having no naval experience, I have a couple of probably stupid questions on your recent progress. On the ship's boats, are they tied down or is their weight sufficient to keep them in place when the ship is in rough seas? On the searchlight towers, how do the crew access the platform? Is there a temporary ladder used or do they climb the platform frame?
It was your attention to the small details that got me to thinking about these questions.
TimReynaga
Staff MemberAssociate Editor
MODEL SHIPWRIGHTS
Visit this Community
California, United States
Joined: May 03, 2006
KitMaker: 2,500 posts
Model Shipwrights: 1,830 posts
Posted: Tuesday, January 29, 2013 - 03:52 PM UTC
Hey John,

I do plenty of lurking myself, but I appreciate you speaking up, especially with a compliment! But talent, well... the consensus between my two teenage daughters is that my model ship building is evidence less of any talent than of some undiagnosed personality disorder!

Anyway, in answer to your (not at all stupid) questions: Olympia’s boats rested on V-shaped supports attached to the rail structures spanning the superstructure deck. These supports slid with the boats sideways along the rails to the ship sides in order for the davits to reach the boats to lower them into the water alongside the ship. I am sure that they were secured to these supports somehow, but I haven’t found any pictures showing just how this was done. My guess is that they used cables or restraining straps strung across the boat tops.

As for the searchlights, they were accessed via permanent ladders attached to the towers. Previous pics I posted of the model didn’t have these in place yet, but I made a start on attaching the photoetched rails today, and I added the ladders too. Here’s how things are looking so far:

best,
Tim
DanielMoscatelli
Visit this Community
Montevideo, Uruguay
Joined: August 22, 2011
KitMaker: 998 posts
Model Shipwrights: 941 posts
Posted: Wednesday, January 30, 2013 - 02:28 AM UTC
Congratulations!!! Quite a work of art!!

Regards Daniel
Gremlin56
Joined: October 30, 2005
KitMaker: 3,897 posts
Model Shipwrights: 3,301 posts
Posted: Thursday, January 31, 2013 - 08:37 PM UTC
Teenage Sons and Daughters take a dim view of model building in general Tim. My boys used to go into hysterical fits of laughter if they found me using the trusty optivisor............
Julian
YellowHammer
#513
Visit this Community
Alabama, United States
Joined: March 28, 2006
KitMaker: 554 posts
Model Shipwrights: 219 posts
Posted: Friday, February 01, 2013 - 04:58 PM UTC
Hi Tim,

I should have figured you had the platform ladders in the works. You haven't missed a thing so far that I can tell. I hadn't considered the boats sliding on the rails. My antiquated brain figured they would be manhandled by the deck crew to the davits. I should have known sailors were smarter than that!

Thanks for being the scout and showing us the way!
John
CanberraBazza
Visit this Community
Australian Capital Territory, Australia
Joined: February 03, 2013
KitMaker: 5 posts
Model Shipwrights: 5 posts
Posted: Saturday, February 02, 2013 - 01:35 PM UTC
Hi Tim

As a voyeur from afar I am amazed at your work. Just first class. I enjoy logging on to see the progress and how you deal with those minute details is mindboggling!

I thought you might be interested in this pic of the old lady - particularly in relation to the recent comments about the boats!

Keep up the great work - it is inspirational!

Best wishes

Brian

http://www.flickr.com/photos/thumpr455/8435994061/in/photostream/
TimReynaga
Staff MemberAssociate Editor
MODEL SHIPWRIGHTS
Visit this Community
California, United States
Joined: May 03, 2006
KitMaker: 2,500 posts
Model Shipwrights: 1,830 posts
Posted: Saturday, February 02, 2013 - 02:46 PM UTC
Brian,

Thanks for the great photo! It shows the ship later (around World War One, judging by the fit) than the version I'm doing, but it still has some really cool detail. Much appreciated!


I had meant to get some more done on her this weekend, but birthday parties for both my nine year old and for my wife (oh, and watching the ‘Niners win the Super Bowl tomorrow!) are putting modeling on the back burner for the present.
surfsup
Visit this Community
Queensland, Australia
Joined: May 20, 2010
KitMaker: 1,230 posts
Model Shipwrights: 1,212 posts
Posted: Saturday, February 02, 2013 - 11:04 PM UTC
You are doing a stunning rendition of her Tim. I absolutely love what you are doing......Cheers mark
TimReynaga
Staff MemberAssociate Editor
MODEL SHIPWRIGHTS
Visit this Community
California, United States
Joined: May 03, 2006
KitMaker: 2,500 posts
Model Shipwrights: 1,830 posts
Posted: Friday, February 08, 2013 - 01:32 PM UTC
A relatively inconspicuous detail the old Revell designers hadn’t thought to include in the kit was the ship’s bell. Not finding anything suitable in my spare parts box, I’d have normally gone to the local model railroad shop to find something. This time, though, I thought I’d try something new: 3D printing.

3D printing (also known as rapid prototyping) is a process of making a three-dimensional solid object from a virtual CAD representation with a materials printer using digital technology. The shape is built up through an additive process where successive layers of material (in this case resin) are laid down in different shapes to form the object rather than the traditional method of removing excess material to produce the shape. I found an outfit called Shapeways (
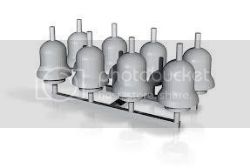
http://www.shapeways.com) that offers this service, and a quick search yielded “EMD Roof Mount Locomotive Bells”. Based on a Southern Pacific SD-45 prototype in N-Scale, these measured .962cm w x .456cm d x .424cm h (.379in w x .18in d x .167in h) – perfect for a 1/232 Olympia ship’s bell!


The bells arrived attached to a frame matrix similar to the sprues on injection molded plastic parts. The material ("frosted ultra detail UV cured acrylic polymer") is similar to the polyurethane resin commonly used in model shipbuilding; solid but also easy to work. The shapes are flawless, and the little step artifacts of the layering process are so small as to be virtually invisible. They do, however, make a useful key for paint.


Fitted to a .015 inch plastic strip mount attached to a couple of the cowl vents, the 3D printed bell looks right at home among all those Old School injection molded plastic parts.
Mgunns
Visit this Community
Arizona, United States
Joined: December 12, 2008
KitMaker: 1,423 posts
Model Shipwrights: 99 posts
Posted: Wednesday, February 13, 2013 - 04:32 AM UTC
Hello Tim:

It has been awhile since I last looked in on this build. You are doing a fantastic job on this kit. I have the Encore Premier edition and one of these days I will tackle it. You are certainly going the extra mile on the boats and it is paying off dividends especially the launch. I like the fact that you didn't settle for the perpendicular wood on the searchlight towers. The parallel wood is much nicer and I bet you are equally happy you did it too.

Keep up the good work Tim and don't let it cut into your riding time.

Best

Mark