Ships by Class/Type: Cruisers
Topics covering cruisers both past and present.
Revell Olympia build
TimReynaga
Staff MemberAssociate Editor
MODEL SHIPWRIGHTS
Visit this Community
California, United States
Joined: May 03, 2006
KitMaker: 2,500 posts
Model Shipwrights: 1,830 posts
Posted: Wednesday, March 28, 2012 - 12:38 AM UTC

Quoted Text

Coming well Tim, the new masts and platforms look the bussiness.

What will you use to rig her?

Si


Hmmm... haven't decided yet. Thin copper wire probably. Maybe fly tippett. Any suggestions?
s4usea
Visit this Community
United States
Joined: December 08, 2011
KitMaker: 46 posts
Model Shipwrights: 45 posts
Posted: Wednesday, March 28, 2012 - 01:41 AM UTC
I picked up steel grey waxed fly line for my Blue Jacket Olympia, and it's available down to .07", For the heavier stuff I'm using grey MoRope which is available down to .5mm.
s4usea
Visit this Community
United States
Joined: December 08, 2011
KitMaker: 46 posts
Model Shipwrights: 45 posts
Posted: Wednesday, March 28, 2012 - 08:30 AM UTC

Quoted Text

I picked up steel grey waxed fly line for my Blue Jacket Olympia, and it's available down to .07", For the heavier stuff I'm using grey MoRope which is available down to .5mm.


I meant .007"
TimReynaga
Staff MemberAssociate Editor
MODEL SHIPWRIGHTS
Visit this Community
California, United States
Joined: May 03, 2006
KitMaker: 2,500 posts
Model Shipwrights: 1,830 posts
Posted: Saturday, March 31, 2012 - 09:09 AM UTC

Having upgraded the masts, it seemed worthwhile to fix up the mast-mounted searchlights and guns too. I replaced the kit lights with new ones cobbled together from Tamiya 1/350 scale USS Missouri searchlights combined with new round plastic bases and support arms made from scrap photoetch brass. I also hollowed out the lights to accommodate MV products glass lenses (#P/N 116, which is .016 inch/2.9mm diameter).
Made for model railroaders, these parts do a super job of simulating scale light lenses.

The kit 1-pounder Mark 6 (37mm) guns (http://www.history.navy.mil/photos/sh-usn/usnsh-d/id3010-o.htm) on the fighting tops will be replaced with parts from the Zvezda Varyag. The four Revell 1-pounders were actually the best weapons provided in the original kit and would have served nicely, but the Zvezda parts are finer. Plus, I’ll be needing an extra gun to mount on the steam launch later anyway.

The parts will go on to the platforms after the masts are painted and installed.
warreni
Visit this Community
South Australia, Australia
Joined: August 14, 2007
KitMaker: 5,926 posts
Model Shipwrights: 2,624 posts
Posted: Saturday, March 31, 2012 - 03:27 PM UTC
Keep up the good work Tim.
My Olympia arrived the other day, I coughed the money up for the Premium Encore Edition. One thing that was a tad off-putting, when I lifted the plastic bag full of plastic bits up to have a look at the stuff underneath I heard a horrible tinkling sound in the bag that sounded like pieces of glass.. shiver... and when I had a look in the box there where plastic bits floating free out of the bag.. gulp..
TAFFY3
Visit this Community
New York, United States
Joined: January 21, 2008
KitMaker: 2,531 posts
Model Shipwrights: 1,244 posts
Posted: Sunday, April 01, 2012 - 01:49 AM UTC
Hello Tim, the more work you do, the better she looks, the more seductive the Olympia becomes. Making me want to add her to the stash that I'm supposed to be reducing. Al
surfsup
Visit this Community
Queensland, Australia
Joined: May 20, 2010
KitMaker: 1,230 posts
Model Shipwrights: 1,212 posts
Posted: Sunday, April 01, 2012 - 07:42 PM UTC
She gets better and better each time I see her Tim.....Cheers Mark
TimReynaga
Staff MemberAssociate Editor
MODEL SHIPWRIGHTS
Visit this Community
California, United States
Joined: May 03, 2006
KitMaker: 2,500 posts
Model Shipwrights: 1,830 posts
Posted: Monday, April 02, 2012 - 04:46 PM UTC
Even though I had already been working on an old Olympia kit for several months, I was excited to get the new Encore Premium Edition issue. I was especially anxious to play with those laminate wood decks, a first for me. Having started the build before I knew these decks would be available for the Olympia, my plan had been to deck the ship with individual HO scale 2 X 4 planks. I had customized the main and superstructure decks with that in mind... but these sheet decks were a completely different design. Sure enough, dry runs revealed that my painstakingly applied alterations interfered with the fit! The main deck was not too bad, but the superstructure deck was a problem. I had replaced the open “crews hammock netting” (kit parts 33 and 35) with .020 X .188 inch solid strips. The walkway above was bordered with .015 X .020 inch strip to retain the individual wood planks to come. It was all very neat and tidy... but it prevented the new deck from fitting! I decided to cut the deck up into sections and fit them around my altered parts, but it quickly became evident that this would be far too much work. My alterations had to go! It was heartbreaking to do, but I tore the strips out and began again. ARRRRGGH!

So I cleaned things up and fit the old “crews hammock netting” parts back in. It had been hard to wipe out my carefuly completed work, but I have to admit it was worth it—the new decks are gonna look great!

RedDuster
Visit this Community
England - South East, United Kingdom
Joined: March 01, 2010
KitMaker: 7,078 posts
Model Shipwrights: 6,649 posts
Posted: Monday, April 02, 2012 - 09:27 PM UTC
Hi Tim

Never easy to undo work you are happy with, but the wood deck does look good down.

Great work, following with interest

Si
Gremlin56
Joined: October 30, 2005
KitMaker: 3,897 posts
Model Shipwrights: 3,301 posts
Posted: Tuesday, April 03, 2012 - 05:13 AM UTC
The wooden decks are magnificent Tim,
Julian
warreni
Visit this Community
South Australia, Australia
Joined: August 14, 2007
KitMaker: 5,926 posts
Model Shipwrights: 2,624 posts
Posted: Tuesday, April 03, 2012 - 06:48 AM UTC
More than worth the undoing Sir.
RedDuster
Visit this Community
England - South East, United Kingdom
Joined: March 01, 2010
KitMaker: 7,078 posts
Model Shipwrights: 6,649 posts
Posted: Tuesday, April 03, 2012 - 08:15 PM UTC
Hi Tim

Going back to the rigging, I use thin copper wire, works fine in 1/350th so should look even better in 1/232. Needs colouring, but that is not a problem, big advantage to me is a free supply, any peice of electical goods in the house needs replacing I "Appropriate" the cable for it and strip the wire out.

Si
TimReynaga
Staff MemberAssociate Editor
MODEL SHIPWRIGHTS
Visit this Community
California, United States
Joined: May 03, 2006
KitMaker: 2,500 posts
Model Shipwrights: 1,830 posts
Posted: Wednesday, April 04, 2012 - 02:43 PM UTC

Quoted Text

Hi Tim

Going back to the rigging, I use thin copper wire, works fine in 1/350th so should look even better in 1/232. Needs colouring, but that is not a problem, big advantage to me is a free supply, any peice of electical goods in the house needs replacing I "Appropriate" the cable for it and strip the wire out.

Si


I’m with you Si. I’ve tried stretched sprue, fly tippet, even human hair for rigging over the years, but I always seem to return to the thin copper wire I salvaged from some transistor radios as a teen. The copper coils are still going strong, and will probably serve for the Olympia when the time comes.
walt90
Visit this Community
United States
Joined: April 06, 2012
KitMaker: 5 posts
Model Shipwrights: 4 posts
Posted: Friday, April 06, 2012 - 11:46 AM UTC
Tim, I am 90 yrs old and will soon start building the USS Olympia Premium Edition.I have enjoyed your pictures and would like to ask you a question about the portholes. Are they painted black inside or drilled through?

If you are familiar with this kit or photo etched parts, any advise would be appreciated as I have never used photo etch before.

Thanks,Oldman90
TimReynaga
Staff MemberAssociate Editor
MODEL SHIPWRIGHTS
Visit this Community
California, United States
Joined: May 03, 2006
KitMaker: 2,500 posts
Model Shipwrights: 1,830 posts
Posted: Friday, April 06, 2012 - 03:31 PM UTC
Hey Walt,

Man, starting new builds at 90... I’m impressed! I hope I'm still cuttin’ and gluin’ plastic if I make it that far! (My wife assures me that this will undoubtedly be the case...)

I'm glad you're enjoying the pictures, it is fun posting them. In answer to your question, the portholes on the kit aren't bad, but I drilled them for better depth. Didn't think painting them black would work very well on a white painted vessel--too much contrast. I'll probably leave them painted white along with the surfaces they're on and fill them in with clear resin for the glass. Or maybe I'll just leave them unfilled as if the crew had them open to vent ship.

As for photoetch I’m no expert, but you might want to check out Art Braunschweiger’s piece on the subject on the Titanic Research and Modeling Association site at http://titanic-model.com/articles/photoetch/Photoetched_Brass.htm. He really knows his stuff!

Speaking of photoetch, while testing the fit of the photoetch ratlines to the foremast I discovered an error in the kit: the forward bridge deck (part 44) is too wide. Designed by Revell to match the superstructure deck (“main deck-center” part #11) below it, the bridge deck should actually be a little narrower. The Booklet of General Plans drawings show this clearly:

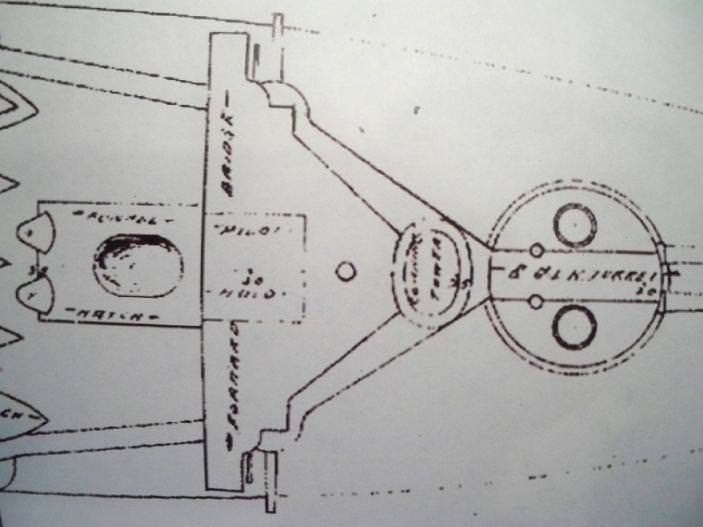
I hadn't noticed the discrepancy earlier, and the deck seemed fine when I test fitted it; the problem only became evident when trying to fit the photoetched ratlines to the mast. Because the bridge deck sticks out too far, the ratlines bump into it instead of hanging clear.


You can see this on the Squadron/Encore build up on their Facebook page.


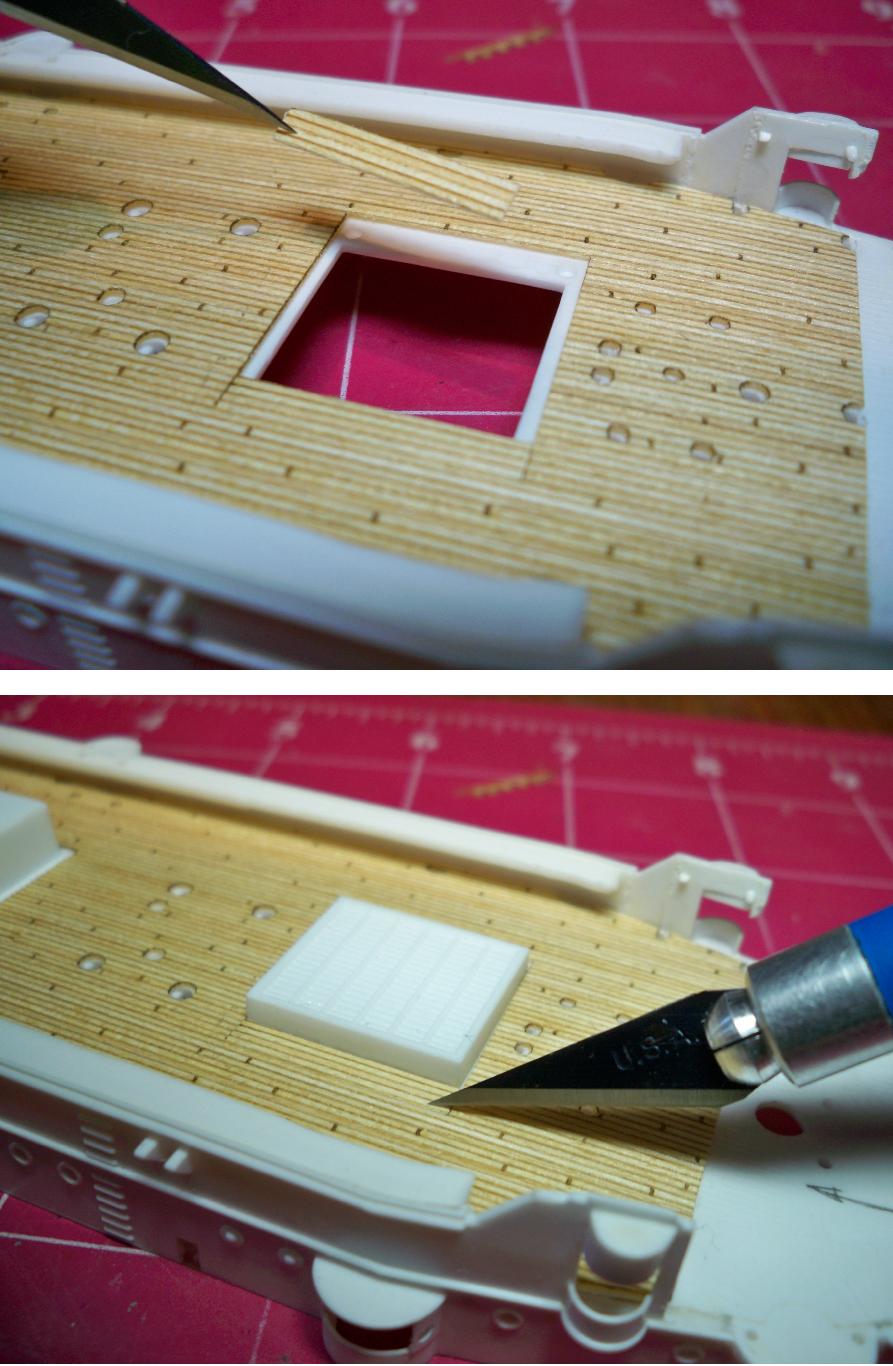
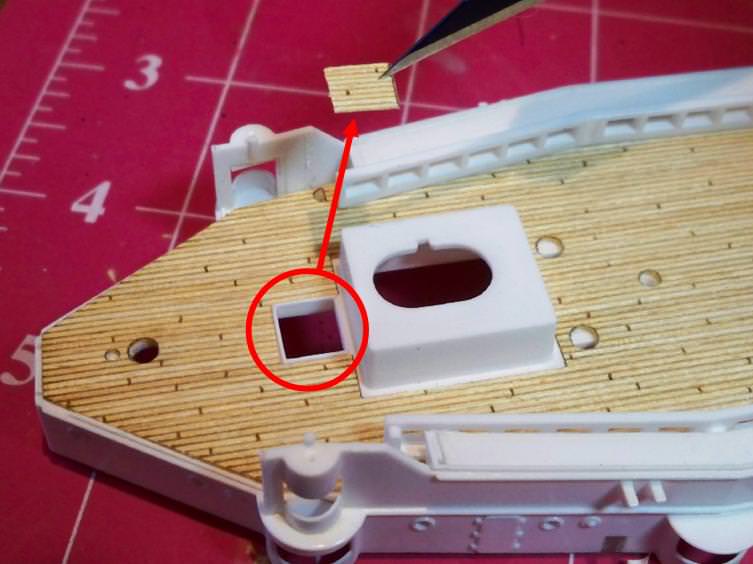
So, using the plans and the photoetched ratlines as guides, I cut the deck back.
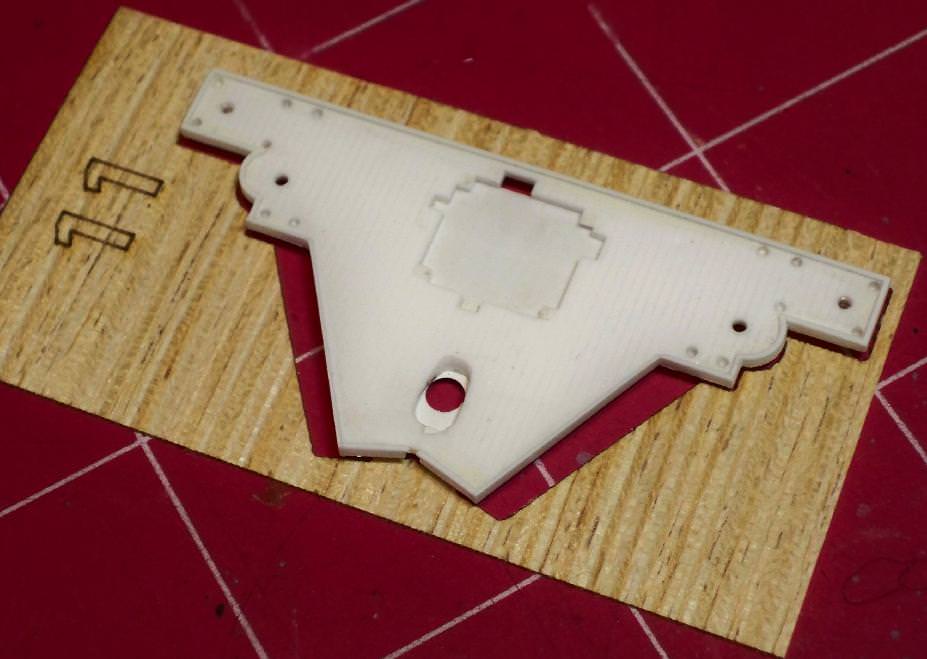
The picture shows the cut-back deck over the scrap left over from the unaltered wood deck upgrade part. The trimming wasn’t much as you can see, but it was still frustrating since I had to undo some of the detailing I had previously added to the bridge deck underside. Still, it is better to discover the problem now than later on!

best regards,
Tim
Gremlin56
Joined: October 30, 2005
KitMaker: 3,897 posts
Model Shipwrights: 3,301 posts
Posted: Friday, April 06, 2012 - 05:07 PM UTC
No one can accuse you of being faint hearted Tim
Going in to carve up that deck at this stage would scare me a lot.
Big brass shiny ones mate, respect
Julian
walt90
Visit this Community
United States
Joined: April 06, 2012
KitMaker: 5 posts
Model Shipwrights: 4 posts
Posted: Saturday, April 07, 2012 - 11:20 AM UTC
Thanks Tim for the great reply.I'll be on the lookout for the problems you've identified. I believe I will drill out the portholes. I will certainly go for the photoetch link, I'll need lots of help.
I promise not to be a pest but as I get into the build I know I will have some questions.
Walt90
TimReynaga
Staff MemberAssociate Editor
MODEL SHIPWRIGHTS
Visit this Community
California, United States
Joined: May 03, 2006
KitMaker: 2,500 posts
Model Shipwrights: 1,830 posts
Posted: Monday, April 09, 2012 - 12:40 AM UTC

Quoted Text

No one can accuse you of being faint hearted Tim
Going in to carve up that deck at this stage would scare me a lot.
Big brass shiny ones mate, respect
Julian


Thanks Tim for the great reply.I'll be on the lookout for the problems you've identified. I believe I will drill out the portholes. I will certainly go for the photoetch link, I'll need lots of help.
I promise not to be a pest but as I get into the build I know I will have some questions.
Walt90


LOL Julian! Had I paid closer attention to the plans I would have caught the mistake at an earlier stage (like the rudder problem). As it is I’ll be a happy man if I can finish this build without having to carve up any more of my already-completed work! And Walt, don't worry about being a pest; as Otto von Bismarck is reputed to have said, "Fools learn from experience. I prefer to learn from others' experience." I'm only too happy to share anything I may have learned in my foolish way!


After tearing out my prior alterations to the superstructure, the wood upgrade deck fit pretty well. The model isn’t ready for the decks yet, but it seemed reasonable to test fit them and make whatever adjustments that may be needed now before painting. The first change was to cut out the little square section just in front of the forward funnel. This was solid on the original kit and also on the wood deck part, but I had previously cut a hole there to accomodate the up-down stairs that Revell had missed. 
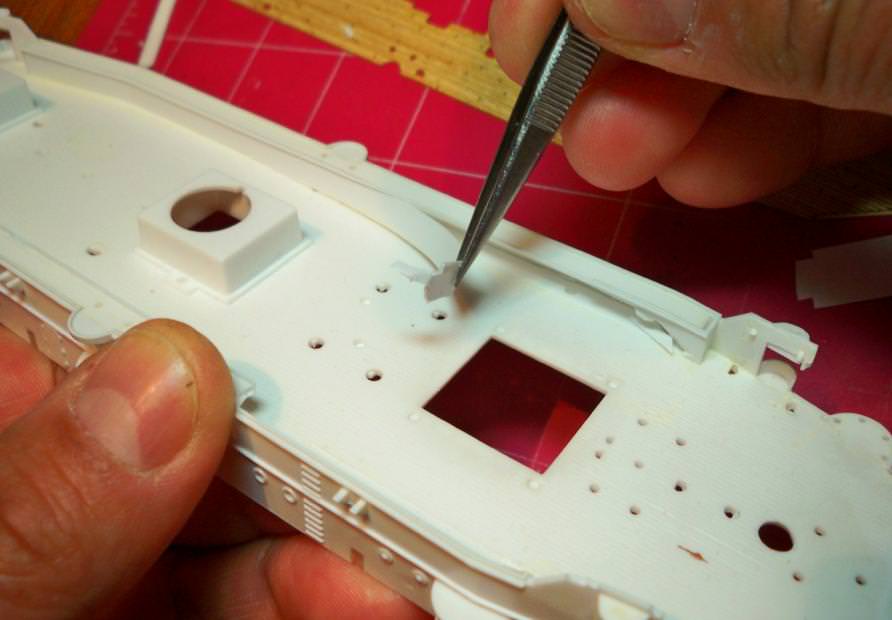
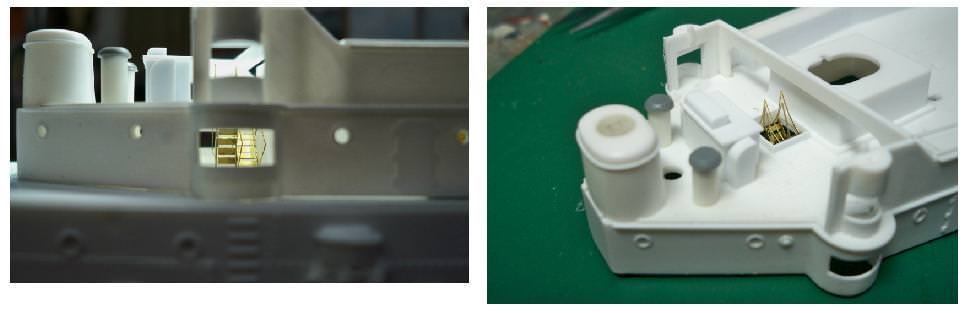
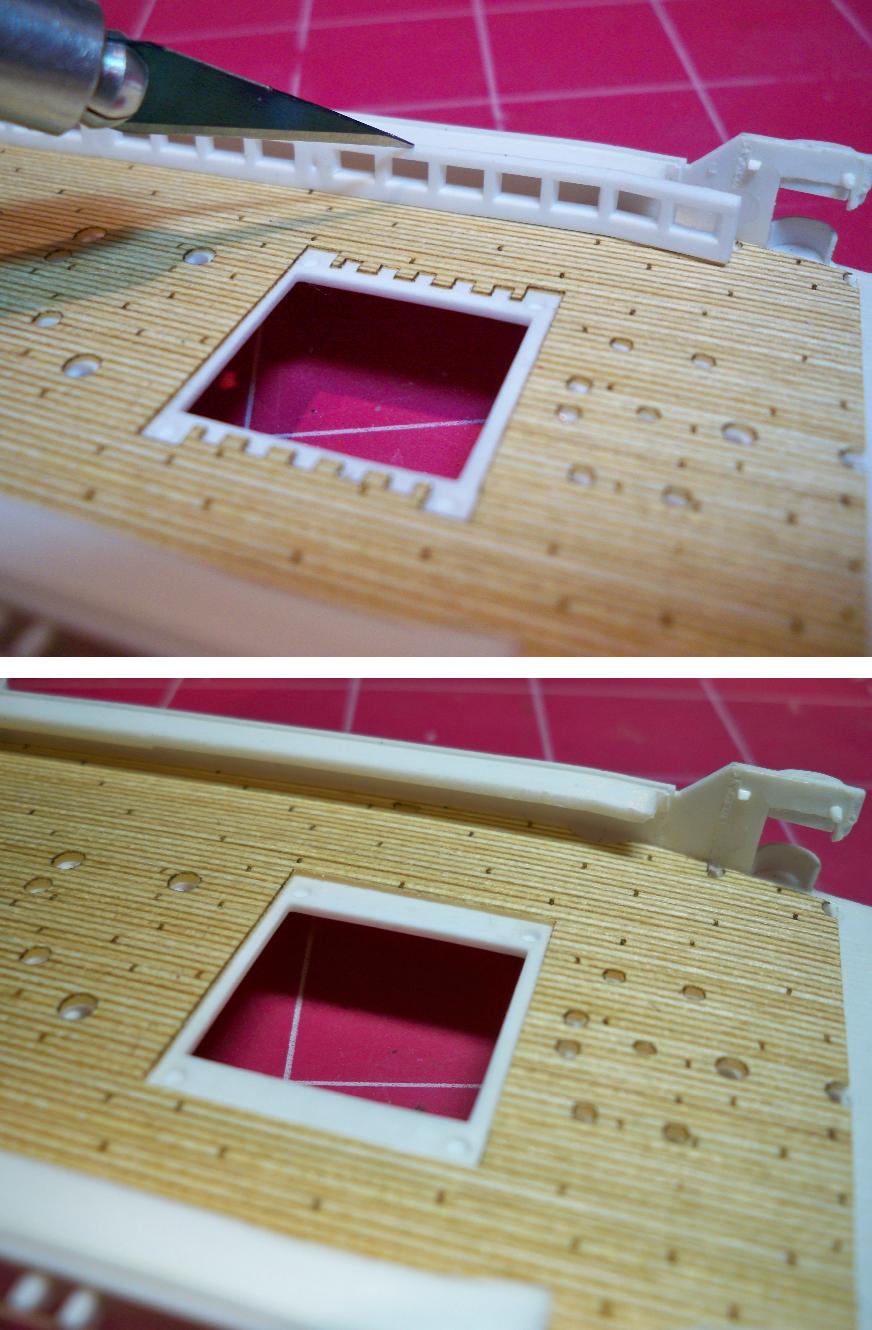
It was a simple square cut to fit around the plastic strip-framed opening I had added there. So far so good!

The second cut was to accommodate the armored citadel. The upgrade deck was designed to fit underneath the citadel part, but it interfered with the fit and just didn’t look quite right. So I cut out the offending section and fit the deck around the citadel.
Much better.
Tim
RedDuster
Visit this Community
England - South East, United Kingdom
Joined: March 01, 2010
KitMaker: 7,078 posts
Model Shipwrights: 6,649 posts
Posted: Monday, April 09, 2012 - 10:19 PM UTC
Great stuff Tim. This is another one, the more I watch your work growing, the more I am liking the idea of a go at this myself.

Si
walt90
Visit this Community
United States
Joined: April 06, 2012
KitMaker: 5 posts
Model Shipwrights: 4 posts
Posted: Thursday, April 12, 2012 - 05:59 AM UTC
TIM,
i REC'D MY KIT LAST EVENING AND BEHOLD I AM STUCK ON THE VERY FIRST INSTRUCTION. DETAIL A ITEM 1 - I HAVE NO IDEA WHAT THE PART IS THAT GETS DRILLED FOR THE CANNON. ALSO INSTRUCTION 2, I AM NOT SURE HOW MUCH TO CUT OFF (2 RAISED PINS). I AM NOT CERTAIN THAT THIS MODEL IS OVER MY HEAD BUT I WILL GIVE IT MY BEST SHOT. MY WORST TALENT IS WHEN THEY REQUIRE CUT-OFFS. tHANKS FOR YOUR HELP.

REGARDS, WALT
TimReynaga
Staff MemberAssociate Editor
MODEL SHIPWRIGHTS
Visit this Community
California, United States
Joined: May 03, 2006
KitMaker: 2,500 posts
Model Shipwrights: 1,830 posts
Posted: Friday, April 13, 2012 - 02:49 PM UTC
Hi Walt,
The Detail A Item 1 part you’re talking about is part #1, the hull-mounted 6-pounder guns (10 parts). 
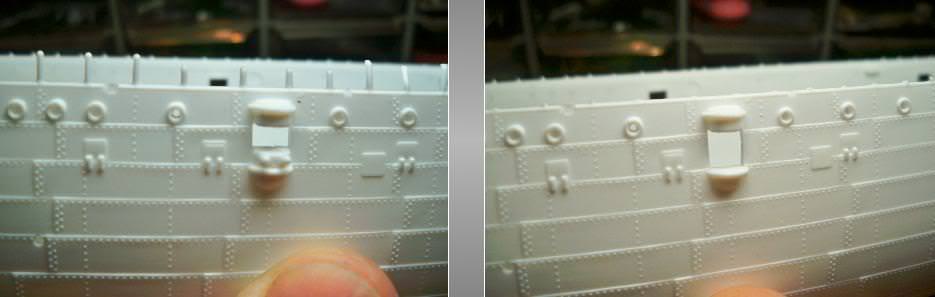
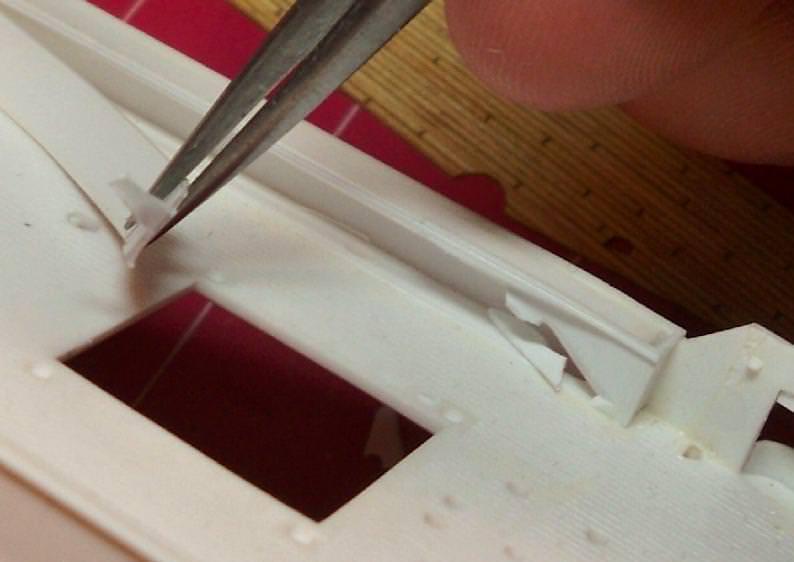
These are the guns for the embrasures in the photograph above. The drawing in the Premium Edition instruction sheet you have shows the plastic part with the barrel already cut off (to be replaced with the brass part MB1 after you drill a hole for it).


The two raised pins to be removed are on those same embrasures on the hull parts (left hand picture above-disregard the right pic). These pins are for mounting the ten 6-pounder gun sponson doors (plastic parts #7) on the original kit. The Premium Edition instructions you have don’t mention these parts (which are nevertheless still provided in the kit) because they are supposed to be replaced with better sponson door parts from the photoetch brass set in the kit.

Don’t worry–this kit is not over your head! The Premium Edition upgrades are great, but they are more difficult to use than the original plastic parts. If you find any of them to be too much fuss, then you can just use the original kit plastic. The old Revell model was pretty good to start with, and you will still get a good result using just the original kit. And remember, you’re supposed to be having fun!


Tim
walt90
Visit this Community
United States
Joined: April 06, 2012
KitMaker: 5 posts
Model Shipwrights: 4 posts
Posted: Saturday, April 14, 2012 - 10:58 AM UTC
TIM
AFTER I WROTE TO YOU I FIGURED OUT THE ANSWERS TO MY 2 QUESTIONS. I AM UNDERWAY AND WILL PROBABLY STICK MOSTLY IF NOT COMPLETELY TO THE PLASTIC MODEL.I WILL USE THE WOOD DECKS AND HAVE A QUESTION? THE WOOD IS SO THIN THAT I HESITATE TO HANDLE IT TOO MUCH, BUT IS THE BACKING REMOVABLE? I THINK SO BUT I'M NOT SURE. aLSO ON THE PLASTIC MODEL HOW ARE THE RAILING STANTIONS TOPPED?

AS ALWAYS I'M GRATEFUL FOR YOUR HELP.javascript:PasteSmiley(':-H')

REGARDS, WALT


TimReynaga
Staff MemberAssociate Editor
MODEL SHIPWRIGHTS
Visit this Community
California, United States
Joined: May 03, 2006
KitMaker: 2,500 posts
Model Shipwrights: 1,830 posts
Posted: Saturday, April 14, 2012 - 11:39 AM UTC
Yep, peel off the plastic adhesive cover on the back and stick the wood to the deck, or so I hear. Haven't done one of these before myself, so Olympia will be the first for me too.

The plastic railing stanchions on the kit get tossed. They will be replaced with photoetch brass rails.
warreni
Visit this Community
South Australia, Australia
Joined: August 14, 2007
KitMaker: 5,926 posts
Model Shipwrights: 2,624 posts
Posted: Saturday, April 14, 2012 - 12:52 PM UTC
Doing a great job instructing and building Tim.
As to the wooden decks, yes, you peel off the backing to adhere the wood to the deck, BUT I would remove any pieces that need to be removed before removing the backing, if you know what I mean. The backing supports the deck during the removal of the parts that need to be removed to clear deck fittings etc. Clear as mud?
TimReynaga
Staff MemberAssociate Editor
MODEL SHIPWRIGHTS
Visit this Community
California, United States
Joined: May 03, 2006
KitMaker: 2,500 posts
Model Shipwrights: 1,830 posts
Posted: Tuesday, April 17, 2012 - 03:32 PM UTC
More test fitting of the wood decks revealed the need for more adjustments. The most obvious area was the engine hatch on the superstructure (part 58). The original plastic part had 14 small rectangular mounting platforms with holes molded to the deck to accommodate the plastic hatch frame (part 59). These mounts were inaccurate, so I cut them away. Since the wood upgrade deck had been designed to fit the original kit parts, this left awful cerrated gaps in the wood deck around the engine hatch. To fix this, I first trimmed them to straight edges...


Then, using carefully cut scrap material from around the edges of the wood parts, I cut sections to fill in the blank spots. With the hatch in place, these repairs mostly become invisible.


I used the same method to repair the gaps left from the removal of the overlarge deck mounts for the windlass: