

Thanks Todd,
Helped by two very good kits.
Cheers Jan,
Mate, in all seriousness, pity you did not mention that a couple of days back, there were spare twos on the decal sheet. It was an enjoyable build.
Si


Go to modelshipwrights.com for the current dynamic site!
Campaigns
Want to be part of a group build? This is where to start, plan, and meet about them.
Want to be part of a group build? This is where to start, plan, and meet about them.
Hosted by Jim Starkweather
Official: Battle of the Atlantic 75th Anniv

RedDuster

Joined: March 01, 2010
KitMaker: 7,078 posts
Model Shipwrights: 6,649 posts

Posted: Sunday, April 26, 2015 - 12:31 PM UTC

Arnzer

Joined: August 01, 2013
KitMaker: 26 posts
Model Shipwrights: 3 posts

Posted: Sunday, April 26, 2015 - 07:05 PM UTC
Hello,
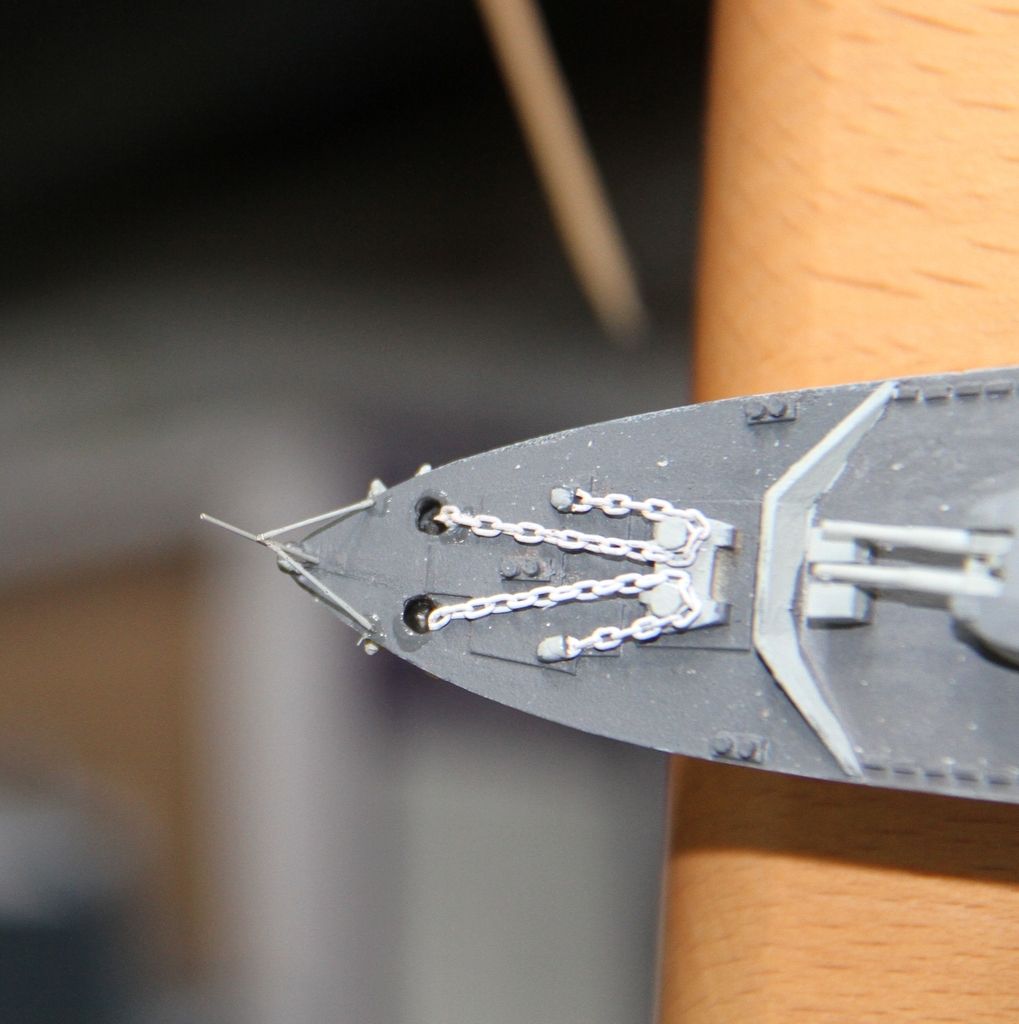
Here is a picture of the finished kit, before painting.
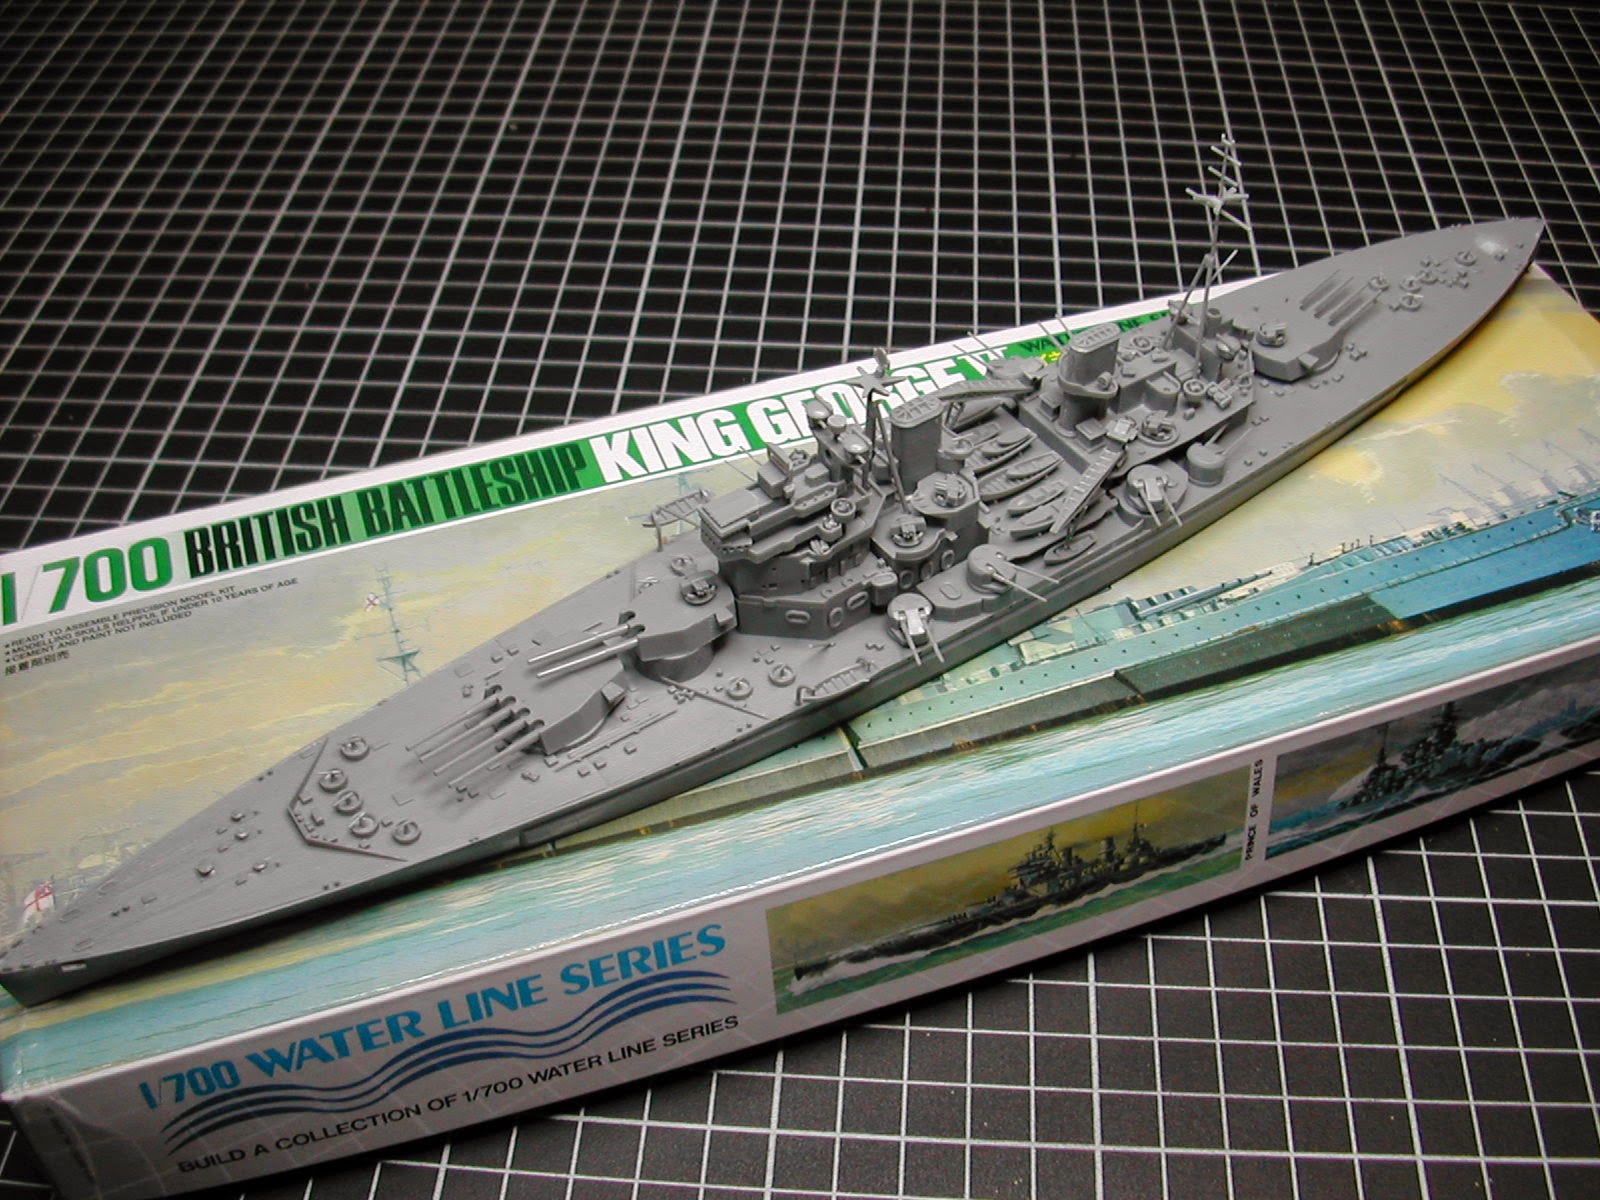
As I never painted a battleship, I decided to paint it with a light gray color as you can see on the finished picture.
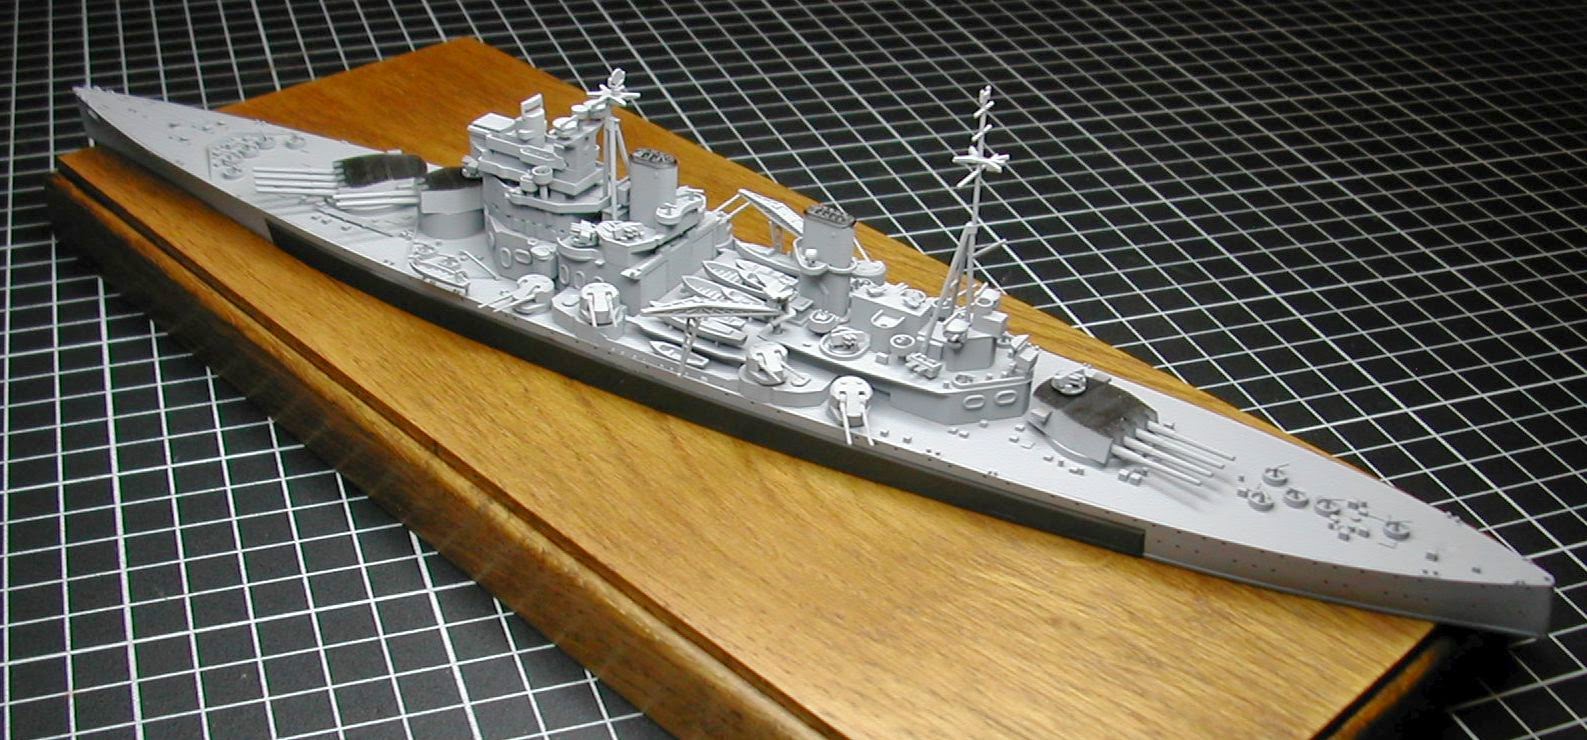
It was very funny to build this kit, but as an adept of 1/35 scale tanks, I found that the 1/700 scale is pretty hard for me (several parts broke in my hands ...).
Best Regards,
Arn
Here is a picture of the finished kit, before painting.
As I never painted a battleship, I decided to paint it with a light gray color as you can see on the finished picture.
It was very funny to build this kit, but as an adept of 1/35 scale tanks, I found that the 1/700 scale is pretty hard for me (several parts broke in my hands ...).
Best Regards,
Arn
RedDuster
Joined: March 01, 2010
KitMaker: 7,078 posts
Model Shipwrights: 6,649 posts
Posted: Sunday, April 26, 2015 - 11:16 PM UTC
Nice looking KGV Arn.
On with the Jupiter.
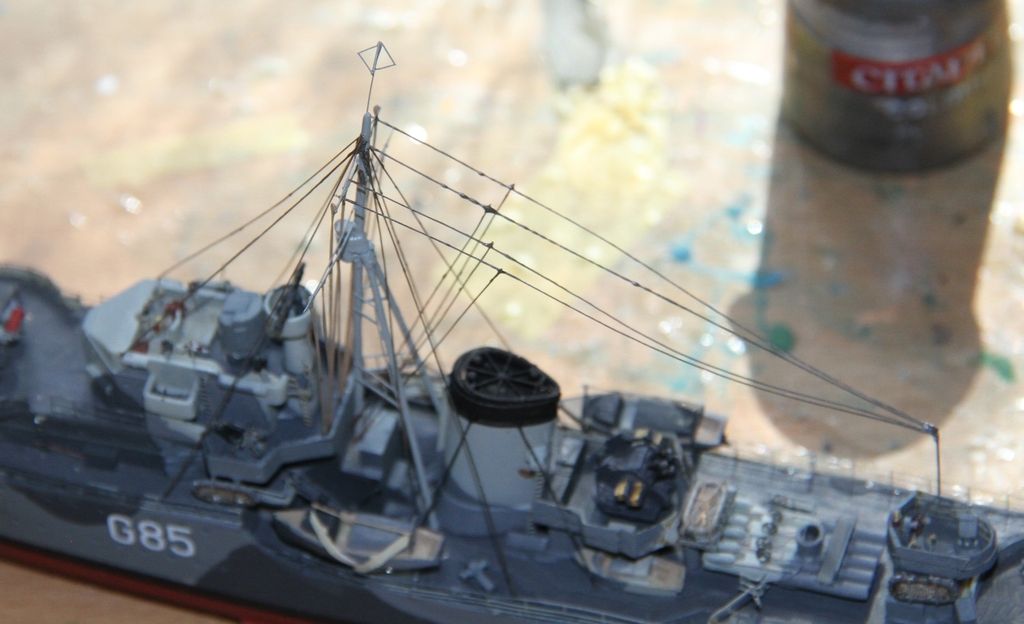
The etched Ensign and jack staffs, were not substantial enough to take the rigging that would be attached to them, so some Brass and something else metal rods were dug out ready for a bit if scratchbuilding.
The Ensign staff, it sits not on the centre line, but up against the port side of depth charge rack.
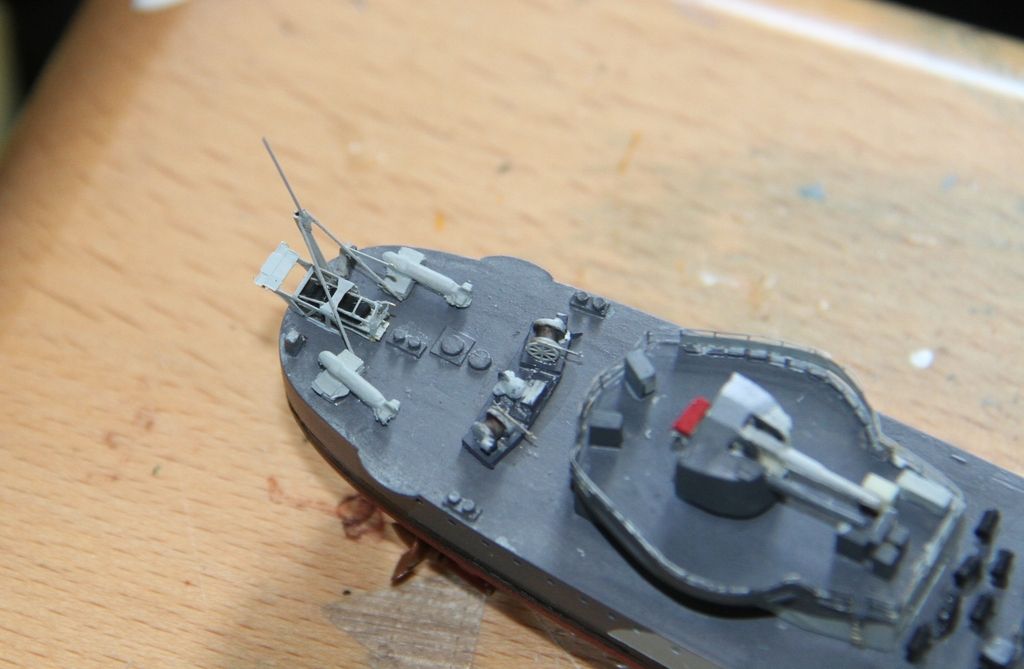
And the jack staff on the bow.
 .
.
Ready to start the rigging, some copper wire stripped out of an old power cable.
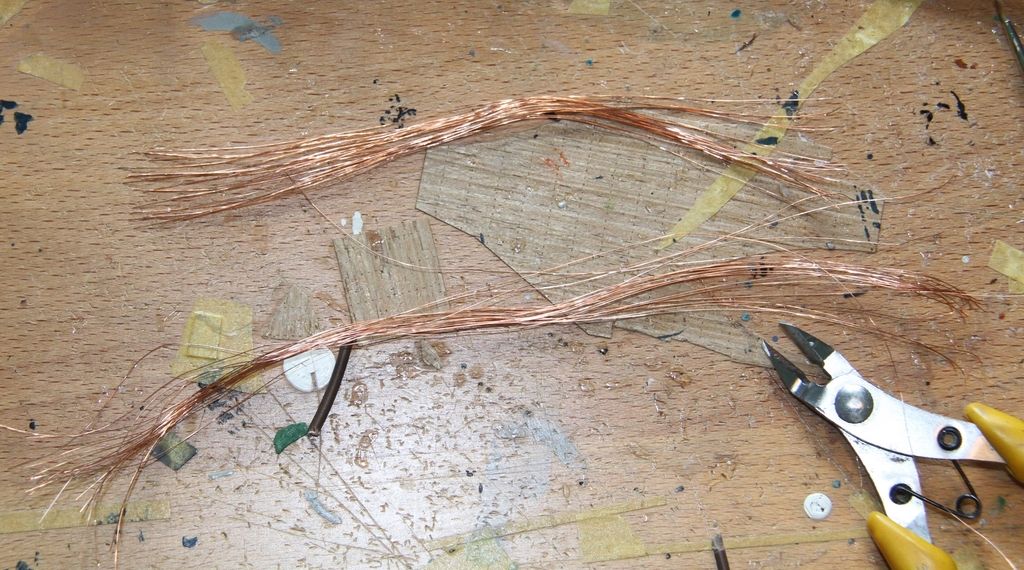
Rolled straight, 10 lengths were bent over dpuble, cut to length and fitted as the flag halyards.

The mast stays cut to length and glued in place.
And painted.

Railing next and then the aerials, oh and of course the base.
Si
On with the Jupiter.
The etched Ensign and jack staffs, were not substantial enough to take the rigging that would be attached to them, so some Brass and something else metal rods were dug out ready for a bit if scratchbuilding.

The Ensign staff, it sits not on the centre line, but up against the port side of depth charge rack.

And the jack staff on the bow.
 .
.Ready to start the rigging, some copper wire stripped out of an old power cable.

Rolled straight, 10 lengths were bent over dpuble, cut to length and fitted as the flag halyards.

The mast stays cut to length and glued in place.

And painted.

Railing next and then the aerials, oh and of course the base.
Si

Cosimodo

#335

Joined: September 03, 2013
KitMaker: 1,808 posts
Model Shipwrights: 871 posts

Posted: Monday, April 27, 2015 - 05:44 AM UTC
Very nice Simon. Lots of good metalwork in there 
cheers
Michael
cheers
Michael

SGTJKJ

#041

Joined: July 20, 2006
KitMaker: 10,069 posts
Model Shipwrights: 228 posts

Posted: Monday, April 27, 2015 - 11:08 AM UTC
Nice job on the rigging, Simon. Looking forward to see her finished!

RedDuster
Joined: March 01, 2010
KitMaker: 7,078 posts
Model Shipwrights: 6,649 posts
Posted: Monday, April 27, 2015 - 11:33 AM UTC
Thanks Michael,
The etched staffs are a bit two dimensional , and would struggle with the weight of the main aerial array which runs all the way from the upper yard arm.
Cheers Tom,
She is getting there, 3 days to go including today, so watch this space.
Si
The etched staffs are a bit two dimensional , and would struggle with the weight of the main aerial array which runs all the way from the upper yard arm.
Cheers Tom,
She is getting there, 3 days to go including today, so watch this space.
Si

TimReynaga

Joined: May 03, 2006
KitMaker: 2,500 posts
Model Shipwrights: 1,830 posts

Posted: Monday, April 27, 2015 - 05:49 PM UTC
Si,
Good call on the staffs; though to scale, etched parts in these highly visible positions are not usually very convincing.
After repairing the little Liberty after her mishap, I managed to get the sea base sculpted (Prang Das modeling clay over a piece of scrap wood). Ill finish painting it tonight. No pics yet, but it will look similar to my 1/1200 scale Bismarck. I made the sea in the same way.


phantom_phanatic309
#372

Joined: March 10, 2010
KitMaker: 2,568 posts
Model Shipwrights: 220 posts

Posted: Tuesday, April 28, 2015 - 12:26 AM UTC
Arn, great work on your KGV. 1/700 can be a challenge at times but the result is usually worth it. I've had to assemble and paint 8 20mm cannon, each made from 2 pieces and it's nothing short of a miracle that I did not lose or break any of the tiny pieces!
I may have to get myself one of those KGV kits having seen yours. I quite like those late-war fits when ships became covered in AA guns!
My Captain is fast nearing completions. I made up the wake and painted it by blending various shades of sea blue, light blue and finally white. A dry brush of neat white on the crests helps to make the waves stand out. Second time I've done a seascape and I think it turned out ok.
I'll leave it all over night to thoroughly dry, then gloss it before adding the last bits to the ship.
I may have to get myself one of those KGV kits having seen yours. I quite like those late-war fits when ships became covered in AA guns!
My Captain is fast nearing completions. I made up the wake and painted it by blending various shades of sea blue, light blue and finally white. A dry brush of neat white on the crests helps to make the waves stand out. Second time I've done a seascape and I think it turned out ok.

I'll leave it all over night to thoroughly dry, then gloss it before adding the last bits to the ship.

RedDuster
Joined: March 01, 2010
KitMaker: 7,078 posts
Model Shipwrights: 6,649 posts
Posted: Tuesday, April 28, 2015 - 12:33 AM UTC
Thanks Tim,
Today's job, deck edge railings.
The Fo'c'sle first.
Then the maindeck. I doo these in short sections, the full length railings on the wem Fret I find tricky.
All the railings on.
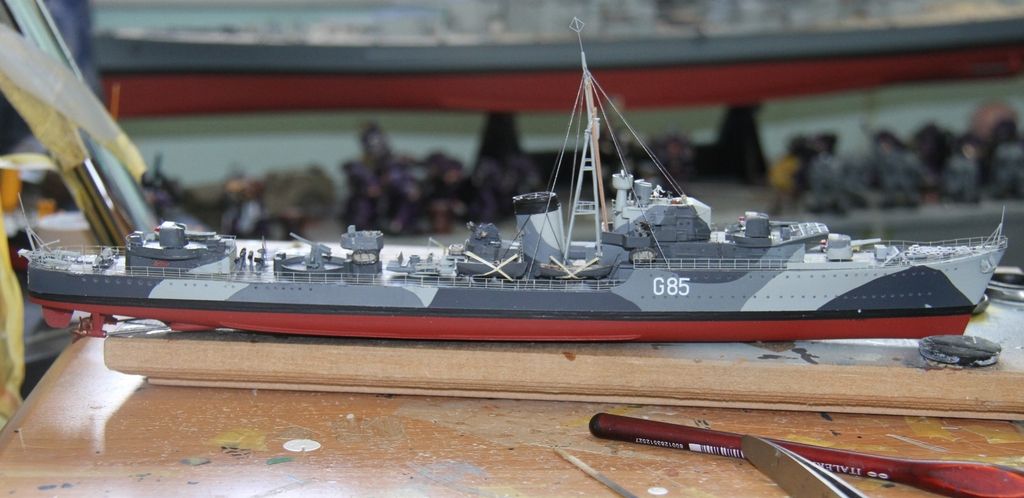
The railings need touching in to match the camouflage, and the aerials (which are going to fun, because of the long run on them)
two days to go.
Si
Today's job, deck edge railings.
The Fo'c'sle first.

Then the maindeck. I doo these in short sections, the full length railings on the wem Fret I find tricky.

All the railings on.

The railings need touching in to match the camouflage, and the aerials (which are going to fun, because of the long run on them)
two days to go.
Si

JJ1973
#345

Joined: August 22, 2011
KitMaker: 1,835 posts
Model Shipwrights: 1,832 posts
Posted: Tuesday, April 28, 2015 - 09:29 AM UTC
Si,
great work on the Jupiter!! I am always amazed by your copper wire rigging, I tried that earlier but I don't get it to look smart...yours looks fantastic!!
Thanks for your words on the U 2513 / U 2512...would have been nice, but as a matter of fact, I did not think about that myself before I saw your nice sub with all the decals on.
Gerat work here all!! Enjoying to have a look into this fine campaign from time to time!!!
Cheers,
Jan
RedDuster
Joined: March 01, 2010
KitMaker: 7,078 posts
Model Shipwrights: 6,649 posts
Posted: Tuesday, April 28, 2015 - 01:15 PM UTC
Thank you Jan,
You are welcome.
The Copper wire is just practice, the long runs from the mast aft are going to be fun, just off up to the bench to crack on with those, will try to keep the language down.
Nice work on the Captain Stephen, looking really good.
Si
You are welcome.
The Copper wire is just practice, the long runs from the mast aft are going to be fun, just off up to the bench to crack on with those, will try to keep the language down.
Nice work on the Captain Stephen, looking really good.
Si
TimReynaga
Joined: May 03, 2006
KitMaker: 2,500 posts
Model Shipwrights: 1,830 posts
Posted: Wednesday, April 29, 2015 - 07:11 AM UTC
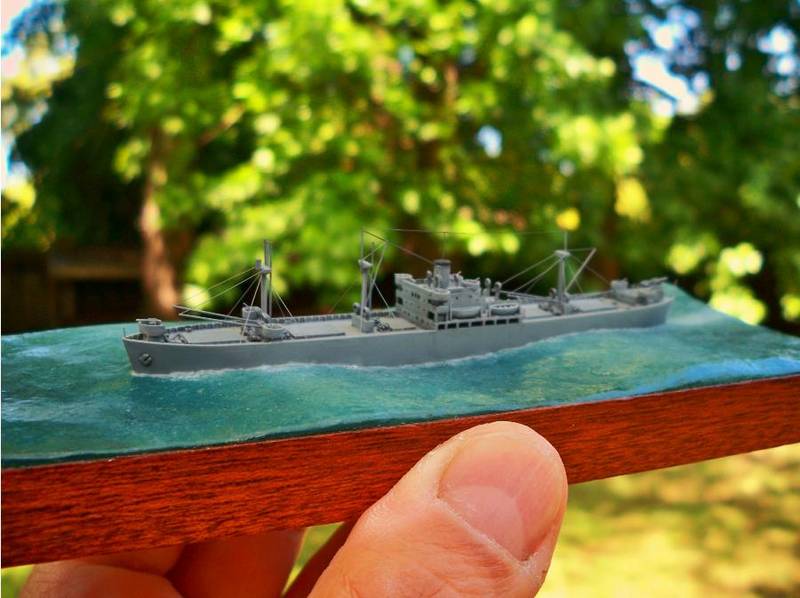
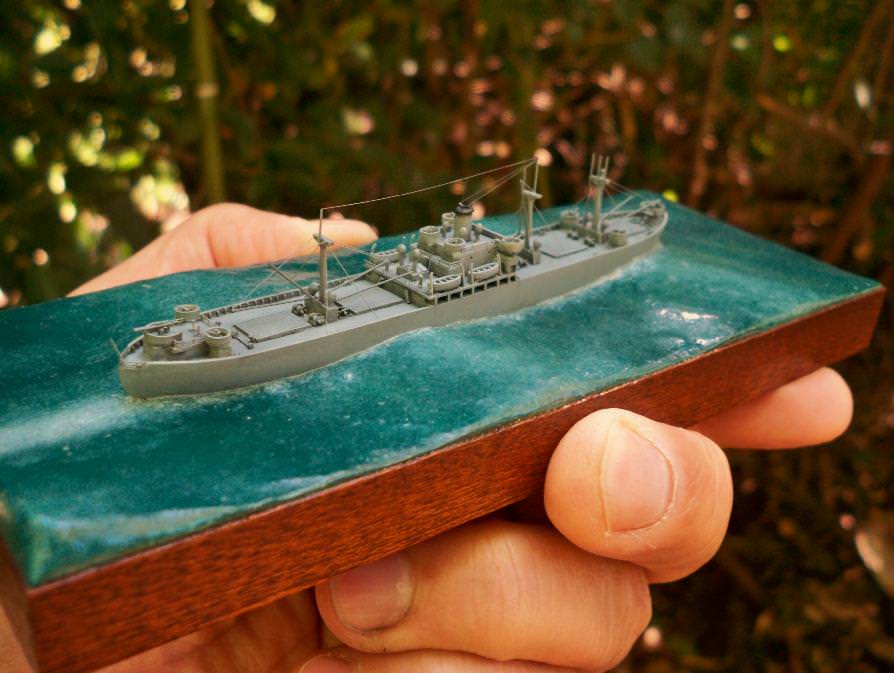
The Armed Liberty ship is finished and with a day to spare!
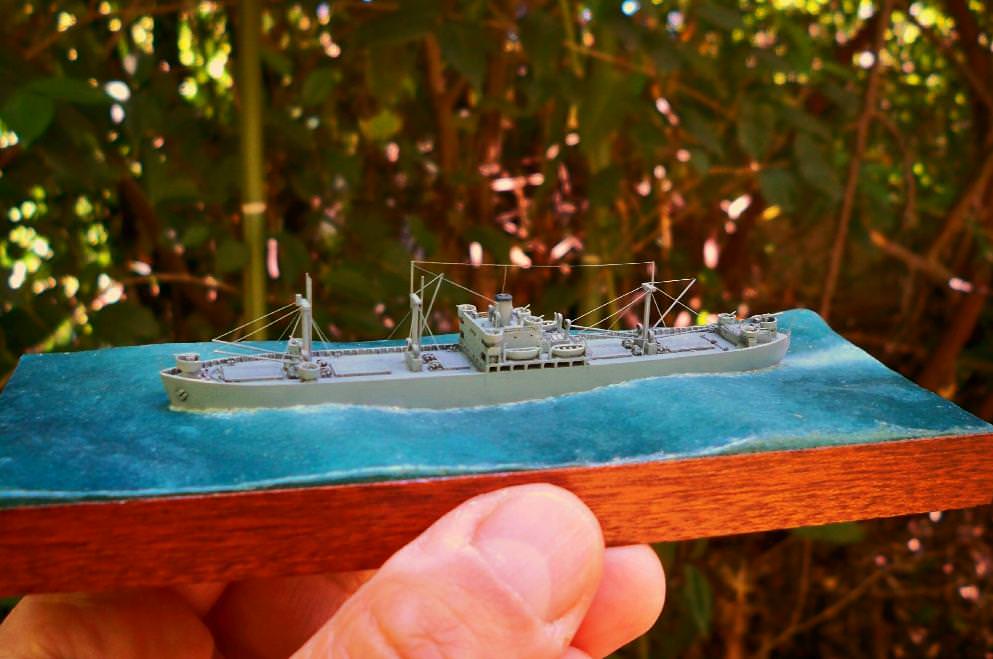
This was my first Len Jordan 1/1200 scale resin model. Great little kit!

This was my first Len Jordan 1/1200 scale resin model. Great little kit!
RedDuster
Joined: March 01, 2010
KitMaker: 7,078 posts
Model Shipwrights: 6,649 posts
Posted: Wednesday, April 29, 2015 - 01:07 PM UTC
Very nice job Tim.
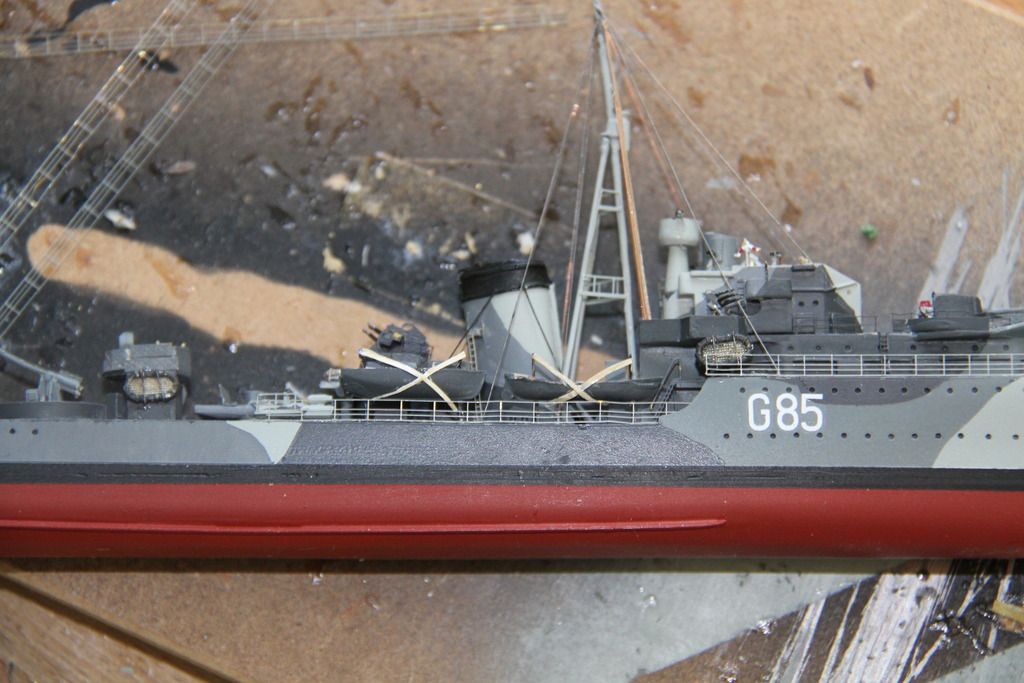
Yesterday's update.
A bit of last minute research showed the rigging had changed after the refit where 4" was fitted in place of the after bank of torpedo tubes.
The upper book is Chis Langtree's "The Kellys" & the lower Norman Freidman's "British Destroyers, WW2 and after".
The railings are painted to match the camouflage pattern.
A stub mast is fitted to the starboard side of the searchlight platform, and aerial runs added.
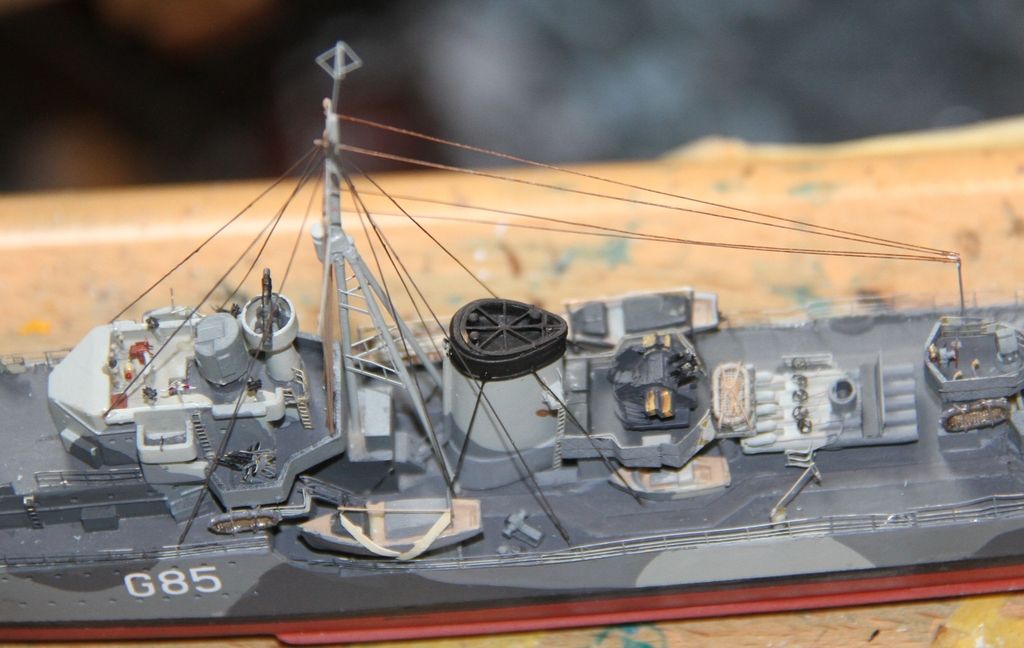
The connections from the aerials to the wireless office in place, and awaiting trimming.
Heading to the workbench shortly to finish the job.
Si.
Yesterday's update.
A bit of last minute research showed the rigging had changed after the refit where 4" was fitted in place of the after bank of torpedo tubes.

The upper book is Chis Langtree's "The Kellys" & the lower Norman Freidman's "British Destroyers, WW2 and after".
The railings are painted to match the camouflage pattern.

A stub mast is fitted to the starboard side of the searchlight platform, and aerial runs added.

The connections from the aerials to the wireless office in place, and awaiting trimming.

Heading to the workbench shortly to finish the job.
Si.

rolltide31
#377
Joined: June 27, 2010
KitMaker: 1,481 posts
Model Shipwrights: 1,332 posts

Posted: Wednesday, April 29, 2015 - 07:33 PM UTC
Tim, incredible work at such a small scI wld never dream of attempting something that small.
Si, Your Jupiter looks great. I hope I can accomplish half the job you have once I start cracking out the Destroyers I have in the stash. I am definitely learning a lot watching.
Great campaign to all that participated. Beautiful work.
Dave
Si, Your Jupiter looks great. I hope I can accomplish half the job you have once I start cracking out the Destroyers I have in the stash. I am definitely learning a lot watching.
Great campaign to all that participated. Beautiful work.
Dave
RedDuster
Joined: March 01, 2010
KitMaker: 7,078 posts
Model Shipwrights: 6,649 posts
Posted: Wednesday, April 29, 2015 - 09:53 PM UTC
Thanks Dave,
It has been a great campaign.
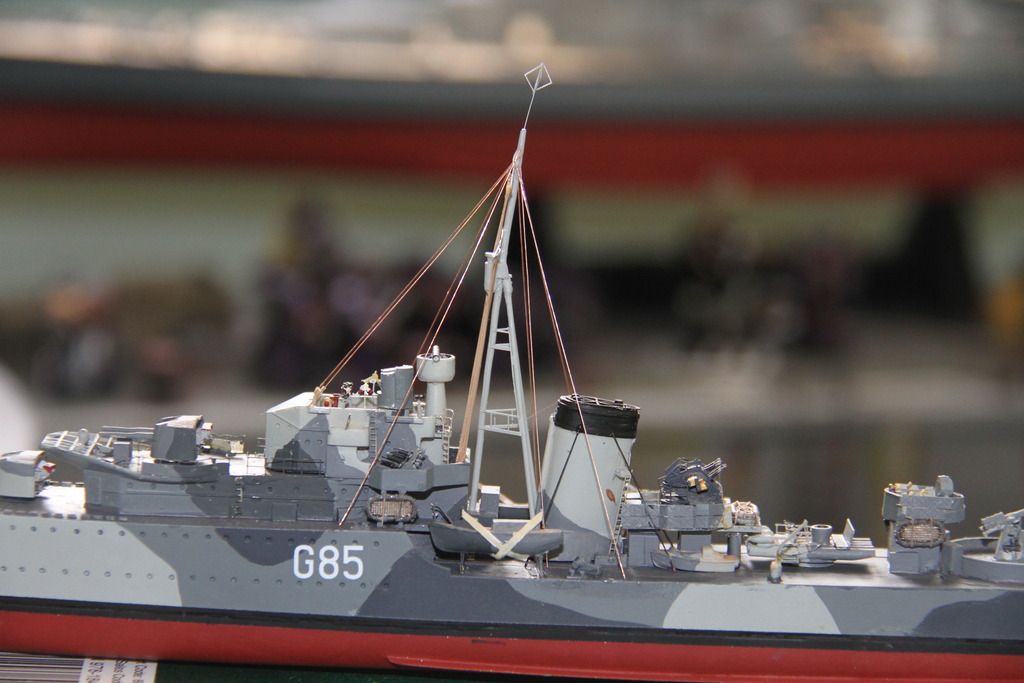
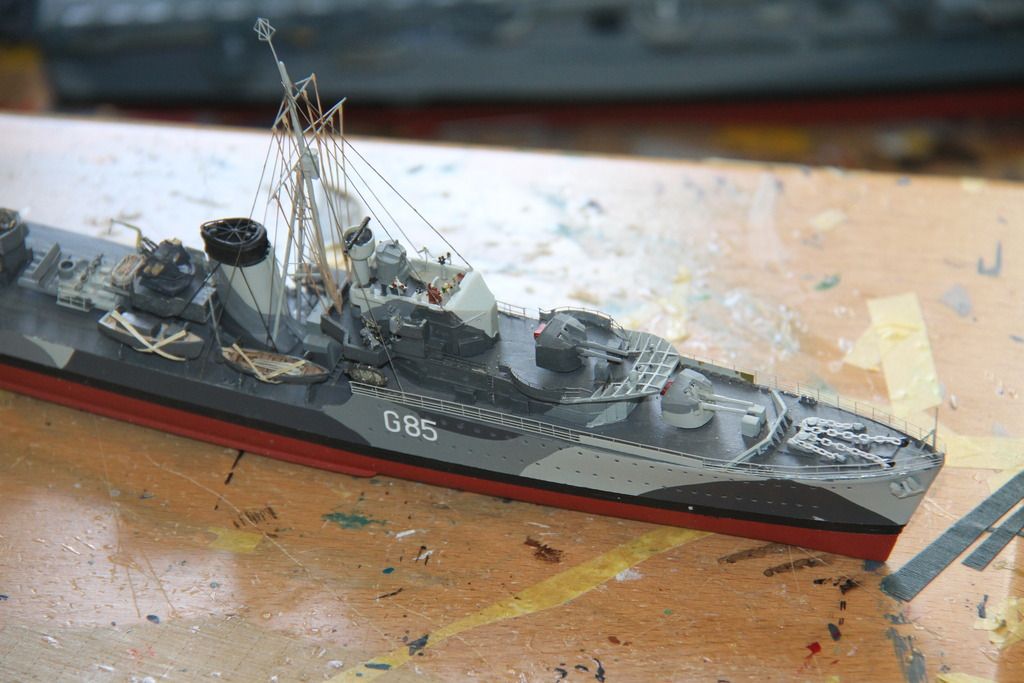
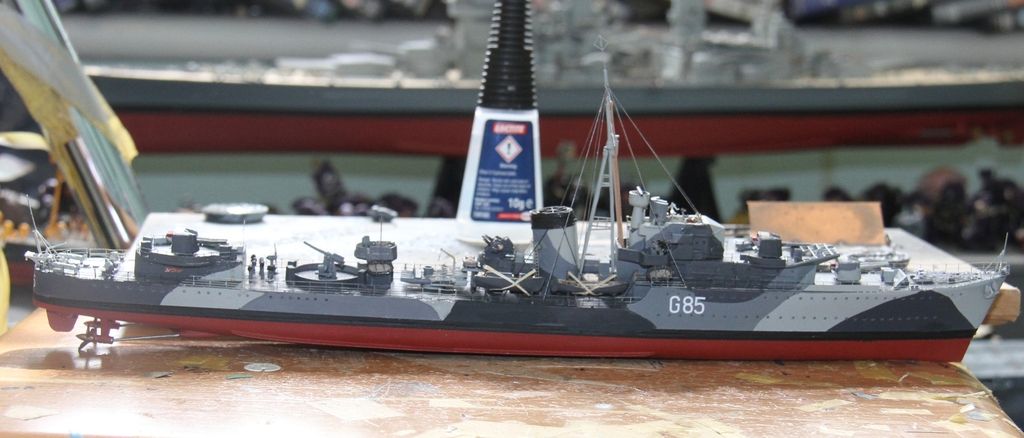
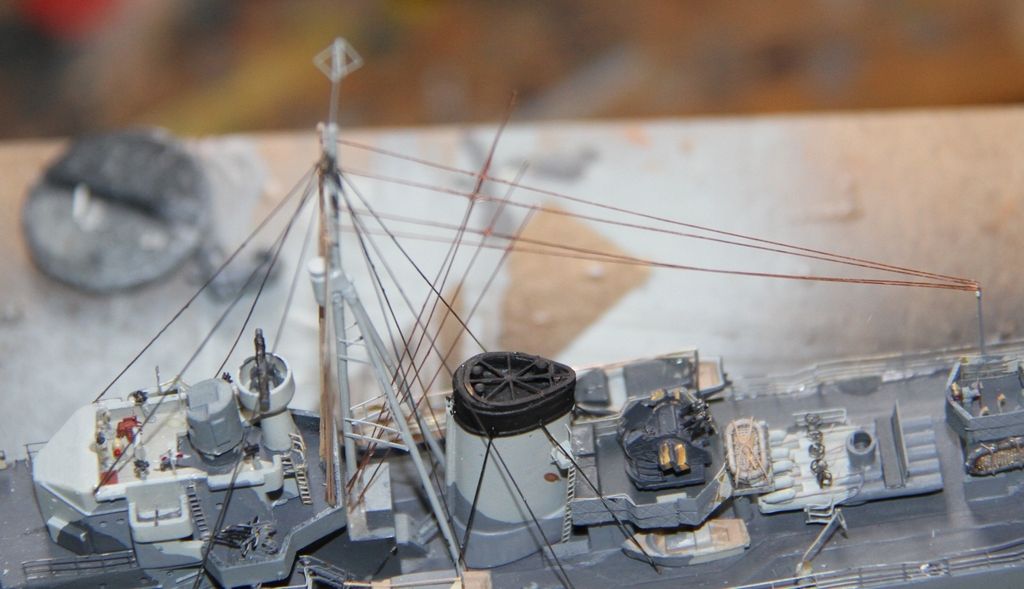
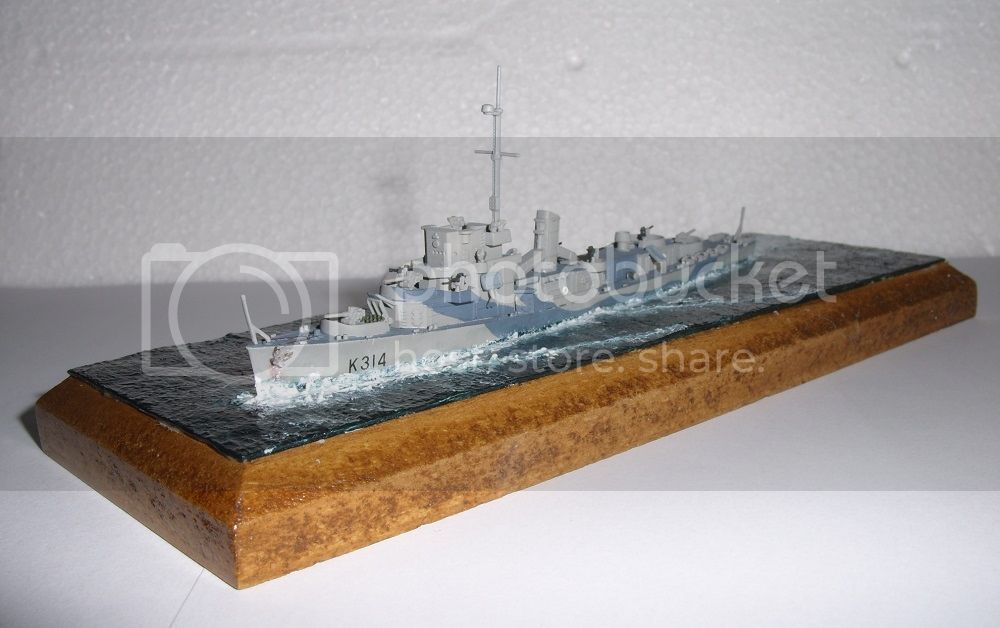
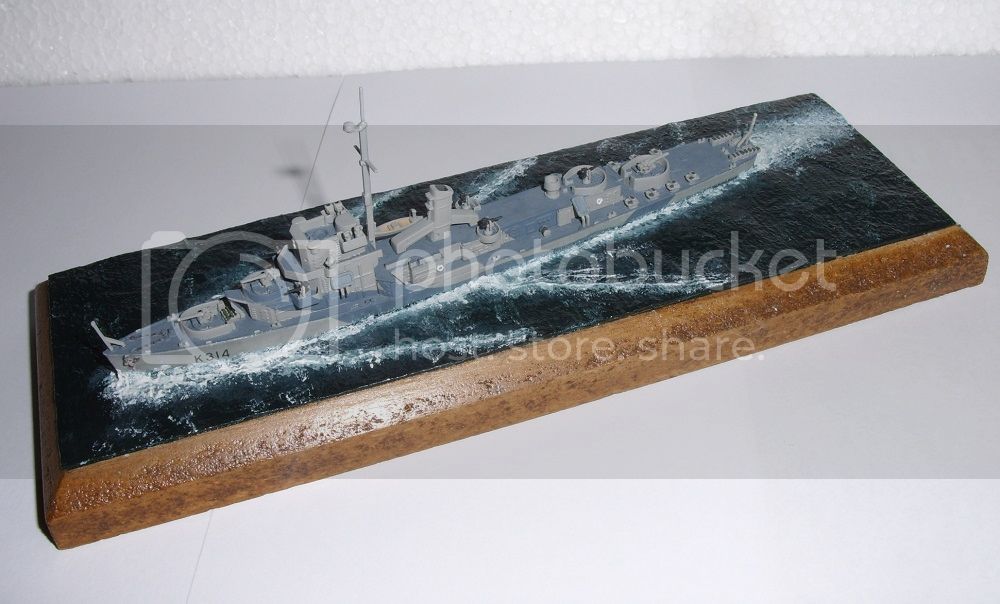
The final push on HMS Jupiter,
The aerial run painted.
The insulators added with thick white paint, and a mist of flat clear to hide any shiny glue patches.
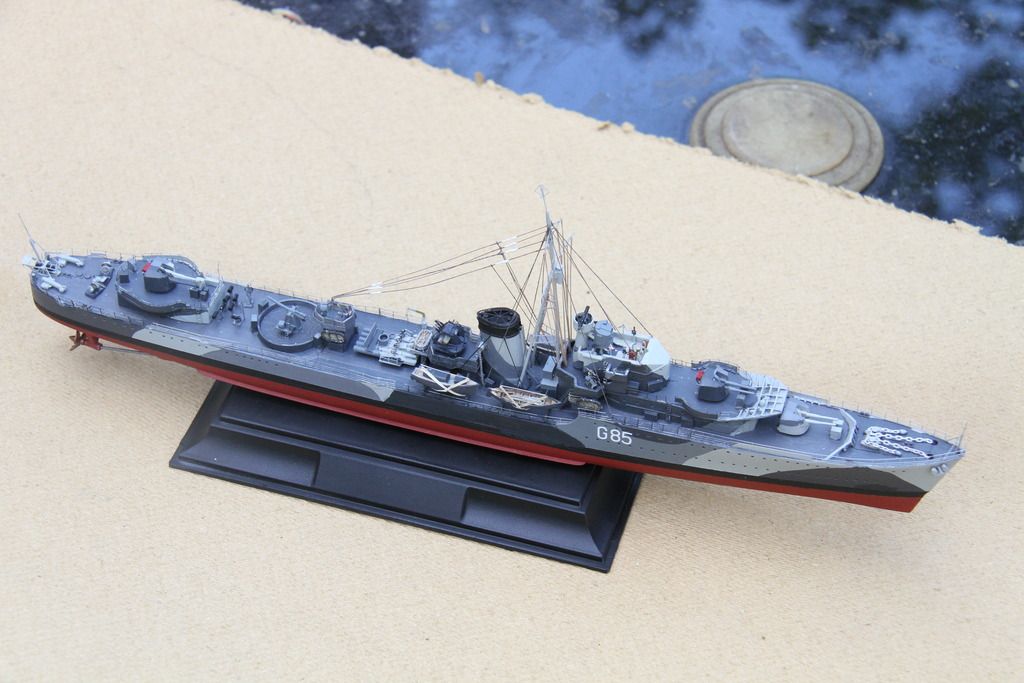
Finished!
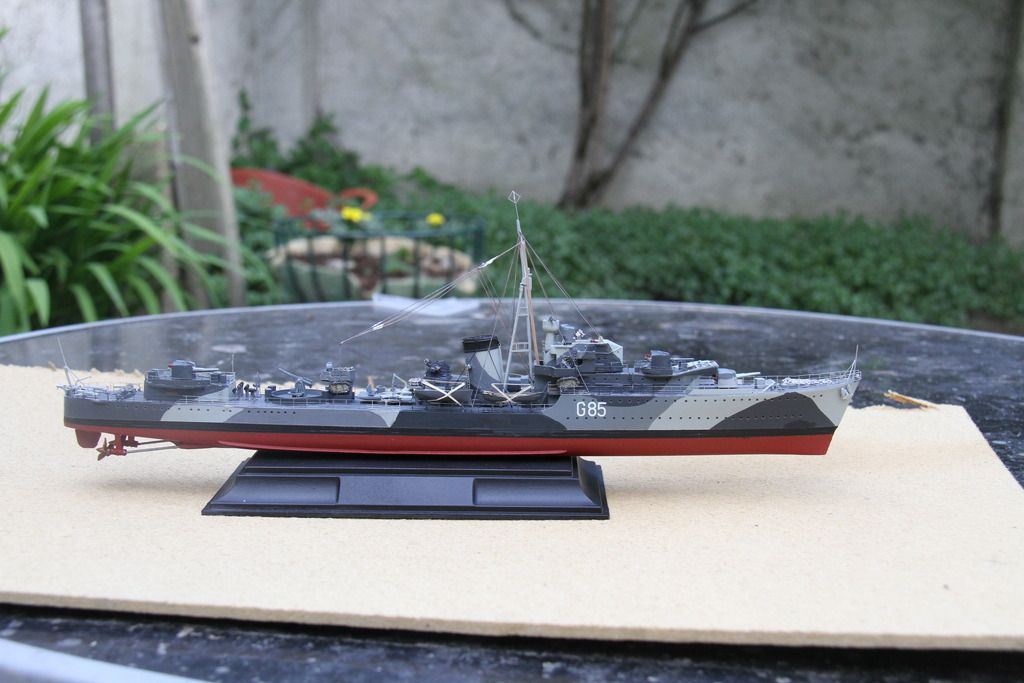
Now off to add a couple to the gallery.
Si
It has been a great campaign.
The final push on HMS Jupiter,
The aerial run painted.

The insulators added with thick white paint, and a mist of flat clear to hide any shiny glue patches.

Finished!

Now off to add a couple to the gallery.
Si
JJ1973
#345
Joined: August 22, 2011
KitMaker: 1,835 posts
Model Shipwrights: 1,832 posts
Posted: Wednesday, April 29, 2015 - 10:17 PM UTC
Wow, great build Si!! 
Congratulations on your commissioning of HMS Jupiter
At all, this was a great campaign to follow!! Fantastic work!
Cheers,
Jan
Congratulations on your commissioning of HMS Jupiter
At all, this was a great campaign to follow!! Fantastic work!
Cheers,
Jan
RedDuster
Joined: March 01, 2010
KitMaker: 7,078 posts
Model Shipwrights: 6,649 posts
Posted: Wednesday, April 29, 2015 - 10:48 PM UTC
Thank you Jan,
Sure has been a great campaign.
A lot of really excellent builds.
Si.
Sure has been a great campaign.
A lot of really excellent builds.
Si.
phantom_phanatic309
#372
Joined: March 10, 2010
KitMaker: 2,568 posts
Model Shipwrights: 220 posts
Posted: Thursday, April 30, 2015 - 01:07 AM UTC
Great work on the Jupiter Simon. The rigging really makes it pop.
Tim, awesome little build! I'm very tempted to add a Liberty ship to my collection. I've got to have something for my destroyers to protect after all.
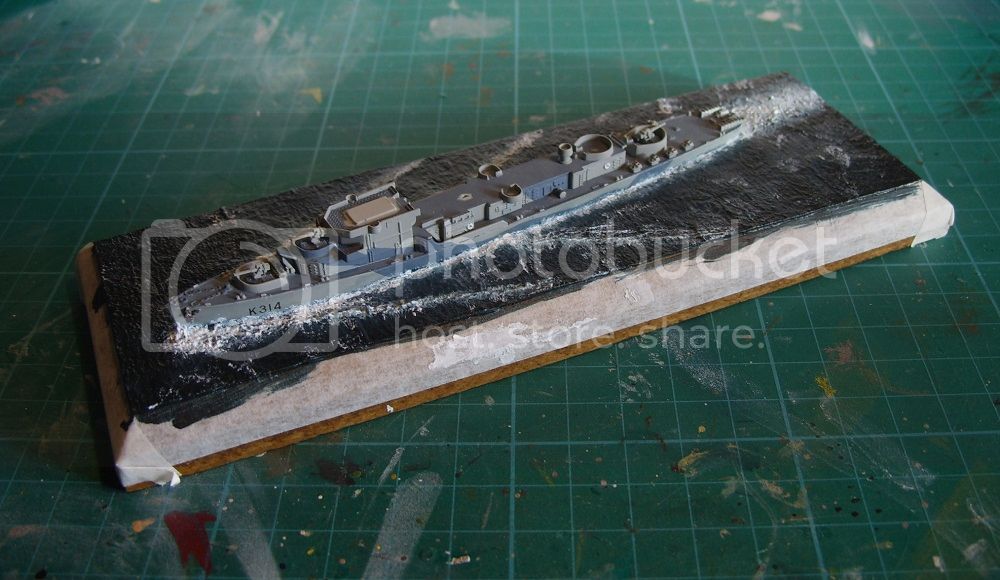
I'm calling my build done.
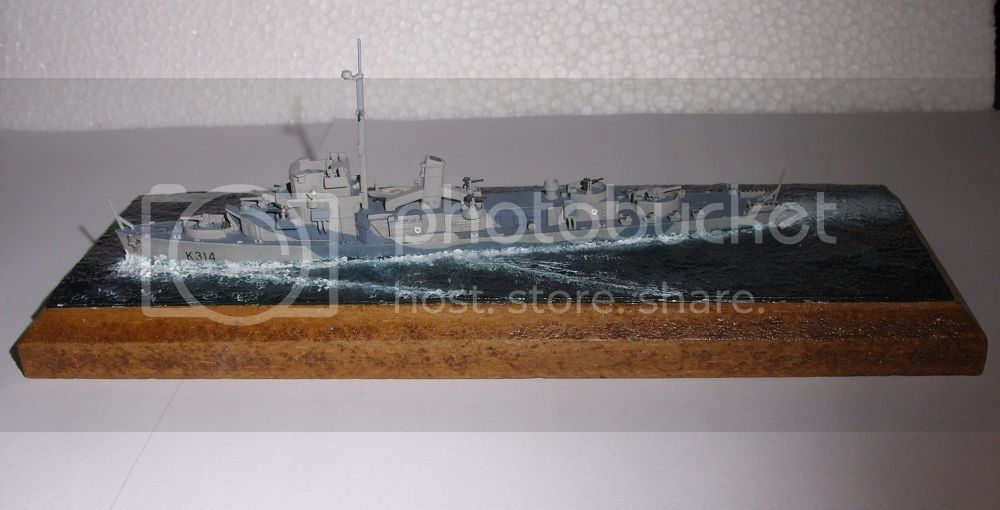
My build represents HMS Bentinck K314, Captain-class frigate, in July 1943. During this period, Bentinck was part of a group of DE's which escorted the cruiser HMS Phoebe and battleship HMS Queen Elizabeth on a return journey to Plymouth from the US. Soon after arriving, Bentinck along with the other DE's set sail for Belfast for an extensive refit to RN standards. Belfast would then be Bentinck's home base
HMS Bentinck, formerly USS Bull DE-52 Buckley-class DE, was commissioned into the Royal Navy on 19th May 43 and served exclusively with the 4th Escort Group taking part in operations in the Arctic and the North Atlantic. She was named in honor of Captain John Bentinck, commander of the HMS Niger during the Severn Years War 1754-63.
On 26 January 1945 U-1051 was sunk in the Irish Sea south of the Isle of Man, at position 53°39′N 5°23′W by the frigates HMS Bentinck, HMS Aylmer, HMS Calder and HMS Manners. U-1051 was forced to the surface by the use of depth charges, then a gun battle ensued with U-1051 finally sinking after it had been rammed by HMS Aylmer. This action resulted in the loss of all hands (47) from the crew of U-1051.
On 8 April 1945 U-774 was sunk in the North Atlantic south-west of Ireland, at position 49°58′N 11°51′W by the frigates HMS Bentinck and HMS Calder. U-774 was attacked by the use of depth charges after its periscope was spotted by a lookout on HMS Calder. This action resulted in loss of all hands (44) aboard U-774.
On 21 April 1945, U-636 was sunk in the North Atlantic west of Ireland, at position 55°50′N 10°31′W by the frigates HMS Bentinck, HMS Bazely and HMS Drury. U-636 was attacked by the use of depth charges. This action resulted in loss of all hands (42) aboard U-636.

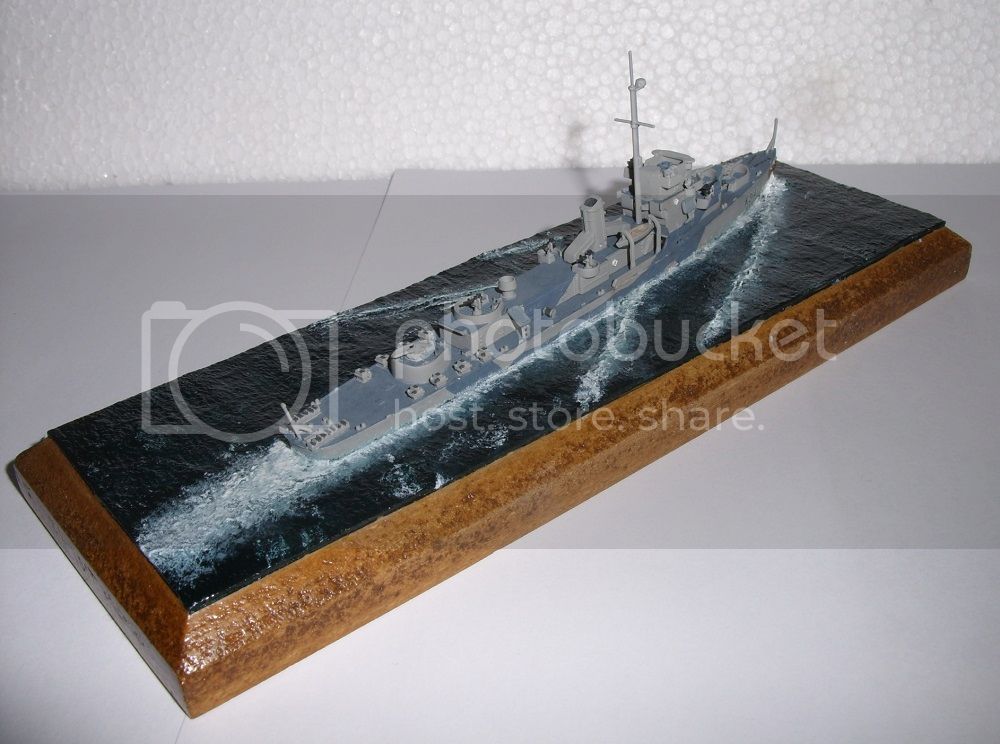
It's been a great campaign that has seen almost all types that flew, sailed or dived under the Atlantic. I've enjoyed seeing everyones builds.
Stephen
Tim, awesome little build! I'm very tempted to add a Liberty ship to my collection. I've got to have something for my destroyers to protect after all.
I'm calling my build done.
My build represents HMS Bentinck K314, Captain-class frigate, in July 1943. During this period, Bentinck was part of a group of DE's which escorted the cruiser HMS Phoebe and battleship HMS Queen Elizabeth on a return journey to Plymouth from the US. Soon after arriving, Bentinck along with the other DE's set sail for Belfast for an extensive refit to RN standards. Belfast would then be Bentinck's home base
HMS Bentinck, formerly USS Bull DE-52 Buckley-class DE, was commissioned into the Royal Navy on 19th May 43 and served exclusively with the 4th Escort Group taking part in operations in the Arctic and the North Atlantic. She was named in honor of Captain John Bentinck, commander of the HMS Niger during the Severn Years War 1754-63.
On 26 January 1945 U-1051 was sunk in the Irish Sea south of the Isle of Man, at position 53°39′N 5°23′W by the frigates HMS Bentinck, HMS Aylmer, HMS Calder and HMS Manners. U-1051 was forced to the surface by the use of depth charges, then a gun battle ensued with U-1051 finally sinking after it had been rammed by HMS Aylmer. This action resulted in the loss of all hands (47) from the crew of U-1051.
On 8 April 1945 U-774 was sunk in the North Atlantic south-west of Ireland, at position 49°58′N 11°51′W by the frigates HMS Bentinck and HMS Calder. U-774 was attacked by the use of depth charges after its periscope was spotted by a lookout on HMS Calder. This action resulted in loss of all hands (44) aboard U-774.
On 21 April 1945, U-636 was sunk in the North Atlantic west of Ireland, at position 55°50′N 10°31′W by the frigates HMS Bentinck, HMS Bazely and HMS Drury. U-636 was attacked by the use of depth charges. This action resulted in loss of all hands (42) aboard U-636.


It's been a great campaign that has seen almost all types that flew, sailed or dived under the Atlantic. I've enjoyed seeing everyones builds.
Stephen
TimReynaga
Joined: May 03, 2006
KitMaker: 2,500 posts
Model Shipwrights: 1,830 posts
Posted: Thursday, April 30, 2015 - 05:39 AM UTC
Quoted Text
Great work on the Jupiter Simon. The rigging really makes it pop.
Tim, awesome little build! I'm very tempted to add a Liberty ship to my collection. I've got to have something for my destroyers to protect after all.
I'm calling my build done.
...Stephen
Stephen,
I agree, Simon's Jupiter is a beauty. Great work on your HMS Bentinck too. Nice little kit - I started one as USS England but never finished it, so it is fun to see one completed - even if it is as a Brit!

RedDuster
Joined: March 01, 2010
KitMaker: 7,078 posts
Model Shipwrights: 6,649 posts
Posted: Thursday, April 30, 2015 - 12:43 PM UTC
Great job on the Bentick Stephen,
Nice to see a "Captain" in the campaign.
Thanks to you and Tim for your kind words on the Jupiter, that was an enjoyable build, even it I did cut it a bit fine.
Si
Nice to see a "Captain" in the campaign.
Thanks to you and Tim for your kind words on the Jupiter, that was an enjoyable build, even it I did cut it a bit fine.
Si
phantom_phanatic309
#372
Joined: March 10, 2010
KitMaker: 2,568 posts
Model Shipwrights: 220 posts
Posted: Thursday, April 30, 2015 - 09:00 PM UTC
Thanks Simon. It is a great little kit and Pit-Road should be commended for producing it and generously supplying 3 in the box. The tooling and engineering are faultless and they even provide plenty of spare parts for modifying the basic model. I'll certainly be building another as a heavily-armed USN AA picket ship.
TimReynaga
Joined: May 03, 2006
KitMaker: 2,500 posts
Model Shipwrights: 1,830 posts
Posted: Friday, May 01, 2015 - 04:47 PM UTC
For anyone who may be inteested, here are some more pics of my completed Liberty:
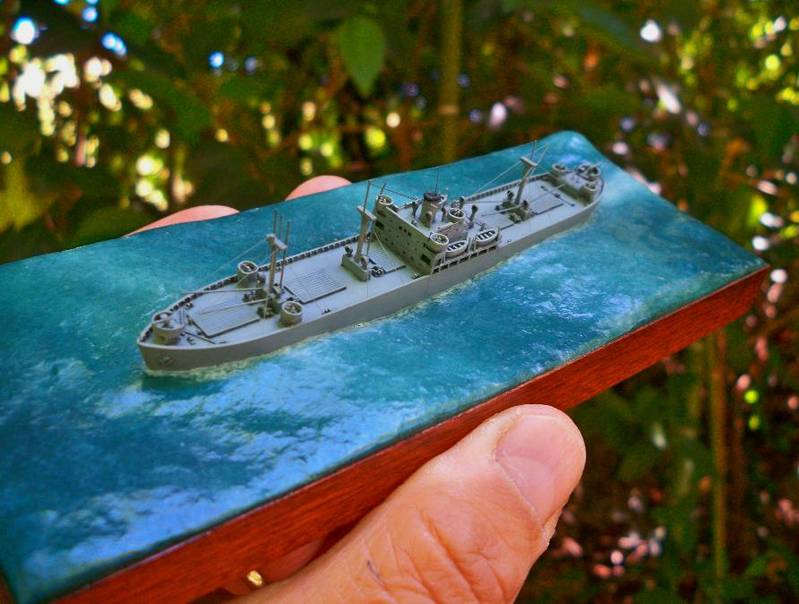
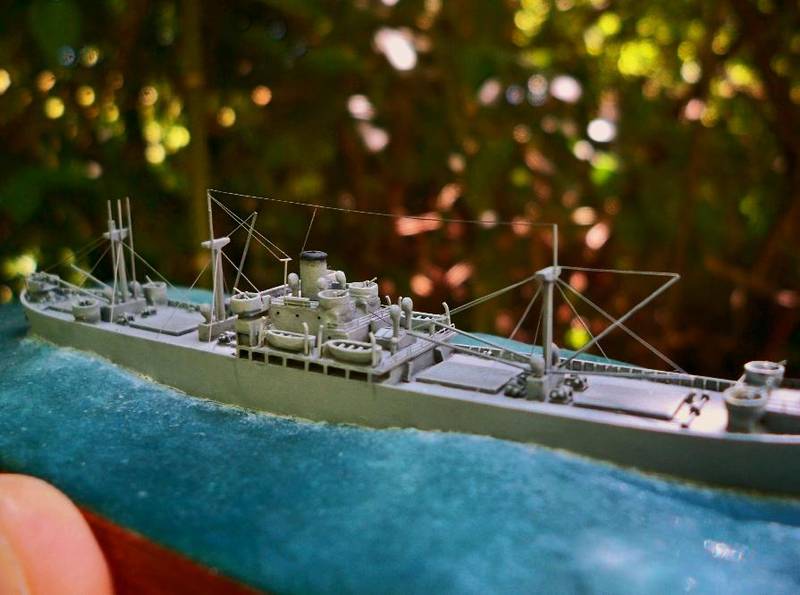
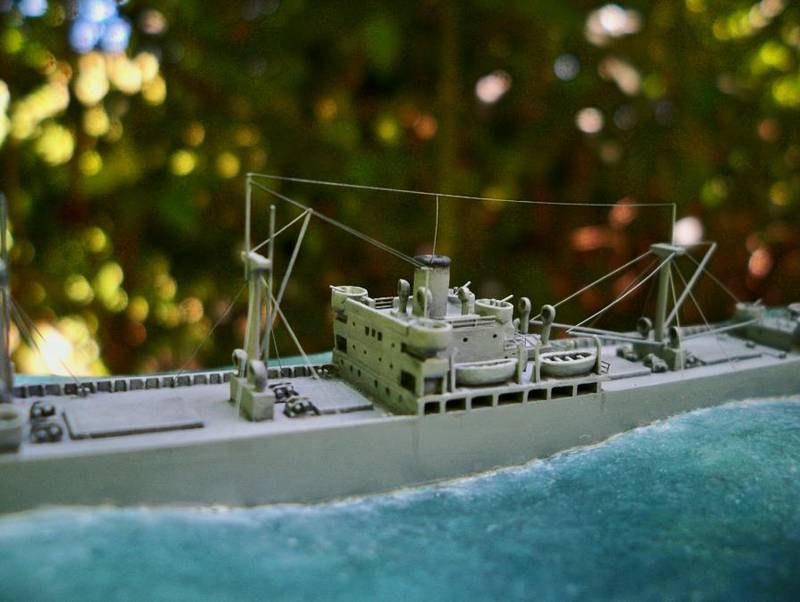
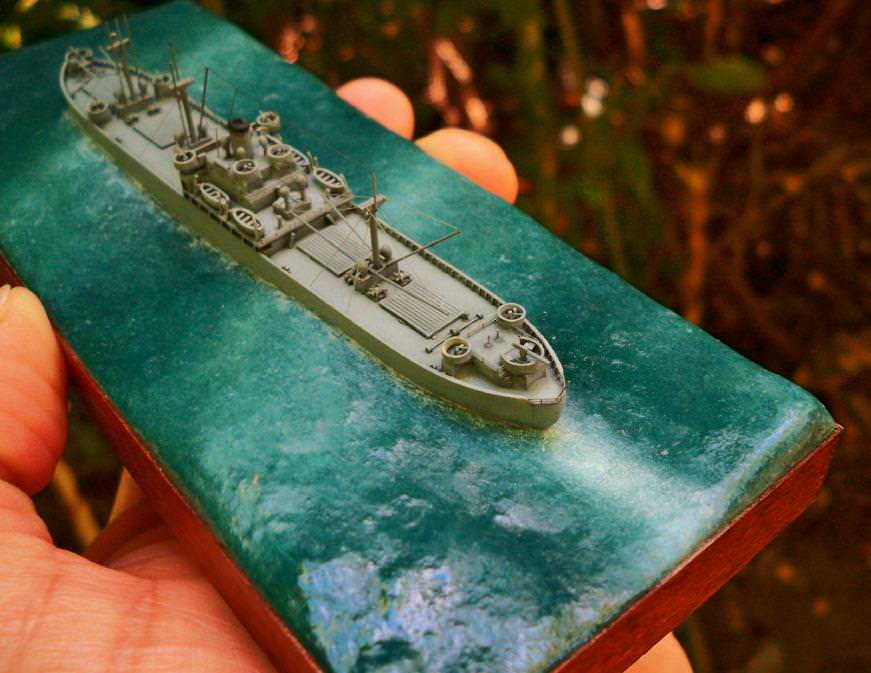
Great campaign guys!

Great campaign guys!
RedDuster
Joined: March 01, 2010
KitMaker: 7,078 posts
Model Shipwrights: 6,649 posts
Posted: Friday, May 01, 2015 - 11:26 PM UTC
Hi Tim,
Cracking little gem of a model, I don't know how did so much in so small a scale.
Cheers
Si
Cracking little gem of a model, I don't know how did so much in so small a scale.
Cheers
Si

bill_c

Joined: January 09, 2008
KitMaker: 10,553 posts
Model Shipwrights: 306 posts
Posted: Sunday, May 03, 2015 - 08:46 PM UTC
Really nifty. Makes my head hurt just looking at the rigging, LOL. 

SGTJKJ
#041
Joined: July 20, 2006
KitMaker: 10,069 posts
Model Shipwrights: 228 posts
Posted: Sunday, May 03, 2015 - 09:16 PM UTC
Beautiful build, Tim. The liberty ship looks outstanding and the rigging in this scale simply blows my mind!
Thanks for a great campaign everybody!
Thanks for a great campaign everybody!
 |

WEB HOSTING BY


Copyright ©2021 Model Shipwrights and Kitmaker Network, a subsidiary of Silver Star Enterprises
All Rights Reserved. Please read our Conditions of Use and Privacy Policy.
All Rights Reserved. Please read our Conditions of Use and Privacy Policy.