

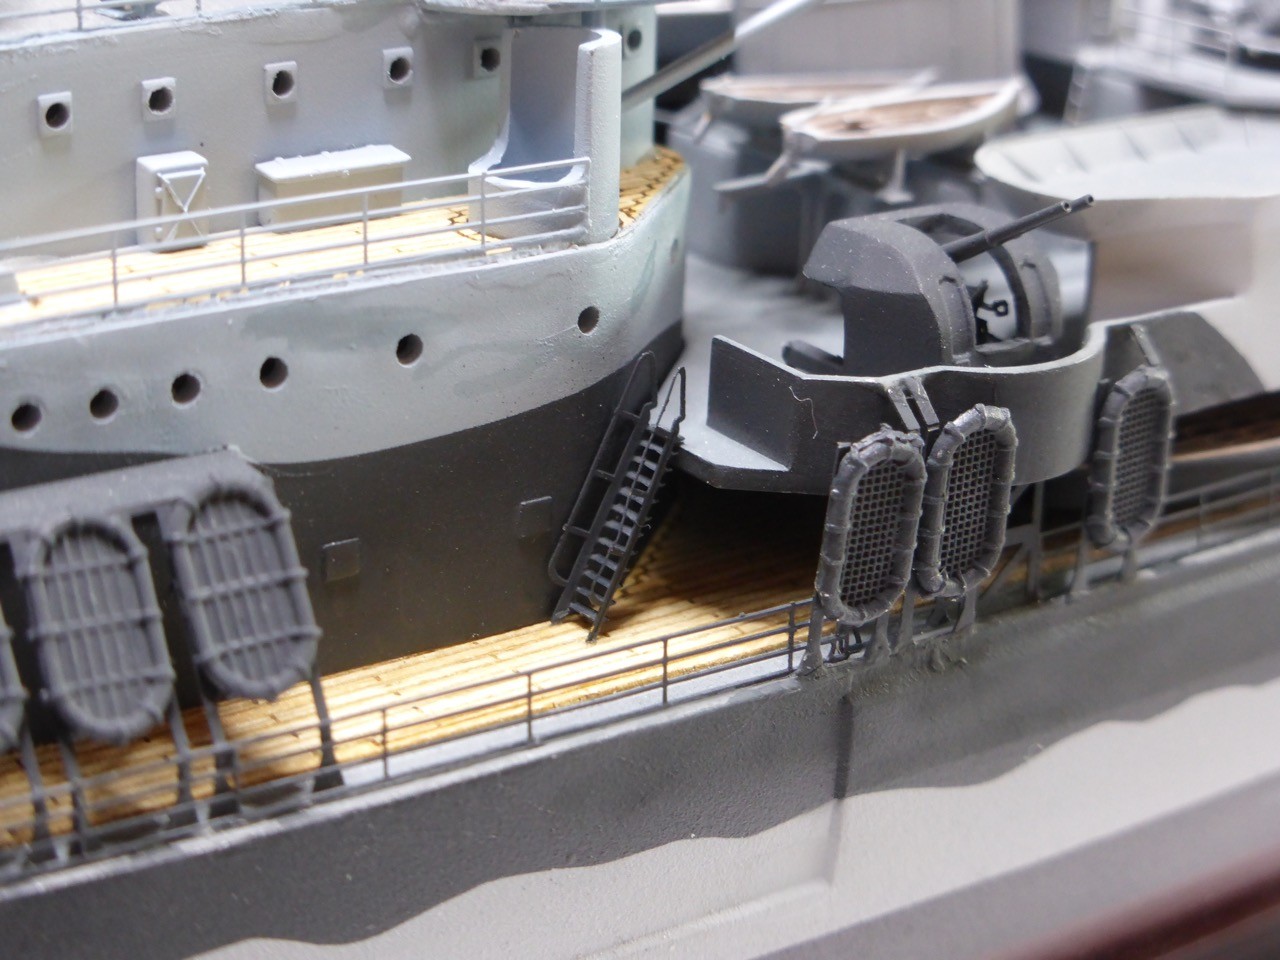
That's great Jan. I think your patience and attention to detail is legend. I have never seen so many Carley floats attached that way. Looks like they doubled as splinter screens.
cheers
Michael


Go to modelshipwrights.com for the current dynamic site!
Ships by Class/Type
For discussions on ships by class and type.
For discussions on ships by class and type.
Hosted by Jim Starkweather
HMS Belfast 1942 Trumpeter 1/350

Cosimodo

#335

Joined: September 03, 2013
KitMaker: 1,808 posts
Model Shipwrights: 871 posts

Posted: Tuesday, March 22, 2016 - 01:42 PM UTC

JJ1973
#345

Joined: August 22, 2011
KitMaker: 1,835 posts
Model Shipwrights: 1,832 posts

Posted: Tuesday, March 22, 2016 - 11:50 PM UTC
Thank you very much, Dave, Russ, Mike and Michael, for your kind comments!!  This forum and the constant interaction really helps keeping the motivation high, even in troublesome times - and every build has those...

Very much appreciated!!
Mike - welcome on board, I am glad you like my Belfast!
The Carleys where a little tricky, admitted, but the more important part was to get the racks straight. Aligning the floats afterwards was probably easier than it appears
And I can very well imagine that they had a secondary function as splinter shields, at least to a certain degree...but than again, too many splinters would kind of negatively impact their primary function, I would think...
Work will re-commence next Wednesday or Thursday, will see how far I will get. In a way I have to slow myself down - not loosing patience on the last yards...
Thanks again!
Jan
This forum and the constant interaction really helps keeping the motivation high, even in troublesome times - and every build has those... Very much appreciated!!
Mike - welcome on board, I am glad you like my Belfast!
The Carleys where a little tricky, admitted, but the more important part was to get the racks straight. Aligning the floats afterwards was probably easier than it appears
And I can very well imagine that they had a secondary function as splinter shields, at least to a certain degree...but than again, too many splinters would kind of negatively impact their primary function, I would think...
Work will re-commence next Wednesday or Thursday, will see how far I will get. In a way I have to slow myself down - not loosing patience on the last yards...
Thanks again!
Jan

TRM5150

Joined: January 03, 2010
KitMaker: 2,159 posts
Model Shipwrights: 1,400 posts

Posted: Wednesday, March 23, 2016 - 12:03 AM UTC
I'm very impressed with you clean work Jan! The old girl is looking fantastic!!
JJ1973
#345
Joined: August 22, 2011
KitMaker: 1,835 posts
Model Shipwrights: 1,832 posts
Posted: Sunday, April 03, 2016 - 11:11 PM UTC
Todd,
thank you very much!!
And here comes the promised update. Even though this will be a lengthy one (I might end up splitting it, will se about that), I am still some way away from commission. As I mentioned over at the cruiser's campaign, some parts turned out to be way more complex than I had expected...
Starting with the easy stuff, some more small parts...(not all painted yet)

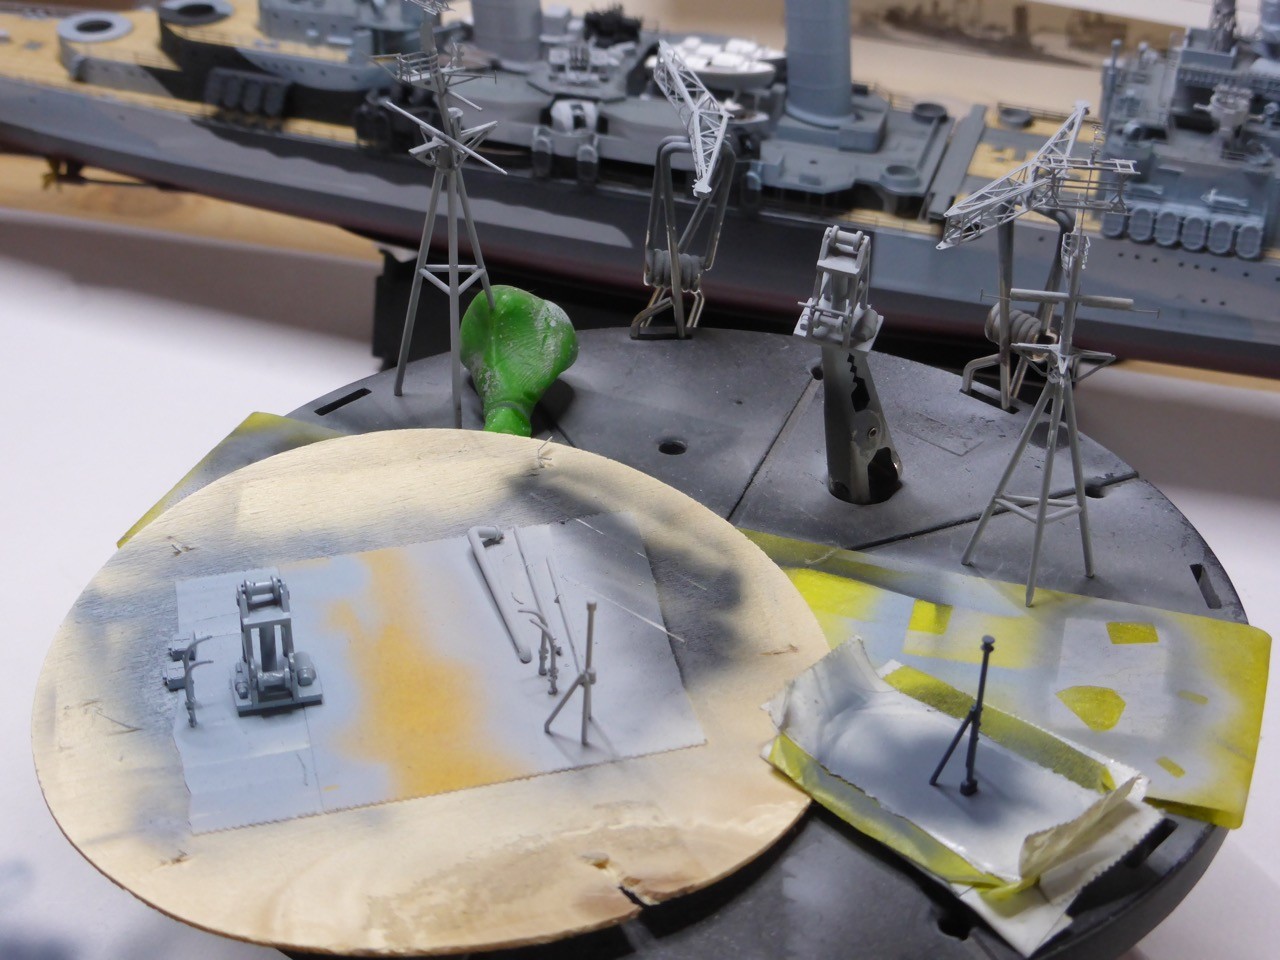

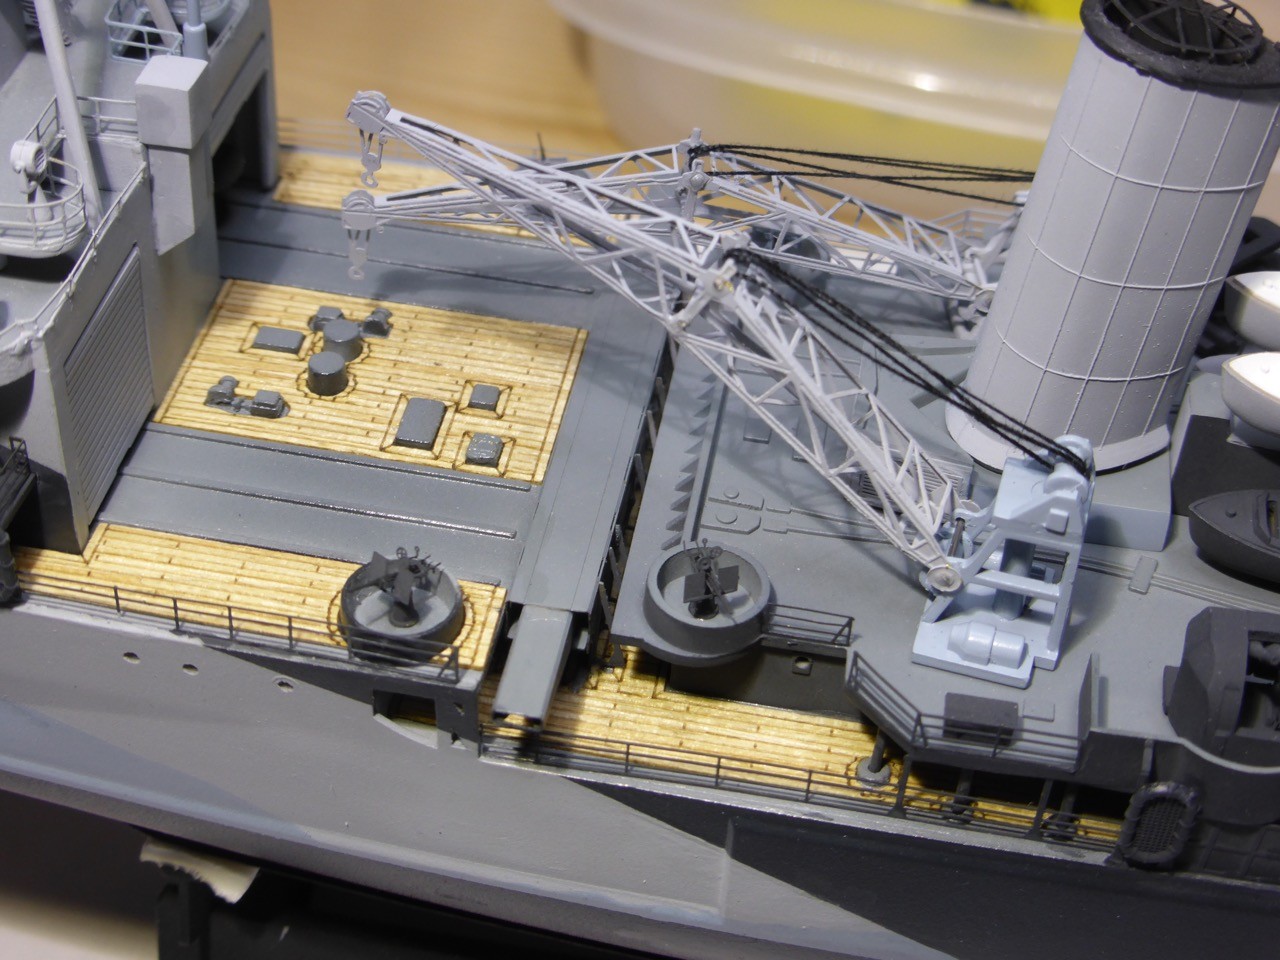
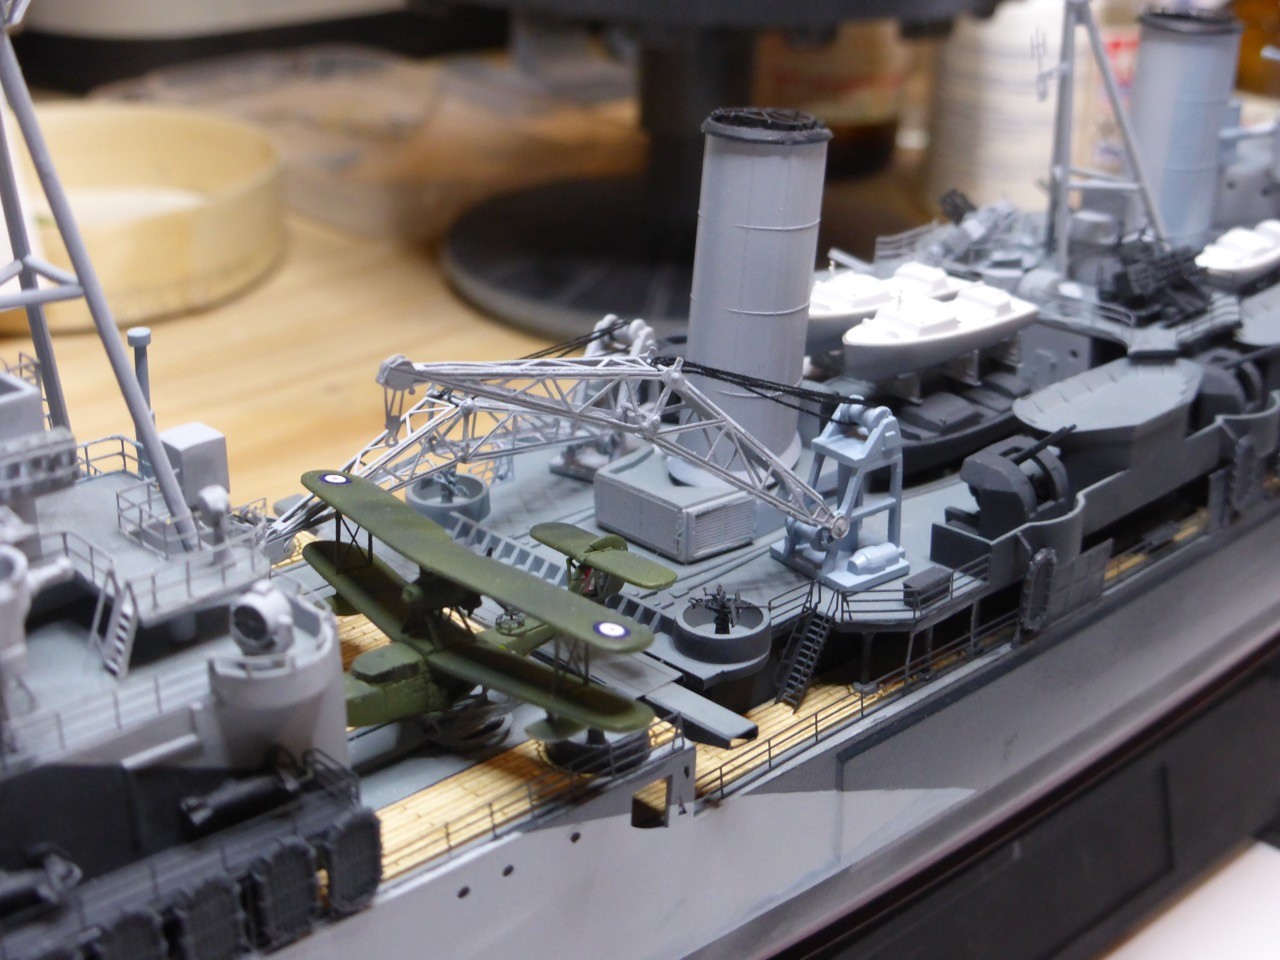
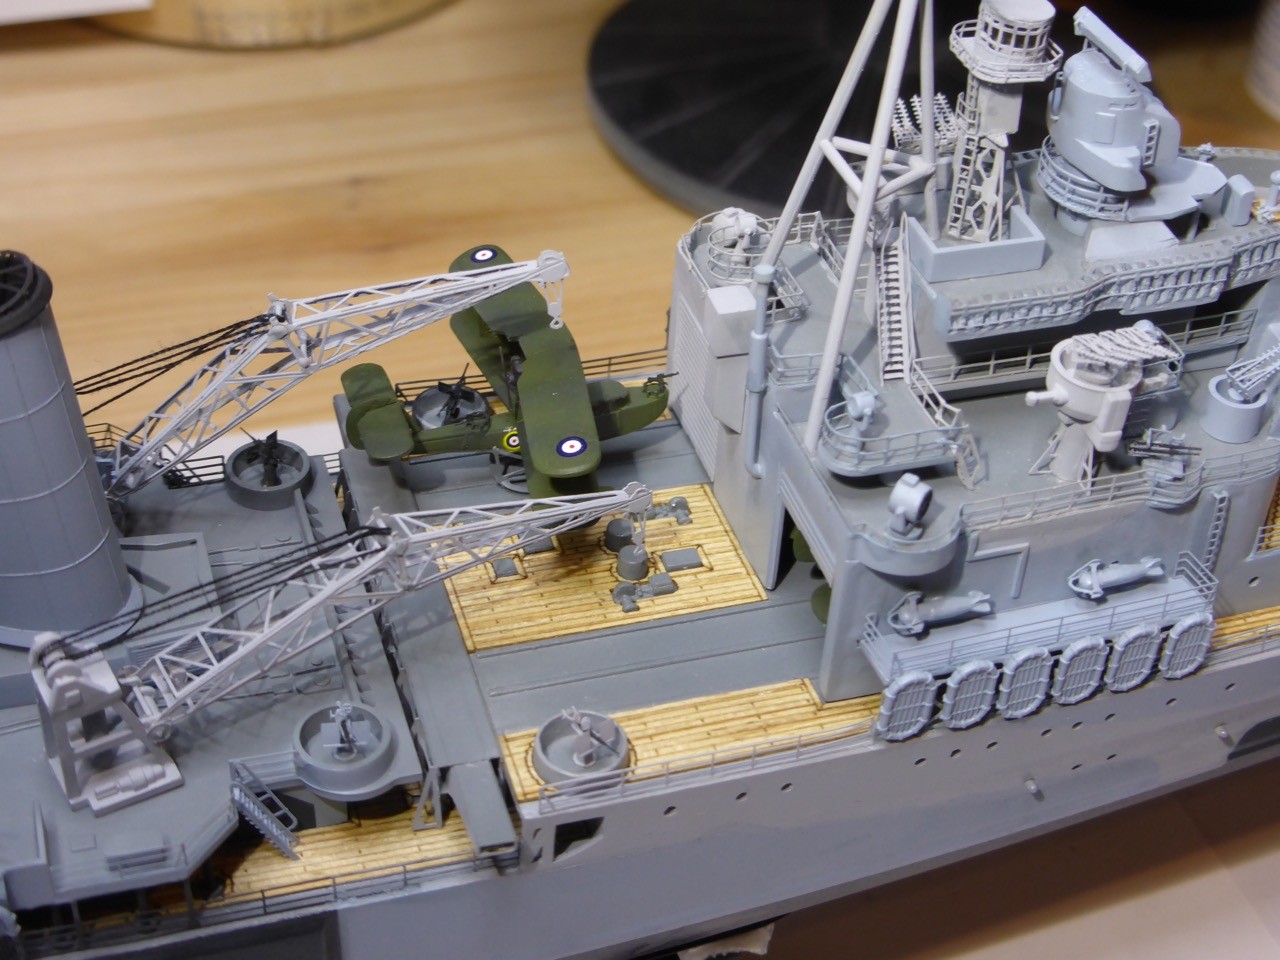
On to the next level, cranes.
The jibs are from the WEM kit, pretty good stuff and straightforward to fold.
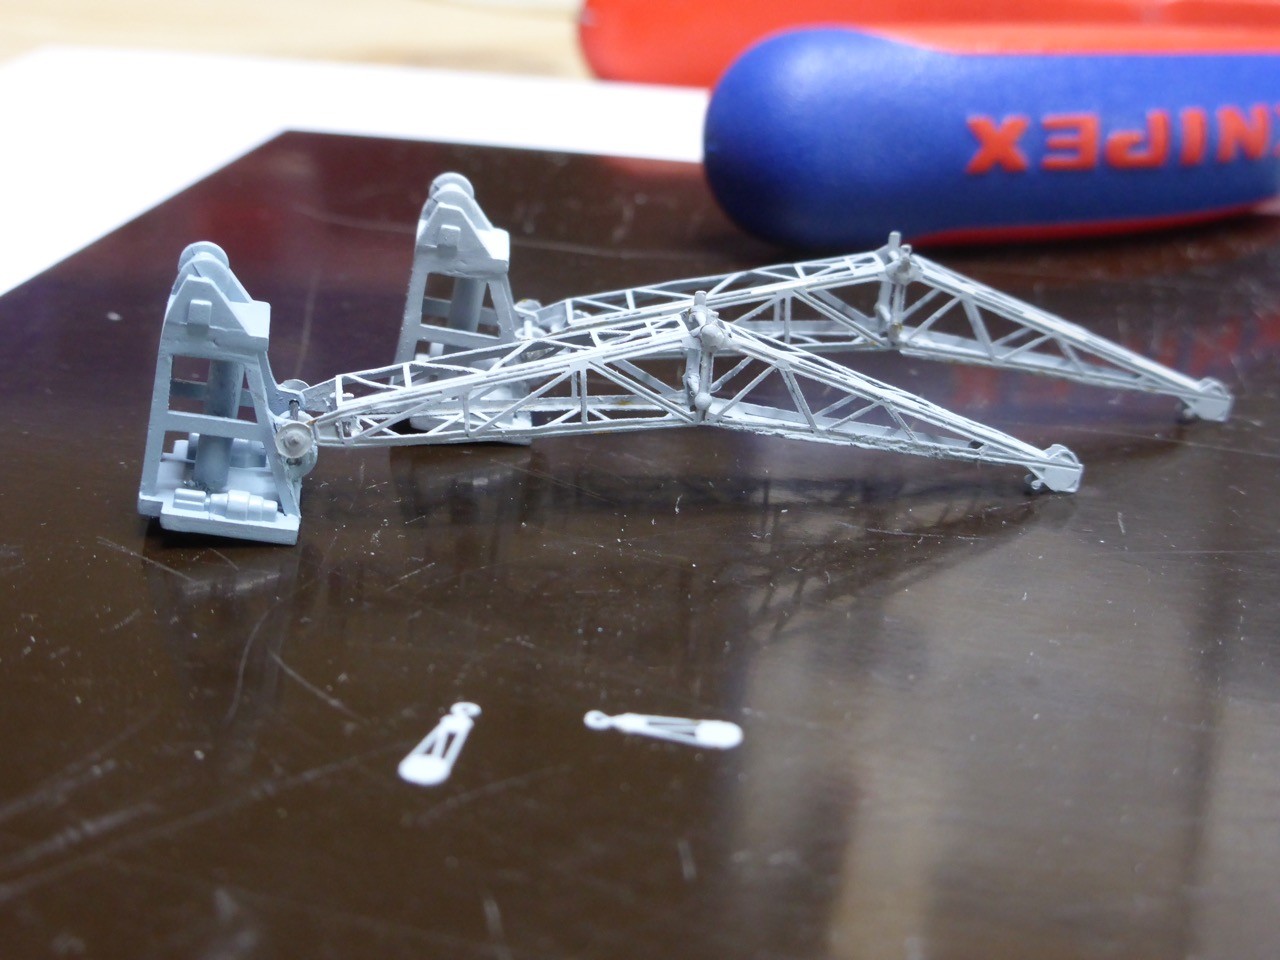
But to me, the etched rigging simply looks odd. So I decided for a real rigging and, at least in principle, movable jibs. I do have some length of .5 mm steel wire, that served as joints and reels...for that I had to drill the etched hole from the PE jib open to .5mm, which was no greater problem. With that steel wire I first connected the jibs to the crane base. I glued PE disks (labeled as 'Pulley Wheels') for which I could not find any use to the ends of the steel, so there was no glue needed tho connect the jib to the base and the jib remains fully flexible.
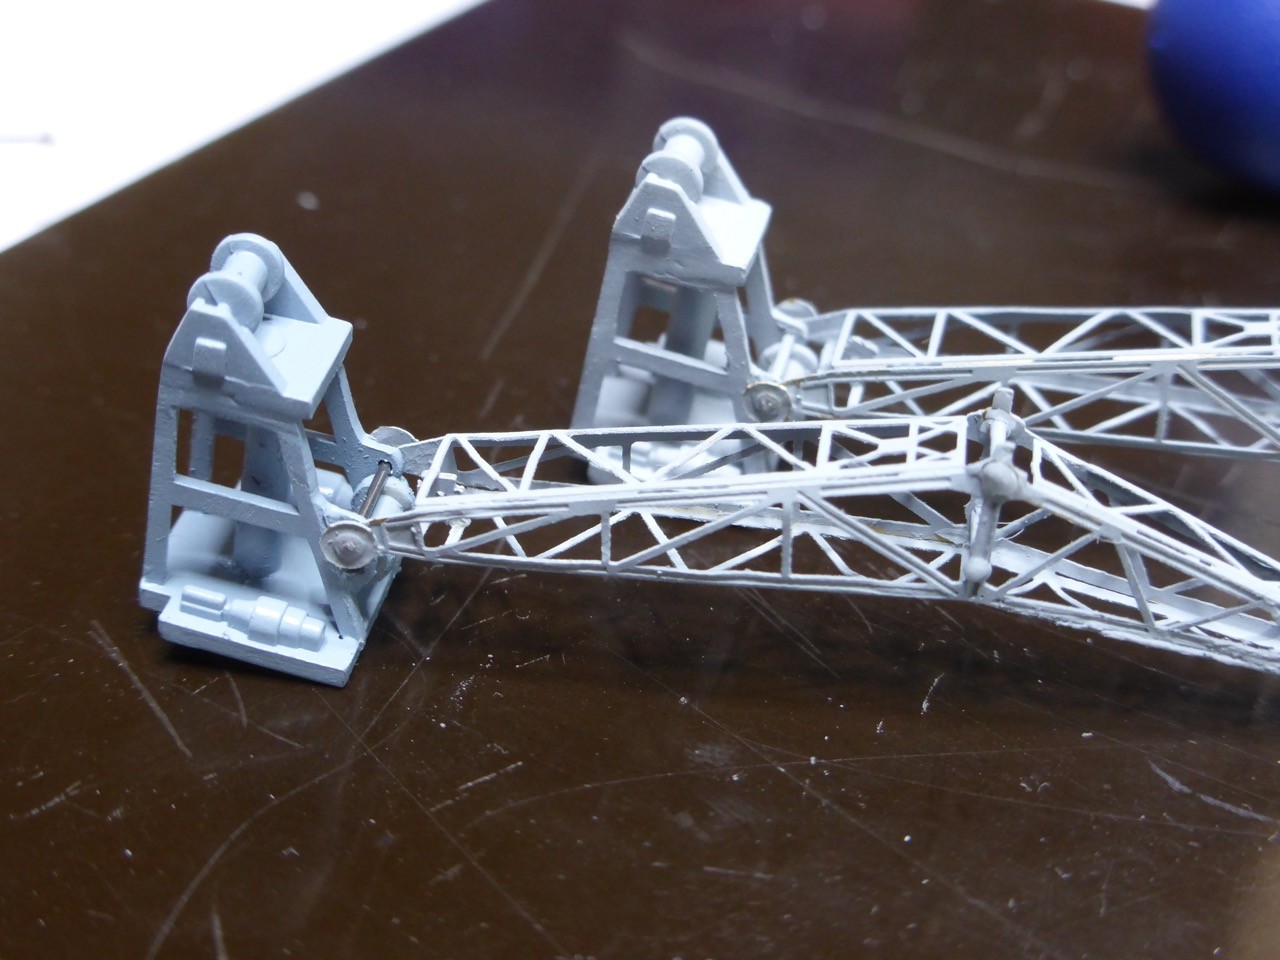
Next I used some sewing thread to rig the jibs in different hight.


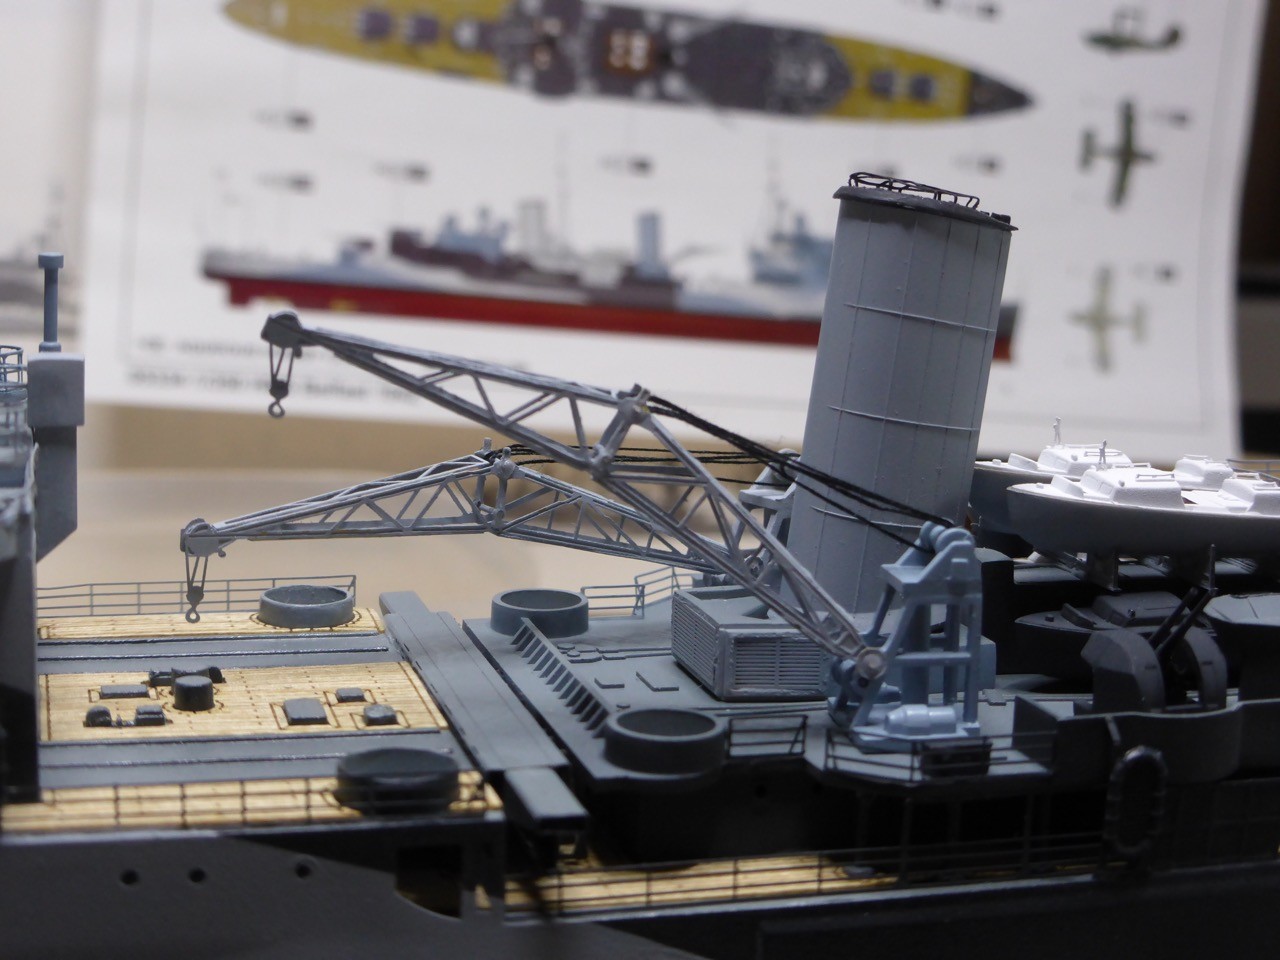
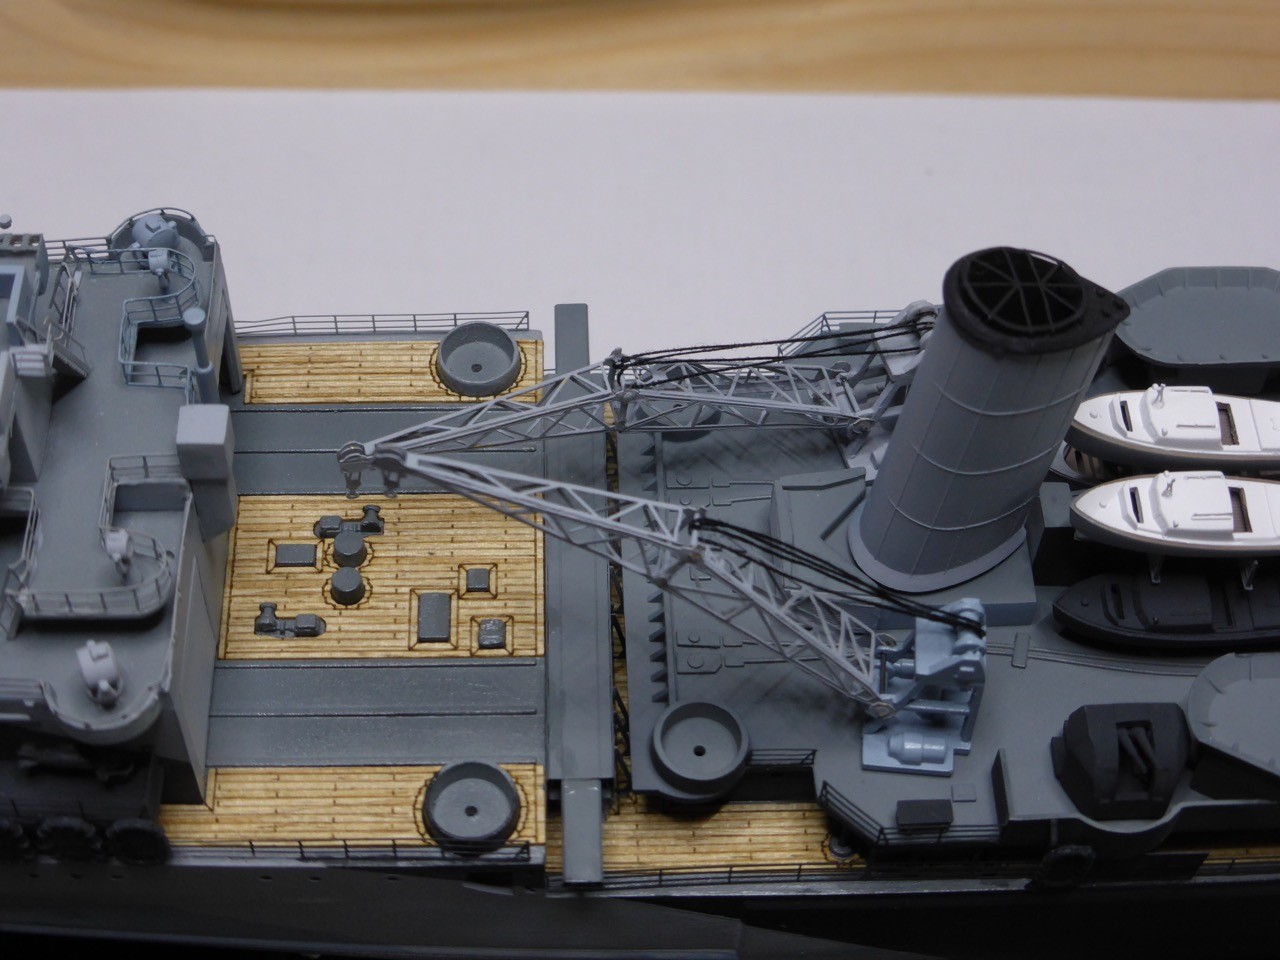
The cranes in place. Room for the Walrus will be tight, but I can fit it outside the closed hangar door, only not on the catapult. But that's ok.
Jumping ahead, I'll cover the antennas and masts in my next posting, work on the main guns commenced.
The biggest weakness of the kit is the alignment of the guns, the middle one just being molded shorter than the outside ones. That only works for zero elevation, if you elevate them the misalignment becomes all too clear. But luckily Master has come up with a proper set to fix it.
But first basic work on the turrets. There are four 'G' sprues provided with one turret each, and those 'G' sprues appear to be the weakest of the kit. Lots of cleaning required.


In addition, the doors and the vertical ladder on the back have to go, they will be replaced by PE.

Now would come all the work on the antennas, but I'll leave that for a second post tomorrow (hopefully). They were rather complex and not straightforward, I think some details simply weren't thought all the way through by good WEM. So some creativity needed...
For now, thanks for looking and part two will follow soon!!
Cheers,
Jan

thank you very much!!
And here comes the promised update. Even though this will be a lengthy one (I might end up splitting it, will se about that), I am still some way away from commission. As I mentioned over at the cruiser's campaign, some parts turned out to be way more complex than I had expected...
Starting with the easy stuff, some more small parts...(not all painted yet)
On to the next level, cranes.
The jibs are from the WEM kit, pretty good stuff and straightforward to fold.
But to me, the etched rigging simply looks odd. So I decided for a real rigging and, at least in principle, movable jibs. I do have some length of .5 mm steel wire, that served as joints and reels...for that I had to drill the etched hole from the PE jib open to .5mm, which was no greater problem. With that steel wire I first connected the jibs to the crane base. I glued PE disks (labeled as 'Pulley Wheels') for which I could not find any use to the ends of the steel, so there was no glue needed tho connect the jib to the base and the jib remains fully flexible.
Next I used some sewing thread to rig the jibs in different hight.
The cranes in place. Room for the Walrus will be tight, but I can fit it outside the closed hangar door, only not on the catapult. But that's ok.
Jumping ahead, I'll cover the antennas and masts in my next posting, work on the main guns commenced.
The biggest weakness of the kit is the alignment of the guns, the middle one just being molded shorter than the outside ones. That only works for zero elevation, if you elevate them the misalignment becomes all too clear. But luckily Master has come up with a proper set to fix it.
But first basic work on the turrets. There are four 'G' sprues provided with one turret each, and those 'G' sprues appear to be the weakest of the kit. Lots of cleaning required.
In addition, the doors and the vertical ladder on the back have to go, they will be replaced by PE.
Now would come all the work on the antennas, but I'll leave that for a second post tomorrow (hopefully). They were rather complex and not straightforward, I think some details simply weren't thought all the way through by good WEM. So some creativity needed...
For now, thanks for looking and part two will follow soon!!
Cheers,
Jan

RedDuster

Joined: March 01, 2010
KitMaker: 7,078 posts
Model Shipwrights: 6,649 posts

Posted: Sunday, April 03, 2016 - 11:48 PM UTC
Looking good Jan.
Like the idea of the thread on the cranes, does look more like real wire rope than the etch. (although I am lazy and tend to use it).
looking forward to the next update.
Cheers
Si
Like the idea of the thread on the cranes, does look more like real wire rope than the etch. (although I am lazy and tend to use it).
looking forward to the next update.
Cheers
Si

RussellE
#306

Joined: June 27, 2010
KitMaker: 3,959 posts
Model Shipwrights: 2,777 posts
Posted: Monday, April 04, 2016 - 02:58 PM UTC
Jan, amazing stuff mate. Well done and keep on cracking on!


rolltide31
#377
Joined: June 27, 2010
KitMaker: 1,481 posts
Model Shipwrights: 1,332 posts

Posted: Monday, April 04, 2016 - 11:12 PM UTC
Jan,
Amazing work my friend. Cant wait to see how the main guns come together.
Dave
Amazing work my friend. Cant wait to see how the main guns come together.
Dave
JJ1973
#345
Joined: August 22, 2011
KitMaker: 1,835 posts
Model Shipwrights: 1,832 posts
Posted: Monday, April 04, 2016 - 11:50 PM UTC
Russ, Dave and Si,
thank you very much for your support!! I'll do my very best!!
But for now, just the second part of what I accomplished over the weekend - I don't see much time for yard work before Sunday...
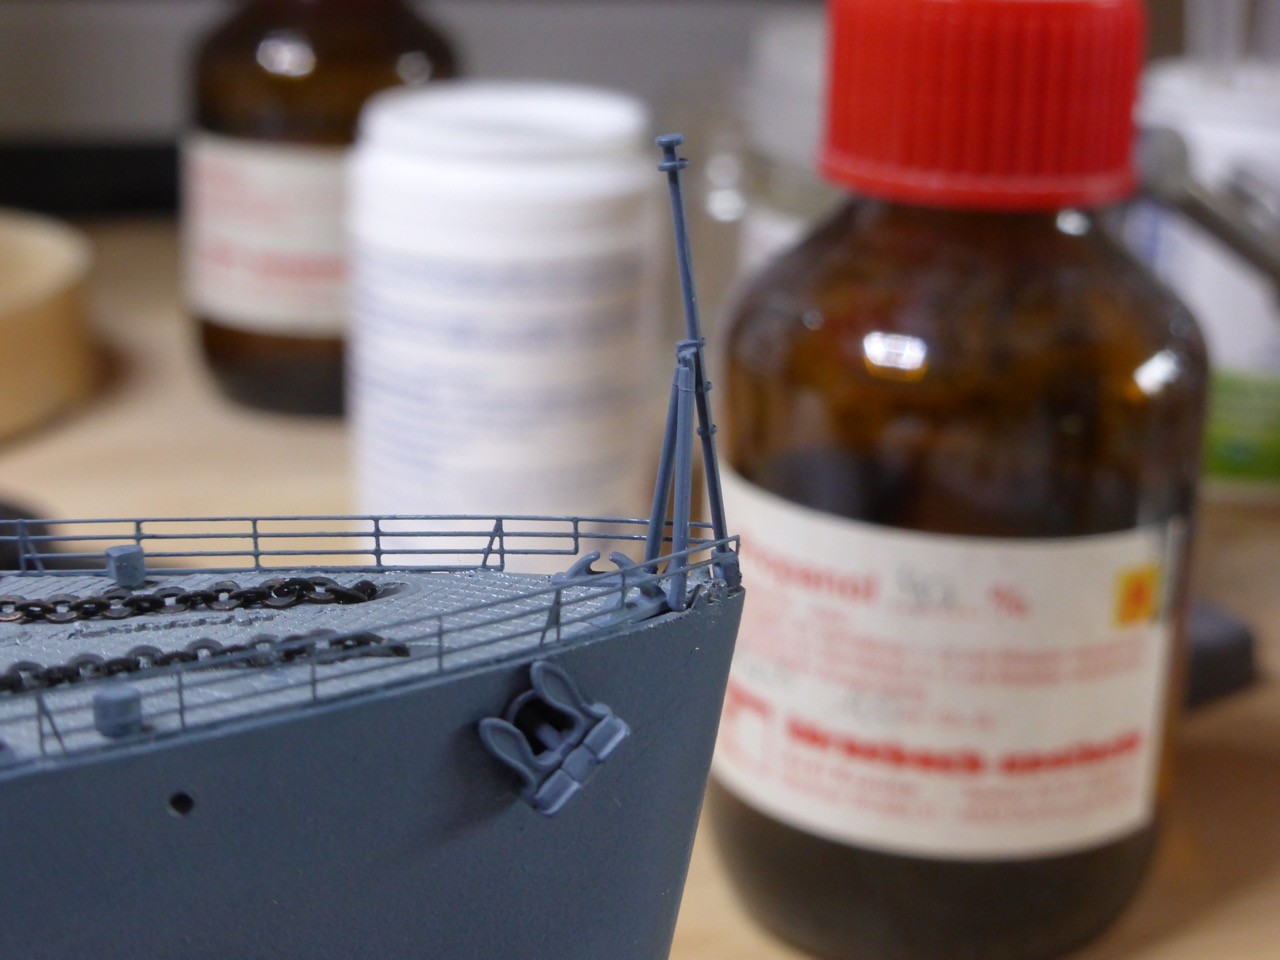
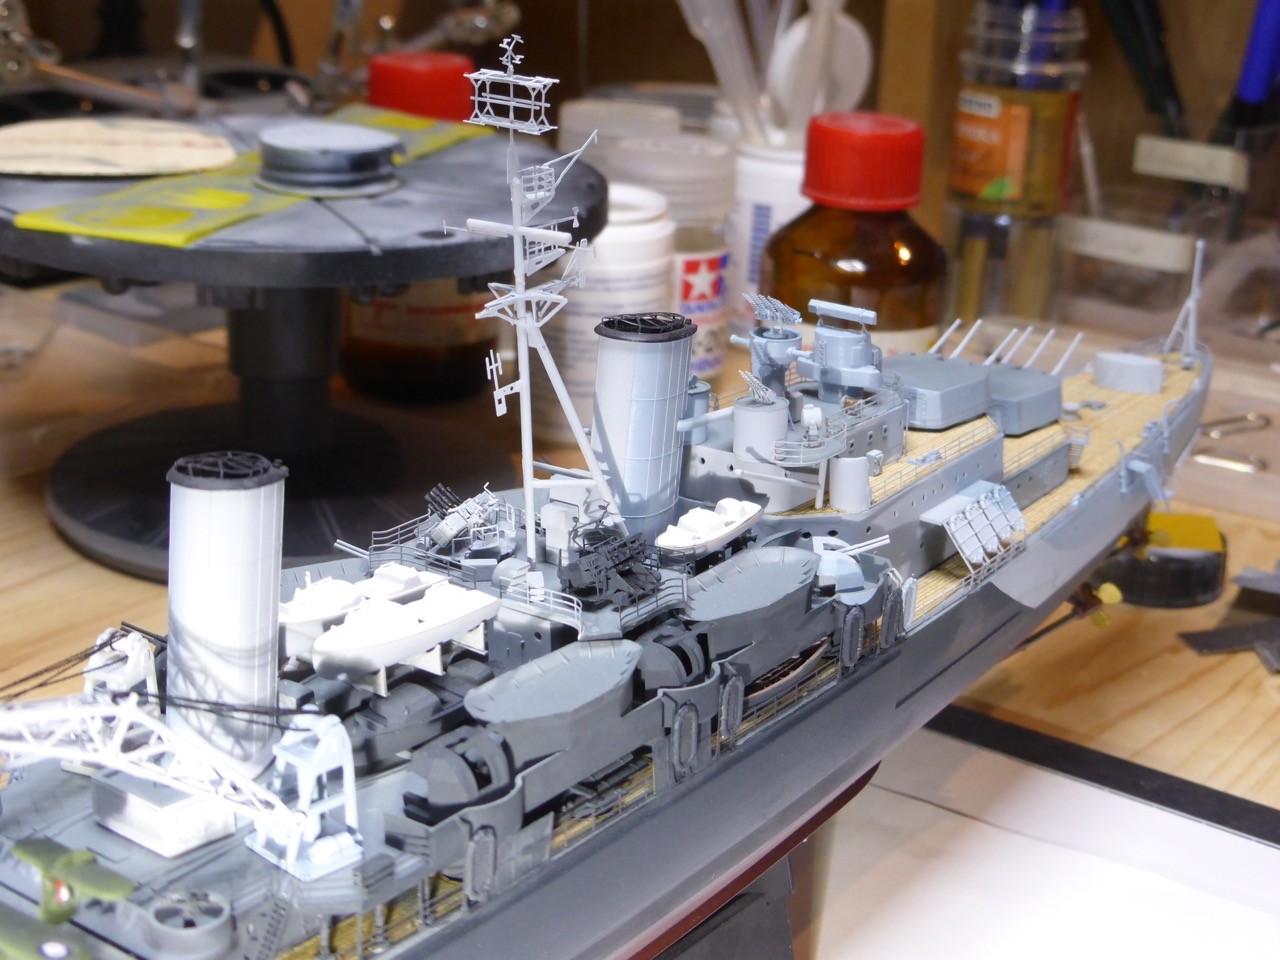
So here's the story on the masts and antennas
The masts as offered by the kit are very basic, and there is really a LOT of stuff to be added form the WEM PE set. And then there is this special yardarm replacement kit from WEM, which basically consists of two turned brass yardarms 20 mm and 34 mm length, that should replace pieces from the foremast.
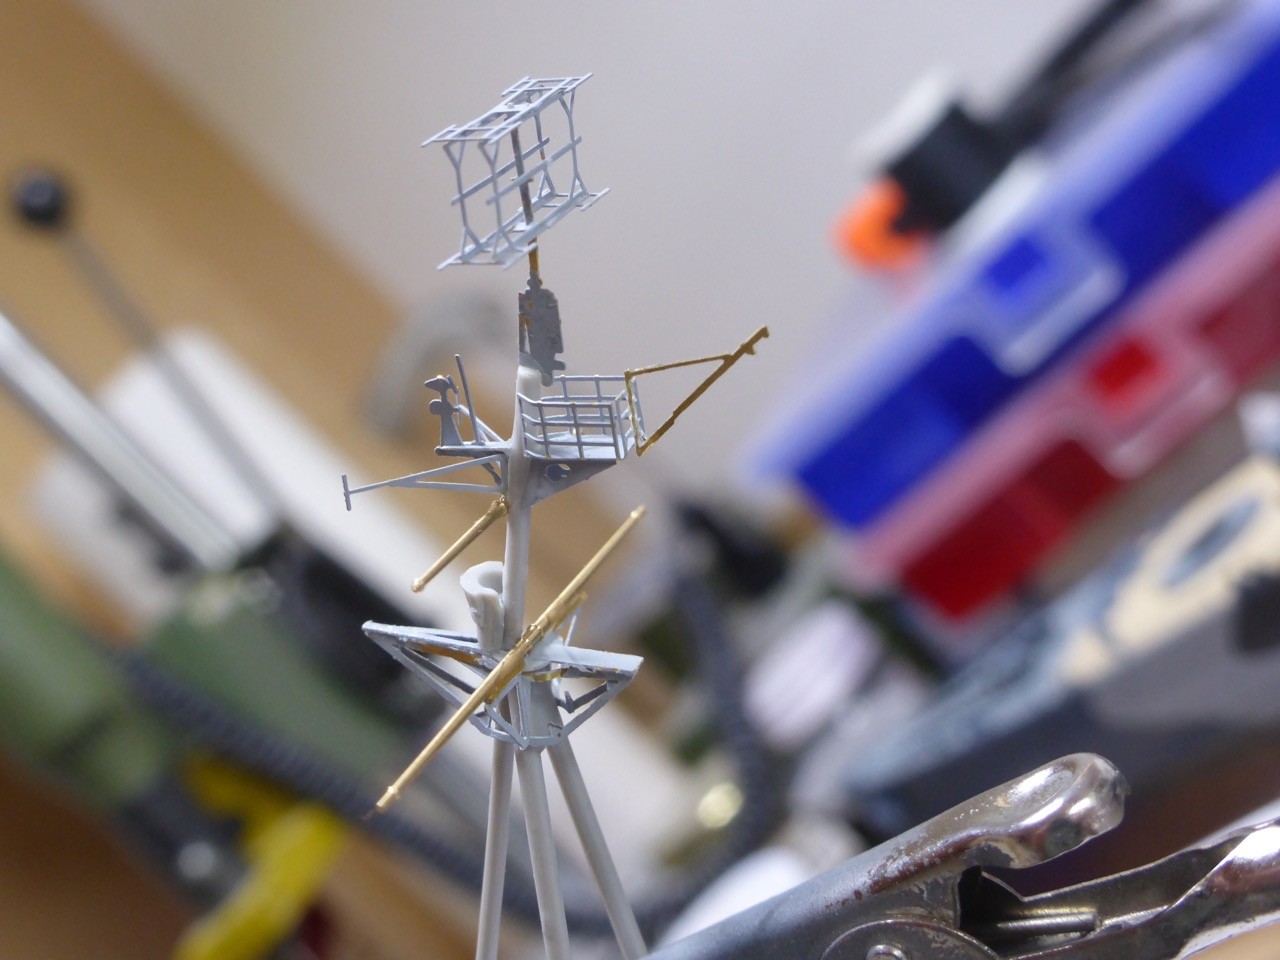
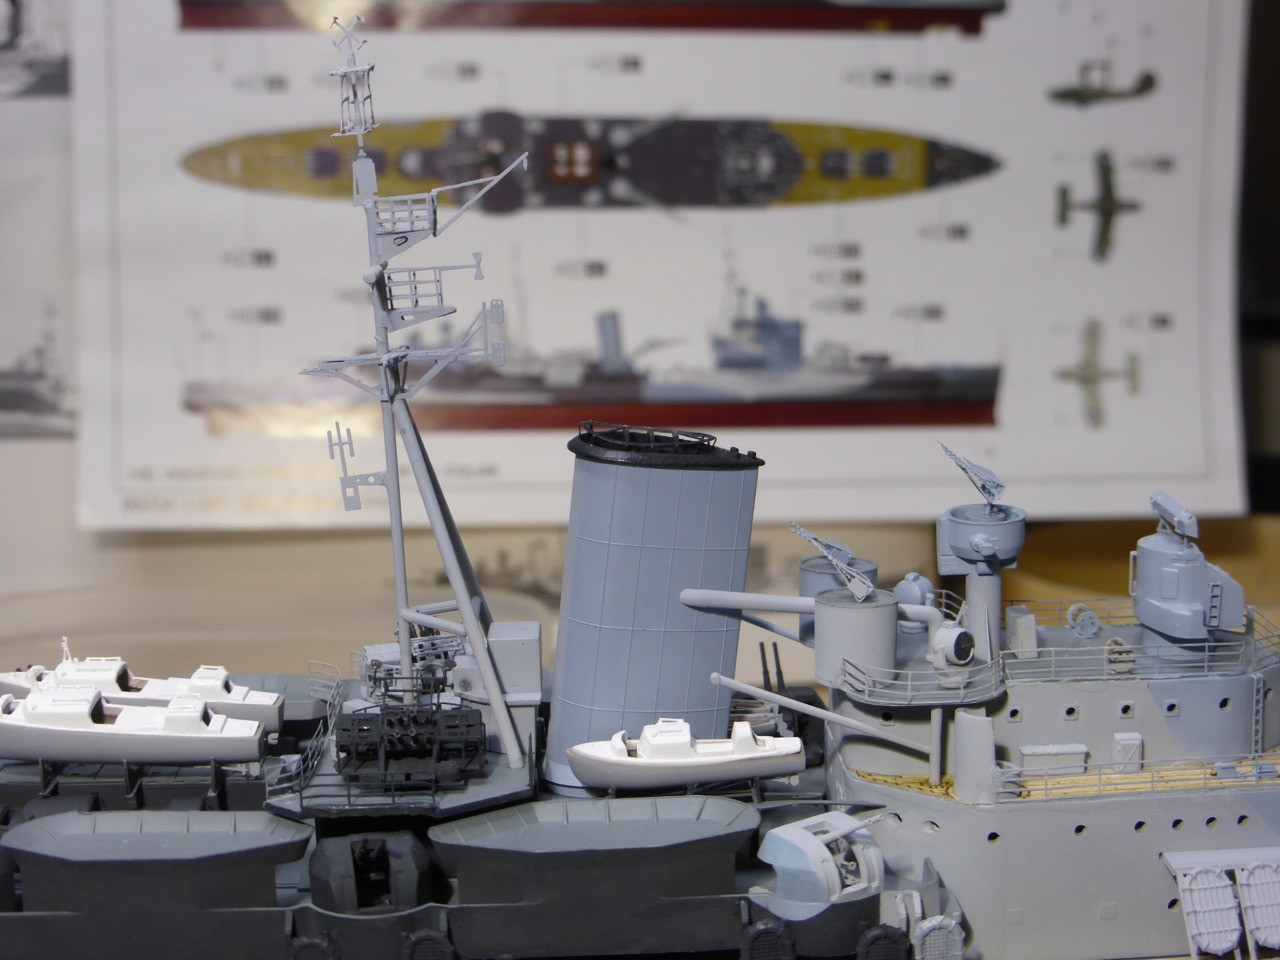
So first thing are the 281 radars, that go on top of both masts. Tiny and fiddly work, but straightforward. The one for the mainmast gets a 291 radar on top, no threat:

Now the fun starts. Let's say the WEM instructions are just 'a little' inconsistent. For the main mast assembly you are instructed to remove all molded yardarms from the kit's parts, but not so for the foremast. The spare yardarms, however, are designed to fit the foremast. Ok. On a first glance it becomes pretty apparent that it is required to remove all the molded yardarms from the foremast as well. Done that, build the tripod structure (which, by the way, is really good supported by molded markings on the kit's masts) and fit the WEM mast platform on top - that's why all yardarms need to go at the beginning.

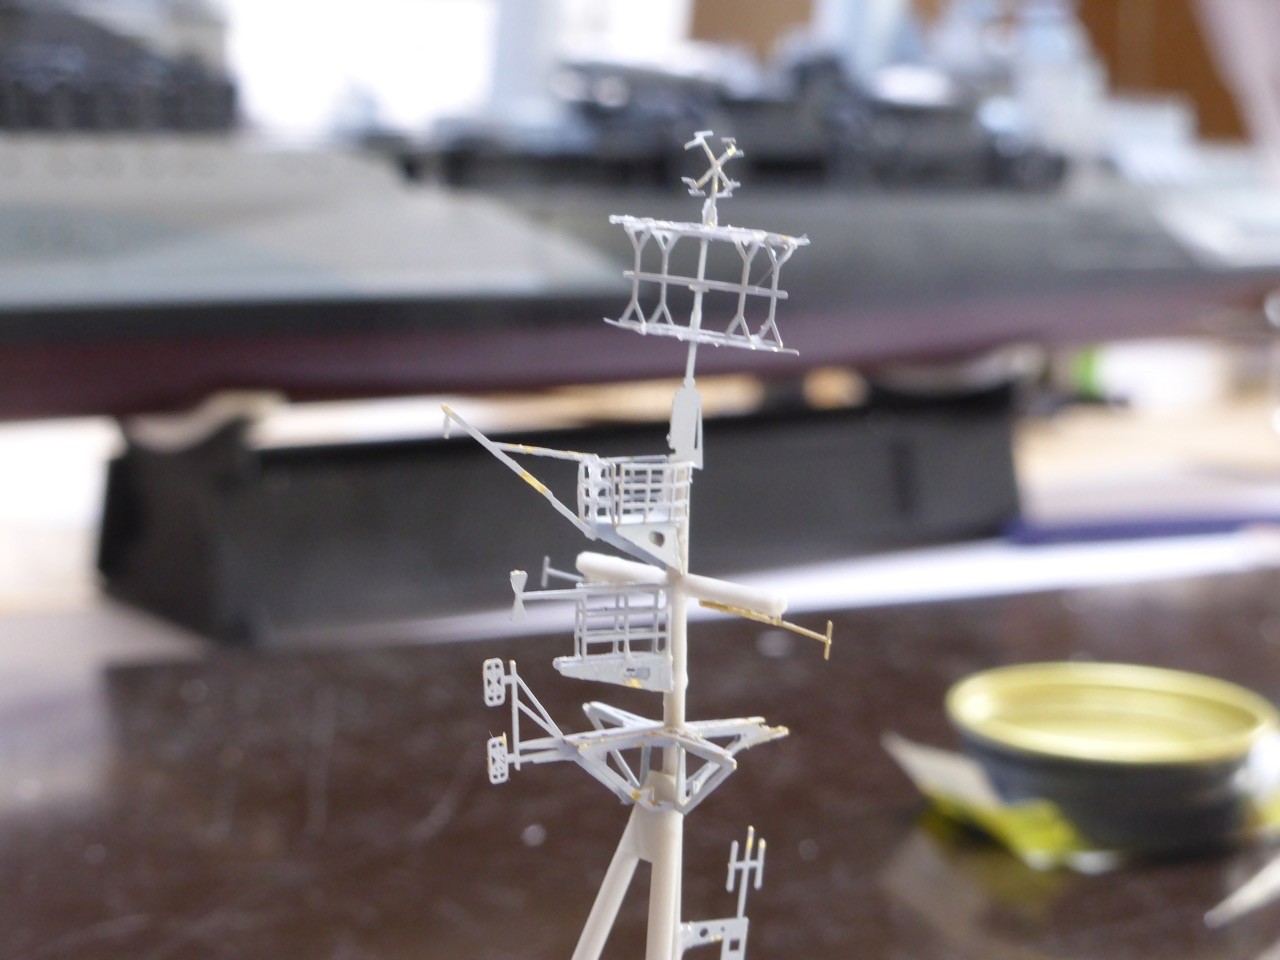
The mast platform is supported by braces to the left an right, those braces again are supported by two more triangular braces that support the yardarm.

Only - these triangular braces are designed in a way that they need to be connected to a vertical surface, to build a flat support for the yardarm. But the 'inner braces' stand out against the tripod at a significant angle, so that would never work. As can be seen in the pictures, I tried to bend and shape the inner braces around the tripod in a manner that they would provide a vertical connection for the outer braces. So that would then look a little like this:

Continuing with the foremast was quite straightforward but rather tedious because of some antennas that have almost none surface to connect. Even intensive thinking and looking at them might make them brake, so I'm 'a little' scared of the rigging, but for now they are in place and still stick...
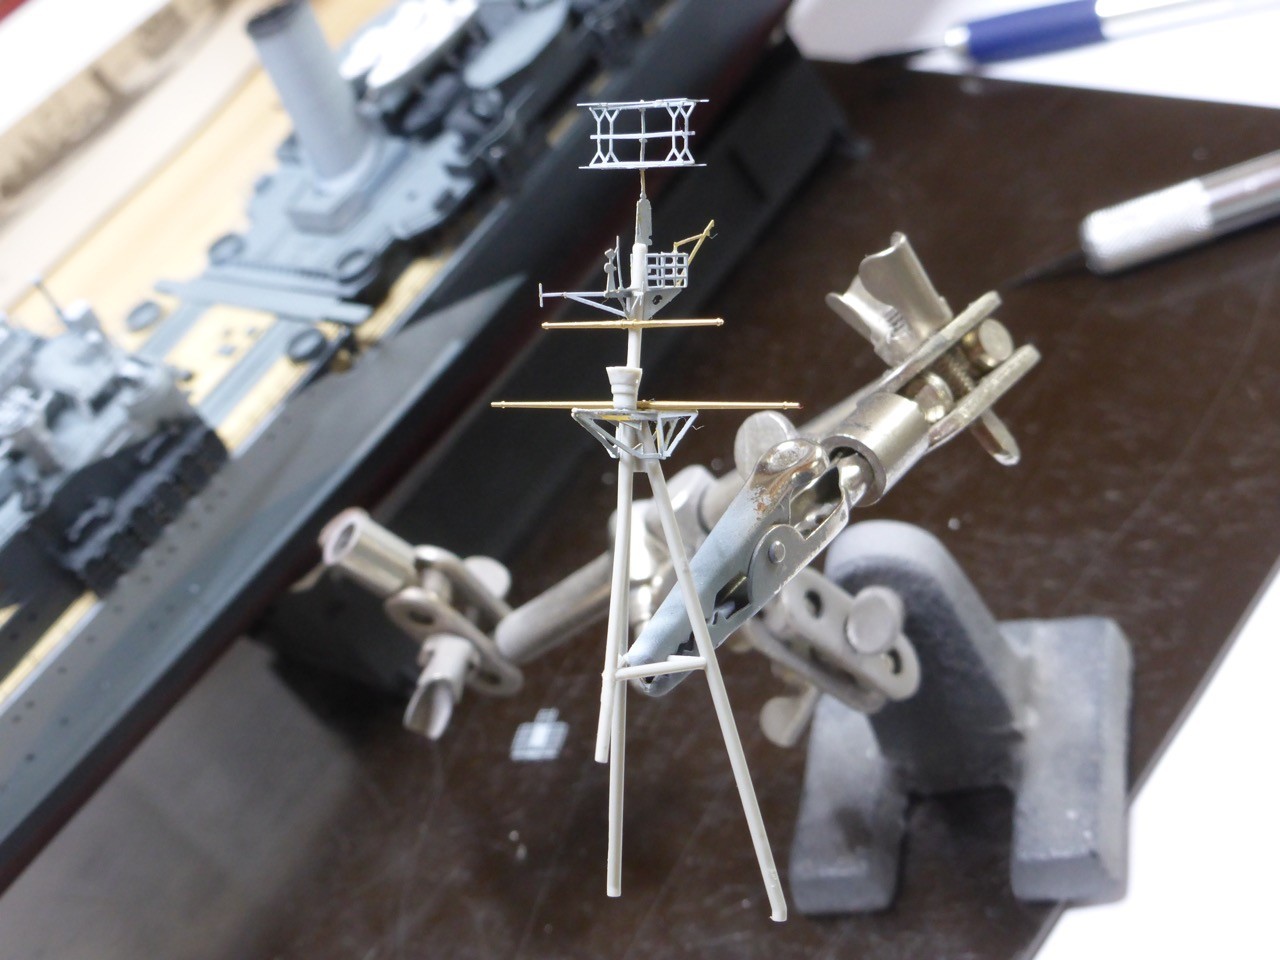
Part two, mainmast. Now I tried to learn my lesson. The instructions clearly tell you - remove molded yardarm to get mast platform/starfish in place on top of the tripod. But no replacement yardarm provided. Ok. But what am I going to eventually accomplish? The WEM platform on top of the tripod, right. And looking at the mainmast below the yardarm, before building the tripod, there is - nothing, right. Just a clean mast. So - leave the molded yardarm where it is and slide the platform from the lower end of the mast:

Then putting the V-shaped part of the later tripod on an even surface, glue on the supports and put the mast with the WEM Platform 'on top' to form the tripod:

Learning, part two: bring the braces into the desired shape
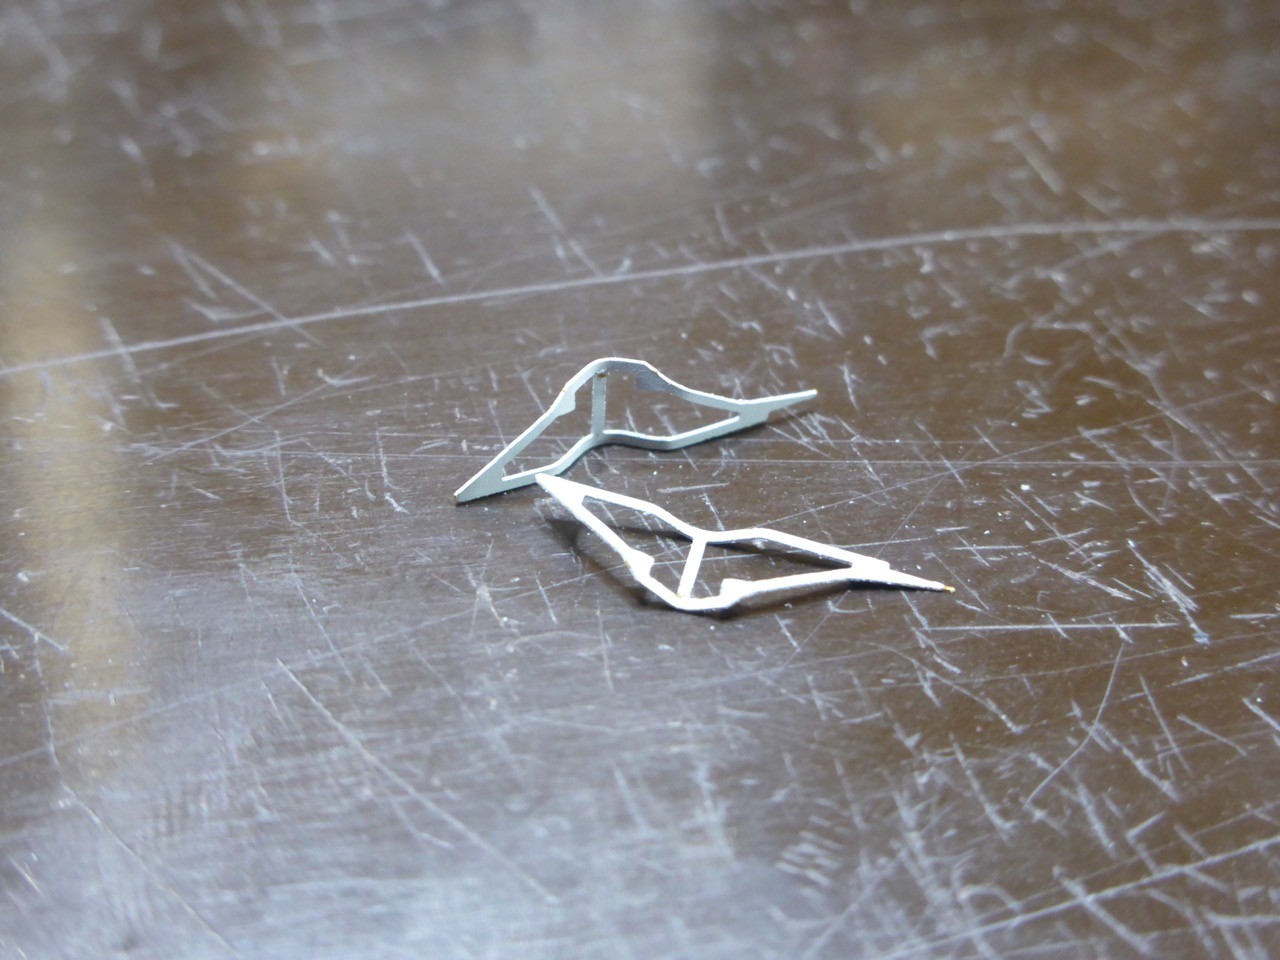
glue the tips

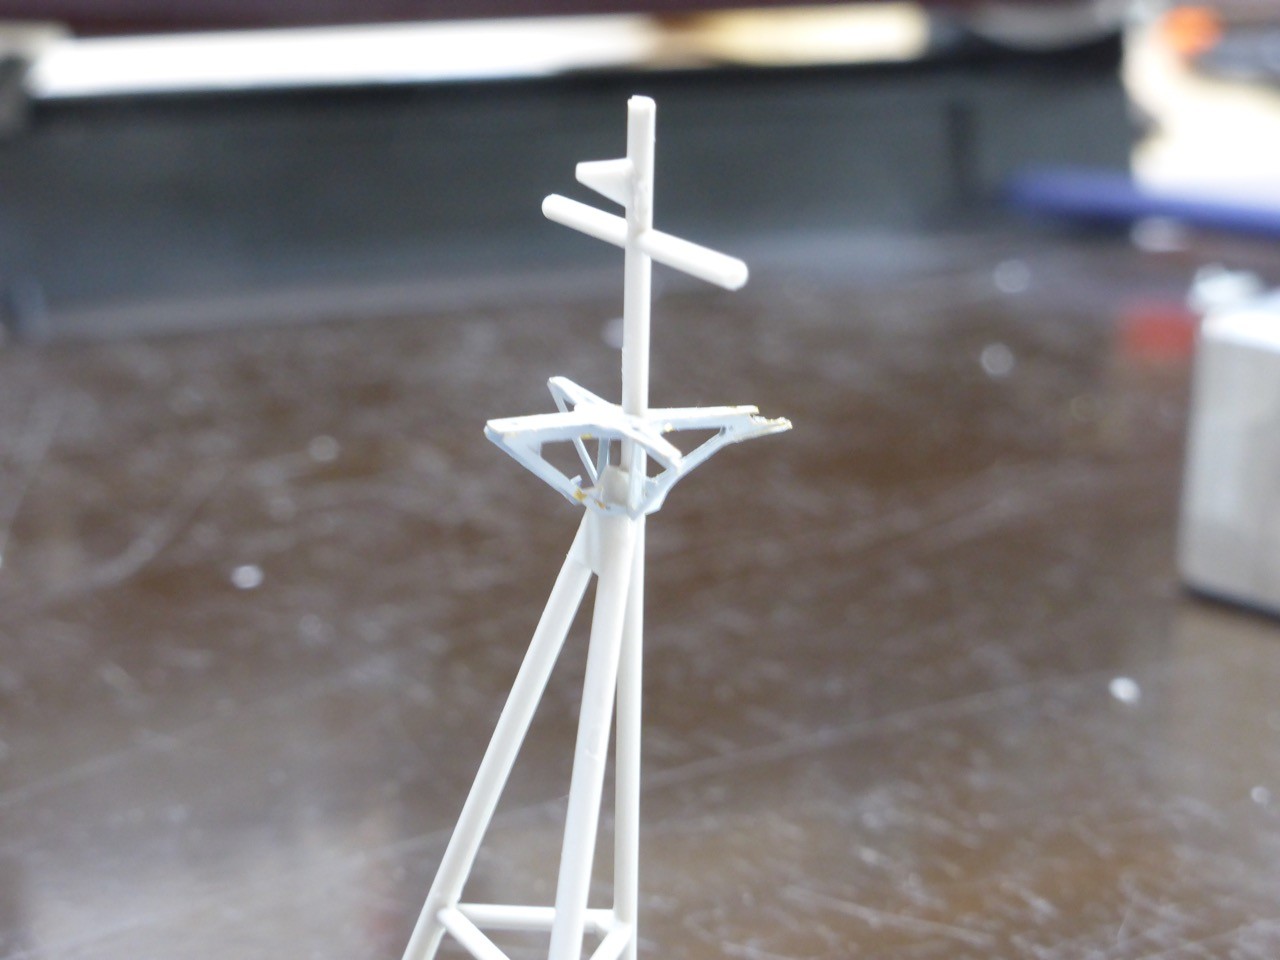
and fit around the upper end of the tripod. Install the 'outer braces' to build the actual starfish, best done upside down:

Looks something like this when finished:
And more straightforward but tedious work, easier this time, though, since through the molded yardarm and the little molded support to the upper platform, the whole thing has an enhanced stability as compared to the foremast...

So that's the story of the antennas and masts - not to difficult to tell, but quite challenging on the way, with some trial and error (and not-so-nice words) involved...

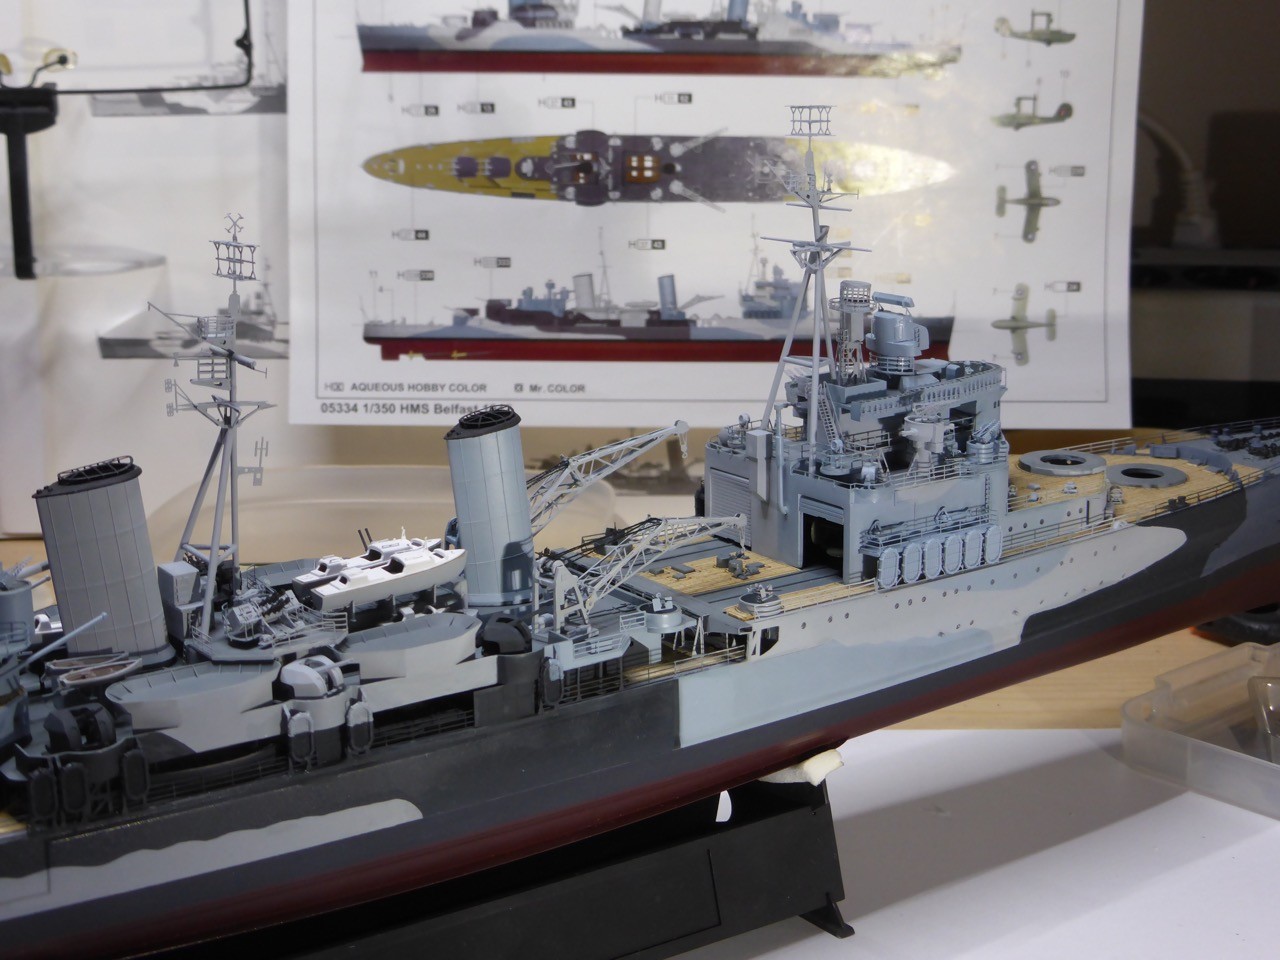
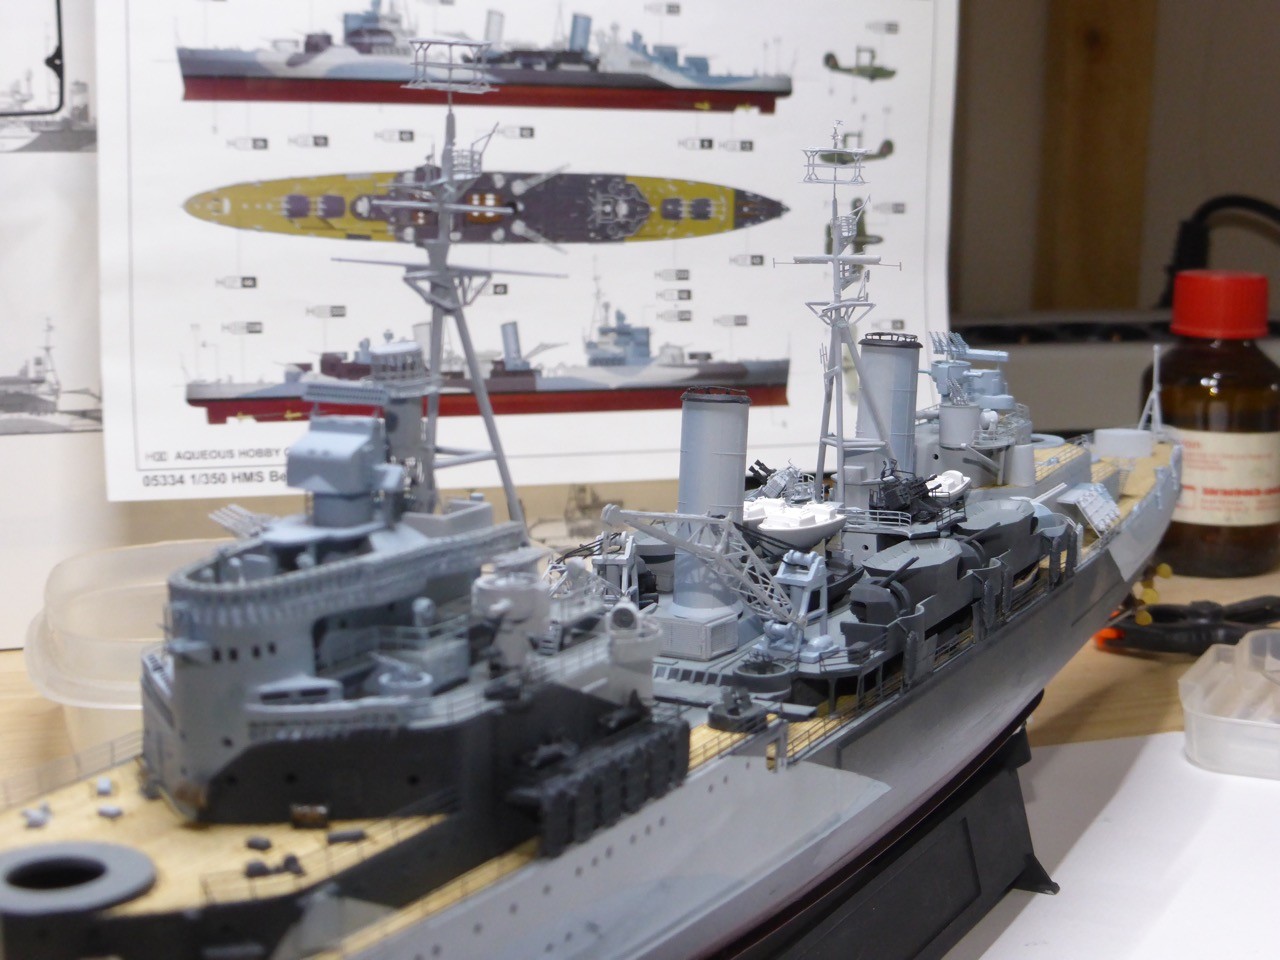
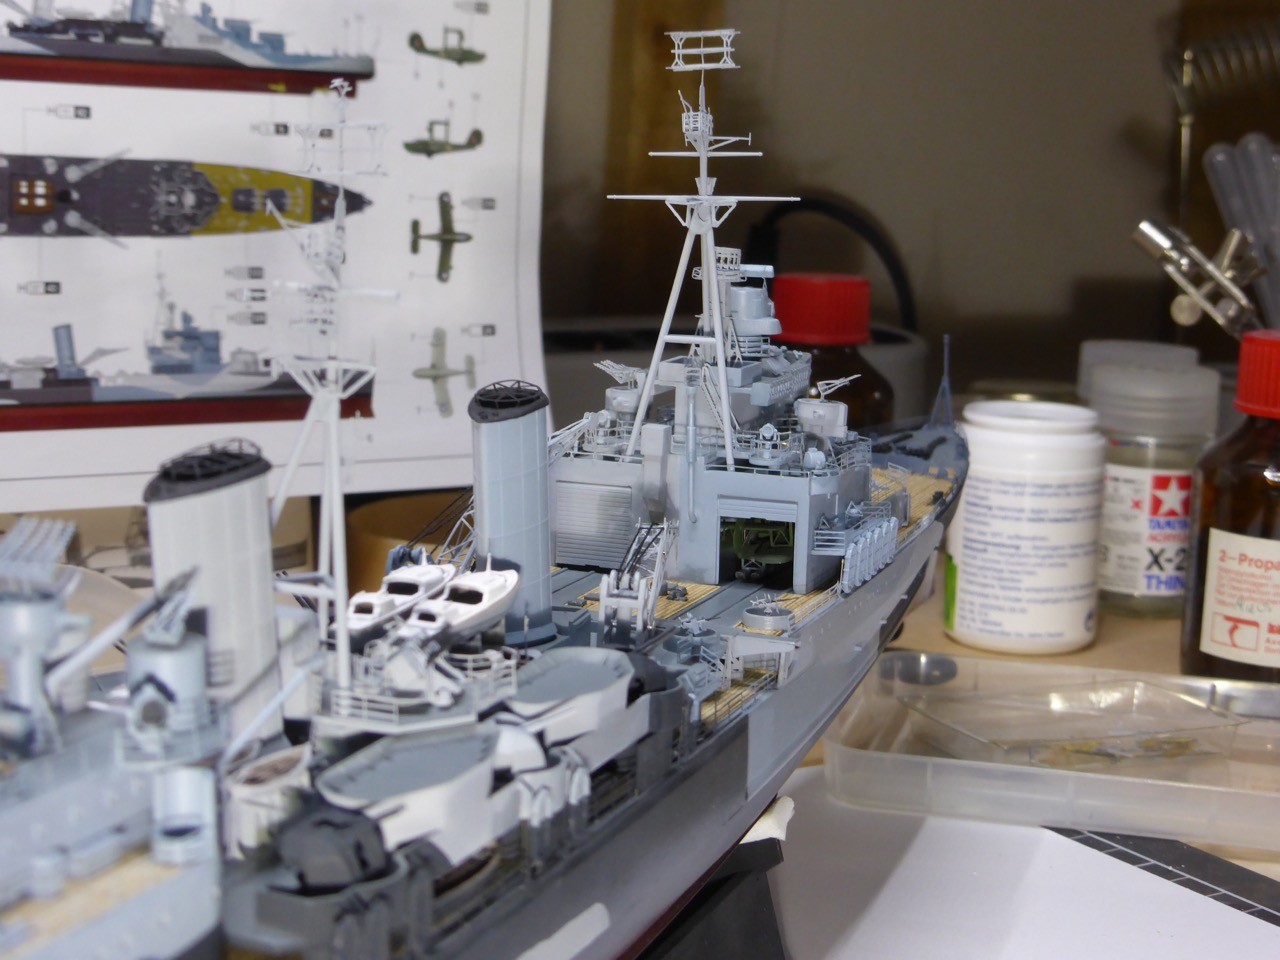
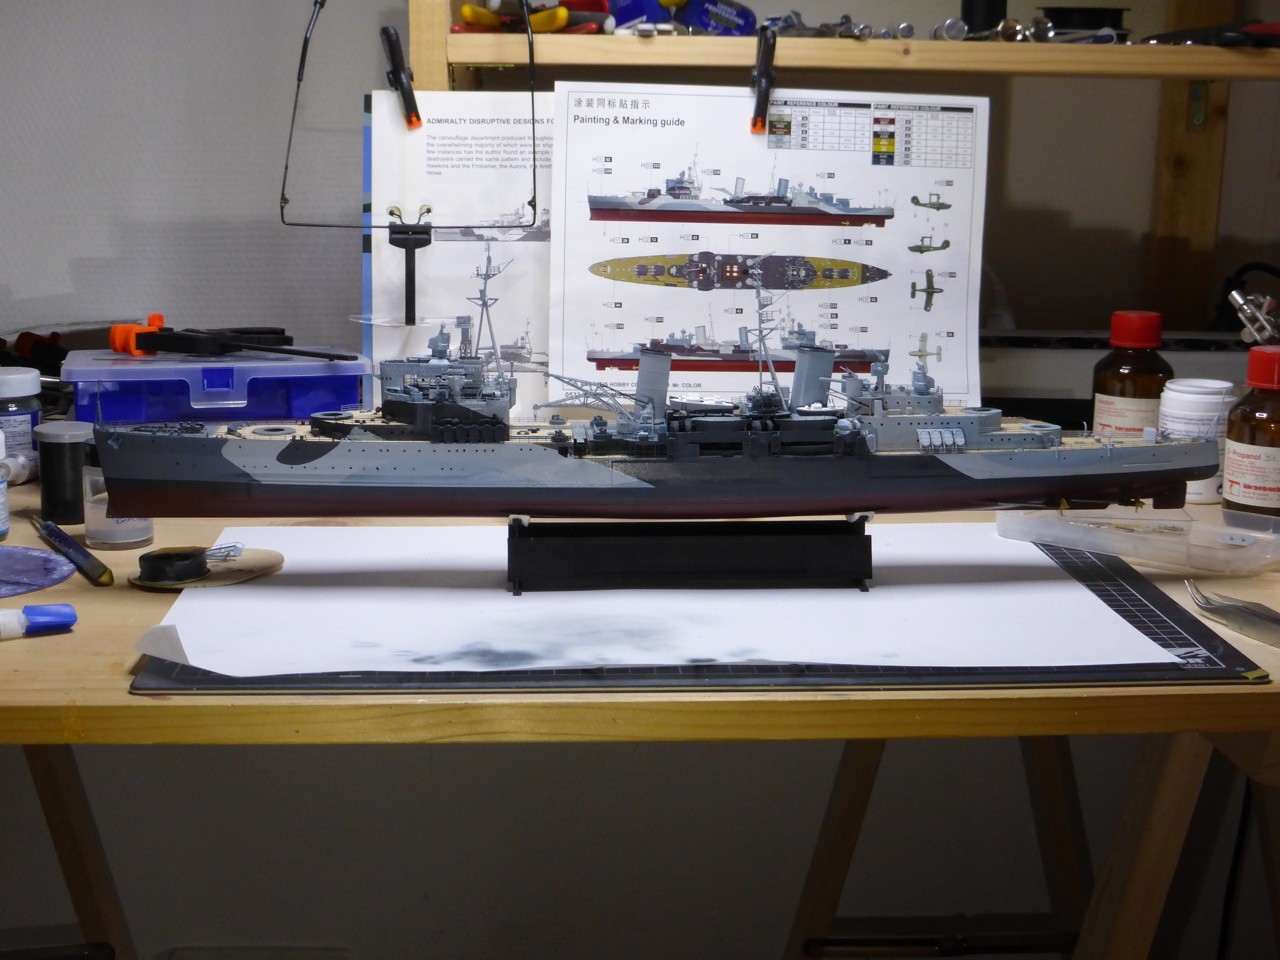
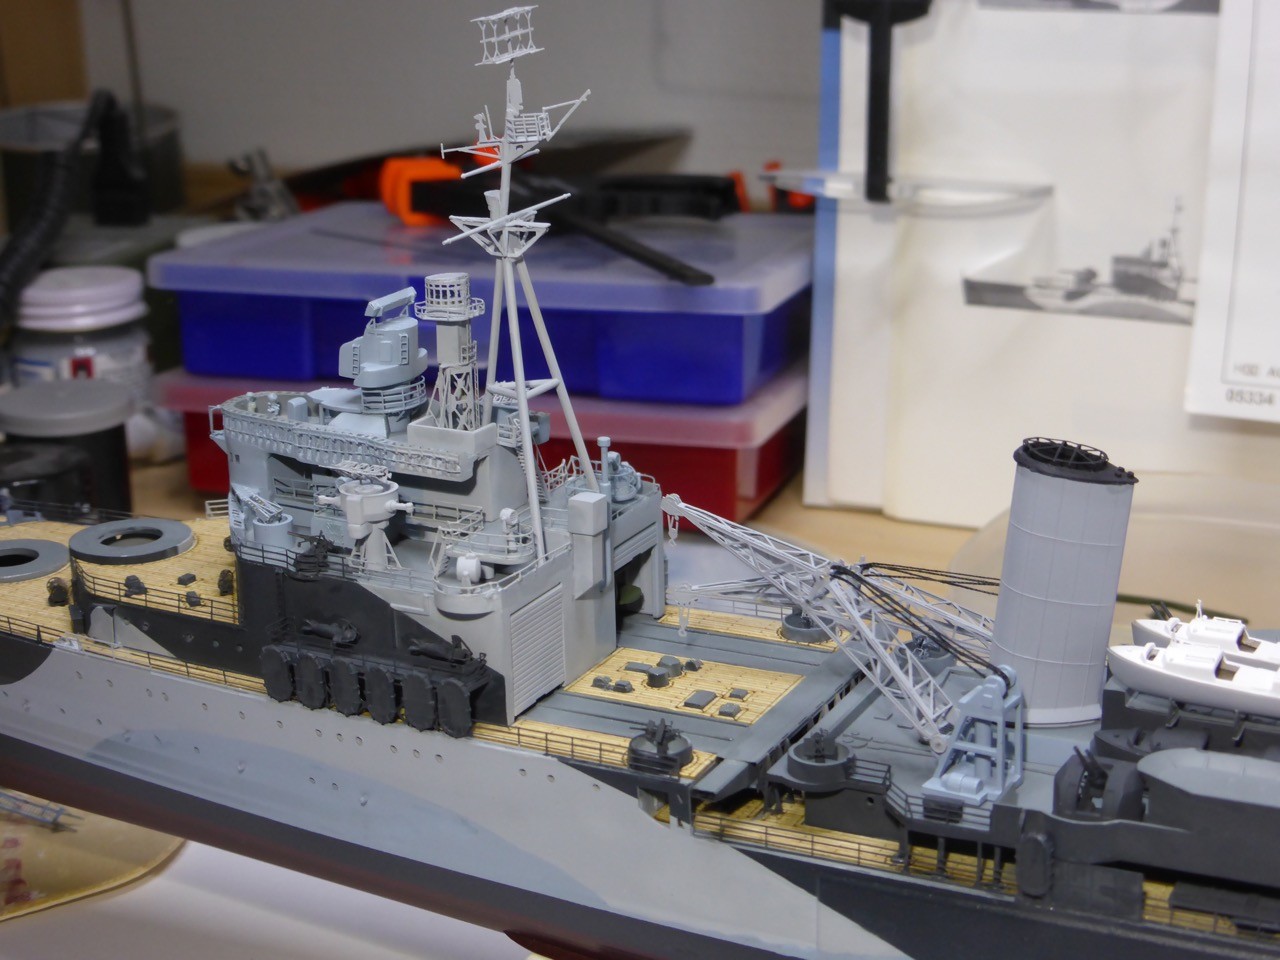
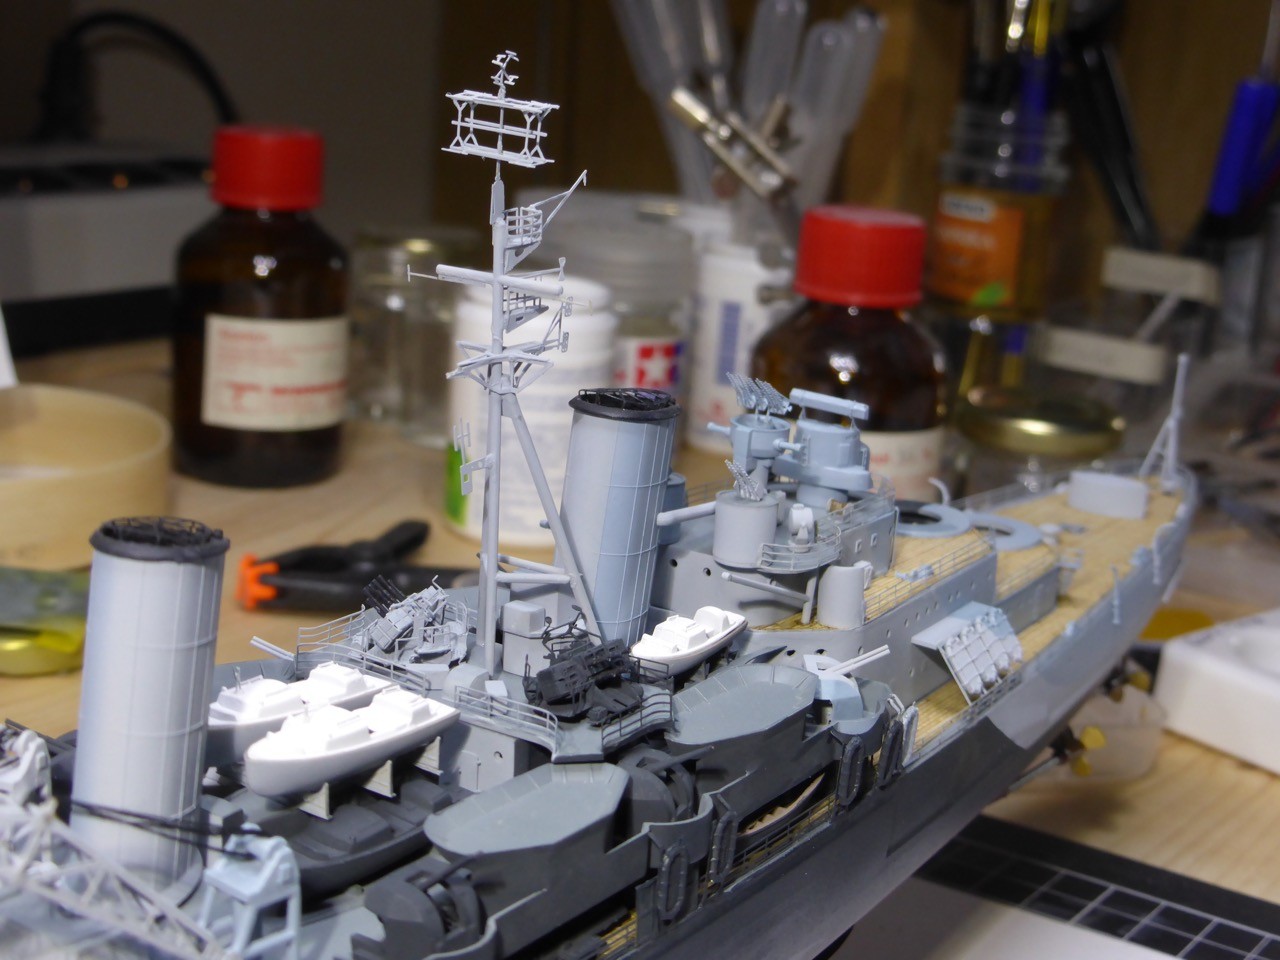
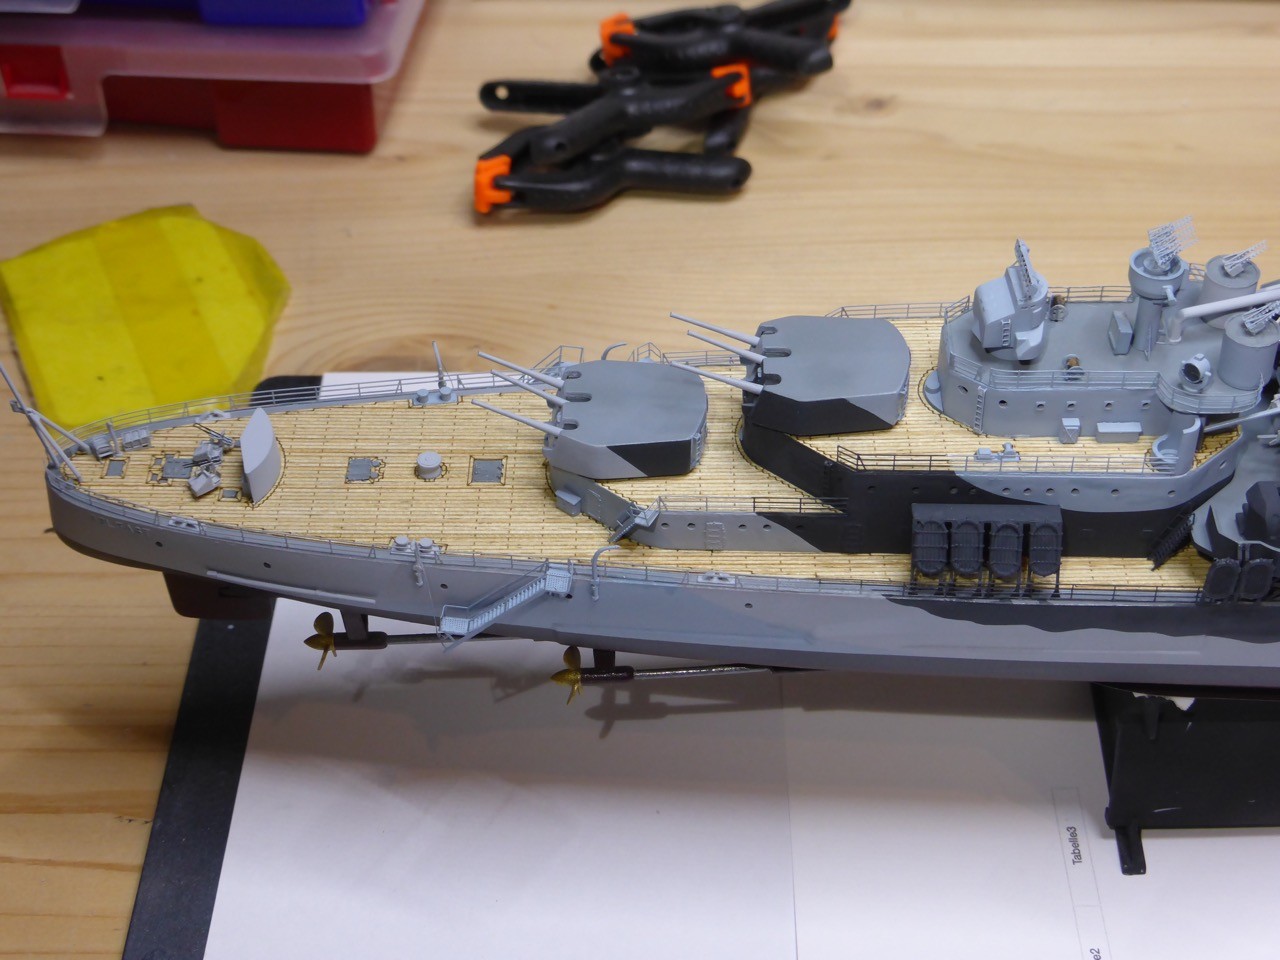
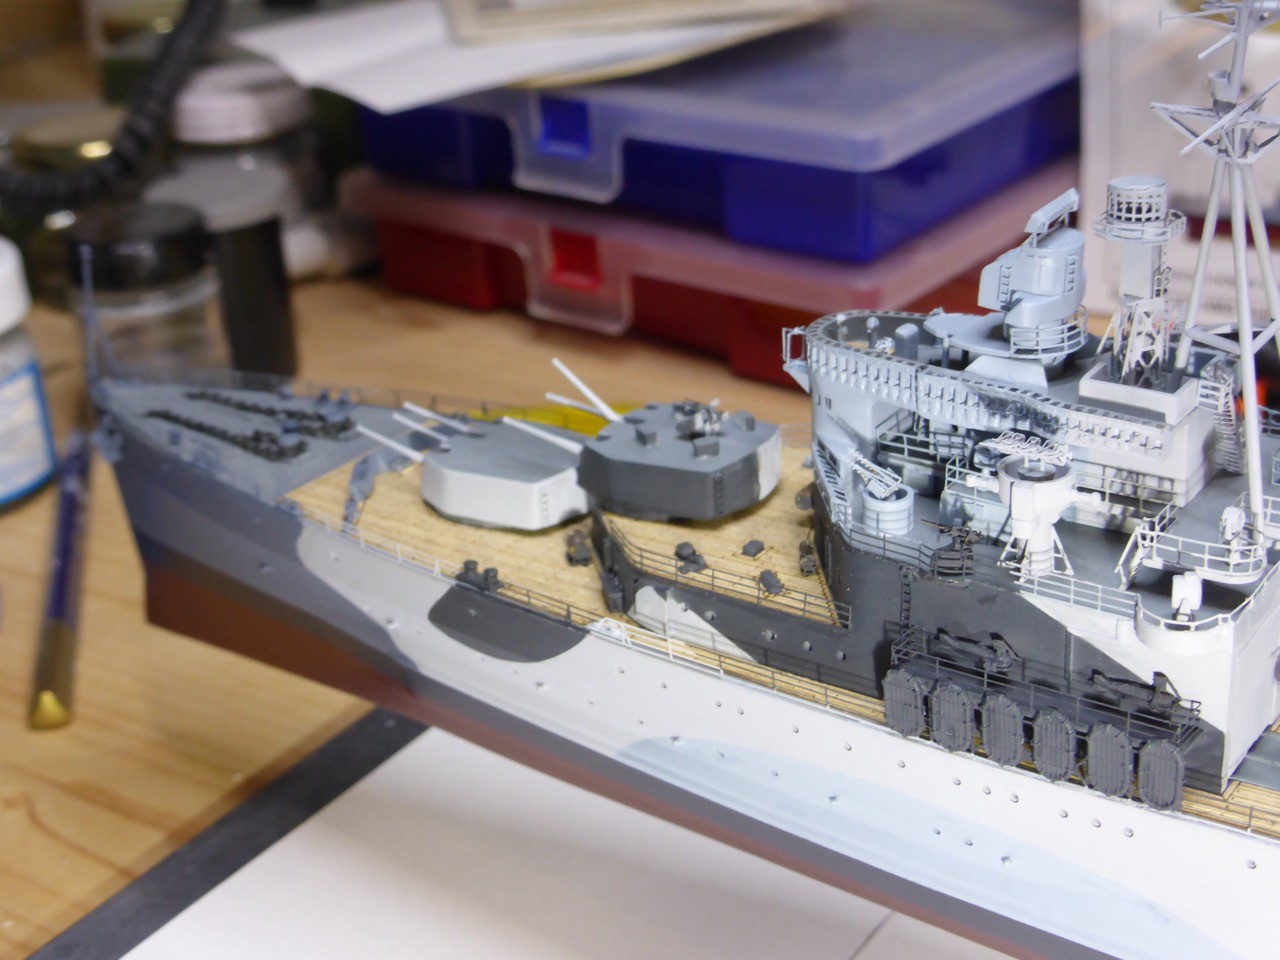
For now, I'll leave you with some impressions of where Belfast stands, with the masts, cranes and some more small stuff installed, including the single Oerlikons around the catapult. Some inclined ladders, the accommodation ladders, the Walrus outside and of course the main guns still missing, and a few touch ups, mainly to the cranes. Then rigging. And clear coat to protect. Not too far out now...


That's it for now, next update should be up on Sunday or Monday. Perhaps even just a brief one only on the cruiser's campaign, and then - fingers crossed - the final one here a week later.
Thank you all for looking in and all your kind comments and support up to today!! That's been extremely helpful!!
Cheers,
Jan
thank you very much for your support!!
I'll do my very best!! But for now, just the second part of what I accomplished over the weekend - I don't see much time for yard work before Sunday...
So here's the story on the masts and antennas
The masts as offered by the kit are very basic, and there is really a LOT of stuff to be added form the WEM PE set. And then there is this special yardarm replacement kit from WEM, which basically consists of two turned brass yardarms 20 mm and 34 mm length, that should replace pieces from the foremast.
So first thing are the 281 radars, that go on top of both masts. Tiny and fiddly work, but straightforward. The one for the mainmast gets a 291 radar on top, no threat:
Now the fun starts. Let's say the WEM instructions are just 'a little' inconsistent. For the main mast assembly you are instructed to remove all molded yardarms from the kit's parts, but not so for the foremast. The spare yardarms, however, are designed to fit the foremast. Ok. On a first glance it becomes pretty apparent that it is required to remove all the molded yardarms from the foremast as well. Done that, build the tripod structure (which, by the way, is really good supported by molded markings on the kit's masts) and fit the WEM mast platform on top - that's why all yardarms need to go at the beginning.
The mast platform is supported by braces to the left an right, those braces again are supported by two more triangular braces that support the yardarm.
Only - these triangular braces are designed in a way that they need to be connected to a vertical surface, to build a flat support for the yardarm. But the 'inner braces' stand out against the tripod at a significant angle, so that would never work. As can be seen in the pictures, I tried to bend and shape the inner braces around the tripod in a manner that they would provide a vertical connection for the outer braces. So that would then look a little like this:
Continuing with the foremast was quite straightforward but rather tedious because of some antennas that have almost none surface to connect. Even intensive thinking and looking at them might make them brake, so I'm 'a little' scared of the rigging, but for now they are in place and still stick...
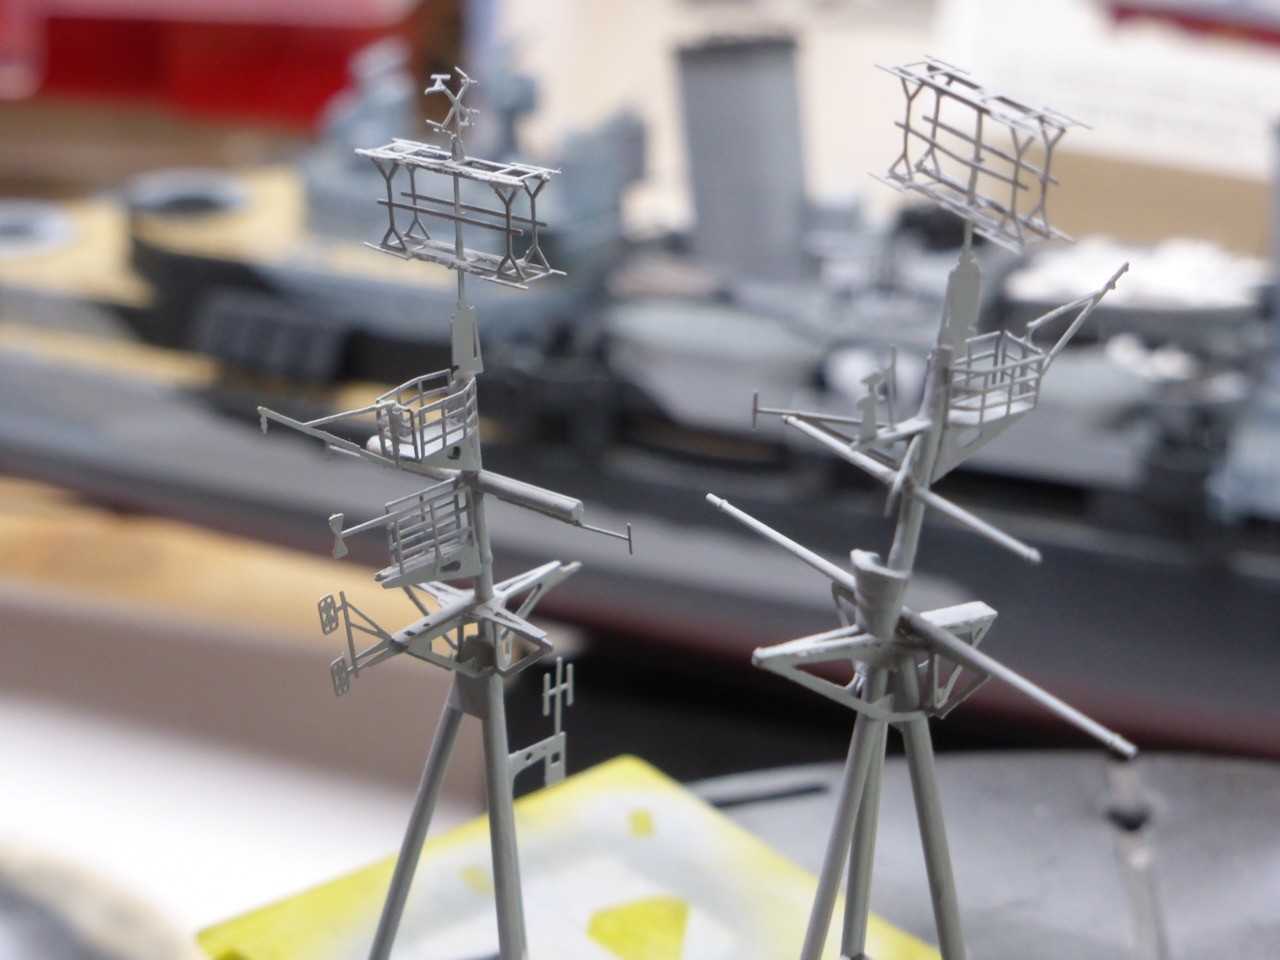
Part two, mainmast. Now I tried to learn my lesson. The instructions clearly tell you - remove molded yardarm to get mast platform/starfish in place on top of the tripod. But no replacement yardarm provided. Ok. But what am I going to eventually accomplish? The WEM platform on top of the tripod, right. And looking at the mainmast below the yardarm, before building the tripod, there is - nothing, right. Just a clean mast. So - leave the molded yardarm where it is and slide the platform from the lower end of the mast:
Then putting the V-shaped part of the later tripod on an even surface, glue on the supports and put the mast with the WEM Platform 'on top' to form the tripod:
Learning, part two: bring the braces into the desired shape
glue the tips
and fit around the upper end of the tripod. Install the 'outer braces' to build the actual starfish, best done upside down:
Looks something like this when finished:
And more straightforward but tedious work, easier this time, though, since through the molded yardarm and the little molded support to the upper platform, the whole thing has an enhanced stability as compared to the foremast...
So that's the story of the antennas and masts - not to difficult to tell, but quite challenging on the way, with some trial and error (and not-so-nice words) involved...
For now, I'll leave you with some impressions of where Belfast stands, with the masts, cranes and some more small stuff installed, including the single Oerlikons around the catapult. Some inclined ladders, the accommodation ladders, the Walrus outside and of course the main guns still missing, and a few touch ups, mainly to the cranes. Then rigging. And clear coat to protect. Not too far out now...
That's it for now, next update should be up on Sunday or Monday. Perhaps even just a brief one only on the cruiser's campaign, and then - fingers crossed - the final one here a week later.
Thank you all for looking in and all your kind comments and support up to today!! That's been extremely helpful!!
Cheers,
Jan
rolltide31
#377
Joined: June 27, 2010
KitMaker: 1,481 posts
Model Shipwrights: 1,332 posts
Posted: Tuesday, April 05, 2016 - 04:21 AM UTC
Jan,
Simply amazing work. She is really coming along and I look forward to the commissioning ceremony.
Dave
Simply amazing work. She is really coming along and I look forward to the commissioning ceremony.
Dave
RussellE
#306
Joined: June 27, 2010
KitMaker: 3,959 posts
Model Shipwrights: 2,777 posts
Posted: Tuesday, April 05, 2016 - 03:43 PM UTC
Outstanding work Jan!
The complexity of those masts has put any thought of attempting the Belfast completely out of my mind!
I take my hat off to you mate, for doing such a good job of them!
The complexity of those masts has put any thought of attempting the Belfast completely out of my mind!
I take my hat off to you mate, for doing such a good job of them!
JJ1973
#345
Joined: August 22, 2011
KitMaker: 1,835 posts
Model Shipwrights: 1,832 posts
Posted: Wednesday, April 06, 2016 - 09:14 AM UTC
Thanks Dave -
and believe me, after about a year, meanwhile I am looking forward to commissioning very much myself!!! - even though it is a wonderful kit and was, apart from some minor issues, a real fun build so far!
Thank you Russ!
- I was looking at the masts, all the parts and the somewhat obscure instructions for some time, and eventually couldn't avoid them any further -really happy they're done, I hope I won't break them during the last steps But all your detail work, to your Prinz and your KGV, is not the least bit less complex or challenging, if not even more so, mate!!
Thanks again, highly appreciated!
Cheers,
Jan
and believe me, after about a year, meanwhile I am looking forward to commissioning very much myself!!! - even though it is a wonderful kit and was, apart from some minor issues, a real fun build so far!
Thank you Russ!
- I was looking at the masts, all the parts and the somewhat obscure instructions for some time, and eventually couldn't avoid them any further
-really happy they're done, I hope I won't break them during the last steps But all your detail work, to your Prinz and your KGV, is not the least bit less complex or challenging, if not even more so, mate!! Thanks again, highly appreciated!
Cheers,
Jan

Paulinsibculo

Joined: July 01, 2010
KitMaker: 1,322 posts
Model Shipwrights: 3 posts

Posted: Wednesday, April 06, 2016 - 10:18 PM UTC
Hi Jan,
What an impressive amount of work you did. I once had the Airfix model, ages ago, so your work brought back happy memories of my first steps into the world of modelling.
I am looking forward to see more.
May I allow one consideration? Why not using fishing wire for the cranes? It is available in every fishing sports shop in various strenghts (read: thickness) and can be easily bend, much easier than the cotton wires. Also, the fibres are not present. I used it for attennas.
I hope you accept this proposal, which is given with respect to the details you are able to bring into your ship.
P.
RedDuster
Joined: March 01, 2010
KitMaker: 7,078 posts
Model Shipwrights: 6,649 posts
Posted: Wednesday, April 06, 2016 - 11:43 PM UTC
Looking Great Jan
The masts and radars look excellent in place, very tidy work with all the etch on those structures.
Keep up the good work, looking forward to more progress.
Cheers.
Si
The masts and radars look excellent in place, very tidy work with all the etch on those structures.
Keep up the good work, looking forward to more progress.
Cheers.
Si
JJ1973
#345
Joined: August 22, 2011
KitMaker: 1,835 posts
Model Shipwrights: 1,832 posts
Posted: Sunday, April 10, 2016 - 09:52 AM UTC
Si,
thank you very much!! Was quite busy yesterday but no chance to do a proper update yet - maybe later today...maybe tomorrow
Paul,
Thank you very much and welcome aboard!!
I did try the fishing wires earlier on in a different build, but somehow didn't get it to work as I wanted. Maybe it's time for another go, with some more experience. I even found fishing wire in three different strengths somewhere hidden deep in a drawer... But I will not replace the crane's rig, since they are glued in place by now and I just fear for collateral damage...
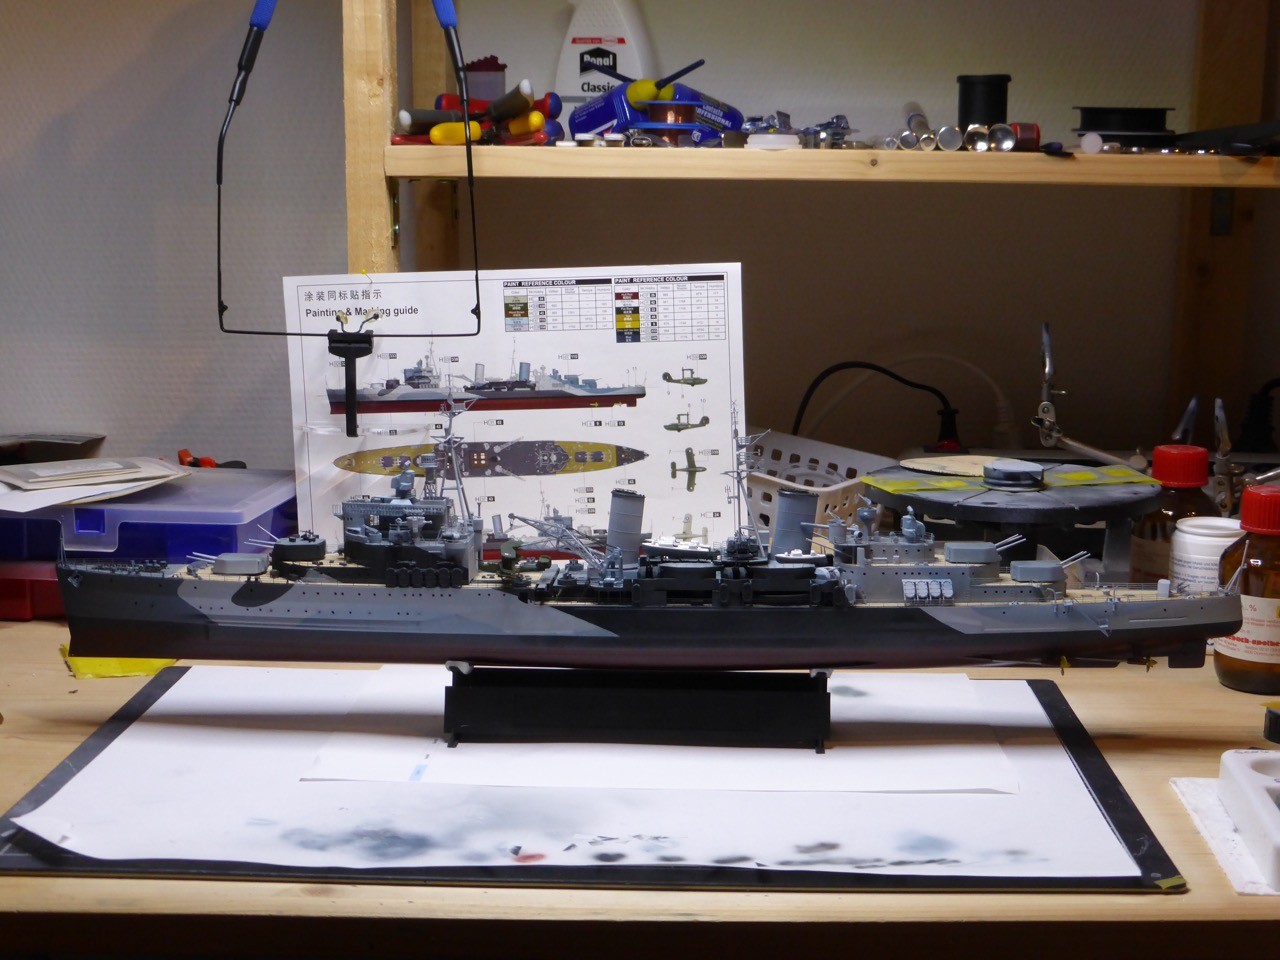
So just tow quick pictures - truest are on! Rigging still to be done. I checked, I started this one on 19 April 2015 - so I just might make it in one year....

A proper update here should follow sonn! - I hope...
Cheers,
Jan
thank you very much!! Was quite busy yesterday but no chance to do a proper update yet - maybe later today...maybe tomorrow
Paul,
Thank you very much and welcome aboard!!
I did try the fishing wires earlier on in a different build, but somehow didn't get it to work as I wanted. Maybe it's time for another go, with some more experience. I even found fishing wire in three different strengths somewhere hidden deep in a drawer... But I will not replace the crane's rig, since they are glued in place by now and I just fear for collateral damage...
So just tow quick pictures - truest are on! Rigging still to be done. I checked, I started this one on 19 April 2015 - so I just might make it in one year....
A proper update here should follow sonn! - I hope...
Cheers,
Jan
RussellE
#306
Joined: June 27, 2010
KitMaker: 3,959 posts
Model Shipwrights: 2,777 posts
Posted: Sunday, April 10, 2016 - 04:04 PM UTC
Masterful work, Jan
under a year hey? Much better than my efforts so far


under a year hey? Much better than my efforts so far
JJ1973
#345
Joined: August 22, 2011
KitMaker: 1,835 posts
Model Shipwrights: 1,832 posts
Posted: Sunday, April 10, 2016 - 11:09 PM UTC
Thank you very much, Russ - that's very kind!!
And YES - I might - just might - finish before 19 April - that's if I don't break anything with my efforts to rig her
Ok, I am going to split this once more, the turrets will come tomorrow. Here's the update on all the other stuff first.
Which actually makes it a rather short update for today, but that suits my time a little better anyway...
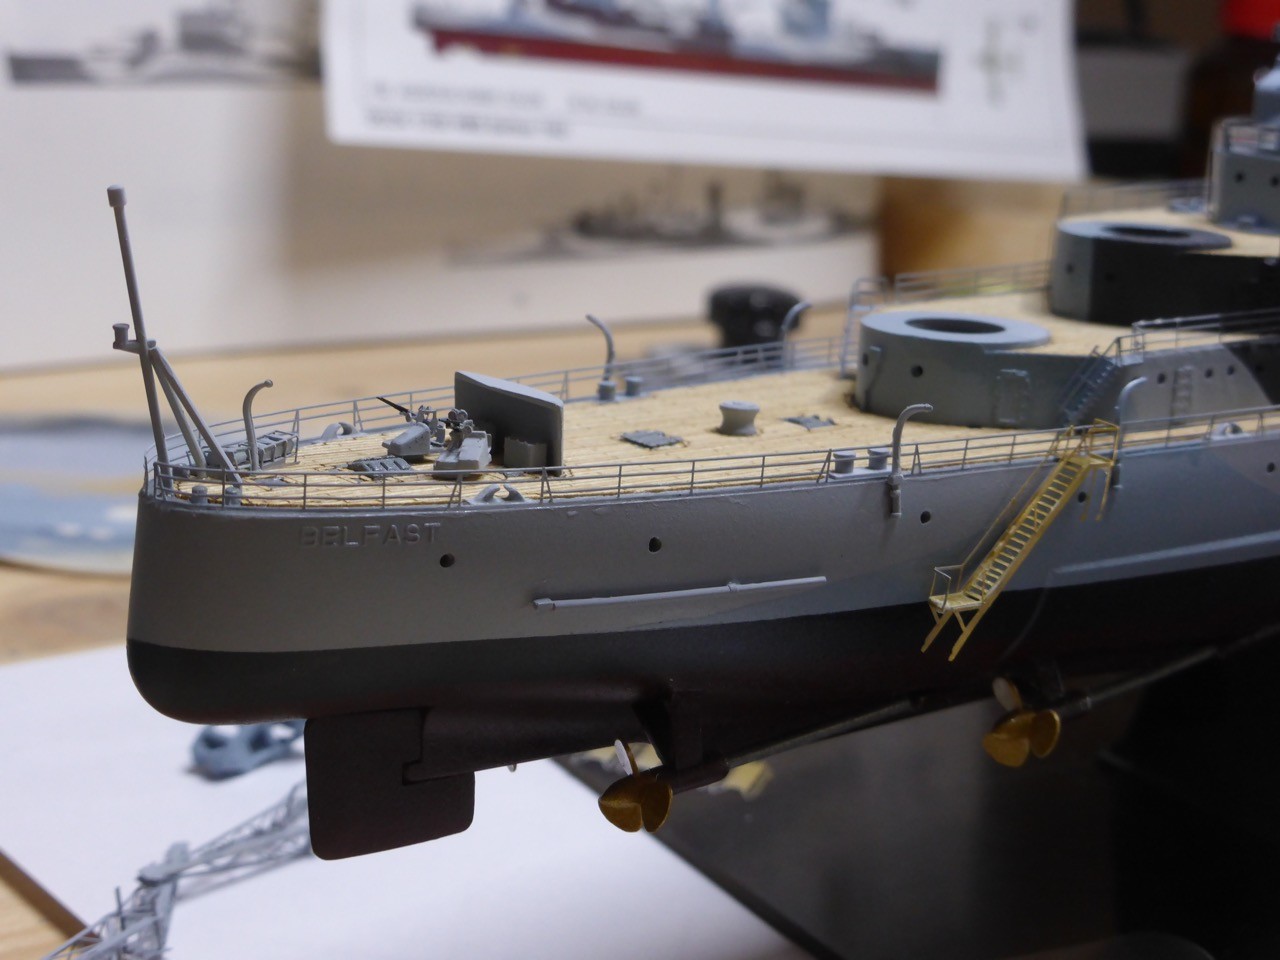
So, the last four inclined ladders installed, two shown

The Walrus in place - only way to fit it, after I glued the cranes down. Well, hands down, that was not the initial plan - I wanted to install it on the catapult, but only after glueing down the cranes I realized that it would not fit...oh well...
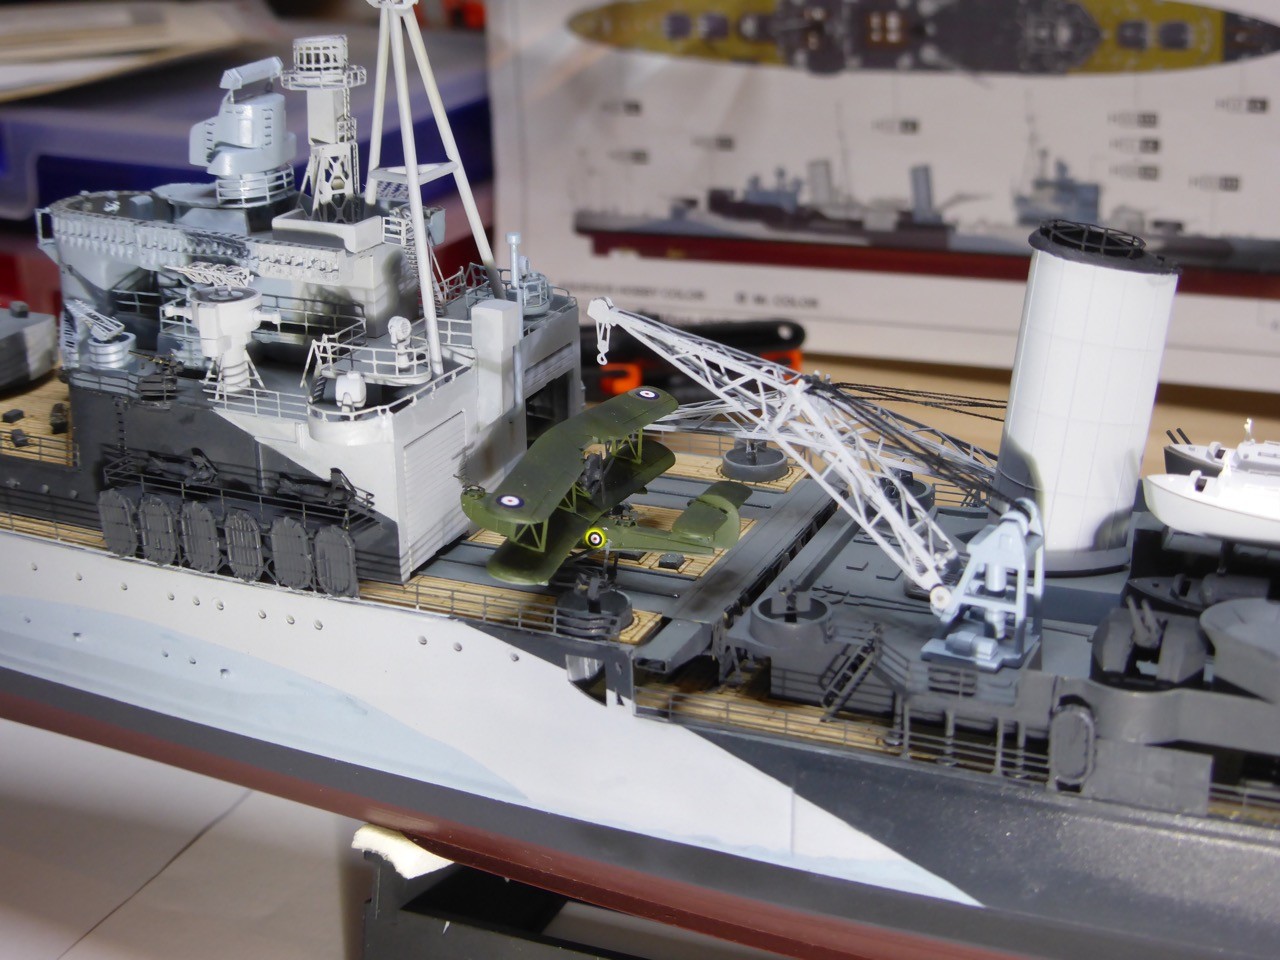
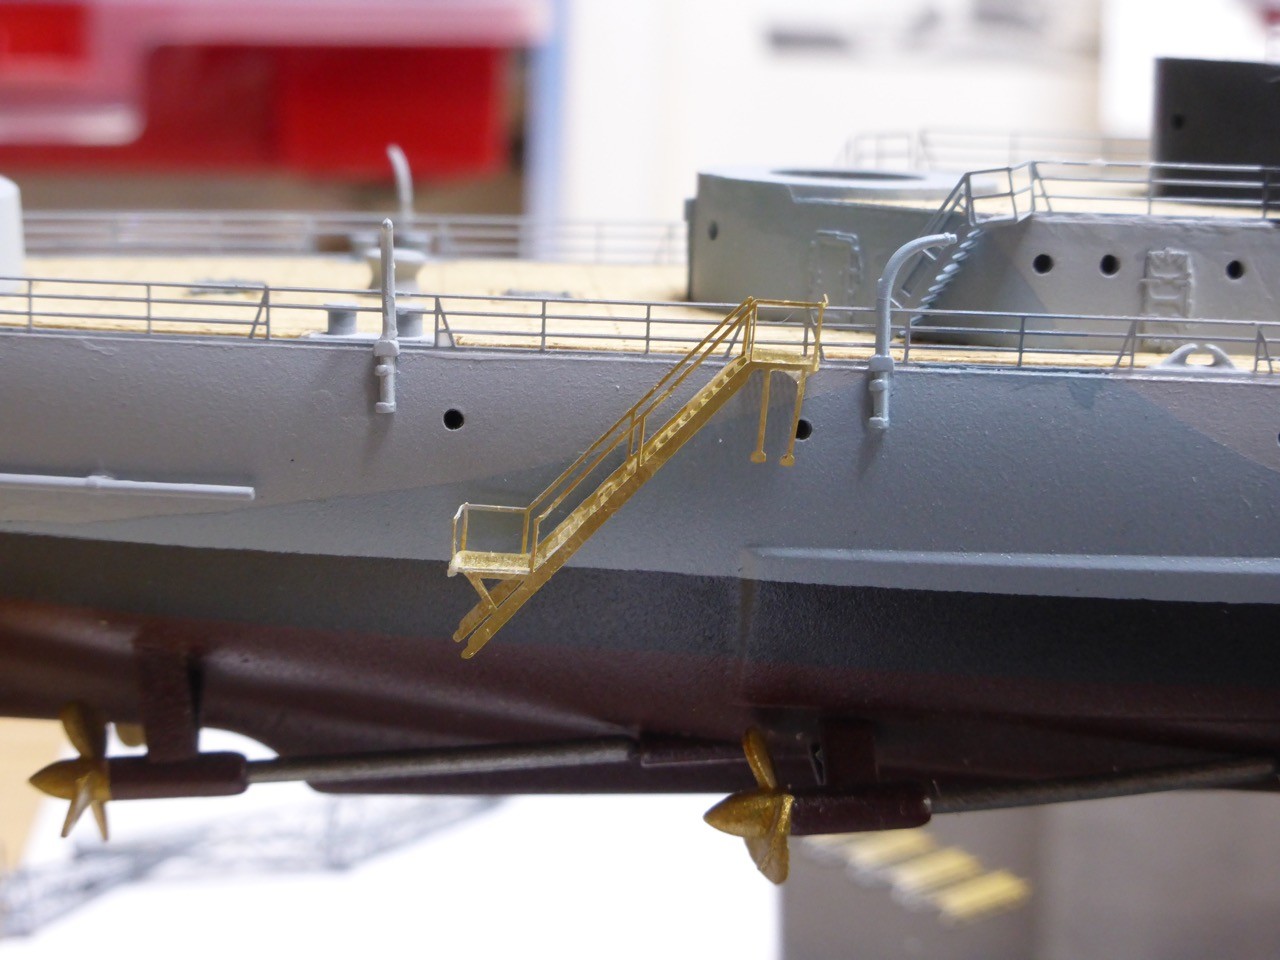
Then I installed the accommodation ladders, after they were painted.
Si - here's another go at the copper wire thing. I am still not sure whether we will become friends, copper wire and myself
I think for the acom ladders it's doing an all right job. I bent a V-shape structure to be attached to the lower part of the acom ladders, and a hook at one end of a longer wire to link up with the V-shape and be attached to the davit above.
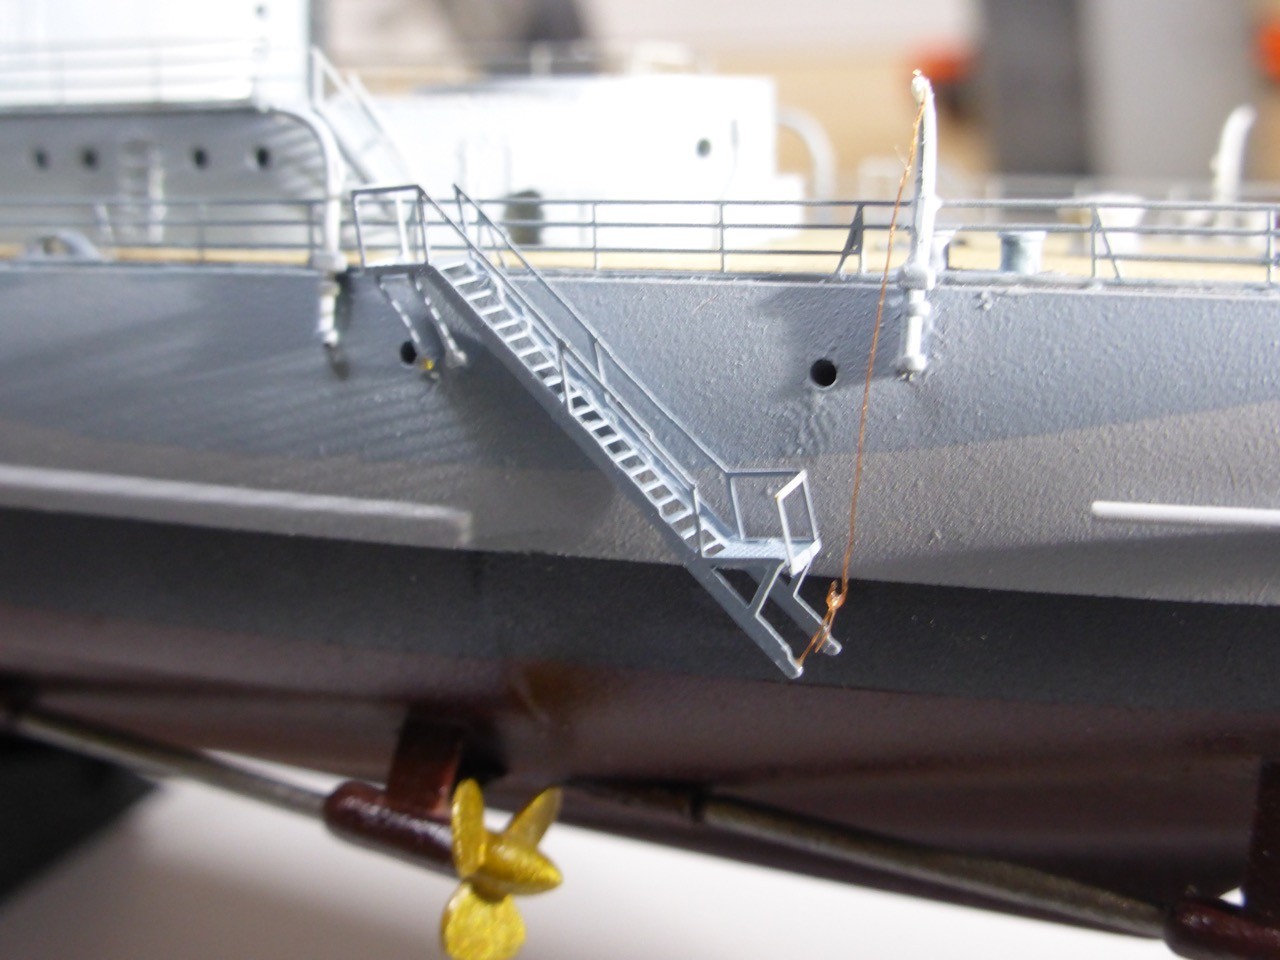


The first one has lots of slack that I wasn't really able to remove, the second one worked better. Still not perfect. Maybe it will settle over time (viscosity of copper  )
)
Here they are painted:
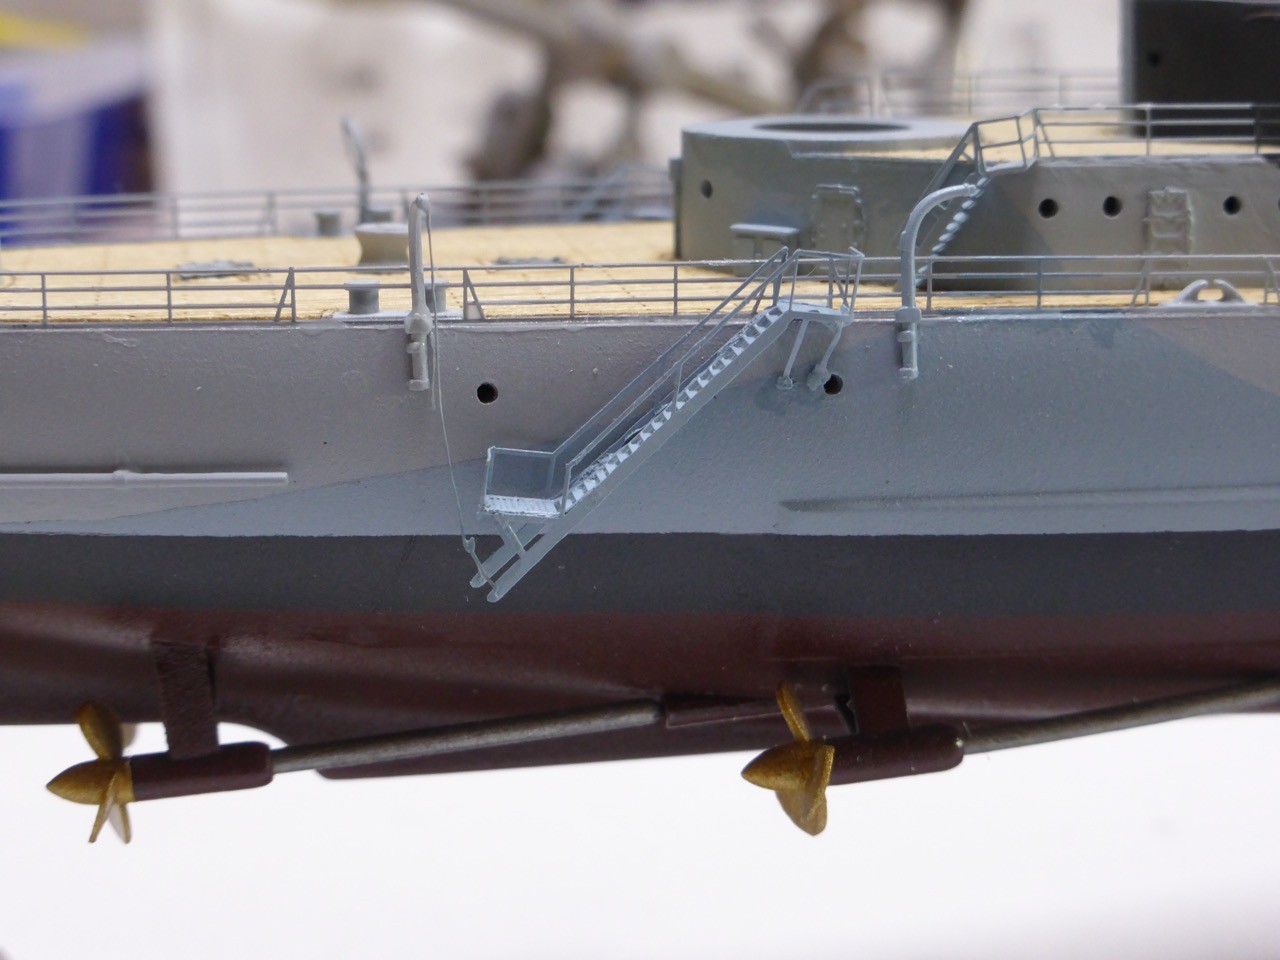
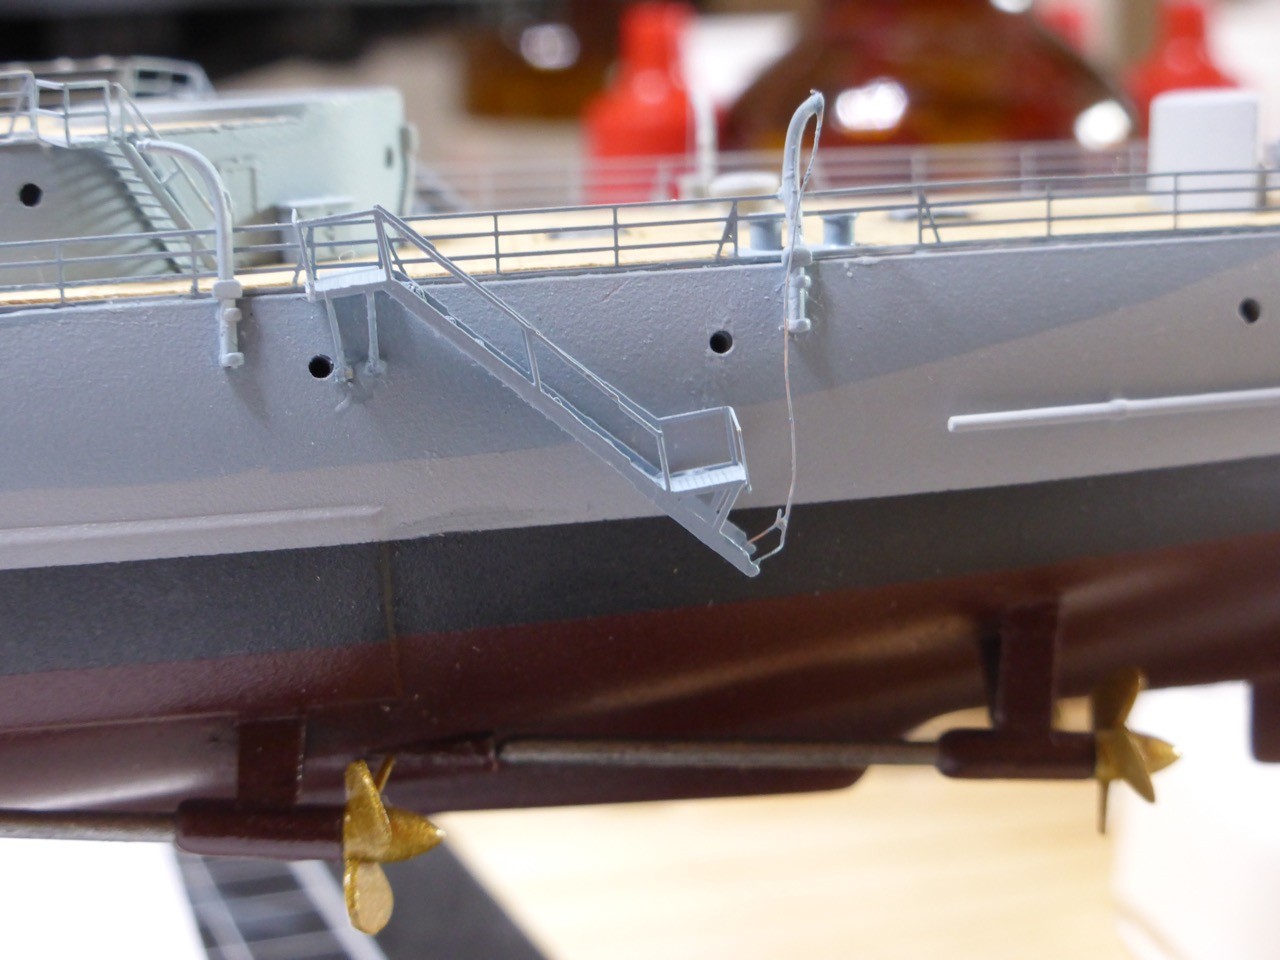
This copper wire is never really getting straight, it's always curling up. I don't know, maybe the type I am using is actually too thin?!? Or maybe I just need to get the 'feeling' for the material, after all, the second one was quicker and better than the first... (and, to the naked eye, the whole thing actually looks fine dam the macro lenses!!)
Next update - I plan for tomorrow - will deal with the turrets. Some more lessons learned here from the Masters' kit for Belfast. Actually, a really fine kit - highly recommended - but I would change my approach to it if I had a second chance. More later
For now,
Cheers
Jan
And YES - I might - just might - finish before 19 April
- that's if I don't break anything with my efforts to rig her Ok, I am going to split this once more, the turrets will come tomorrow. Here's the update on all the other stuff first.
Which actually makes it a rather short update for today, but that suits my time a little better anyway...
So, the last four inclined ladders installed, two shown
The Walrus in place - only way to fit it, after I glued the cranes down. Well, hands down, that was not the initial plan - I wanted to install it on the catapult, but only after glueing down the cranes I realized that it would not fit...oh well...
Then I installed the accommodation ladders, after they were painted.
Si - here's another go at the copper wire thing. I am still not sure whether we will become friends, copper wire and myself
I think for the acom ladders it's doing an all right job. I bent a V-shape structure to be attached to the lower part of the acom ladders, and a hook at one end of a longer wire to link up with the V-shape and be attached to the davit above.
The first one has lots of slack that I wasn't really able to remove, the second one worked better. Still not perfect. Maybe it will settle over time (viscosity of copper
)Here they are painted:
This copper wire is never really getting straight, it's always curling up. I don't know, maybe the type I am using is actually too thin?!? Or maybe I just need to get the 'feeling' for the material, after all, the second one was quicker and better than the first... (and, to the naked eye, the whole thing actually looks fine
dam the macro lenses!!) Next update - I plan for tomorrow - will deal with the turrets. Some more lessons learned here from the Masters' kit for Belfast. Actually, a really fine kit - highly recommended - but I would change my approach to it if I had a second chance. More later
For now,
Cheers
Jan
RedDuster
Joined: March 01, 2010
KitMaker: 7,078 posts
Model Shipwrights: 6,649 posts
Posted: Monday, April 11, 2016 - 12:28 AM UTC
Hi Jan,
Nice work, I can never get the copper wire completely straight, except for short lengths.
It could be a bit thin, but it looks like it should work, what are you using to roll the wire straight?
Cheers
Si
Nice work, I can never get the copper wire completely straight, except for short lengths.
It could be a bit thin, but it looks like it should work, what are you using to roll the wire straight?
Cheers
Si
RussellE
#306
Joined: June 27, 2010
KitMaker: 3,959 posts
Model Shipwrights: 2,777 posts
Posted: Monday, April 11, 2016 - 02:35 AM UTC
Hi Jan,
for the rigging, have you tried Ez Line?
It's an elastic product and very forgiving. Can be attached with a little accelerator applied to the model, and the Ezy Line dipped in CA then attached to the ship. And because it's elastic, you can tension it, thus ironing out the kinks.
The only catch is, it will bend plastic masts, so you need to replace them with brass rod.
JJ1973
#345
Joined: August 22, 2011
KitMaker: 1,835 posts
Model Shipwrights: 1,832 posts
Posted: Monday, April 11, 2016 - 09:46 AM UTC
Russ,
thank you very much mate!! Well, I worked with EZ line on Repulse and am very happy with it, however, I am a little frightened since those masts are quite fragile...
Si,
I do have some copper wire 0,1 mm strength, on a spool that already is 'quite' straight, in the way it has no kinks or buckles, and I used my cutting mat and a small glass bottle to roll it. Came out almost more curlier than straight from the spool... So I don't see me getting some 10 cm straight wire that I can attache somewhere...but I think I give it another try over the weekend
Thanks again for looking in and your support!!
Cheers,
Jan
JJ1973
#345
Joined: August 22, 2011
KitMaker: 1,835 posts
Model Shipwrights: 1,832 posts
Posted: Monday, April 11, 2016 - 10:36 PM UTC
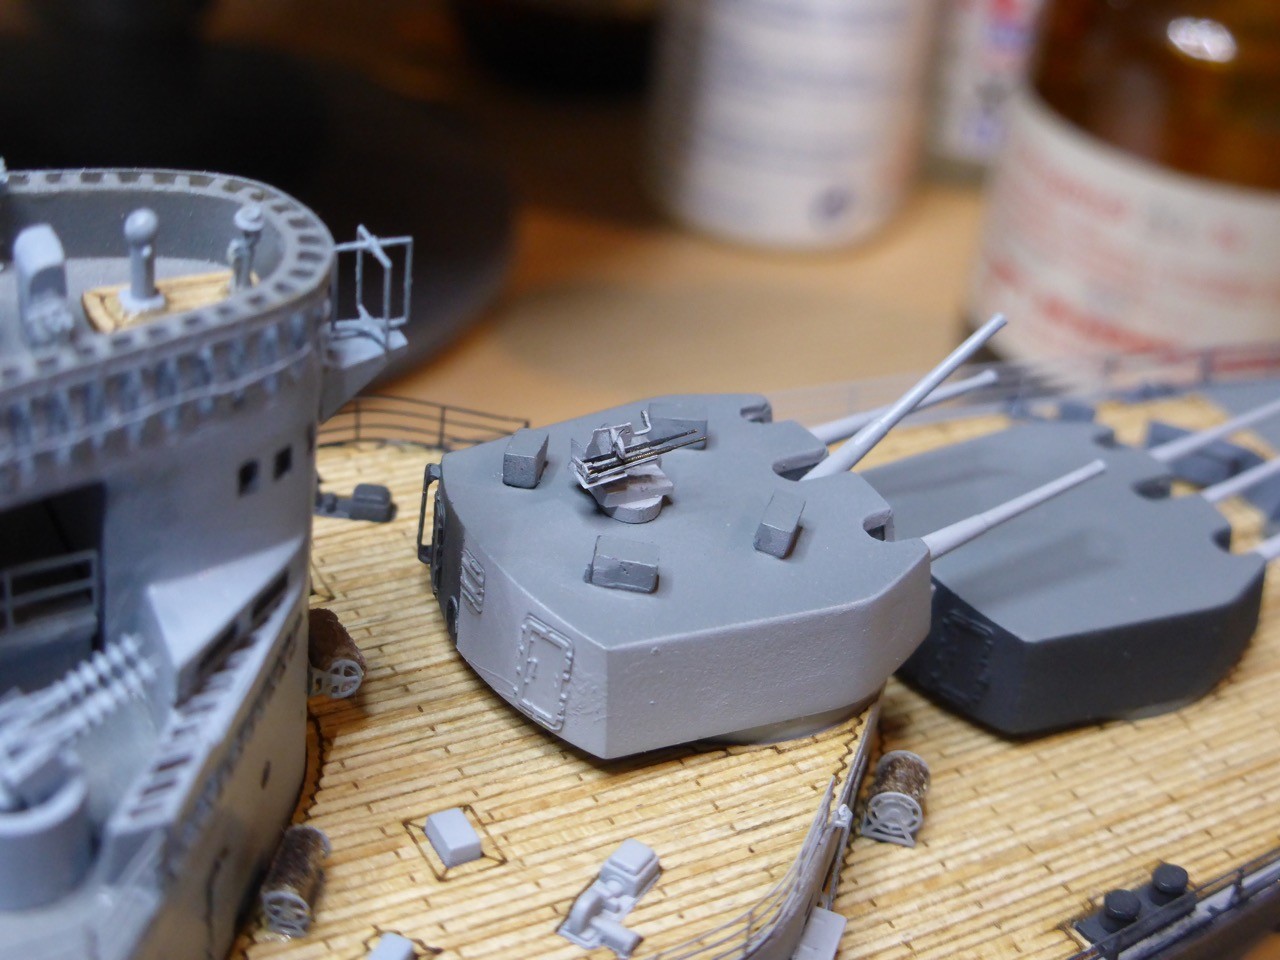
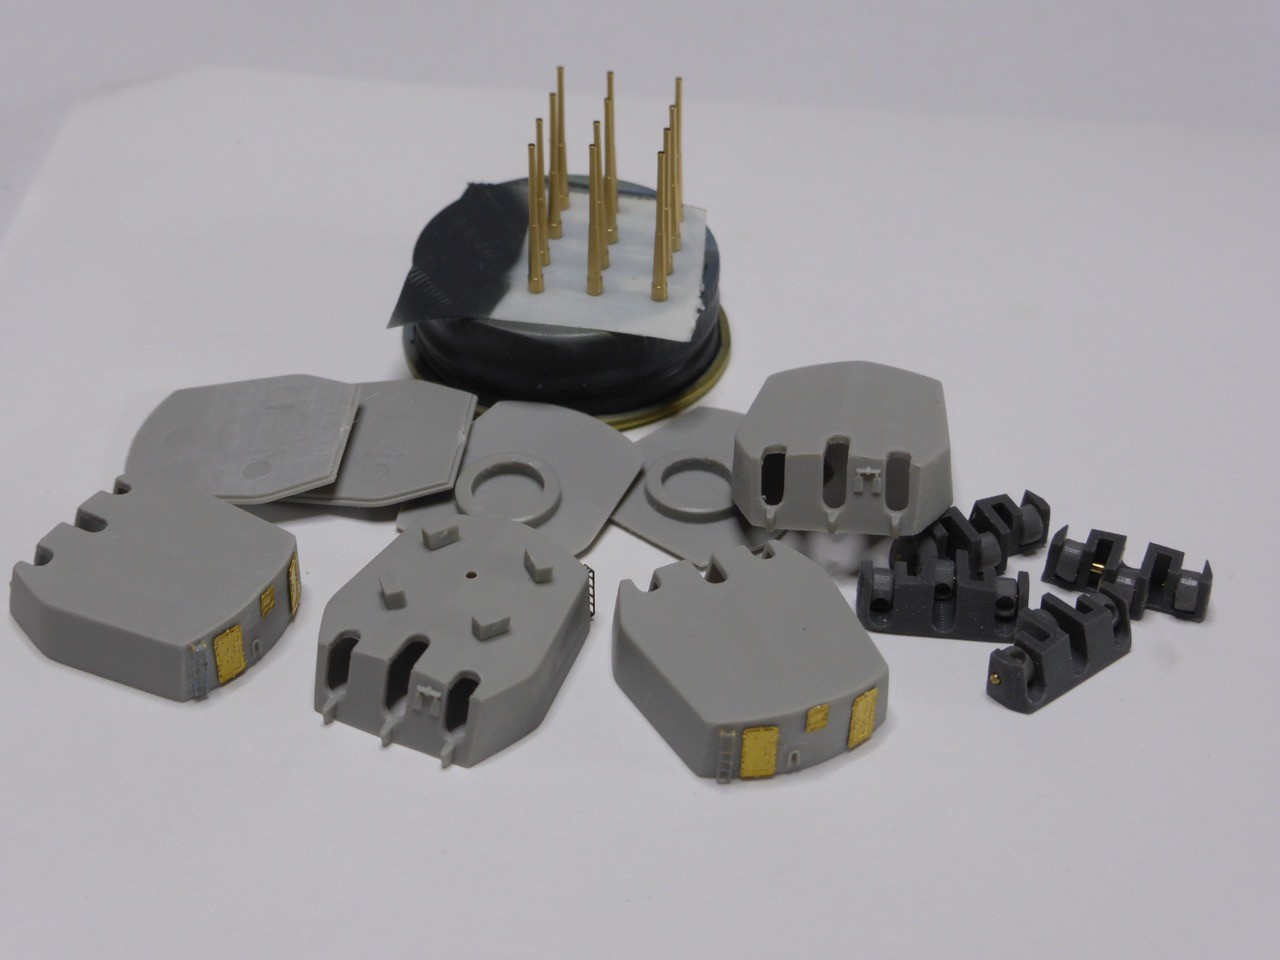
Finally - the main guns, twelve 6" guns in four turrets.
The kit's turrets were used, with all the doors, hatches and the ladder replaced by WEM PE, and the Master set for Belfast with the 12 brass barrels and - most important - the proper fix to the alignment of the guns.
The turret housings required quite some sanding, I would call them the worst molded pieces of the kit. The general shape and fit is good, but lots of flash...
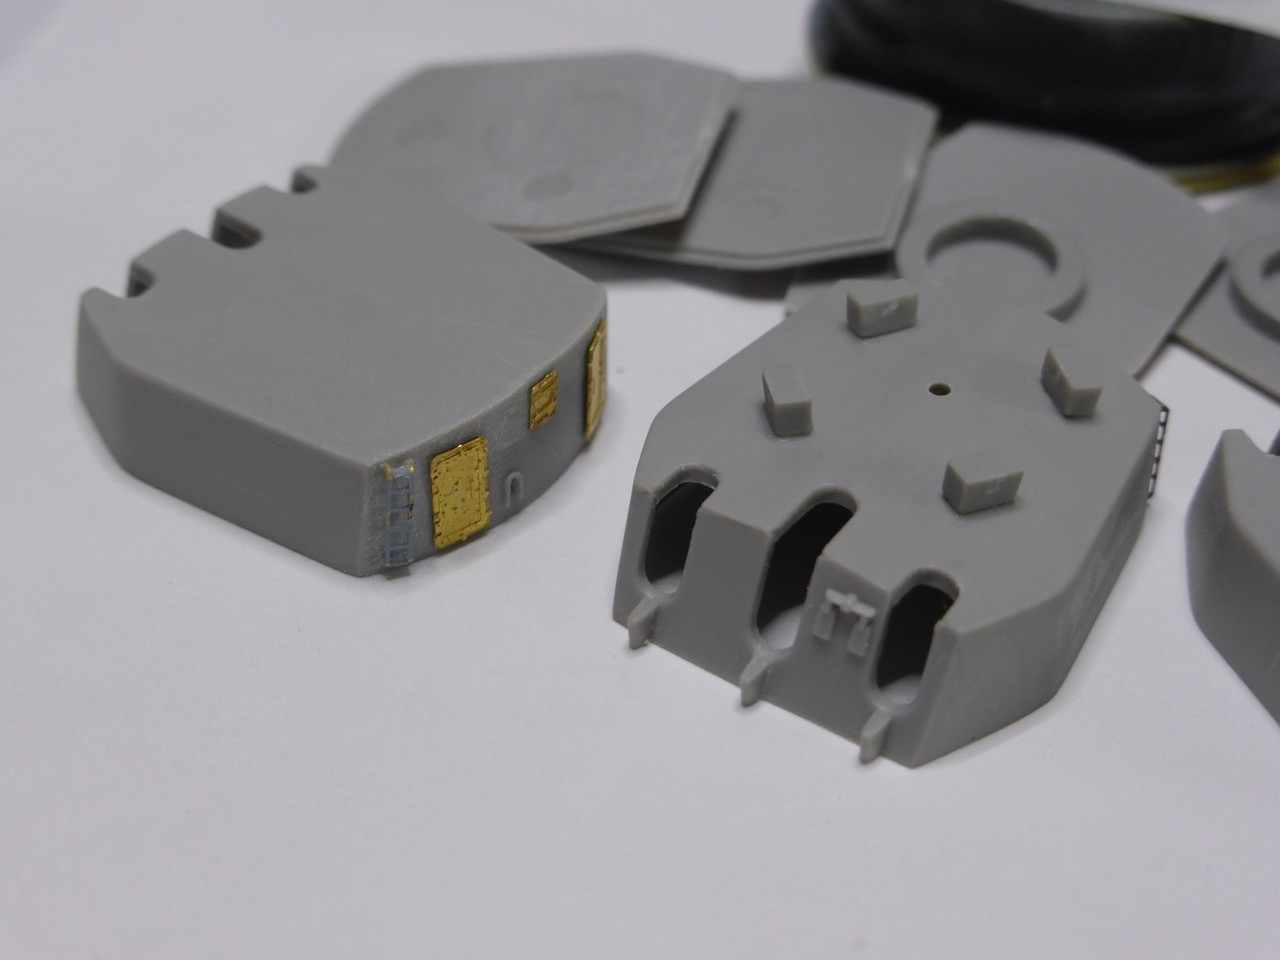
Here are all parts:
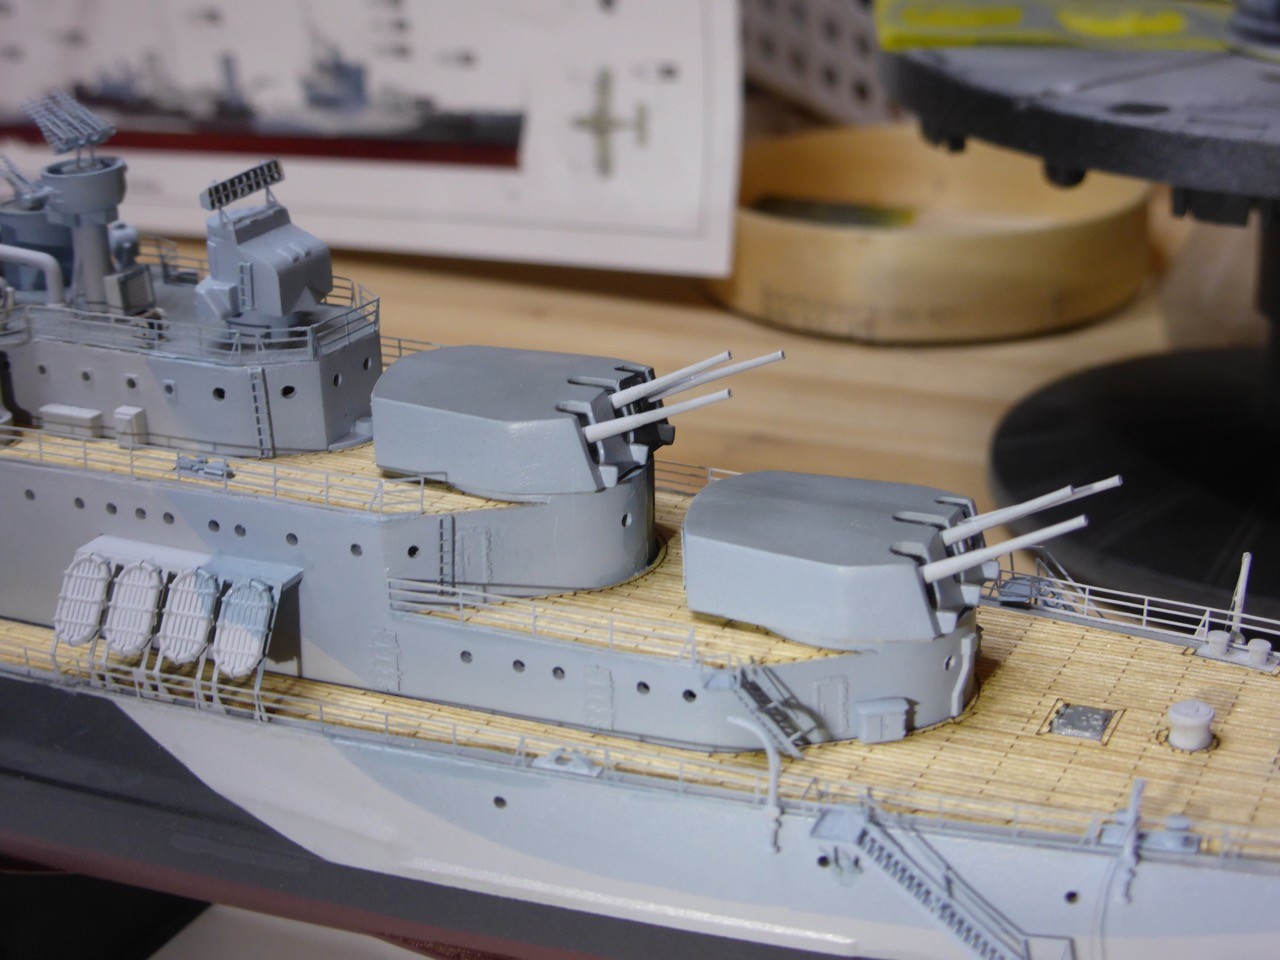
The kit's main guns have the - in my opinion - most significant flaw by just shortening the middle gun barrel, but putting them all on the same 'axis'. That works for zero elevation, but ONLY for zero elevation. At any other elevation, the middle barrel will stand out, it's breech is located farther inside the turret than those of the outer barrels.

The Master barrels are all the same length - as should be - but the breeches are located differently. To achieve this, the black piece was designed. Twelve rings are provided that hold the barrels and that can be attached to the black piece with pins, so you will easily achieve parallel and properly aligned barrels that can be elevated independently. Very nice!
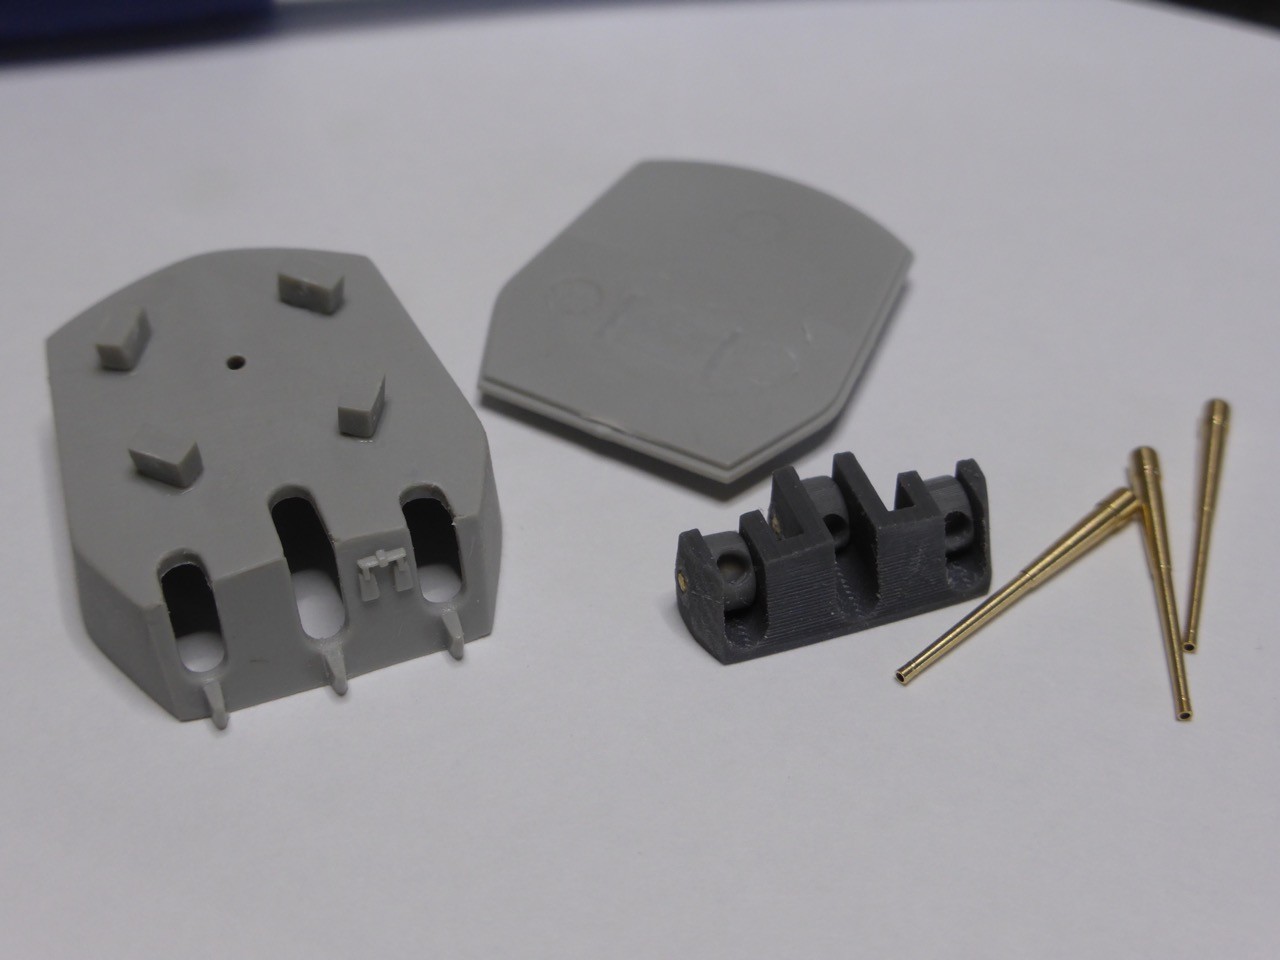

The instructions call to glue the 'breeches' to the base like this, after removing all the molded on parts on the base plate:

Luckily I tried just the opposite early on - the breeches fit into the housing very nicely, they are even supported by the molded parts inside the turret housing:
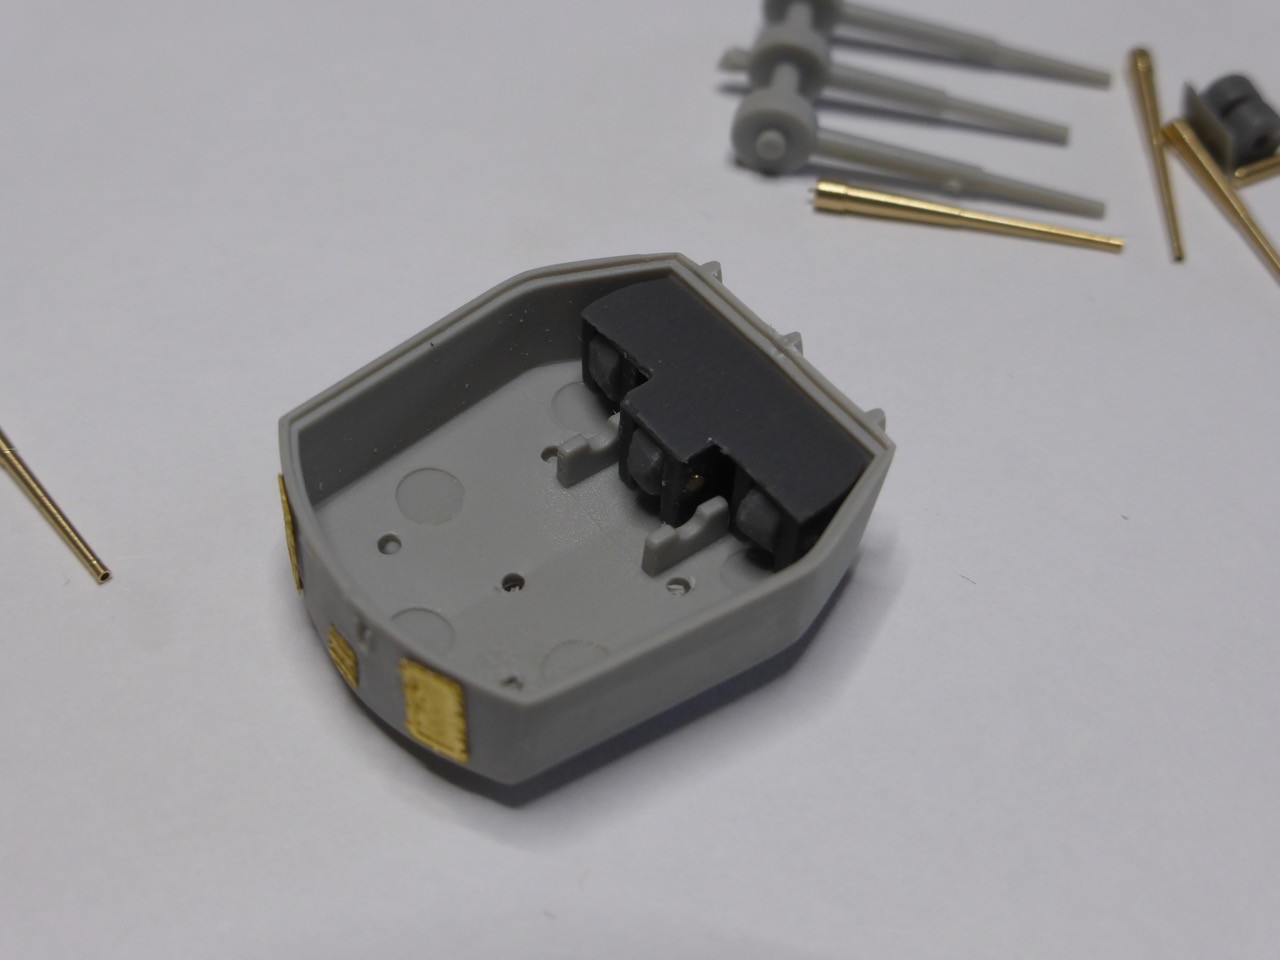
Some test-fitting:

Now I painted the parts as shown, the breeches already with those rings in place, that later would hold the barrels, the base plates, housing and the barrels.


This worked, but I would do it differently now! Here's the reason: the 'breech-parts' and the rings are almost certainly 3D-printed and the material is very refractory. I could not force the pins through the rings, I had to drill them open a little. The guns would fit tightly - without paint. After painting they were too thick. I had to force the gun barrels in, and it didn't really work. Good old engineering truth - if force doesn't do it - more force will. So I heard a sound that I thought was a reaffirming 'snap'. On closer inspection, it was the busting - or at least cracking - of the rings. Hm. Good thing though, the rings are sitting nicely inside this 'breech-part', and the super glue attached them to the guns, so nothing fell apart. But that certainly is not as designed. Now, things are somewhat semi-stable, it all looks ok, and you still can elevate all guns individually as desired, but I would not want to change that elevation all too frequently... Certainly better to attach the gun barrels to the rings, paint them altogether, and the fix the whole thing with the pins to the 'breech-part'.
So that was the longest part of the story, let's go on with pictures!
The Master arrangement as compared to the kit's part:

The whole production line:

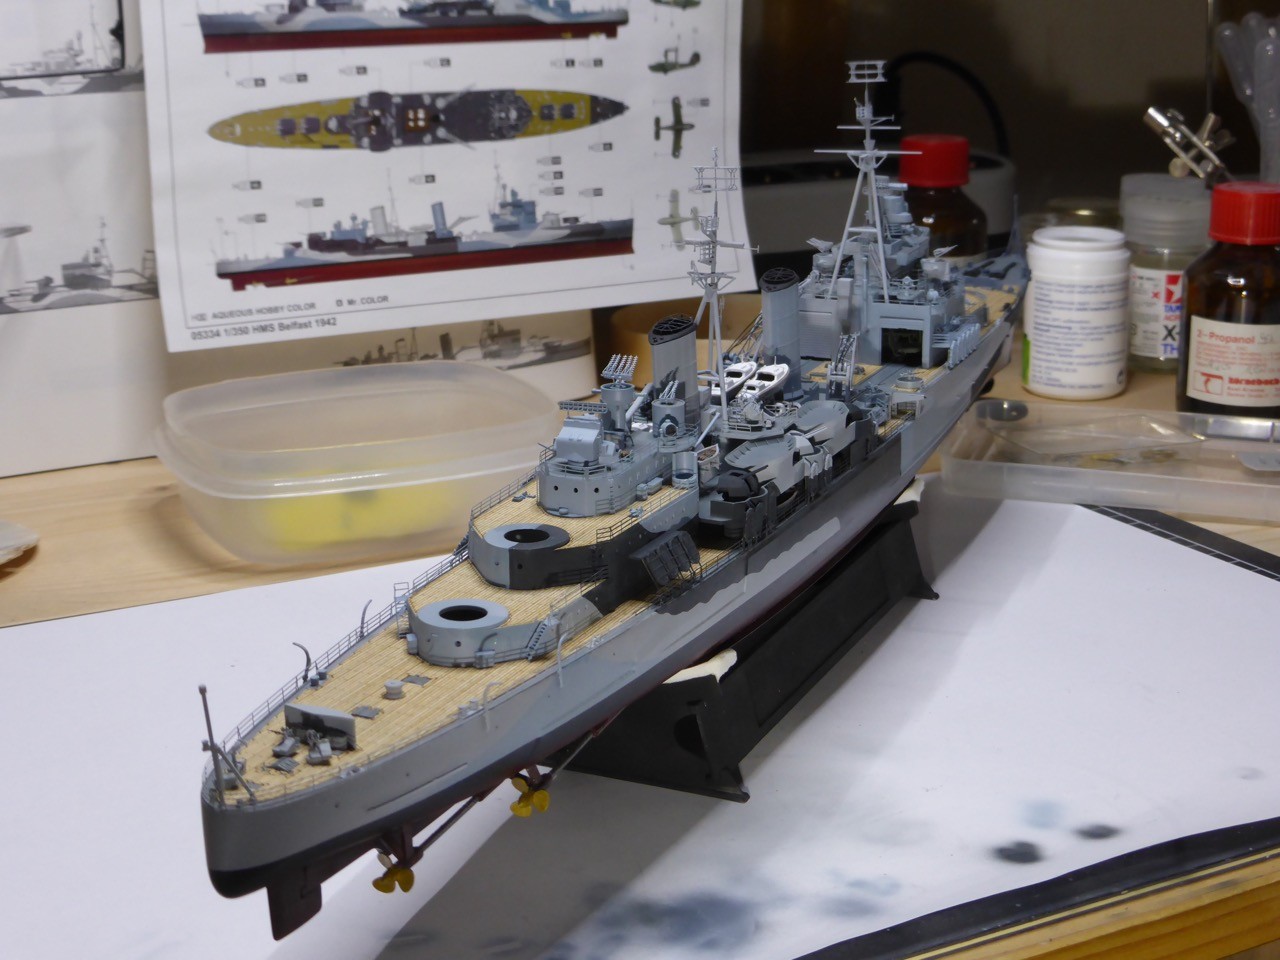
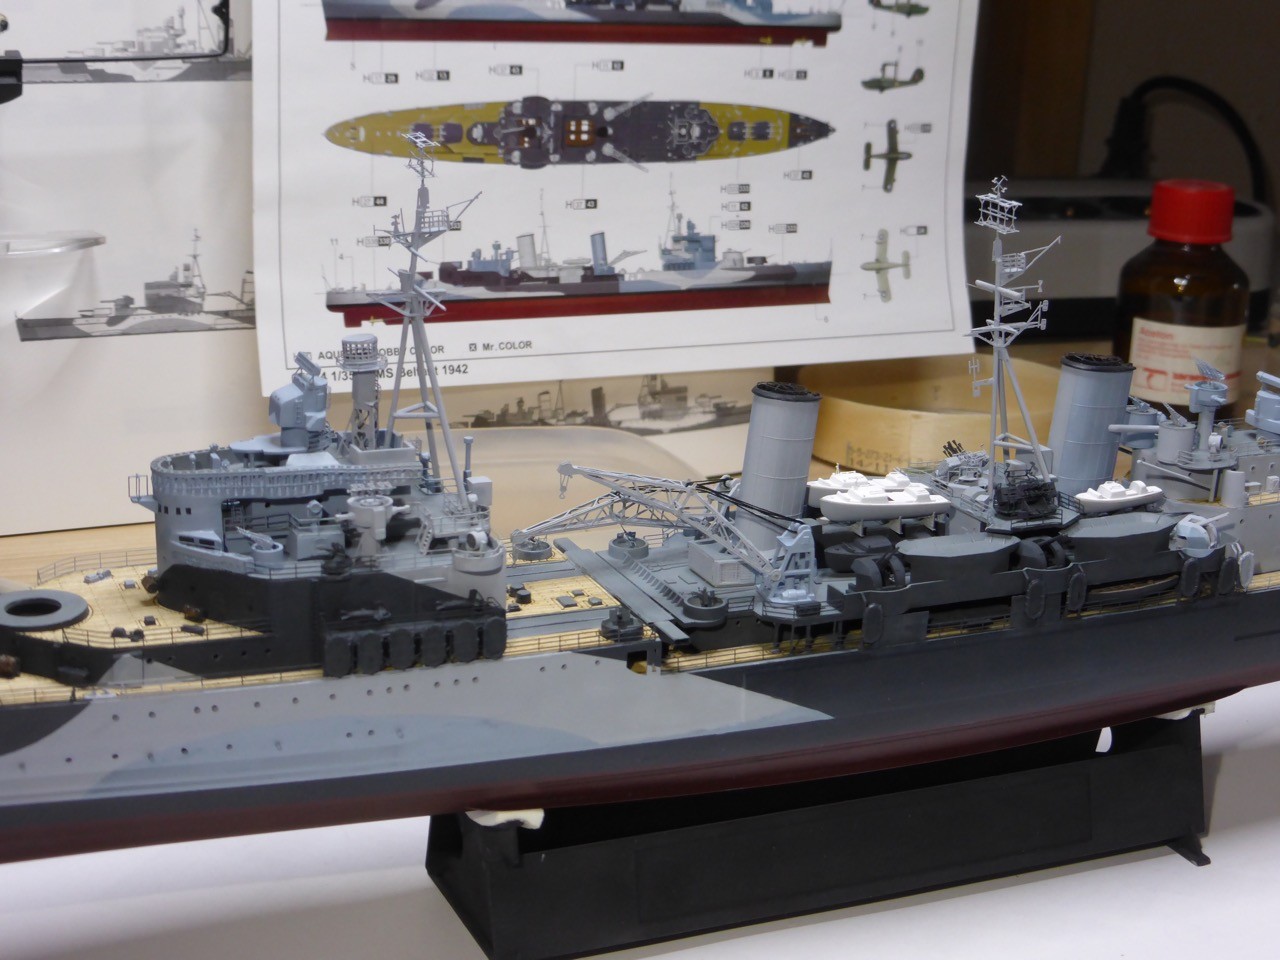
And then I realize that I have no picture of an sole assembled turret. So I leave you with a set of pictures of HMS Belfast with the main guns installed.


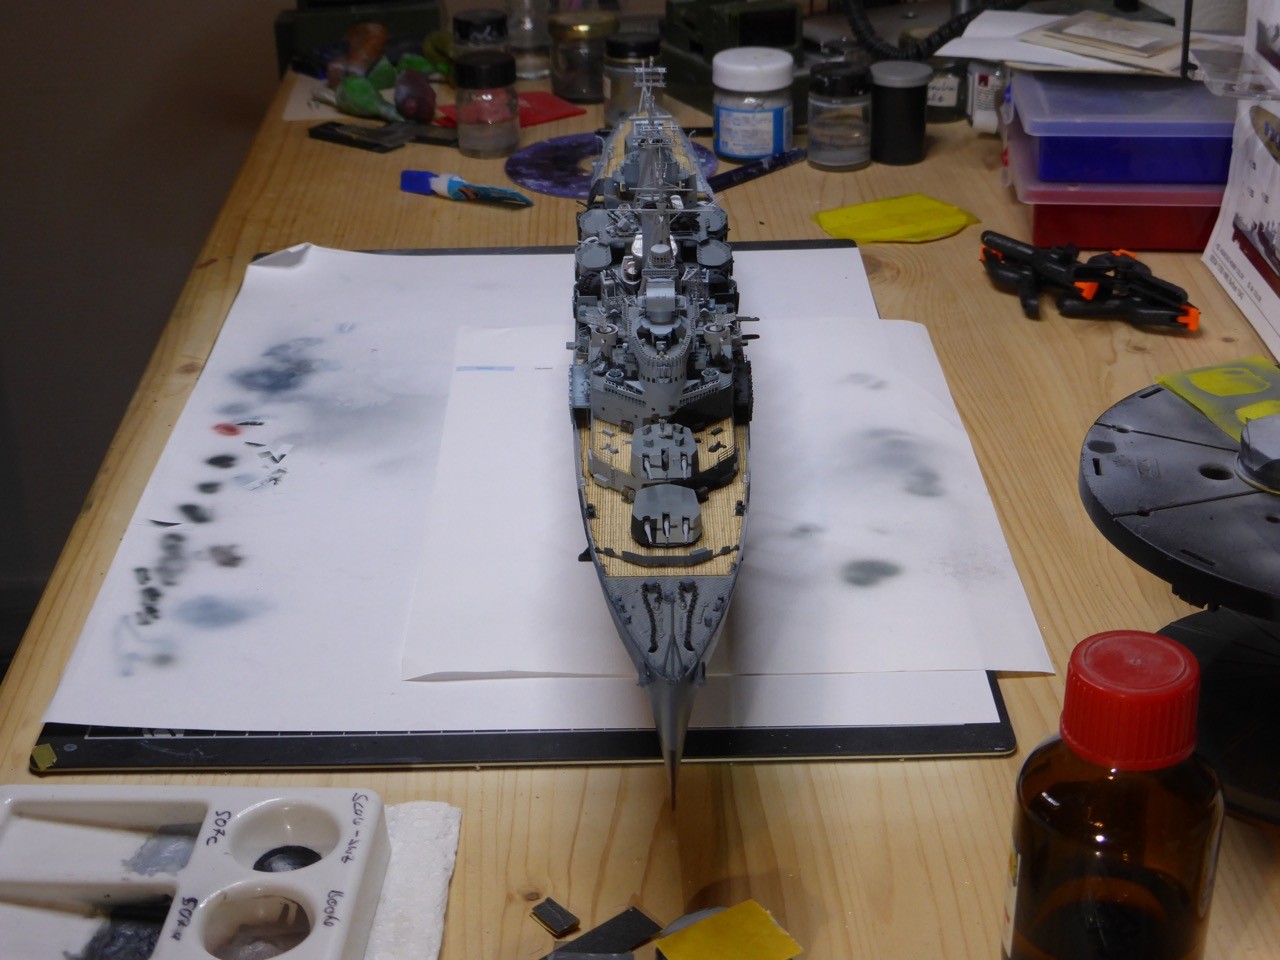


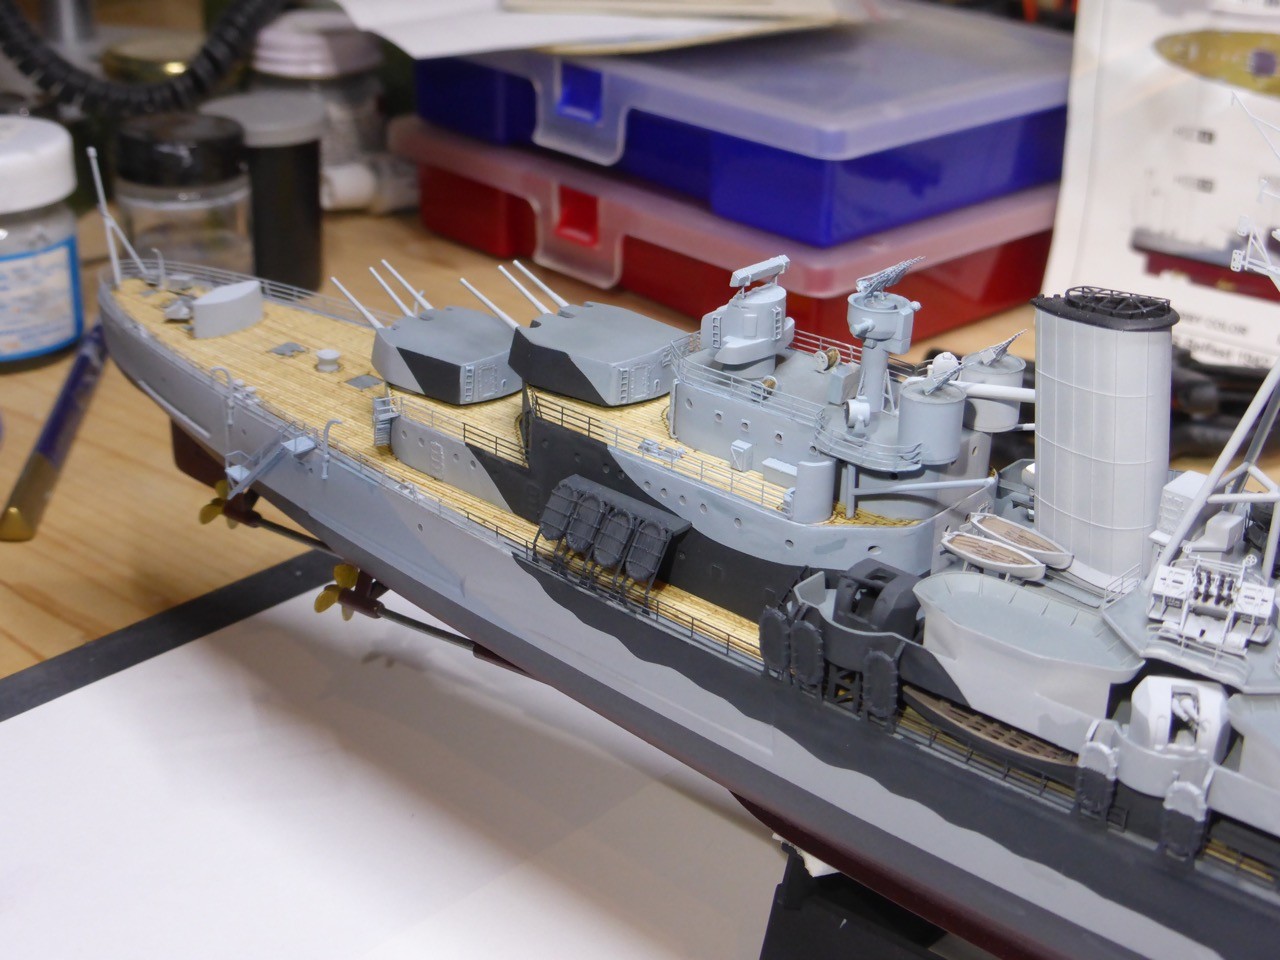


I am fairly happy with the elevation on the forward turrets, the middle barrel of 'B' looks quite distinctive. I am not so sure about 'X' and 'Y' - what would you say? I wanted to show the correct alignment of the breeches, so go away from zero elevation, but have 'X' and 'Y' at a slight, maybe 15°, I am not so sure... Any opinion on that?!?
All right! - no parts left. No plastic on the sprues that I am going to install, no PE on the frets that would be needed for this project. And I hope, with my final update here on HMS Belfast next weekend, I can show you a rigged ship with flying flags
Thank you all for looking an bearing with me for almost a year, and hopefully I can report 'commissioned' in a few days!!
For now,
Cheers
Jan
- ahhh, there's some signal...even without all antennas, but the radars pick something up. Could be a German Battleship, Scharnhorst class. Let's get ready with some illuminating shells!! Sorry Si! Doesn't look too good for you
The kit's turrets were used, with all the doors, hatches and the ladder replaced by WEM PE, and the Master set for Belfast with the 12 brass barrels and - most important - the proper fix to the alignment of the guns.
The turret housings required quite some sanding, I would call them the worst molded pieces of the kit. The general shape and fit is good, but lots of flash...
Here are all parts:
The kit's main guns have the - in my opinion - most significant flaw by just shortening the middle gun barrel, but putting them all on the same 'axis'. That works for zero elevation, but ONLY for zero elevation. At any other elevation, the middle barrel will stand out, it's breech is located farther inside the turret than those of the outer barrels.
The Master barrels are all the same length - as should be - but the breeches are located differently. To achieve this, the black piece was designed. Twelve rings are provided that hold the barrels and that can be attached to the black piece with pins, so you will easily achieve parallel and properly aligned barrels that can be elevated independently. Very nice!
The instructions call to glue the 'breeches' to the base like this, after removing all the molded on parts on the base plate:
Luckily I tried just the opposite early on - the breeches fit into the housing very nicely, they are even supported by the molded parts inside the turret housing:
Some test-fitting:
Now I painted the parts as shown, the breeches already with those rings in place, that later would hold the barrels, the base plates, housing and the barrels.
This worked, but I would do it differently now! Here's the reason: the 'breech-parts' and the rings are almost certainly 3D-printed and the material is very refractory. I could not force the pins through the rings, I had to drill them open a little. The guns would fit tightly - without paint. After painting they were too thick. I had to force the gun barrels in, and it didn't really work. Good old engineering truth - if force doesn't do it - more force will. So I heard a sound that I thought was a reaffirming 'snap'. On closer inspection, it was the busting - or at least cracking - of the rings. Hm. Good thing though, the rings are sitting nicely inside this 'breech-part', and the super glue attached them to the guns, so nothing fell apart. But that certainly is not as designed. Now, things are somewhat semi-stable, it all looks ok, and you still can elevate all guns individually as desired, but I would not want to change that elevation all too frequently... Certainly better to attach the gun barrels to the rings, paint them altogether, and the fix the whole thing with the pins to the 'breech-part'.
So that was the longest part of the story, let's go on with pictures!
The Master arrangement as compared to the kit's part:
The whole production line:
And then I realize that I have no picture of an sole assembled turret. So I leave you with a set of pictures of HMS Belfast with the main guns installed.
I am fairly happy with the elevation on the forward turrets, the middle barrel of 'B' looks quite distinctive. I am not so sure about 'X' and 'Y' - what would you say? I wanted to show the correct alignment of the breeches, so go away from zero elevation, but have 'X' and 'Y' at a slight, maybe 15°, I am not so sure... Any opinion on that?!?
All right! - no parts left. No plastic on the sprues that I am going to install, no PE on the frets that would be needed for this project. And I hope, with my final update here on HMS Belfast next weekend, I can show you a rigged ship with flying flags
Thank you all for looking an bearing with me for almost a year, and hopefully I can report 'commissioned' in a few days!!
For now,
Cheers
Jan
- ahhh, there's some signal...even without all antennas, but the radars pick something up. Could be a German Battleship, Scharnhorst class. Let's get ready with some illuminating shells!!
Sorry Si! Doesn't look too good for you RedDuster
Joined: March 01, 2010
KitMaker: 7,078 posts
Model Shipwrights: 6,649 posts
Posted: Tuesday, April 12, 2016 - 02:38 AM UTC
Hi Jan,
I will just have to fight to the last shell and go down with battle ensigns flying. (but only when Duke of York looms over the horizon)
The wire, could be the bottle that is making it curl, I roll mine under a steel ruler, a 30cm to get some longer lengths, and a 15cm for anything shorter than that.
The Main turrets look great, must get the master set for my Belfast.
Almost there mate.
Great job
Si
Great job on the
TRM5150
Joined: January 03, 2010
KitMaker: 2,159 posts
Model Shipwrights: 1,400 posts
Posted: Wednesday, April 13, 2016 - 07:32 AM UTC
She's a real beauty Jan!! Just such a clean build all around! Personally I dig the offset turrets and elevation...adds a bit of conversation to the piece! Looking forward to seeing you hit one of the German Big Girls soon!!
Personally I dig the offset turrets and elevation...adds a bit of conversation to the piece! Looking forward to seeing you hit one of the German Big Girls soon!! JJ1973
#345
Joined: August 22, 2011
KitMaker: 1,835 posts
Model Shipwrights: 1,832 posts
Posted: Wednesday, April 13, 2016 - 09:35 AM UTC
Thank you very much, Todd - should be there sometime soon, and should be in contact with DoY on TBS once the rigging is up...
Thank you very much Si - heard some chatter on TBS already
Ahhh yes...
Well, don't tell anybody, will you?!?  Once you have an idea in your head you sometimes can't get away from it... So a ruler and two different lengths, that made it 'click'. I was 90° off and rolling the wrong thing, have been rolling something hard and smooth on top of the wire along the length of the wire... Already got me an old steel ruler from my toolbox, will try it this afternoon. That indeed could make the difference
Cheers,
Jan
Thank you very much Si - heard some chatter on TBS already
Quoted Text
I roll mine under a steel ruler, a 30cm to get some longer lengths, and a 15cm for anything shorter than that.
Ahhh yes...
Well, don't tell anybody, will you?!?
Once you have an idea in your head you sometimes can't get away from it... So a ruler and two different lengths, that made it 'click'. I was 90° off and rolling the wrong thing, have been rolling something hard and smooth on top of the wire along the length of the wire... Already got me an old steel ruler from my toolbox, will try it this afternoon. That indeed could make the difference Cheers,
Jan
JJ1973
#345
Joined: August 22, 2011
KitMaker: 1,835 posts
Model Shipwrights: 1,832 posts
Posted: Wednesday, April 13, 2016 - 11:39 PM UTC
Well...ahhmmmm...
So, reading what Si was actually trying to say (vs. what I somehow wanted to understand ) I did a quick field test.
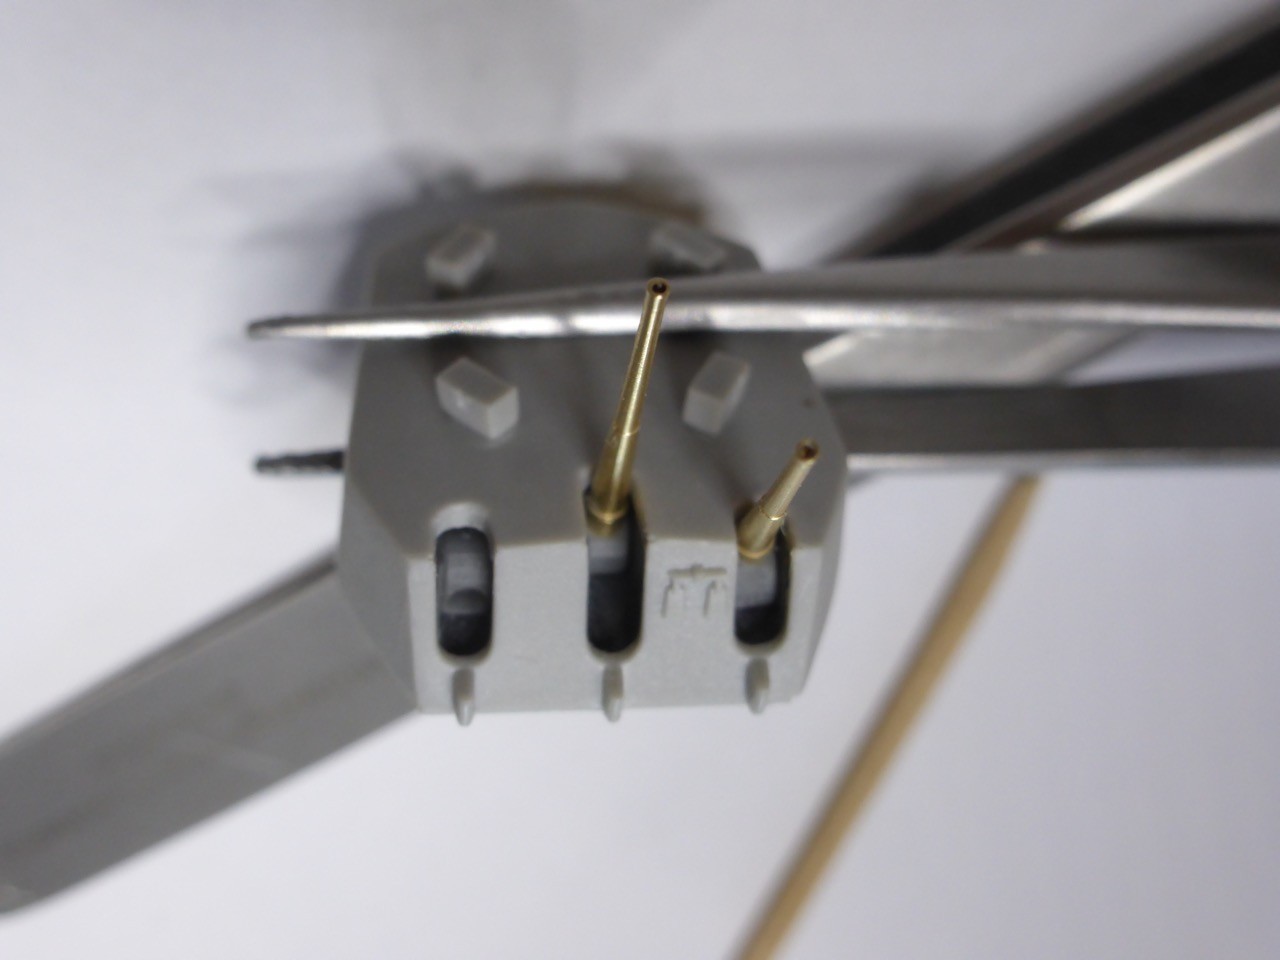
Rolling a piece of copper wire between a steel ruler and my board that I use to cut PE, I got a nice, straight piece of wire. I placed that on the yardarms of the fore- and mainmast, without any glue. Just testing:
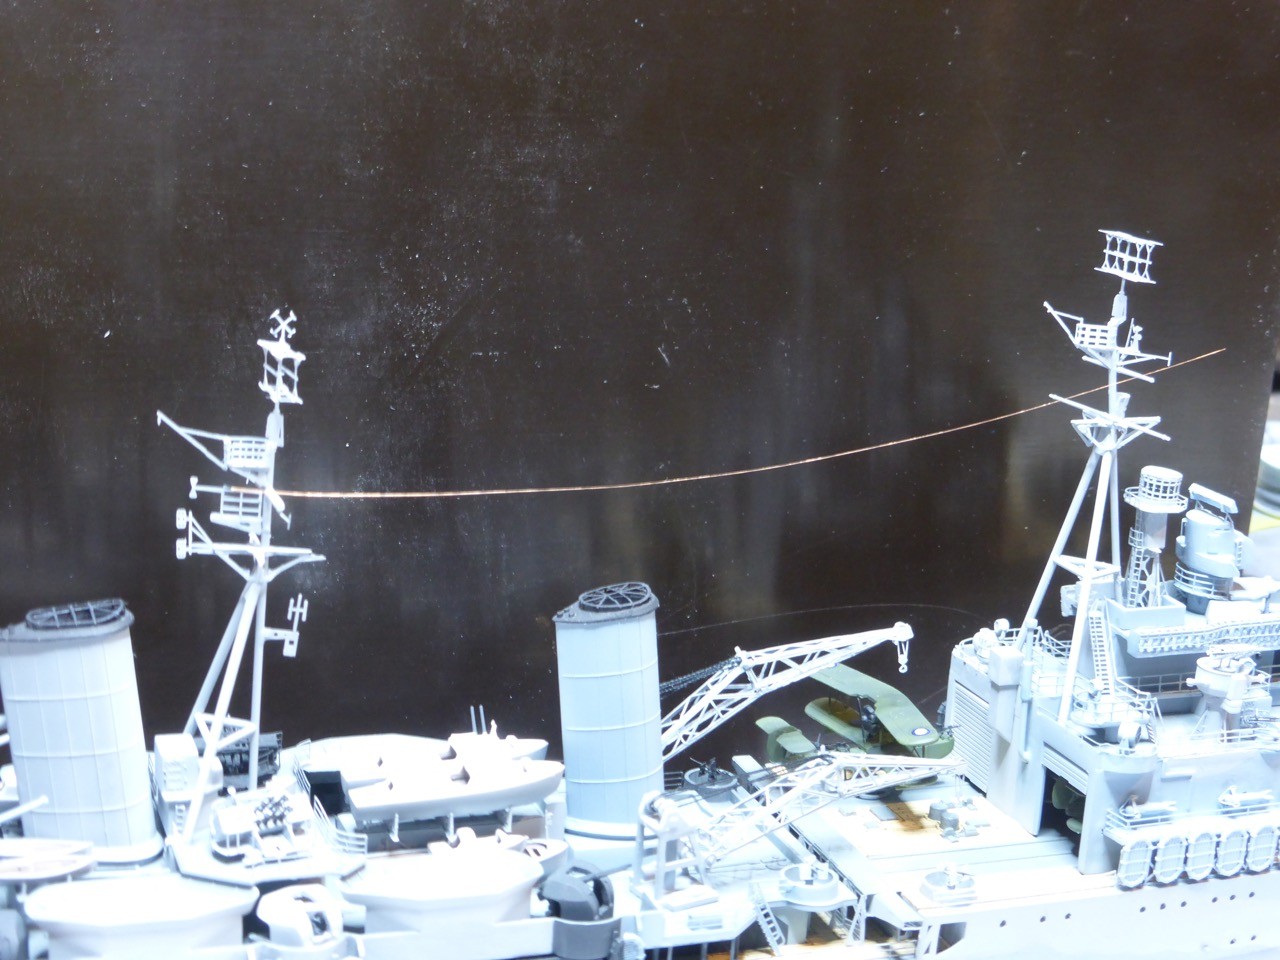
I think, NOW we're talking... That could actually work!!
I will see if it stands the test of real rigging business, but it certainly seems promising. Probably a mixture of EZ line and copper wire in the end...
Cheers,
Jan
So, reading what Si was actually trying to say (vs. what I somehow wanted to understand
) I did a quick field test.Rolling a piece of copper wire between a steel ruler and my board that I use to cut PE, I got a nice, straight piece of wire. I placed that on the yardarms of the fore- and mainmast, without any glue. Just testing:
I think, NOW we're talking... That could actually work!!
I will see if it stands the test of real rigging business, but it certainly seems promising. Probably a mixture of EZ line and copper wire in the end...
Cheers,
Jan

mgrummitt
Joined: January 07, 2014
KitMaker: 133 posts
Model Shipwrights: 105 posts

Posted: Thursday, April 14, 2016 - 01:20 AM UTC
Looking great Jan! I like the way the gun barrels from Master go on. Found a set for my Indianapolis with the same type of setup.
On a side note I also bought Master barrels for my USS. Missouri and thought I had read somewhere on this forum how to make a jig to fit the barrels right?
Can't wait to see the finished product!
Mike
On a side note I also bought Master barrels for my USS. Missouri and thought I had read somewhere on this forum how to make a jig to fit the barrels right?
Can't wait to see the finished product!
Mike
 |

WEB HOSTING BY


Copyright ©2021 Model Shipwrights and Kitmaker Network, a subsidiary of Silver Star Enterprises
All Rights Reserved. Please read our Conditions of Use and Privacy Policy.
All Rights Reserved. Please read our Conditions of Use and Privacy Policy.