

Go to modelshipwrights.com for the current dynamic site!


General Ship Modeling
Discuss modeling techniques, experiences, and ship modeling in general.
Discuss modeling techniques, experiences, and ship modeling in general.
Hosted by Jim Starkweather
Build blog for Heller's HMS Victory

Jylppy71

Joined: April 24, 2016
KitMaker: 23 posts
Model Shipwrights: 23 posts

Posted: Friday, May 13, 2016 - 01:46 AM UTC
Hi Tim. My e-mail adress is [email protected]
Jylppy71
Joined: April 24, 2016
KitMaker: 23 posts
Model Shipwrights: 23 posts
Posted: Friday, May 13, 2016 - 01:52 AM UTC
Sorry, but for some reason I can't upload photos? But if you use facebook you can see some photos there.
I have put a few ropes in place, but I'm not sure that they are long enough (or too long).
I am using a brown felt-tip marker to darken the thread too, that should do the trick
I have put a few ropes in place, but I'm not sure that they are long enough (or too long).
I am using a brown felt-tip marker to darken the thread too, that should do the trick
timmyp

Joined: May 18, 2008
KitMaker: 496 posts
Model Shipwrights: 404 posts

Posted: Saturday, May 14, 2016 - 05:00 AM UTC
Jyrki -I thought I had a copy of that spreadsheet here at home, but it turns out, it's only at work. So I should be able to send that spreadsheet to you early Tuesday morning (your time).
It sounds like you're finished with the actual assembly of your Victory and are ready to install the rigging - is that correct?
Today, I attached the stern gallery to the hull - it looks pretty good, but for the most part, there's very little contact with the actual hull itself, and there are gaps between the gallery and the hull. Fortunately, the side galleries will cover-up a lot of those gaps. Hopefully, I can post those pictures tomorrow, and add some editorial comments along the way.
Jylppy71
Joined: April 24, 2016
KitMaker: 23 posts
Model Shipwrights: 23 posts
Posted: Saturday, May 14, 2016 - 11:44 AM UTC
Hi. Actually I am painting pieces of maindeck. I wish I can install it today.
Only threds number A71-A72, A124-A125 and two other threads (I can't read their numbers) are right lenght because when maindeck is in place I can't correct them anymore.

Only threds number A71-A72, A124-A125 and two other threads (I can't read their numbers) are right lenght because when maindeck is in place I can't correct them anymore.
Jylppy71
Joined: April 24, 2016
KitMaker: 23 posts
Model Shipwrights: 23 posts
Posted: Saturday, May 14, 2016 - 09:19 PM UTC
timmyp
Joined: May 18, 2008
KitMaker: 496 posts
Model Shipwrights: 404 posts
Posted: Sunday, May 15, 2016 - 12:26 AM UTC
J,
When I look at the pictures of your model, I feel like I'm looking at my own model!! Our color schemes seem to match 100%! I'm curious, though, on the stern gallery, did you paint all the balustrades and the background all yellow? From the picture, it looks like that, instead of alternating yellow & black. I haven't assembled the long boat/dinghy yet, probably will do that some time in the future (like, about the time the instructions say to install them on the boat).
Keep up the good work!!!
Jylppy71
Joined: April 24, 2016
KitMaker: 23 posts
Model Shipwrights: 23 posts
Posted: Sunday, May 15, 2016 - 12:38 AM UTC
I've paint stern gallery with mixture 2 and everything else with yellow . Only top of balusters and gunports insides are black. And last three gunports on the stern are red.
And I agree that we have very similar colours in our ships.
And I agree that we have very similar colours in our ships.
timmyp
Joined: May 18, 2008
KitMaker: 496 posts
Model Shipwrights: 404 posts
Posted: Sunday, May 15, 2016 - 12:47 AM UTC
Quoted Text
Hi. Actually I am painting pieces of maindeck. I wish I can install it today.
Only threds number A71-A72, A124-A125 and two other threads (I can't read their numbers) are right lenght because when maindeck is in place I can't correct them anymore.
Good luck on installing the main deck. I think it took me maybe 20 minutes or so to figure out to pry it into place. No glue hold my deck in place; it's a pure "press fit".
With regards to the threads: A72 (200 mm length) and A71 (240 mm length, and goes on the left side of the boat). A72 starts inside the hull, goes outside of the hull, through a pulley (m26), then back through yet another pulley (installed in an earlier step), with the end ultimately getting attached to part 100, which is a bitt that is attached to the inside of the hull. But before the thread is tied off to part 100, you have to leave it loose outside of the hull, and then after installing part 100, you can lead it into the hull and towards the bitt.
the difference in length is because the yards are set at a 15 degree angle from the mast; hence, port (left) side threads should be a little longer than the starboard (right) side threads.
Going back to step 8 of the instructions, some of the other threads I found were:
A207/A206 - this threads through the rudder. I used a single thread 400 mm long for this thread.
A74/(A73) indicates that A74 is 160 mm and A73 is 120 mm.
I hope this helps. I used a magnifying glass to see some of those numbers. I didn't notice on your pictures, but you did get threads E50, E51, E52, E53, E54 and E55 installed before you glued the hull together, yes? I did not!! So I had to very carefully push the threads in from the outside, capture each thread with some tweezers, pull it up from the inside, tie a knot in the end, then pull the thread tight again from the outside.
You had a question about how long some of the threads should be - I usually take Heller's length, and add about 25 or 50 mm, so that I have enough to a knot in the end (a knot on both ends!)
Jylppy71
Joined: April 24, 2016
KitMaker: 23 posts
Model Shipwrights: 23 posts
Posted: Sunday, May 15, 2016 - 12:48 AM UTC
Actually good point, there must be black mouldings. Thanks, I'll correct that tomorrow
slug955

Joined: November 10, 2013
KitMaker: 195 posts
Model Shipwrights: 7 posts
Posted: Sunday, May 15, 2016 - 01:09 AM UTC
Tim, Your model is coming along nicely. I have had this kit in my stash for many years, and will do it one day. Heller have been a bit imaginative with some of their details, completely missing the hull side entry door for one! As a matter of interest the bulkheads of the small cabins were removable and cleared for action allowing the guns to be run out. When not in action the gun has kept fore and aft with the occupant slinging his hammock above the gun. With the gun run out as you have, you could rightly remove the bulkheads. Oh, and take Hellers painting instructions with a large pinch of salt! HTH.
timmyp
Joined: May 18, 2008
KitMaker: 496 posts
Model Shipwrights: 404 posts
Posted: Sunday, May 15, 2016 - 01:13 AM UTC
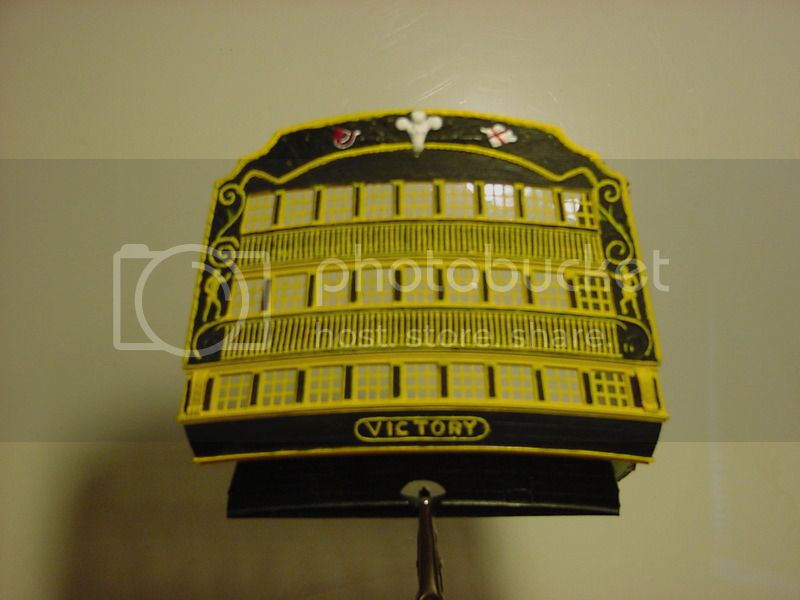
Hip hip hooray!! Finally finished (quit?) painting the stern & side galleries, and have installed the stern gallery in place (as well as the poop deck, and the last remaining rigging parts). So finally, I can move on to step 10! (Which involves more painting).
So here are some pictures; I hope I get the right URL from Photobucket (it's been a while since I did this!!):
This is a (relative) close-up of the stern gallery:
And here's a close-up of the "decoration" at the top of the gallery. This picture was taken through my magnifying lamp, and before I tried to paint some of the finer detail with some gold paint:

Here's the stern gallery & side galleries laid side-by-side:

Here's a side gallery taped to the stern gallery, just to give an idea of the size:

This is a view from the interior, after the window panes have been glued in place. A note to the wise: the long center panes that are glued to the stern gallery have very little wiggle-room, in the left-to-right direction. So it's imperative you do a test fit before gluing, so that you know where exactly to place the pane on its corresponding ledge. The same holds true for the side window panes on the stern. For the side galleries, the panes aren't bowed to match the gallery, so you actually have 2 attachment points - the left and right upright part of the window panes.

Here's the little piece I had to cut out of the stern gallery, so I could make it fit around the rudder post:

Here's a close-up of the detailing at the top of the stern gallery. Painting the gold band on the white thing wasn't too hard, but trying to paint the arrow shafts & stuff was close to impossible; so, it is, what it is.

Et voila! The stern gallery attached to the hull.

In the end, I didn't paint all the curly-cue filigree on the gallery; if I tried, I'd never finish this thing. I did the best I could painting the name on the gallery; in the end, I used a felt tip marker (a very fine marker!) to cover-up any slop from the yellow paint. And once again, Heller's molds need some work: the figure on the left of the gallery has his feet well defined in relief; the figure on the right, his leg/foot ends before it touches the ledge. So some liberties were taken in painting this piece.
Thanks for watching, and hopefully, the next update won't be so long in coming!!
So here are some pictures; I hope I get the right URL from Photobucket (it's been a while since I did this!!):
This is a (relative) close-up of the stern gallery:

And here's a close-up of the "decoration" at the top of the gallery. This picture was taken through my magnifying lamp, and before I tried to paint some of the finer detail with some gold paint:

Here's the stern gallery & side galleries laid side-by-side:

Here's a side gallery taped to the stern gallery, just to give an idea of the size:

This is a view from the interior, after the window panes have been glued in place. A note to the wise: the long center panes that are glued to the stern gallery have very little wiggle-room, in the left-to-right direction. So it's imperative you do a test fit before gluing, so that you know where exactly to place the pane on its corresponding ledge. The same holds true for the side window panes on the stern. For the side galleries, the panes aren't bowed to match the gallery, so you actually have 2 attachment points - the left and right upright part of the window panes.

Here's the little piece I had to cut out of the stern gallery, so I could make it fit around the rudder post:

Here's a close-up of the detailing at the top of the stern gallery. Painting the gold band on the white thing wasn't too hard, but trying to paint the arrow shafts & stuff was close to impossible; so, it is, what it is.

Et voila! The stern gallery attached to the hull.

In the end, I didn't paint all the curly-cue filigree on the gallery; if I tried, I'd never finish this thing. I did the best I could painting the name on the gallery; in the end, I used a felt tip marker (a very fine marker!) to cover-up any slop from the yellow paint. And once again, Heller's molds need some work: the figure on the left of the gallery has his feet well defined in relief; the figure on the right, his leg/foot ends before it touches the ledge. So some liberties were taken in painting this piece.
Thanks for watching, and hopefully, the next update won't be so long in coming!!
timmyp
Joined: May 18, 2008
KitMaker: 496 posts
Model Shipwrights: 404 posts
Posted: Sunday, May 15, 2016 - 01:21 AM UTC
Hi Dave,
Thank you for your kind words. Given how long it's taken me to get this far on the kit, I'd suggest that "one day" be a lot sooner!
You're right about Heller - they certainly missed those side entry doors. I think the best advice here, is not just to take their painting instructions with a pinch of salt, but take Heller as a whole with a pinch of salt!
Jylppy71
Joined: April 24, 2016
KitMaker: 23 posts
Model Shipwrights: 23 posts
Posted: Sunday, May 15, 2016 - 01:23 AM UTC
Nice work!! 
Jylppy71
Joined: April 24, 2016
KitMaker: 23 posts
Model Shipwrights: 23 posts
Posted: Sunday, May 15, 2016 - 01:33 AM UTC
"I didn't notice on your pictures, but you did get threads E50, E51, E52, E53, E54 and E55 installed before you glued the hull together, yes?"
Yes I did, but there wasen't holes for those threads. SO I had drill those holes and I havent dimensions (clearly) for holes. So compare images an using my imagination I drilled those holes. Hopefully I got even close..
Yes I did, but there wasen't holes for those threads. SO I had drill those holes and I havent dimensions (clearly) for holes. So compare images an using my imagination I drilled those holes. Hopefully I got even close..

RussellE

#306

Joined: June 27, 2010
KitMaker: 3,959 posts
Model Shipwrights: 2,777 posts

Posted: Sunday, May 15, 2016 - 03:28 AM UTC
Beautiful work Tim
always fascinated by these superb sailing ships
always fascinated by these superb sailing ships


JJ1973
#345

Joined: August 22, 2011
KitMaker: 1,835 posts
Model Shipwrights: 1,832 posts
Posted: Sunday, May 15, 2016 - 10:12 PM UTC
Beautiful, absolutely beautiful!!
You can tell that this was a huge effort, but it pays!! That's really standing out!!
Looking forward to your next update!
Cheers,
Jan
You can tell that this was a huge effort, but it pays!! That's really standing out!!
Looking forward to your next update!
Cheers,
Jan
Jylppy71
Joined: April 24, 2016
KitMaker: 23 posts
Model Shipwrights: 23 posts
Posted: Sunday, May 15, 2016 - 10:26 PM UTC
"With regards to the threads: A72 (200 mm length) and A71 (240 mm length, and goes on the left side of the boat). A72 starts inside the hull, goes outside of the hull, through a pulley (m26), then back through yet another pulley (installed in an earlier step), with the end ultimately getting attached to part 100, which is a bitt that is attached to the inside of the hull. But before the thread is tied off to part 100, you have to leave it loose outside of the hull, and then after installing part 100, you can lead it into the hull and towards the bitt."
My instructions says: A72 starts at the hull following the arrow, goes trough the pulley block m26 which must be 200mm from the starting point, comes back to pulley bolck m24..
So I understand this so that A72 must be at least 400mm long and A71 are 500mm long
My instructions says: A72 starts at the hull following the arrow, goes trough the pulley block m26 which must be 200mm from the starting point, comes back to pulley bolck m24..
So I understand this so that A72 must be at least 400mm long and A71 are 500mm long
timmyp
Joined: May 18, 2008
KitMaker: 496 posts
Model Shipwrights: 404 posts
Posted: Monday, May 16, 2016 - 03:40 AM UTC
Hi Jyrki,
With regards to threads E50 - E55 (and most other threads), I use a #62 drill bit to drill-out any rigging holes I find. I was using the tip of my X-acto knife, but it tends to make the hole too big.
Sometimes, the hole isn't open all the way through the hull - it's open on the inside of the hull, and one needs to drill it out from the inside to the outside. Or maybe the hole is visible on the outside of the hull, and you need to drill it open into the inside hull. There's a good number of holes in the hull for rigging lines, so keep watch on this.
With regards to threads A71, etc: hmmmm, you might be right!! And maybe that's why my pulley blocks seem awfully close to the hull! Heller's directions aren't always clear, and I sometimes get in a hurry and skip over vital instructions!!
If those pullies need to be 200 mm or so from the hull, I can go back and fix it - just cut the current thread, add some length to it, and the problem is fixed!! I'll either use some clear nail polish to "splice"the thread, or some white glue (some white glue thinned with water).
In other news, I glued the side galleries to the hull today - no pictures yet, but keep watching!
timmyp
Joined: May 18, 2008
KitMaker: 496 posts
Model Shipwrights: 404 posts
Posted: Saturday, May 21, 2016 - 06:39 AM UTC
Hello from soggy northern Virginia!
Well, just when I thought it was safe to put the paint brushes away, along comes some more of that insane detail painting on the port and starboard galleries. To wit, there are a couple of small parts that finish up the galleries on the bottom, and while small parts, still had some detailed painting. Here's a pic of the port part attached to the gallery (it's the very bottom piece)...and this is a view from the port stern

And here is a shot from the starboard side:

And here's a couple of pictures from the stern, showing how things (don't really) fit together:


So here again is a pic of the port gallery. The thing is, I though these galleries would fit all the way to match the height of the railing; they fell short by about a quarter of an inch, so this pic just shows that I painted the hull from the top of the gallery to the rail black; previously, it was colored the M1 (or M2? whatever the white/green mixture is, and was used to paint the cabin interiors).

This picture illustrates a bit of conundrum: what color to paint the area of part 351 (the stern gallery) that overhang past the hull, but is not covered by the port gallery? I'm thinking of painting it black, up to the hull, just to match the hull & gallery top. I think, too, I'll check Lockridge's book, to see if there are any reference photos, as well as another reference book, that has a few photos in it. The area that is between the hull will be painted yellow, to match the hull color that is on the inside of the hull.

This picture shows what I will paint yellow, to match the inside of the hull. However, there are several parts that are glued onto the deck, and onto the stern gallery. The question for me is, where do I not paint the gallery, so that those other parts can be glued against the gallery?

And the answer can be seen in this picture. Using my table lamp to illuminate the gallery, you can see some engravings on the gallery. The brown box that is in place, covers some of the engraving, which is there to help place those parts (I think they're parts 144 - 147). Things will be a tight fit, but the box (I think it's a signal flag box) and parts 144 - 147 are all painted yellow, so I don't have to worry about splashing yellow paint on things that shouldn't be splashed with yellow paint!

This picture is just a close-up of the signal flag box. The 3 holes in the deck are for some rings that are to be attached. I decided to hold off on putting those rings in, as I felt it would be better to paint the stern gallery before the rings get attached. There are 3 rings on the starboard side, too. (So that accounts for 6 of the 15 rings that are attached in this step).

And here's a pic of 7 other rings that have been attached. From the instructions, it's pretty hard to tell exactly where the rings go, but by looking at the holes in the deck, and looking at the instructions, you get a good idea of where they should go.

So tomorrow calls for a good chance of rain, so I'll have another day to play around. Hopefully I can do some post again tomorrow or Monday.
As always, thanks for watching, and stay tuned for more!
Jylppy71
Joined: April 24, 2016
KitMaker: 23 posts
Model Shipwrights: 23 posts
Posted: Saturday, May 21, 2016 - 05:27 PM UTC
And once again, nice job
JJ1973
#345
Joined: August 22, 2011
KitMaker: 1,835 posts
Model Shipwrights: 1,832 posts
Posted: Saturday, May 21, 2016 - 10:05 PM UTC
That's some very nice and impressive painting!! It's a shame that the parts aren't really fitting, I hope you are finding some smart solutions to overcome those issues - it a really impressive build so far!!
Cheers,
Jan
It's a shame that the parts aren't really fitting, I hope you are finding some smart solutions to overcome those issues - it a really impressive build so far!!Cheers,
Jan
timmyp
Joined: May 18, 2008
KitMaker: 496 posts
Model Shipwrights: 404 posts
Posted: Saturday, May 21, 2016 - 11:38 PM UTC
Thanks, Jan. I never really expected the parts to fit perfectly together. I had entertained thoughts of filling all the gaps with putty, but given the time & effort & re-painting that would require, I'm just going with what it is. Besides, the gaps and such aren't that big, nothing that would be noticed at first blush. Of course, the real skill is in finding ways to cover all those gaps without working at it!!
timmyp
Joined: May 18, 2008
KitMaker: 496 posts
Model Shipwrights: 404 posts
Posted: Saturday, May 21, 2016 - 11:42 PM UTC
Thanks, Jyrki. How's everything coming along on your build? I'm guessing you got that spreadsheet - I didn't hear one way or another from you.
I re-read the instructions about those threads you were asking about - yep, the instructions certainly say to have one of those blocks 200 mm from the hull. But you know, I went and looked at some pictures of the Victory, and I see that there is a big block that is pulled in close to the hull. I figure if the block isn't really where it's supposed to be, I'll just make the threads that go through it a bit longer.
Tim
timmyp
Joined: May 18, 2008
KitMaker: 496 posts
Model Shipwrights: 404 posts
Posted: Saturday, May 21, 2016 - 11:47 PM UTC
A little correction: it isn't Lockridge's book I have, it's Longridge (C. Nepean Longridge, to be exact). Plus, I looked in John McKay's book, and from the B&W photo, it looks like the stern gallery, isn't covered by the side gallery, is painted yellow (hard to tell, what with many objects in the way). So yellow it is; earlier today, I affixed the last of the rings to the deck, and scraped away some of the existing M2 mixture paint that was on the stern gallery. I'm thinking of painting the front of the signal flag boxes more of a sand/khaki color, as in McKay's book, there's a photo showing the signal boxes "open", that is, the canvas flap that covers them is rolled up. Maybe that's why there's an engraved line on the bottom of the box in the kit - to denote actual box, and what might be the flap.
Jylppy71
Joined: April 24, 2016
KitMaker: 23 posts
Model Shipwrights: 23 posts
Posted: Sunday, May 22, 2016 - 07:48 PM UTC
Hi Tim
I did got that spreadsheet, thanks a lot. I did answer to your e-mail, perhaps it didn't got trough.
Anyway, I'm trying to put the main deck to it's place, but it's little bit too wide and long so I have to hone it. Then, I got to glue it other vise there will be gap between deck and hull.
And could you please tell me, threads no.A71 and A72, there are two more pulley blocks one on starboard side and one on port side(m24) so there must be two more threads? So where they start and end, and they lenght of course. I don't have clear image of that part.
I found clearer pictures from Picasa. Only language is Japanese, how else it could be!! But fortunately you can understand the numbers
Here is link for those images, I hope its helpful to you too
https://picasaweb.google.com/raspper/ImaiVictoryInstructions?authkey=Gv1sRgCNza1qyEl_uY_gE
J
I did got that spreadsheet, thanks a lot. I did answer to your e-mail, perhaps it didn't got trough.
Anyway, I'm trying to put the main deck to it's place, but it's little bit too wide and long so I have to hone it. Then, I got to glue it other vise there will be gap between deck and hull.
And could you please tell me, threads no.A71 and A72, there are two more pulley blocks one on starboard side and one on port side(m24) so there must be two more threads? So where they start and end, and they lenght of course. I don't have clear image of that part.
I found clearer pictures from Picasa. Only language is Japanese, how else it could be!!
But fortunately you can understand the numbers Here is link for those images, I hope its helpful to you too
https://picasaweb.google.com/raspper/ImaiVictoryInstructions?authkey=Gv1sRgCNza1qyEl_uY_gE
J
 |

WEB HOSTING BY


Copyright ©2021 Model Shipwrights and Kitmaker Network, a subsidiary of Silver Star Enterprises
All Rights Reserved. Please read our Conditions of Use and Privacy Policy.
All Rights Reserved. Please read our Conditions of Use and Privacy Policy.