

Hi Tim,
your patience with all your rigging- and line-work all around the masts continues to amaze me!! I sure hope your new jig will be helpful!
So for the next two weeks you moved on hour towards us here in Europe...if we at least could synchronise this daylight savings time thing...
Cheers,
Jan


Go to modelshipwrights.com for the current dynamic site!
General Ship Modeling
Discuss modeling techniques, experiences, and ship modeling in general.
Discuss modeling techniques, experiences, and ship modeling in general.
Hosted by Jim Starkweather
Build blog for Heller's HMS Victory

JJ1973

#345

Joined: August 22, 2011
KitMaker: 1,835 posts
Model Shipwrights: 1,832 posts

Posted: Sunday, March 12, 2017 - 09:49 AM UTC

timmyp

Joined: May 18, 2008
KitMaker: 496 posts
Model Shipwrights: 404 posts

Posted: Sunday, March 12, 2017 - 09:39 PM UTC
Good afternoon Jan,
Thanks, as always, for your comments. It's not only some patience needed, but also a strong magnifying glass! Those instructions from Heller are just hard to read!
At least now, with our clocks set forward, we're only 4 hours behind GMT, and for some reason, it makes the math easier to do in my head!
Waiting here to get walloped with the big snow storm that is to come later today...
timmyp
Joined: May 18, 2008
KitMaker: 496 posts
Model Shipwrights: 404 posts
Posted: Sunday, March 19, 2017 - 11:03 PM UTC
Still finishing those upper (or middle) shrouds & ratlines...seems that here and there, the nail polish didn't hold the ratline in place, so I'm re-doing selected lines again, one at a time. I think I did the last one last night, so it should be time, soon, to start putting some more elements of the mizzen mast together.
I was also reading Longridge's book, trying to get insight into how the the shrouds loop around the top deadeye (Roth's book indicates the port shrouds loop around the deadeye from the aft side to the forward side, with the starboard shrouds looping around from forward side to aft side. Or vice versa). He also mentioned that he left the attachment of the shrouds to the deadeyes as an event after placing the running rigging, as it would be easier to belay lines without having to go around the shrouds. Same idea with the stays. Seems to make sense, but knowing my luck, I'd manage to mess up the shrouds, and would have to spend twice as much time to fix things. Maybe I'll put the deadeyes in place, and loop the shrouds around them, but not finish them with glue, so I'll be able to move things around as/when required.
I've also come to the conclusion that I could use about 5 or 6 different workstations...one to store the model, a second to do painting, a third to cut & trim parts, a fourth to hold things that are glued & clamped, a fifth to hold the instructions (and re-write them!), and maybe the sixth to use as a general purpose desk! In the meantime, it's one desk, and one operation at a time...
timmyp
Joined: May 18, 2008
KitMaker: 496 posts
Model Shipwrights: 404 posts
Posted: Tuesday, March 21, 2017 - 05:24 AM UTC
Quoted Text
Are you switching to daylight saving time this weekend?
Here in Sweden we will set the clocks one hour forward on the 26th of March ...
Good decision about saving work and being a little wasteful with cheap thread
Maybe you can even use the cut-offs for some other part of the rigging ....
/ Robin
Hey Robin,
Yeah, I can probably use some of those cut-offs/cast-offs for something. Here's a pic of the current pile:

I'm surprised you haven't moved your clocks forward...isn't CET currently ahead of UTC by 2 hours now?

RobinNilsson

Joined: November 29, 2006
KitMaker: 6,693 posts
Model Shipwrights: 70 posts
Posted: Tuesday, March 21, 2017 - 04:45 PM UTC
UTC is always UTC (or GMT) and never changes.
CET is one hour eastwards (i.e. ahead of) UTC during normal (winter time).
United Kingdom switches to BST (British Summer Time) on the 27th of March (night between the coming Saturday and Sunday).
At the same time most of the other European countries switch from CET (Central European Time, UTC/GMT + 1 hour) to CEST (Central European Summer Time, UTC + 2) so we stay at one hour ahead of Britain the whole year since we switch at the same date. This makes it a easier for all kinds of communication, physical or electronic) inside Europe.
In the winter we are one hour ahead of UTC/GMT and in the summer we are two hours ahead, switch on March 27th and October 30th
/ Robin
timmyp
Joined: May 18, 2008
KitMaker: 496 posts
Model Shipwrights: 404 posts
Posted: Friday, March 24, 2017 - 09:33 PM UTC
Outwitting myself, part...
So, hooda thunk that some cotton thread, soaked with dried liquid petrochemicals, would catch fire so easily? All I was trying to do, was to "sharpen up" the ends of the ratlines without causing further damage...until a section just lit up like a match. I should have stayed with plan A, which was to use a soldering iron to burn off the ends, but I decided to use a candle. What I really should have done was just a get new, sharp Xacto blade, and trim the edges.
So I tried to re-start the whole thing, but I found that I had cut the thread length about 4 inches too short for a new set of shrouds...so I'm gonna have my lunch, run the vacuum cleaner, and maybe try again. Otherwise, I'll let another week go by before I try anything again.
Aaaaarrrrrrgggggg!

TimReynaga
Joined: May 03, 2006
KitMaker: 2,500 posts
Model Shipwrights: 1,830 posts
Posted: Friday, March 24, 2017 - 10:26 PM UTC
Oh nooooooo!
Tim, I feel your pain! I did the same thing on my Pinta build a while back...

I was so mad at myself I had to take a break from the build and do something else for the afternoon! You will come back and make it work, I'm sure.
Aside from this hiccup, your Victory is looking fantastic!
Tim, I feel your pain! I did the same thing on my Pinta build a while back...

I was so mad at myself I had to take a break from the build and do something else for the afternoon! You will come back and make it work, I'm sure.
Aside from this hiccup, your Victory is looking fantastic!

timmyp
Joined: May 18, 2008
KitMaker: 496 posts
Model Shipwrights: 404 posts
Posted: Saturday, March 25, 2017 - 12:31 AM UTC
Thanks Tim! The stuff we do to ourselves... 
Here's my photo of what I torched:
So I've already re-strung the shrouds and one side of ratlines...waiting for the glue to dry, and to see what the glue didn't secure the first time around.
In the meanwhile, to keep myself going, just for fun, I rigged up a line to go through a couple of the pulleys:


Here's my photo of what I torched:

So I've already re-strung the shrouds and one side of ratlines...waiting for the glue to dry, and to see what the glue didn't secure the first time around.
In the meanwhile, to keep myself going, just for fun, I rigged up a line to go through a couple of the pulleys:


timmyp
Joined: May 18, 2008
KitMaker: 496 posts
Model Shipwrights: 404 posts
Posted: Saturday, March 25, 2017 - 12:38 AM UTC
I forgot to mention: last night, on the Smithsonian channel, there was a show about the Battle of Jutland. I missed the first bit of the show, but when I tuned in, it was showing a battleship or cruiser slowly rolling onto its side...and then, as soon as the stack got into the water, the exposed side of the hull just went "kablooey" when that cold water hit the boilers...lots of steam, smoke, and ship parts went flying.
Towards the end of the show, they talked about the politics/scandal/revising of recent history that Beatty instigated to make himself look good, and to have Jellicoe (Gellicoe?) look bad.
Towards the end of the show, they talked about the politics/scandal/revising of recent history that Beatty instigated to make himself look good, and to have Jellicoe (Gellicoe?) look bad.
timmyp
Joined: May 18, 2008
KitMaker: 496 posts
Model Shipwrights: 404 posts
Posted: Wednesday, March 29, 2017 - 12:09 AM UTC
Well, I've re-strung those middle mizzen shrouds (H6, in Heller's terminology, and if my memory serves correctly!). So that puts me back to where I was about two or three weeks ago. And I can see I will have a similar problem as before: my bonding agent, for some reason, didn't adhere the ratline to the shroud, so I'll probably spending too much time fixing things there.
On a more positive note, I drilled out the holes on all the "p" blocks. I was doing that drilling with a pin vise, but after a while, my fingers would get all achey and crampy, and I said to myself, "there's got to be a faster way"...and there was! I was able to chuck the drill bit into a Dremel tool, and the drilling went faster. But I had already cut off a handful of the blocks from the sprue, so the difficulty there was keeping the drill bit perpendicular while a pair of tweezers held the block. So on about the last 60 or so blocks, I drilled out the holes while they were still on the sprue, thus eliminating my problem of perpendicularity of the drill holes.
Looking forward to getting those shrouds/ratlines finished, and continuing some assembly!
timmyp
Joined: May 18, 2008
KitMaker: 496 posts
Model Shipwrights: 404 posts
Posted: Sunday, April 02, 2017 - 01:24 AM UTC
Oh boy, looky what the postman left on my doorstep!

timmyp
Joined: May 18, 2008
KitMaker: 496 posts
Model Shipwrights: 404 posts
Posted: Sunday, April 16, 2017 - 06:50 PM UTC
Shrouds H6, take 2
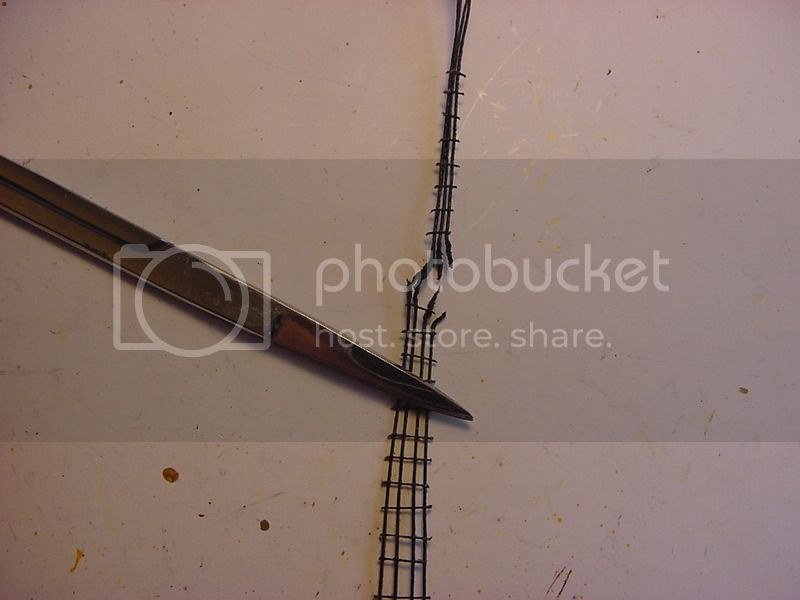
Well, I finally got the second set of shrouds for the mizzenmast completed. It seems, though, once I started to cut the excess ratlines away, a lot of them weren't sticking to the shrouds, so I had to do them over and over and over.
Here's a couple of pictures of how I trimmed the ratlines. My big fear/problem was, in trimming the line, the ratline would come in-done from the force of my blade, so I was using one set of tweezers to hold things in place, another tweezer to put tension on the thread, and then slice through with a knife blade. Of course, this had its own dangers, in that if I didn't put the first tweezer exactly on the joint, I ran the risk of slicing through the shroud. And of course, I kept everything away from open flames!

Here's a close-up with some of the excess thread cut away:

After I removed the shroud from the frame, the part of the shrouds that would ultimately go around the mast, was separating from each other, so I tied a couple of knots around the shrouds to keep them together.

In preparing to put the deadeyes on, I spent some time yesterday cutting and bending some floral wire, to keep the spacing between upper and lower deadeyes the same. I only did the deadeyes for the mizzenmast. I also found, especially for the upper set of deadeyes, that it's best to use a #62 drill bit to open up any holes that were malformed.
And lastly, a note about the parts count. The picture below is what 221 "p" blocks look like; that's all of the remaining "p" blocks. These blocks aren't quite ready to go, I still have to cut the groove on each side so the attachment thread has a good place to get seated.
So here's a rough estimate of parts I've used, or will be used:
cannons - 612 parts
anchors - 9 parts
glass on the stern galleries - 15 parts
cannon port lids - 82 parts
hammock hangers - 74 parts
buckets - 21 parts
bow parts - 18 parts
"p" blocks - 221 + 41 + about 50 installed = 312 parts
Total = 1143 parts so far, not counting hull, decks, and other stuff. And that's out of a total of 2107 parts (as per Heller).

So as usual, thanks for taking a look. I'm really excited about getting the deadeyes installed, but this is going to be a busy week at work, so I may not get back to this until later this week, or the weekend. Besides, I've got to finish assembling the mizzen mast, so there's still a few intermediary steps to be done.
Cheers!!
Well, I finally got the second set of shrouds for the mizzenmast completed. It seems, though, once I started to cut the excess ratlines away, a lot of them weren't sticking to the shrouds, so I had to do them over and over and over.
Here's a couple of pictures of how I trimmed the ratlines. My big fear/problem was, in trimming the line, the ratline would come in-done from the force of my blade, so I was using one set of tweezers to hold things in place, another tweezer to put tension on the thread, and then slice through with a knife blade. Of course, this had its own dangers, in that if I didn't put the first tweezer exactly on the joint, I ran the risk of slicing through the shroud. And of course, I kept everything away from open flames!


Here's a close-up with some of the excess thread cut away:

After I removed the shroud from the frame, the part of the shrouds that would ultimately go around the mast, was separating from each other, so I tied a couple of knots around the shrouds to keep them together.

In preparing to put the deadeyes on, I spent some time yesterday cutting and bending some floral wire, to keep the spacing between upper and lower deadeyes the same. I only did the deadeyes for the mizzenmast. I also found, especially for the upper set of deadeyes, that it's best to use a #62 drill bit to open up any holes that were malformed.
And lastly, a note about the parts count. The picture below is what 221 "p" blocks look like; that's all of the remaining "p" blocks. These blocks aren't quite ready to go, I still have to cut the groove on each side so the attachment thread has a good place to get seated.
So here's a rough estimate of parts I've used, or will be used:
cannons - 612 parts
anchors - 9 parts
glass on the stern galleries - 15 parts
cannon port lids - 82 parts
hammock hangers - 74 parts
buckets - 21 parts
bow parts - 18 parts
"p" blocks - 221 + 41 + about 50 installed = 312 parts
Total = 1143 parts so far, not counting hull, decks, and other stuff. And that's out of a total of 2107 parts (as per Heller).

So as usual, thanks for taking a look. I'm really excited about getting the deadeyes installed, but this is going to be a busy week at work, so I may not get back to this until later this week, or the weekend. Besides, I've got to finish assembling the mizzen mast, so there's still a few intermediary steps to be done.
Cheers!!
timmyp
Joined: May 18, 2008
KitMaker: 496 posts
Model Shipwrights: 404 posts
Posted: Sunday, April 23, 2017 - 10:26 PM UTC
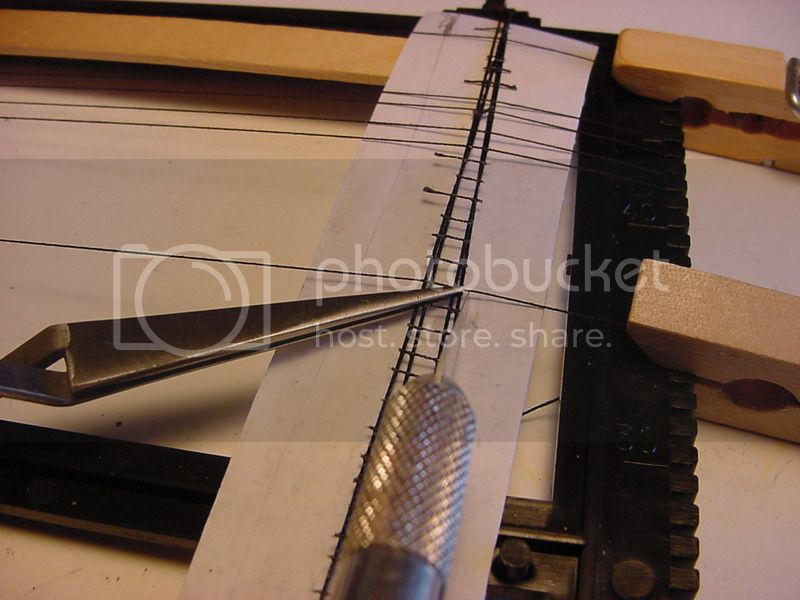
Managed to get started on making up the deadeyes for the upper shrouds on the mizzen mast. Going a bit slower than I had hoped for, but, taking my time and not rushing things, should give a better result!
So before I started cutting off the pairs of deadeyes, I ran into this little problem:

The problem being that there is the connecting pieces of plastic between the deadeyes, as well as a left-to-right connection. So instead of being able to just cut the deadeye pair from the sprue, it means taking out the small wire I was using as a spacer, cutting off the express plastic, making another (or, a second spacer) wire, cutting off the deadeyes from the sprue, cleaning up the deadeye, and getting ready to attach a thread to what will become the lower deadeye, which is what we see in this picture:

Not the best picture, but the thread is wrapped around the deadeye, with care being taken to try and get the start & stop point of the thread just underneath one of the eyes in the deadeye. There also seems to be a bit of a flange going around the deadeye, so that helps to align the thread. When wrapping the thread, I start right about underneath a single eye, then wrap the thread around about a third of the way, so I can cement the thread in place, let it dry, and then move on to the next third.
For the upper deadeye, here's the shroud getting wrapped around the deadeye. The shroud got started on the outside edge (like, the 3 o'clock position), then followed around in a clockwise direction, with the excess of the shroud hanging down (before I trimmed it):

As you can see, it took some specialized clamping tools to keep the deadeyes upright - here's a pic. In this pic, I haven't wrapped shroud around the deadeye yet.

Here's a picture of the knot that holds the thread between the deadeyes in place. I tied the knot 5 times; I guess it only needs to be tied 3 time or less. Also, I've shifted to using #70 drill bit to open the holes in the deadeyes. I might, on the next set of deadeyes, use a needle to help thread the string through the deadeyes.

And here's the final product:

The light colored thread is wrapped about 3 times around the shroud before I finished it with an overhand knot, and some cement.
So here's a question for everyone: I see mentions about people using "CA" glue. I thought this was an abbreviation for cyanoacrylate(?) glue, which, I believe, is the same thing as super glue. However, people talk about keeping their CA glue wet, or solvent, when it's not capped. So, is this CA the same stuff as super glue? And does it not dry as fast as regular super glue? And if it's not the usual kind of super glue sold in stores, what brand names/other names is this glue sold as?
Look forward to your replies! And thanks for taking a look - right now, I've got the other 3 lower deadeyes on the mizzen mast installed, and just waiting a bit for the glue (Testor's ) to get good and dry, before I try putting another deadeye/shroud combo in place. Wish me luck!!
So before I started cutting off the pairs of deadeyes, I ran into this little problem:

The problem being that there is the connecting pieces of plastic between the deadeyes, as well as a left-to-right connection. So instead of being able to just cut the deadeye pair from the sprue, it means taking out the small wire I was using as a spacer, cutting off the express plastic, making another (or, a second spacer) wire, cutting off the deadeyes from the sprue, cleaning up the deadeye, and getting ready to attach a thread to what will become the lower deadeye, which is what we see in this picture:

Not the best picture, but the thread is wrapped around the deadeye, with care being taken to try and get the start & stop point of the thread just underneath one of the eyes in the deadeye. There also seems to be a bit of a flange going around the deadeye, so that helps to align the thread. When wrapping the thread, I start right about underneath a single eye, then wrap the thread around about a third of the way, so I can cement the thread in place, let it dry, and then move on to the next third.
For the upper deadeye, here's the shroud getting wrapped around the deadeye. The shroud got started on the outside edge (like, the 3 o'clock position), then followed around in a clockwise direction, with the excess of the shroud hanging down (before I trimmed it):

As you can see, it took some specialized clamping tools to keep the deadeyes upright - here's a pic. In this pic, I haven't wrapped shroud around the deadeye yet.

Here's a picture of the knot that holds the thread between the deadeyes in place. I tied the knot 5 times; I guess it only needs to be tied 3 time or less. Also, I've shifted to using #70 drill bit to open the holes in the deadeyes. I might, on the next set of deadeyes, use a needle to help thread the string through the deadeyes.

And here's the final product:

The light colored thread is wrapped about 3 times around the shroud before I finished it with an overhand knot, and some cement.
So here's a question for everyone: I see mentions about people using "CA" glue. I thought this was an abbreviation for cyanoacrylate(?) glue, which, I believe, is the same thing as super glue. However, people talk about keeping their CA glue wet, or solvent, when it's not capped. So, is this CA the same stuff as super glue? And does it not dry as fast as regular super glue? And if it's not the usual kind of super glue sold in stores, what brand names/other names is this glue sold as?
Look forward to your replies! And thanks for taking a look - right now, I've got the other 3 lower deadeyes on the mizzen mast installed, and just waiting a bit for the glue (Testor's
) to get good and dry, before I try putting another deadeye/shroud combo in place. Wish me luck!!RobinNilsson
Joined: November 29, 2006
KitMaker: 6,693 posts
Model Shipwrights: 70 posts
Posted: Sunday, April 23, 2017 - 10:59 PM UTC
A small suggestion regarding the use of a needle to get the thread through holes:
Another option is to fold a thin copper wire,
push the copper wire through from the "other side",
folded end first, but not all the way through,
insert the thread in the fold of the copper wire and then pull the copper wire back to the "other side" again.
The double copper wire can be made thinner than a sewing needle, it depends on what copper wire you have access to.
Electrical cables from household appliances usually have thicker wires but broken head set cables from mobile phones or similar are thin and very useful.
The rope used for tightening dead eyes usually fill up the holes (more or less) on the dead eyes. Using a needle you get the thickness of the needle around the eye plus two times the thread.
Another possibility is to dip the end of the thread into a little cyanoacrylate glue, let harden and the gently sand it to a point that can be pushed through holes in dead eyes.
Use a long thread so that you can "service" a lot of dead eyes before you need to put a fine point to a new thread.
Shoemakers use a split hogs bristle and somehow roll and wax it to the sewing thread. It is apparently stiff enough to push through holes in the shoe leather. Saw it in a YouTube clip a few years ago ....
/ Robin
/ Robin
timmyp
Joined: May 18, 2008
KitMaker: 496 posts
Model Shipwrights: 404 posts
Posted: Tuesday, April 25, 2017 - 07:23 PM UTC
Hi Robin,
Thanks for the tips. I think, given the small diameter of the holes in the deadeyes, finding a copper wire thin enough to fit, as well as having enough stiffness to be folded without breaking, would be a tad difficult. But the method is definitely sound.
I got to thinking about using a sewing needle to thread the deadeyes. I think, unless the needle is very short, it would probably get hung up amongst all the other threads & the mast itself, increasing my frustration level quite a bit!
In the first deadeye I threaded, I did put some glue on the end of the thread, more to keep it from unraveling, than to try and make a tapered point. So far, it seems that if I can get the thread lined up "head-on" to the hole in the deadeye, things go quite smoothly.
One thing I'm finding, and it applies to a lot of the other threads I've installed, is that the thread tends to want to stick to the tweezers/fingers/whatever after I've gotten the thread through the appropriate hole. And because the thread is barely hanging out the other side of the hole, when I try to release the thread from the tweezers or whatever, the thread pops out of the hole, and I'm starting all over again. It just adds a minute or two to the whole process, but when it happens over and over, those minutes added up!!
Thanks for your suggestions!
Cheers,
Tim
GrantGoodale

Joined: April 26, 2015
KitMaker: 99 posts
Model Shipwrights: 99 posts

Posted: Friday, April 28, 2017 - 05:50 AM UTC
Quoted Text
So here's a question for everyone: I see mentions about people using "CA" glue. I thought this was an abbreviation for cyanoacrylate(?) glue, which, I believe, is the same thing as super glue. However, people talk about keeping their CA glue wet, or solvent, when it's not capped. So, is this CA the same stuff as super glue? And does it not dry as fast as regular super glue? And if it's not the usual kind of super glue sold in stores, what brand names/other names is this glue sold as?
Yes, CA glue and super glue are one and the same. You can get various thickness of glue at hobby stores and places like Home Depot. You can leave out the glue on something like Saran Wrap and it does not dry. It just gets thicker until it turns quite rubbery. I do that frequently. I would not think about leaving an uncapped bottle open. The glue end up plugging the nozzle (vice of experience). Also pick up some CA accelerator. I prefer a medium gel so you get a bit of working time. Once things are in place, hit it with the accelerator - instant set. A good idea is to get some debonder as well. That and a sharp blade can help unstick glued fingers. Also helps you correct screw-ups.
I have also come across some thin CA in a bottle with a brush applicator. I am really liking it for rigging lines on wooden ships.
HTH
JJ1973
#345
Joined: August 22, 2011
KitMaker: 1,835 posts
Model Shipwrights: 1,832 posts
Posted: Saturday, April 29, 2017 - 11:46 PM UTC
Hi Tim!
Just catching up here, reading about your mishap about a month ago...great to see that you've recovered, I admire your patience with all this!! Your are doing an awesome job!! Looking at all those tiny bits there you are preparing, I don't envy you...
Cheers,
Jan
Just catching up here, reading about your mishap about a month ago...great to see that you've recovered, I admire your patience with all this!! Your are doing an awesome job!! Looking at all those tiny bits there you are preparing, I don't envy you...
Cheers,
Jan
timmyp
Joined: May 18, 2008
KitMaker: 496 posts
Model Shipwrights: 404 posts
Posted: Monday, May 01, 2017 - 04:29 AM UTC
Thanks for your thoughts on the subject, Grant. I'll inquire about those products next time I'm at my hobby shop, or at one of the big box stores. So far, in my experience, super glue usually sets very fast (faster than I want it to), and like you, I've had several containers of the stuff (usually in a small tube) get the nozzle plugged up due to dried glue. I think I'll stick with good ol' Testors glue, as I've been using it since I was a kid.
Thanks again for your answer!
Tim
Thanks again for your answer!
Tim
timmyp
Joined: May 18, 2008
KitMaker: 496 posts
Model Shipwrights: 404 posts
Posted: Monday, May 01, 2017 - 04:35 AM UTC
Hell Jan!
Hope all is well in Niedersachsen!
Yes, my little mishap proved to be a valuable lesson. Fortunately, things have progressed, and now I'm fighting with getting the deadeyes on the upper mizzen shroud installed. Sometimes it takes up to 40 minutes to get the deadeyes in place (on the next set of deadeyes, I'm going with plan B, and I'll discuss that in a future post). But I've got 3 of the 4 deadeyes installed on the port side, they don't look too bad. I still need to install the final segment of the mizzen mast, and one or two rigging blocks, then will come my bravery test: cementing the mizzen mast in place, and installing the lower deadeyes! It would be amazing if I can all that done by the end of the month. At which time I can flog myself by adding all the blocks to the mizzen yardarms!!
Thanks for checking in!
Tim
timmyp
Joined: May 18, 2008
KitMaker: 496 posts
Model Shipwrights: 404 posts
Posted: Monday, May 22, 2017 - 12:59 PM UTC
Well, things have been progressing a little slower than I had hoped for. I think that's because I was just nervous/worried/overly concerned about screwing something up, and having to start over! But I finally finished installing the upper mizzen shrouds & deadeyes, so in the near future, I should be able to install the last part of the mast (I think it's part 467), finalize any touch-up painting, and get that baby glued in.
And speaking of deadeyes, my "Plan B" was to thread the deadeyes while they're still on the sprue, and then glue the bottom deadeye onto the mast top, and use the shroud to take the slack out of the deadeye. It was a semi-effective method, but probably loads easier than trying to use that floral wire to keep the distance correct. While the method is semi-effective, it doesn't look all that great once installed. Pictures will be forthcoming.
In some other stuff, I was looking at the netting that holds the hammocks. Heller's instructions say to add a thread along the top of the netting, but nothing along the bottom of the netting. (The netting that runs crosswise to the centerline of the hull has threads top & bottom). As I was looking at my model, it struck me that the netting looks "unfinished", so I've taken to adding a thread along the bottom of the netting, and then having it turn upright at each end of the netting.
timmyp
Joined: May 18, 2008
KitMaker: 496 posts
Model Shipwrights: 404 posts
Posted: Sunday, June 04, 2017 - 07:53 PM UTC
Let's see...where was I?
Here's a couple of pictures of the thread I put on the bottom side of the hammock netting. In the picture, the netting on the left doesn't have the thread, and the netting on the right does have the thread:

Here's a pic of the netting before:

This is how the starboard upper deadeyes turned out. A sort-of problem I encountered, was that those deadeyes fit very tightly against each other, so it wasn't easy to get the shrouds to fit around the deadeye, and still maintain some kind of evenness in all three planes:

And here's a picture of the hack job done on the port upper deadeyes:

As I mentioned previously, here is my plan B for threading-up the deadeyes: it's essentially Heller's plan, to thread things up before installing them. In this case, every time the thread went through a hole on the deadeye, I put a drop of cement on it maintain the distance between the deadeyes. However, as you can see in the above pictures, once installed, the "height"of each deadeye wasn't always even. I'll try to do better on the rest of the deadeyes!!

And finally, I did my bravery test a few days ago, and cemented the mizzen mast in place.

Now that the mizzen mast is in place, I'm looking at the decks, and doing some touch-up painting on them, before I get a bunch of rigging in the way, and it becomes nearly impossible to get a paint brush down on the deck. I'm still considering using a black wash on the main deck, just to highlight the engraving. My fears, of course, is that I won't make the wash "thin" enough, or if I do, I won't make enough to cover the whole deck, and even if I get the formulation right, when the wash dries, it'll look like crap. Oh, woe is me!!!
JJ1973
#345
Joined: August 22, 2011
KitMaker: 1,835 posts
Model Shipwrights: 1,832 posts
Posted: Tuesday, June 06, 2017 - 09:14 AM UTC
Hi Tim,
I truly admire your patience with all those thread works, be it on dead eye or the the hammock nets or the rig in general - absolutely amazing, and steady and good progress!!
She's coming along very nicely!!
I do not admire you for your decision about whether or not to give the deck a wash, though...
Cheers,
Jan
timmyp
Joined: May 18, 2008
KitMaker: 496 posts
Model Shipwrights: 404 posts
Posted: Tuesday, June 06, 2017 - 09:00 PM UTC
Hi Jan,
Thanks very much for your comments. I really look forward to installing more and more of the rigging. (I also look forward to finishing this model some day!!)
So, your vote is "no", with regard to giving the deck a wash. Any particular reason why? The intent would be to try and highlight the engraving in the deck. However, I've also realized that, in real life, the deck would have been scrubbed with abrasives, and the deck color probably would have turned more of a gray-white color.
Giving the deck a wash is not yet a "done deal", so I'd like to hear more abut your thinking on that subject.
Of course, I'd like to hear anyone's opinion about the deck wash, so drop a line!
Thanks again,
Tim
JJ1973
#345
Joined: August 22, 2011
KitMaker: 1,835 posts
Model Shipwrights: 1,832 posts
Posted: Tuesday, June 06, 2017 - 11:54 PM UTC
Hi Tim,
sorry if I put that wrong...
What I was trying to say was not "don't do it", but rather, reading your considerations about what all could go wrong, taking in account how far you have progressed and how much work you put in this beautiful model and being uncertain, whether or not you might be able to deal with an undesired outcome of a certainly desired effect of a wash to the deck, I simply do not envy you about that decision you have to take. Just checking my post - should read envy not admire - sorry for that - early morning around 5:30 am before heading to office...I would not want to be in your place and having to decide...
So, yes, I think a wash to the wooden deck would be a pretty good thing, no, I am really not certain if I would dare to do it... Sorry for not being any more helpful than that...
Cheers,
Jan
sorry if I put that wrong...
Quoted Text
Hi Jan,
Thanks very much for your comments. I really look forward to installing more and more of the rigging. (I also look forward to finishing this model some day!!)
So, your vote is "no", with regard to giving the deck a wash. Any particular reason why? The intent would be to try and highlight the engraving in the deck. However, I've also realized that, in real life, the deck would have been scrubbed with abrasives, and the deck color probably would have turned more of a gray-white color.
Giving the deck a wash is not yet a "done deal", so I'd like to hear more abut your thinking on that subject.
Of course, I'd like to hear anyone's opinion about the deck wash, so drop a line!
Thanks again,
Tim
What I was trying to say was not "don't do it", but rather, reading your considerations about what all could go wrong, taking in account how far you have progressed and how much work you put in this beautiful model and being uncertain, whether or not you might be able to deal with an undesired outcome of a certainly desired effect of a wash to the deck, I simply do not envy you about that decision you have to take. Just checking my post - should read envy not admire - sorry for that - early morning around 5:30 am before heading to office...I would not want to be in your place and having to decide...
So, yes, I think a wash to the wooden deck would be a pretty good thing, no, I am really not certain if I would dare to do it... Sorry for not being any more helpful than that...
Cheers,
Jan
TimReynaga
Joined: May 03, 2006
KitMaker: 2,500 posts
Model Shipwrights: 1,830 posts
Posted: Wednesday, June 07, 2017 - 06:14 AM UTC
Quoted Text
...I'm still considering using a black wash on the main deck, just to highlight the engraving. My fears, of course, is that I won't make the wash "thin" enough, or if I do, I won't make enough to cover the whole deck, and even if I get the formulation right, when the wash dries, it'll look like crap. Oh, woe is me!!!
Tim, for what it's worth, I agree with Jan - do the wash! Rather than black, though, I'd go with raw umber artist's oils. This dark brown color is less stark than black and will look more like wood. Also, artist's oils take a long time to dry, so you will have plenty of time to fiddle with the deck until you are happy with the look. Good luck with it!

 |

WEB HOSTING BY


Copyright ©2021 Model Shipwrights and Kitmaker Network, a subsidiary of Silver Star Enterprises
All Rights Reserved. Please read our Conditions of Use and Privacy Policy.
All Rights Reserved. Please read our Conditions of Use and Privacy Policy.