

Go to modelshipwrights.com for the current dynamic site!


General Ship Modeling
Discuss modeling techniques, experiences, and ship modeling in general.
Discuss modeling techniques, experiences, and ship modeling in general.
Hosted by Jim Starkweather
Build blog for Heller's HMS Victory

timmyp

Joined: May 18, 2008
KitMaker: 496 posts
Model Shipwrights: 404 posts

Posted: Monday, December 26, 2016 - 08:57 PM UTC
Well, in an effort to find some paint for the hammocks, I went to the shopping center where a Hobby Town USA store used to be, but they've gone out of business. Another hobby store I went to on Saturday only had enamel paints, no Model Master acrylics. They had a stand for Vallejo paints, but it was more empty than full. I think maybe later this week I'll go to my usual hobby shop (it's near Lowe's, and Lowe's has furnace filters on sale), and see if they've got some paints that I can use.

TRM5150
Joined: January 03, 2010
KitMaker: 2,159 posts
Model Shipwrights: 1,400 posts

Posted: Tuesday, December 27, 2016 - 05:15 AM UTC
Ooooo....ratlines! Best of luck getting them set! I remember knotting all of the ones on my Sultana a while back...hitch knot, hitch knot, hitch knot, hitch knot, hitch knot........ tedious, but fun!  Keep the fires lit!
Keep the fires lit! timmyp
Joined: May 18, 2008
KitMaker: 496 posts
Model Shipwrights: 404 posts
Posted: Tuesday, December 27, 2016 - 10:17 PM UTC
Hey Todd!
Yeah, I'm thinking it will be tedious putting those ratlines in place. Any ideas on how to get a consistent "sag" in the ratlines between the each shroud? I'm thinking of making-up some kind of jig so that I won't be pulling my hair out trying to get the same sag "by eye".
Yeah, I'm thinking it will be tedious putting those ratlines in place. Any ideas on how to get a consistent "sag" in the ratlines between the each shroud? I'm thinking of making-up some kind of jig so that I won't be pulling my hair out trying to get the same sag "by eye".
timmyp
Joined: May 18, 2008
KitMaker: 496 posts
Model Shipwrights: 404 posts
Posted: Sunday, January 01, 2017 - 06:13 AM UTC
Just want to wish everyone a Happy New Year!!
timmyp
Joined: May 18, 2008
KitMaker: 496 posts
Model Shipwrights: 404 posts
Posted: Monday, January 09, 2017 - 05:39 AM UTC
Mizzen mast lower shrouds
Well, I've been spending quite a bit of time trying to make-up the mizzen mast shrouds. So far, I've managed one side of the lower mizzen mast! I haven't timed myself, but it takes about 30 minutes or so to try and thread maybe 3 or 4 ratlines across the shrouds. And believe me, after doing 3 or so ratlines, I'm ready to call it a day.
I made mention before that I've read a few tips in Milton Roth's book, "Ship Modeling from Stem to Stern". Here's a picture of the foremast foreyard that is illustrated in his book:

And here's his take on how to attach the ratlines to the shrouds:

Here's a picture of the frame that Heller includes in the kit. I had a little trouble attaching the square piece to the frame, that holds the futtocks in place. I thought the problem was the slot on the square piece wasn't big enough for the stem; turns out, the holes that hold the piece in place weren't big enough.

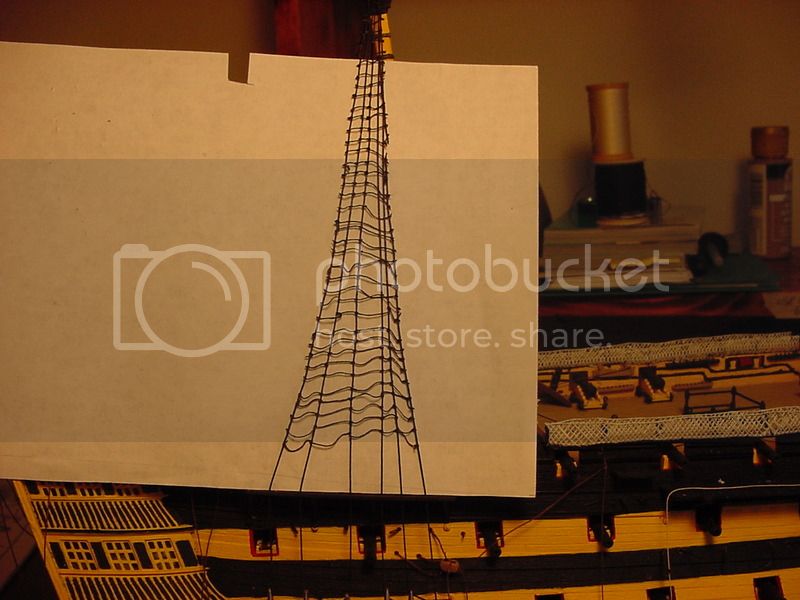
And lastly, here's the finished product (this is just the port side lower mizzen shrouds, still on the frame). The ratlines are supposed to go up several more rungs (the frame is notched on each side, and the numbering starts at 50 at the top, and goes down to 0). The last bit of ratlines (from 46 to 50) are going to be very short in length, so I might just glue string straight across, rather than try and tie a bunch of knot through there. BTW, if I did knot everything, it would be a total of 468 knots, just on this set of shrouds (6 shrouds times 39 ratlines times 2 sides). I slid a piece of paper behind the shrouds, so that they wouldn't cast a shadow on the starboard side shrouds, thus making for a confusing picture (confusing - that's quite the word to apply to this effort!)

In case you're wondering, the sequence was to start on the left-most shroud, tie a double-overhand knot, take the long side under the next shroud, then up and back over the same shroud, then under and up from the ratline, and then taking the free end and pushing it through the loop that was made when taking the string up through the shroud. And that's why it takes 30 - 40 minutes to string just a couple of ratlines!!
Thanks for watching, and hopefully, the next post will have both sides of the shrouds completed.
Well, I've been spending quite a bit of time trying to make-up the mizzen mast shrouds. So far, I've managed one side of the lower mizzen mast! I haven't timed myself, but it takes about 30 minutes or so to try and thread maybe 3 or 4 ratlines across the shrouds. And believe me, after doing 3 or so ratlines, I'm ready to call it a day.
I made mention before that I've read a few tips in Milton Roth's book, "Ship Modeling from Stem to Stern". Here's a picture of the foremast foreyard that is illustrated in his book:

And here's his take on how to attach the ratlines to the shrouds:

Here's a picture of the frame that Heller includes in the kit. I had a little trouble attaching the square piece to the frame, that holds the futtocks in place. I thought the problem was the slot on the square piece wasn't big enough for the stem; turns out, the holes that hold the piece in place weren't big enough.

And lastly, here's the finished product (this is just the port side lower mizzen shrouds, still on the frame). The ratlines are supposed to go up several more rungs (the frame is notched on each side, and the numbering starts at 50 at the top, and goes down to 0). The last bit of ratlines (from 46 to 50) are going to be very short in length, so I might just glue string straight across, rather than try and tie a bunch of knot through there. BTW, if I did knot everything, it would be a total of 468 knots, just on this set of shrouds (6 shrouds times 39 ratlines times 2 sides). I slid a piece of paper behind the shrouds, so that they wouldn't cast a shadow on the starboard side shrouds, thus making for a confusing picture (confusing - that's quite the word to apply to this effort!)

In case you're wondering, the sequence was to start on the left-most shroud, tie a double-overhand knot, take the long side under the next shroud, then up and back over the same shroud, then under and up from the ratline, and then taking the free end and pushing it through the loop that was made when taking the string up through the shroud. And that's why it takes 30 - 40 minutes to string just a couple of ratlines!!
Thanks for watching, and hopefully, the next post will have both sides of the shrouds completed.
timmyp
Joined: May 18, 2008
KitMaker: 496 posts
Model Shipwrights: 404 posts
Posted: Tuesday, February 07, 2017 - 08:50 AM UTC
Hi-ho!!
Not much to say, still working on the ratlines (at least I've moved over to doing the starboard side!). Things got a bit off-schedule in early January, as I had a tooth pulled, and there was just a lot of difficulties afterward.
I think, on the remaining shrouds, instead of knotting each ratline at the intersection of each shroud, I'm just going to lay a thread straight across, glue it in place, and try to use the cut-offs on other shrouds.
How 'bout that Super Bowl,huh?

pbishop
Joined: November 03, 2016
KitMaker: 116 posts
Model Shipwrights: 116 posts

Posted: Wednesday, February 08, 2017 - 12:44 AM UTC
Tim,
This too will end. This is the most tedious part of the build in my mind, just keep at it. Lookin good so far!!
-Paul
This too will end. This is the most tedious part of the build in my mind, just keep at it. Lookin good so far!!
-Paul
timmyp
Joined: May 18, 2008
KitMaker: 496 posts
Model Shipwrights: 404 posts
Posted: Wednesday, February 08, 2017 - 07:30 AM UTC
Quoted Text
Tim,
This too will end. This is the most tedious part of the build in my mind, just keep at it. Lookin good so far!!
-Paul
Well, I sure hope it will end!!
I'm still working on those lower mizzen shrouds & ratlines...I was really hoping this would be an interesting part of the build, but as you say, it is rather tedious. Thanks for the encouragement!!timmyp
Joined: May 18, 2008
KitMaker: 496 posts
Model Shipwrights: 404 posts
Posted: Tuesday, February 21, 2017 - 11:10 AM UTC
Woo-hoo! Finally finished the lower mizzenmast shrouds & ratlines....some pictures to follow shortly. I've also come to realize that the upper part of each lower mast assembly needs to be painted black, and not yellow! Scraping, sanding, and re-painting is in my future!
pbishop
Joined: November 03, 2016
KitMaker: 116 posts
Model Shipwrights: 116 posts
Posted: Tuesday, February 21, 2017 - 02:11 PM UTC
Tim, if you are like me you will find that it gets a little easier as time goes by. My worst rat lines were the first I did and looked better over time. Keep up your great work!
timmyp
Joined: May 18, 2008
KitMaker: 496 posts
Model Shipwrights: 404 posts
Posted: Tuesday, February 21, 2017 - 04:20 PM UTC
Quoted Text
Tim, if you are like me you will find that it gets a little easier as time goes by. My worst rat lines were the first I did and looked better over time. Keep up your great work!
Hiya Paul,
I sure hope this gets a little bit easier! In hindsight, I think I should have started with a set of the upper shrouds before doing the lower shrouds - I would have gained the experience, and some time! One thing that kept progress a bit slow was the drying time needed for the fingernail polish I used as an adhesive - it takes about an hour for it to set.
I've been reading your exchanges with Robin N., about attaching the sails and such. I've used his method that he discusses - tying a "shoelace" knot on the top of the sail, and then taking the loose ends and tying those to the yardarm. The only problem there, is if you tie the sail too close to the yard, then the sail gets crushed under the yard.
Cheerios & Fruit Loops,
Tim
timmyp
Joined: May 18, 2008
KitMaker: 496 posts
Model Shipwrights: 404 posts
Posted: Wednesday, February 22, 2017 - 02:01 PM UTC
Well, I did my bravery test today: I cut the lower mizzen shrouds/ratlines from the frame today, and fortunately, everything held together!! However, when trimming the excess thread from the ratline knots, I managed to slice through one of the shrouds. A small piece of thread & some nail polish should hold everything together.
At this point, it seems I have a choice as to what steps should be taken next: continue working solely on the mizzen mast, or try making another set of shrouds/ratlines for either of the 2 remaining masts, fix the hole in one of the lower decks so that the main mast will fit, or do some painting on the masts (painting - it's a never-ending chore). It seems that if I continue to work on the mizzen mast, I feel I'll be really "committing" myself to a course of action!
At this point, it seems I have a choice as to what steps should be taken next: continue working solely on the mizzen mast, or try making another set of shrouds/ratlines for either of the 2 remaining masts, fix the hole in one of the lower decks so that the main mast will fit, or do some painting on the masts (painting - it's a never-ending chore). It seems that if I continue to work on the mizzen mast, I feel I'll be really "committing" myself to a course of action!
timmyp
Joined: May 18, 2008
KitMaker: 496 posts
Model Shipwrights: 404 posts
Posted: Saturday, February 25, 2017 - 08:28 AM UTC
Damn - I don't believe this. I was proofreading my post, when somehow I got flipped to one of the advertiser's websites, and now my post is gone. So here we go again:
This first pic is of how I managed to cross the shrouds as I was winding the thread around the futtock:

This next one, shows how horrible the stbd side looks:
The port side looks a little better:

Without any backing paper:

Here's the broken shroud:

And here's an interesting view:

So like I mentioned in a previous post, I feel like, once I cement the mizzenmast in place, I'll be really, really, really committing myself. Which is good, because maybe it will keep me motivated to chugging along.
I shaved down the lower part of the mainmast today, as it wouldn't fit all the way to the hull bottom. This was/is due to the mis-alignment of the lower deck halves. I tried to use a file to enlarge the hole below decks, but as usual, I was getting impatient, so I decided to shave the mast (which was easier!). However, now that I've gotten it to slide all the way down, I can't find the square hole that will accept the peg on the bottom of the mast for a good fit. So maybe I'll have to cut off the peg and just use a massive amount of glue to keep the mast in place.
As usual, thanks for checking things out!! BTW, our spring-like weather came to an end today after the rainstorm moved through...I guess I have to wait until Wednesday or so for the temps to be back up in the seventies.
This first pic is of how I managed to cross the shrouds as I was winding the thread around the futtock:

This next one, shows how horrible the stbd side looks:

The port side looks a little better:

Without any backing paper:

Here's the broken shroud:

And here's an interesting view:

So like I mentioned in a previous post, I feel like, once I cement the mizzenmast in place, I'll be really, really, really committing myself. Which is good, because maybe it will keep me motivated to chugging along.
I shaved down the lower part of the mainmast today, as it wouldn't fit all the way to the hull bottom. This was/is due to the mis-alignment of the lower deck halves. I tried to use a file to enlarge the hole below decks, but as usual, I was getting impatient, so I decided to shave the mast (which was easier!). However, now that I've gotten it to slide all the way down, I can't find the square hole that will accept the peg on the bottom of the mast for a good fit. So maybe I'll have to cut off the peg and just use a massive amount of glue to keep the mast in place.
As usual, thanks for checking things out!! BTW, our spring-like weather came to an end today after the rainstorm moved through...I guess I have to wait until Wednesday or so for the temps to be back up in the seventies.
timmyp
Joined: May 18, 2008
KitMaker: 496 posts
Model Shipwrights: 404 posts
Posted: Sunday, February 26, 2017 - 02:35 PM UTC
Well, I took a big step towards making my "commitment" on the mizzenmast yesterday, by gluing the futtock & mast top into place. After the glue dried, I did a test-fit of the next mast segment (not sure of the actual name or part number), and found it doesn't fit too well into the notches on the cross members under the mast top. I think some judicious filing will take care of that; perhaps, too, the same filing will cure the problem of the mast cap not fitting on to the top of the futtock (you'd think it would just slide on there and seat itself, but of course, nothing is easy with this kit!) And because the mast segment & cap don't fit well, the upright support (I think it's part 125) fits a bit too loose, so hopefully, that upright support will fit better after I make the modifications to the mast segment & cap.
Until next time...
Until next time...
timmyp
Joined: May 18, 2008
KitMaker: 496 posts
Model Shipwrights: 404 posts
Posted: Monday, February 27, 2017 - 01:59 PM UTC
oooh!ooooh!oooh! When I got home from work this morning, I tackled the filing job, and I'm glad I did - I managed to get the mast cap & middle segment of the mizzen mast to fit together, and then glued it all up. I have to admit, it looks hot!! And it motivates me to keep going! Next steps: more painting, and installing the blocks on the mast.

RobinNilsson

Joined: November 29, 2006
KitMaker: 6,693 posts
Model Shipwrights: 70 posts

Posted: Tuesday, February 28, 2017 - 01:01 AM UTC
Hi Timothy,
Nice to see that you have got the motivation back up
and thanks for the feedback on attaching sails to yards, I'll keep it in mind for the future
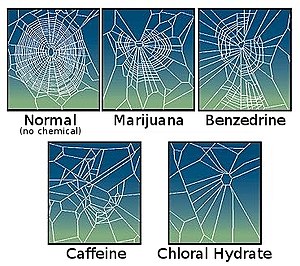
I fully appreciate that those ratlines are difficult to get straight and even (it's one of the things that keep me from starting my 1/96 Cutty Sark by Revell). However, when looking at them, I can't help myself from being reminded about images of the spiderwebs made by spiders while under the influence of various substances:
Would it possibly be easier if the foot ropes where stiffened first ? Dip them in clear acrylic laquer let them dry while hanging over the shrouds on that jig and glue them (or use sewing needle to pierce the shrouds) once they are dry?
Maybe this would avoid tensioning the shrouds and pulling them away from a straight line ?
A foot rope that looks to straight or sagging could be discarded before it is permanently attached to the shrouds.
/ Robin
Nice to see that you have got the motivation back up
and thanks for the feedback on attaching sails to yards, I'll keep it in mind for the future
I fully appreciate that those ratlines are difficult to get straight and even (it's one of the things that keep me from starting my 1/96 Cutty Sark by Revell). However, when looking at them, I can't help myself from being reminded about images of the spiderwebs made by spiders while under the influence of various substances:
Would it possibly be easier if the foot ropes where stiffened first ? Dip them in clear acrylic laquer let them dry while hanging over the shrouds on that jig and glue them (or use sewing needle to pierce the shrouds) once they are dry?
Maybe this would avoid tensioning the shrouds and pulling them away from a straight line ?
A foot rope that looks to straight or sagging could be discarded before it is permanently attached to the shrouds.
/ Robin

JJ1973

#345

Joined: August 22, 2011
KitMaker: 1,835 posts
Model Shipwrights: 1,832 posts
Posted: Tuesday, February 28, 2017 - 10:01 AM UTC
Tim,
the amount of work you are putting into all of your 'rope work' is absolutely amazing!! I hope you manage to keep your motivation and - even with some needed and deserved breaks - eventually find your way through it!!
Even if you're experiencing a setback from time to time - you are doing an amazing job and your's already is a mighty fine looking ship!!
Cheers,
Jan
timmyp
Joined: May 18, 2008
KitMaker: 496 posts
Model Shipwrights: 404 posts
Posted: Tuesday, February 28, 2017 - 02:34 PM UTC
Quoted Text
Hi Timothy,
Nice to see that you have got the motivation back up
and thanks for the feedback on attaching sails to yards, I'll keep it in mind for the future
I fully appreciate that those ratlines are difficult to get straight and even (it's one of the things that keep me from starting my 1/96 Cutty Sark by Revell). However, when looking at them, I can't help myself from being reminded about images of the spiderwebs made by spiders while under the influence of various substances:
Would it possibly be easier if the foot ropes where stiffened first ? Dip them in clear acrylic laquer let them dry while hanging over the shrouds on that jig and glue them (or use sewing needle to pierce the shrouds) once they are dry?
Maybe this would avoid tensioning the shrouds and pulling them away from a straight line ?
A foot rope that looks to straight or sagging could be discarded before it is permanently attached to the shrouds.
/ Robin
Hello Robin,
OK, I'll bite: what's chloral hydrate?
If I had just strung the ratlines straight across the shrouds on the frame, as Heller instructs, then yeah, there wouldn't be so many...inconsistencies... in the straightness of the ratlines. But I wanted to avoid a look of them being absolutely straight (which, I do believe, will be happening on all the other shroud/ratline assemblies!).
Your suggested method of lacquering the threads and then installing them sounds good. Maybe in a future model I'll give it a try.
Thanks for sharing!
Tim
timmyp
Joined: May 18, 2008
KitMaker: 496 posts
Model Shipwrights: 404 posts
Posted: Tuesday, February 28, 2017 - 02:41 PM UTC
Thanks for your words of encouragement, Jan.
It was really thrilling for me to get the mast cap & middle mast segment to fit together so well - it felt like one of those "Wow! Look what I did" moments. And such a small event!
I need to back-track a little bit, and install some rigging blocks on the lower mast segment, while the mast is still easy to move & manipulate.
Thanks again!
Tim
RobinNilsson
Joined: November 29, 2006
KitMaker: 6,693 posts
Model Shipwrights: 70 posts
Posted: Wednesday, March 01, 2017 - 02:31 PM UTC
Knock-out drops or "Mickey Finn"
Found of Wikipedia: https://en.wikipedia.org/wiki/Chloral_hydrate
"Chloral hydrate is an organic compound with the formula C2H3Cl3O2. It is a colorless solid. It has limited use as a sedative and hypnotic pharmaceutical drug. It is also a useful laboratory chemical reagent and precursor. It is derived from chloral (trichloroacetaldehyde) by the addition of one equivalent of water.
It was discovered through the chlorination (halogenation) of ethanol in 1832 by Justus von Liebig in Gießen.[3][4] Its sedative properties were first published in 1869 and subsequently, because of its easy synthesis, its use was widespread.[5] It was widely used recreationally and misprescribed in the late 19th century. Chloral hydrate is soluble in both water and ethanol, readily forming concentrated solutions. A solution of chloral hydrate in ethanol called "knockout drops" was used to prepare a Mickey Finn.[6]"
The intention with stiffening the foot ropes with lacquer and then letting them dry on a template (shrouds stretched on that jig) was to get a consistent sag to all the foot ropes.
"Heavy" rope hanging between to fixed points will hang in a catenary curve https://en.wikipedia.org/wiki/Catenary
Light thread used in modelling to represent heavy rope has the irritating habit of defying gravity (flapping all over the place). By soaking the threads in lacquer our friend gravity will have a better chance of pulling the threads downwards into a natural curve (added weight on the thread).
The dried lacquer will then enforce this curve on the thread
/ Robin
timmyp
Joined: May 18, 2008
KitMaker: 496 posts
Model Shipwrights: 404 posts
Posted: Wednesday, March 01, 2017 - 04:26 PM UTC
Ah, knock-out drops/Mickey Finn! Old school stuff!
timmyp
Joined: May 18, 2008
KitMaker: 496 posts
Model Shipwrights: 404 posts
Posted: Tuesday, March 07, 2017 - 07:10 AM UTC
I thought I'd make a jig to match the ratline/shroud frame that Heller added to the kit. The thinking here is, instead of wasting a lot of thread stringing the ratlines across a lot of "empty space", I'd make something that would match the slots for the ratlines, but wouldn't use up so much thread. Here's cutting part of the jig:

And here's the finished part. This is the "upper" part of the jig; it's made to fit between the top and middle part of the ratline frame:

And here's how it all goes together:

So, before I got started on cutting that jig, I thought I was well on my way to finishing putting the mizzen mast together. I was all ready to put the next segment of the mizzen mast on, when I realized that I needed to make-up another set of ratlines before I could proceed. I was also ready to start adding the blocks to the mast, as per the instructions, when I noticed two things: that block P21 seemed to get attached to the mast cap, and that another set of blocks (not sure what the designations are) needed to go between the lower segment and the middle segment of the mast. So a word to the wise: before adding the mast cap, add those 2 blocks, then put the mast cap in place.
To get P21 to fit, I drilled a hole through the mast cap, and threaded P21 through the hole. I started to make the hole with my Dremel tool, but the bit "caught" and gouged a part of the mast cap - nothing too bad, just copious paint to hide the gouge. I finished the hole with my pin drill:

To try and make sense out of where all the blocks go on the mizzen mast, and which they face (fore, aft, athwart), which line goes through them, where that line starts, and where it belays, I made a rough chart for all that, so when I'm actually putting the rigging in, I don't get too flustered with having to flip through several pages of instructions. I also made a similar chart for the spanker boom & spanker gaff (not sure I have the correct names). IF anybody would like a copy, let me know, and I'll see about getting a copy to you. I'm going to make similar charts for the mizzen yards, as well as for the fore & main masts.
Would you believe it took me like almost 3 hours to cut that ratline jig? I sure hope it's worth it! And if none of the photos in this post are present, it's because Photobucket was a little more recalcitrant than normal tonight. At least, I was able to do a load of laundry while trying to make this post!!
timmyp
Joined: May 18, 2008
KitMaker: 496 posts
Model Shipwrights: 404 posts
Posted: Tuesday, March 07, 2017 - 09:57 PM UTC
Whoops! A correction or two on the previous post: that should be block P19 that goes through the mast cap - P21 hangs below the mast top, and is secured around the futtock. Also, part 419, what I think I called the "spanker gaff", is actually called the "mizzen mast horn". I see in the instructions that for those 2 parts, the ends closest to the mast are painted black - but does that mean the whole thing is painted black, or just the end, with the rest of the part painted yellow? Anyone?
I just saw a news item that air traffic controllers have lost contact with another Malaysia Airlines plane - not again!
I just saw a news item that air traffic controllers have lost contact with another Malaysia Airlines plane - not again!
timmyp
Joined: May 18, 2008
KitMaker: 496 posts
Model Shipwrights: 404 posts
Posted: Saturday, March 11, 2017 - 08:02 PM UTC
Well, I got to thinking about this whole ratlines business, and I decided to go to the fabric store and get a spool of black thread, as well as another spool of the cream-colored thread. And what a bargain! They were having a two-for-one sale, and then I got another 25% off on top of that! And I still had to sign the receipt, all for a measly $2.77!!
So anyway, I was using that little jig I had cut, to help save some thread when making the ratlines. However, because of the clothespins I used to hold it in place, I only effectively had about 10 slots to use for the ratlines. Plus, I was using a felt-tip marker to color the cream colored thread black. So that's when I wised up, went to the store & got some black thread, and now, I'm just going to thread the entire ratline frame with the black thread, and be done with it. Talk about a time-saving device!
And in yet another astounding... I dunno, thing?..from Heller, I was re-reading the instructions for making up the shrouds and ratlines. I noticed that it said for shroud H4 (which should be the mizzen middle shrouds), the introductory part of the instructions said to use a part b on the frame. Yet when I read the detailed instructions for shroud H4, it says to remove part b! Egad, make up my mind!
I also finished attaching the various blocks to the mizzen mast - only have one left (I think it's p187), which faces forward when attached to the mizzen mast.
Hope you all enjoy having to move the clocks forward (which, IMHO, is one of the most stupidest things we do).
Yuck! I go back to work tomorrow, after having the past week off.
Thanks for checking out the ol' blog.
RobinNilsson
Joined: November 29, 2006
KitMaker: 6,693 posts
Model Shipwrights: 70 posts
Posted: Saturday, March 11, 2017 - 11:16 PM UTC
Are you switching to daylight saving time this weekend?
Here in Sweden we will set the clocks one hour forward on the 26th of March ...
Good decision about saving work and being a little wasteful with cheap thread
Maybe you can even use the cut-offs for some other part of the rigging ....
/ Robin
Here in Sweden we will set the clocks one hour forward on the 26th of March ...
Good decision about saving work and being a little wasteful with cheap thread
Maybe you can even use the cut-offs for some other part of the rigging ....
/ Robin
 |

WEB HOSTING BY


Copyright ©2021 Model Shipwrights and Kitmaker Network, a subsidiary of Silver Star Enterprises
All Rights Reserved. Please read our Conditions of Use and Privacy Policy.
All Rights Reserved. Please read our Conditions of Use and Privacy Policy.