General Ship Modeling
Discuss modeling techniques, experiences, and ship modeling in general.
Build blog for Heller's HMS Victory
timmyp
Visit this Community
Virginia, United States
Joined: May 18, 2008
KitMaker: 496 posts
Model Shipwrights: 404 posts
Posted: Sunday, May 22, 2016 - 10:48 PM UTC
Hi Jyrki,

No worries about that e-mail.

You might want to look through this blog, at the section where I installed the main deck, and what it took to get it in position. For me, it was such a tight fit, that no glue was used. I don't recall it being too long, so I didn't have that worry. Essentially, I had to pry the hull open (using a very narrow blade knife), and used the edge of the deck as a lever point, and I was able to push out the hull just enough to let the deck drop in place. I probably took 20 or 30 minutes to get the deck in place, so it pays off to take your time.

OK, threads A71 & 72: so the instructions (step show thread A72 going through pulley m26, going back through pulley m24, then ending at part 100 (install part 100 in step 9). In the instructions, there is also the black dot beside the box with the number 9 in it - the dot refers to step 17. IN step 17, you will see that a thread goes from the the hull, up to pulley m26, which will be located near the bottom corner of the mainsail (in reality, this is probably what is called a "sheet" line). Step 29 shows the pulley at the bottom of the sail.

So, at this point, some of those pullies & threads are just hanging out of/off the hull...myself, I taped some paper to the end of each thread, with that thread's number on it (Axx, for example). So, for the time being on your model, just install the threads & pullies the best you can/as you see fit. What I'm going to do, when the time comes, will be to tie a separate thread to block m26, run it up to the bottom corner of the mainsail, run it through the block m25 (to be installed), and bring the thread back to a belay point on the hull.

One of the problems with this step (8), is that it's not really clear how the pulley gets attached to the hull. Heller shows some kind of 3-way connection, with no detail on how to make that connection. So, I just took it to mean that a short thread coming out of the hull is run through one side of the pulley, and thread a72 goes through the other side...it's a bit of a mess, that's for sure.

In image 2 of the pictures in your link, there is a box 2 on the drawing. This illustrates a little bit better (I think) of how the block m24 gets attached to the hull. And in this image, I believe the thread going through the pulley would be the equivalent of Heller's A72.

Is your head spinning yet??

Today, I cemented in place the signal flag lockers & knees. I've started painting the bowspirit, also.

Don't stress too much on this - it's only a model!!!

Cheers,

Tim
timmyp
Visit this Community
Virginia, United States
Joined: May 18, 2008
KitMaker: 496 posts
Model Shipwrights: 404 posts
Posted: Monday, May 23, 2016 - 01:49 AM UTC
Hey Jyrki,

Well, you've got me thinking about this A71 & A72 thing. So I took some pictures of what I've done, and at the end of this post, how I will finish these threads.

So, thread A72 starts at the hull, goes through pulley m24, then goes out and on towards pulley m26, then through pulley m26 and back to pulley m24, then back into the hull, and ends by being tied to part 100, which is a kind of bitt. As you noted, the instructions say to put pulley m26 200 mm away from the hull. This makes sense, as pulley m26 is tied to the corner of the main sail. But as you will note in my pictures, both pullies m24 and m26 are quite close to the hull; at the right time, I will cut thread A72, and a lot of length to it, tie pulley m26 close to the main sail, put A71 through m26, and then tie/splice/glue A72 back to the original thread of A72. I hope this isn't confusing!!

In the meanwhile, some pictures to enjoy. The first one is a picture of the knife I used to pry the main deck into place:


Here's a series of pictures showing how my thread A72 is installed. The red line in some of the pictures denotes the direction the thread is going.


The next picture shows the thread after passing through pulley m26, and on the way back to m24:


And now, A72 comes out of m24, back into the hull, and to its belaying point:


And now, A72 attached to part 100:


And here's the belaying point on the port side. The pulleys and thread A71 have similar positions, so I will have to splice some longer thread, to get the one pulley closer to the main sail.


So I hope all this helps.
Jylppy71
Visit this Community
Kuopio, Finland
Joined: April 24, 2016
KitMaker: 23 posts
Model Shipwrights: 23 posts
Posted: Monday, May 23, 2016 - 06:36 PM UTC
Thanks Tim
This will help a lot. I need to cut A72 and 71 because I put threads back to hull and tied them (next hole where A72 started from).
And main deck, in my case the masts determine the position of the main deck.
So, part no.344 does not fit into place in mind to shorten the cover 1.5-2mm
Otherwise, the deck goes into place quite easily.

J
Jylppy71
Visit this Community
Kuopio, Finland
Joined: April 24, 2016
KitMaker: 23 posts
Model Shipwrights: 23 posts
Posted: Wednesday, May 25, 2016 - 08:16 AM UTC
Cover.., I meant deck
warreni
Visit this Community
South Australia, Australia
Joined: August 14, 2007
KitMaker: 5,926 posts
Model Shipwrights: 2,624 posts
Posted: Saturday, May 28, 2016 - 01:47 AM UTC
Everytime I read another build blog for the 1/100 Victory I get a little more tempted to start mine.. but I must wait until I get everything I need before I start.

I got some rigging hardware from Caldercraft (blocks and thread) to see what their quality is like and they look very good so I will order the gazillion more I need when I finally find out how much of each I will be needing.. blocks, double blocks, pulleys, dead eyes.. for an aircraft person all these rigging names are mesmerising!

Cheers Tim and keep up the ggod work. No slacking off for wood-working projects anymore OK?

Cheers
Warren

timmyp
Visit this Community
Virginia, United States
Joined: May 18, 2008
KitMaker: 496 posts
Model Shipwrights: 404 posts
Posted: Tuesday, May 31, 2016 - 06:31 AM UTC

Quoted Text

Everytime I read another build blog for the 1/100 Victory I get a little more tempted to start mine.. but I must wait until I get everything I need before I start.

I got some rigging hardware from Caldercraft (blocks and thread) to see what their quality is like and they look very good so I will order the gazillion more I need when I finally find out how much of each I will be needing.. blocks, double blocks, pulleys, dead eyes.. for an aircraft person all these rigging names are mesmerising!

Cheers Tim and keep up the ggod work. No slacking off for wood-working projects anymore OK?

Cheers
Warren


Good idea to try and get everything gathered together before starting...but believe me, between all the painting that happens, I think you'll have plenty of time to go out and get more things. So far, it's not additional parts that i'm having to acquire, but supplies - paints, brushes, tools, all that good stuff. However, today, I was reading ahead in the insructions, and looking up in Longridge's & McKay's books, about the standing rigging on the bowspirit. They kept talking about certain lines have a heart or eye spliced into them...it would be nice if Heller had added some of those parts to the kit, instead of having to try and build those structures out of thread.

And I don't slack off in my woodshop - I get just as frustrated there as with the Victory!!! And when I get done with this ship, I'm going back to building tanks!!

Currently, I'm painting the skylight that will be installed on the poop deck. For some reason, my m5 mixture of paint does not adhere very well to the clear plastic, but I'm currently painting the framework for the top of the skylight. What I'm not sure about, is the actual construction of the skylight - Heller says to glue 2 parts 365 to part 366, then glue 367 to 365. The problem is, I don'tknow if 365 gets glued to the inside of 366/367, or to the outside of them. It will be easy enough to figure out (put the long sides of the skylight into the deck, and see how the short sides fit against them), but it would have been nice if Heller had said to glue part365 to the inside of part 366 (I might have those part numbers incorrect).

Jylppy71
Visit this Community
Kuopio, Finland
Joined: April 24, 2016
KitMaker: 23 posts
Model Shipwrights: 23 posts
Posted: Sunday, June 05, 2016 - 10:08 PM UTC
Hi Tim
I added few new pictures to my blog
As you can see, main deck needed little bit force, weight and determination to settle in place
timmyp
Visit this Community
Virginia, United States
Joined: May 18, 2008
KitMaker: 496 posts
Model Shipwrights: 404 posts
Posted: Monday, June 06, 2016 - 11:07 AM UTC
Jyrki,

Wow!! You're really moving ahead on assembling things. Your painting of the mizzenmast looks really good!

I saw, in your blog, that you had posted a picture of the instructions (to wit, the rigging of the bowspirit)...that looks absolutely insane, doesn't it? I think, though, just do one step at a time, and it will all work out ok.

I was looking at some other Victory models on the internet yesterday. I found someone who had built the Victory in 1:50 scale - it was over 1900 cm long!! It was a fantastic build.

At this time, I have to finish installing the skylight. Maybe in a day or two I will get that finished.

Oh, for those reading along: on the skylight parts, the short ends of the skylight (part 367?)fit inside the long ends of the skylight (parts 365 & 366, I think). So far, they whole assembly fits quite well in to the space in the deck.
Jylppy71
Visit this Community
Kuopio, Finland
Joined: April 24, 2016
KitMaker: 23 posts
Model Shipwrights: 23 posts
Posted: Monday, June 06, 2016 - 07:03 PM UTC
Thank's Tim for your comments

My instruction are equally poor quality especially those with rigging threads. They are mostly unreadable, so sometimes I'll need some guidance.

Today I'll try to assembly bowsprit and tie it up.

That HMS Victory 1/50 is absolutely incredible

J
timmyp
Visit this Community
Virginia, United States
Joined: May 18, 2008
KitMaker: 496 posts
Model Shipwrights: 404 posts
Posted: Thursday, June 09, 2016 - 11:01 AM UTC
Hi J,

I was looking at your pictures on your blog, and it looks like you didn't put the buckets on the railing (I think the railing is part 225). Did you take the picture before installing the buckets, or did you just leave the buckets off? Myself, I'm going to glue the buckets to the railing, then paint everything black, then attach the railing to the deck.

Today's objective: glue the mizzen fife rail onto the deck,and its 2 associated "feet". After that, start gluing the buckets to the rail.
Jylppy71
Visit this Community
Kuopio, Finland
Joined: April 24, 2016
KitMaker: 23 posts
Model Shipwrights: 23 posts
Posted: Thursday, June 09, 2016 - 09:47 PM UTC
Hi

Did you meant part no.31? I forgot them,
thank you for reminding me
timmyp
Visit this Community
Virginia, United States
Joined: May 18, 2008
KitMaker: 496 posts
Model Shipwrights: 404 posts
Posted: Monday, June 13, 2016 - 12:19 PM UTC
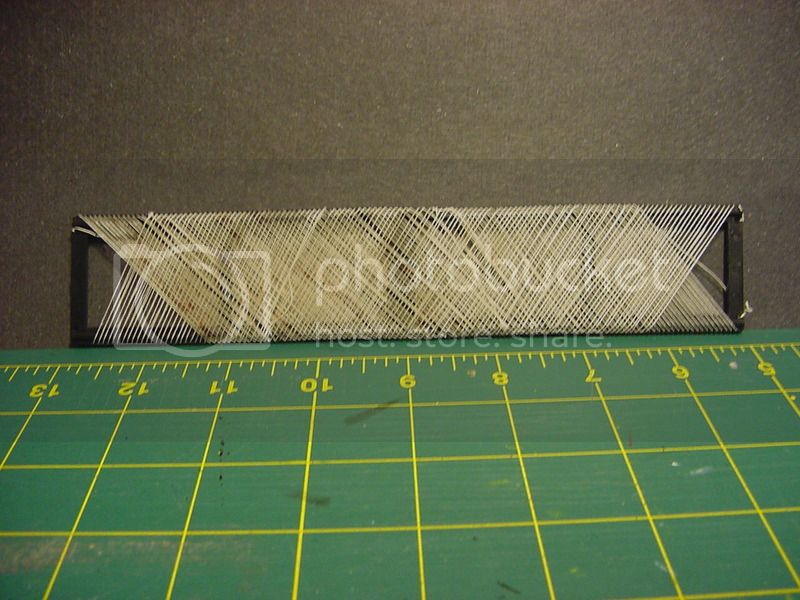
I decided to glue the buckets (yes, I think they're part 31) to the rail, before even painting the rail. Now, the buckets are attached, everything thing is painted black, but I still haven't glued the rail to the deck. I decided to add the U-shaped brackets that holds the netting, as I figured it would be a lot easier to add those brackets and the netting now, instead of after all the rigging is installed (as the instructions indicate). So right now, I have assembled the jig to make-up the netting. A note to the wise: be careful with how much glue you use when putting the jig together!! I got some glue on the edge of the jig, and now, some of those sharp points on the jig of melted down to almost nothing! Makes for a hard time when trying to fix the thread to the jig. And the other problem I've had, is the 0.3 mm thread I'm using to make the netting...well, I have no idea of how long a thread should be used to make then netting, so I was just unspooling some thread from the spool, and installing it on the jig. Unfortunately, this caused the thread to twist on itself, and then I had a chunk of thread all wound up in ball. So I've taken to unspooling a couple of feet of thread (like maybe about20 feet), cutting it off the spool, then looping it over a door for a day or so, to try and allow it to untwist itself. This does mean having to tie each length to the previous length that is already on the jig, but the knot is very small, and I use some clear nail polish to help secure the knot.

And on the jig itself, for the section that has the netting actually completed,I used a mixture of water and white glue to secure the threads to each other. I mean, if you don't, when you cut the netting away, you wind up with a bunch of little pieces of thread!! I suppose you could also just use clear nail polish to secure it.

So I'll probably add the netting brackets to the rail that is near the main mast, and add the netting now, as opposed to trying to add the nettting after the rigging is installed.

Hopefully I can post some pictures soon...maybe this weekend.
timmyp
Visit this Community
Virginia, United States
Joined: May 18, 2008
KitMaker: 496 posts
Model Shipwrights: 404 posts
Posted: Sunday, June 26, 2016 - 04:41 AM UTC
So, been working on the netting thing. I think it's a good idea to try and install the netting on the two "interior" rails, as if you do it sequentially in the instruction book, I think you'll run into some problems with how much space you have to work in.

So here's the first thing: on both the rail that sits behind the opening in the main deck (I'm going to call this the main rail) and the rail that holds the fire buckets (this will be the bucket rail), do not paint the indentations in the rail. This is where the brackets that the netting is attached to are affixed to those rails. You'll be glad you didn't paint them! I found on the main rail, the upright brackets (that the netting is attached to) needed to be sanded down in thickness to fit into the slots on the rail. Now also might be the time to clean out (i.e., remove the paint) from the slots on the hull, where these netting brackets are attached.

So here's some pictures of the first attempt at trying to put the netting together. The brown color comes from an attempt at trying to color the white thread brown, in what I was hoping would be a quick method (it didn't work):


Here's the netting after I cut it off the frame:


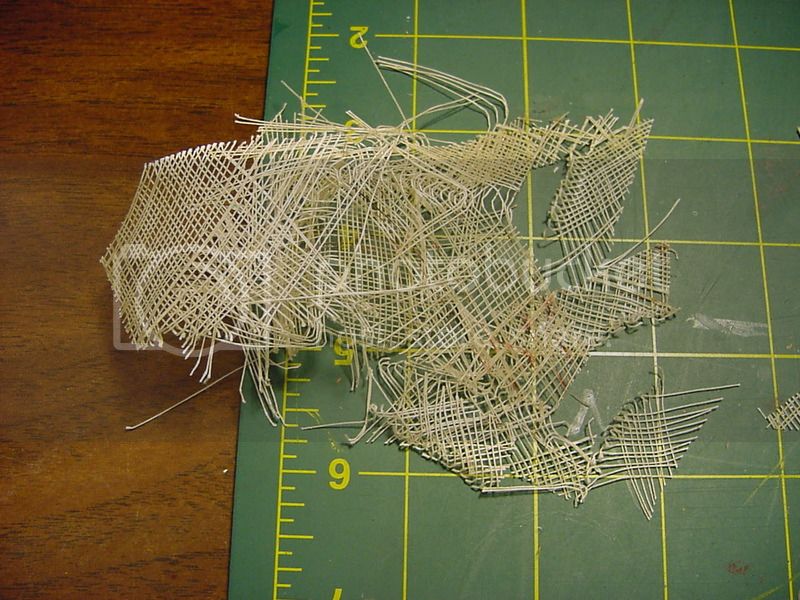
And here's a picture of how things turned out when my frustration level was about 110%:


So here's attempt #2:


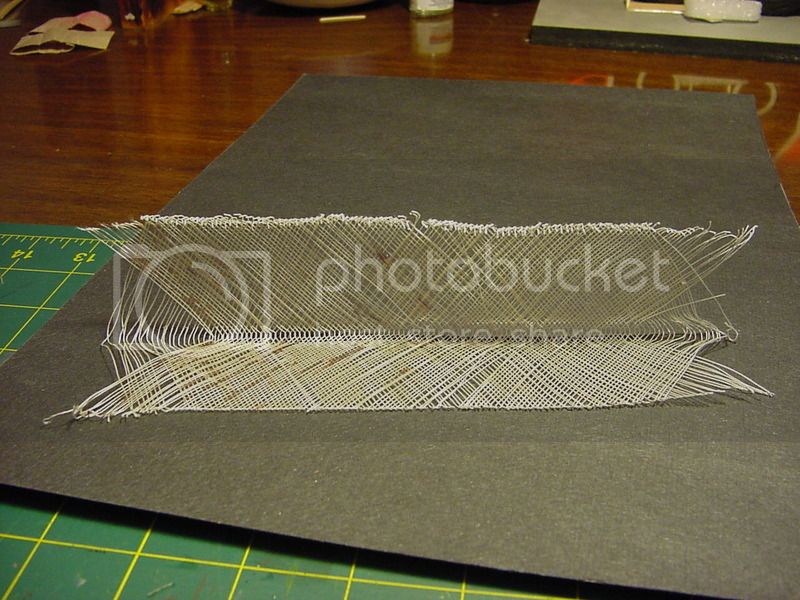
And here is attempt #2 after cutting it free and flattening it. In this case, I coated the entire net with the white glue diluted with water mixture 2 times; I think the second mixture was a bit thicker than the first. I used some compressed air (like Dustoff) to blow all the excess mixture out from between the threads and where it accumulated along the frame.


This picture is a bit out of sequence, but you can see how badly the first netting turned out.


So here's some pictures of the netting all assembled on the bucket rail:


And here the bucket rail is emplaced, but not yet glued:


Here's the brackets attached to the main rail, in a starboard - to - port view. Most of the brackets seemed to line up pretty well.


And here's the brackets lined up fore-and-aft pretty well:


Now here's a picture that explains why you should probably install the netting now, instead of waiting until the instructions tell you to install things. I got my desktop magnifying light too close to the ship, and was pressing down on it quite a bit; I guess I was also pressing down with my forearm, and didn't realize it. In the end, I found one of those uprights had broken off; there's still a couple that are bent, and I don't know if I'll be able to straighten them. You can also see that I've cemented into place the supports for the lifeboats. Doing that now, allows me to do any touch-up painting, without having to do some other touch-up painting.


So for now, I've attached netting to one side of the main rail; will probably do the rest tomorrow, or soon thereafter.
Jylppy71
Visit this Community
Kuopio, Finland
Joined: April 24, 2016
KitMaker: 23 posts
Model Shipwrights: 23 posts
Posted: Sunday, July 03, 2016 - 07:51 PM UTC
Hi T!

Nice work with that netting and buckets.

I know that frustration pretty well about that netting, I had the same result for the first time. And I haven't try for second time yet.

I'm workin with bowsprit and it's rigging at the moment (an waiting for inpiration to try that netting again)..

J
JJ1973
#345
Visit this Community
Niedersachsen, Germany
Joined: August 22, 2011
KitMaker: 1,835 posts
Model Shipwrights: 1,832 posts
Posted: Sunday, July 03, 2016 - 10:27 PM UTC
Wow, that's a pretty impressive update good to see you progressing and fighting through some frustrations! Great work!

Cheers,
Jan
timmyp
Visit this Community
Virginia, United States
Joined: May 18, 2008
KitMaker: 496 posts
Model Shipwrights: 404 posts
Posted: Friday, July 08, 2016 - 07:56 AM UTC

Quoted Text

Hi T!

Nice work with that netting and buckets.

I know that frustration pretty well about that netting, I had the same result for the first time. And I haven't try for second time yet.

I'm workin with bowsprit and it's rigging at the moment (an waiting for inpiration to try that netting again)..

J


Hello J,

How goes the bowsprit rigging? I've just started step 11 (or is it 12?) - putting all the parts around the bowsprit, as well as assembling it. I just started painting the those big pieces (I call them baskets, because that's what all that lattice work reminds me of)(and they're theparts where you had a piece break off). So I'm pretty excited that thigns are moving forward for me. I've been dry fitting those 2 basket parts to the hull, and I see that I'm going to have to use some heat to soften the plastic and mold them to the hull - right now, they don't fit very good.

I was just thinking tonight, that maybe instead of using the water & white glue solution to keep the netting together, maybe I should just use the same glue as for styrene. But I just realized, that wouldn't be a good idea, as then the glue might start melting the plastic frame, and I don't want that!!

Have you posted any new photos? And how goes making up all those collars & loops for the bowsprit rigging?

Tim
timmyp
Visit this Community
Virginia, United States
Joined: May 18, 2008
KitMaker: 496 posts
Model Shipwrights: 404 posts
Posted: Friday, July 08, 2016 - 07:59 AM UTC

Quoted Text

Wow, that's a pretty impressive update good to see you progressing and fighting through some frustrations! Great work!

Cheers,
Jan


Thanks, Jan! Things are moving along quite well; I wanted to post some photos of the finished job on the netting, but Photobucket isn't cooperating with me tonight. Maybe tomorrow!
Jylppy71
Visit this Community
Kuopio, Finland
Joined: April 24, 2016
KitMaker: 23 posts
Model Shipwrights: 23 posts
Posted: Saturday, July 09, 2016 - 01:05 PM UTC
Hello Tim

I'm kind of stand by mode right now because I'm golfing my ass of
Can you tell me the name of that white glue you used that netting? I've tried Revell's plastic glue, but it didn't worked well..
And other thing,
do you have an email which should be enough space if I send few pictures every now and then? Pienoismallit.net where my blog is, there is limited space for pictures.

J
timmyp
Visit this Community
Virginia, United States
Joined: May 18, 2008
KitMaker: 496 posts
Model Shipwrights: 404 posts
Posted: Saturday, July 09, 2016 - 09:55 PM UTC

Quoted Text

Hello Tim

I'm kind of stand by mode right now because I'm golfing my ass of
Can you tell me the name of that white glue you used that netting? I've tried Revell's plastic glue, but it didn't worked well..
And other thing,
do you have an email which should be enough space if I send few pictures every now and then? Pienoismallit.net where my blog is, there is limited space for pictures.

J


J, I'm glad you're getting a chance to do some golfing! I guess this time of year is probably the best time to go.

The white glue I use is Elmer's white glue - it's a brand that's been around since I was a little kid. It's a glue that is used by primary school children for their arts & crafts projects. You should be able to find something similar there in Finland, just look in the arts & crafts section of whatever store you like (even the grocery store!), look for any kind of white glue that is water soluble & non-toxic. I guess, if things don't work out with a liquid glue, you could use a glue stick to try and make all those threads stick together when making the netting (I thought about using a glue stick). I will send you a separate e-mail with my address to where you can send some pictures.

Thanks, and I hope you improve your golfing handicap!!
timmyp
Visit this Community
Virginia, United States
Joined: May 18, 2008
KitMaker: 496 posts
Model Shipwrights: 404 posts
Posted: Saturday, July 09, 2016 - 10:15 PM UTC
So here's the last of the pictures for step 10, and putting the netting up.

As you can see in the picture below, my second attempt on the netting still had some problems, which left a hole in the netting (the brown thing was just a piece of paper, to give a background to the netting). I also placed threads on the top and bottom of the netting, to try and give it a dressed look:


Here's a picture of where I put what I call "the iron bar" back on the fantail. The instructions don't give a precise location as to where to glue this part in, so I looked at Longridge's book, and fortunately, he has a photo in his book of this part from the Victory. It would appear, though, that this iron bar is maybe a little closer to the signal flag boxes than where I put mine. However, knowing how much room I like to have when I put the rigging in, I kept my placement a little further out from the signal flag boxes.


Here's the pic from Longridge's book:


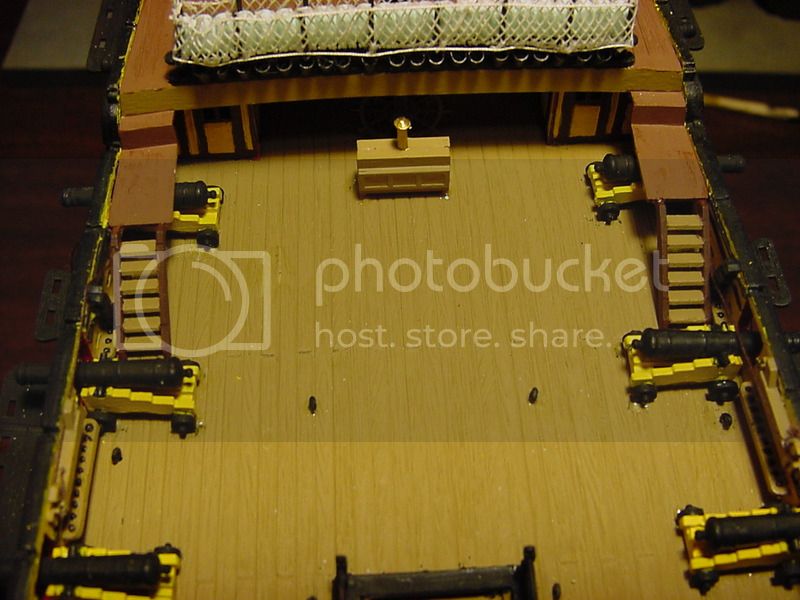
Lastly, a picture showing both ladders leading up to the poop deck. It's somewhat aggravating that these ladders don't seem to fit the way they should: if I had glued the flat bottom of the ladder to the main deck, then the steps of the ladder look obviously backwards/upside down. So instead of having a nice firm base to use to glue the ladders in place, I wound up having to just use the two points where the ladder rests against the edge of the poop deck. I mean, they turn out ok, but it just seems they were molded wrong in the first place:

OK, no photo right now, as Photobucket has completely locked up on me again. Just as well - I've gotta pull clothes out of the clothes dryer. Maybe later today I can PB to cooperate.

Thanks again for taking a look.

I think Photobucket is cooperating, so here's my picture of my ladders installed:


And here's a picture from Longridge's book. I think in this case, it's a picture of the model he's building, not from the actual Victory:

Jylppy71
Visit this Community
Kuopio, Finland
Joined: April 24, 2016
KitMaker: 23 posts
Model Shipwrights: 23 posts
Posted: Sunday, July 10, 2016 - 11:21 PM UTC
Hi Tim

Somehow I can't send you email? But I created a Picasa webalbum and put some pictures there. Now, I don't know that can you see those pictures right away or do you need a google gmail adress first..


J
Jylppy71
Visit this Community
Kuopio, Finland
Joined: April 24, 2016
KitMaker: 23 posts
Model Shipwrights: 23 posts
Posted: Monday, July 11, 2016 - 08:40 AM UTC

Quoted Text


Quoted Text

Hello Tim

I'm kind of stand by mode right now because I'm golfing my ass of
Can you tell me the name of that white glue you used that netting? I've tried Revell's plastic glue, but it didn't worked well..
And other thing,
do you have an email which should be enough space if I send few pictures every now and then? Pienoismallit.net where my blog is, there is limited space for pictures.

J


J, I'm glad you're getting a chance to do some golfing! I guess this time of year is probably the best time to go.

The white glue I use is Elmer's white glue - it's a brand that's been around since I was a little kid. It's a glue that is used by primary school children for their arts & crafts projects. You should be able to find something similar there in Finland, just look in the arts & crafts section of whatever store you like (even the grocery store!), look for any kind of white glue that is water soluble & non-toxic. I guess, if things don't work out with a liquid glue, you could use a glue stick to try and make all those threads stick together when making the netting (I thought about using a glue stick). I will send you a separate e-mail with my address to where you can send some pictures.

Thanks, and I hope you improve your golfing handicap!!

Thaks Tim

Thanks Tim

My handicap is bouncing back and forth (about 0.5 points) But at least weather has been pretty nice

I got to start find that white glue. Have you paint that glue/water mix or do you dip whole net and frame in to that mix?

J
timmyp
Visit this Community
Virginia, United States
Joined: May 18, 2008
KitMaker: 496 posts
Model Shipwrights: 404 posts
Posted: Wednesday, July 13, 2016 - 04:38 AM UTC
J,

I paint the water/glue mixture onto the netting frame. The bowl I use to mix the water & glue is pretty small. Here's a picture of what I use:


As you can see, the bowl is pretty small! That's a number 6 or 7 round sable brush, and I use the Dust-off to blow off any excess water/glue mixture (I do that over the bathroom sink). But even with this, I find that some of the threads don't get glued to each other, and I have problems with threads falling off, or otherwise getting messed up.

Hope you had a sunny day to go golfing again.

Tim
JJ1973
#345
Visit this Community
Niedersachsen, Germany
Joined: August 22, 2011
KitMaker: 1,835 posts
Model Shipwrights: 1,832 posts
Posted: Wednesday, July 13, 2016 - 09:25 AM UTC
Despite your problems with the netting, that's some very nice work, and really brings it to life!

Very nice and steady progress, the overall impression and your detail work really are great both the same!

Cheers,
Jan
timmyp
Visit this Community
Virginia, United States
Joined: May 18, 2008
KitMaker: 496 posts
Model Shipwrights: 404 posts
Posted: Saturday, July 16, 2016 - 04:08 AM UTC
Thanks, Jan. I hope you continue to read this blog!!

And now, for everyone's enjoyment:

I've managed to move on to step 11 in the instructions, but of course, nothing is easy with this model!! The big problem here are fitting parts 349 (starboard curve) and 350 (port curve), and 347 and 348(elemnent of curve, port & starboard, respectively). As well as painting the darn things! Here's some pictures of the "starboard curve" (part 349) before I did some (melting) and stretching of the piece:


As you can see, the back end of the part does not come close to touching the hull (it's supposed to connect to the hull, just behind the blue and yellow "bulkhead for beakhead". I was thinking that I might have to saw off part of the round piece of the bulkhead to get things to fit. You will also notice that there is a yellow-painted "timber" just above the hawse holes; this "timber" should lay flat just above the hawse holes.

Here's another view before I started stretching things. In this view, you can see the distance between the curve part and the hull:


And now, a picture or two showing the after, on the starboard side. The instructions do not give a very precise location for parts 347 and 348; in one of the pictures, it looks like the limiting factor is the curve of the part as it goes under the beakhead bulkhead, even though the box artwork, and pictures from Longridge, seem to show that it should be nestled right against the "curve" part.


Here, you can see the warping due to the heat applied. I got a little careless, too, as I was holding the part over the candle flame, and got slightly distracted, so when I turned my attention back to the melting/stretching process, this was sort of heat damaged:


And now a couple of pictures from the port side. These are both after melting/stretching/cursing a lot. The "port curve" does not fit as well against the hull as does the starboard side, but I think once I get the main part of the curve glued to the hull, some cementing & clamping of this last section to the hull should keep everything in place. In this picture, there's some glare on the curve part, so it's hard to see the distance between it and the hull:


This photo shows the distance a little bit better:


One problem I had with both of the curve parts, is that as I was trying to stretch the pieces to fit better, the plastic cracked at the junction of the last "upright" post and the section I was trying to stretch. I think just the way it was molded, makes that spot fairly fragile.

So that's about it for now. Need to continue painting the port & starboard "curves" with yellow; I think at most, 2 more coats should have everything covered, then a little touch-up with mixture #2. Thanks for watching!!