General Ship Modeling
Discuss modeling techniques, experiences, and ship modeling in general.
Build blog for Heller's HMS Victory
timmyp
Visit this Community
Virginia, United States
Joined: May 18, 2008
KitMaker: 496 posts
Model Shipwrights: 404 posts
Posted: Saturday, August 06, 2016 - 06:58 AM UTC
Well, I guess I need to update the ol' blog, because I see the whole blog has been pushed to page 2!

So I've been working on the bow parts (still, again, forever). After stretching the big curved parts to get them to fit, especially on the port side, I had to do some fixing for part 252, "trimming for curve" (well, it might be part 253, whichever is for the port side). There was a fairly big gap between the curved part and the trimming for curve, so here's some pictures of the process of adding some plastic to make things sort of look presentable:

This is the first go-round with adding some plastic:


And here's a couple more pictures, showing some more additional plastic, as well as fitting it to the curved part:


And here's a final fit:


So here's a pic of the starboard bow, with trim piece and the curved part that will hold the cathead:


Here's the port side. If you compare the previous picture with this one, you can see how much extra plastic was added to the trim work, to make it reach back to the curved piece:


This picture shows how the curved piece that holds the cathead (the blue & yellow piece, curving in from the right, at the center of the photo) does not completely connect to the timber from the big lattice part. In a perfect world, these 2 parts would have connected:


In the instructions, it says to put in place parts 178 & 179, which are cannonball lockers (for the swivel guns that are forward). However, the instructions are sort of vague (thanks, Heller!) about how these lockers are supposed to go around the post that was already cemented a few steps back. So here's the space where the cannonball lockers go, and how the parts initially sat:

This first photo isn't exactly from 90 degrees above, so it gives a false sense of the problem:


Here's one idea I had about emplacing these lockers, but it would just look dumb butting up against the post:


So here's the second idea: put the locker on top of the ledge from the bulkhead:


This picture gives you a better idea how the locker lays up on the bulkhead:


So what I did, I marked about where the lockers fit around those posts, got the Dremel tool out and machined away some of the plastic, and got quite a good fit. I had to do a little extra sanding on the port locker, on the side that faces the bulkhead, but everything fit quite well (esp. the starboard side - it was tight enough just to press-fit it into place! But I glued it anyways). And this is the finished process:


And lastly, a picture of the bow, with the catheads installed (I noticed earlier that I still need to add another part to the cathead!):


So the next couple of steps are putting in those pieces on the cathead, gluing up the bowsprit, paint & install the shield & crown, and then start making-up the initial rigging for the bowsprit. That should keep me occupied until about October (of 2017!!
)

Thanks for watching!
timmyp
Visit this Community
Virginia, United States
Joined: May 18, 2008
KitMaker: 496 posts
Model Shipwrights: 404 posts
Posted: Tuesday, August 23, 2016 - 03:41 AM UTC
Welcome back!

So the bowsprit is coming along, just, as usual, lots of painting to do, especially with the yellow. I jumped ahead a little bit to step 19B, to further assembly the bowsprit, as I thought it'd be easier to paint and assemble the whole thing before I installed it.

One of the things about step 11 is putting in some rigging for a variety of stays. One of the problems is, there are no dimensions on how long some of this rigging should be, and the other problem is, just exactly how the thread gets from one pulley block to another. The instructions don't provide a start & stop point for the rigging, so I guess I'm free to just to make it up as I go along.

The first picture is of the shield & figureheads attached to the bow. Unfortunately, the camera focused on a point behind the shield, and it's a bit blurry in the photo. I got the painting scheme from some pictures of a 1/50th scale Victory (one-fifitieth!). That painting scheme is lot clearer than what Heller has in their instructions. (In other words, Heller's instructions are impossible to implement).


This next photo shows how a part had broken apart in the box, and I had to glue together the part that is circled by the black thread, as well as the narrow "bridge" across the top. I started painting the bottom black, but again, looking at the 1/50th Victory, the grating there is painted light tan, so I'm painting the top of my grating the same color as the deck (light tan). However, in dry-fitting the piece to the bow, the piece is curved too much to fit flat (the way it should fit, I guess), so I'm going to lay it flat as much as possible, and let the curvature rise up against the beakhead bulkhead.


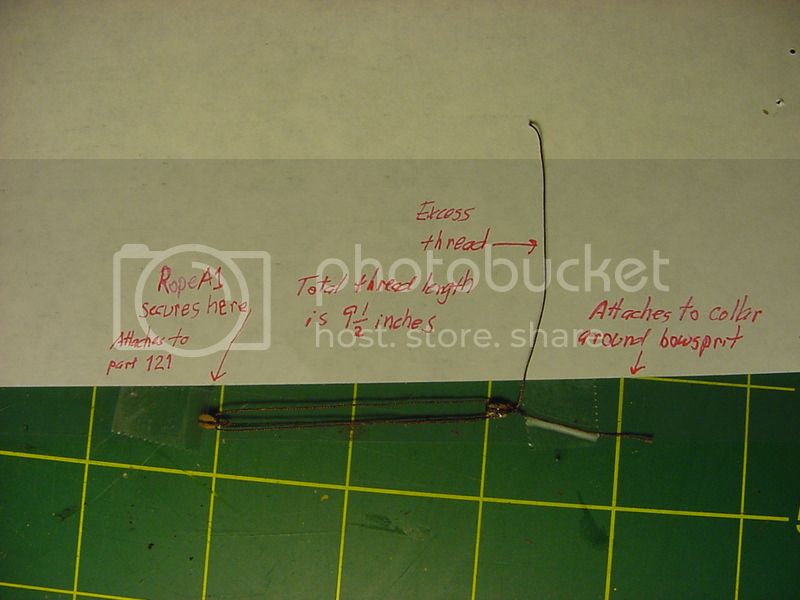
Here's a picture of one set of the rigging that attaches to the bowsprit (actually it gets attached to a collar, and the collar attaches to the bowsprit). Like I said before, Heller doesn't give you any dimensions on how long to make these up (there's a total of 4, of this size), so I put the bowsprit in place, and held a small ruler up to it, and made some guesses on how long (i.e., the distance between blocks) should be (and also taking into account how big my fingers are, and how small this space is going to be) and came up with this:


Here's a picture of the rigging that is fabricated for step 11. From left to right, the first 6 sets are what goes around the collar for the base of the bowsprit; the net seven pieces are attached to collars further up the bowsprit. These last 7 pieces hold stays that come up from the hull of the ship (installed in like step 7 or so), and the other stays come up from the stem (I guess it'd be the stem - it's the area where the 2 hull halves come together, below the beakhead). The dimensions I used are 2 inches between the blocks on the first 4 objects, 1-3/4 inches on the 5th & 6th objects, and 1 inch between loops on the last 7 objects. On those last 7 objects, I looped my thread between some 8d nails, secured the thread with a knot, and then took some more thread, and seized the horizontal threading to make the loops. One loop is used to attach this bit of rigging to the collar, the other loop is where the stay gets attached to.


Here's a pic showing the length of those last 7 pieces of rigging:

OK, no picture, as PHotobucket has totally locked up on me. So the plan for now is, go kick Photobucket in the butt, then start putting the rigging on to the bowsprit, do some more painting, take some more pictures, and some more blogging.

So now, a little bit later...

Here's the picture:


Here's the bowsprit with the 6 rigging units attached:


Here's 2 pics of the grating part. It broke in half again, so I glued the pieces in separately. This picture shows the curvature of the grate, as opposed to the curve of the lattice work:


And here's a top view:


Here's the bowsprit attached, and with some of the standing rigging (E50, 51, 52, 53, 54, and 55) run through their ending points:


And here's all those rigging parts with blocks, that are attached to the bottom end of the bowsprit:


And here's a kind of jig I put together, to help in making up the rigging parts. I didn't know how long some of this stuff was to be, so I just pounded some nails (8d on the left side, a bunch of 1" brads on the right) in a block of wood. The dimensions are in inches:


I forgot to tell you this: I cut and shaped of piece of wood dowel to fit inside the bowsprit, to try and give it some stiffness. Seems to be working ok. I read on Pete Coleman's site, someone had used brass tubing inside the masts, to give the a bit of stiffness. Not sure if I'll use brass, or use some wood dowel, but it seems like a good idea. Nothing worse than adding all your standing rigging, only to have the masts bent every which way!!

Thanks for reading!

timmyp
Visit this Community
Virginia, United States
Joined: May 18, 2008
KitMaker: 496 posts
Model Shipwrights: 404 posts
Posted: Wednesday, August 24, 2016 - 04:00 AM UTC
Oh joy, more problems.

I was going to start the gammoning on the bowsprit today, but I was concerned about a gap between the bowsprit and the hull of the ship. I didn't want to put more stress on the bowsprit with the gammoning, for fear of uprooting it at its attachment point into the deck. So I made a small wedge to fit under the bowsprit, to give it some support once I start the gammoning:


The other problem I found out, was that part 340 (bowsprit grating) isn't long enough to fit from part 344 (beakhead bulkhead) to part 196 (Support for bowsprit floor) (which is the y-shaped upright):


And another thing: you need to cement 2 of part 40 to the grating; the instructions show that they get installed, but it's not mentioned in the text of the instructions.

Maybe tomorrow I'll start the gammoning, and do some repair work to get that grating to fit.

Cheers!
timmyp
Visit this Community
Virginia, United States
Joined: May 18, 2008
KitMaker: 496 posts
Model Shipwrights: 404 posts
Posted: Wednesday, August 24, 2016 - 11:50 PM UTC
The Gammoning job

Did the gammoning today. Took about 2 hours altogether to get it done (that includes some practicing before doing it for real). On the forward gammoning, my initial thread length was 96 inches (that was partly why I did some practicing, to get an idea of how long a thread I need to cut). After doing the forward gammoning, I had 27-3/4 inches of thread leftover, so that means I used 68-1/4 inches altogether. For the gammoning abaft, I started out with 80 inches of thread, had 23-3/8 leftover, for a total of 56-3/8 inches. I think the difference between the two thread lengths is due to the fact that the abaft gammoning didn't fit around the bowsprit the same as the forward gammoning. Heller's instructions say to make 4 tight turns around the center of the gammoning; does that mean the gammoning should be a figure 8, or does it mean to lash the gammoning with 4 tight turns of thread? Doesn't matter, I'm leaving the gammoning as is! Also, the instructions say to make the gammoning up with 9 turns; the forward gammoning is more like 13 turns (I was on a roll, and the side view of the instructions indicate the gammoning fills-up the space between the raised parts of the bowsprit), and the abaft gammoning is probably about 10 turns. Besides, I had scraped all the paint away to help the glue make better contact.

As usual, some photographic evidence:

The starboard side:


The port side:


And a top view:


I added some plastic to the bowsprit grating part, to make it longer and fit better. Waiting for the glue to dry nice and solid before I start shaping it.

Thanks for taking a look!
JJ1973
#345
Visit this Community
Niedersachsen, Germany
Joined: August 22, 2011
KitMaker: 1,835 posts
Model Shipwrights: 1,832 posts
Posted: Friday, September 02, 2016 - 12:34 AM UTC
Wow Tim,

that's some impressive work going on here!!

All the rigging you are doing, and overcoming quite a few bugs that Heller happened to implement in their kit - great work!!

And some great paintwork on the bow, coming along really nicely!!

I'm really looking forward to see you fine model grow!

Cheers,
Jan
timmyp
Visit this Community
Virginia, United States
Joined: May 18, 2008
KitMaker: 496 posts
Model Shipwrights: 404 posts
Posted: Saturday, September 03, 2016 - 06:17 PM UTC
Thanks Jan! I need to get back to work on the model...I'm a bit stuck on step 12 right now, insofar as putting up the netting, to hold the hammocks. As usual, Heller falls a bit short in their instructions!
timmyp
Visit this Community
Virginia, United States
Joined: May 18, 2008
KitMaker: 496 posts
Model Shipwrights: 404 posts
Posted: Monday, September 12, 2016 - 10:46 PM UTC
So, step 11 is completed, and here's how it looks:


The tips of parts 172 & 173 have been scraped clean of the black paint, as some more rigging gets attached there. I wanted a clean surface when I start cementing things in place. The standing rigging that is emplaced here, well, it's very hard to pull the rigging taught through the eyes that I made with thread - you'd think Heller could have sprung for some plastic eyes and hearts here, to make it bit easier to put the rigging together. There is nothing in the instructions that say to add the netting, also, but on the box art, and in other models, as well as the real ship, the netting is in place, so I thought I'd put in as well. The trick is getting parts 172 & 173 through the correct part of the netting, so as not to tear it up, or otherwise get it off-balance.

So, with step 11 done, it's time for step 12: putting up the hammock netting on the sides of the ship. One little hiccup I found was with the cranes (that's what Heller calls the hammock brackets) that go in around the forecastle, they have an extension arm that is not shown in the instructions:


Those extension aren't really a problem, until you realize that the indentations in the hull, where they fit, are also in line with some of the bulwarks (?) on the hull. I had to drill out some holes so that the extensions would fit, and a couple of the bulwarks I had to shave away some material (and sorry the pic is out of focus):


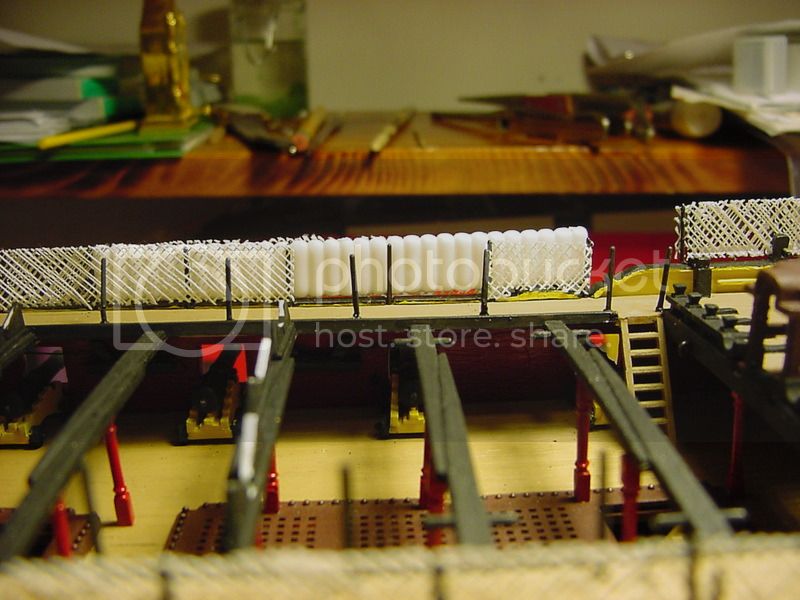
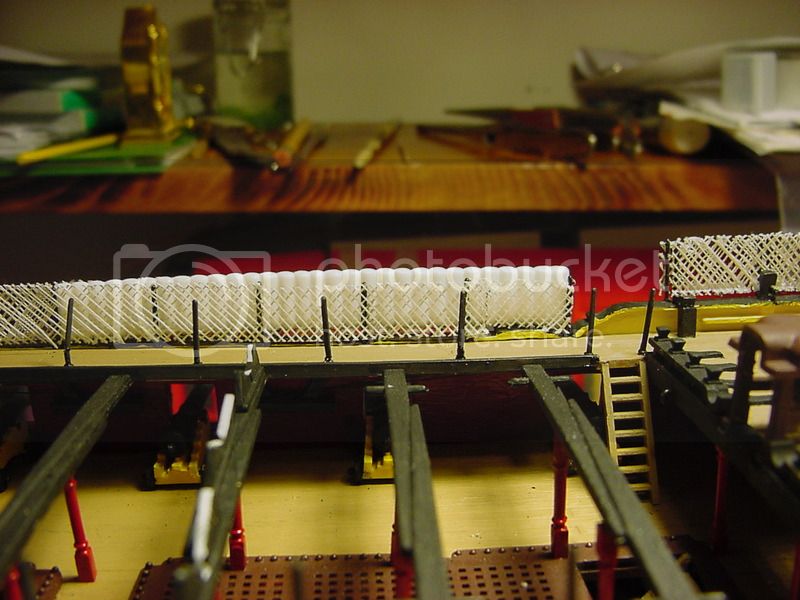
So here's a couple of pictures of some of the netting in place. The first picture is of the netting up around the forecastle; I left the opening there so that the carronade can have its barrel poking through:


And here, this is the netting that follows along the waist. You'll note that it's a bit short on the after end; when I have more wits about me, I'll grab some of the excess netting and try to patch it up. I'm going to leave the place where the exterior steps are open, as to show that's where personnel would come aboard the ship:


Now, in all this, I've found that the netting frame doesn't make enough netting to cover everything. So I started making another set of netting, but ran out of thread!! Oh, the calamity! So as soon as I find a source for thread, things are sort of at a standstill...I do have enough netting already made to put up a bit more, but when that's gone...


timmyp
Visit this Community
Virginia, United States
Joined: May 18, 2008
KitMaker: 496 posts
Model Shipwrights: 404 posts
Posted: Saturday, September 17, 2016 - 09:40 PM UTC
So I went to my local fabrics store (Jo Ann Fabrics, to be exact), and found some Coats & Clark 100% cotton quilting thread. I forget the exact color (maybe cream?) but the article number is S975 and the color code is 8020 (per Coatss & Clark). The color is a real good match to what Heller included in their kit (in the 0.3 mm size), and the diameter is very close - so much that you can't really tell the difference.

I've been adding some more netting; believe me, its taking several go-rounds with making the netting on the frame to get enough netting to cover everything (on an average height of 7 mm, with average lengths of about 100 mm, I get about 4 individual nets' worth out of each frame; considering there is a total 16 pieces of netting (in inboard and outboard) it gets used up pretty quick.

Once I get step 12 (the netting) completed, I'll post some pics. Right now, it's time for lunch, and get ready for some futbawl!
JJ1973
#345
Visit this Community
Niedersachsen, Germany
Joined: August 22, 2011
KitMaker: 1,835 posts
Model Shipwrights: 1,832 posts
Posted: Saturday, September 17, 2016 - 10:03 PM UTC
That's quite a job you are doing there with the netting, Tim!! Amazing!!(Somehow missed your last update, saw it only with your latest post).

Cheers,
Jan
timmyp
Visit this Community
Virginia, United States
Joined: May 18, 2008
KitMaker: 496 posts
Model Shipwrights: 404 posts
Posted: Sunday, September 18, 2016 - 04:05 PM UTC
Thanks, Jan. Making up that netting is a real pain in the butt; not only do fingers start to cramp, but the thread easily pops out of the small notches on the frame, and sometimes when that happens, three or four threads have come out of the notches before I notice it, and then I have to re-do what I just did!

Believe it or not, though, I'm having fun doing this!! I can't wait to finish step 12 and get on with step 17 (or is it 19?), to finish rigging the bowsprit.

And as a general note, I've been thinking about getting some canvas colored paint to paint the hammocks that go between all the netting. I found a color called "sail cloth" from Benjamin Moore - it's a real nice color, but I think it'd look great painted on your wall, but would be too "rich" a color to use on a smaller scale. I suppose I could thin it down, or even mix it with maybe some grey, to lessen the intensity of the color. I've decided to go out and paint chips from the various paint retailers, and see if there's anything I like. Furthermore, I'm thinking of getting some actual cloth to make the sails - I've seen a nice fabric at the fabric stores, but it's a bit "loose" - that is, it's not very stiff. But sails are still a few steps away, and considering I just paid my car insurance, car tax, water bill, credit card bill, Costco renewal, and mortgage, I'm broke!!
RussellE
#306
Visit this Community
Victoria, Australia
Joined: June 27, 2010
KitMaker: 3,959 posts
Model Shipwrights: 2,777 posts
Posted: Monday, September 19, 2016 - 03:01 AM UTC
Wow Tim!

it's great to see a sailing ship being built here on MSW!

I've finally had the chance to drop by and catch up on your progress! Well done sir! She's looking great!

timmyp
Visit this Community
Virginia, United States
Joined: May 18, 2008
KitMaker: 496 posts
Model Shipwrights: 404 posts
Posted: Tuesday, September 20, 2016 - 11:12 AM UTC
Thanks, Russell. Nice of you to drop by! Hopefully, by the end of the weekend, I will have finished the netting & get some pictures posted. What's nice about this stage in the assembly, is that I finally get to put the paint brush down and do some actual assembly!
timmyp
Visit this Community
Virginia, United States
Joined: May 18, 2008
KitMaker: 496 posts
Model Shipwrights: 404 posts
Posted: Friday, September 23, 2016 - 12:47 AM UTC
Some step 12 notes.

In the instructions, and in my reference books, it shows that part 67 should be glued to the rail, and up against the stern piece. However, when I did a test fit, the opening in it was just forward of the aftermost hammock crane. This left very little room to run the mainsail sheet line through, as well as having to contend with any ill-fitting netting I put in place. So I decided to put part 67 between the last two hammock cranes, as this would provide plenty of room to run the sheet line through it, and would probably be easier to cut the netting away from around it.

Here's a pic of where I put part 67, and where it should go:


And here's a pic of the port side, with the netting installed & cut away:


Right now, I'm letting some more of the glue & water mixture dry on the netting frame; the last netting I made, kept falling apart as I cut it into the right sizes. Hopefully, this netting will absorb the glue and stay stuck to itself.
JJ1973
#345
Visit this Community
Niedersachsen, Germany
Joined: August 22, 2011
KitMaker: 1,835 posts
Model Shipwrights: 1,832 posts
Posted: Saturday, September 24, 2016 - 09:25 PM UTC
Tim,

your patience with the netting is just amazing! And you're getting great results!

Cheers,
Jan
timmyp
Visit this Community
Virginia, United States
Joined: May 18, 2008
KitMaker: 496 posts
Model Shipwrights: 404 posts
Posted: Sunday, September 25, 2016 - 08:21 PM UTC
Thanks, Jan. I'm actually having a bit of trouble in making up more netting - not only do I have to be careful in stringing the netting on the frame, I've found that when I apply my glue & water mixture, the brushstrokes cause the thread to jump out of their place on the frame, thus leading to gaps in the netting. (Hopefully, I can post a quick pic soon to better explain the problem). However, if the damage isn't too great, I can individually glue threads to the places where there are gaps, and continue on. But because the places on the netting, once I cut it from the frame, that have damage, I can't use that netting in a continuous length, so I'm having to cut the netting into shorter lengths, and use multiple pieces of netting to cover an entire length. The good news is, I didn't throw out any of the previous netting I made! I'd like to finish the installation of the netting later today; I think I have about 5 sections to finish before all the netting is in place.

And thanks for reading & posting!!
timmyp
Visit this Community
Virginia, United States
Joined: May 18, 2008
KitMaker: 496 posts
Model Shipwrights: 404 posts
Posted: Tuesday, September 27, 2016 - 06:03 AM UTC
More netting stuff.

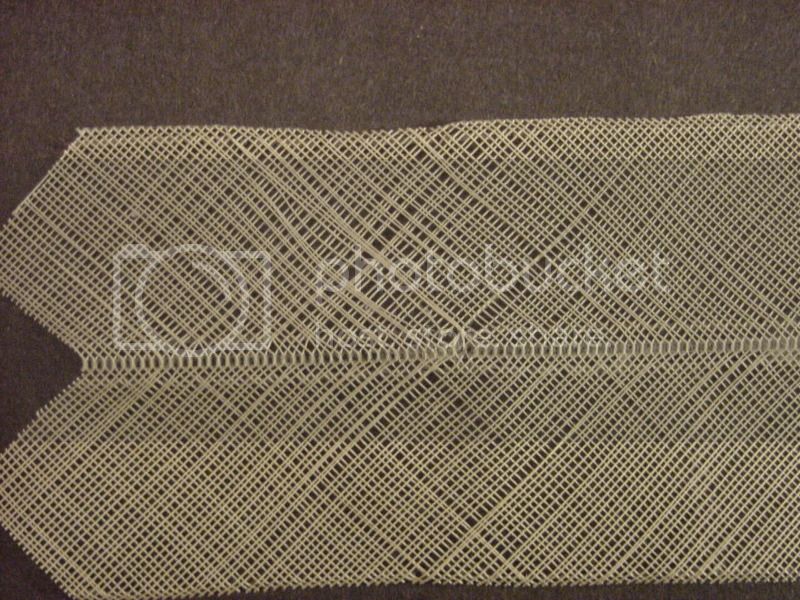
Here's a picture of the netting, after I cut it off the frame. As you can see, there are gaps in the netting, which I think happened when I was applying my glue mixture to the thread - the force of the brush strokes caused some of the thread to jump off their respective notches, and hence, the gaps:


Rather than try to "fix" the gaps before I cut the right size, I'm cutting the netting to fit, and will try to make repairs once it's in place.

Here's the other problem I'm having: the length of the "good" netting isn't enough to cover an entire length of the crane hammocks, so I'm cutting the netting short in length, and using two good sections to complete things:


And here it is with the patch job:


I still have to trim the patched-in piece of netting in the above photo.

So tonight, I almost finished with netting - another little patch job on the poop deck port side, then I can start trimming/repairing things. If all goes well, step 12 should be completed by the end of the week! Hooray!
timmyp
Visit this Community
Virginia, United States
Joined: May 18, 2008
KitMaker: 496 posts
Model Shipwrights: 404 posts
Posted: Saturday, October 01, 2016 - 06:42 AM UTC
"Welcome back my friends to the show that never ends!"

Finally finished step 12,and here's a look at the finished product:


It seemed, from looking at the instruction sheet, this step would be pretty easy, but I spent a lot longer than anticipated on it. Having to string the netting on the frame several times, and letting the glue dry overnight, took a good portion of time.

Some thoughts about this assembly step:

a) You might be better off waiting until the netting is installed, before you install parts 35 (crutch, as Heller calls it; a stanchion as you and I would call it). I kept knocking the stanchions around, bending several, breaking one or two. I think these parts were installed back in step 8 or 9.

b) once the netting is installed, it helps to put a piece of dark colored paper or something inside the hammock cranes, as this will give you some contrast to the netting, whether you're trimming the netting, or installing threads A176 - A191.

c) I was re-reading some of the instructions, and I saw that Heller states I should have 500 meters of the 0.3 thread, and 25 meters of 0.6 thread. Turns out, I had one spool of 100 meters of the 0.3 thread (no wonder I ran out!), and 20 meters of 0.6 thread.


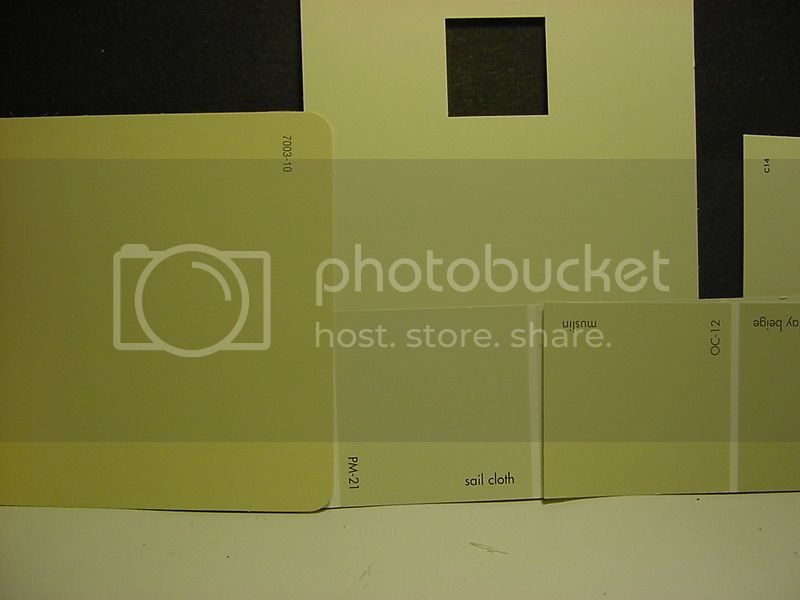
So, instead of painting the hammocks the colors that Heller recommends, I started looking around for a suitable canvas color. I found a color called "sail cloth" at Benjamin Moore paints, and after getting a color sample there, I grabbed some other color samples from other stores. In the below picture, the bottom center square is "sail cloth";, to the left, Home Depot's "drumskin", behind the sail cloth sample is Home Depot's "muslin", and to the right, is Benjamin Moore's version of muslin. I'm pretty much set on the sail cloth color, but I'd like to hear any other opinions.

I'm thinking of making cloth sails for this model, and would probably paint them in the same sail cloth color, if the fabric itself wasn't a good "sail cloth" color.


So for now, I've jumped over to step 19, which is finishing the bowsprit & jibbooms, and all the associated rigging (which looks like a nightmare).

Thanks for stopping by!
JJ1973
#345
Visit this Community
Niedersachsen, Germany
Joined: August 22, 2011
KitMaker: 1,835 posts
Model Shipwrights: 1,832 posts
Posted: Thursday, October 06, 2016 - 09:39 PM UTC
Tim,

once more very nice work and I adore your patience with all the netting. But you are getting great results!!

As for the color you want to use - hard to tell from your picture. Different light gives a very different impression. If you look at it 'for real' and make your choice, you're most likely right.

Cheers,
Jan
timmyp
Visit this Community
Virginia, United States
Joined: May 18, 2008
KitMaker: 496 posts
Model Shipwrights: 404 posts
Posted: Thursday, October 06, 2016 - 11:26 PM UTC
Hi JJ,

As always, many thanks for your comments!

Yes, you're right about the lighting making a difference. The "sail cloth" color really looks great, to me. And the sample matched a canvas tarpaulin that was at the store, really well. I'm just afraid the color will be a bit overwhelming for the scale of the model!

Again, thanks for your comments, and if all goes well, I'll be posting a few more pictures this weekend.

Cheers!

Tim
timmyp
Visit this Community
Virginia, United States
Joined: May 18, 2008
KitMaker: 496 posts
Model Shipwrights: 404 posts
Posted: Saturday, October 15, 2016 - 12:55 AM UTC
Step 19

So here's some pictures for step 19, which involves attaching the inner and outer jib booms (parts 123 & 124, respectively).


A close-up of the jib booms:


This picture shows the martingale stays. Their attachment point, on the bowsprit, I think is incorrect; I was using John McKay's book to figure out what those lines were called; in his book, he has only 3 stays, and it shows their connection point is where the bowsprit color changes from black to yellow. However, after installing them, I saw in other references that they attach further up on the bowsprit (in the black colored area).


This next picture shows several things: the footropes added to the boom, and the sprit sail boom top installed (along with its footropes and the sheet lines for a sail that is non-existent). For making the knots in the footropes, I hammered 2 1/2" x 20 braids into a board, and used those brads (set 10 mm apart) to makes the knots. However, I think if you set the brads apart 9 mm, you will get closer to having the knots being 10 mm apart, as I didn't take into account the diameter of the brads, so my knots are more like 12 mm apart. I think I need to try to shape them so that they hang down better, and look more natural. The knots in the footropes on the boom aren't called for in the instructions, but I was sort of on a roll.


So here's a better look at the sprit sail boom. It was a guess as to where to place it, as the instructions have no indication as to where it goes, and using the box art & references was about all I had to rely on. As you can see, the blocks for the sheet line are installed, and just for fun, I started to rove a thread through the block, just to see what it would look like (it's not firmly attached, that's why there's slack in the line). It took a while to figure out, from the instructions, what lines these are, and where exactly the blocks attach to (I found it in McKay's book, but they're not really called out in his book. Just some more guesswork on my part). These lines are V8 and V9 in the instructions, and they terminate on the railing (?) just behind the beakhead bulkhead (in fact, third upright from outboard).


Here's an overhead shot of the bow, with the sheet line (V9) running from the boom to its belay point. You might be able to see how I've got it started at the blocks, and run back to its belay point (it's the brown thread). I cut a piece of uncolored thread (the much lighter thread), just to see how it would look. Based on what I see, I might just keep going with uncolored thread for the running rigging. It provides a good contrast to the other colors, and the thread I've colored it so dark, it's pretty hard to see. Decisions, decisions!


And lastly, a picture of step 19B instructions - just to show you the complete maze of rigging that goes on the bowsprit. It's really hard to tell which way to orient the blocks, and a lot of the blocks that can be installed right now, the line that runs through them has attachment points that haven't even been constructed! And if you look carefully, at about the middle of the picture, there are 2 lines, each labelled E62 - and I'm not sure where they start, and where they end up. I could probably just skip them, and nobody is the wiser!!


So that's all for now. Next steps will be to install the lower sprit sail boom, attach a bit more rigging, then get ready to start building the masts. (Oh my God, then I have to start painting them!) I'm also starting to do a "mass preparation" on all the blocks - rather than cut, trim, and paint blocks as I need them, I'm trying to get them all prepared now, so that once I really get going on the rigging, I won't have to stop and do all the prep work.

Thanks for stopping by, and I hope you enjoy the view!
timmyp
Visit this Community
Virginia, United States
Joined: May 18, 2008
KitMaker: 496 posts
Model Shipwrights: 404 posts
Posted: Monday, October 31, 2016 - 03:29 AM UTC
Just some thoughts on the current assembly step (19A & 19B): I previously mentioned for line V8 & V9, that it was sheet line; I think maybe it should be a clew line, especially with the way I have it rigged. The same is true for line V11 & V12 (rigged the same way). Now, in the instructions, and in some line drawings of Victory, it would seem that all this rigging just hangs down from the 2 sprit sail booms. The problem there is, the blocks would just be hanging down from the booms, with nothing tensioning the line strung between them. That is one reason why I rigged those lines like a clew line.

Another...difficulty...that I'm forseeing are lines A9, A11, and A13 (those are for the port side, there are 3 lines just like them on the starboard side). The problem here is, these 3 lines, on most drawings I've seen, go through some eyes that are on the lower sprit sail boom. However, Heller has not molded any rings into place, nor do the instructions point out adding any rings to the boom, to accommodate these lines. I'm thinking of doing one of three things:

a) just take the lines, make a few turns around the boom, and carry on

b) drill holes through the boom, and stuff the thread through the holes

c) super-glue some metal rings (which are 4mm in diameter) to the boom, and then run the threads through them

I sort of messed up on the bowsprit rigging - for lines V1 and V2, these 2 lines are supposed to start wrapped around the jib, down to block p10 (I think - I'm looking at the picture of the instructions I posted last time), back up to a block attached to the boom, then off to their respective belaying points. I think my way (starting the line at the upper block, running it to the block on the end of the boom, then back up to the first block and then to the belaying point) looks like better. Especially when you consider it's all guesswork as to where some of these blocks are supposed to go.

Hopefully, pictures will be posted in a day or three.
JJ1973
#345
Visit this Community
Niedersachsen, Germany
Joined: August 22, 2011
KitMaker: 1,835 posts
Model Shipwrights: 1,832 posts
Posted: Tuesday, November 01, 2016 - 09:58 AM UTC
Wow!! Somehow I missed you Step 19 - that's amazing.

Honestly - the instruction for rigging the bow sprit is, well, how to say? Confusing doesn't get it...I think this would discourage me already... So you are doing an absolutely great and stunning job in fighting through!!

Reading your guessing and estimating because of missing or misleading instructions - I don't know if that is possible at all - but might it be a solution to try to understand how this was intended to work for the sails and going backwards from there, instead of trying to follow some, likely inadequate, instructions? But that's very easy to say...and the best skippers are always those how are standing on the pier and are just observing and commenting...

Amazing work, Tim!

Cheers,
Jan
timmyp
Visit this Community
Virginia, United States
Joined: May 18, 2008
KitMaker: 496 posts
Model Shipwrights: 404 posts
Posted: Wednesday, November 02, 2016 - 01:14 AM UTC

Quoted Text

Wow!! Somehow I missed you Step 19 - that's amazing.

Honestly - the instruction for rigging the bow sprit is, well, how to say? Confusing doesn't get it...I think this would discourage me already... So you are doing an absolutely great and stunning job in fighting through!!

Reading your guessing and estimating because of missing or misleading instructions - I don't know if that is possible at all - but might it be a solution to try to understand how this was intended to work for the sails and going backwards from there, instead of trying to follow some, likely inadequate, instructions? But that's very easy to say...and the best skippers are always those how are standing on the pier and are just observing and commenting...

Amazing work, Tim!

Cheers,
Jan


Dear Skipper Pier ,

Your comments are most welcome, and in this case, caused me to laugh, especially about the skipper standing on the pier!!

You are absolutely correct, regarding trying to go backwards from the function of the line to how it actually gets rigged. I do keep that thought in mind, but even still, I wonder what they were thinking back in the 18th century. I guess it made sense to them.

WRT to all the rigging on the bowsprit, I wrote on a separate sheet of paper, the pulley number and the line that goes through, as well as where it belays. And yes, I used a magnifying glass to read all those alphanumeric designations. I think, in total, for step 19B, there are 24 blocks that get attached here, and there are at least another 6 blocks that are shown in step 17 that are associated with the bowsprit rigging.

It would have been nice if Heller had included a list of names for all the threads (i.e., V1 is a spritsail boom lower lift). But lacking such "extras" in the instructions, I just do the best I can with what I got.

So now, for everyone's enjoyment, a new post with some pictures and some commentary!!

Thanks again, JJ.

Tim
timmyp
Visit this Community
Virginia, United States
Joined: May 18, 2008
KitMaker: 496 posts
Model Shipwrights: 404 posts
Posted: Wednesday, November 02, 2016 - 01:49 AM UTC
Step 19B, continued

So here's an aerial view of some of the bowsprit rigging I've done. In the instructions, it says to "install V4-V5 which go through an eye at the extremity of 119-123 and end at (black dot)." Well, there's no eye at the extremity of parts 119-123 (two eyes are formed by parts 119 and 123, but in step 19A, it leads one to believe that those eyes are reserved for stays E12 and E13, and there really isn't room to run that many lines through those two eyes. However, there is a vertical notch at the end of part 123, and I ran V4 & V5 through the notch, and then back to the belay point. In the picture below, V4 & V5 are the lines that make up a triangle (the triangle composed of the spritsail boom, the jib boom, and the thread). The other lines are, what I think are, the "bare minimum" of rigging on the bowsprit proper - I still need to install lines A9 - A14, and which get attached to some blocks that are attached to rings, and those rings are attached to the beakhead bulkhead (the rings are supposed to be installed in step 11, and I managed to overlook that part. However, the installation of those rings aren't in the printed instructions, they're just indicated in the drawing for that step. I think, though, attaching the rings with their associated pulleys attached to the ring, will make life a bit easier).

Boy, that was wordy!!

So here's a pic:


This next picture shows how line A1 & A2 are attached to the pulleys that were installed back in step 11 (it's one of the group of 5 that are attached to a collar around the bowsprit). Sorry for it being out of focus.


So that's all for now...thanks again for taking a look!
JJ1973
#345
Visit this Community
Niedersachsen, Germany
Joined: August 22, 2011
KitMaker: 1,835 posts
Model Shipwrights: 1,832 posts
Posted: Wednesday, November 02, 2016 - 10:16 AM UTC
Wow - almost getting cross-eyed just from looking at this... Amazing, I don't think I could do that. Great work Tim, looking forward to your next updates!!

Cheers,
JJ