

Go to modelshipwrights.com for the current dynamic site!


General Ship Modeling
Discuss modeling techniques, experiences, and ship modeling in general.
Discuss modeling techniques, experiences, and ship modeling in general.
Hosted by Jim Starkweather
Build blog for Heller's HMS Victory
Removed by original poster on 09/18/17 - 17:44:40 (GMT).

timmyp

Joined: May 18, 2008
KitMaker: 496 posts
Model Shipwrights: 404 posts

Posted: Sunday, September 17, 2017 - 10:46 PM UTC

timmyp
Joined: May 18, 2008
KitMaker: 496 posts
Model Shipwrights: 404 posts
Posted: Sunday, September 17, 2017 - 10:46 PM UTC
OK, I got it figgered out how to get the image itself pasted into the blog, instead of just the link. Woo-hoo!!

JJ1973

#345

Joined: August 22, 2011
KitMaker: 1,835 posts
Model Shipwrights: 1,832 posts

Posted: Monday, September 18, 2017 - 08:51 AM UTC
Hi Tim!
Yes, I was one of those having a look but not commenting - waiting for you to settle the pic hosting issues, and since I'm not at all familiar with the one you choose I had nothing meaningful to contribute.
Glad you got things settled, and I'm looking forward to some impressions of your HMS Victory, how she's looking these days!!
Talking about real life issues, well, all too familiar with that. That'S why I've been pretty quiet over the last weeks (and some more to come), new job (or 'tour') in a different place with moving and all of that, as is custom for military folks every few years or so...
Cheers,
Jan
timmyp
Joined: May 18, 2008
KitMaker: 496 posts
Model Shipwrights: 404 posts
Posted: Monday, September 18, 2017 - 07:21 PM UTC
Hi Jan,
Thanks for your post! Not much to show on Victory at this time - seems like I just can't settle myself long enough to work on her. But I do see light at the end of the tunnel!
So far as the image hosting site, I decided on the cubeupload.com site, as currently, it's free (thought they do ask for donations), and it wasn't encumbered with a lot of do's and don'ts on their Terms of Service (which is a very short document). They have a nice FAQ and blog page, should you have any questions.
I know the feeling of ending a tour in one place, and moving on to the next. Did it 3 or 4 times when I was employed by the army. Where is your next tour at?
write when you can.
Tim
timmyp
Joined: May 18, 2008
KitMaker: 496 posts
Model Shipwrights: 404 posts
Posted: Thursday, September 21, 2017 - 04:37 AM UTC
I think this is the last image I tried to paste here, before PB went haywire:
timmyp
Joined: May 18, 2008
KitMaker: 496 posts
Model Shipwrights: 404 posts
Posted: Friday, October 13, 2017 - 12:15 AM UTC
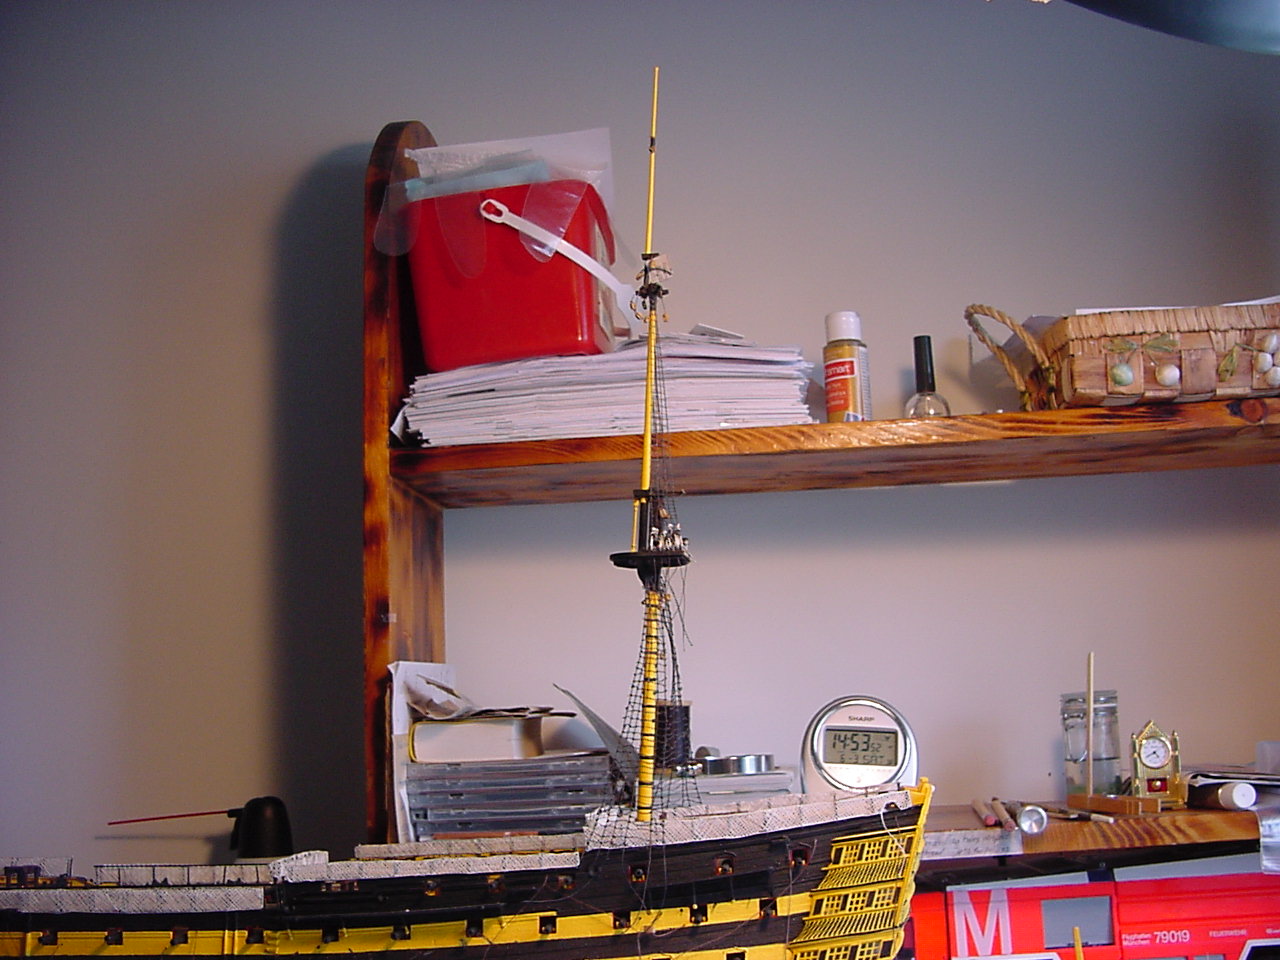
So, while I'm not doing a whole lot on Victory (besides from painting the blocks, and using my airbrush kit to paint the masts), I've been puzzling about the block placement that is indicated in step 19B:
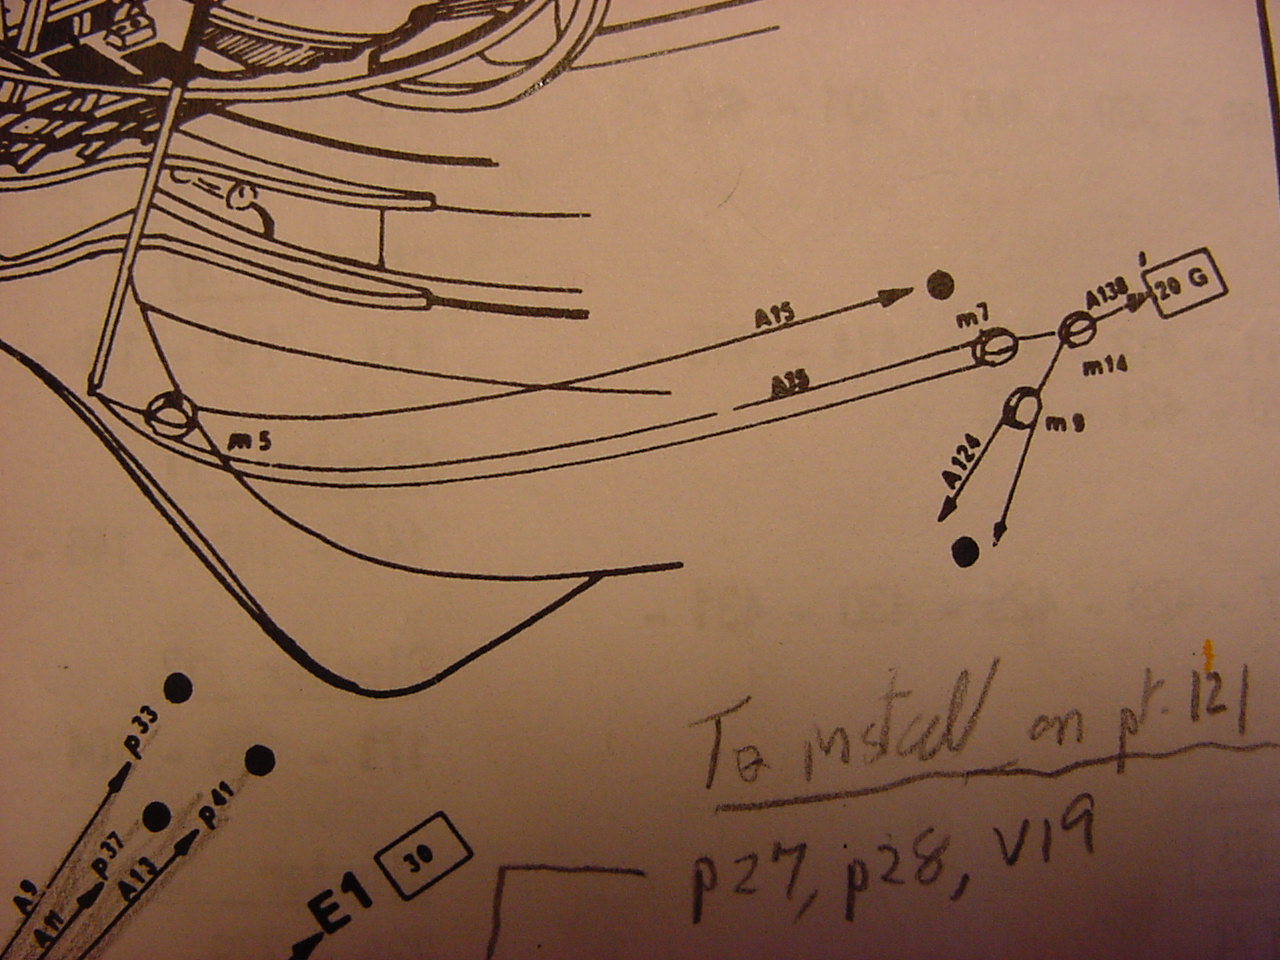
As you can see, it's rather vague about the placement of blocks m7, m9, and m14. Oh, but look! There's an arrow from block m14 pointing us in the direction of step 20G, which shows this:
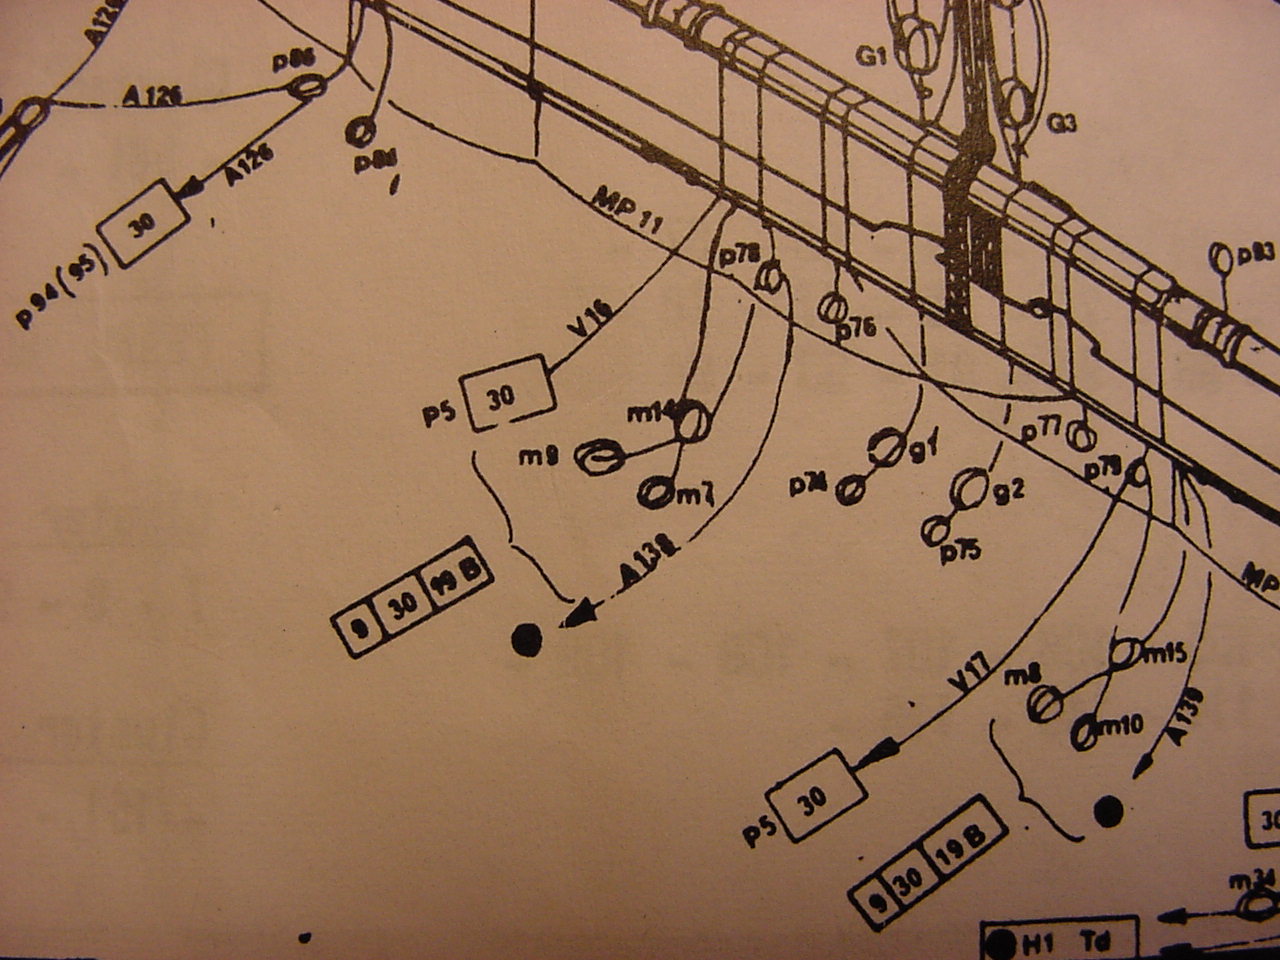
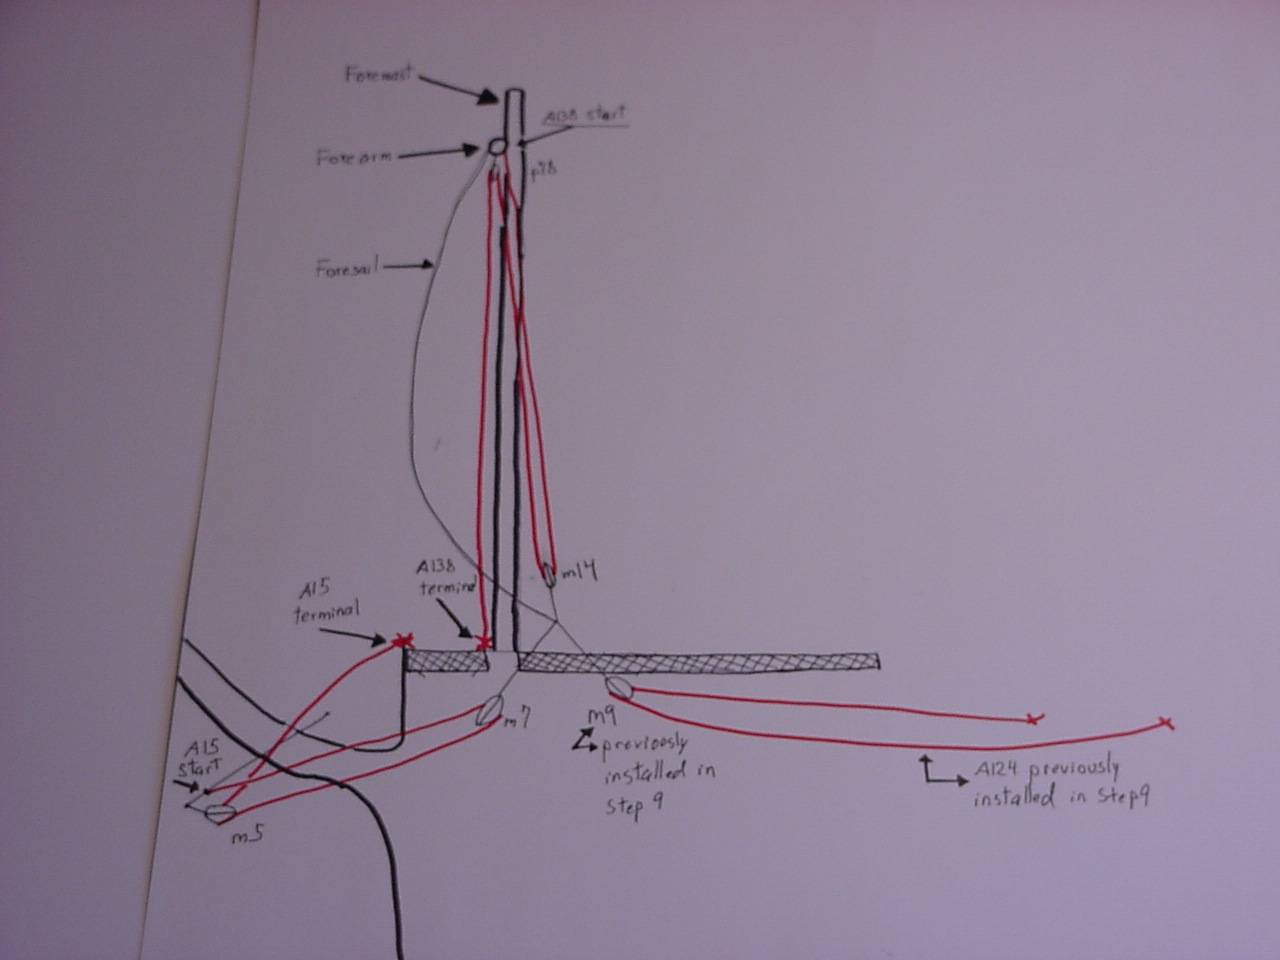
So now, we can figure out that thread A138 begins attached to the fore yard, goes through m14, back around through p78, and then terminates according to step 17 (it terminates on the left-hand side of the fore fife rail). Oh, but wait, it still shows blocks m7 and m9 just sort of "hanging" in space. But lo and behold, there's another "flag" that shows thread A138 is also shown in steps 9, 30, and 19B. So taking a look at step 30:

we see that blocks m14, m9, and m7 all are attached to the lower corner of the foresail!
So to diagram all this out, I made my own pictures to describe where everything goes:
This first drawing was to get thread A15 positioned.
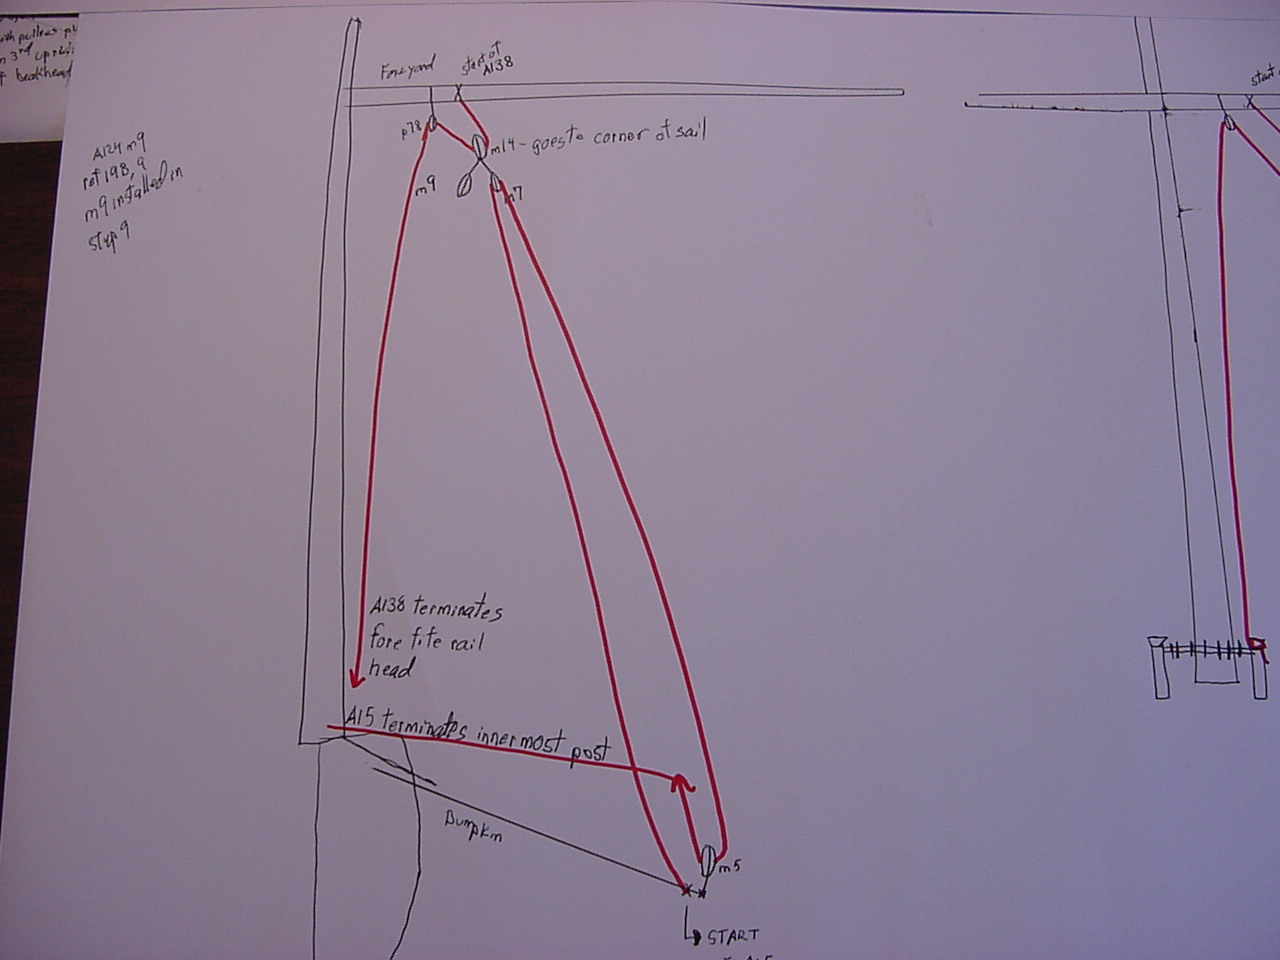
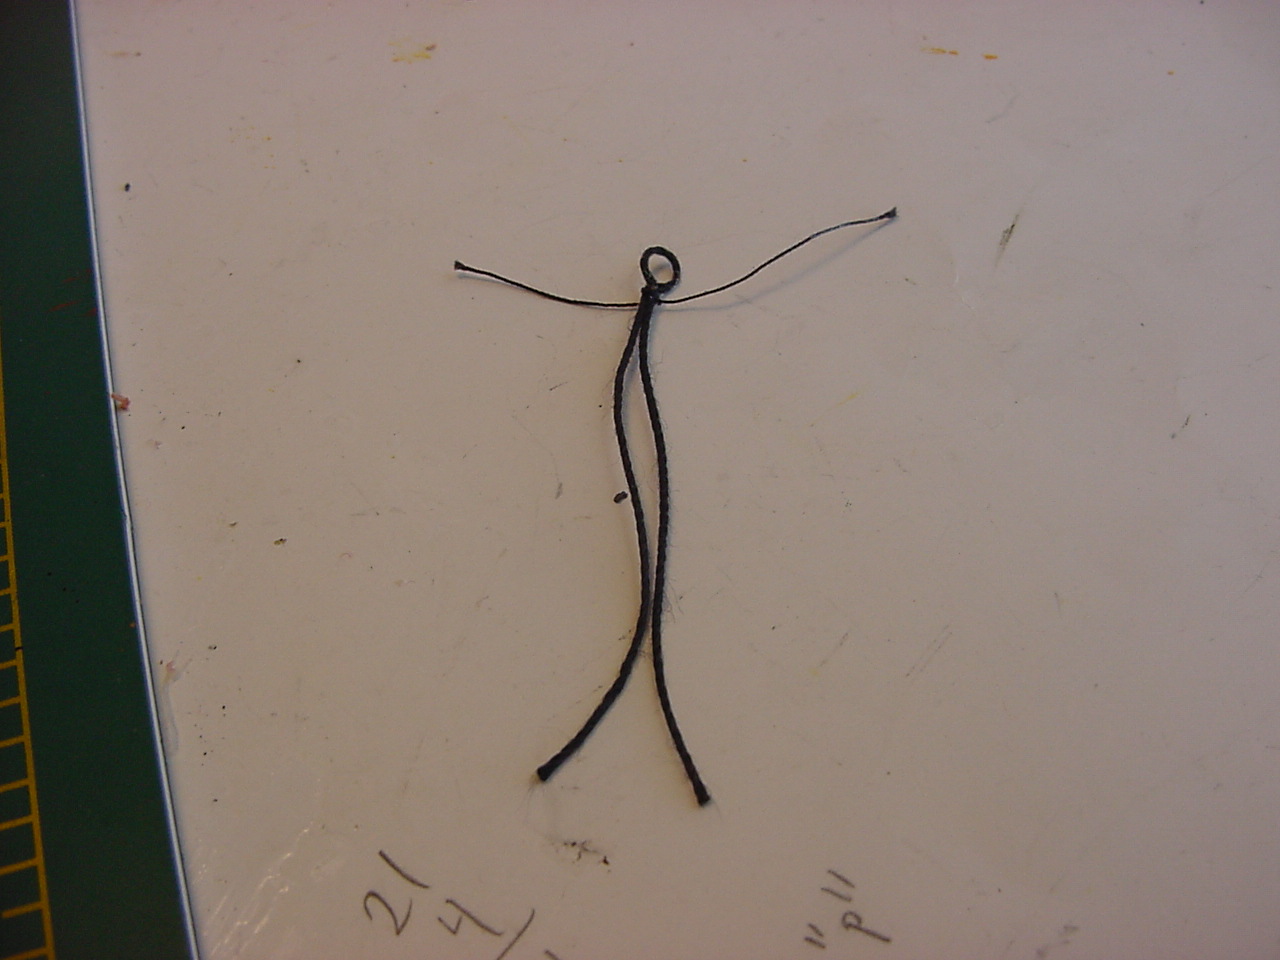
The second drawing focuses on blocks m7, m9, and m14, as well as thread A138:
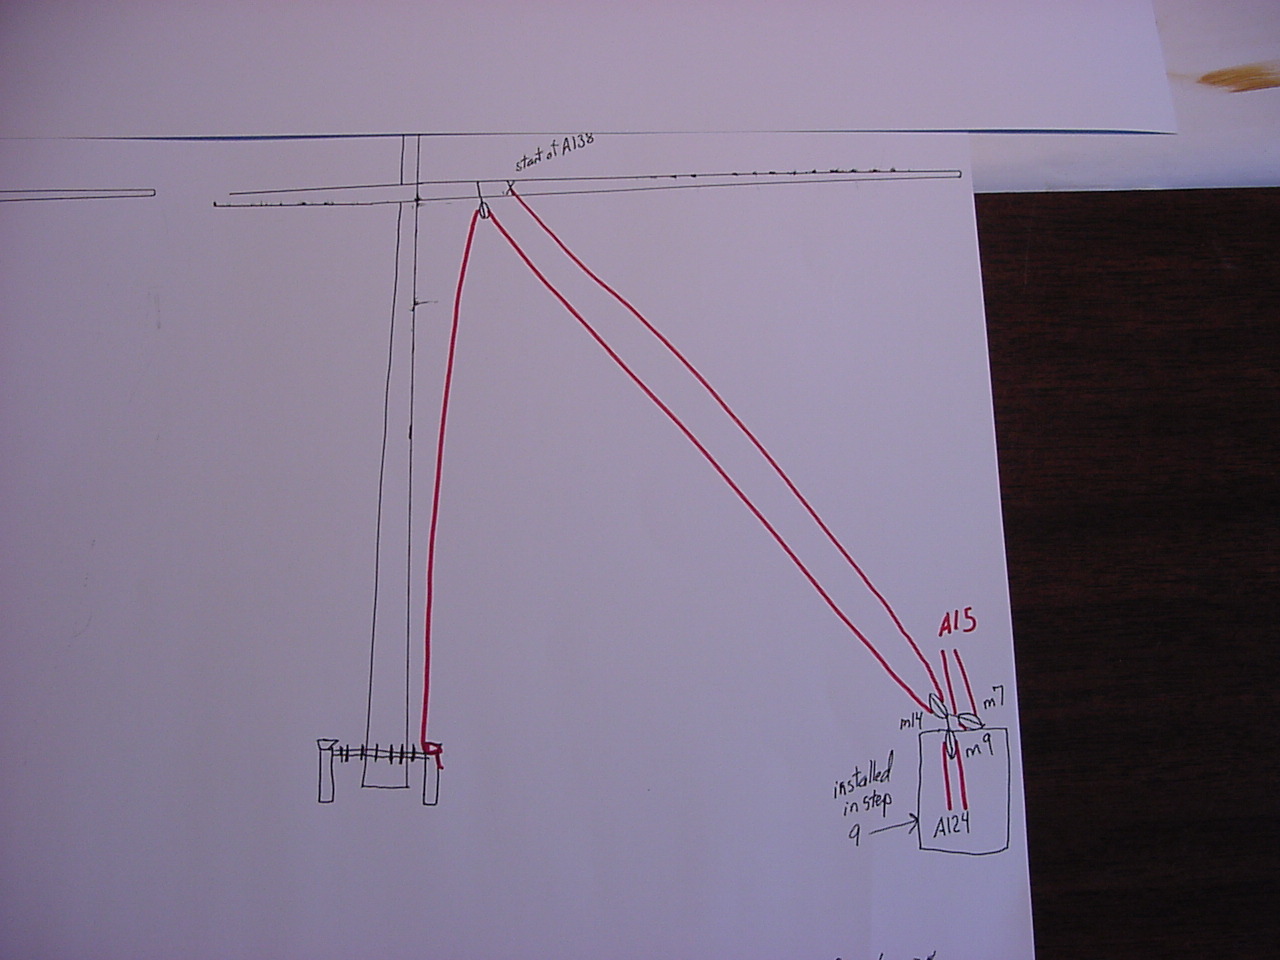
And finally, in a bit of a side view of things, a drawing of where everything actually goes:
And the beauty of it all, it only took me about an hour to figure out this construction and do those drawings!
As you can see, it's rather vague about the placement of blocks m7, m9, and m14. Oh, but look! There's an arrow from block m14 pointing us in the direction of step 20G, which shows this:
So now, we can figure out that thread A138 begins attached to the fore yard, goes through m14, back around through p78, and then terminates according to step 17 (it terminates on the left-hand side of the fore fife rail). Oh, but wait, it still shows blocks m7 and m9 just sort of "hanging" in space. But lo and behold, there's another "flag" that shows thread A138 is also shown in steps 9, 30, and 19B. So taking a look at step 30:
we see that blocks m14, m9, and m7 all are attached to the lower corner of the foresail!
So to diagram all this out, I made my own pictures to describe where everything goes:
This first drawing was to get thread A15 positioned.
The second drawing focuses on blocks m7, m9, and m14, as well as thread A138:
And finally, in a bit of a side view of things, a drawing of where everything actually goes:
And the beauty of it all, it only took me about an hour to figure out this construction and do those drawings!
timmyp
Joined: May 18, 2008
KitMaker: 496 posts
Model Shipwrights: 404 posts
Posted: Sunday, November 05, 2017 - 11:48 PM UTC
So, while I'm waiting for some more yellow paint to arrive in the mail, and continuing to paint the "p" blocks, I've been looking ahead to putting in the main stay. In looking at various pictures of a finished model of Victory, I've seen that the main stay isn't merely looped around the bowsprit and back around. In fact, it's sort of a 2-part process: there's the main stay, and then there's the main stay collar, which is the part that is looped around the bowsprit. Then, the main stay is attached to the main stay collar. Here's what C. Nepean Longridge has to say about it:
"The main stay collar is not the same thing as the collar of the main stay. The former is a 14-in.four-stranded cable-laid rope, wormed, parceled and served throughout its length. An eye is worked in one end. The other end is passed through a hole made in the gangboard grating, through the hole in the starboard knight head, through a hole in the gammoning knee, then up through the port knight head, through the grating and then through the eye at its other end. It is then turned down and seized in three places to its other part. In the upper bight so formed a 26-in. open heart is seized. The two hearts are then lashed together with a 4-in lashing (See Fig. 140, Plate 73 and Plan NO. 6)."
At first, I thought the hole in the gammoning knee was a hole I found that is just below the bowsprit; looking at the standing rigging plan in C. Nepean's book, I see that the main stay collar is actually looped much lower, that is, about as low as the bottom side of the gammoning. Here's a picture of the rigging plan, with the stay collar outlined in red:
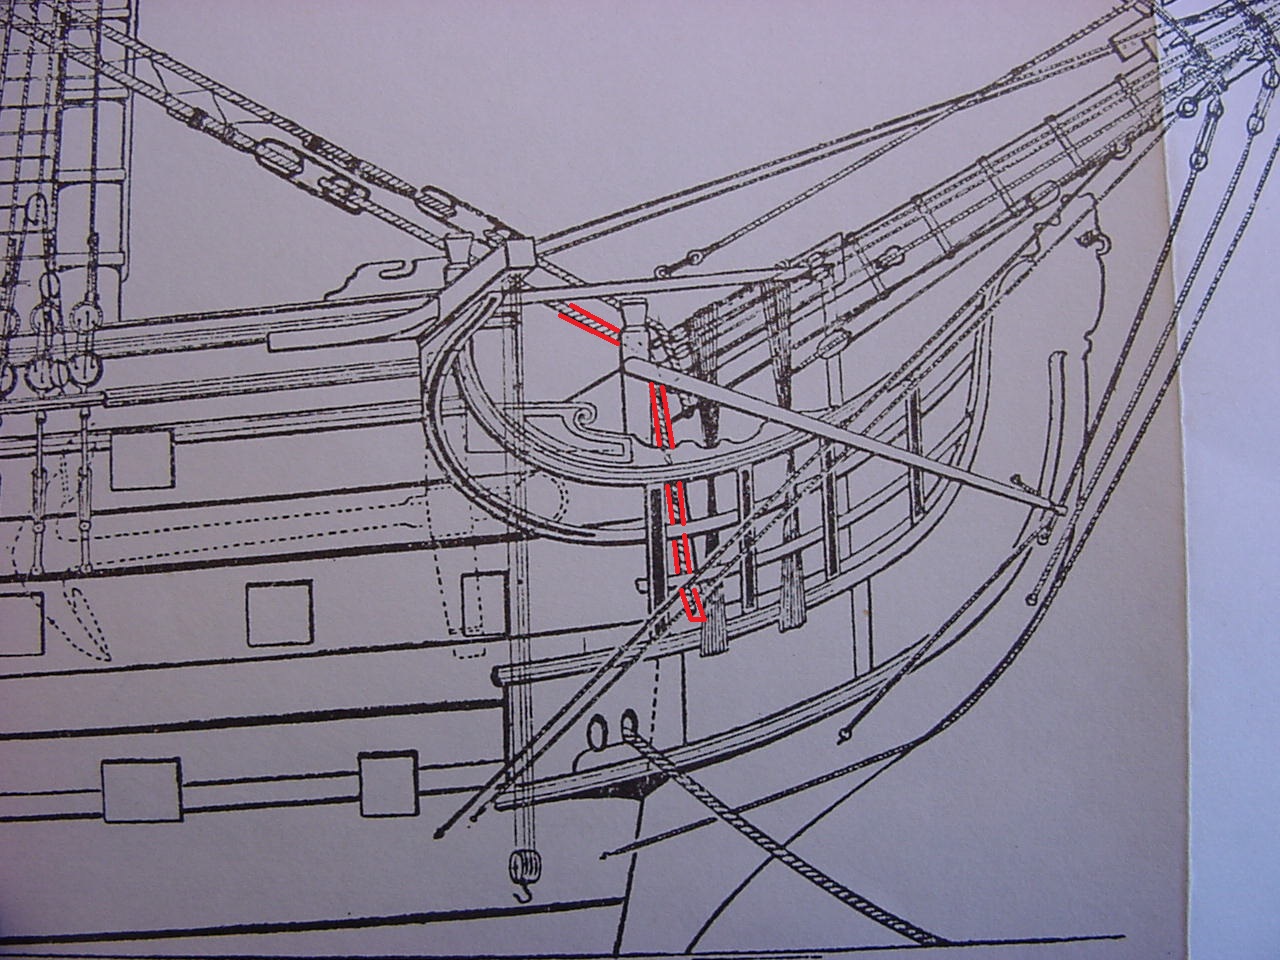
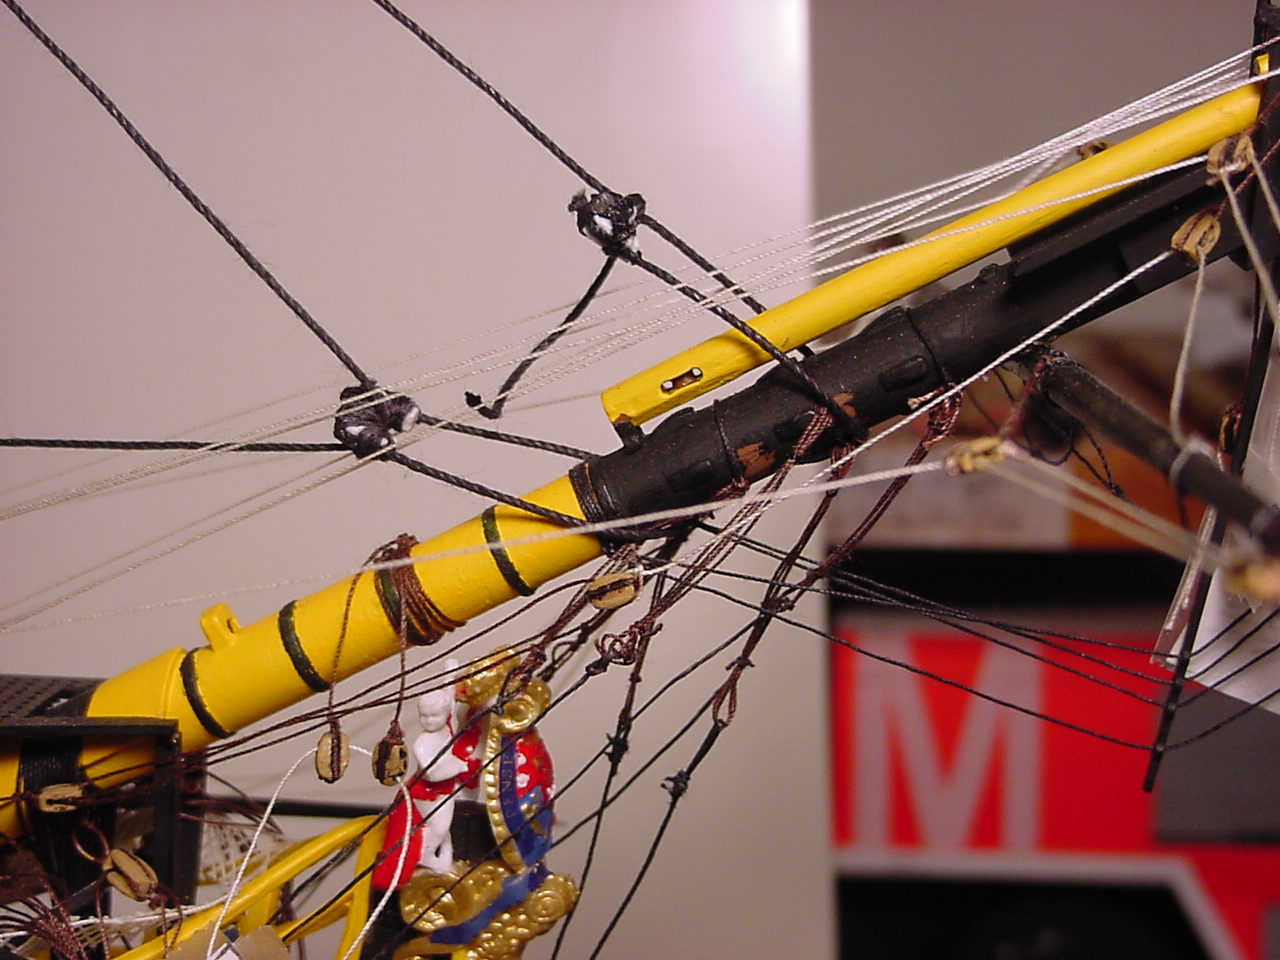
As you can see, the main stay collar is looped quite low. Initially, I thought the hole that the main stay collar went through was higher - as you can see in this picture, I've put a short length of white thread through a hole that I thought was the correct hole (as denoted by the arrow). This particular hole is just below the bowsprit, but above part 358, the "section of flooring":
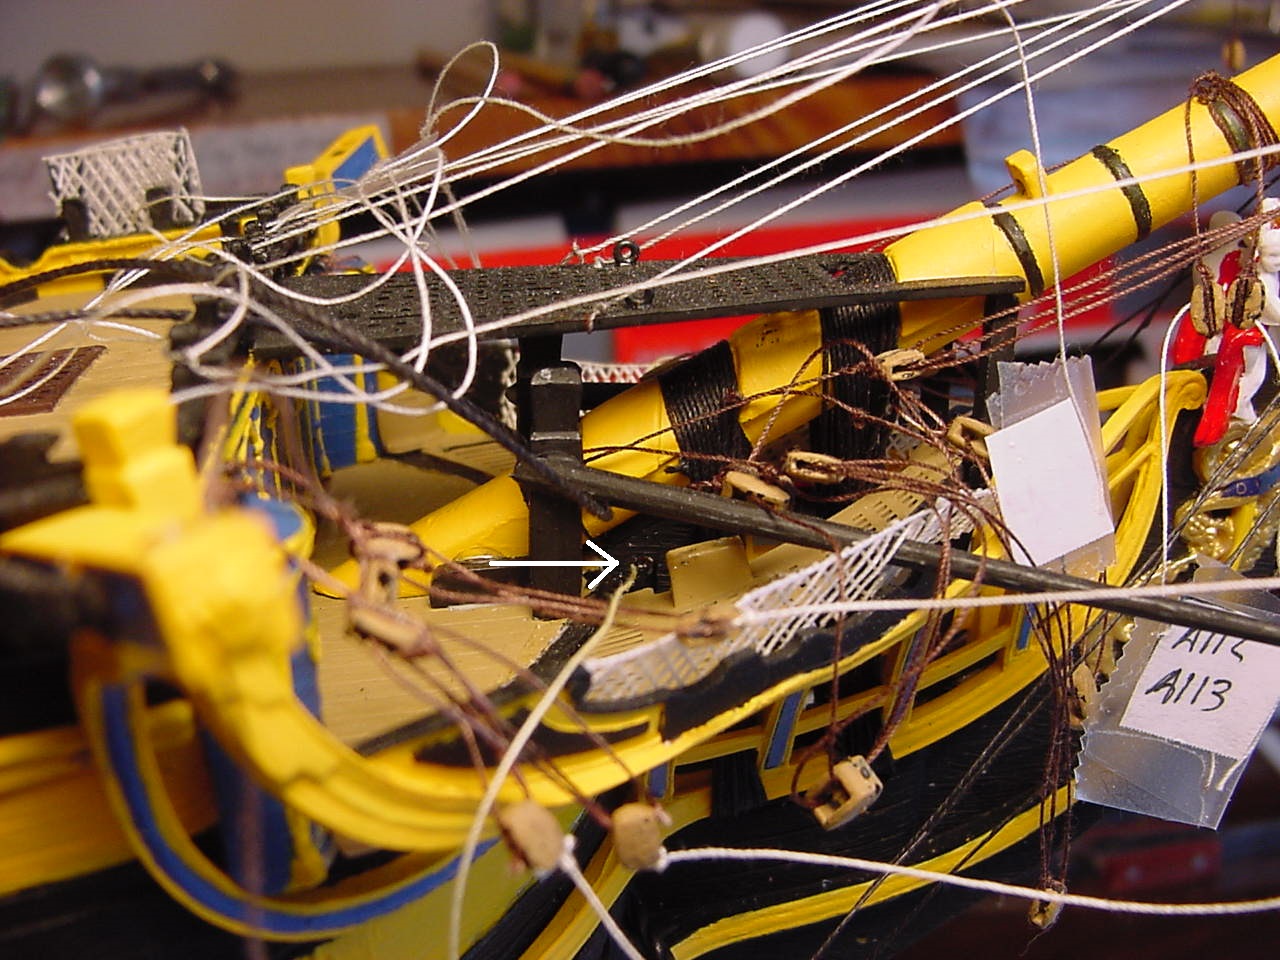
However, on closer examination, I found that there is a hole down where the gammoning is - it's very difficult to see, once all the bowsprit pieces are put in, but in this picture, I've stuck a toothpick in the hole I found (again, denoted by the red arrows, with some text pointing out the thread for the collar):
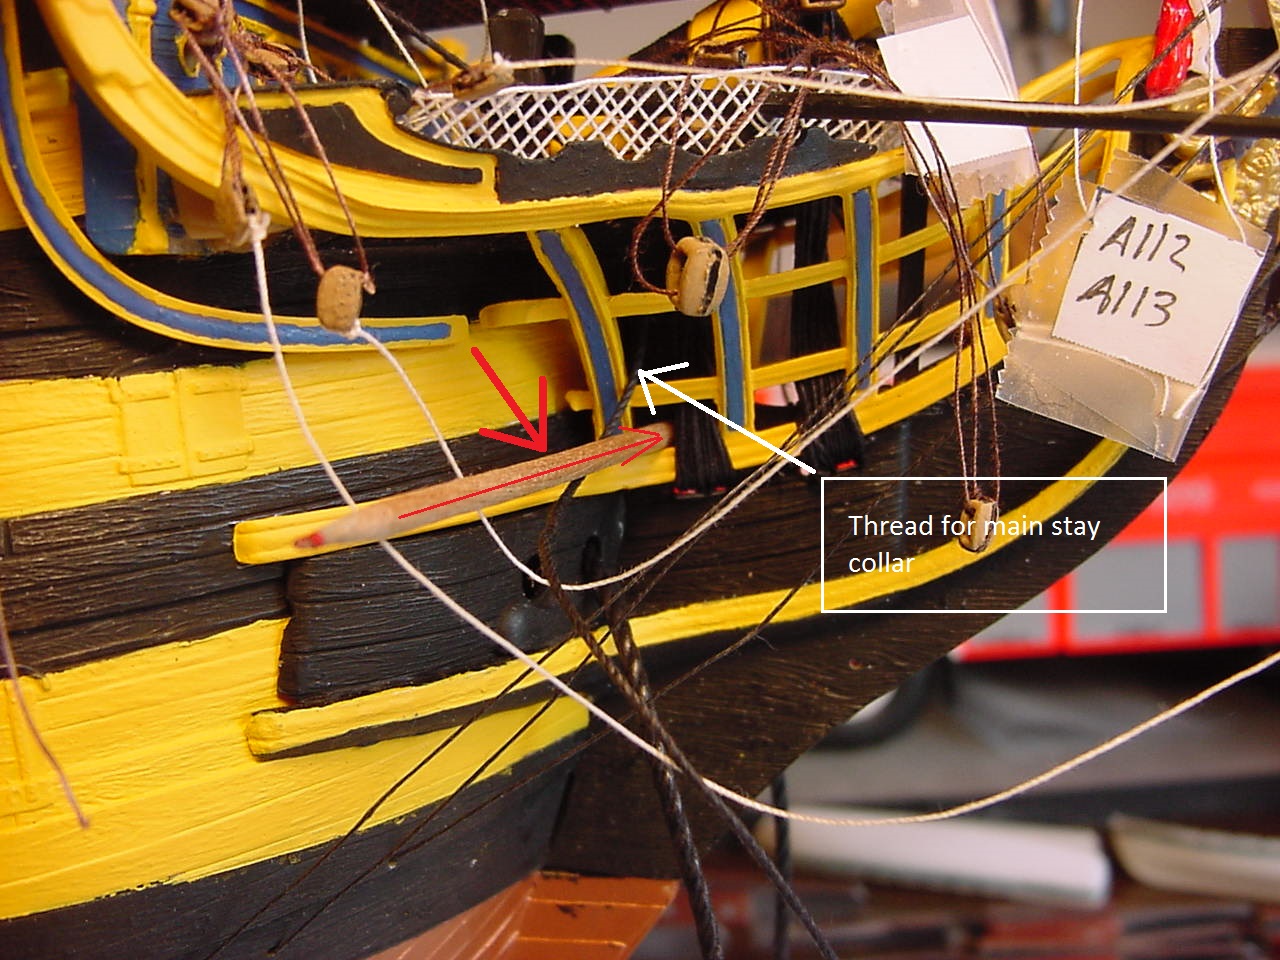
At this point, the thread is merely run through the knight's head, I haven't properly placed it through the gangplank grating.
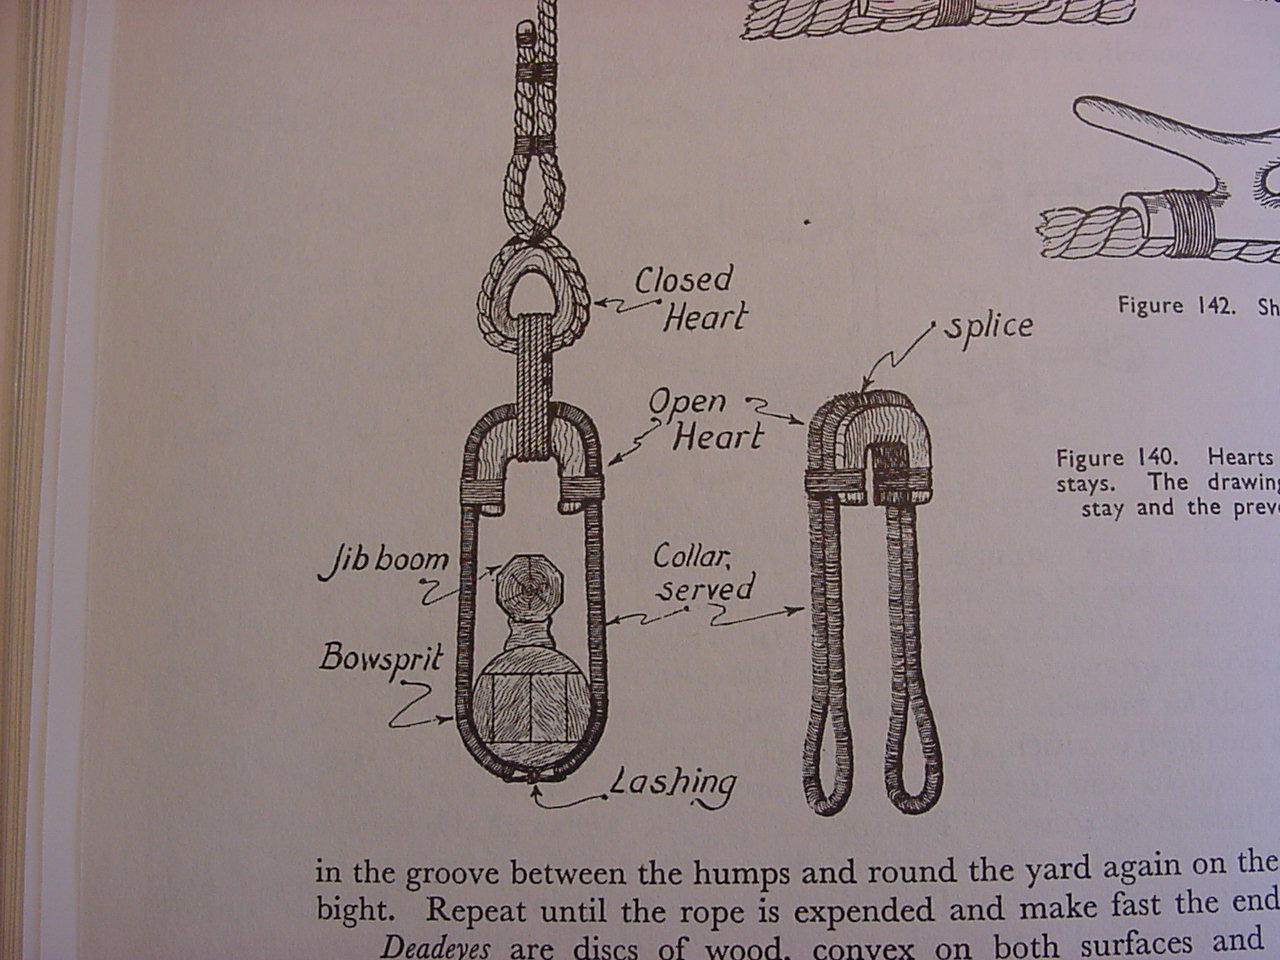
Here is a picture of the illustration in C. Nepean's book, showing how the collar is placed around the open heart and lashed together:
So for the open heart, I've glued a couple pieces of sheet plastic together, with the intent to fabricate the heart. I figure the final size of the heart will be about a quarter inch, which should be pretty much to scale for this model.
I also thought it would be a good idea to start making up the lower shrouds and ratlines for the main mast, but the 1 mm thread I was using looks to be too big. In checking a spreadsheet I have for approximate correct size of the various rigging, it shows that some 0.89 mm thread is correct; I've ordered up some 0.73 mm thread from castyouranchorhobby.com, which should be arriving in the next week or so. My spreadsheet also shows that the main stay collar should be 1.13 mm in diameter, and the main stay itself should 1.54 mm. For my purposes here, both the stay and the stay collar will be made of 1.0 mm diameter thread.
So, bottom line, as you construct the bowsprit, it would be a really good idea to at least install a length of thread (I think maybe 10 or 12 inches would be about right) through that hole in the gammoning knee, and just let it hang there until it's time to install the main stay. This would be in step 11; install the thread before you add parts 350 and 349, which are the port and starboard curves, respectively.
"The main stay collar is not the same thing as the collar of the main stay. The former is a 14-in.four-stranded cable-laid rope, wormed, parceled and served throughout its length. An eye is worked in one end. The other end is passed through a hole made in the gangboard grating, through the hole in the starboard knight head, through a hole in the gammoning knee, then up through the port knight head, through the grating and then through the eye at its other end. It is then turned down and seized in three places to its other part. In the upper bight so formed a 26-in. open heart is seized. The two hearts are then lashed together with a 4-in lashing (See Fig. 140, Plate 73 and Plan NO. 6)."
At first, I thought the hole in the gammoning knee was a hole I found that is just below the bowsprit; looking at the standing rigging plan in C. Nepean's book, I see that the main stay collar is actually looped much lower, that is, about as low as the bottom side of the gammoning. Here's a picture of the rigging plan, with the stay collar outlined in red:
As you can see, the main stay collar is looped quite low. Initially, I thought the hole that the main stay collar went through was higher - as you can see in this picture, I've put a short length of white thread through a hole that I thought was the correct hole (as denoted by the arrow). This particular hole is just below the bowsprit, but above part 358, the "section of flooring":
However, on closer examination, I found that there is a hole down where the gammoning is - it's very difficult to see, once all the bowsprit pieces are put in, but in this picture, I've stuck a toothpick in the hole I found (again, denoted by the red arrows, with some text pointing out the thread for the collar):
At this point, the thread is merely run through the knight's head, I haven't properly placed it through the gangplank grating.
Here is a picture of the illustration in C. Nepean's book, showing how the collar is placed around the open heart and lashed together:
So for the open heart, I've glued a couple pieces of sheet plastic together, with the intent to fabricate the heart. I figure the final size of the heart will be about a quarter inch, which should be pretty much to scale for this model.
I also thought it would be a good idea to start making up the lower shrouds and ratlines for the main mast, but the 1 mm thread I was using looks to be too big. In checking a spreadsheet I have for approximate correct size of the various rigging, it shows that some 0.89 mm thread is correct; I've ordered up some 0.73 mm thread from castyouranchorhobby.com, which should be arriving in the next week or so. My spreadsheet also shows that the main stay collar should be 1.13 mm in diameter, and the main stay itself should 1.54 mm. For my purposes here, both the stay and the stay collar will be made of 1.0 mm diameter thread.
So, bottom line, as you construct the bowsprit, it would be a really good idea to at least install a length of thread (I think maybe 10 or 12 inches would be about right) through that hole in the gammoning knee, and just let it hang there until it's time to install the main stay. This would be in step 11; install the thread before you add parts 350 and 349, which are the port and starboard curves, respectively.
timmyp
Joined: May 18, 2008
KitMaker: 496 posts
Model Shipwrights: 404 posts
Posted: Thursday, November 09, 2017 - 04:33 AM UTC
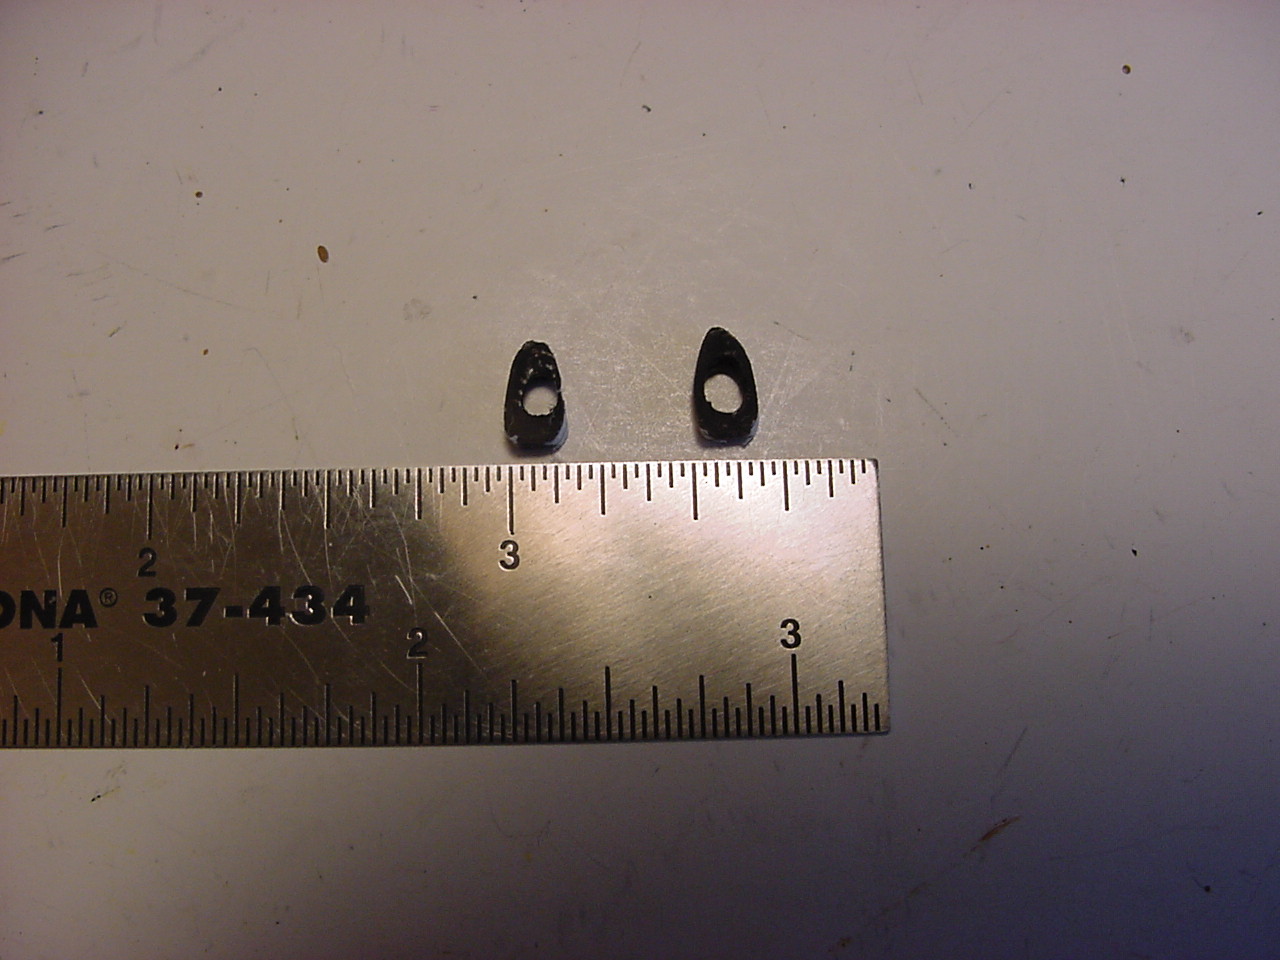
So I finished creating the open heart for the stay collar, and here's a couple pictures of when I got it finished. It's a little smaller than I had wanted, but at this scale, I don't think any one is going to notice:
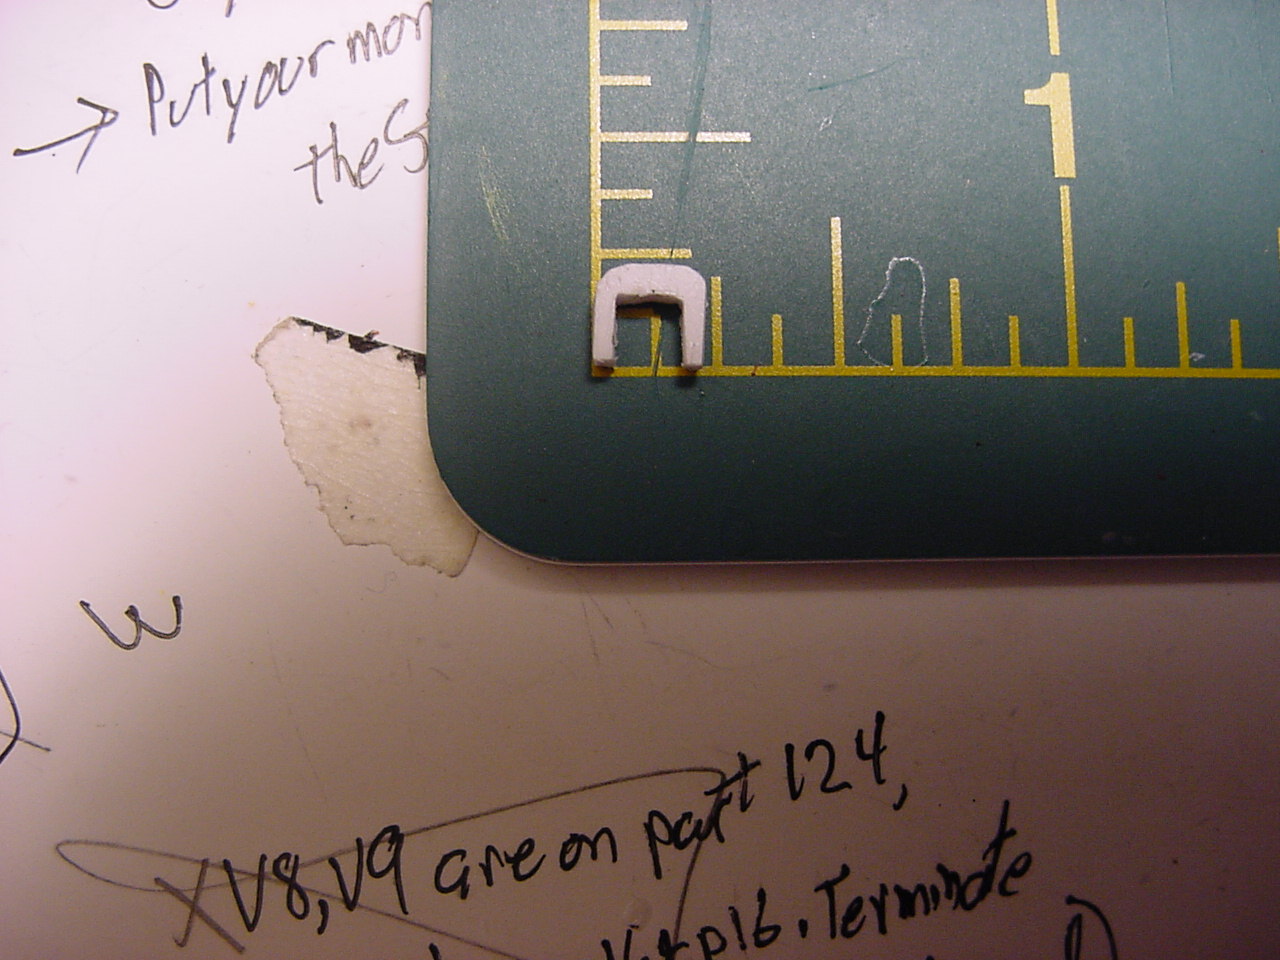
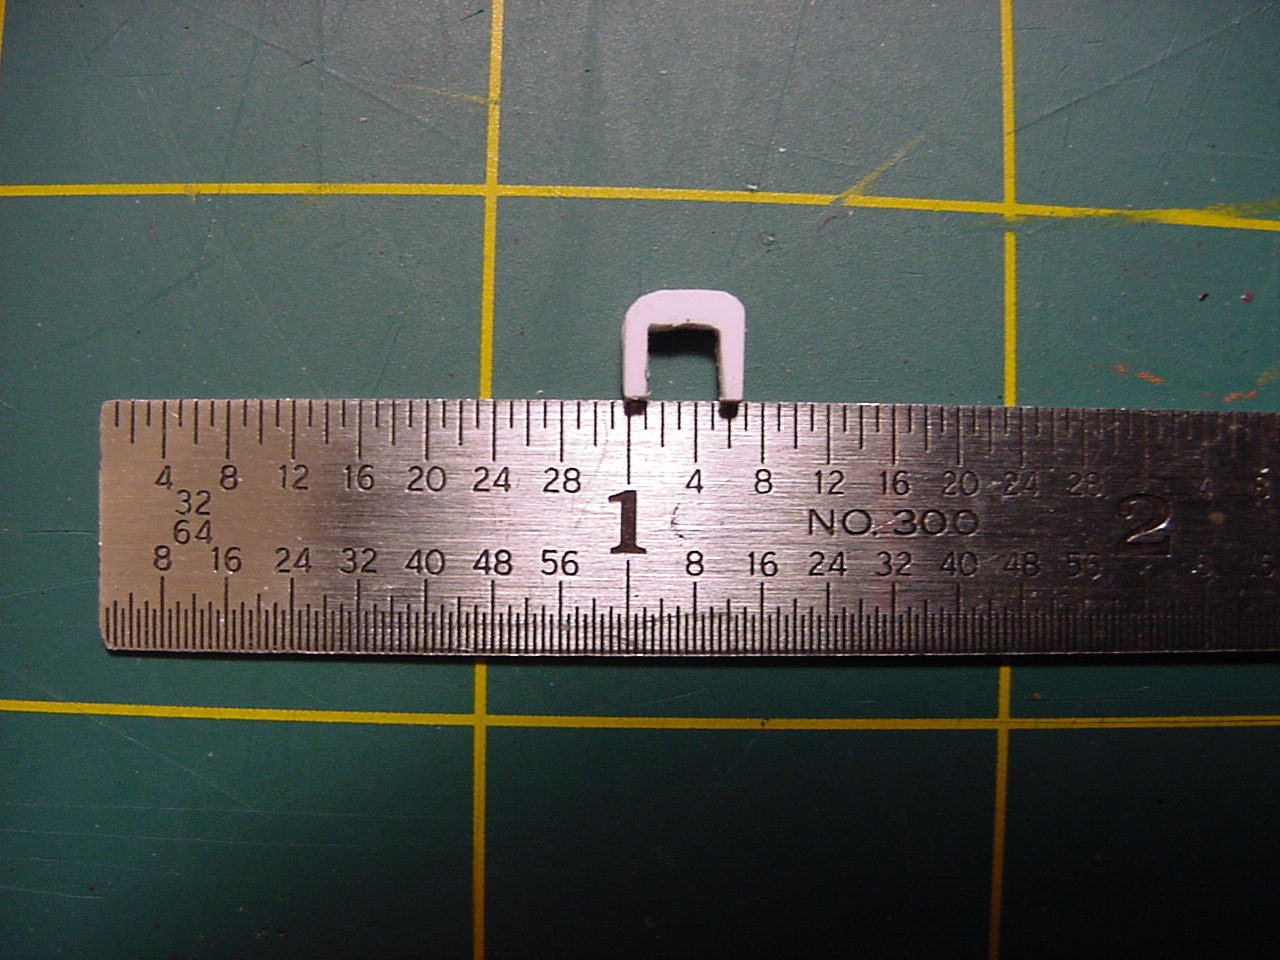
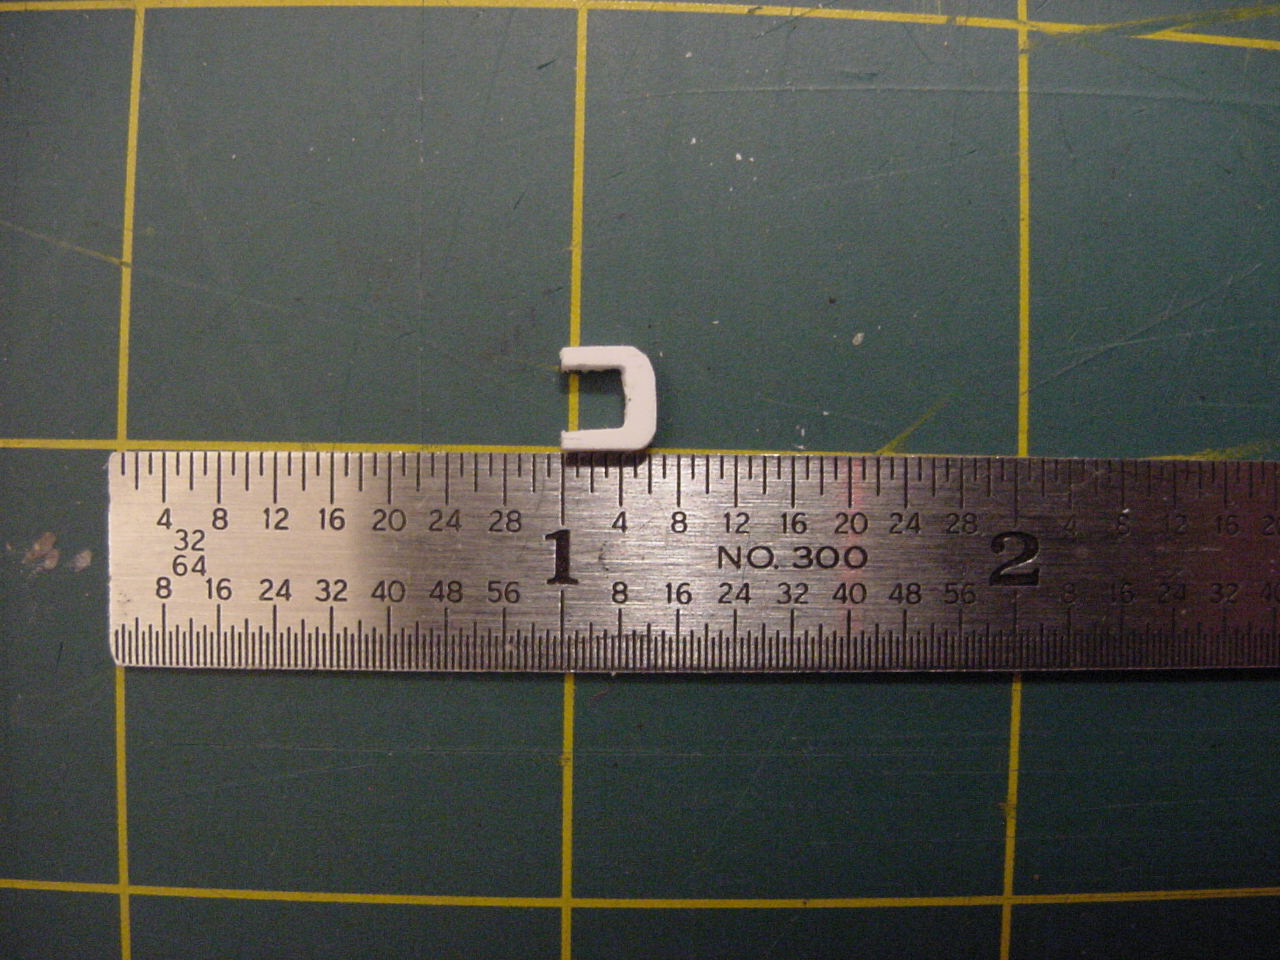
I put a groove in the outside edge of the heart, to help seat the thread that goes around it:
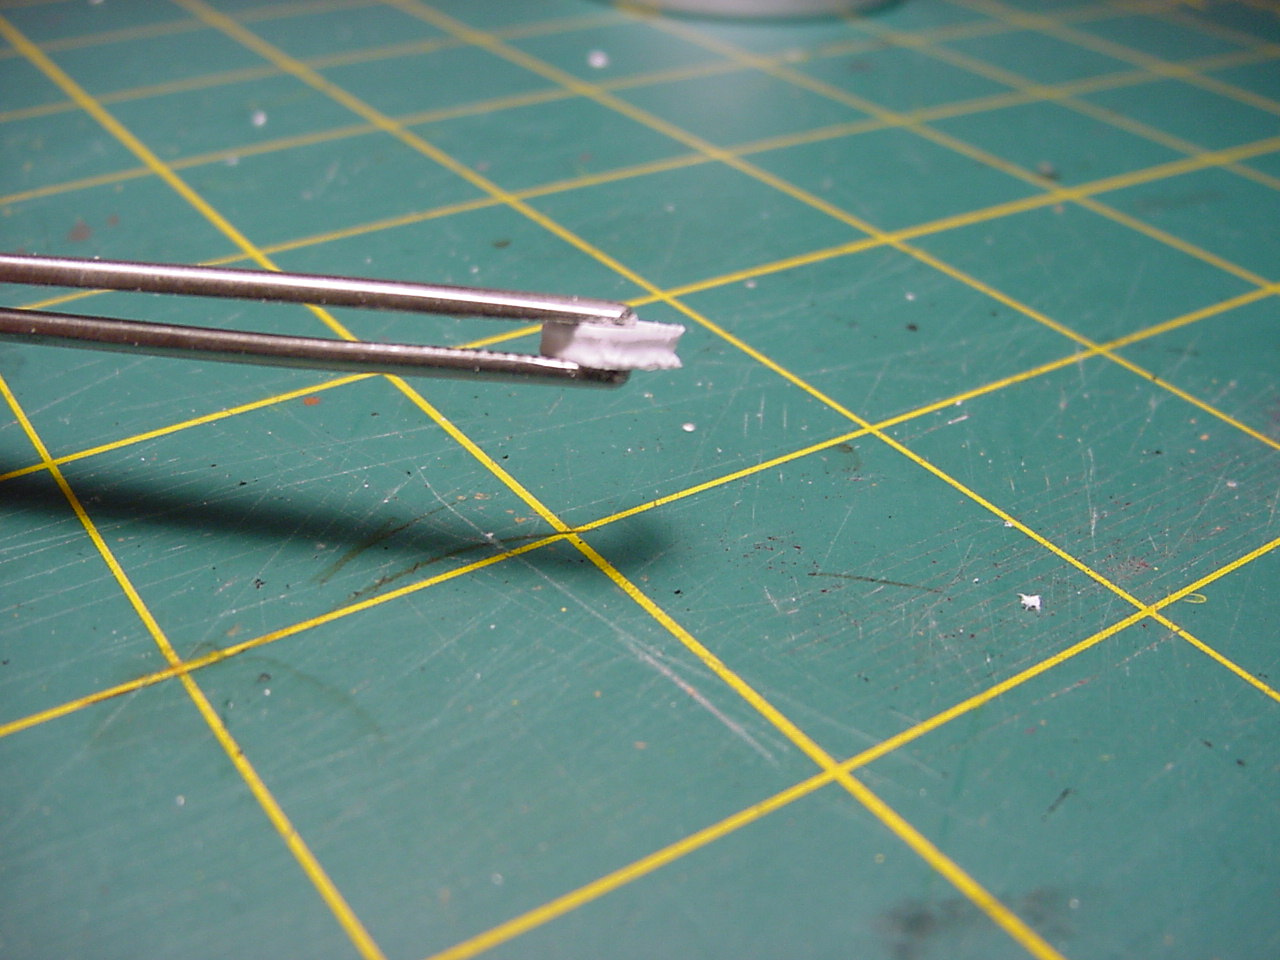
This is a picture of after I wound black sewing thread around the heart. I started in the middle of the heart and worked toward the port side; I just looped the thread around and around, using some clear nail polish to help hold things in place (good stuff to use - it holds quite well, and doesn't dry as soon as it's exposed to air, so you have a bit of working time with it). For the starboard side of the collar, I made a series of overhand knots instead of a bunch of loops; this worked out well until the last knot I put in, which caused all the other knots to slip off the collar and get all tangled on the collar itself. This step (covering everything with thread)was done to be both functional (further securing the collar to the heart) and historically correct:
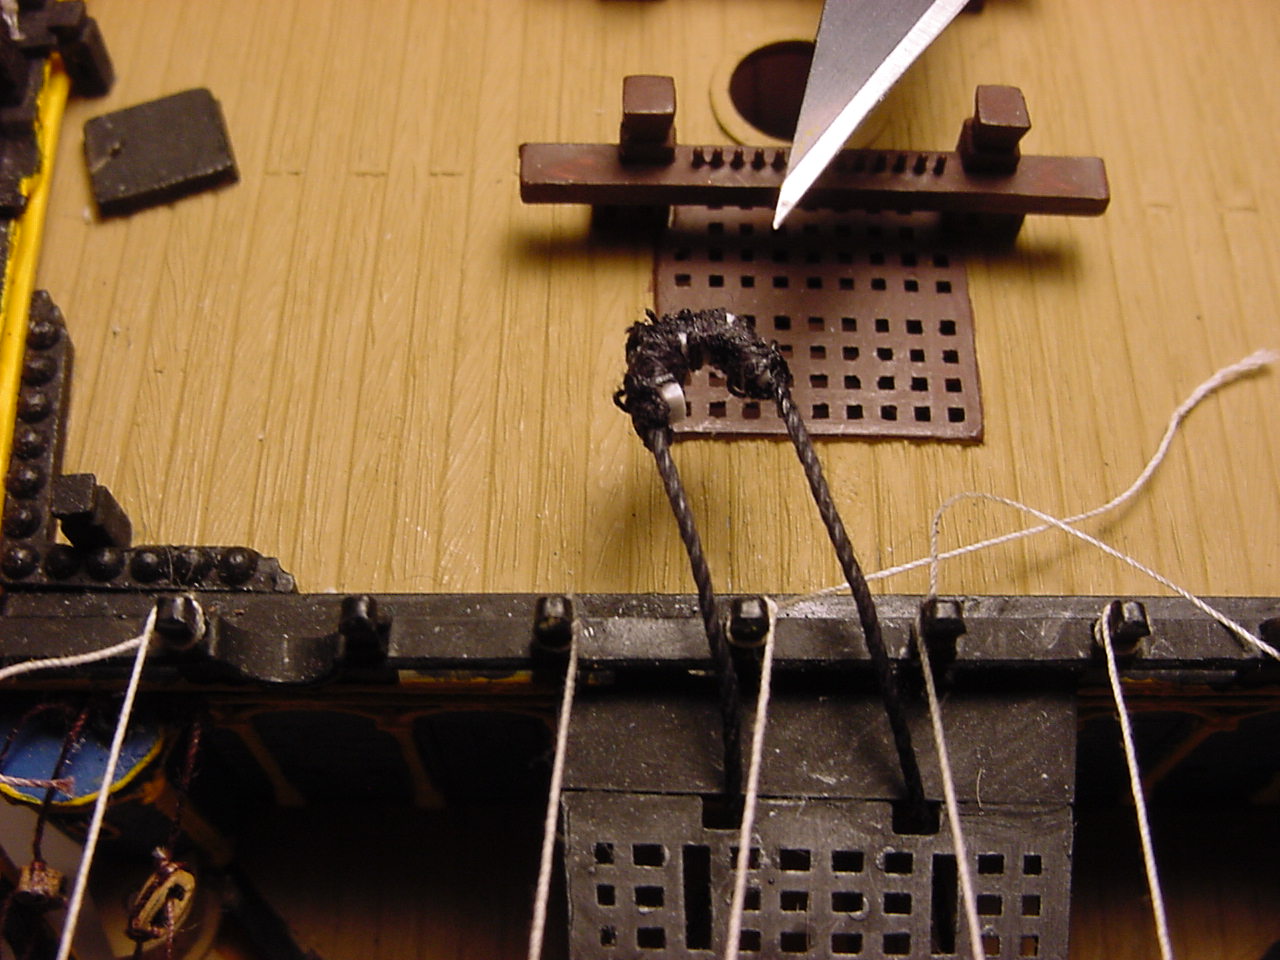
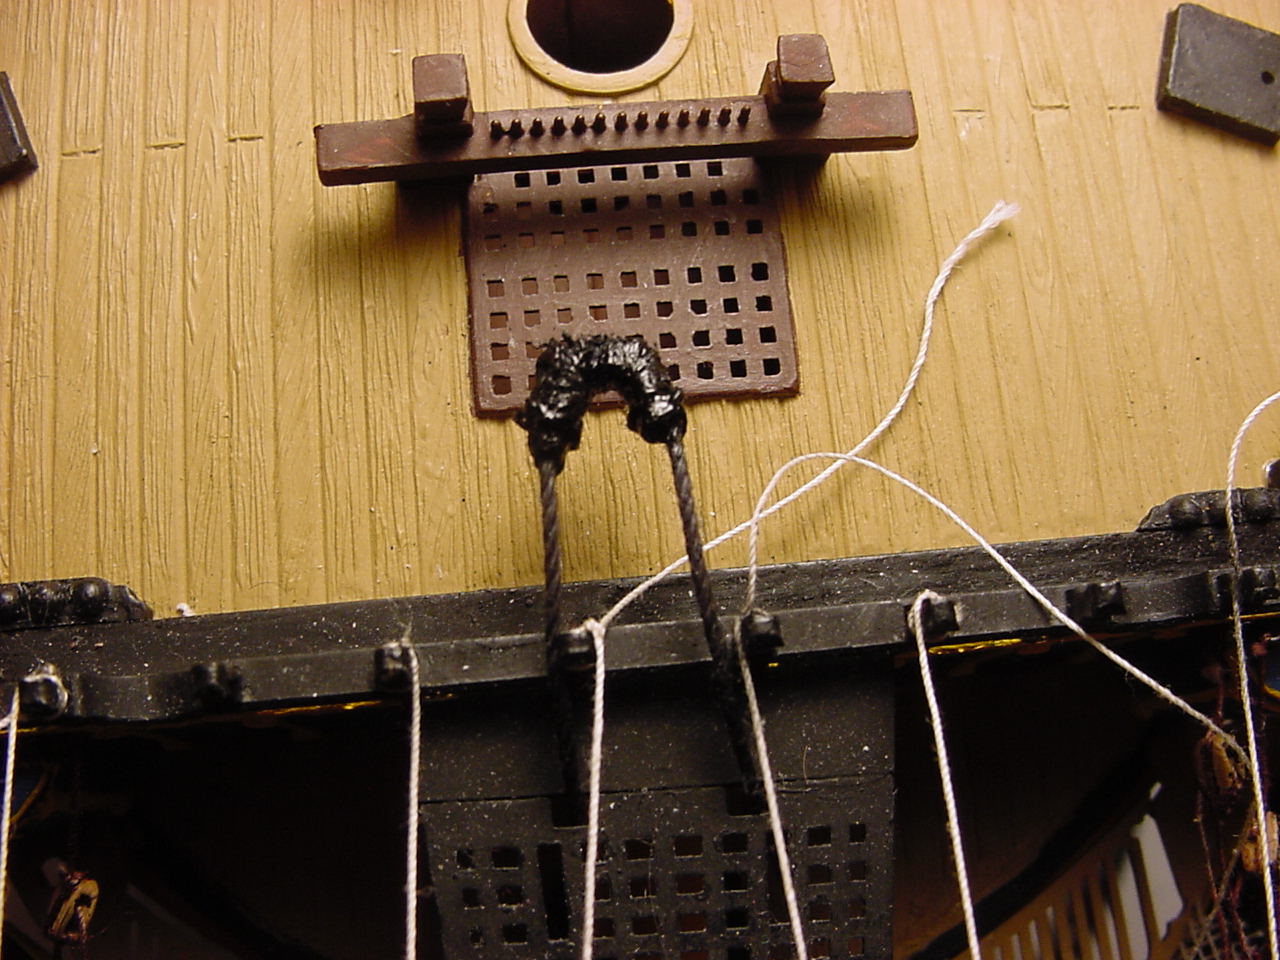
And lastly, a picture of the top and bottom sides of the collar wrapped around its heart, after I applied some black paint to cover all the white plastic of the heart. If it looks shiny, it's because I took the pictures right after applying the paint:
Now, you might be wondering why there's this sudden interest in this piece of rigging. I'm close to getting ready to install the masts, and I've been reading up about the main stay, in particular, how it goes over the mast top, and whether or not it goes over or under the shrouds/ratlines (it goes over the shrouds). So rather than wait until the masts are in, and having a little bit less room to work with, I decided to go ahead and put this collar in place. I made another open heart last night, for the other stay that goes around the main mast. I'll probably do some work tomorrow to get all that installed.
These details aren't anything you'd find in Heller's instructions, so if they're of use to anybody, I hope my ramblings make some sense.
As always, thanks for taking the time to look.
I put a groove in the outside edge of the heart, to help seat the thread that goes around it:
This is a picture of after I wound black sewing thread around the heart. I started in the middle of the heart and worked toward the port side; I just looped the thread around and around, using some clear nail polish to help hold things in place (good stuff to use - it holds quite well, and doesn't dry as soon as it's exposed to air, so you have a bit of working time with it). For the starboard side of the collar, I made a series of overhand knots instead of a bunch of loops; this worked out well until the last knot I put in, which caused all the other knots to slip off the collar and get all tangled on the collar itself. This step (covering everything with thread)was done to be both functional (further securing the collar to the heart) and historically correct:
And lastly, a picture of the top and bottom sides of the collar wrapped around its heart, after I applied some black paint to cover all the white plastic of the heart. If it looks shiny, it's because I took the pictures right after applying the paint:
Now, you might be wondering why there's this sudden interest in this piece of rigging. I'm close to getting ready to install the masts, and I've been reading up about the main stay, in particular, how it goes over the mast top, and whether or not it goes over or under the shrouds/ratlines (it goes over the shrouds). So rather than wait until the masts are in, and having a little bit less room to work with, I decided to go ahead and put this collar in place. I made another open heart last night, for the other stay that goes around the main mast. I'll probably do some work tomorrow to get all that installed.
These details aren't anything you'd find in Heller's instructions, so if they're of use to anybody, I hope my ramblings make some sense.
As always, thanks for taking the time to look.
timmyp
Joined: May 18, 2008
KitMaker: 496 posts
Model Shipwrights: 404 posts
Posted: Saturday, November 18, 2017 - 06:09 AM UTC
My cup runneth over:
Ohio State won.
My rigging thread from Cast Your Anchor Hobbies arrived.
The 2 jars of yellow paint I ordered from Amazon arrived Thursday (it only took two and a half weeks). (And only after I bought 4 jars at a hobby shop that's about half way across the county).
So the airbrush painting of the remaining masts is proceeding apace, I think another coat or two on the main mast, and everything should be in order. I've also finished painting the hammocks. I found that a color called "Aged concrete" has a good canvas color to it. And in an effort to conserve that little bit of paint, I did some dry brushing on the hammocks with Tamiya's flat desert yellow, followed by an ink pen to try to give some shadow between the hammocks, and a bit of stippling, to try and give them some character. Next step will be to make some more of the those open hearts, so I can install the fore stay preventer collars.
timmyp
Joined: May 18, 2008
KitMaker: 496 posts
Model Shipwrights: 404 posts
Posted: Tuesday, November 21, 2017 - 06:50 AM UTC
Here's a pic of the hammocks. I've noticed that on the hammocks I already painted & installed, well, you really can't tell any painting was done to them, as the netting pretty much obscures any detailing.

JJ1973
#345
Joined: August 22, 2011
KitMaker: 1,835 posts
Model Shipwrights: 1,832 posts
Posted: Saturday, December 09, 2017 - 01:30 AM UTC
Hi Tim,
steady progress and amazing work!! The fews of the foc'sle with all the rigging and blocks made me awe - keep up your spirit!!!
Cheers,
Jan
steady progress and amazing work!! The fews of the foc'sle with all the rigging and blocks made me awe - keep up your spirit!!!
Cheers,
Jan
timmyp
Joined: May 18, 2008
KitMaker: 496 posts
Model Shipwrights: 404 posts
Posted: Monday, December 11, 2017 - 11:51 PM UTC
Thanks, Jan! So good to hear from you!
I'm glad you like the views of all the rigging - it's not completed yet, as there's still lots of other stuff that needs to be completed first. But it does look pretty cool, doesn't it?
The latest news: still working on the forestay preventer collars - I've got one collar/heart unit wrapped around the bowsprit, and I'm working on the other collar/heart unit (off the model, it's a lot easier that way). I also completed painting the fore and mainmast components, and the next step will be to paint the iron bands on the lower parts of the mast. I'm also getting ready to start stringing the ratlines for the mainmast. I also assembled and painted the longboats, but have not put them in place.
Lastly, I see that there's been over 45,000 views on my blog, in just a little over 2 years. Thank you everyone for taking a look!
JJ1973
#345
Joined: August 22, 2011
KitMaker: 1,835 posts
Model Shipwrights: 1,832 posts
Posted: Saturday, December 16, 2017 - 10:44 PM UTC
It does look pretty cool indeed, Tim!!
Looking forward to lore pictures of your progress
Cheers,
Jan
Looking forward to lore pictures of your progress
Cheers,
Jan
timmyp
Joined: May 18, 2008
KitMaker: 496 posts
Model Shipwrights: 404 posts
Posted: Sunday, January 07, 2018 - 07:25 AM UTC
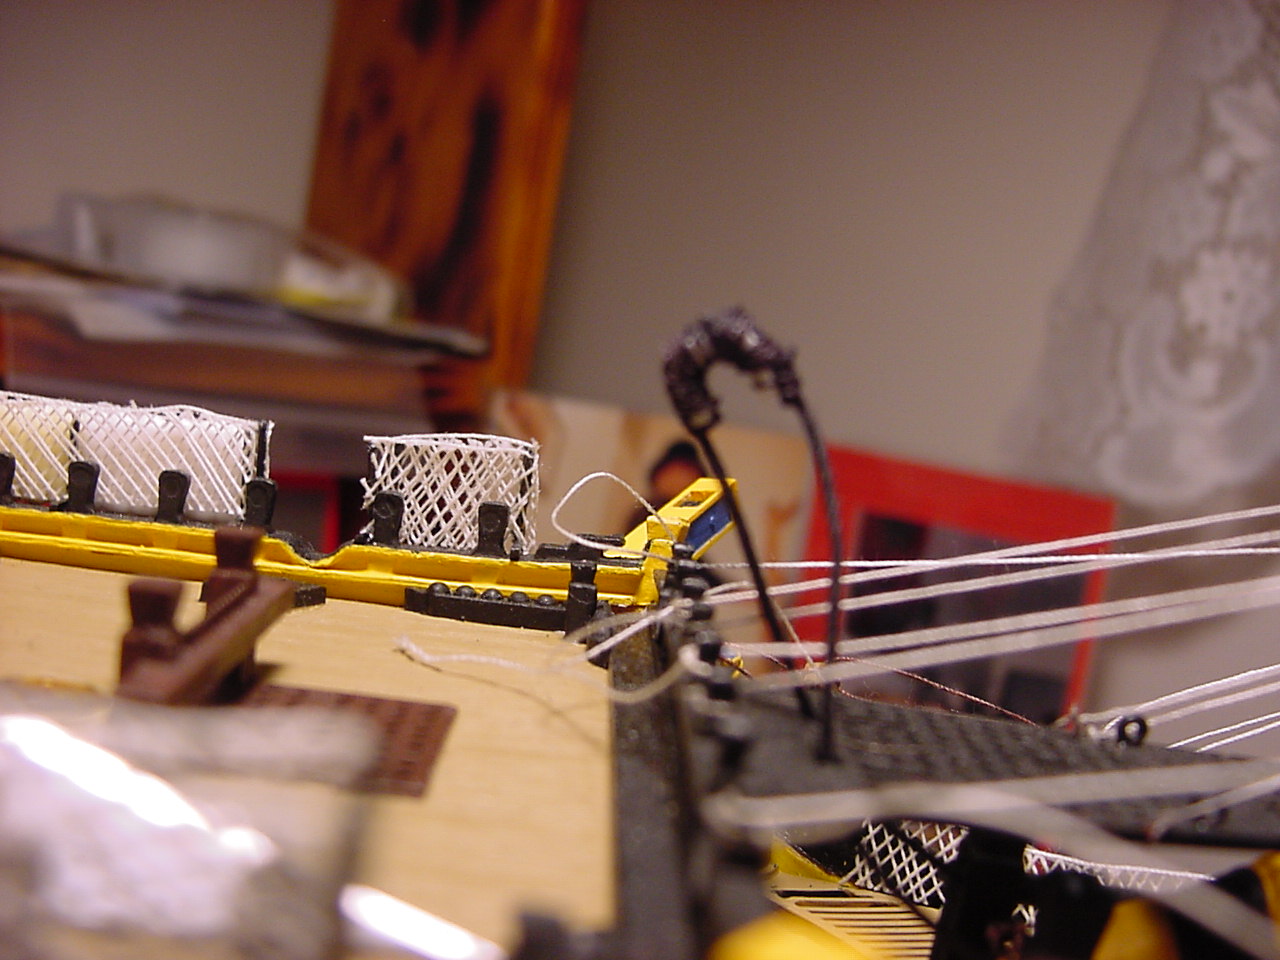
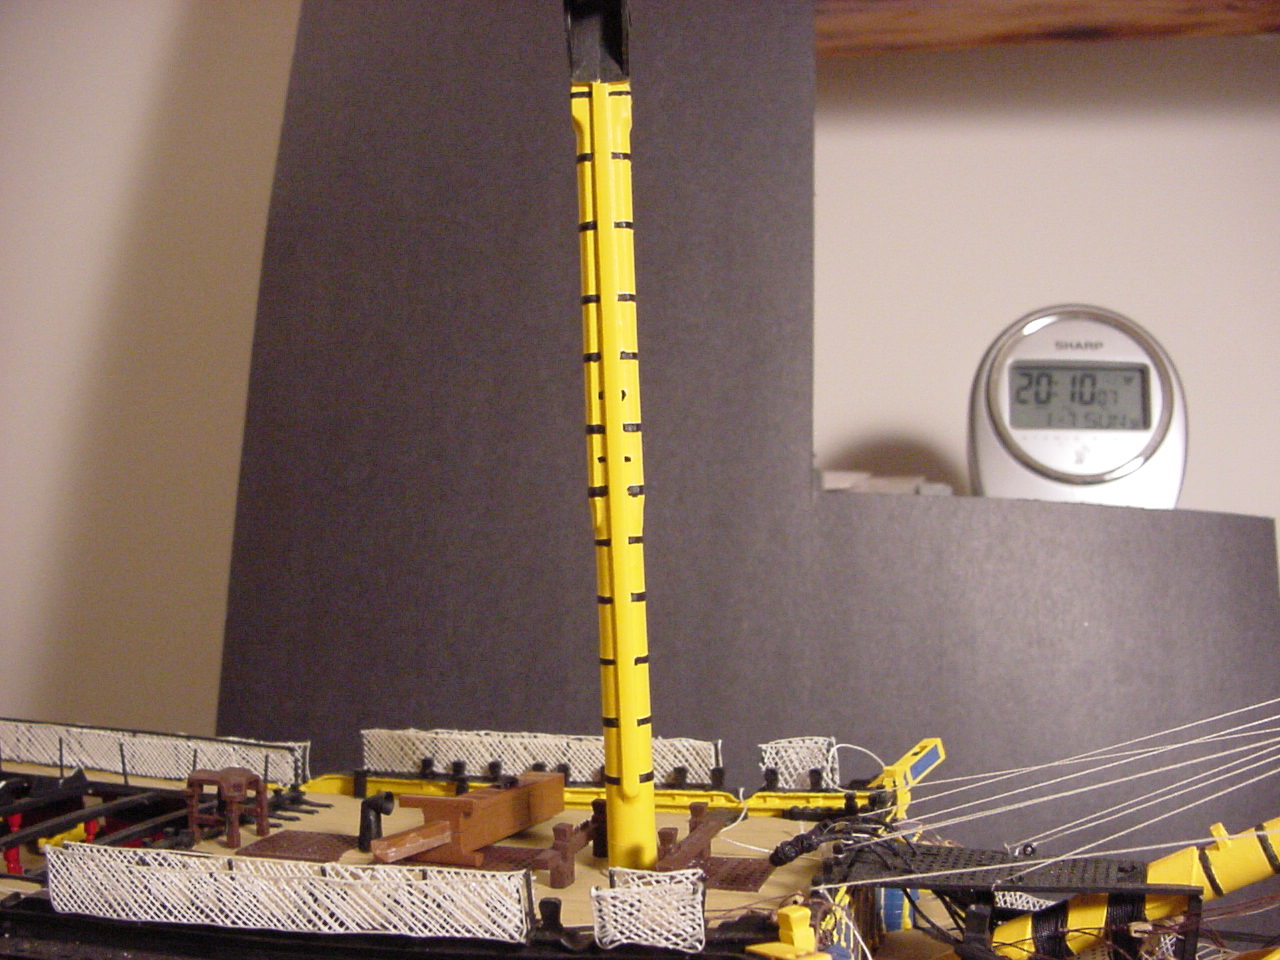
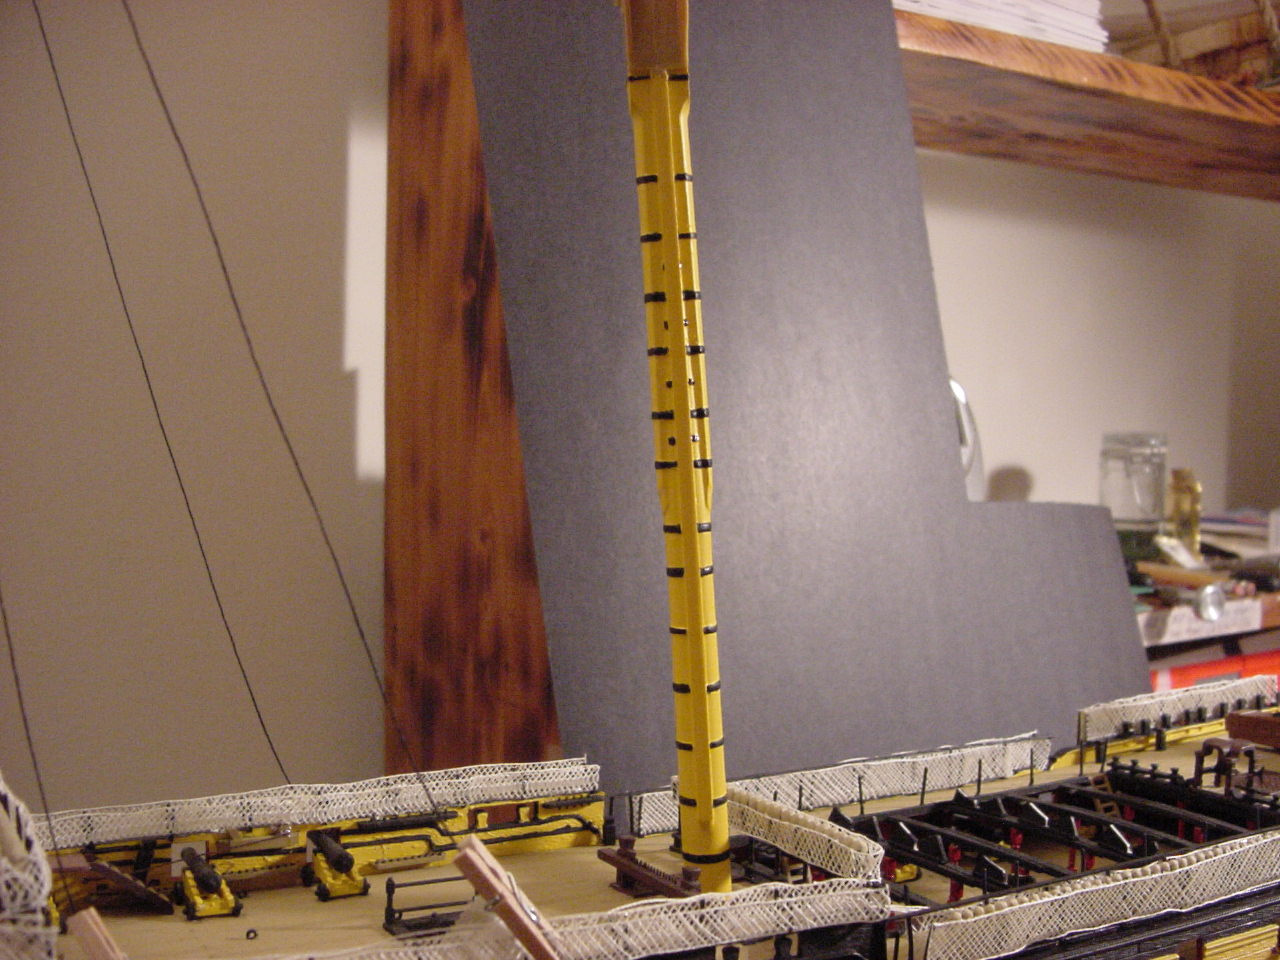
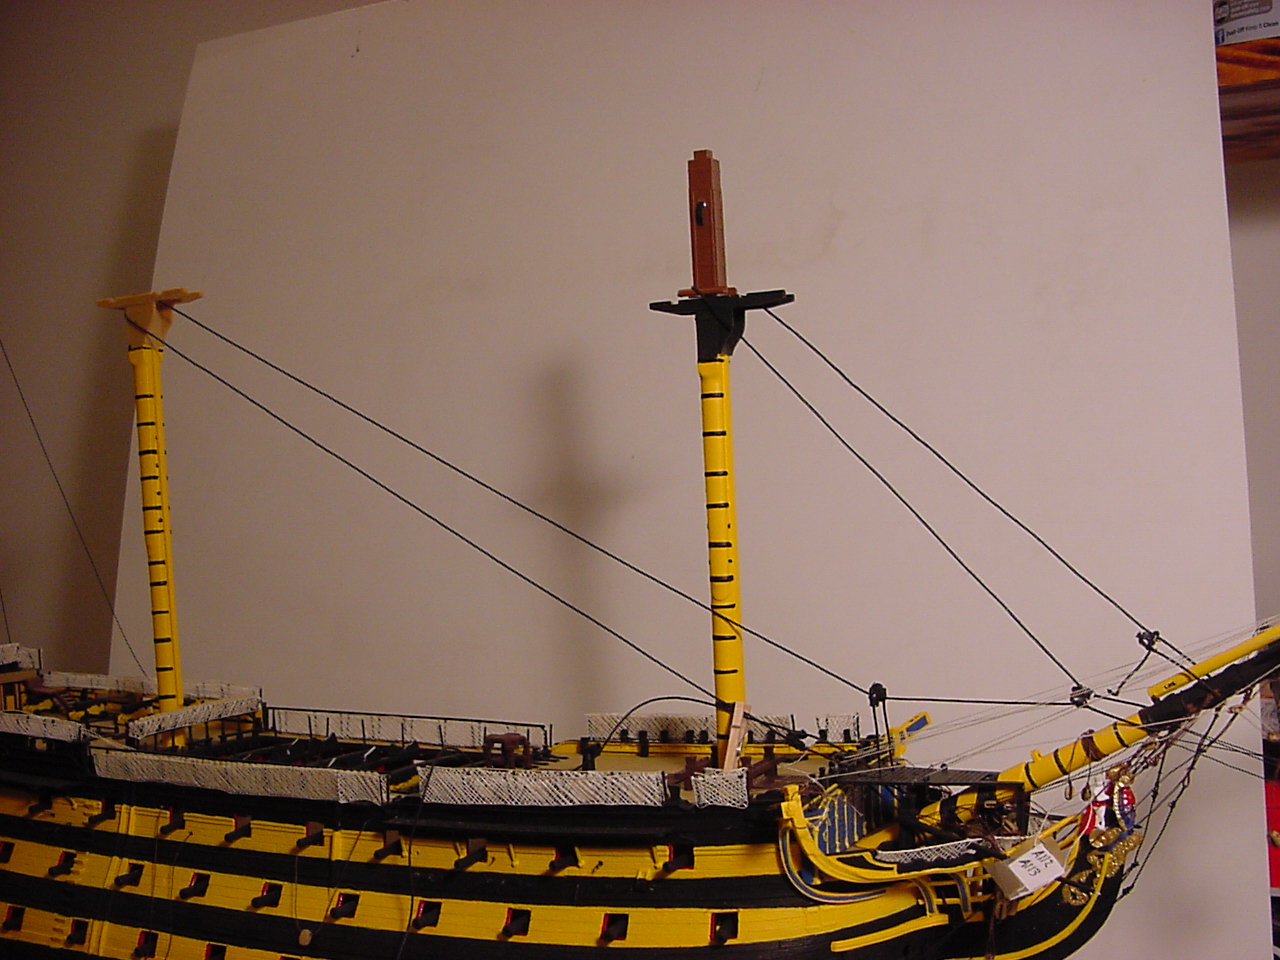
Well, I finished painting the bands on the fore and main masts. Fortunately, when I removed the tape, there was minimal peeling of the yellow paint, so touch-up was pretty easy. For the touch-up on the bands, and for some of the smaller indications of the bands, I used a felt tip marker (a fine tipped marker). Here's how the fore & main masts (bottom sections) turned out:
Here's some pictures with the preventer collar stays in place, and one with stays (tentatively) in place:
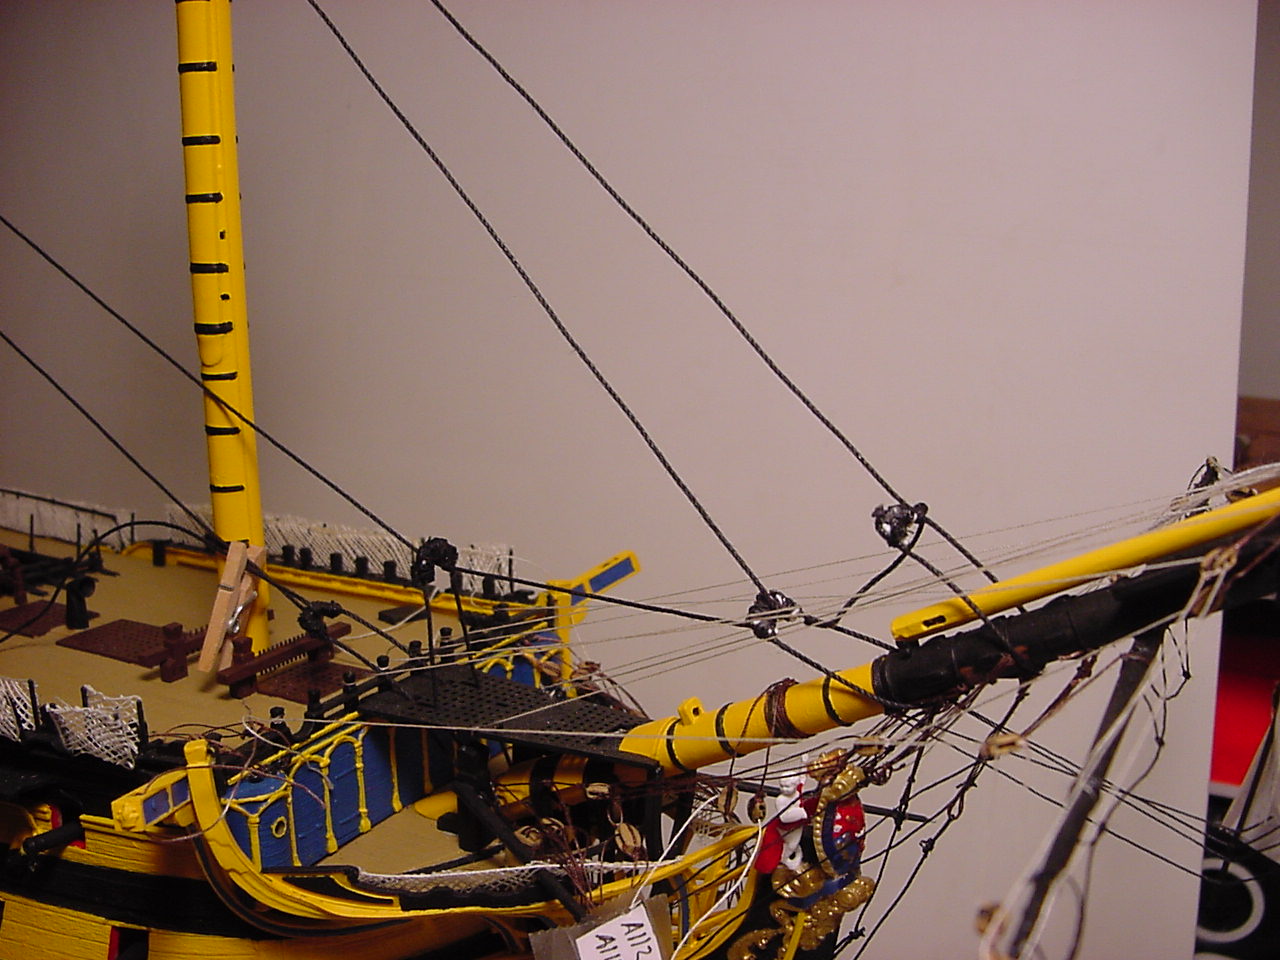
Lastly, and just for fun, I ran some thread through some of the upper blocks on the mizzenmast. When I was painting & preparing the blocks, my thoughts were "gee, these things are small". But once I put some thread through them, it seemed that the blocks were a lot bigger - almost too big! But I did this just because I'm anxious to start the rigging (which is still a ways away).
In other news, I'm about 3/4 of the way done with fabricating the main lower shrouds. I'm doing about 10 - 15 ratlines at a pop, and with 12 vertical elements to the shroud, that's at least 120 crossing points that need glued!
Also, I got an e-mail from what might be the last remaining hobby store in the county, informing me that they're closing their doors by the end of the month. I went there Saturday, hoping to maybe pick up some deals...unfortunately, it looked like they had already gone through and cherry-picked the stuff they were sending to other stores, so there wasn't a whole lot to grab. I did, however, get some solid Plastruct rods, for future use as a "mouse" on the main & fore stays (more on this later).
Aside from all that, though, I'm very pleased with the airbrushing of the remaining mast elements...it sure was a lot easier than trying to brush paint everything!
Hope you all enjoy the pix; if there are any questions, please ask. And, as always, thanks for reading!
Here's some pictures with the preventer collar stays in place, and one with stays (tentatively) in place:
Lastly, and just for fun, I ran some thread through some of the upper blocks on the mizzenmast. When I was painting & preparing the blocks, my thoughts were "gee, these things are small". But once I put some thread through them, it seemed that the blocks were a lot bigger - almost too big! But I did this just because I'm anxious to start the rigging (which is still a ways away).
In other news, I'm about 3/4 of the way done with fabricating the main lower shrouds. I'm doing about 10 - 15 ratlines at a pop, and with 12 vertical elements to the shroud, that's at least 120 crossing points that need glued!
Also, I got an e-mail from what might be the last remaining hobby store in the county, informing me that they're closing their doors by the end of the month.
I went there Saturday, hoping to maybe pick up some deals...unfortunately, it looked like they had already gone through and cherry-picked the stuff they were sending to other stores, so there wasn't a whole lot to grab. I did, however, get some solid Plastruct rods, for future use as a "mouse" on the main & fore stays (more on this later).Aside from all that, though, I'm very pleased with the airbrushing of the remaining mast elements...it sure was a lot easier than trying to brush paint everything!
Hope you all enjoy the pix; if there are any questions, please ask. And, as always, thanks for reading!
timmyp
Joined: May 18, 2008
KitMaker: 496 posts
Model Shipwrights: 404 posts
Posted: Sunday, February 04, 2018 - 12:29 AM UTC
Just some updating: I've been making the collars that go around the mainmast, that will hold the mizzen stays as they go to their belaying point:
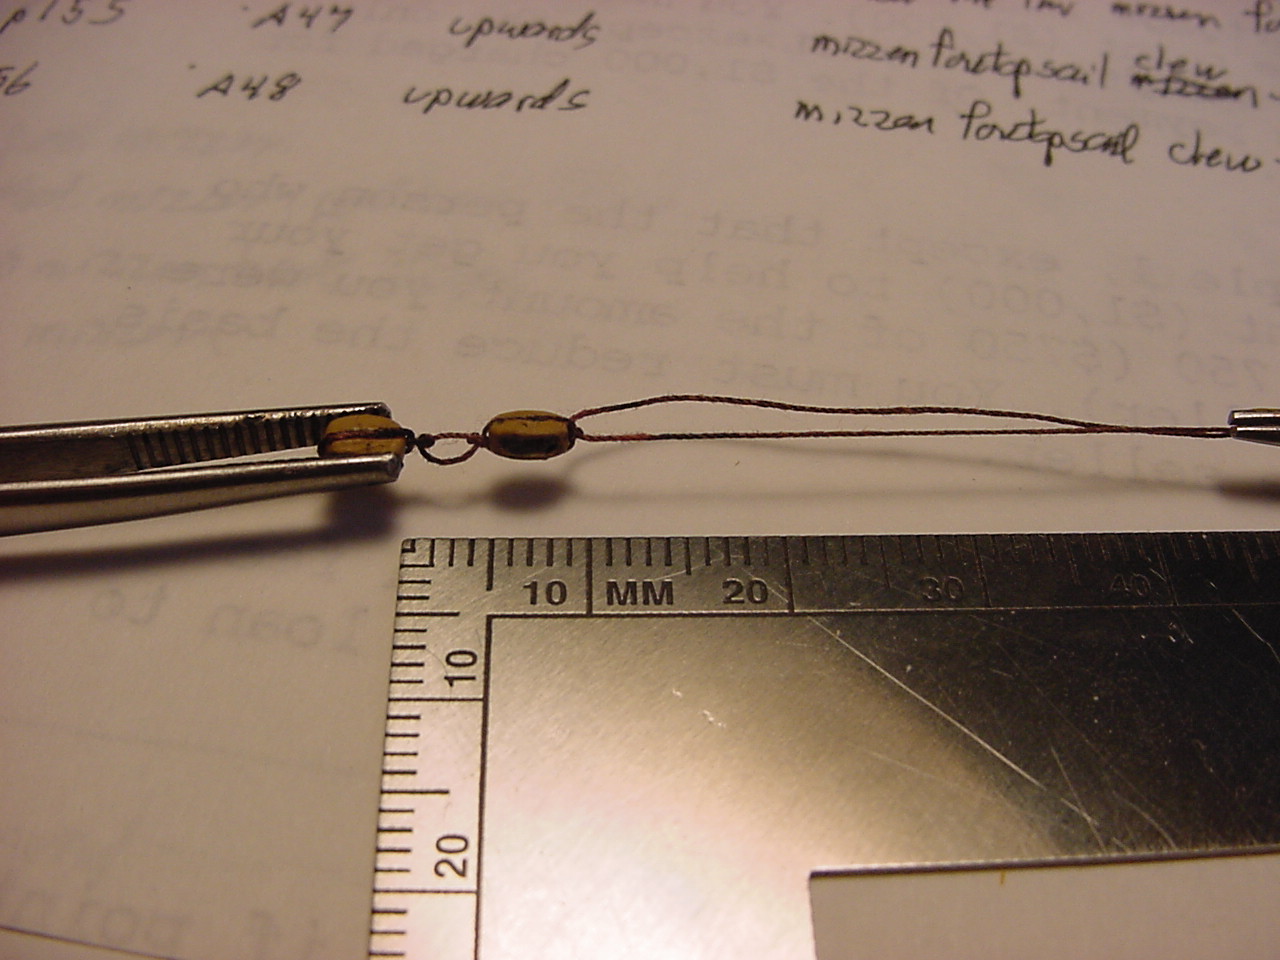
Here's my version of some hand-made hearts, which will be used on the fore & main stays:
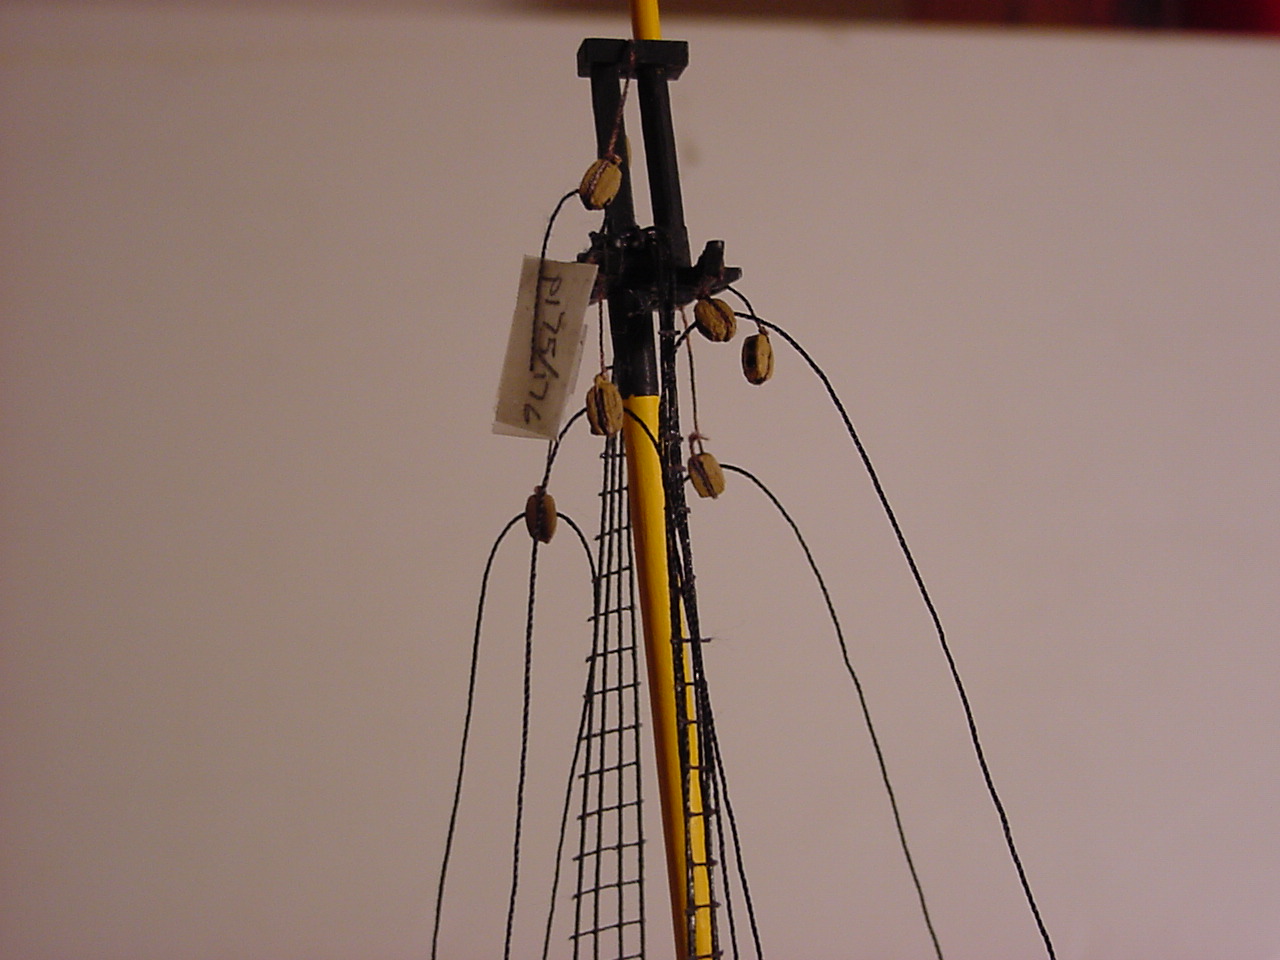
And here's the completed main lower shrouds in place, but not completed:
And finally, the lower fore shrouds under construction:
For everyone who watches the Super Bowl this evening, may your favorite team win!!
Here's my version of some hand-made hearts, which will be used on the fore & main stays:
And here's the completed main lower shrouds in place, but not completed:
And finally, the lower fore shrouds under construction:
For everyone who watches the Super Bowl this evening, may your favorite team win!!
timmyp
Joined: May 18, 2008
KitMaker: 496 posts
Model Shipwrights: 404 posts
Posted: Sunday, February 11, 2018 - 06:23 AM UTC
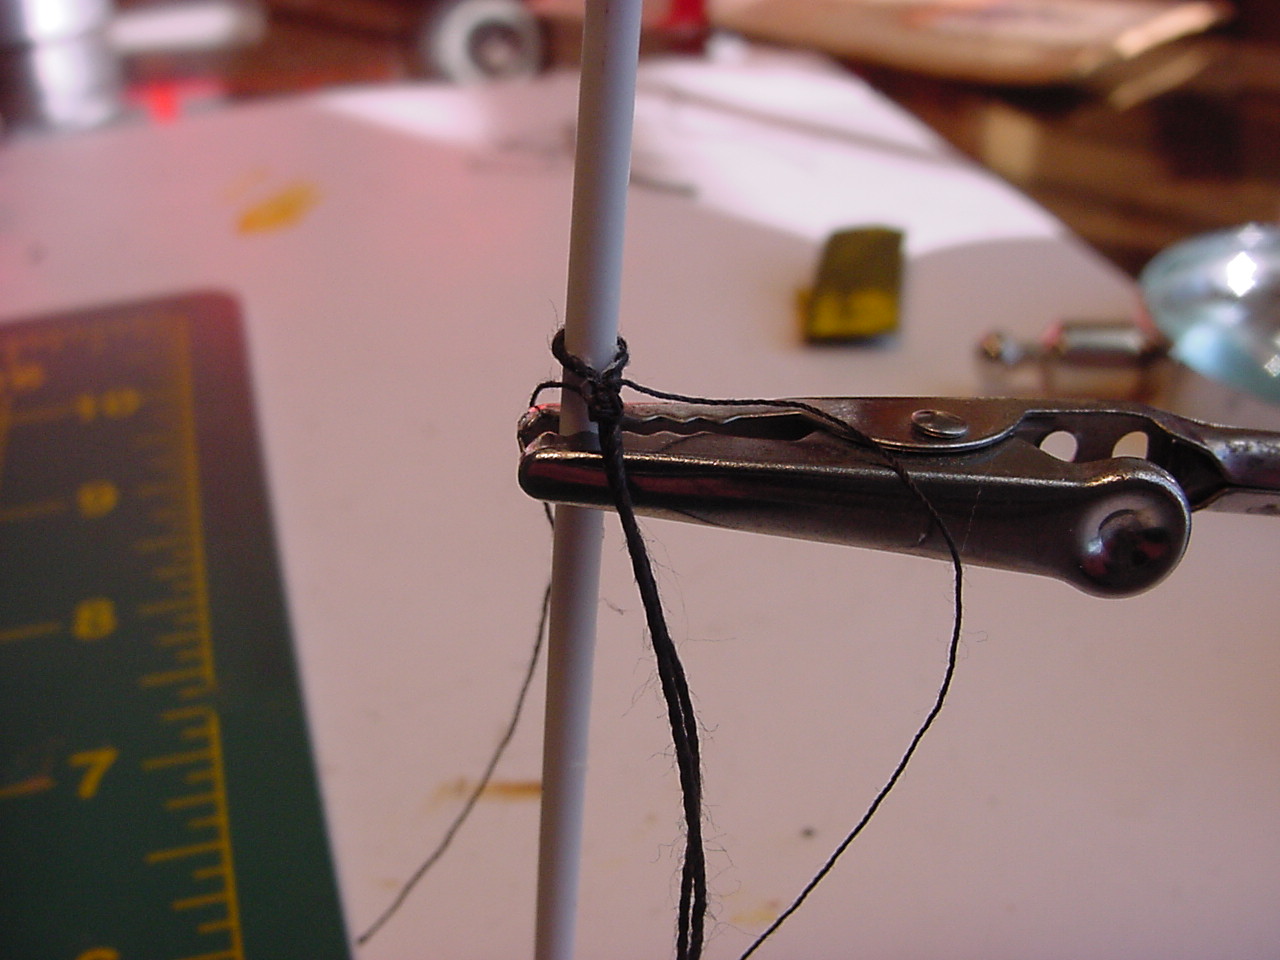
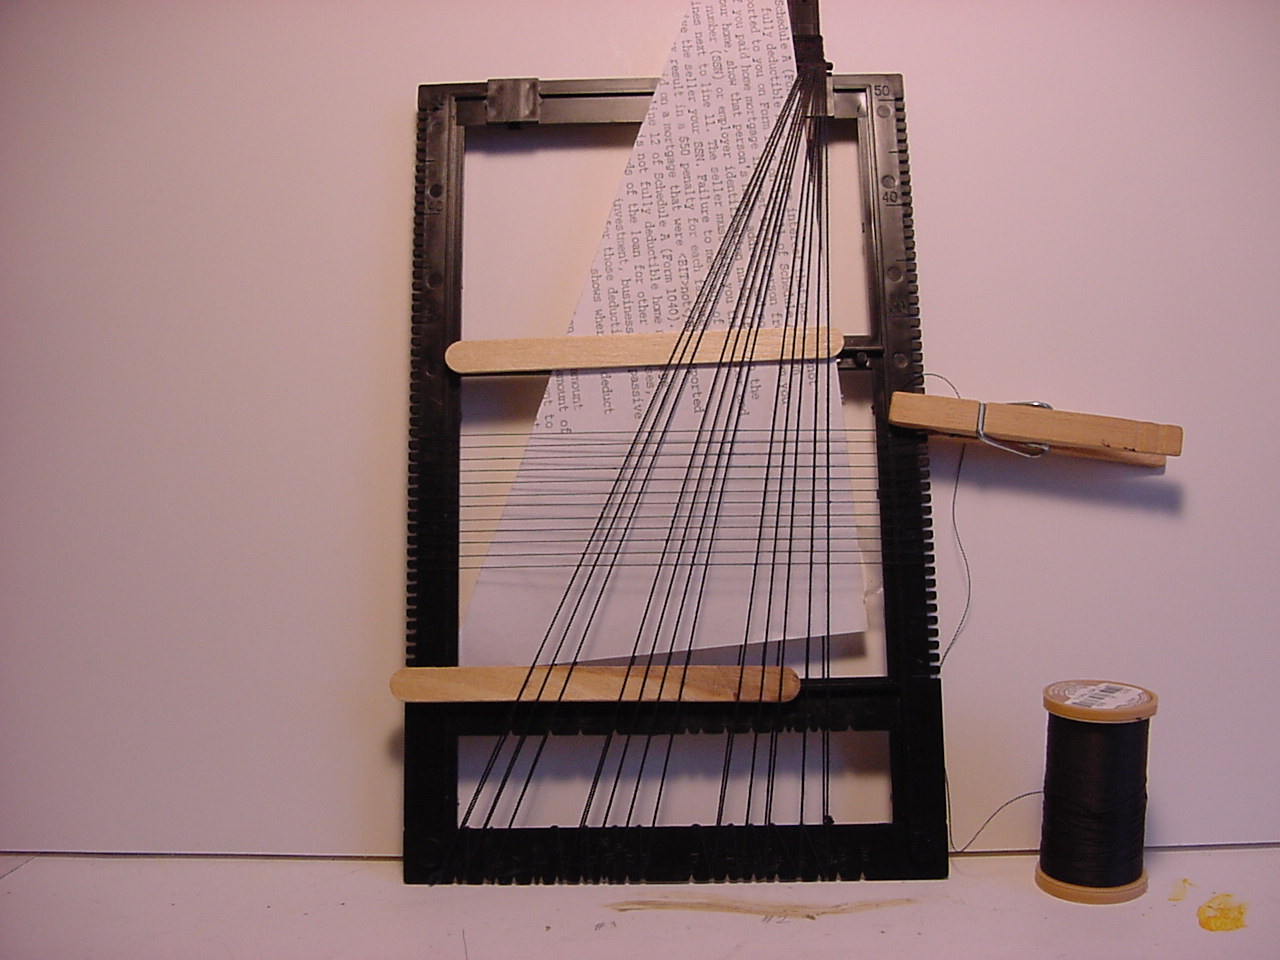
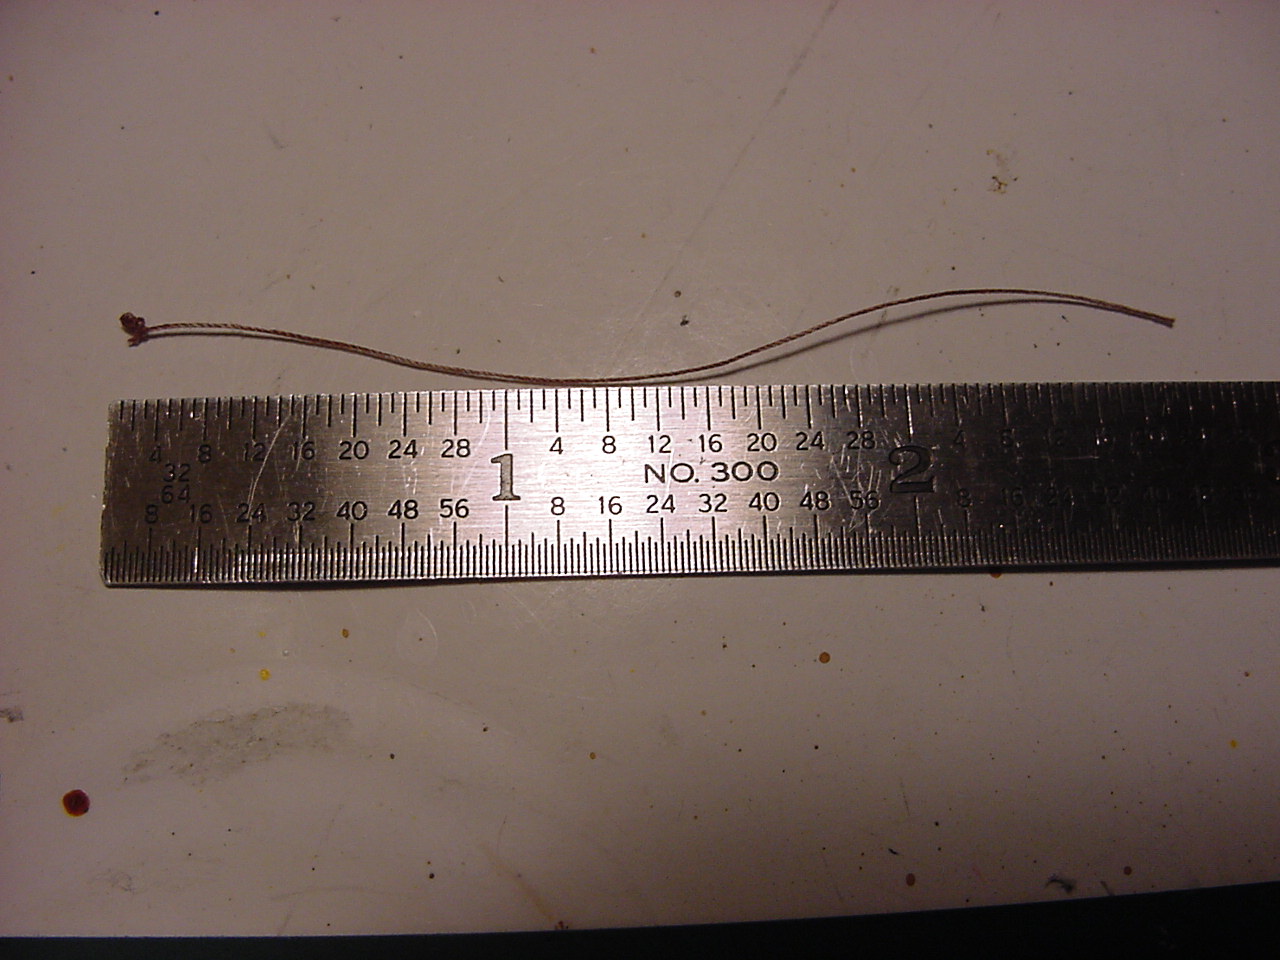
So, work progress. I've managed to get the blocks that go under the maintop installed. Here's a series of photos, with this first photo showing the length of the thread I used. I used this length so my fat fingers had enough room to grab things!:
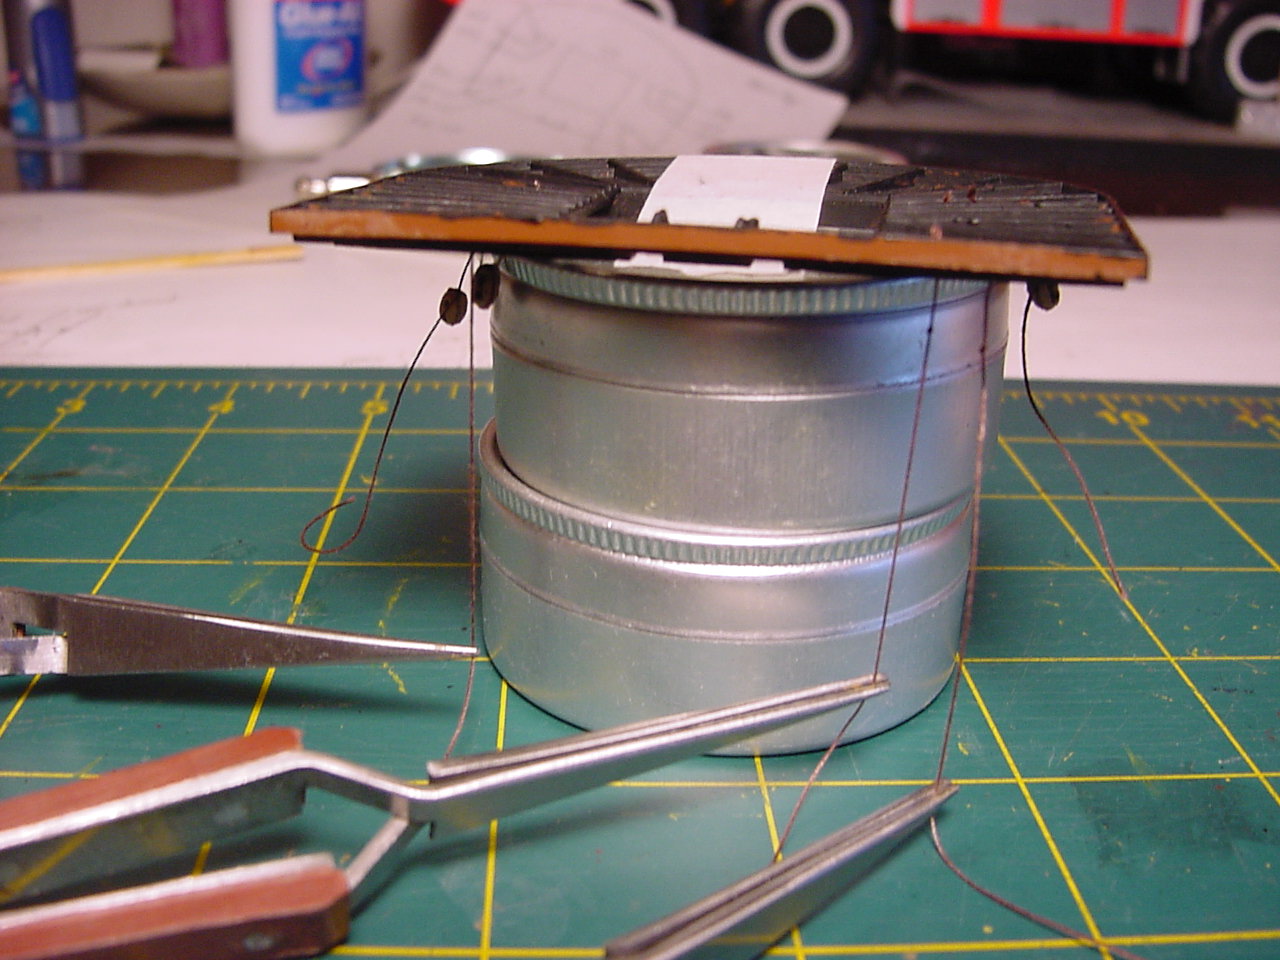
This is how I set things up, so I would have some tension on the thread, while the glue dried:
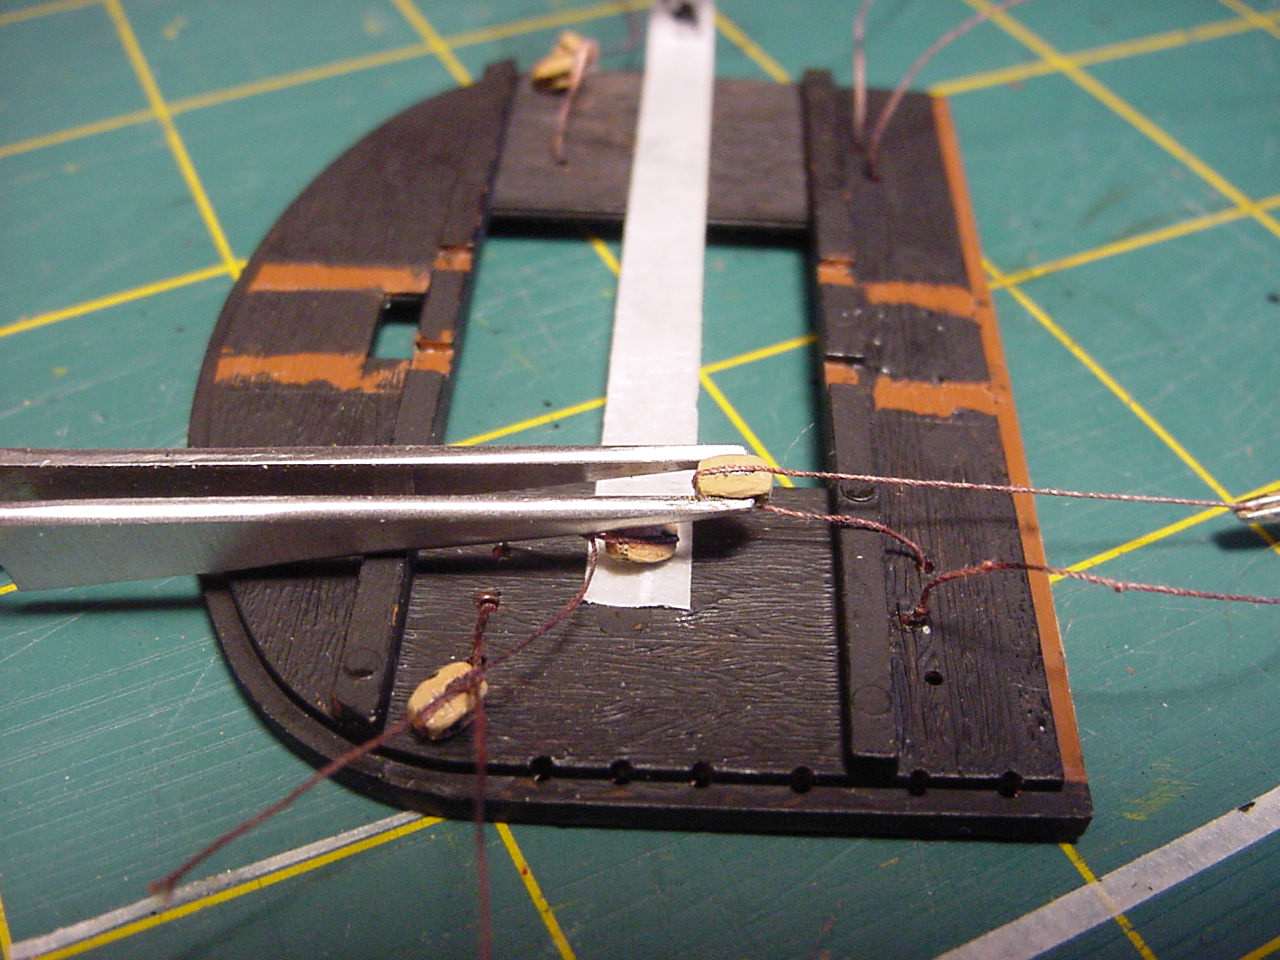
The first block I installed hung down quite a bit; the second one was a bit higher up, and I managed to get the third & fourth blocks to be about the same length. So I got smart, and decided I should try to make all the blocks hang down the same length. I set the piece of tape so that the blocks would hang down by about 12 or 13 mm:
Then try and get the block lined-up with the tape:
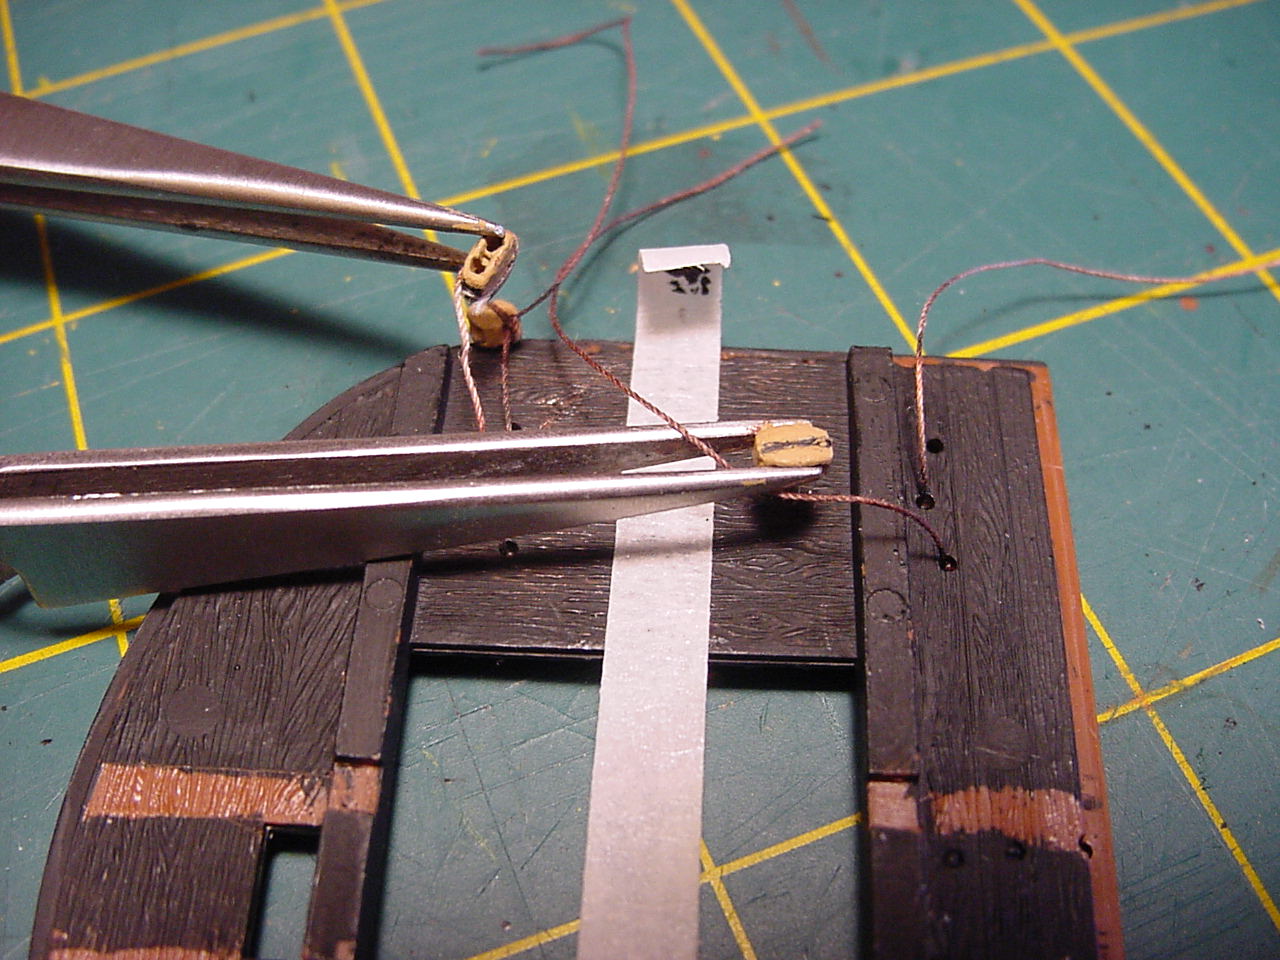
Then make the thread tight, and glue it:
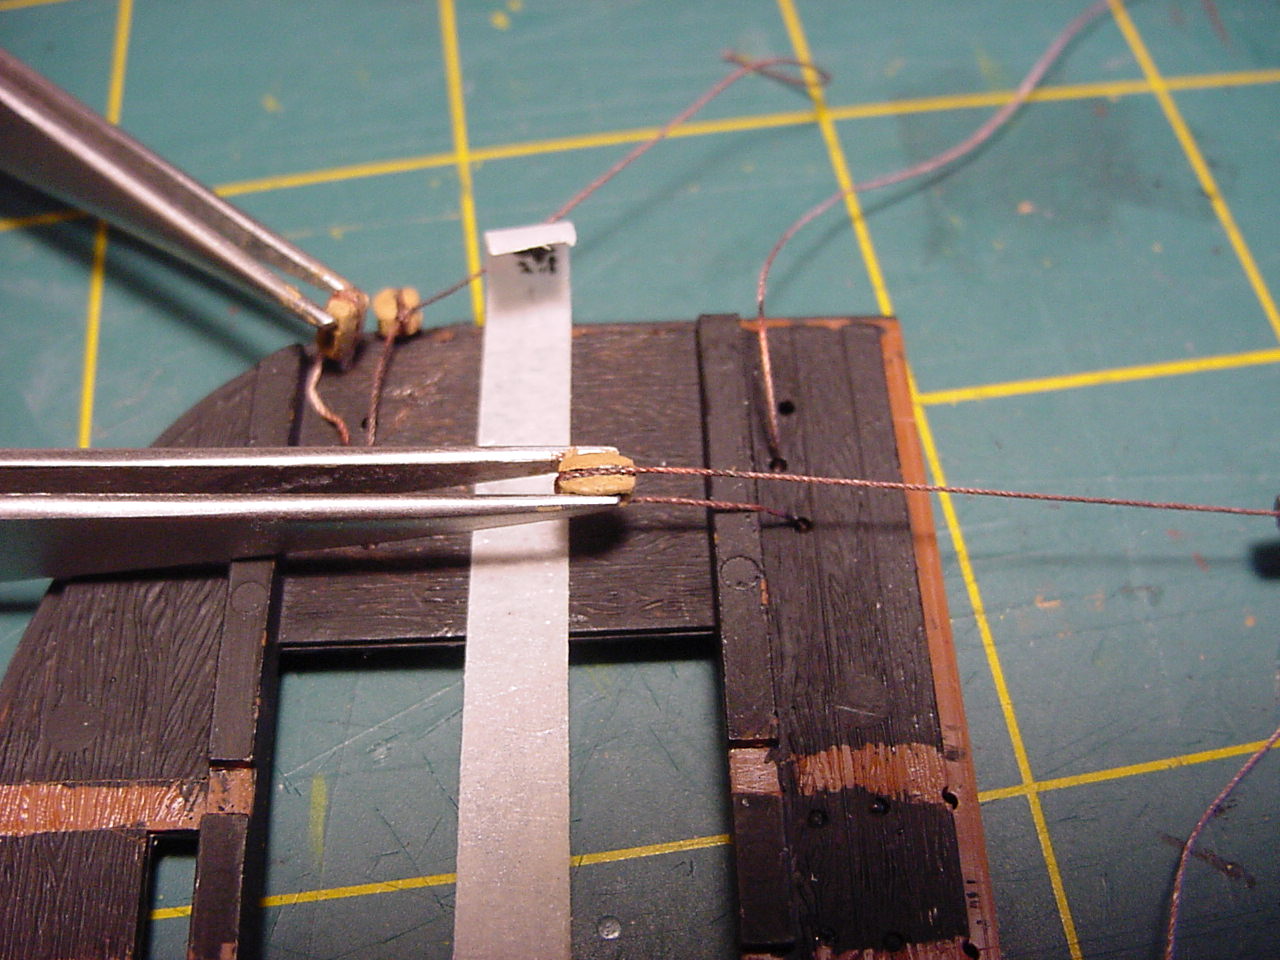
And then the final knot:

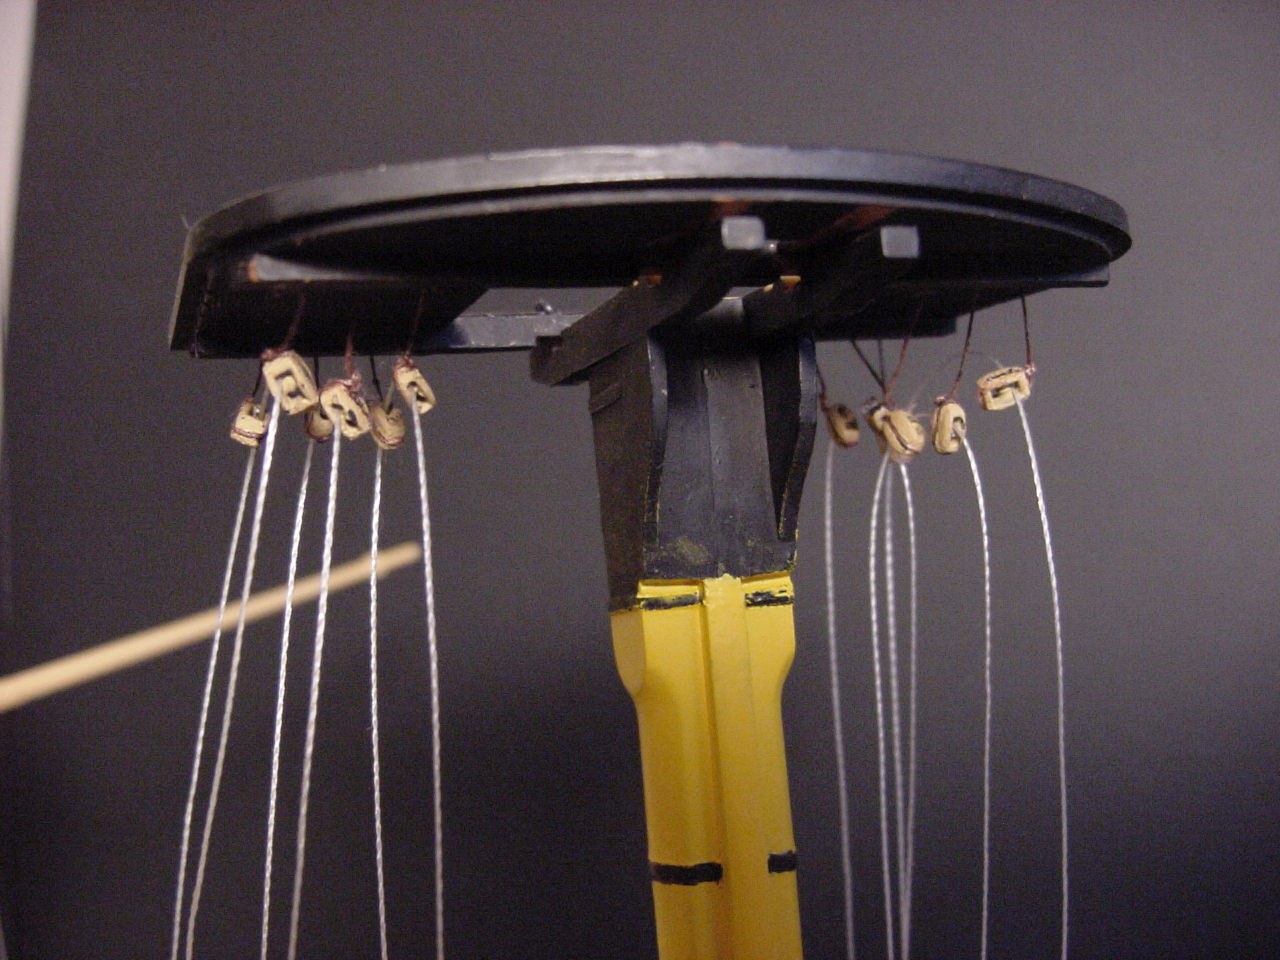
And here is about what the whole shebang looks like:
I also started attaching the blocks to the mizzen "bare yard", as Heller calls it. The instructions indicate that the blocks for the topgallant (?) sail sheet line, and the mizzen bare yard lift line, are attached to each other. So here's my interpretation of how that is done:
In other news, I was thinking of just tying the straps that hold the jeer blocks, to the cleats that are on the futtock. But the more I thought about it, I think I've figured out a way to make it look more authentic. But more on that later. I've also started adding the blocks to the mizzen "bare yard", and I'm doing that before I paint the yardarm. I figured the layer of paint on top of the thread holding the blocks in place will act as some extra adhesive. Also, if you're into counting time, it took me about an hour to complete the installation of the "P" blocks (there's 4 of them) on the main top. I know, it seems like a lot of time to do something relatively simple, but not being in a hurry seems to make things turn out better.
Thanks for taking a look.
This is how I set things up, so I would have some tension on the thread, while the glue dried:
The first block I installed hung down quite a bit; the second one was a bit higher up, and I managed to get the third & fourth blocks to be about the same length. So I got smart, and decided I should try to make all the blocks hang down the same length. I set the piece of tape so that the blocks would hang down by about 12 or 13 mm:
Then try and get the block lined-up with the tape:
Then make the thread tight, and glue it:
And then the final knot:
And here is about what the whole shebang looks like:
I also started attaching the blocks to the mizzen "bare yard", as Heller calls it. The instructions indicate that the blocks for the topgallant (?) sail sheet line, and the mizzen bare yard lift line, are attached to each other. So here's my interpretation of how that is done:
In other news, I was thinking of just tying the straps that hold the jeer blocks, to the cleats that are on the futtock. But the more I thought about it, I think I've figured out a way to make it look more authentic. But more on that later. I've also started adding the blocks to the mizzen "bare yard", and I'm doing that before I paint the yardarm. I figured the layer of paint on top of the thread holding the blocks in place will act as some extra adhesive. Also, if you're into counting time, it took me about an hour to complete the installation of the "P" blocks (there's 4 of them) on the main top. I know, it seems like a lot of time to do something relatively simple, but not being in a hurry seems to make things turn out better.
Thanks for taking a look.

Longshanks8

Joined: July 04, 2013
KitMaker: 430 posts
Model Shipwrights: 390 posts
Posted: Monday, February 12, 2018 - 01:33 PM UTC
A beautiful model coming together here.
Thank you for taking the time to show how you're are going about the rigging.
Looking forward to further posts
Kev
Thank you for taking the time to show how you're are going about the rigging.
Looking forward to further posts
Kev
timmyp
Joined: May 18, 2008
KitMaker: 496 posts
Model Shipwrights: 404 posts
Posted: Monday, February 12, 2018 - 06:32 PM UTC
Thanks, Kev. I appreciate your comments. Stay tuned for more!! 
timmyp
Joined: May 18, 2008
KitMaker: 496 posts
Model Shipwrights: 404 posts
Posted: Saturday, February 17, 2018 - 01:06 AM UTC
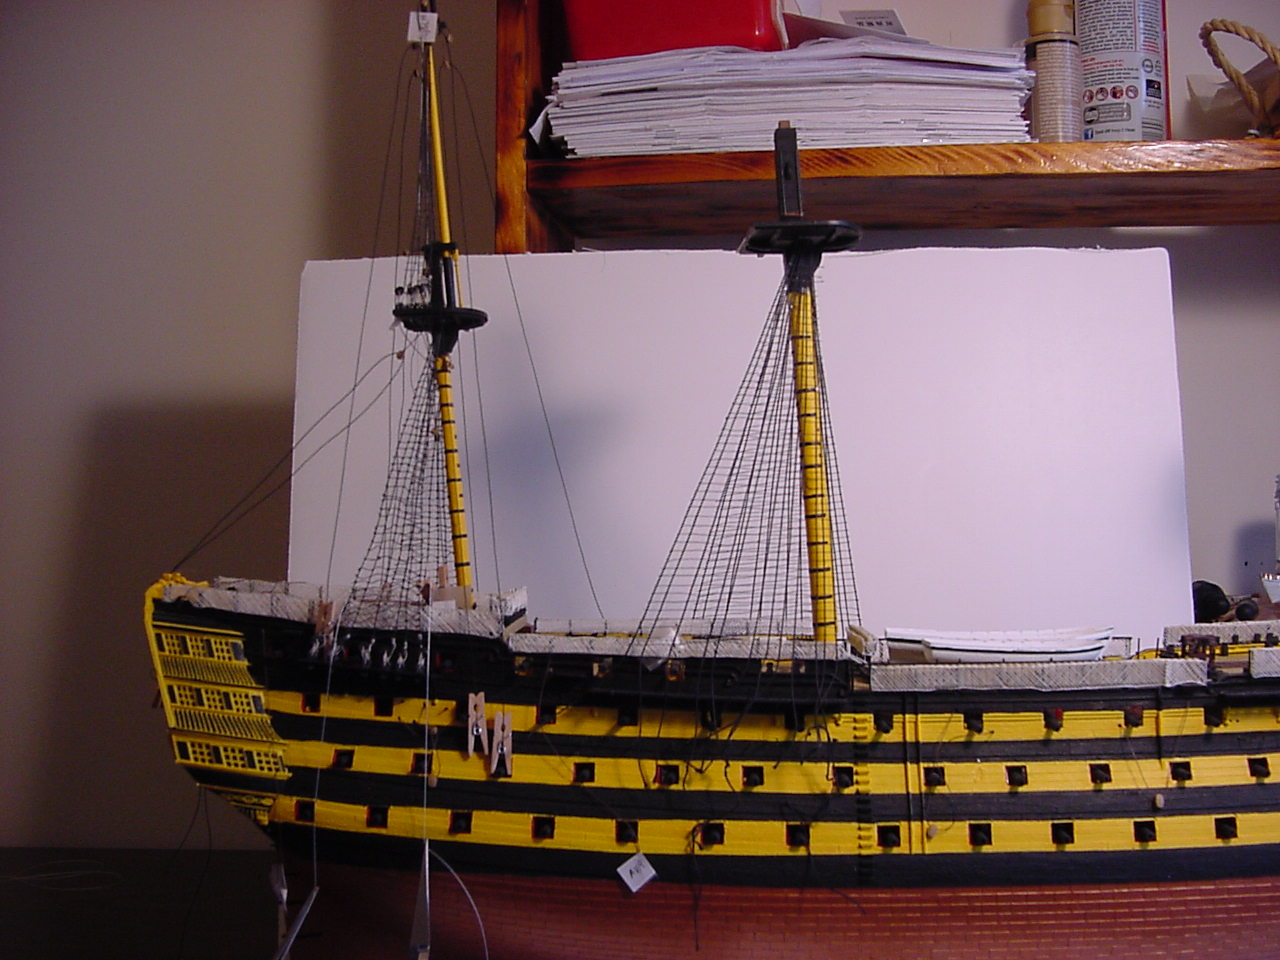
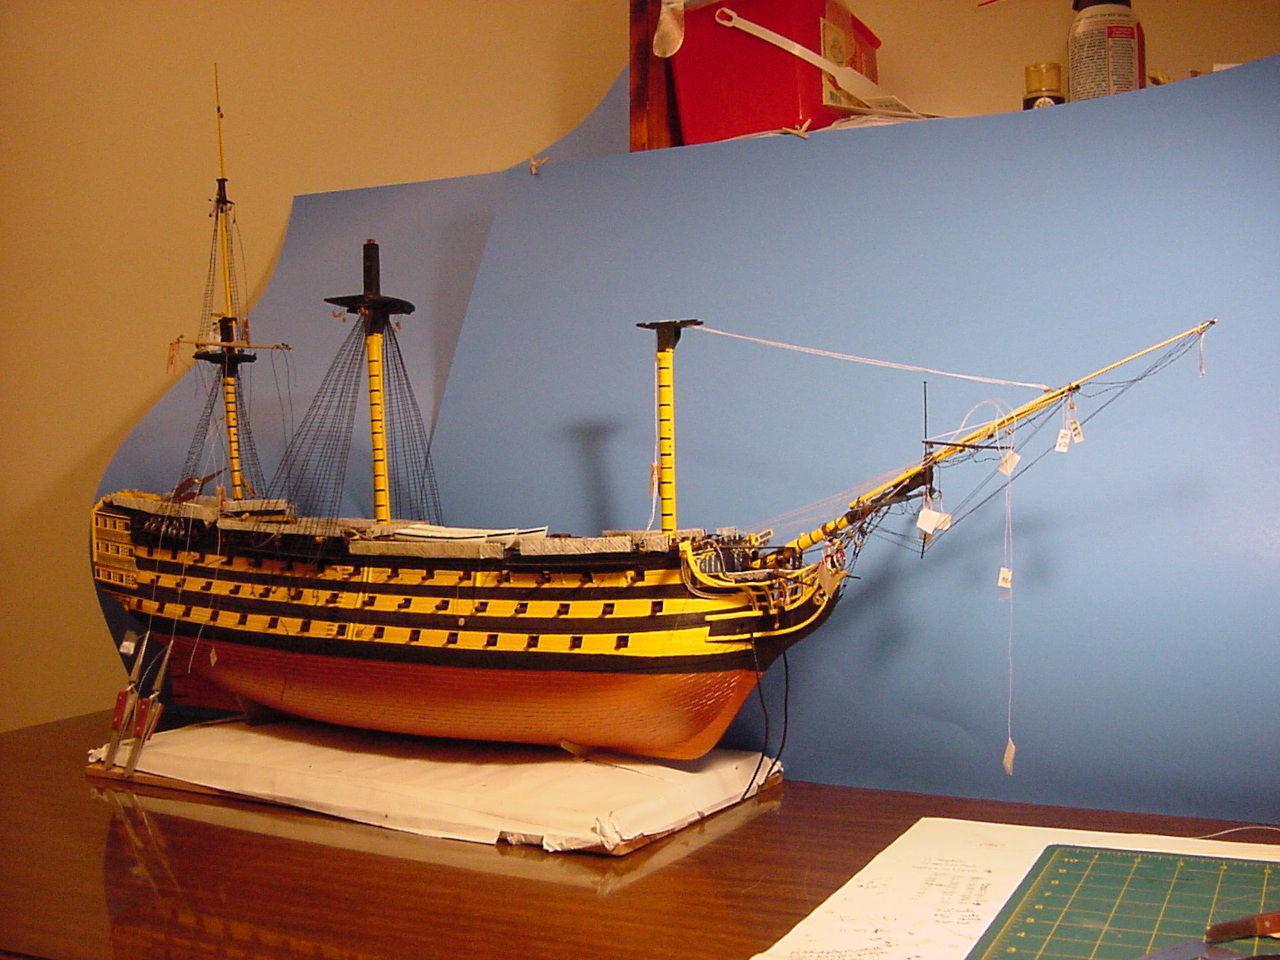
The Beast, so far.
JJ1973
#345
Joined: August 22, 2011
KitMaker: 1,835 posts
Model Shipwrights: 1,832 posts
Posted: Saturday, February 17, 2018 - 01:08 AM UTC
The rigging Madman continues...
Hands down, Tim, I never could do this - your patience and will to continue is awesome! And the results you achieve as well. I'm just astonished with your endeavor to fight through this complicated mess of ropes and lines...
Cheers,
Jan
Hands down, Tim, I never could do this - your patience and will to continue is awesome! And the results you achieve as well. I'm just astonished with your endeavor to fight through this complicated mess of ropes and lines...
Cheers,
Jan
timmyp
Joined: May 18, 2008
KitMaker: 496 posts
Model Shipwrights: 404 posts
Posted: Sunday, February 18, 2018 - 07:45 PM UTC
Quoted Text
The rigging Madman continues...
Hands down, Tim, I never could do this - your patience and will to continue is awesome! And the results you achieve as well. I'm just astonished with your endeavor to fight through this complicated mess of ropes and lines...
Cheers,
Jan
Thanks, Jan! Believe it or not, I'm having a grand time doing all this! Stick around for the next post - I think you'll like it!!
Cheers and
 ,
,Tim
timmyp
Joined: May 18, 2008
KitMaker: 496 posts
Model Shipwrights: 404 posts
Posted: Wednesday, March 07, 2018 - 07:02 AM UTC
HiiiiiHooooo! HiiiiiHooooo!
HiHo
HiHo
It's off to school we go
we learn some junk and
then we flunk
HiHo-HiHoHiHoHiHo
A- hem
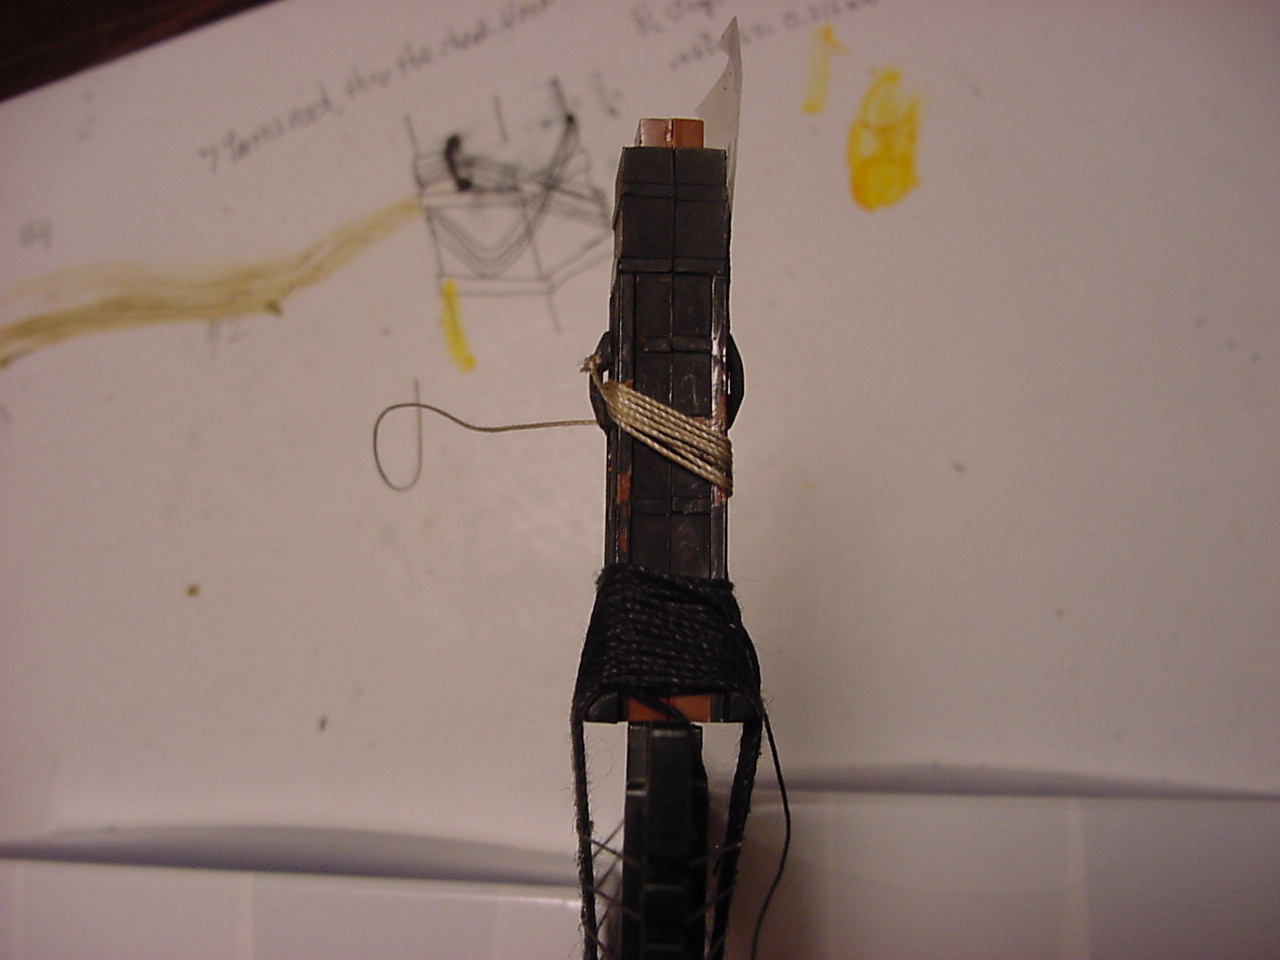
Oh boy, it seems that I've been all over the place, doing a little of this, a little of that. The biggest accomplishment has been getting the jeer block strop lashings completed on the foremast. It took about 2 weeks to get it done, only because every time I turned a corner on the futtock, I usually waited for the glue to cure at least overnight. It would have been very helpful if Heller had put little or hooks or something on the futtock, to hold the lashing in place (it would have been helpful if Heller had done a better job on the instructions, but I digress). One reason I'm doing the work I'm doing right now, is because a lot of this stuff is best done "off-model", and a also because the fore and main stays wrap around the mast top, on top of all this other stuff that's happening. Here's a picture of all the things happening there:
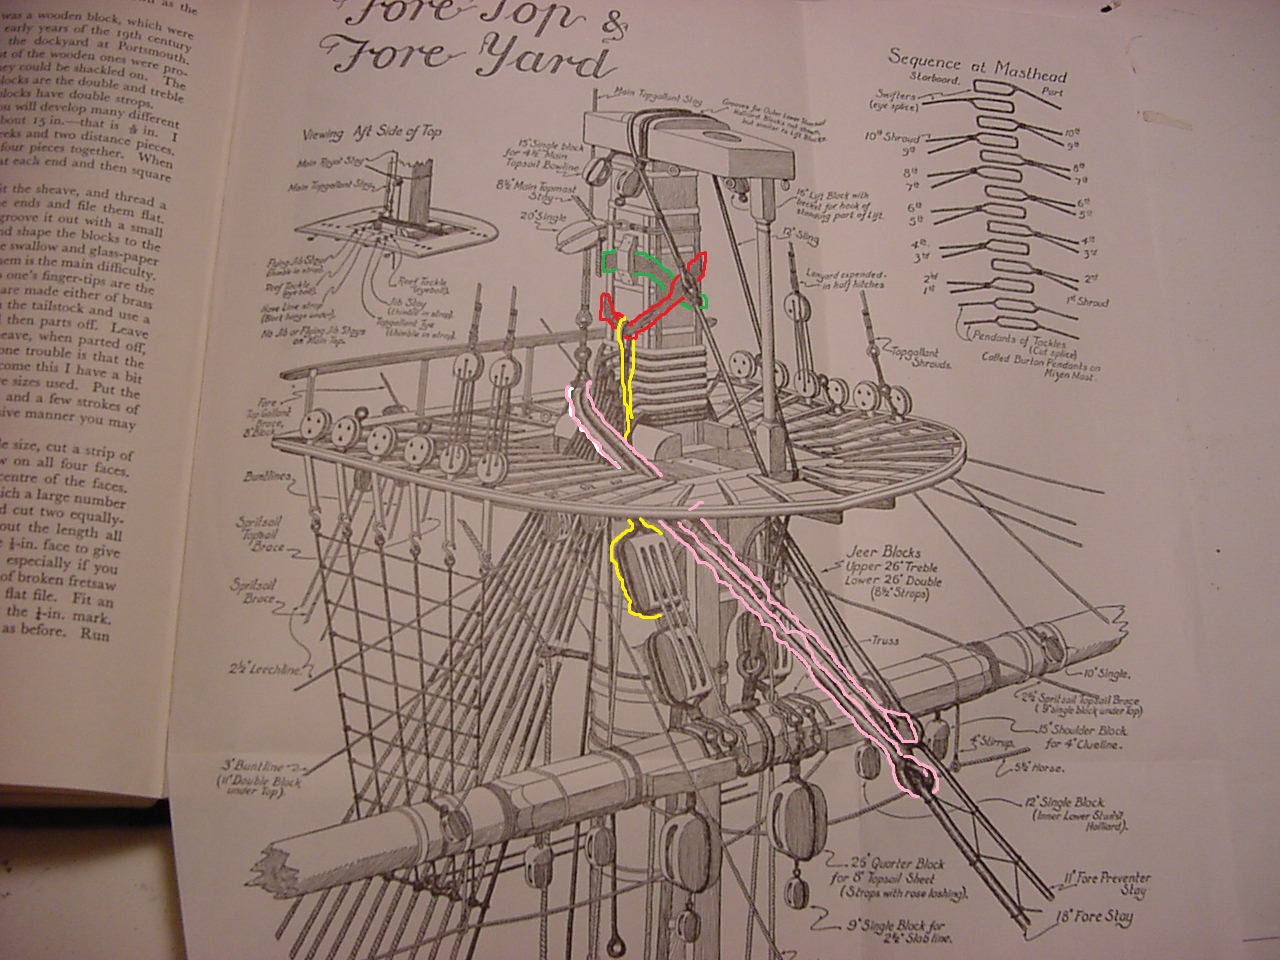
As you can see, the jeer strops are sort of "underneath" the stays, as well as some other rigging. In the above picture, I outline the strop lashings in red and green (red to port, green to starboard. Get it? Of course you do). The jeer block strops are outlined in yellow, and the stay is outlined in pink. One interesting thing, and I mentioned this when I was assembling the mizzen mast, are what to do with the rings that are on the back side of the top. In the picture, you'll noticed that they're not really rigged to anything; in Heller's instructions, it shows a double set of blocks are attached to each ring. I only one set of the double set of blocks being used in the instructions, and it's a bit dodgy as to what all the connect to...it just reinforces my decision not to use the rings for anything (well, at least, at this time).
So here's some close-ups of the jeer block strop lashings - when I first started this process, I tied the holding knot on the high side of the...the thing on the side of the futtock:
Doing this, I had to make each loop around the futtock lower than the one before. Here's another picture, with just the starboard lashings started:
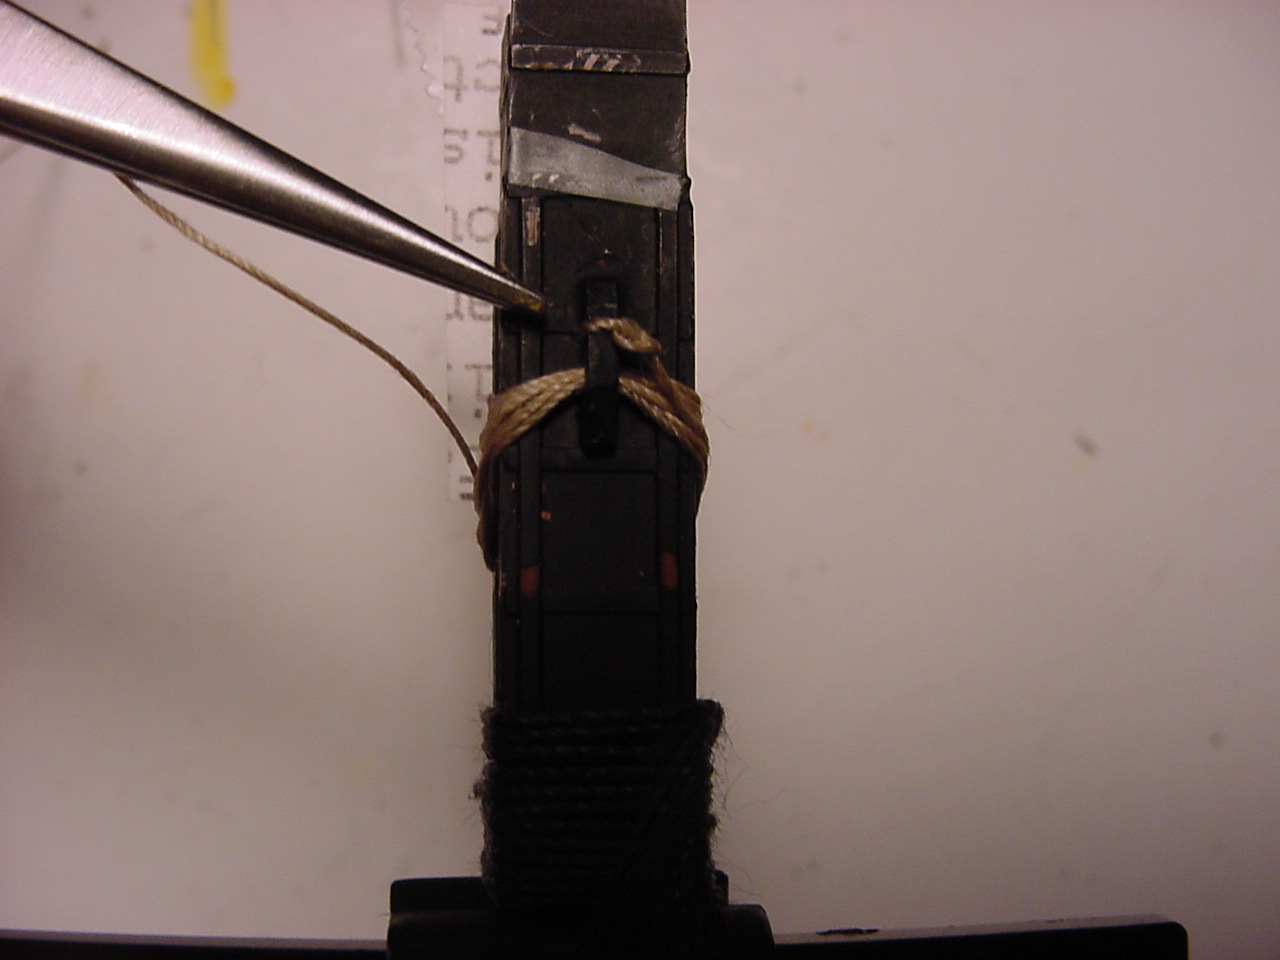
Now, on the port side, I started the lashing's knot at the bottom, and worked my way up. This seemed to work a little bit better...until got the 7th turn done, and found myself with not enough thread to finish the knot. Fortunately, I had left a lot of excess from the initial knot, and as I made each turn, I pulled that excess up through the turns. Therefore, I had enough thread to wrap around the thingy on the side of the futtock, and get it all cemented in place:
This next picture shows the black thread that will become the strop - even though there is some slack underneath the lashings, I figured it would be easier to have the thread in place before I started the lashings. And because the thread is black, I put some paper underneath it, just to give it some contrast.

I've noticed in the various drawings I've looked at, that there are 7 turns of the lashings for each strop. So I tried to replicate that here. Unfortunately, as you can see, some of the turns of the thread overlapped, or a gap was in between turns:
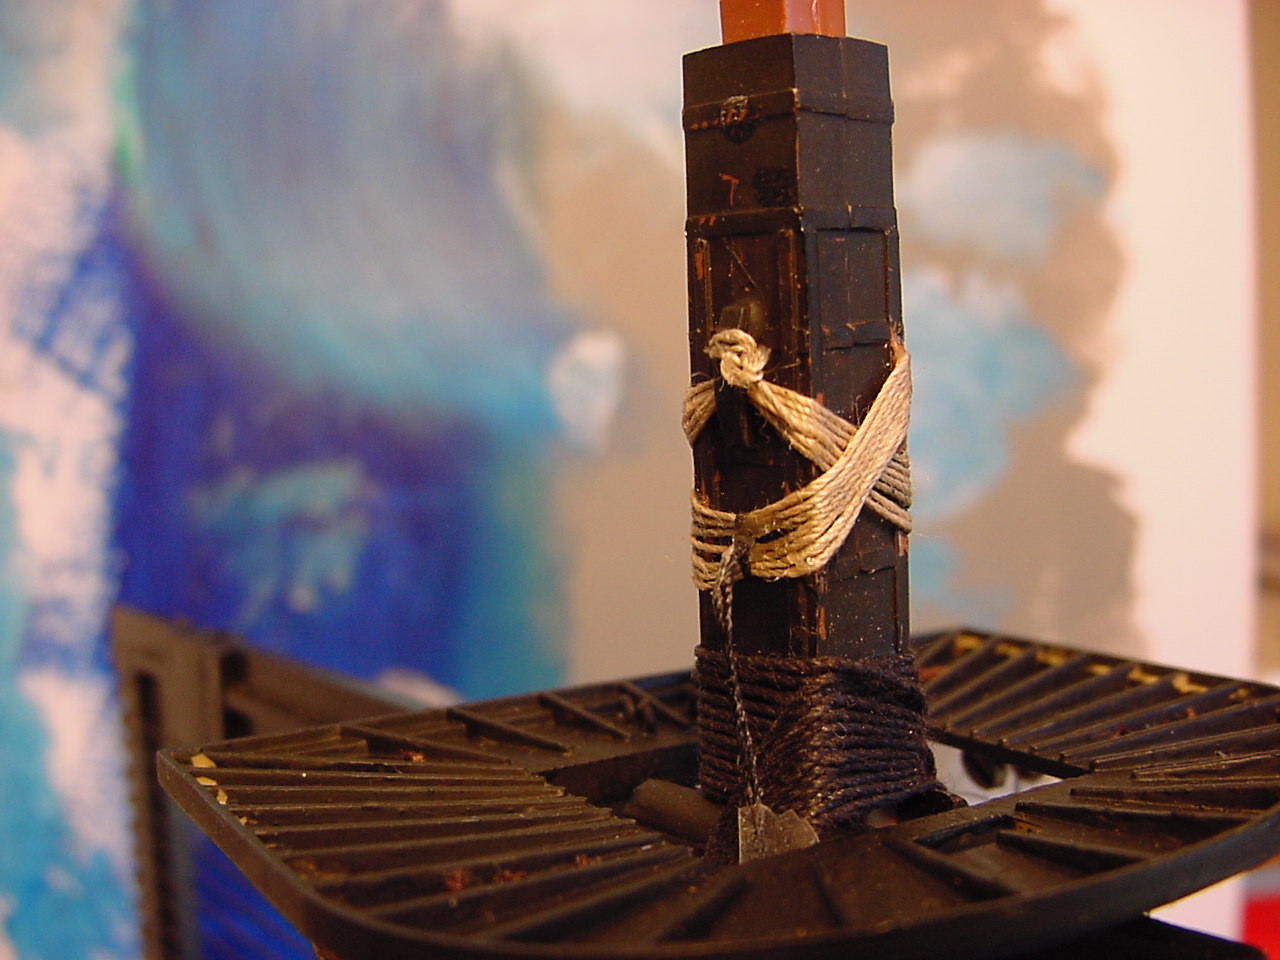
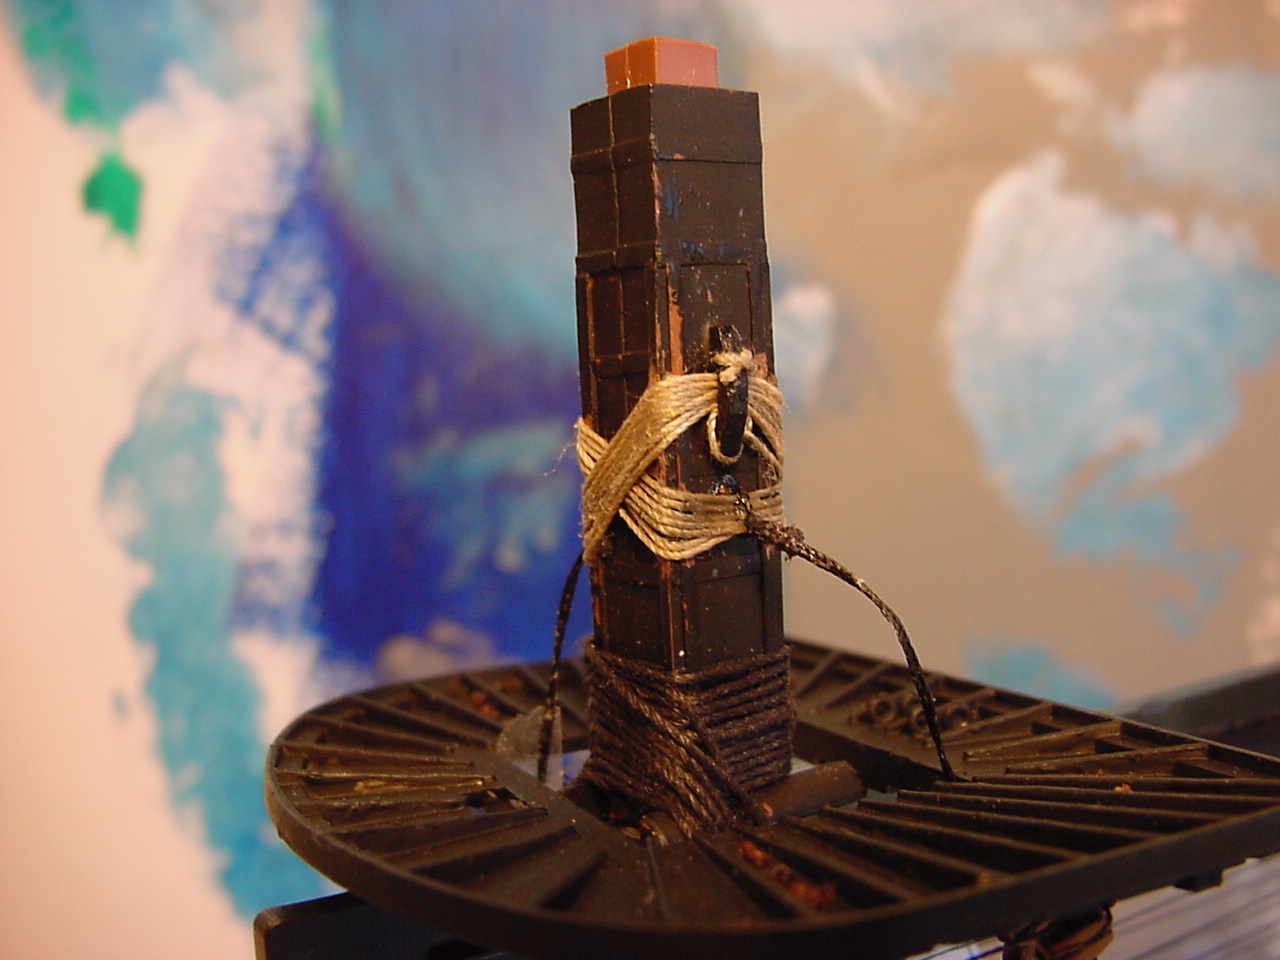
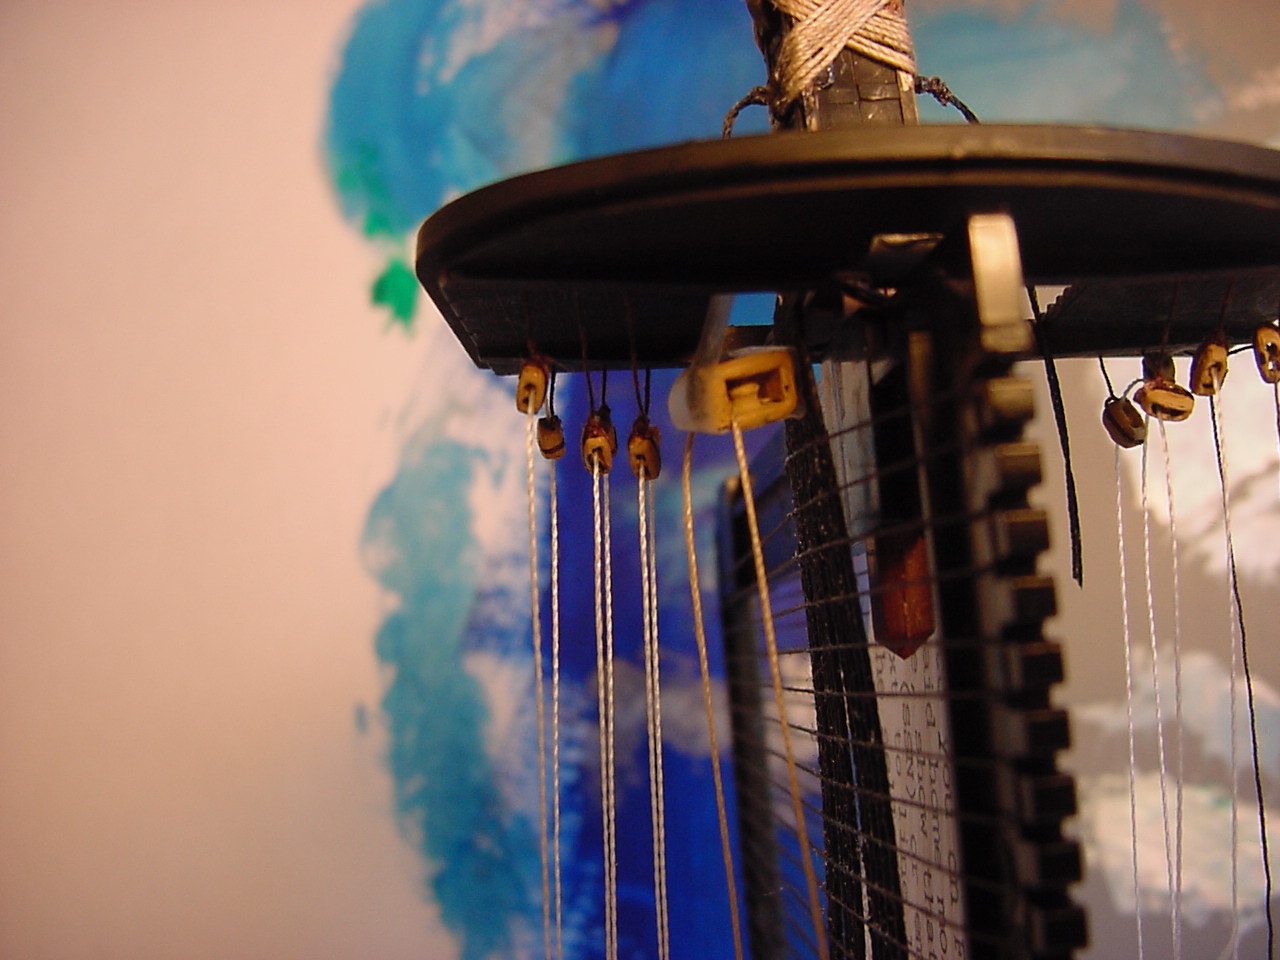
So here's a couple of views with the lashing completed, the mast top just put in place, and a jeer block that is somewhat attached.
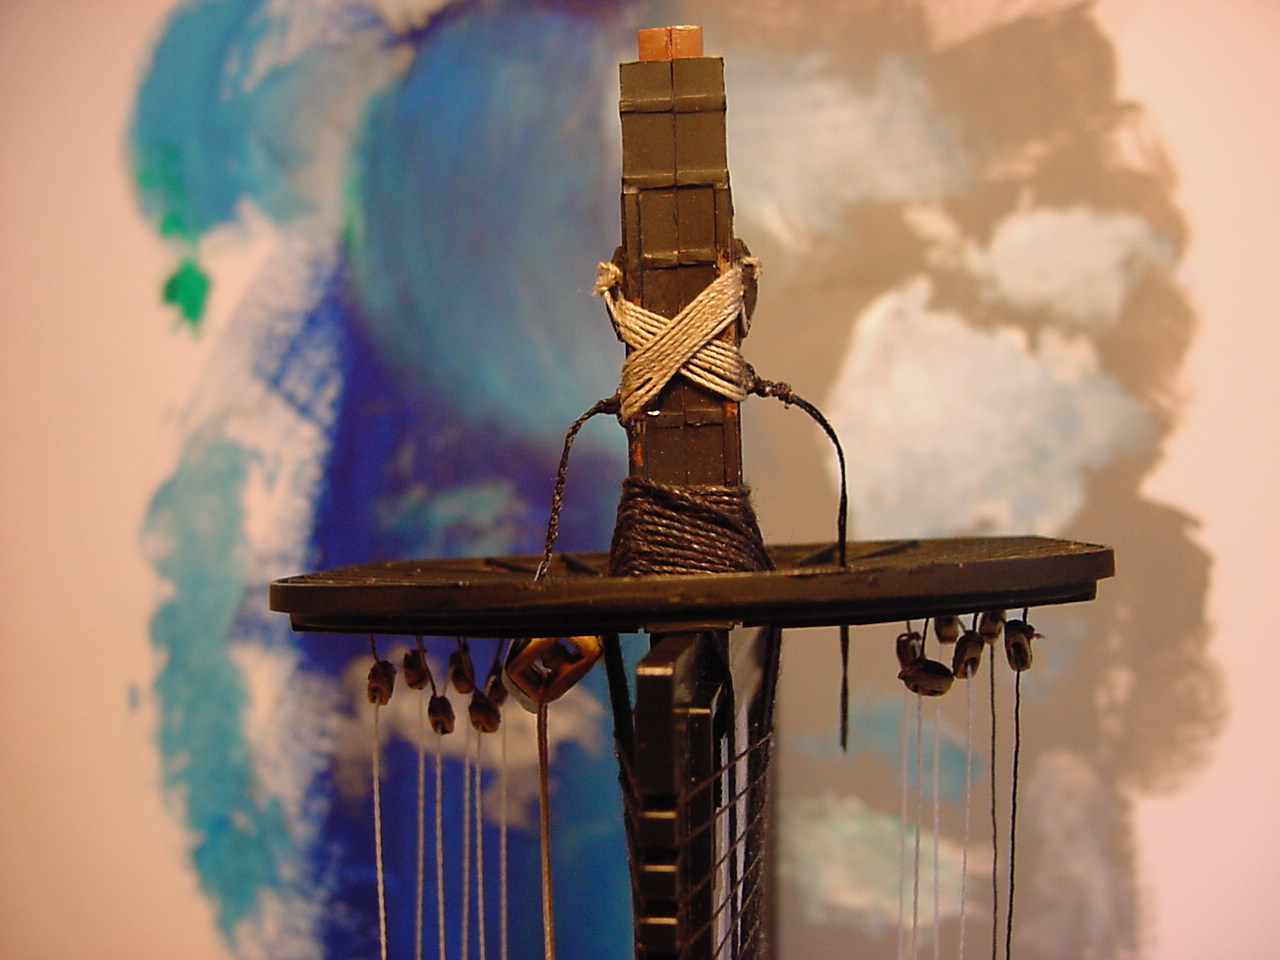
Here again is a similar view, it's just taken from a slightly lower angle. And again, I haven't cut the whole thing loose from the shroud-making frame, so that's the black finger-like projections that are in the center right of the picture.
Now, for the jeer block, especially that one that is taped in place in the pix, I wanted to use the strop, and run it completely around the block, then lash the bitter end to the standing end. However, it looks like, on this particular strop, I'm a bit short in length (I'm guessing as to its length; the other side is longer). So I was huffin' & puffin' on the treadmill, and I came up with the answer: use a separate thread to tie around the block, put a loop at one end of the block (that will become the upper end, in this case), and then slide the strop through the loop, and lash the strop back unto itself. Sheer brilliance! I can't wait to make that happen.
In other news, I had previously assembled the blocks to the lower mizzen yard. In determining which direction the blocks should face, I found that two of them face forward (towards the mainmast)...I don't have my notes with me, so I can't tell you what threads they are. However, at the end of the thread in the instructions, there's a little box, that indicates I should go to instruction (I think it's 29 and 24) to find more details about the placement of the thread. Well, 29 is instructions on rigging the sails & such, and didn't show me anything. I went to instruction 24, and after about 10 minutes (seriously!) I found that the start point for those particular threads are on the mainmast - which then go back to the mizzen yard block, back to blocks on the mainmast, and then down to their belaying point. While checking on those details, I saw also that Heller indicates a couple of other sets of blocks get tied to the mainmast, for other rigging. Buuuuuuuuut, in the instructions for rigging the sails on the mainmast, the drawing shows the other sets of blocks get attached to the shrouds. I checked my 2 reference books, and neither one really indicates if those blocks are attached to the mast, or to the shrouds. Decisions, decisions!!
So, I hope to post some more tidbits soon (but I doubt it - I'll be working on those strop lashings on the main mast, so it'll be a while before I post again, I guess). One thing I have done recently, though, is to cut out a small portion of the main yard, so that it fits against the mainmast with more surface area.
So, peace, love, and understanding, and thanks for reading!!
HiHo
HiHo
It's off to school we go
we learn some junk and
then we flunk
HiHo-HiHoHiHoHiHo
A- hem
Oh boy, it seems that I've been all over the place, doing a little of this, a little of that. The biggest accomplishment has been getting the jeer block strop lashings completed on the foremast. It took about 2 weeks to get it done, only because every time I turned a corner on the futtock, I usually waited for the glue to cure at least overnight. It would have been very helpful if Heller had put little or hooks or something on the futtock, to hold the lashing in place (it would have been helpful if Heller had done a better job on the instructions, but I digress). One reason I'm doing the work I'm doing right now, is because a lot of this stuff is best done "off-model", and a also because the fore and main stays wrap around the mast top, on top of all this other stuff that's happening. Here's a picture of all the things happening there:
As you can see, the jeer strops are sort of "underneath" the stays, as well as some other rigging. In the above picture, I outline the strop lashings in red and green (red to port, green to starboard. Get it? Of course you do). The jeer block strops are outlined in yellow, and the stay is outlined in pink. One interesting thing, and I mentioned this when I was assembling the mizzen mast, are what to do with the rings that are on the back side of the top. In the picture, you'll noticed that they're not really rigged to anything; in Heller's instructions, it shows a double set of blocks are attached to each ring. I only one set of the double set of blocks being used in the instructions, and it's a bit dodgy as to what all the connect to...it just reinforces my decision not to use the rings for anything (well, at least, at this time).
So here's some close-ups of the jeer block strop lashings - when I first started this process, I tied the holding knot on the high side of the...the thing on the side of the futtock:
Doing this, I had to make each loop around the futtock lower than the one before. Here's another picture, with just the starboard lashings started:
Now, on the port side, I started the lashing's knot at the bottom, and worked my way up. This seemed to work a little bit better...until got the 7th turn done, and found myself with not enough thread to finish the knot. Fortunately, I had left a lot of excess from the initial knot, and as I made each turn, I pulled that excess up through the turns. Therefore, I had enough thread to wrap around the thingy on the side of the futtock, and get it all cemented in place:
This next picture shows the black thread that will become the strop - even though there is some slack underneath the lashings, I figured it would be easier to have the thread in place before I started the lashings. And because the thread is black, I put some paper underneath it, just to give it some contrast.
I've noticed in the various drawings I've looked at, that there are 7 turns of the lashings for each strop. So I tried to replicate that here. Unfortunately, as you can see, some of the turns of the thread overlapped, or a gap was in between turns:
So here's a couple of views with the lashing completed, the mast top just put in place, and a jeer block that is somewhat attached.
Here again is a similar view, it's just taken from a slightly lower angle. And again, I haven't cut the whole thing loose from the shroud-making frame, so that's the black finger-like projections that are in the center right of the picture.
Now, for the jeer block, especially that one that is taped in place in the pix, I wanted to use the strop, and run it completely around the block, then lash the bitter end to the standing end. However, it looks like, on this particular strop, I'm a bit short in length (I'm guessing as to its length; the other side is longer). So I was huffin' & puffin' on the treadmill, and I came up with the answer: use a separate thread to tie around the block, put a loop at one end of the block (that will become the upper end, in this case), and then slide the strop through the loop, and lash the strop back unto itself. Sheer brilliance! I can't wait to make that happen.
In other news, I had previously assembled the blocks to the lower mizzen yard. In determining which direction the blocks should face, I found that two of them face forward (towards the mainmast)...I don't have my notes with me, so I can't tell you what threads they are. However, at the end of the thread in the instructions, there's a little box, that indicates I should go to instruction (I think it's 29 and 24) to find more details about the placement of the thread. Well, 29 is instructions on rigging the sails & such, and didn't show me anything. I went to instruction 24, and after about 10 minutes (seriously!) I found that the start point for those particular threads are on the mainmast - which then go back to the mizzen yard block, back to blocks on the mainmast, and then down to their belaying point. While checking on those details, I saw also that Heller indicates a couple of other sets of blocks get tied to the mainmast, for other rigging. Buuuuuuuuut, in the instructions for rigging the sails on the mainmast, the drawing shows the other sets of blocks get attached to the shrouds. I checked my 2 reference books, and neither one really indicates if those blocks are attached to the mast, or to the shrouds. Decisions, decisions!!
So, I hope to post some more tidbits soon (but I doubt it - I'll be working on those strop lashings on the main mast, so it'll be a while before I post again, I guess). One thing I have done recently, though, is to cut out a small portion of the main yard, so that it fits against the mainmast with more surface area.
So, peace, love, and understanding, and thanks for reading!!
JJ1973
#345
Joined: August 22, 2011
KitMaker: 1,835 posts
Model Shipwrights: 1,832 posts
Posted: Saturday, April 21, 2018 - 11:16 PM UTC
Hi Tim!
Sorry for my so delayed reply! This is indeed amazing work, and it's always fun and interesting to follow your build. I hope you could make some progress over the last weeks - I'm looking forward to you next update and see Victory's sail come up sometime!
Cheers,
Jan
Sorry for my so delayed reply! This is indeed amazing work, and it's always fun and interesting to follow your build. I hope you could make some progress over the last weeks - I'm looking forward to you next update and see Victory's sail come up sometime!
Cheers,
Jan
timmyp
Joined: May 18, 2008
KitMaker: 496 posts
Model Shipwrights: 404 posts
Posted: Sunday, April 22, 2018 - 03:08 PM UTC
Quoted Text
Hi Tim!
Sorry for my so delayed reply! This is indeed amazing work, and it's always fun and interesting to follow your build. I hope you could make some progress over the last weeks - I'm looking forward to you next update and see Victory's sail come up sometime!
Cheers,
Jan
Jan!!
Good to hear from you, and I hope all is well with you!! I found your blog on HMS Hood that you started some time back - that was some real amazing fold-up work on the PE parts that became the 0.5 inch machine gun mounts (your describing it as some kind of oragami is very accurate!) I haven't gotten to the end of your blog, so I'm looking forward to finishing it.
Progress is proceeding. I think I've FINALLY got the all the (touch up) painting done on the masts, so next steps are glue the masts into place, attached the lower shrouds, and put the fore- and mainstays in place (I was doing some preliminary work for the stays today). So maybe by this coming weekend, I'll have some photos to post, showing a lot of progress.
And thanks for writing!!

 |

WEB HOSTING BY


Copyright ©2021 Model Shipwrights and Kitmaker Network, a subsidiary of Silver Star Enterprises
All Rights Reserved. Please read our Conditions of Use and Privacy Policy.
All Rights Reserved. Please read our Conditions of Use and Privacy Policy.