_GOTOBOTTOM
Ships by Class/Type: Cruisers
Topics covering cruisers both past and present.
Revell Olympia build
TimReynaga
Staff MemberAssociate Editor
MODEL SHIPWRIGHTS
Visit this Community
California, United States
Joined: May 03, 2006
KitMaker: 2,500 posts
Model Shipwrights: 1,830 posts
Posted: Tuesday, October 25, 2011 - 05:28 PM UTC

I've been building Revell's ancient (1959!) cruiser Olympia, thought I'd share it with you all. Here's a picture of the model on the cover of a 1974 Revell brochure... Remember those? They used to be included in Revell ship kits back then. Very inspirational for a kid at the time. I thought those out of the box builds on the model boxes were WAY cool!
CaptSonghouse
Visit this Community
California, United States
Joined: August 08, 2008
KitMaker: 1,274 posts
Model Shipwrights: 1,236 posts
Posted: Wednesday, October 26, 2011 - 05:43 AM UTC
Hi TIm!

In the early '70's Revell even had a "kit of the month" club where subscribers would get a different kit in the mail each time. Can you image Dragon or Trumpy doing that today?


--Karl
surfsup
Visit this Community
Queensland, Australia
Joined: May 20, 2010
KitMaker: 1,230 posts
Model Shipwrights: 1,212 posts
Posted: Wednesday, October 26, 2011 - 01:27 PM UTC
Looking forward to seeing your Build Tim. I have 2 in my stash that I will do oneday but have never seen one built up. Will watch with interest.....Cheers Mark
ejhammer
Visit this Community
Michigan, United States
Joined: June 10, 2008
KitMaker: 230 posts
Model Shipwrights: 136 posts
Posted: Wednesday, October 26, 2011 - 01:58 PM UTC
Got a Revell H-353-249 USS ESSEX kit from 1958 or so.
It's the 1/540 scale angle deck version. I built that kit as a teenager, then wound up serving on ESSEX as a CVS from 1961 to 63 as a Machinist's Mate. What are the chances of that?
I'll be building that kit after the first of the year. Got PE from Gold Medal, Resin island and aircraft, decals from Mark's Models. Want to do this one right.

EJ
TimReynaga
Staff MemberAssociate Editor
MODEL SHIPWRIGHTS
Visit this Community
California, United States
Joined: May 03, 2006
KitMaker: 2,500 posts
Model Shipwrights: 1,830 posts
Posted: Wednesday, October 26, 2011 - 02:15 PM UTC

Quoted Text

Looking forward to seeing your Build Tim. I have 2 in my stash that I will do oneday but have never seen one built up. Will watch with interest.....Cheers Mark


Wow, TWO in the stash! Man, you have your work cut out for you.

As I begin the blog, I thought I'd share my impressions of the kit for those who may not be familiar with it:

Revell's 1/232 scale Olympia is one of their "box-scale" classics, first appearing in 1959 in white, tan, and dark brown plastic (kit H-367-198). Sometimes confused with the 1967 Pyro 1/228 Olympia (later reissued by Life-Like and Lindberg), Revell’s Olympia is an entirely different, and far superior, kit. It has been issued numerous times over the years, including by both Revell and Revell UK in 1974 (H-443), Revell-clone Advent in 1979 (2552), and Revell “History Makers” series in 1982 (kit 8623, in gray plastic). It was also issued in the late 1980s by Tsukuda Hobby of Japan (kit C01) and more recently by Revell-Monogram in 1999 (5026), which is the one I'm building. This Fall Encore Models (Squadron Mail Order's house brand) announced their reissue of the old Revell plastic as a "premium edition" kit with resin propellers and stern torpedo tube cover, extensive photoetch upgrades, turned brass replacement gun barrels, and a press-on wood deck from KA models, as well as brass display pedestals and a wood base. I haven't seen this issue yet, but if you are considering doing a Revell Olympia it looks like this is definitely the one to start with!
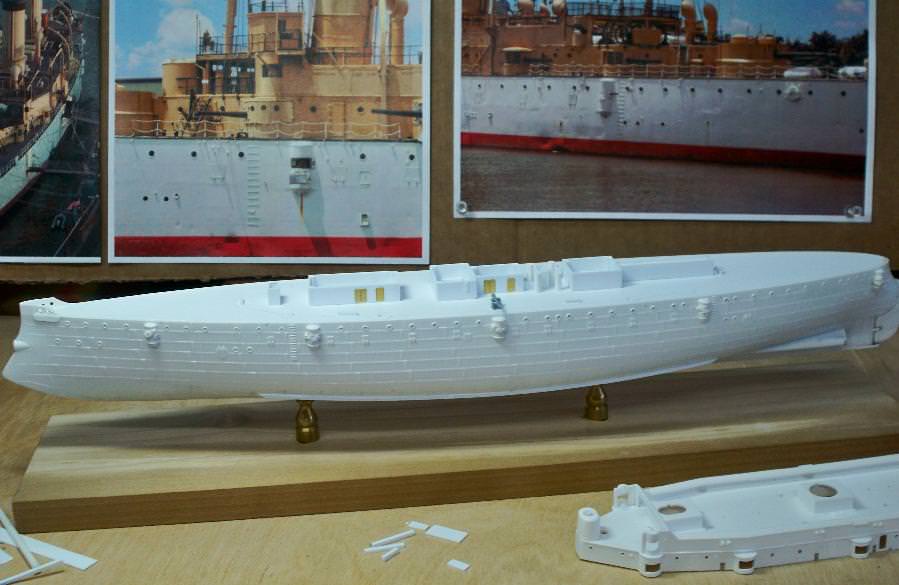
The kit has been criticized for its somewhat heavy detailing, molded in rail stanchions and 1950s-era moving features such as a turnable rudder and davits that lower and raise. Even with these weaknesses though, it is still a pretty good kit. Checking the dimensions against the 1895 Booklet of General Plans for the ship, the model scales out perfectly. Hull, superstructure, and 8 inch turret dimensions are dead on. Shapes are correct as well. Unlike many of Revell’s early ship models, this one has an accurate hull including correct underwater hullform and well executed screws. Scuttles, hatches and other details are credibly represented and appropriately placed. Highlights include nicely rendered canvas detail on the main hatch frame cover, excellent decals (including federal shield for the bow, stern nameplate, and flags), and no molded-in anchor chain to mar the raised planking detail on the foredeck. I also liked the nicely done clinker-plated hull detail on the boats, the delicate one-pounder guns, and the tiny three-part open spoked helm. Details are sharp and parts fit overall is decent, so the casual modeler can assemble the model without heartburn into an attractive display piece right out of the box.
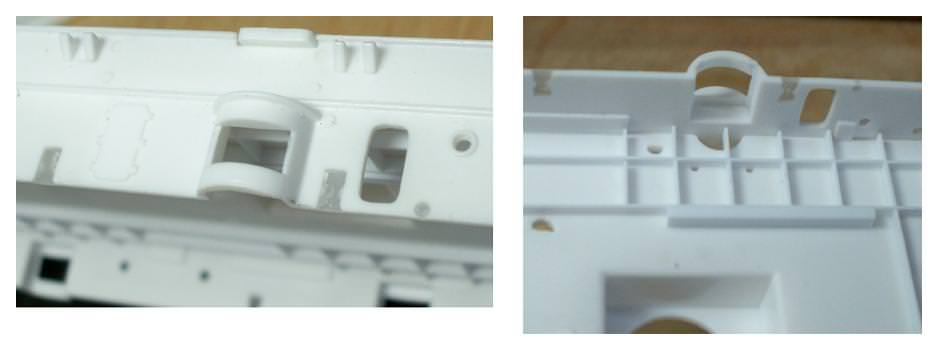
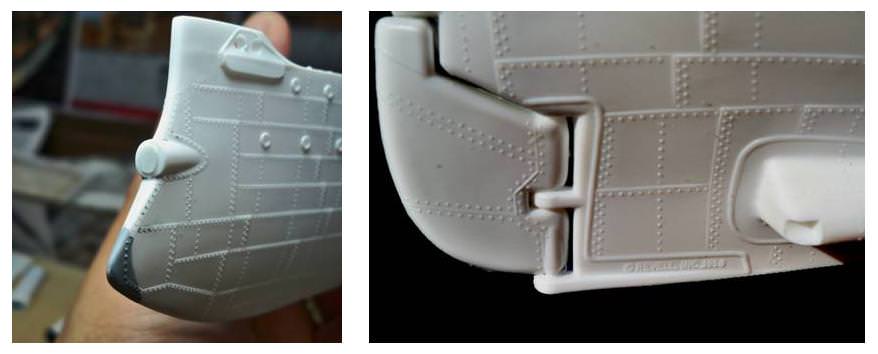
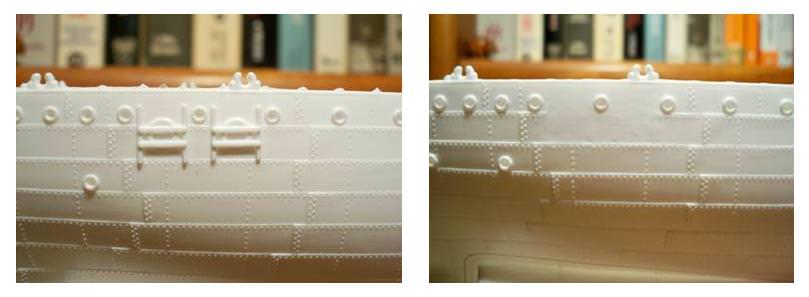
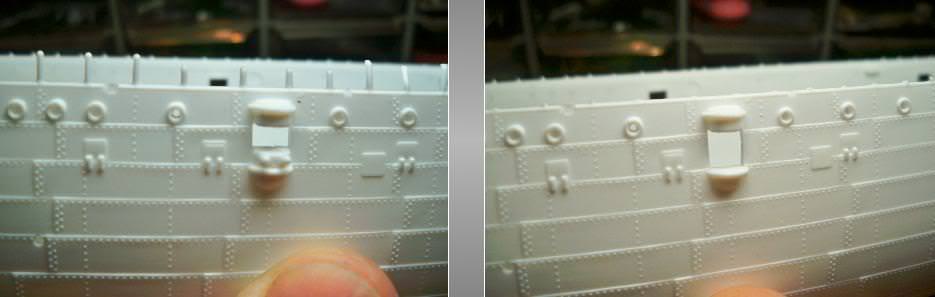
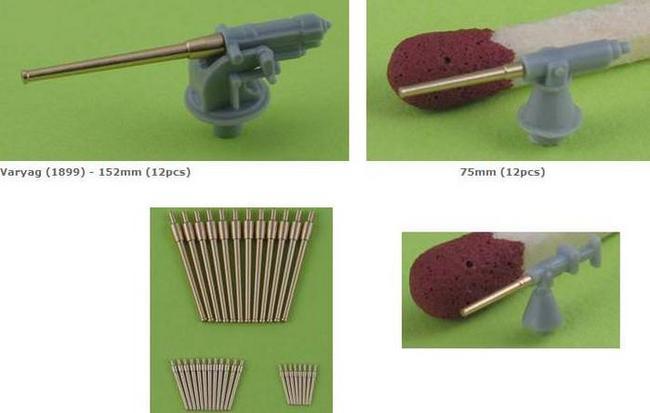
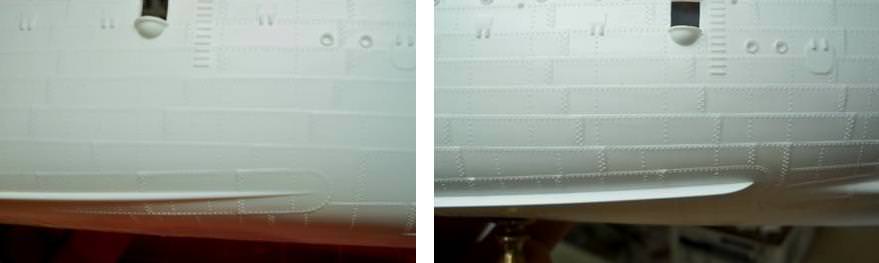
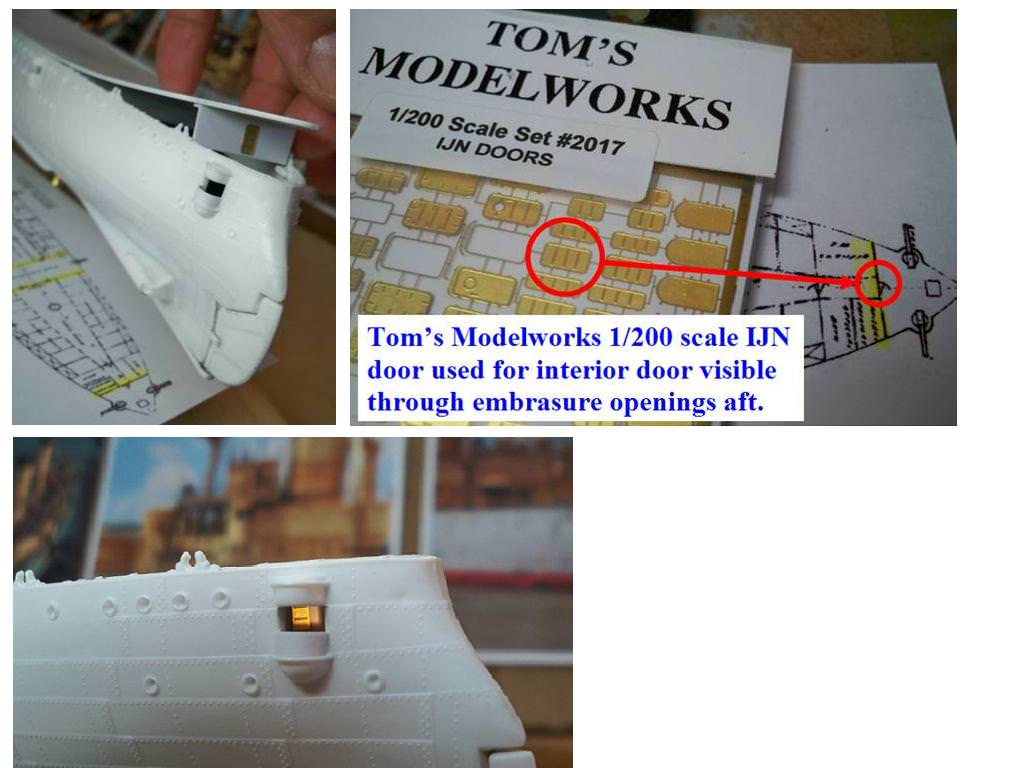
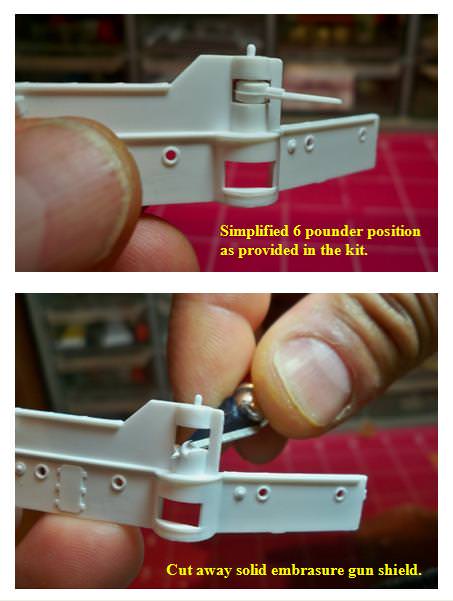
For the more ambitious builder there are some challenges. Photos of the preserved USS Olympia show that the extensive rivet and plating details on the kit hull, though accurate, are a bit heavy. These details are visible, but the actual hull sides appear quite modern and fairly smooth from any distance. You can sand the kit details down or leave them for “impressionistic” effect. Also, while the deck planking detail is good, there are hard to conceal seams where the fantail and the foredeck attach to the main deck. A more serious problem is the guns. While the one-pounders are quite good, the simplified depiction of the hull mounted six-pounders is passable only if the casemates are shown closed. When open, the unshielded gun mounts should be visible inside. Also, Revell incorrectly depicted Olympia’s 5 inch battery in individual enclosed niches. These guns were actually arranged along an open gun deck within the superstructure, something like that on an old sailing ship of the line. If you open up the niches you must also fill the hole in the kit main deck under the superstructure which then becomes visible behind the guns. In addition, though useable, the weapons themselves are very basic. Upgrades might include photoetch details (both Gold Medal Models and Tom’s Modelworks have sets especially for the Olympia) and turned brass gun barrels (B&D set 23201). These enhancements dramatically improve things, but even without them this venerable kit from the dawn of plastic ship modeling should build into a good looking model.


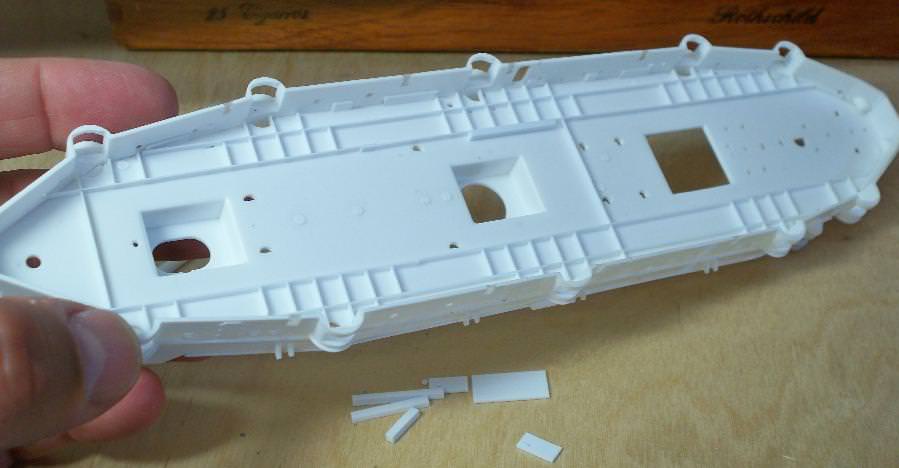
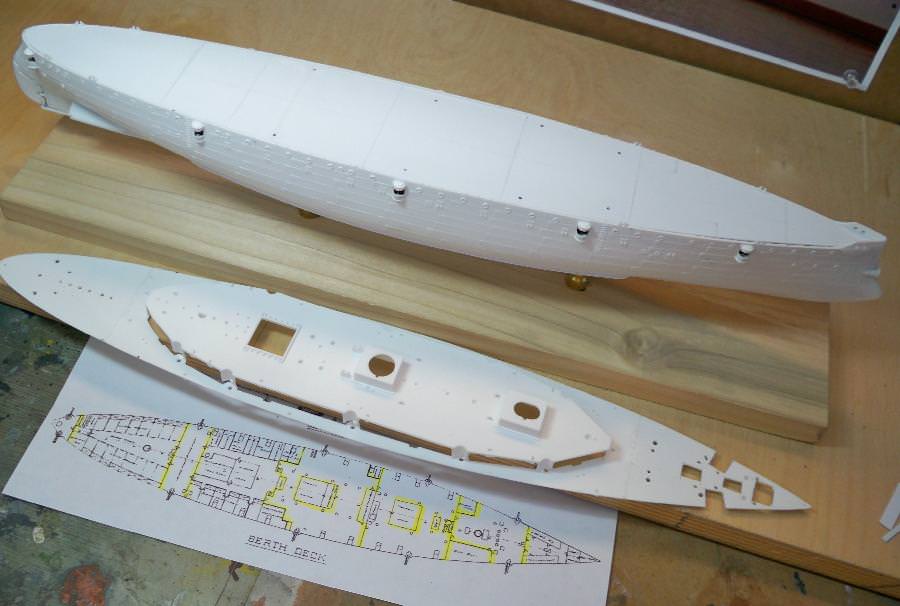
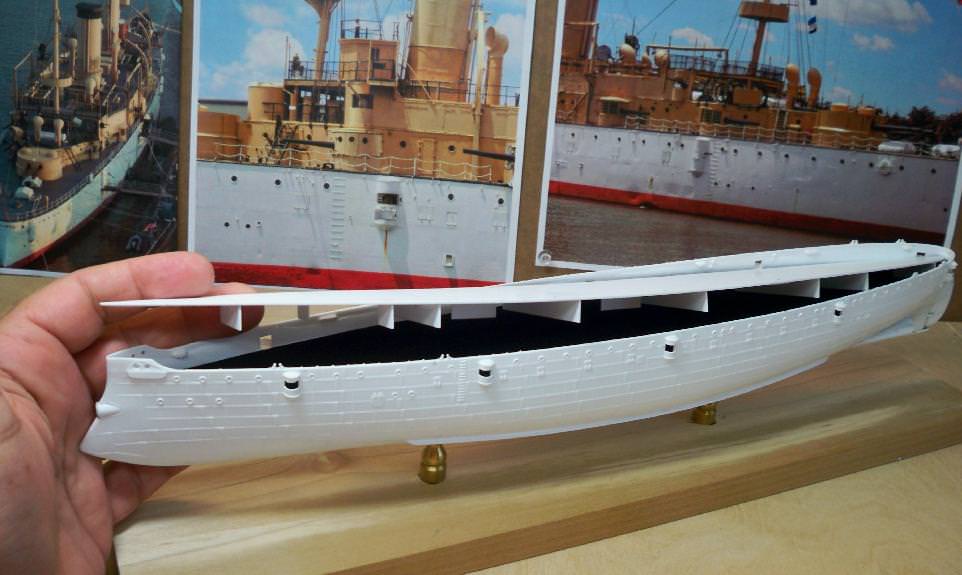
The first part of the build was to assemble the hull halves. I kinda liked the kit provided stand/nameplate, but my wife pronounced it UGLY, so I replaced it with with cheap brass lampshade risers from Home Depot. She was right; they do look better.
surfsup
Visit this Community
Queensland, Australia
Joined: May 20, 2010
KitMaker: 1,230 posts
Model Shipwrights: 1,212 posts
Posted: Thursday, October 27, 2011 - 02:35 PM UTC
The Stand sets her off very nicely. Look forward to seeing more.....Cheers Mark
TimReynaga
Staff MemberAssociate Editor
MODEL SHIPWRIGHTS
Visit this Community
California, United States
Joined: May 03, 2006
KitMaker: 2,500 posts
Model Shipwrights: 1,830 posts
Posted: Friday, October 28, 2011 - 06:09 PM UTC
More work on the hull. The relief-molded plating and rivet detail is sharp but a bit exaggerated when viewed close up. I decided to leave it , though, since it looks good and does give a nice 19th Century feel to the ship.

I filled in the torpedo launcher at the bow. The kit depicted it as a round mounting with a hole in the front, but the real one was actually oval in section and had a cover. I reshaped the mounting a little, but I couldn’t do very much without destroying the surrounding detail so I compromised by filling the hole and adding an oval cap. I also scraped away the federal shield on the prow, which Revell had depicted in relief. Pictures of the preserved ship in Philadelphia today show this to be painted on, so I figured Revell got it wrong. Of course, after I did this I found a clear picture of the ship in the 1890s showing that Revell had it right after all! Turns out the shield was removed at some point and is now on display in the Washington Navy Yard museum, and the Philadelphia guys just painted it back on the preserved ship. Doh! Guess I’ll use the kit supplied decal later.

Also added the rudder. It was designed to be moveable and so looks a little clunky, but I just cleaned the seams and cemented it on unchanged. Revell had “© Revell, Inc.,1959” engraved in tiny letters on the keel at the stern. Amusing, but of course these had to go!

Gremlin56
Joined: October 30, 2005
KitMaker: 3,897 posts
Model Shipwrights: 3,301 posts
Posted: Friday, October 28, 2011 - 09:20 PM UTC
Very brave taking on a 52 year old It's a very interesting project you have going there. I will follow this build closely, who knows, might get tempted to try and get hold of this model myself.
Cheers,
Julian
RadE8Boy
Visit this Community
Pennsylvania, United States
Joined: October 29, 2011
KitMaker: 2 posts
Model Shipwrights: 1 posts
Posted: Saturday, October 29, 2011 - 06:53 AM UTC
I will be watching this build intently, and I wanted to pass this on as a friend of mine is the product development manager for MMD aka Squadron and they will be releasing the Revell Olympia this year in 2 versions; one stock and one with a bunch of add on goodies, like PE, wooden deck and metal barrels.


http://www.squadron.com/ItemDetails.asp?item=EC80001
http://www.squadron.com/ItemDetails.asp?item=EC85001

JR
TimReynaga
Staff MemberAssociate Editor
MODEL SHIPWRIGHTS
Visit this Community
California, United States
Joined: May 03, 2006
KitMaker: 2,500 posts
Model Shipwrights: 1,830 posts
Posted: Sunday, October 30, 2011 - 02:07 AM UTC

Quoted Text

I will be watching this build intently, and I wanted to pass this on as a friend of mine is the product development manager for MMD aka Squadron and they will be releasing the Revell Olympia this year in 2 versions; one stock and one with a bunch of add on goodies, like PE, wooden deck and metal barrels.

http://www.squadron.com/ItemDetails.asp?item=EC80001
http://www.squadron.com/ItemDetails.asp?item=EC85001

JR


It never fails... this kit has been around for over 50 years, and when I finally get to it someone releases an upgraded version of it! Oh well, I'm already started so there'e nothing for it but to just keep on...

The surface detail on the old kit is good generally, but some of it is just too crude for my taste, like the life rings at the stern. I scraped them away, carefully avoiding the surrounding plating and rivet detail. There are etched ring mounts in the Tom’s Modelworks brass set, but they are a little heavy too. I may scratchbuild them if they don’t look right. The rings themselves will probably be wire. Not crazy about the bald spot in the detail there now, but hopefully the replacement rings will cover it up.

Grumpyoldman
Staff Member_ADVISOR
KITMAKER NETWORK
Visit this Community
Florida, United States
Joined: October 17, 2003
KitMaker: 15,338 posts
Model Shipwrights: 981 posts
Posted: Sunday, October 30, 2011 - 04:10 AM UTC

Quoted Text

Got a Revell H-353-249 USS ESSEX kit from 1958 or so.
It's the 1/540 scale angle deck version. I built that kit as a teenager, then wound up serving on ESSEX as a CVS from 1961 to 63 as a Machinist's Mate. What are the chances of that?
I'll be building that kit after the first of the year. Got PE from Gold Medal, Resin island and aircraft, decals from Mark's Models. Want to do this one right.

EJ


Nice to see another MM snipe aboard.

You doing a nice job on the old girl.

I thought I saw an upgraded kit of this subject, just couldn't remember where.
ejhammer
Visit this Community
Michigan, United States
Joined: June 10, 2008
KitMaker: 230 posts
Model Shipwrights: 136 posts
Posted: Sunday, October 30, 2011 - 10:47 AM UTC
Hey Mate - Grumpyoldman
Sure would like to see an ESSEX class with 1958 beyond angle deck, preferably 1/350. I'd get a couple right out of the gate.

EJ
surfsup
Visit this Community
Queensland, Australia
Joined: May 20, 2010
KitMaker: 1,230 posts
Model Shipwrights: 1,212 posts
Posted: Sunday, October 30, 2011 - 08:26 PM UTC
Nice work so far my Friend. Looking forward to watch your build of her.....Cheers Mark
TimReynaga
Staff MemberAssociate Editor
MODEL SHIPWRIGHTS
Visit this Community
California, United States
Joined: May 03, 2006
KitMaker: 2,500 posts
Model Shipwrights: 1,830 posts
Posted: Saturday, November 05, 2011 - 12:08 PM UTC
More work on Olympia's hull. The kit provided parts for the hull mounted 6-pounder (2.2 inch) guns depict the embrasures opened up, sort of like little semi-turrets, with the dropped shields (parts #7) as half cylinders. It is a reasonable representation, but not very inspiring. I thought it would be fun to go a little further and show them opened up with the guns visible inside. Normally I’d wait until later to figure out the armament, but the interiors of these things won’t be accessible once the main deck is glued down, so now’s the time.

The kit parts are crude, but the sponsons can be fixed up with a little cutting and simple scratchbuilding. The first step was to cut away the solid molded shields to open up the hull casemates (all ten of them!). These will be replaced with curved plastic strips later, once the new guns are in place.

The guns themselves are harder. There aren’t any 1/232 scale replacements out there. Pawing through my parts box, I considered using armament recycled from an old Revell 1/350 Emden wreck, but there weren’t enough parts to fully outfit the Olympia model. Looking farther afield, Glencoe’s Oregon, Eastern Express’ Borodino or Zvezda's Varyag all had potential. I finally settled on the Varyag. The weapons from that 1/350 scale model, with modifications, can be made to work pretty well for the larger scale Olympia. Even though it was a Russian vessel, Varyag was built in an American yard and its guns closely resembled American weapons of the era. The Varyag kit contains 75mm (3 inch) guns which could be converted to represent the 2.2 inchers on Olympia’s ten hull sponsons. They are reasonably close in appearance, and would be equivalent to 1.9 inch guns in 1/232.

The Varyag could also contribute the 5 inch/40cal guns for Olympia's secondary battery. Varyag’s 152mm (6 inch) armament are similar in appearance to Olympia’s guns. These would be equivalent to 4 inchers in 1/232; a little small, but fortunately they are molded slightly overscale in the Zvezda kit. With some basic mods and B & D or perhaps Master–Model brass replacement barrels they will look great. In addition, Olympia’s six very visible 1-pounders (37mm) could be made from Varyag’s 3-pounder (47mm) guns; they would be equivalent to 31mm guns in 1/232, which is reasonably close to 37mm.

Here’s the rub: the Zvezda kit retails at about US$45, which is pretty steep just to raid it for parts, and the Master–Model brass barrels are another $25... but it would be very cool to see detailed guns in all those open sponsons on the hull and superstructure. And the Revell parts really are a mess, so...
TimReynaga
Staff MemberAssociate Editor
MODEL SHIPWRIGHTS
Visit this Community
California, United States
Joined: May 03, 2006
KitMaker: 2,500 posts
Model Shipwrights: 1,830 posts
Posted: Sunday, November 06, 2011 - 03:28 PM UTC

DanielMoscatelli
Visit this Community
Montevideo, Uruguay
Joined: August 22, 2011
KitMaker: 998 posts
Model Shipwrights: 941 posts
Posted: Monday, November 07, 2011 - 01:28 AM UTC
My god!!! It is more old that my !!! Nice ship and very nice work!!!
Congratulations
TimReynaga
Staff MemberAssociate Editor
MODEL SHIPWRIGHTS
Visit this Community
California, United States
Joined: May 03, 2006
KitMaker: 2,500 posts
Model Shipwrights: 1,830 posts
Posted: Wednesday, November 09, 2011 - 05:19 PM UTC
The hull is looking better, just had to take care of some minor prep details. I filled various mounting holes for davits and boat booms on the hull as well as a few sink marks, which is a simple but fiddly process since I wanted to avoid damage to the surrounding plate and rivet detail. I also removed Revell’s soft bilge keels and replaced them with styrene strip, which makes for a sharper look. They aren’t all that noticeable, but vague bilge keels are a common weakness on older ship kits.

Next up: the main deck

TimReynaga
Staff MemberAssociate Editor
MODEL SHIPWRIGHTS
Visit this Community
California, United States
Joined: May 03, 2006
KitMaker: 2,500 posts
Model Shipwrights: 1,830 posts
Posted: Sunday, November 13, 2011 - 05:27 PM UTC
Having finished the embrasures for the hull 6-pounders, it was on to the main deck.
The kit deck part fits well and has nice raised plank detail, but unfortunately there are difficult to hide seams where the separate fore and fantail decks attach to the central portion. Also, Revell’s odd design left a big hole in the middle of the deck under the superstructure, which would not have been a problem as the kit designers envisioned it since none of this area of the model would be visible with the 5 inch casemates (inaccurately) closed in behind. I am going to open them up though, so this interior deck will be faintly visible through the embrasure openings. Rather than trying to blend in the seams in the planks and patch that huge hole in the middle of the kit part, I decided to just replace the whole thing. Using the assembled kit deck parts as a guide, I cut a sheet of Evergreen #2030 .030” spaced V-Groove sheet to become the new main deck. This gives a nice even surface with perfect fore-and-aft grooves for planking if I decide to represent the deck with painted styrene, or if I go with wood strips (still haven't decided) those grooves will provide a guide for the little planks to go consistently parallel to the centerline. The down side is that I had to cut off and must later reattach various foredeck details that came molded to the deck parts.


Since the “berth deck” beneath the main deck will be somewhat visible past the 6-pounder guns through the opened up hull casemates, I decided to add some interior bulkheads. I was able to find Olympia's 1895 Booklet of General Plans online through the Historic Naval Ships Association (http://www.hnsa.org/doc/plans/ ), which shows the layout of the interior compartments. I made simple sheet plastic bulkheads and and just attached them to the underside of the new main deck, letting them hang into space. I didn’t bother to add the deck below, just painted the hull inside black since it would be next to impossible to see down in there anyway. I didn’t add any detail to the bulkheads either since they will appear only as vague shapes behind the guns.

An exception is the bulkhead near the aftermost 6-pounders where I added a Tom's Modelworks 1/200 scale Japanese Navy photoetched door. This bulkhead is fairly close to the embrasure openings, so I figured it could be visible from the outside if somebody were to take a penlight and look in carefully. Once installed, painted white and nestled behind the guns in the embrasures, though, it virtually disappeared. Oh well, at least we’ll know it is in there!

Mgunns
Visit this Community
Arizona, United States
Joined: December 12, 2008
KitMaker: 1,423 posts
Model Shipwrights: 99 posts
Posted: Monday, November 14, 2011 - 06:15 AM UTC
Very inspiring work. It is simple, but the results are very nice. Looking forward to more.

Best

Mark
TimReynaga
Staff MemberAssociate Editor
MODEL SHIPWRIGHTS
Visit this Community
California, United States
Joined: May 03, 2006
KitMaker: 2,500 posts
Model Shipwrights: 1,830 posts
Posted: Tuesday, November 22, 2011 - 12:13 PM UTC
Thanks for the kind words, Mark, much appreciated!

Aside from dealing with the usual fit issues of 1950s era kits, things are proceeding fairly smoothly. Having dealt with the hull, I separated the superstructure deck from the unused kit main deck and built up the basic superstructure shapes. I drilled out the portholes and filled in the numerous holes for assorted klunky kit parts I won’t be using. The nastiest holes were for mounting the large boat davits, which were Revell designed to actually raise and lower! Kind of a fun feature, but unfortunately accomplishing this required ugly rectangular gashes in the superstructure sides to mount them. Not a big deal to fill these really, just a little cyanoacrylate sanded smooth... but I did manage to spill super glue all over one of those lovely molded in doors... grrrrr!

The first change was to improve the simplified 6-pounder mounts. Revell depicted these as strange looking pseudo-turrets rather than as the open mounts they really were. In addition the openings, although correct in size, were sited too high. I started by carving away the solid lower embrasures, replacing them with .015 X .100 inch Evergreen stock shields. Since these corrected shields were lower than the kit depictions, they left the openings oversized; I added plastic shims to the upper portions of the four positions to restore the apertures to their correct dimensions.


With the new Zvezda guns test fitted, things looked much better!

dioman13
Visit this Community
Indiana, United States
Joined: August 19, 2007
KitMaker: 2,184 posts
Model Shipwrights: 204 posts
Posted: Tuesday, November 22, 2011 - 03:12 PM UTC
Hey Tim, nice job on an oldie. When I first started building models back in 63 they were ships. I could of filled a wall with them all, of course the glue marks and runny paint non trimed sprue points would make me shiver now. Though I build 1/35th vign. now, I can appriciate what you are doing. Brings back alot of memories of my step father being fastinated with my interest as he was army airforce. He bought me my first airplane kit, a B-17. Anyway, yours looks amazing, from what you started with and where you are going. Will keep looking in on your build and might even get a ship in the future just for the fun memories, if I can work that small anymore, lol. bob d.
TimReynaga
Staff MemberAssociate Editor
MODEL SHIPWRIGHTS
Visit this Community
California, United States
Joined: May 03, 2006
KitMaker: 2,500 posts
Model Shipwrights: 1,830 posts
Posted: Tuesday, November 22, 2011 - 04:58 PM UTC

Quoted Text

Hey Tim, nice job on an oldie. When I first started building models back in 63 they were ships. I could of filled a wall with them all, of course the glue marks and runny paint non trimed sprue points would make me shiver now. Though I build 1/35th vign. now, I can appriciate what you are doing. Brings back alot of memories of my step father being fastinated with my interest as he was army airforce. He bought me my first airplane kit, a B-17. Anyway, yours looks amazing, from what you started with and where you are going. Will keep looking in on your build and might even get a ship in the future just for the fun memories, if I can work that small anymore, lol. bob d.


Thanks Bob. If I can inspire you to come back from the ‘dark side’ even for a little while, my work is done!
TimReynaga
Staff MemberAssociate Editor
MODEL SHIPWRIGHTS
Visit this Community
California, United States
Joined: May 03, 2006
KitMaker: 2,500 posts
Model Shipwrights: 1,830 posts
Posted: Friday, November 25, 2011 - 02:05 PM UTC
I hope you all had a great Thanksgiving Day holiday (at least for us Americans!) I did my part, visiting family, watching lots of college football and eating myself into a stupor!

As for Olympia, I‘ve been working on the superstructure interior, which will be partially visible through all those open 5 inch embrasures. I used the 1895 Booklet of General Plans as a guide to construct basic interior structures. Not much detail here since the apertures are small, the interior is rather dark, and it is mostly blocked by the guns... but if you look carefully with a penlight you will be able to see the shapes in there. Photoetch brass doors are from the Toms Modelworks 1/200 IJN doors set.

]
Just for fun I added detail to the interior overheads too. Now this will be really hard to see, but if you look carefully it will be there! I wouldn’t have bothered with this, but after I ruined that exterior door with superglue I decided to just trim it out and depict it as open. This means that more of this portion of the interior will be visible.


So I detailed the area above and behind that door a little more than elsewhere; but then the other openings started to look a little blank. I ended up adding similar overhead detail to the other areas where it might be seen. It was a slow process of placing individually cut pieces of .015 X .060 inch strip to build up the girders... but the task was actually a pleasantly mindless diversion as my son and I watched Fellowship of the Ring for the hundredth time this afternoon!

All in all an enjoyable time, though for some of us, fatiguing.

best,
Tim
Gremlin56
Joined: October 30, 2005
KitMaker: 3,897 posts
Model Shipwrights: 3,301 posts
Posted: Friday, November 25, 2011 - 04:38 PM UTC
Nice work Tim, looking good there. I see that Revell supplied the ship's cat in the box as well Now that is real detailing
Julian
CaptSonghouse
Visit this Community
California, United States
Joined: August 08, 2008
KitMaker: 1,274 posts
Model Shipwrights: 1,236 posts
Posted: Saturday, November 26, 2011 - 06:47 AM UTC
HI Tim!

You said you "borrowed" the smaller guns from the Varyag kit. Do you have brass barrels on order for the final build, or will Admiral Dewey be in a pickle when 1:350 Russians come calling wanting their guns back?

--Karl
 _GOTOTOP