

Great photos.
I wish you were further ahead, it would have helped my build. I think I'm in the last stages. Heck of a lot of small details to add however.
BTW the rope reels. The PE instructions included some photos of the Snowberry museum ship. And it shows a photo of the rope reels. And they have 3 disks!? as per instructions.


Go to modelshipwrights.com for the current dynamic site!
General Ship Modeling
Discuss modeling techniques, experiences, and ship modeling in general.
Discuss modeling techniques, experiences, and ship modeling in general.
Hosted by Jim Starkweather
Building Revells 1/72 Flower-Class Corvette

cloggerdemps

Joined: December 05, 2012
KitMaker: 88 posts
Model Shipwrights: 75 posts
Posted: Wednesday, June 24, 2015 - 04:37 PM UTC

RussellE

#306
Joined: June 27, 2010
KitMaker: 3,959 posts
Model Shipwrights: 2,777 posts

Posted: Wednesday, June 24, 2015 - 05:55 PM UTC
Oh no! 2 days! Very Lazy! 

I haven't done any work since Sunday on the KGV-may get to finish prepping the boats over the weekend for some painting next week.
Looking good though Warren. Keep the updates coming!
Russ
I haven't done any work since Sunday on the KGV-may get to finish prepping the boats over the weekend for some painting next week.
Looking good though Warren. Keep the updates coming!
Russ


TRM5150

Joined: January 03, 2010
KitMaker: 2,159 posts
Model Shipwrights: 1,400 posts

Posted: Wednesday, June 24, 2015 - 06:10 PM UTC
Looking great Warren! Nice work on the hatch! I have been slacking off myself lately! Enjoy the couple days of downtime away from the updating!

warreni
Joined: August 14, 2007
KitMaker: 5,926 posts
Model Shipwrights: 2,624 posts

Posted: Wednesday, June 24, 2015 - 11:59 PM UTC
Quoted Text
Great photos.
I wish you were further ahead, it would have helped my build. I think I'm in the last stages. Heck of a lot of small details to add however.
BTW the rope reels. The PE instructions included some photos of the Snowberry museum ship. And it shows a photo of the rope reels. And they have 3 disks!? as per instructions.
I saw that one as well mate. Maybe changed in a refit at some time. Who knows when each ship is a little different at each stage in its life. I am not too worried..

Cheers mate
Warren
warreni
Joined: August 14, 2007
KitMaker: 5,926 posts
Model Shipwrights: 2,624 posts
Posted: Thursday, June 25, 2015 - 12:01 AM UTC
Thanks Russell and Todd.

RedDuster

Joined: March 01, 2010
KitMaker: 7,078 posts
Model Shipwrights: 6,649 posts

Posted: Thursday, June 25, 2015 - 06:27 PM UTC
Hatch and skylight looking very good Warren,
Is that a bit of deliberate wear and tear on the hatch cover? recon it will look effective under a coat of paint and some weathering.
Cheers
Si
Is that a bit of deliberate wear and tear on the hatch cover? recon it will look effective under a coat of paint and some weathering.
Cheers
Si
warreni
Joined: August 14, 2007
KitMaker: 5,926 posts
Model Shipwrights: 2,624 posts
Posted: Thursday, June 25, 2015 - 07:32 PM UTC
Quoted Text
Hatch and skylight looking very good Warren,
Is that a bit of deliberate wear and tear on the hatch cover? recon it will look effective under a coat of paint and some weathering.
Cheers
Si
Hello Simon.
They look dramatic but there are only very light scratches caused by some excess glue removal. Wee will see what happens Simon.
Cheers mate
Warren
cloggerdemps
Joined: December 05, 2012
KitMaker: 88 posts
Model Shipwrights: 75 posts
Posted: Friday, June 26, 2015 - 02:31 AM UTC
Take a look at 'World or Warships', a 'free'online multiplayer game. If you can play the British eventually there should be a Flower Class Corvette available to play with I think.
warreni
Joined: August 14, 2007
KitMaker: 5,926 posts
Model Shipwrights: 2,624 posts
Posted: Saturday, June 27, 2015 - 02:33 AM UTC
Time for another thrilling installment of 'Building the Little Grey, White, Green and Blue Corvette'.
Did I say thrilling?? Well maybe not but it is an update for better or worse..
First up, I have finished glueing the plastic decks in place...
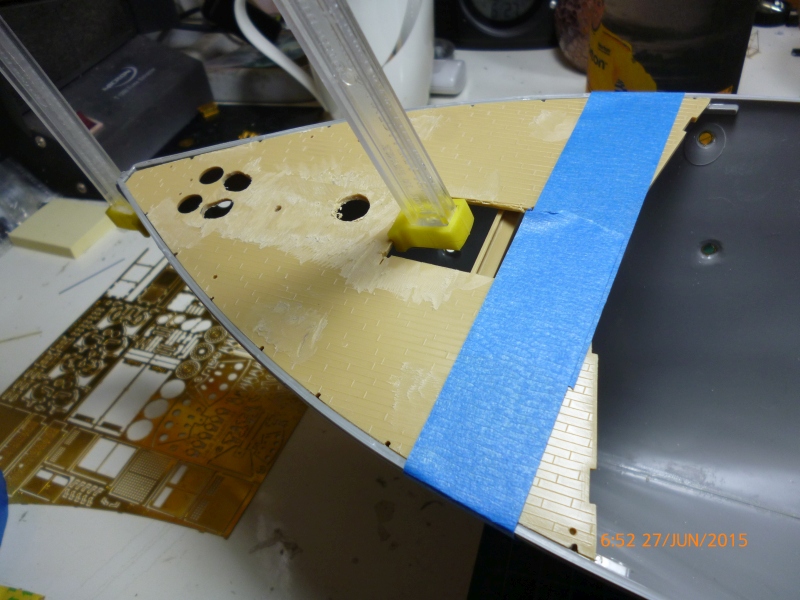
And I have found yet another use for tweezers.. if you shove 'em through the holes in the hull the hold the deck in position!!
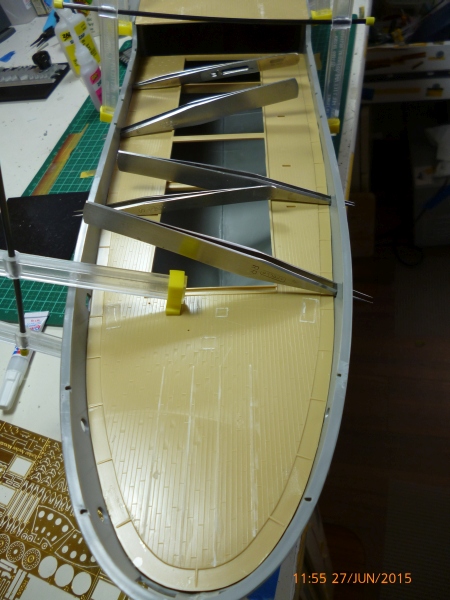
And the with a strategically placed clamp the fore deck is almost in position..
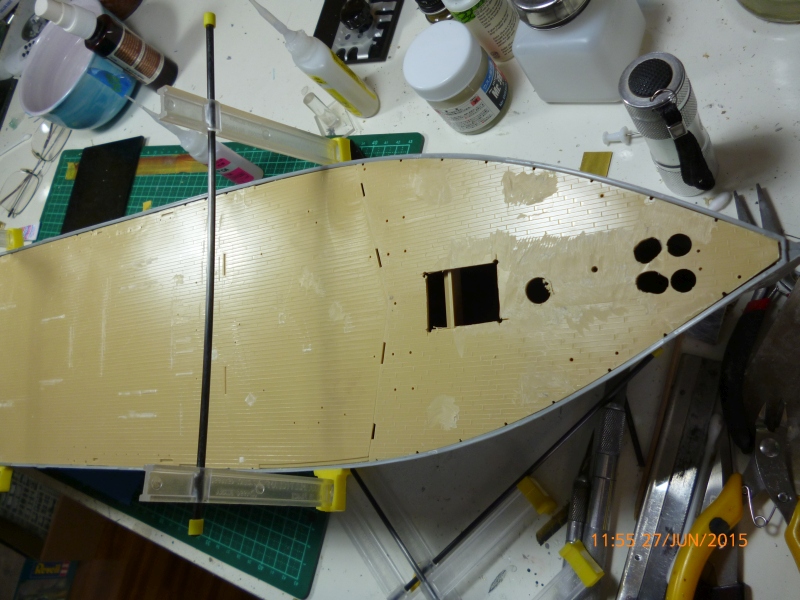
And for those who were thinking to themselves "lazy bugger hasn't even removed all the plank detail from the deck" the deck is going to be covered by brass very soon so you wont even see the plastic deck anymore. Well that's the plan anyway.. and we all know what they say about plans...
After that the hull has been put aside to dry and I continued with building brass details..
First up the ward room skylight hatch,,
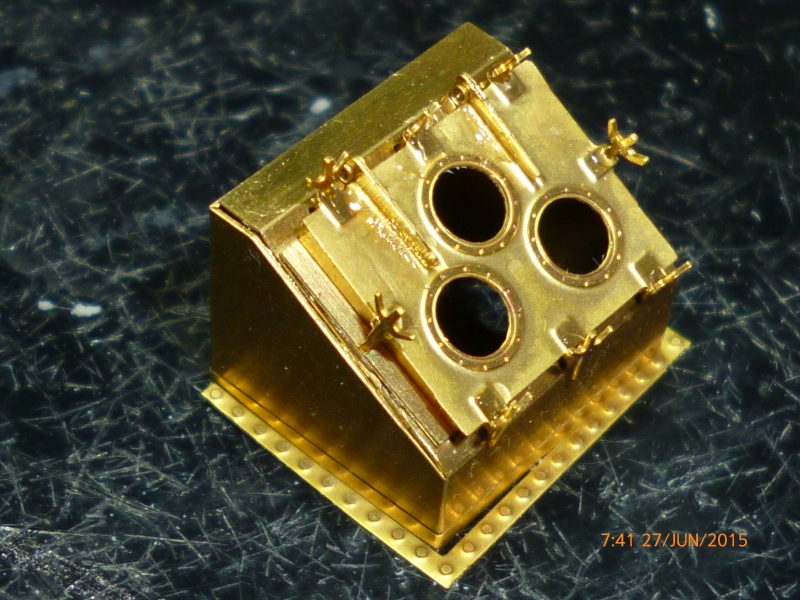
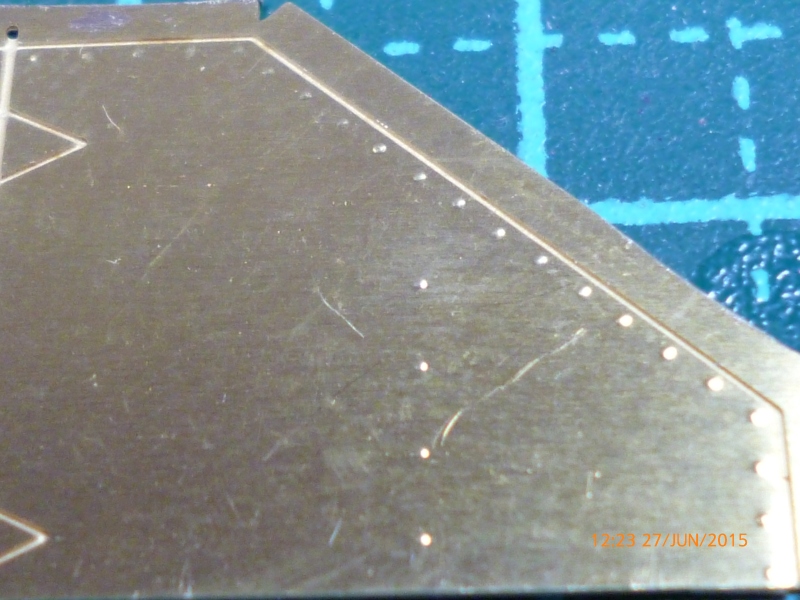
Then I went up the street to buy a scriber which I used to create some more petite rivets..
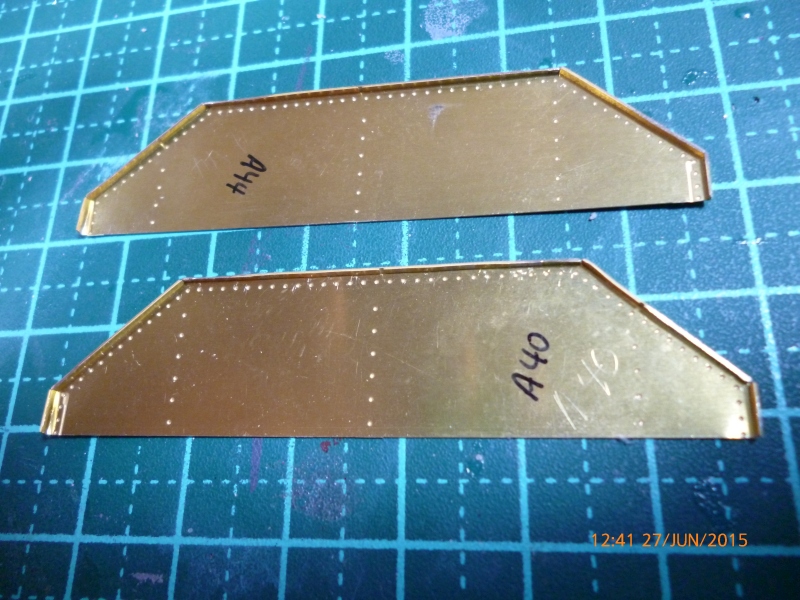
Did some bending..
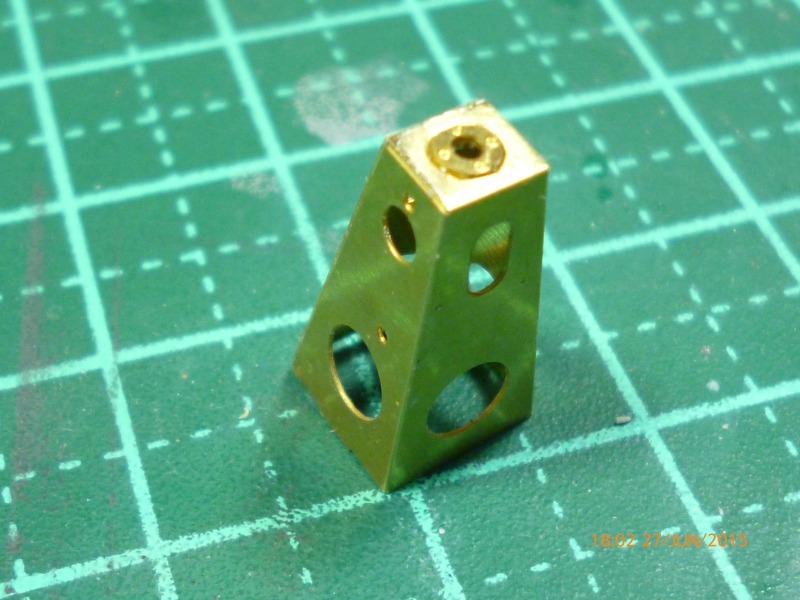
And finally bent up some davit bases..
That's all until tomorrow. Stay tuned at the same bat time on same bat channel for the next exciting episode! (And for those who don't know that was the signout from the original Batman series).
Cheers
Warren
Did I say thrilling?? Well maybe not but it is an update for better or worse..
First up, I have finished glueing the plastic decks in place...
And I have found yet another use for tweezers.. if you shove 'em through the holes in the hull the hold the deck in position!!
And the with a strategically placed clamp the fore deck is almost in position..
And for those who were thinking to themselves "lazy bugger hasn't even removed all the plank detail from the deck" the deck is going to be covered by brass very soon so you wont even see the plastic deck anymore. Well that's the plan anyway.. and we all know what they say about plans...
After that the hull has been put aside to dry and I continued with building brass details..
First up the ward room skylight hatch,,
Then I went up the street to buy a scriber which I used to create some more petite rivets..
Did some bending..
And finally bent up some davit bases..
That's all until tomorrow. Stay tuned at the same bat time on same bat channel for the next exciting episode! (And for those who don't know that was the signout from the original Batman series).
Cheers
Warren
RedDuster
Joined: March 01, 2010
KitMaker: 7,078 posts
Model Shipwrights: 6,649 posts
Posted: Saturday, June 27, 2015 - 02:50 AM UTC
Good progress Warren,
Like the use of the tweezers, very innovative, may borrow that idea if you don't mind.
Skylight looking superb too, like the rivets as well.
Cheers.
Si
Like the use of the tweezers, very innovative, may borrow that idea if you don't mind.
Skylight looking superb too, like the rivets as well.
Cheers.
Si
warreni
Joined: August 14, 2007
KitMaker: 5,926 posts
Model Shipwrights: 2,624 posts
Posted: Saturday, June 27, 2015 - 04:01 AM UTC
Quoted Text
Good progress Warren,
Like the use of the tweezers, very innovative, may borrow that idea if you don't mind.
Skylight looking superb too, like the rivets as well.
Cheers.
Si
Be my guest Si..
The punch I used for the deck ones made them a little large, but the ones in the shields are much smaller. The deck ones would tone down a bit under a coat of paint as well... hopefully!
Cheers
Warren
TRM5150
Joined: January 03, 2010
KitMaker: 2,159 posts
Model Shipwrights: 1,400 posts
Posted: Saturday, June 27, 2015 - 06:01 AM UTC
Well done again Warren! Things are progressing nicely! I have to chuckle at the Batman reference...the wife is watching the last movie in the other room right now!
warreni
Joined: August 14, 2007
KitMaker: 5,926 posts
Model Shipwrights: 2,624 posts
Posted: Saturday, June 27, 2015 - 01:09 PM UTC
Quoted Text
Well done again Warren! Things are progressing nicely! I have to chuckle at the Batman reference...the wife is watching the last movie in the other room right now!
The theme song's lyrics were easy to remember.. just one word
Batman.... batman.... batman, batman, batman....
warreni
Joined: August 14, 2007
KitMaker: 5,926 posts
Model Shipwrights: 2,624 posts
Posted: Sunday, June 28, 2015 - 02:52 PM UTC
Greetings fellow scurvy dogs!
Time for another update to the Snowberry Saga..
First up, I built the Hedgehog Splinter Shield for the side of the main deck, next to the hedgehog launcher actually.. Inside view..

Outside view..

No soldering to see here. Just used various CA glues for this one.
Next up, I bent up a splinter shield that goes in front of the bridge..

A little soldering here..

And the other side..

Then I decided to solder this shield into position as I don't think soldering on a plastic deck is such a good idea. First up I put the shield in position and after s little experimentation I secured it with some masking tape, no where near it will get hot..

Have you ever seen someone pick up something that is hot then drop it very quickly? It seems heat and the weight of an item are directly related. The hotter something is the heavier it gets, so heavy in fact that some one will drop it it gets so heavy. That hasn't happened to me, in this build, but it has before..
Next up the back of the shield after soldering..

And 'tother side..

I will clean it up later with the wire brush on my motor tool. I had to use my big-bottom soldering iron as my temperature controlled one just couldn't get enough heat into the huge heat-sink that is the deck and shield. I used solder paste and it worked great.
Anyway. that all for now. Tomorrow I am going to the hardware store and am going to buy some nice, strong contact cement and I will glue the foredeck in position.. I hope anyway!
That's it for now..
Thanks for tuning in,
Cheers
Warren
Time for another update to the Snowberry Saga..
First up, I built the Hedgehog Splinter Shield for the side of the main deck, next to the hedgehog launcher actually.. Inside view..
Outside view..
No soldering to see here. Just used various CA glues for this one.
Next up, I bent up a splinter shield that goes in front of the bridge..
A little soldering here..
And the other side..
Then I decided to solder this shield into position as I don't think soldering on a plastic deck is such a good idea. First up I put the shield in position and after s little experimentation I secured it with some masking tape, no where near it will get hot..
Have you ever seen someone pick up something that is hot then drop it very quickly? It seems heat and the weight of an item are directly related. The hotter something is the heavier it gets, so heavy in fact that some one will drop it it gets so heavy. That hasn't happened to me, in this build, but it has before..
Next up the back of the shield after soldering..
And 'tother side..
I will clean it up later with the wire brush on my motor tool. I had to use my big-bottom soldering iron as my temperature controlled one just couldn't get enough heat into the huge heat-sink that is the deck and shield. I used solder paste and it worked great.
Anyway. that all for now. Tomorrow I am going to the hardware store and am going to buy some nice, strong contact cement and I will glue the foredeck in position.. I hope anyway!
That's it for now..
Thanks for tuning in,
Cheers
Warren
RussellE
#306
Joined: June 27, 2010
KitMaker: 3,959 posts
Model Shipwrights: 2,777 posts
Posted: Sunday, June 28, 2015 - 04:16 PM UTC
Great work Warren!
warreni
Joined: August 14, 2007
KitMaker: 5,926 posts
Model Shipwrights: 2,624 posts
Posted: Sunday, June 28, 2015 - 10:10 PM UTC
Quoted Text
Great work Warren!
Thanks Russell.


youngtiger1
Joined: May 14, 2008
KitMaker: 534 posts
Model Shipwrights: 55 posts

Posted: Monday, June 29, 2015 - 01:00 AM UTC
Boy, you are fast at work. I like how the soldering is coming along
warreni
Joined: August 14, 2007
KitMaker: 5,926 posts
Model Shipwrights: 2,624 posts
Posted: Monday, June 29, 2015 - 02:02 AM UTC
Quoted Text
Boy, you are fast at work. I like how the soldering is coming along
Thanks Mike!
RedDuster
Joined: March 01, 2010
KitMaker: 7,078 posts
Model Shipwrights: 6,649 posts
Posted: Monday, June 29, 2015 - 02:23 AM UTC
Hi Warren,
Coming on great mate, the splinter shields look cool.
The folding is very neat.
Cheers
Si
Coming on great mate, the splinter shields look cool.
The folding is very neat.
Cheers
Si
warreni
Joined: August 14, 2007
KitMaker: 5,926 posts
Model Shipwrights: 2,624 posts
Posted: Monday, June 29, 2015 - 11:29 AM UTC
Thanks Simon..
warreni
Joined: August 14, 2007
KitMaker: 5,926 posts
Model Shipwrights: 2,624 posts
Posted: Monday, June 29, 2015 - 01:35 PM UTC
Well, nothing exciting to show here except many pieces of diecast metal in a plastic container...

Time has been taken up cleaning up the castings for the anchor winch. I have also started preparing the PE for said winch.
That's it for now.
Cheers
Warren
Time has been taken up cleaning up the castings for the anchor winch. I have also started preparing the PE for said winch.
That's it for now.
Cheers
Warren
TRM5150
Joined: January 03, 2010
KitMaker: 2,159 posts
Model Shipwrights: 1,400 posts
Posted: Monday, June 29, 2015 - 05:46 PM UTC
Organizing is all part of the game Warren! Nice to see things are falling in place!
Nice to see things are falling in place! RedDuster
Joined: March 01, 2010
KitMaker: 7,078 posts
Model Shipwrights: 6,649 posts
Posted: Tuesday, June 30, 2015 - 12:31 AM UTC
Nice Organisation Warren, better than mine.
I just have a collection of plastic tubs from the take away.
Cheers.
Si
I just have a collection of plastic tubs from the take away.
Cheers.
Si
warreni
Joined: August 14, 2007
KitMaker: 5,926 posts
Model Shipwrights: 2,624 posts
Posted: Tuesday, June 30, 2015 - 01:19 AM UTC
Thanks Todd.
Thanks Si. I have those tubs as well but I bought these plastic organisers a while ago and I have different sizes as well for big brass bits and all these diecast bits.
The anchor winch is going to be a model by itself.
Cheers
Warren
Thanks Si. I have those tubs as well but I bought these plastic organisers a while ago and I have different sizes as well for big brass bits and all these diecast bits.
The anchor winch is going to be a model by itself.
Cheers
Warren
warreni
Joined: August 14, 2007
KitMaker: 5,926 posts
Model Shipwrights: 2,624 posts
Posted: Tuesday, June 30, 2015 - 12:58 PM UTC
Greetings from overcast Adelaide.
Well as I keep forgetting to go to the hardware shop and buy the glue I need I suppose I will continue with the Anchor Winch.
First up one of the two brakes.

The brakes (not breaks) are made by laminating a number of parts together to produce something with some thickness rather than PE thick.

You won't see any evidence of lamination when it is all finished as I will fill the gaps with Mr Surfacer or similar and make it look like one piece.
Next I started on the winch itself with the front drives and the steam cylinders..

The drives are made using metal pieces and plastic rod. DJP do supply some diecast rod but one of mine had a fault and it broke while I was trying to straighten it. No problem really as I have a good supply of styrene rod in various sizes.
That's it for now,
Cheers
Warren
Well as I keep forgetting to go to the hardware shop and buy the glue I need I suppose I will continue with the Anchor Winch.
First up one of the two brakes.
The brakes (not breaks) are made by laminating a number of parts together to produce something with some thickness rather than PE thick.
You won't see any evidence of lamination when it is all finished as I will fill the gaps with Mr Surfacer or similar and make it look like one piece.
Next I started on the winch itself with the front drives and the steam cylinders..
The drives are made using metal pieces and plastic rod. DJP do supply some diecast rod but one of mine had a fault and it broke while I was trying to straighten it. No problem really as I have a good supply of styrene rod in various sizes.
That's it for now,
Cheers
Warren
 |

WEB HOSTING BY


Copyright ©2021 Model Shipwrights and Kitmaker Network, a subsidiary of Silver Star Enterprises
All Rights Reserved. Please read our Conditions of Use and Privacy Policy.
All Rights Reserved. Please read our Conditions of Use and Privacy Policy.