Official Thread: Mighty Battleship

#306
Victoria, Australia
Joined: June 27, 2010
KitMaker: 3,959 posts
Model Shipwrights: 2,777 posts
Posted: Monday, August 18, 2014 - 10:41 PM UTC
It's been a while coming, but well worth the wait Joseph!
Looking mighty fine!

And, I have serious spray booth envy!

Is that something you've put together yourself or did you buy it? Spray booths that size are a rarity down here...
Russ
Stay home and build models!
In 1/72
Gloster Gladiator MkII for the Bi-planes Campaign
In 1/350
Airfix 1:350 Type 45 Destroyer
#377
Texas, United States
Joined: June 27, 2010
KitMaker: 1,481 posts
Model Shipwrights: 1,332 posts
Posted: Monday, August 18, 2014 - 11:10 PM UTC
Joseph,
Looking good. I agree with Russeli I have spray booth envy too, especially since I don't have a spray booth at all.
Watching your progress with great interest.
Dave
In Dry Dock #1: 1/350 IJN SHOKAKU (Fujimi)
In Dry Dock #2: 1/350 IJN Tama (Aoshima)
#360
Connecticut, United States
Joined: June 18, 2003
KitMaker: 1,020 posts
Model Shipwrights: 630 posts
Posted: Tuesday, August 19, 2014 - 12:08 AM UTC
I've contacted Shapeways, the 3D printing company, about a request.
They sell a 1/650 OS2U Kingfisher float plane and I asked if they could do a 1/500 scale for my Revell New Jersey build.
They replied they thought that would be relatively easy to do and would start on it later this week.
If this works out and I get them I'll report back here how they look.
Anyone else get anything from Shapeways?
"I wish to have no Connection with any Ship that does not Sail fast for I intend to go in harm's way." - John Paul Jones
TimReynaga
 Associate Editor
California, United States
Joined: May 03, 2006
KitMaker: 2,500 posts
Model Shipwrights: 1,830 posts
Posted: Tuesday, August 19, 2014 - 01:04 AM UTC
Quoted Text
...Anyone else get anything from Shapeways?
I used Shapeways for a ships bell for my Revell Olympia build.

Their EMD Roof Mount Locomotive Bells, based on a Southern Pacific SD-45 prototype in N-Scale, measure .962cm w x .456cm d x .424cm h (.379in w x .18in d x .167in h) perfect for a 1/232 Olympia ships bell!
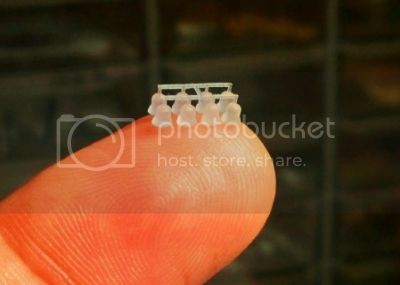
The bells arrived attached to a frame matrix similar to the sprues on injection molded plastic parts. The material ("frosted ultra detail UV cured acrylic polymer") is similar to the polyurethane resin commonly used in model shipbuilding; solid but also easy to work. The shapes are flawless, and the little step artifacts of the layering process are so small as to be virtually invisible. They do, however, make a useful key for paint.
Fitted to a .015 inch plastic strip mount attached to a couple of the cowl vents, the 3D printed bell looks right at home among all those Old School injection molded plastic parts.
Alberta, Canada
Joined: December 10, 2007
KitMaker: 66 posts
Model Shipwrights: 60 posts
Posted: Tuesday, August 19, 2014 - 03:02 AM UTC
Quoted Text
It's been a while coming, but well worth the wait Joseph!
Looking mighty fine!
And, I have serious spray booth envy! Is that something you've put together yourself or did you buy it? Spray booths that size are a rarity down here...
Russ
Thanks Russell.
I'm behind in the build from where I want to be, but the hull has entailed more work than intended. However, now that I have decided on not reworking the stern portholes the pace should pick up.
The spray booth was bought. My modelling room is in the basement and has no windows. It also runs directly under our bedroom so fumes were going to be an issue. I decided health and safety was a priority so did not custom make one. The filtering system should remove almost all of the odour and vents outside through duct work in the ceiling. The fan is spark free as well.
All told with tax and shipping the price tag was just under $600. A lot of money to be sure, but I think it was a smart investment under the circumstances. I have the venting material, just need to hook it up and I can begin painting stuff.
Joseph
Alberta, Canada
Joined: December 10, 2007
KitMaker: 66 posts
Model Shipwrights: 60 posts
Posted: Tuesday, August 19, 2014 - 03:05 AM UTC
Quoted Text
Joseph,
Looking good. I agree with Russeli I have spray booth envy too, especially since I don't have a spray booth at all.
Watching your progress with great interest.
Dave
Thank you Dave. Once the hull is finished I can get to the fun stuff. I'm looking forward to making progress over the next two weeks during my vacation.
England - South East, United Kingdom
Joined: March 01, 2010
KitMaker: 7,078 posts
Model Shipwrights: 6,649 posts
Posted: Tuesday, August 19, 2014 - 07:29 AM UTC
Great start on the Roma, Joseph,
Nice to see one of that class on the campaign, really elegant looking Battleships.
Si
#360
Connecticut, United States
Joined: June 18, 2003
KitMaker: 1,020 posts
Model Shipwrights: 630 posts
Posted: Wednesday, August 20, 2014 - 12:13 AM UTC
A 3D preview of my requested 1/500 Kingfishers from Shapeways.
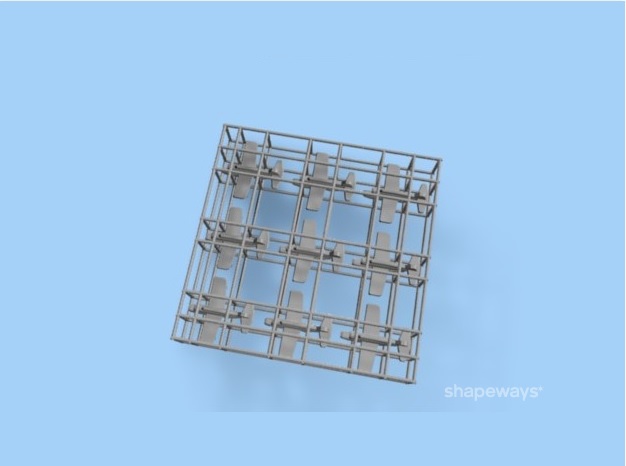

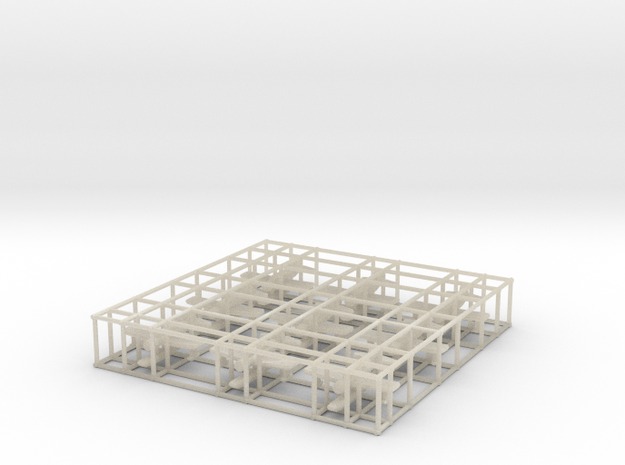
9 planes for $8.50(US) plus $4.99 shipping. Should be arriving by September 1st or so and I'll post pics of the actual pieces when they arrive.
"I wish to have no Connection with any Ship that does not Sail fast for I intend to go in harm's way." - John Paul Jones
New Jersey, United States
Joined: July 25, 2006
KitMaker: 1,139 posts
Model Shipwrights: 84 posts
Posted: Wednesday, August 20, 2014 - 07:50 AM UTC
Finally moving ahead, the hull is now red. Not worth a picture red hull and masking tape. I realized how I will approach this. As an armor modeler I build large sub assemblies paint then put them together and weather.
A large scale ship has to be built like several small models and the completed pieces joined at the end. Just like the way they build ships now in sub assemblies. It seems to be the only way to minimize over spray and continual touch ups.I'm sure glad we have a year for this build.
Tom
"ALLONS" 11TH ACR BLACKHORSE
"Death Before Dismount"
19K40/ Dino Rider 19F10
#306
Victoria, Australia
Joined: June 27, 2010
KitMaker: 3,959 posts
Model Shipwrights: 2,777 posts
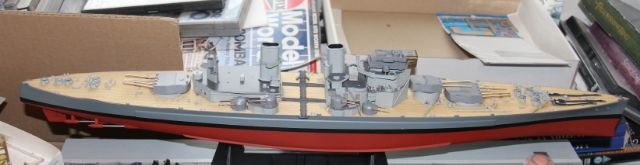
Posted: Saturday, August 23, 2014 - 12:26 AM UTC
base has arrived, hull matt varnished up to deck level and work on the superstructure continues...

more pictures
here Stay home and build models!
In 1/72
Gloster Gladiator MkII for the Bi-planes Campaign
In 1/350
Airfix 1:350 Type 45 Destroyer
England - South East, United Kingdom
Joined: March 01, 2010
KitMaker: 7,078 posts
Model Shipwrights: 6,649 posts
Posted: Sunday, August 24, 2014 - 06:08 AM UTC
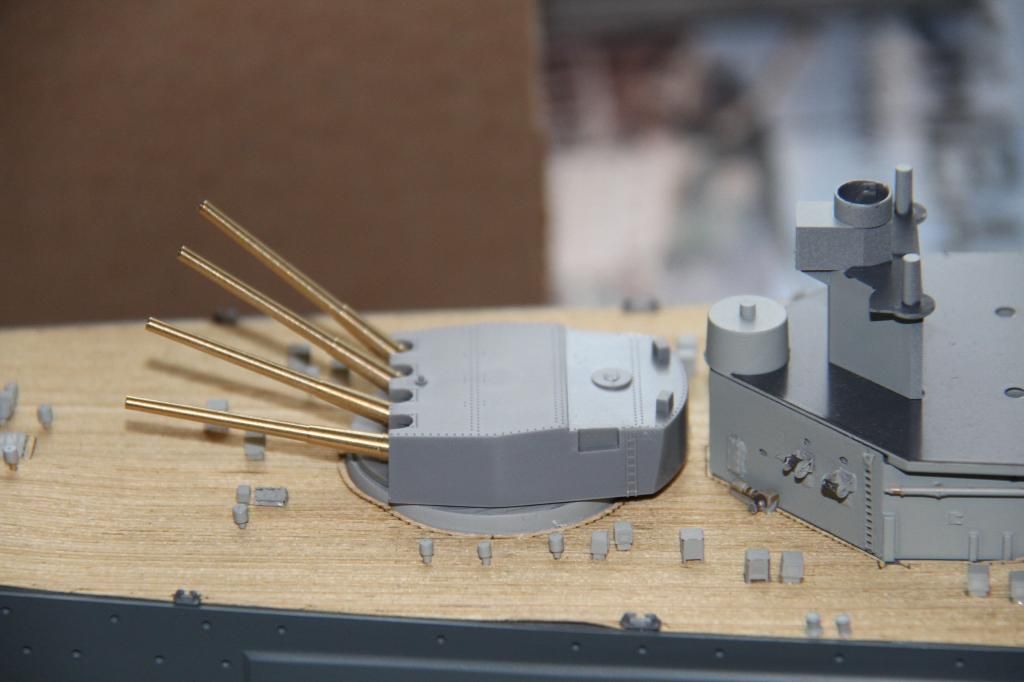
A bit more progress on another KGV
Production line time. All eight 5.25" mounts fitted with their barrels.
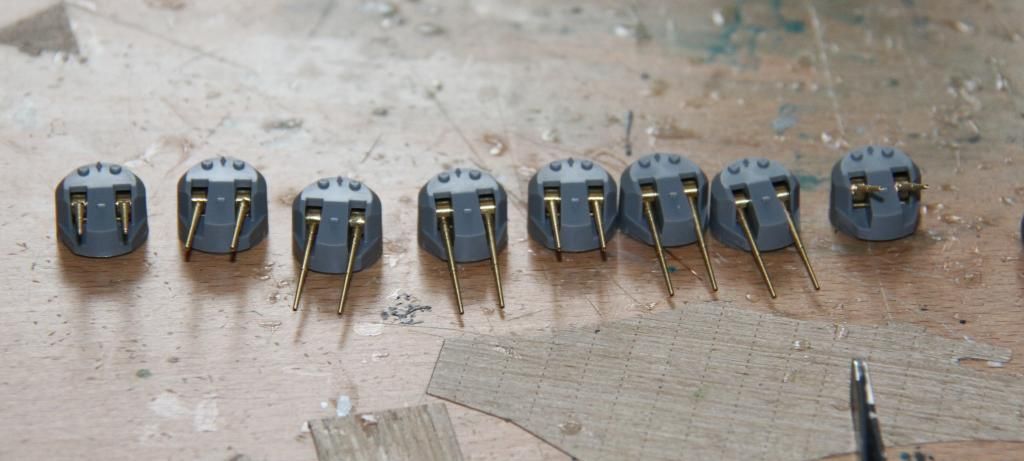
Fitting the etched details under way, 2 mounts completed.
A break from the 5.25s stated on the ladders around maindeck and 5.25 decks.
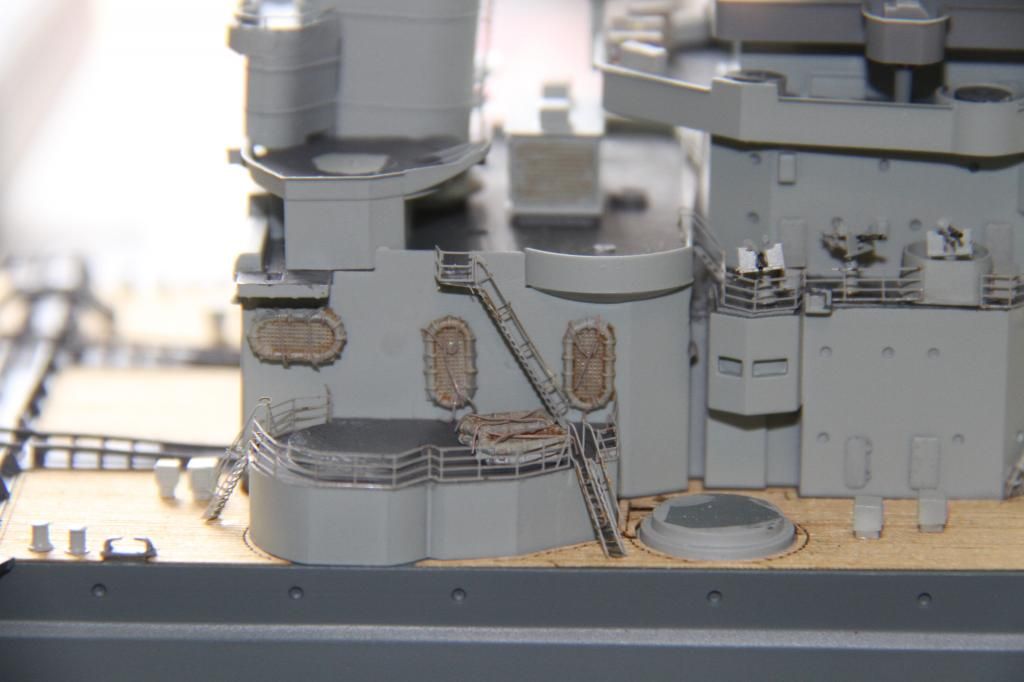
The ladders need a touch up after handling.
Si
England - South East, United Kingdom
Joined: March 01, 2010
KitMaker: 7,078 posts
Model Shipwrights: 6,649 posts
Posted: Monday, August 25, 2014 - 08:26 AM UTC
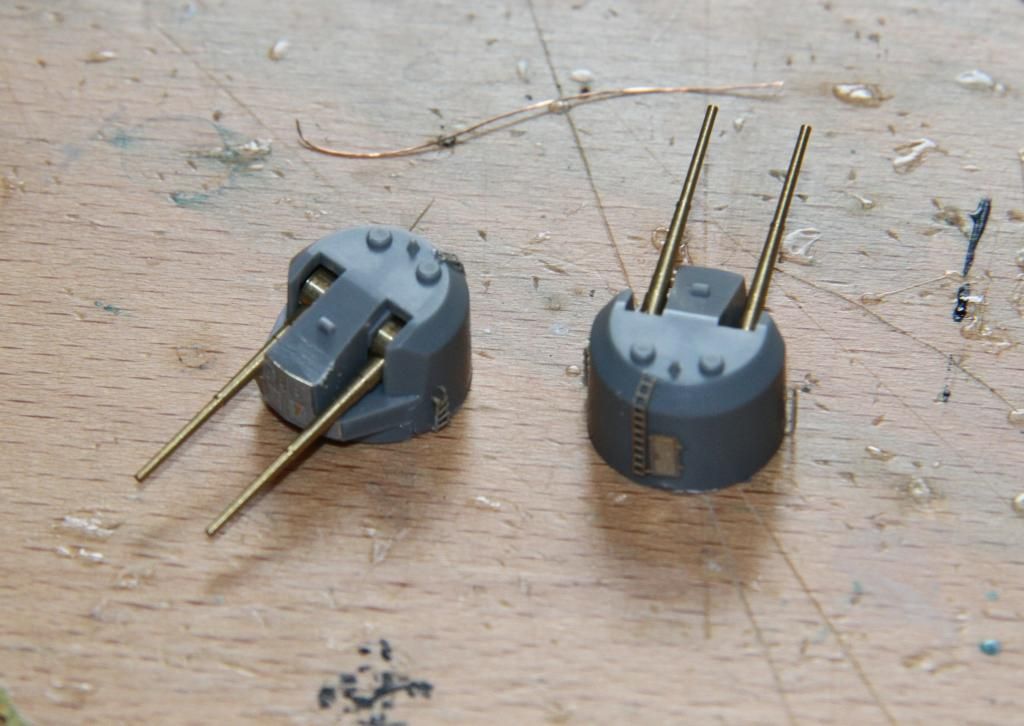
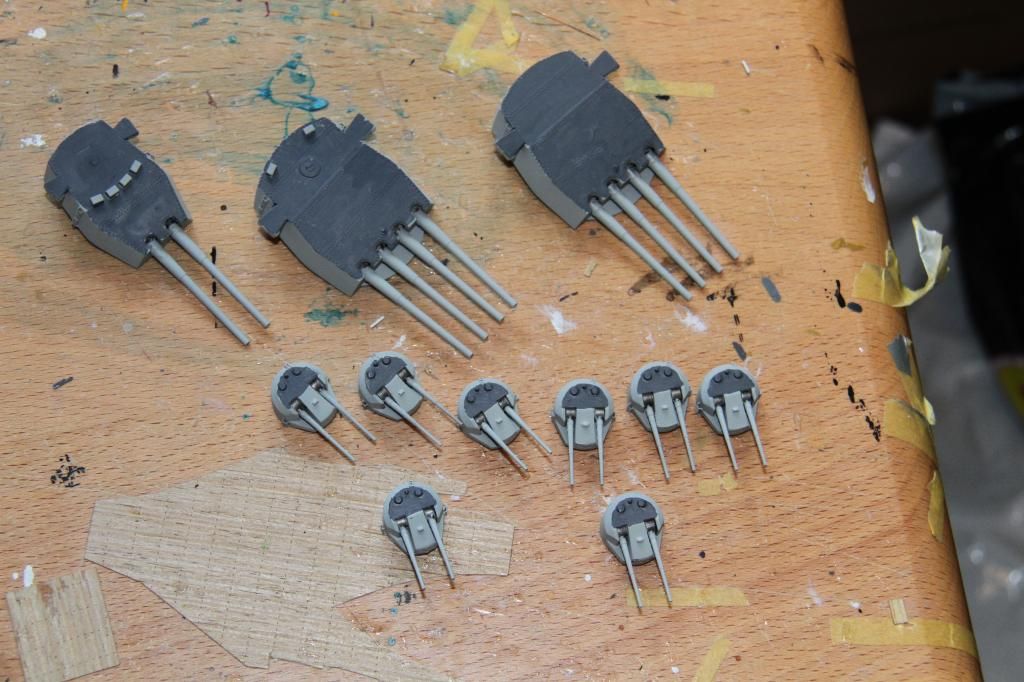
All the 5.25" mounts have had their etch fitted, so on with the main turrets.
The main barrels all fitted to their trunions. B turret' guns already paired.
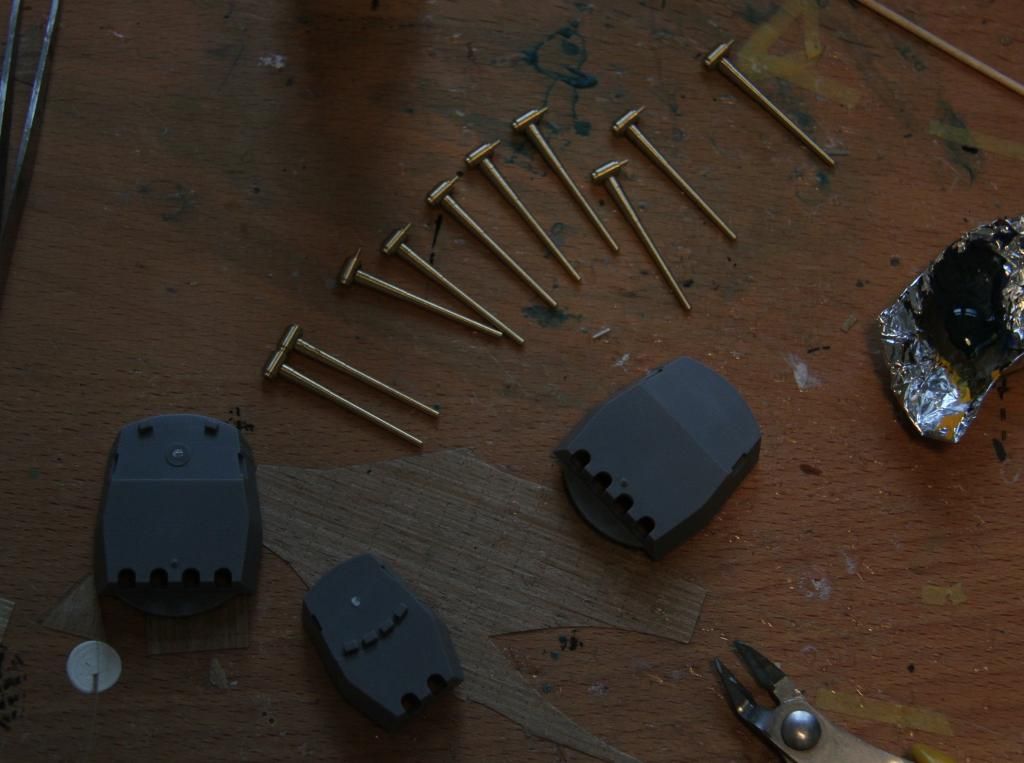
The retaining sections for the quad turrets, one in place, the other folded.
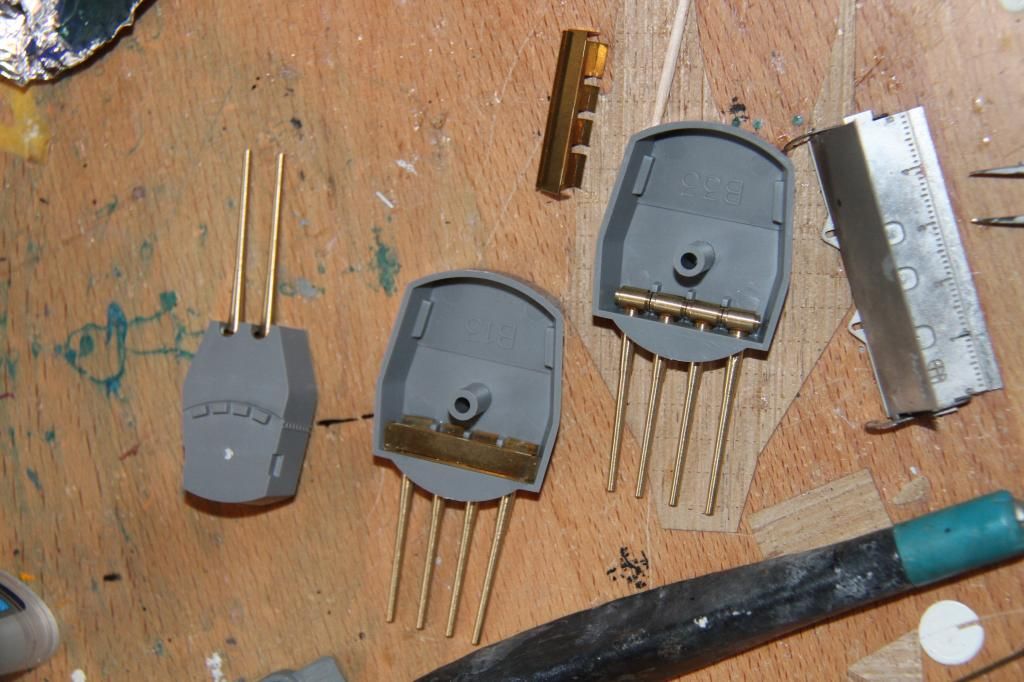
Y turret in place, if the etch retaining part is fitted right each barrel can be elevated separately.
All the main and secondary turret sat in place.
Si
#377
Texas, United States
Joined: June 27, 2010
KitMaker: 1,481 posts
Model Shipwrights: 1,332 posts
Posted: Monday, August 25, 2014 - 09:02 AM UTC
Si, beautiful work. your PE skills are definitely something I watch with keen interest. Hope one day I have as mush skill.
Russell, incredible work. The base is beautiful. I hope to be able to maintain as much attention to detail as you have with your work.
I will have an update probably sometime this weekend. Right now all the major work is complete, just doing all of the minor details which is somewhat repetitive.
The most fun I have had in this campaign is learning from ya'll. I cant tell you how much I appreciate your response and critiques. I know my final product will be somewhat historically deficient but I can definitely say I have grown because of this campaign.
I hope I can show you how much I have learned from you with my IJN Cruiser Maya during the Leyte Gulf Campaign.
thanks again
Dave
In Dry Dock #1: 1/350 IJN SHOKAKU (Fujimi)
In Dry Dock #2: 1/350 IJN Tama (Aoshima)
#306
Victoria, Australia
Joined: June 27, 2010
KitMaker: 3,959 posts
Model Shipwrights: 2,777 posts
Posted: Monday, August 25, 2014 - 09:52 PM UTC
Quoted Text
Si, beautiful work. your PE skills are definitely something I watch with keen interest. Hope one day I have as mush skill.
Russell, incredible work. The base is beautiful. I hope to be able to maintain as much attention to detail as you have with your work.
I will have an update probably sometime this weekend. Right now all the major work is complete, just doing all of the minor details which is somewhat repetitive.
The most fun I have had in this campaign is learning from ya'll. I cant tell you how much I appreciate your response and critiques. I know my final product will be somewhat historically deficient but I can definitely say I have grown because of this campaign.
I hope I can show you how much I have learned from you with my IJN Cruiser Maya during the Leyte Gulf Campaign.
thanks again
Dave
Good to hear you're having fun Dave.
After all that's why we're all in this crazy hobby

as long as it keeps being fun that's what matters the most. Keep up the good work! Looking forward to those pics!

Stay home and build models!
In 1/72
Gloster Gladiator MkII for the Bi-planes Campaign
In 1/350
Airfix 1:350 Type 45 Destroyer
England - South East, United Kingdom
Joined: March 01, 2010
KitMaker: 7,078 posts
Model Shipwrights: 6,649 posts
Posted: Tuesday, August 26, 2014 - 07:31 AM UTC
Thanks Dave,
It is just practice.
Glad you are enjoying the thread.
Si
#360
Connecticut, United States
Joined: June 18, 2003
KitMaker: 1,020 posts
Model Shipwrights: 630 posts
Posted: Tuesday, August 26, 2014 - 09:03 AM UTC
Si,
Those barrels look nice. Where do you get them from? I'm thinking I want to do brass barrels for my Blyskawica.
"I wish to have no Connection with any Ship that does not Sail fast for I intend to go in harm's way." - John Paul Jones
Colorado, United States
Joined: March 07, 2011
KitMaker: 158 posts
Model Shipwrights: 123 posts
Posted: Wednesday, August 27, 2014 - 03:15 AM UTC
Here is my first silly question. What color red are the IJN hulls painted. I usually use Tamiya XF-9 Hull Red on my US ships. Same color for Japanese Navy??
Greg
#377
Texas, United States
Joined: June 27, 2010
KitMaker: 1,481 posts
Model Shipwrights: 1,332 posts
Posted: Wednesday, August 27, 2014 - 10:31 AM UTC
Greg,
I used Tamiya Hull Red for the Musashi. I do believe that the IJN used a more glossy paint than the Hull Red portrays but you could probably overcome that with some gloss coat.
Dave
In Dry Dock #1: 1/350 IJN SHOKAKU (Fujimi)
In Dry Dock #2: 1/350 IJN Tama (Aoshima)
Colorado, United States
Joined: March 07, 2011
KitMaker: 158 posts
Model Shipwrights: 123 posts
Posted: Wednesday, August 27, 2014 - 03:48 PM UTC
Quoted Text
Greg,
I used Tamiya Hull Red for the Musashi. I do believe that the IJN used a more glossy paint than the Hull Red portrays but you could probably overcome that with some gloss coat.
Dave
Thanks Dave. I will see what I can do with the clear coat. I did find a copy of "Anatomy of a Ship Fuso" and it is on its way. Maybe it will have some color info I can use.
England - South East, United Kingdom
Joined: March 01, 2010
KitMaker: 7,078 posts
Model Shipwrights: 6,649 posts
Posted: Friday, August 29, 2014 - 07:13 AM UTC
Hi Michael,
The barrels come in the Pontos set, along with their mounts. I think they are by far the best system as there is no hit and miss hole drilling.
Si
South Australia, Australia
Joined: August 14, 2007
KitMaker: 5,926 posts
Model Shipwrights: 2,624 posts
Posted: Friday, August 29, 2014 - 09:12 AM UTC
Greetings one and all!
Great work going on in here.
With any luck I should be up and modelling again in the next few months and I have a plethora of BBs to choose from for this campaign, so hopefully will get the hobby room set up and be back into the plastic and PE sooner than later.

Cheers
Warren
You may be right, I may be crazy.
England - South East, United Kingdom
Joined: March 01, 2010
KitMaker: 7,078 posts
Model Shipwrights: 6,649 posts
Posted: Saturday, August 30, 2014 - 08:59 PM UTC
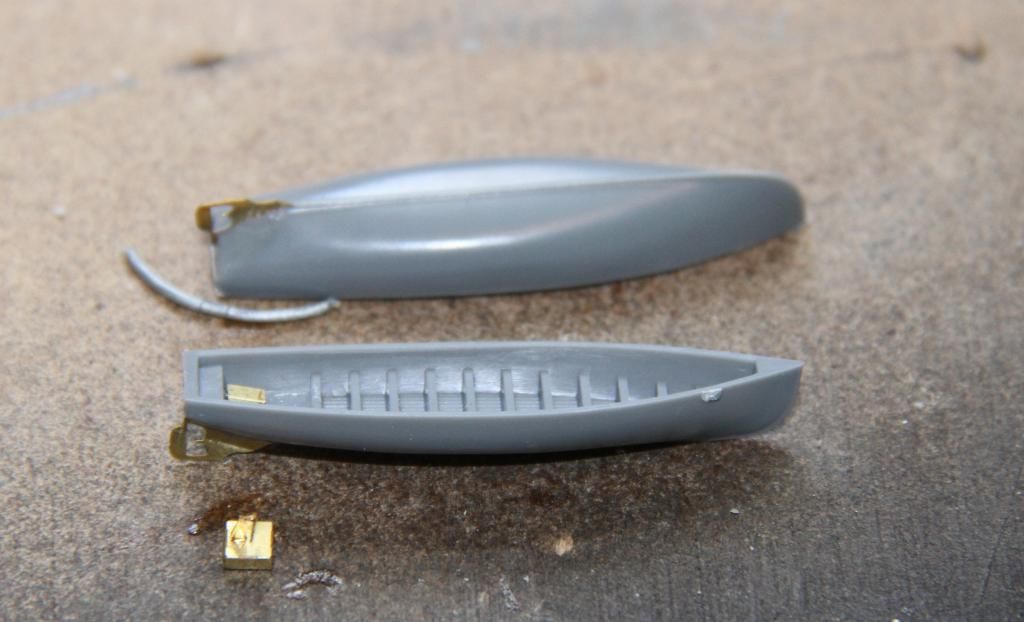
Very quick update,
weather in North London not good for going out in the back yard & spraying, so started to put the etch on the boats.
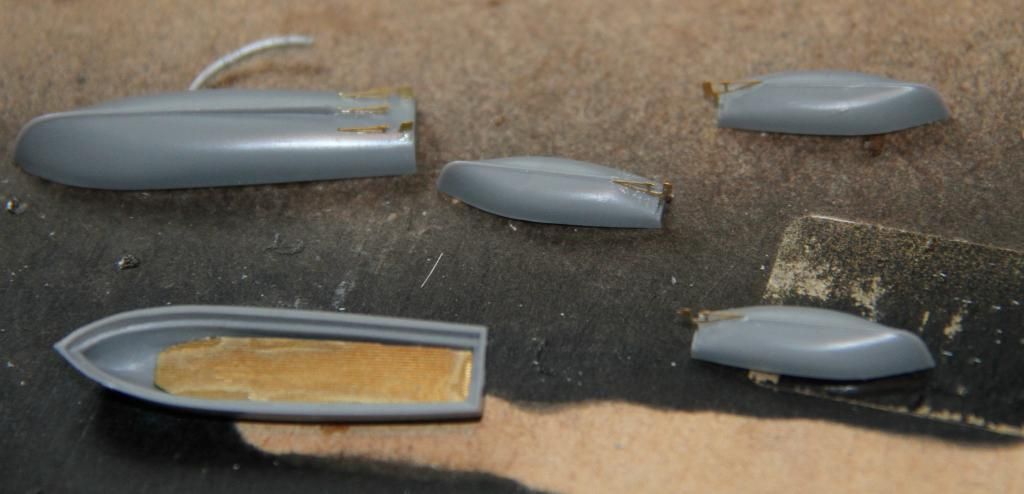
These are the motor boats, the tiny props will be added after spraying.
Si
England - North East, United Kingdom
Joined: October 22, 2007
KitMaker: 971 posts
Model Shipwrights: 645 posts
Posted: Sunday, August 31, 2014 - 04:57 AM UTC
Gent,s after coming back from my vacation as they say over the big pond i have not had a lot of motivation for my build but will try and get back into it this week just read through the thread from were I left off and some great progress with all the builds Simon and Russell your builds are way ahead of mine this will give me a chance to get some ideas off of yous with my build
hope to get some updates of my own up soon.
Keith
England - South East, United Kingdom
Joined: March 01, 2010
KitMaker: 7,078 posts
Model Shipwrights: 6,649 posts
Posted: Sunday, August 31, 2014 - 05:48 AM UTC
Be good to see you back in the game Kieth.
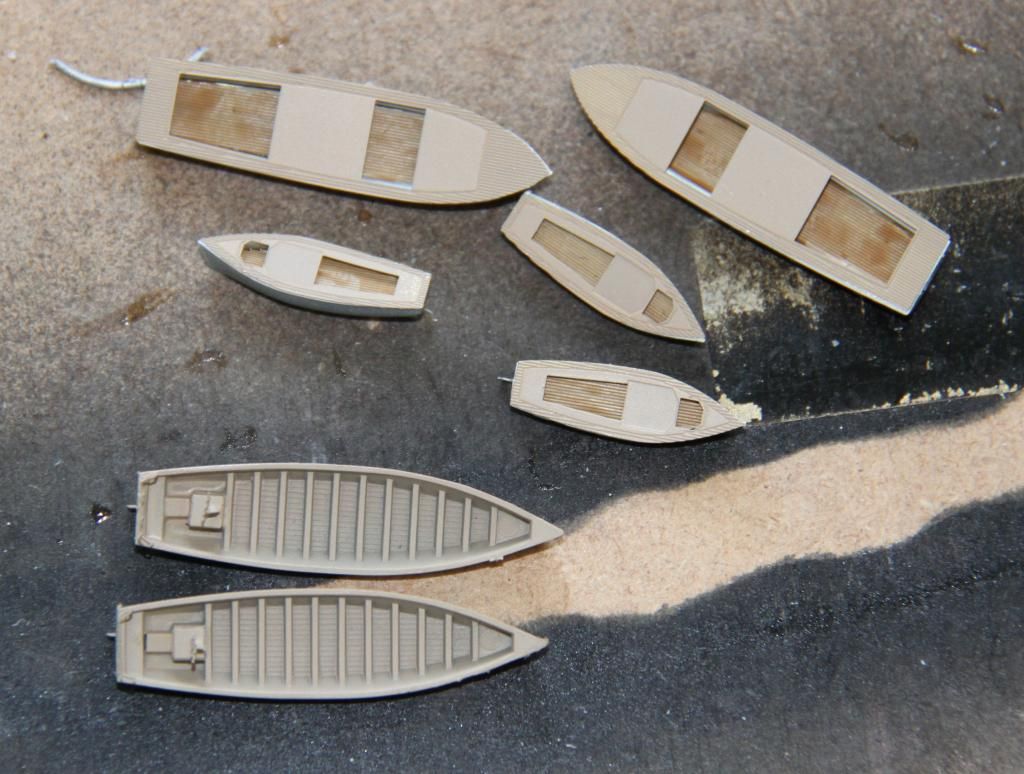
Continuing with the boats,
the motor cutters, quite a bit of etch.
and built
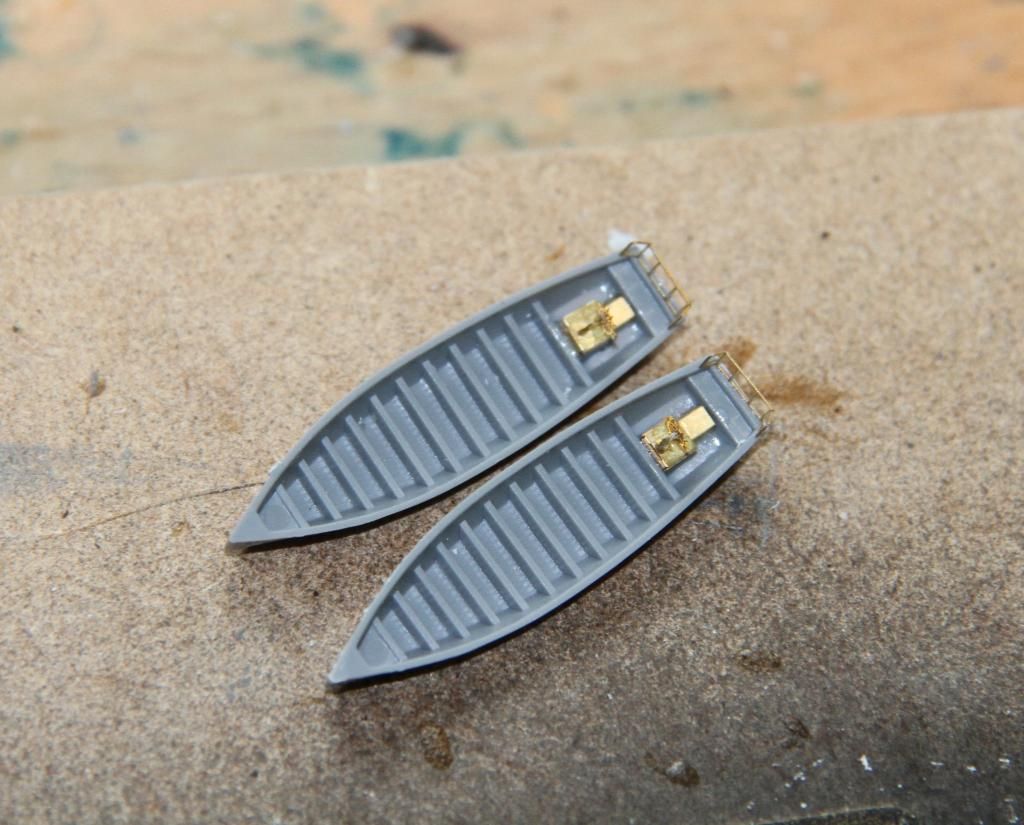
The weather allowed some spraying, boat interiors and decks done, the smaller cabin motor boats look a little hallow in the interior, the interior decks have been washed to bring out the planking, the upper decks haven't, the motor cutter also had their insides sprayed.
The main & secondary turrets also sprayed.
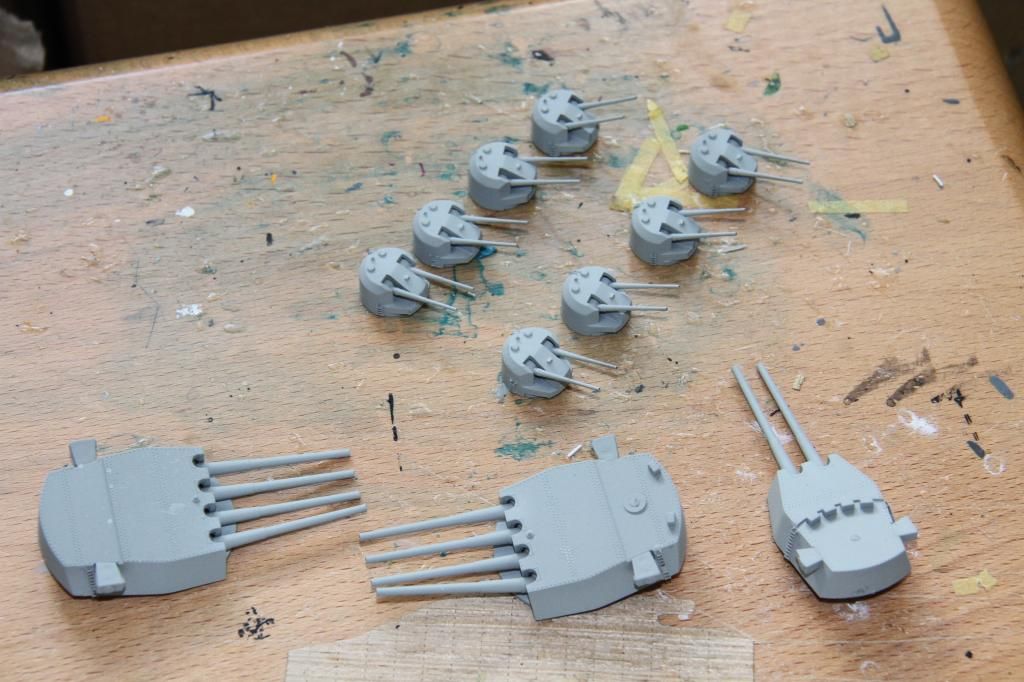
and their roofs painted dark grey and the gun truntions picked out in citadel "Leadbelcher"
Si
#345
Niedersachsen, Germany
Joined: August 22, 2011
KitMaker: 1,835 posts
Model Shipwrights: 1,832 posts
Posted: Sunday, August 31, 2014 - 06:48 AM UTC
Great progress on your DoY Si! Somewhere in my stash I have the very same (PoW + Pontos DoY conversion); it will take a while until I will come to the DoY, but it's highly interesting to follow your build!!
Jan