

Thanks Keith,
They are not doing a lot for my sanity either, but they will be worth it in the end.
Like you sea, that is going to look impressive.
si


Go to modelshipwrights.com for the current dynamic site!
Campaigns
Want to be part of a group build? This is where to start, plan, and meet about them.
Want to be part of a group build? This is where to start, plan, and meet about them.
Hosted by Jim Starkweather
Official Thread: Mighty Battleship

RedDuster

Joined: March 01, 2010
KitMaker: 7,078 posts
Model Shipwrights: 6,649 posts

Posted: Tuesday, July 08, 2014 - 06:47 AM UTC

IronOwl

Joined: January 07, 2013
KitMaker: 572 posts
Model Shipwrights: 80 posts

Posted: Thursday, July 10, 2014 - 04:15 AM UTC
everybodys Builds are Looking good I hope to be starting in a month or so .
Sascha(Ironowl)
Sascha(Ironowl)

rolltide31

#377
Joined: June 27, 2010
KitMaker: 1,481 posts
Model Shipwrights: 1,332 posts

Posted: Friday, July 11, 2014 - 03:17 AM UTC
The carpet monster has risen and eaten a critical part for the Musashi Bridge...alas lady luck has smiled and Tamiya USA has the part on hand and it was not too expensive...an entire fret for one part....argggg
Should have the part sometime next week, luckily enough there is plenty to do so I can remain busy while I wait. Should have some updated photos in the next couple of days..
Hope all is going well..
Dave
Should have the part sometime next week, luckily enough there is plenty to do so I can remain busy while I wait. Should have some updated photos in the next couple of days..
Hope all is going well..
Dave
rolltide31
#377
Joined: June 27, 2010
KitMaker: 1,481 posts
Model Shipwrights: 1,332 posts
Posted: Saturday, July 12, 2014 - 09:09 AM UTC
Si, your 20mm's are looking great, glad this kit doesn't have them.
quick question regarding your gun rubs that you built earlier, what do you use to get a uniform bend for the PE. I am starting the gun tubs and am finding it difficult to bend the tubs.
thanks
Dave
quick question regarding your gun rubs that you built earlier, what do you use to get a uniform bend for the PE. I am starting the gun tubs and am finding it difficult to bend the tubs.
thanks
Dave
RedDuster
Joined: March 01, 2010
KitMaker: 7,078 posts
Model Shipwrights: 6,649 posts
Posted: Saturday, July 12, 2014 - 08:21 PM UTC
Thank Dave,
The 20mm should look good when they are done. (A bit of strain on the sanity, which is why I am doing them in two batches)
The gun tubs on the Duke are resin castings, but when I have had to create a smooth etched curve:-
Anneal the brass, (heat gently to a dull red and allow to cool)
I have some odd lengths of wood / brass rod of different diameters, starting with one a bit larger than the required result role the tub side on a surface with a bit of give, (Cutting mat or old paperback book works for me) don't press too hard to start, or you may put a kink in the part.
reduce the diameter of the rod you are rolling with and gradually the two ends will come together.
The trick is not to rush, also it doesn't hurt to practice on a couple of bits of scrap etch, brass from the frame the gun tubs is on is good, as then you get a feel for how far you can heat it and how much pressure you can use without kinking. (It does vary from fret to fret.)
Si
rolltide31
#377
Joined: June 27, 2010
KitMaker: 1,481 posts
Model Shipwrights: 1,332 posts
Posted: Saturday, July 12, 2014 - 11:51 PM UTC
Si, thanks I will give that a try. Not rushing is going to be my biggest challenge...
Dave
Dave
RedDuster
Joined: March 01, 2010
KitMaker: 7,078 posts
Model Shipwrights: 6,649 posts
Posted: Sunday, July 13, 2014 - 08:44 AM UTC
Don't blame you Dave, I have taken a break from the 20mm to get on with some bigger stuff... so I thought.
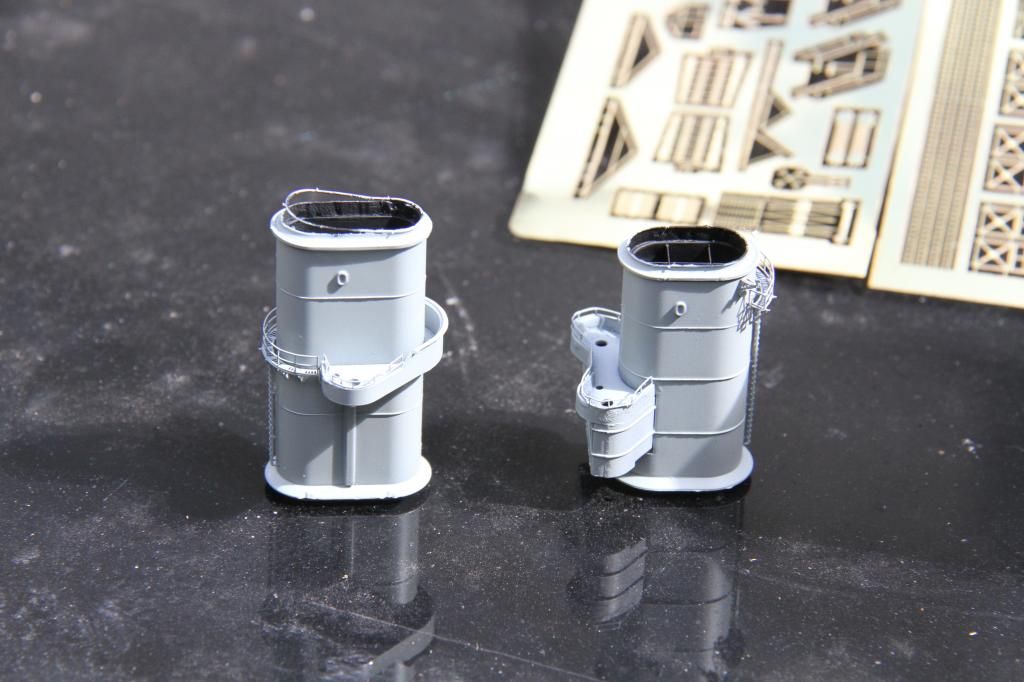
The forward funnel platforms fitted, the smaller one is just the fill the gap it fitted into as it will be replaced with etch.
All the etch, except the funnel cap, fitted to the forward funnel.
The after funnel similarly fitted out.
The interior of both funnels sprayed black.
Whilst I was at it, a few bits of superstructure got some AP507c shot at them.
Will get back to the 20mm tomorrow.
Si
The forward funnel platforms fitted, the smaller one is just the fill the gap it fitted into as it will be replaced with etch.

All the etch, except the funnel cap, fitted to the forward funnel.

The after funnel similarly fitted out.

The interior of both funnels sprayed black.

Whilst I was at it, a few bits of superstructure got some AP507c shot at them.

Will get back to the 20mm tomorrow.
Si
rolltide31
#377
Joined: June 27, 2010
KitMaker: 1,481 posts
Model Shipwrights: 1,332 posts
Posted: Monday, July 14, 2014 - 02:56 AM UTC
hi all,
Si things are looking great. Love the detail on the stacks.
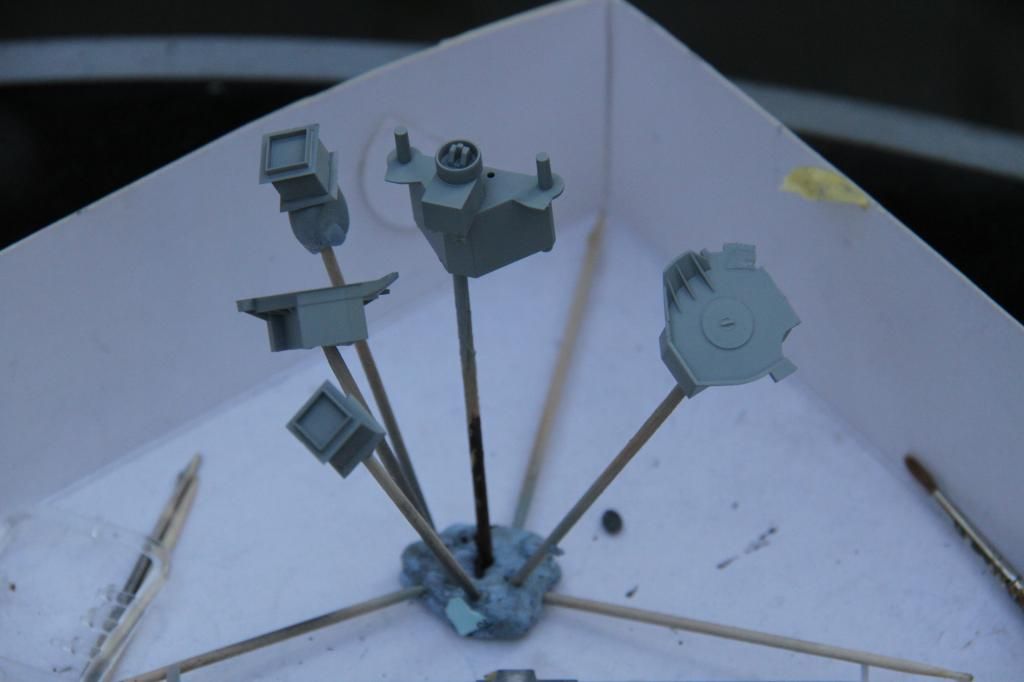
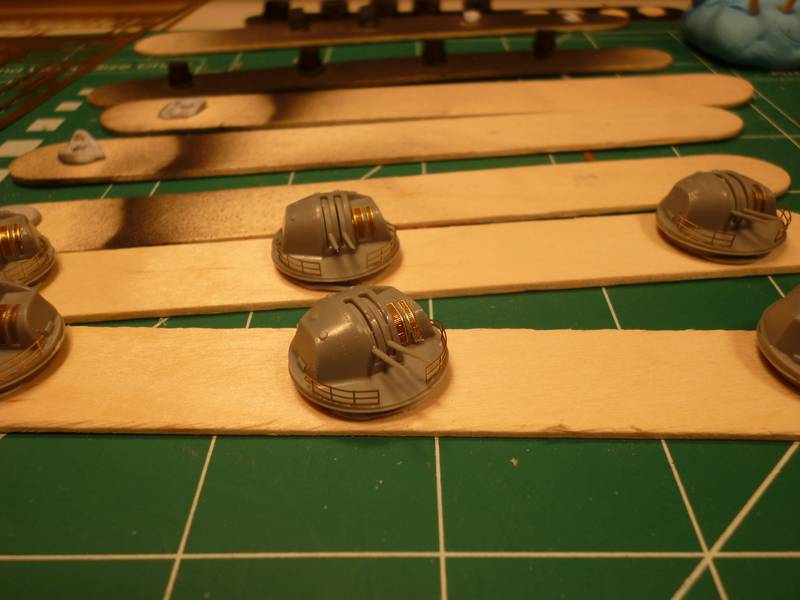
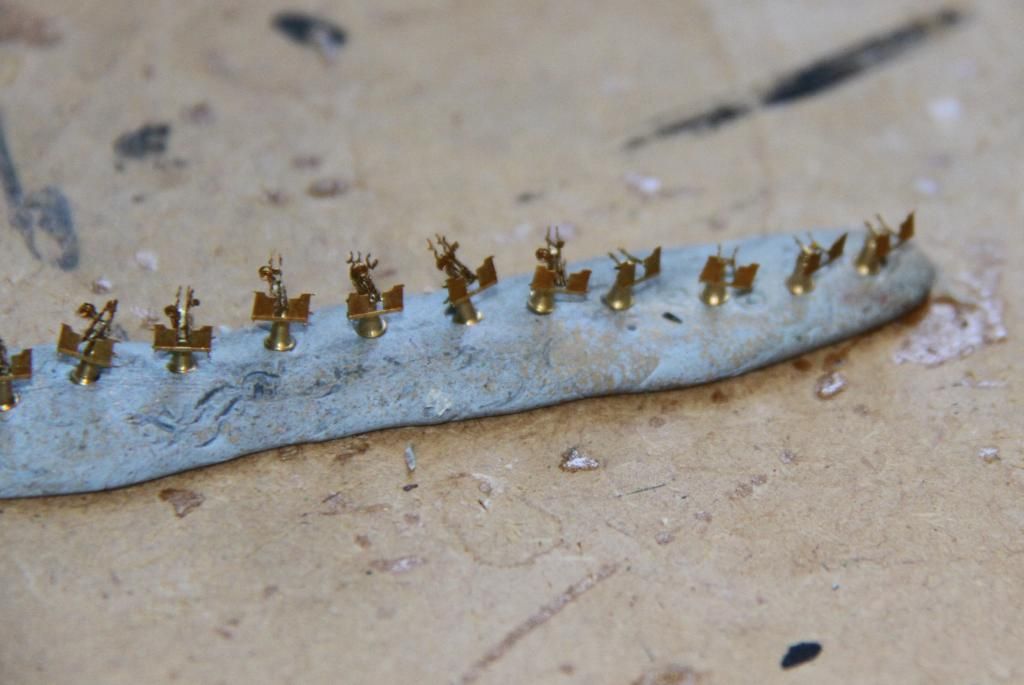
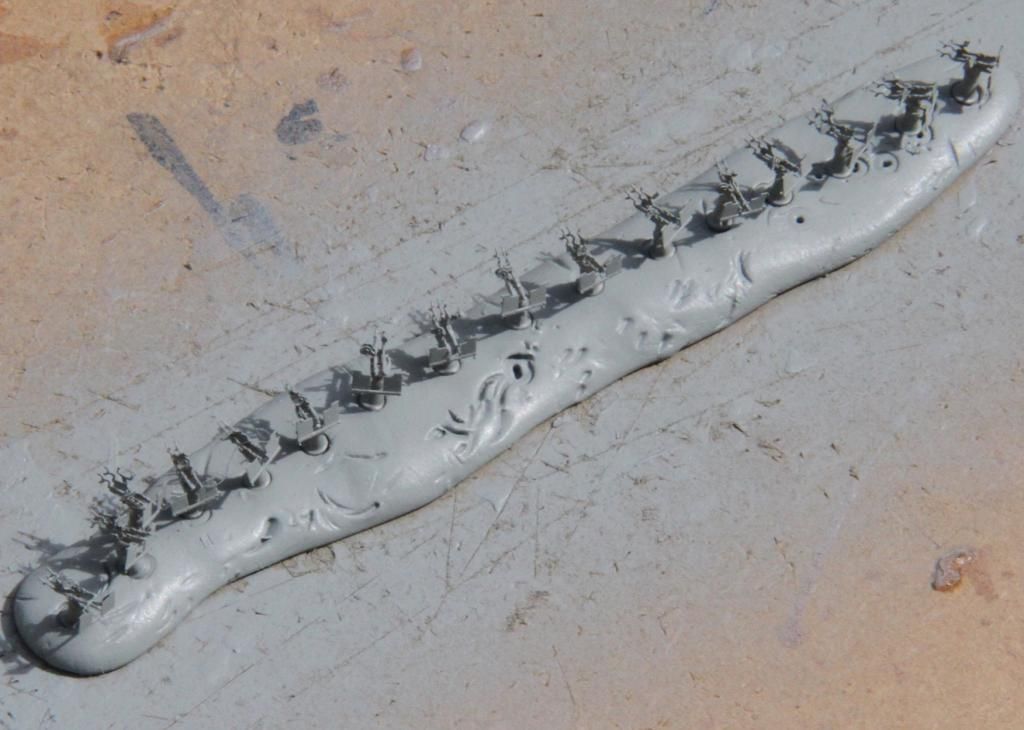
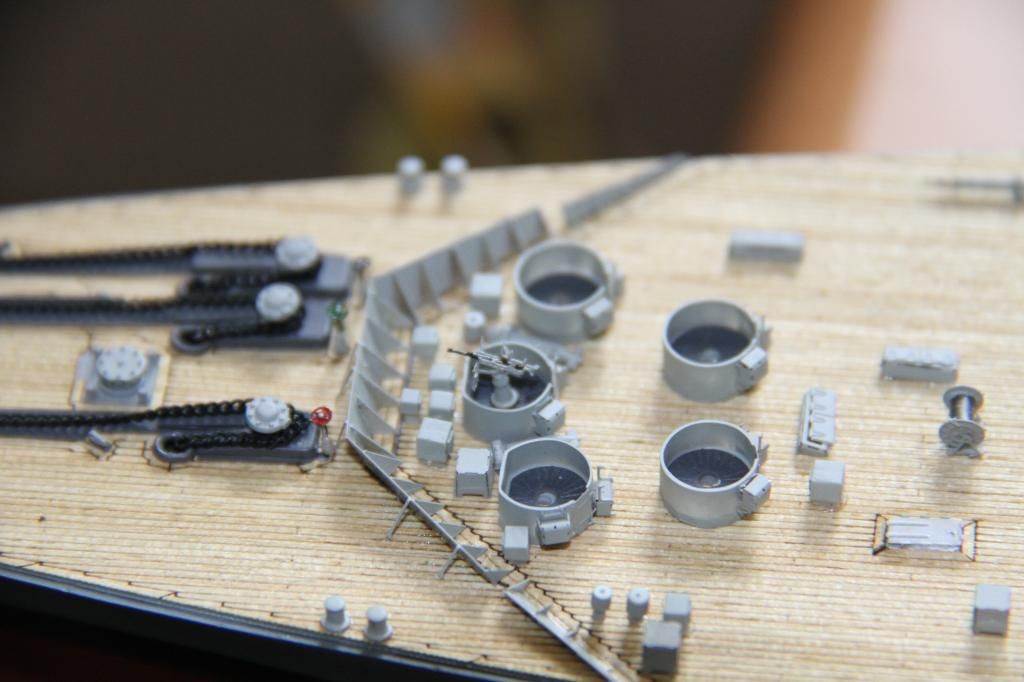
A brief update, as I mentioned earlier I started working on the triple 25mm gun tubs with some difficulty.
I got two complete somewhat and decided I needed expert advice which Si provided. The internal ribs all fell off as I was trying to bend the PE which is going to be fun putting them back, 9 tubs and 10 internal ribs each..oh yea!!
I finally completed the 12.7 cm guns
and started on one main gun controller
and finished the tower for the rear gun controller.
I started using a different camera and now that I have I see it picks up the flaws a lot better. Guess I will be going back and doing some touch up. I definitely need to work on my glue applications as I have piles of glue all over the ship..at least the Gator Grip glue is working well..
As soon as my shipment of Kure Arsenal arrives Ill move on to painting some more..hopefully this week I can get the wooden deck onto the main hull..
hope everyones build is going well. Cant wait to see some updated photos..
Dave
Si things are looking great. Love the detail on the stacks.
A brief update, as I mentioned earlier I started working on the triple 25mm gun tubs with some difficulty.
I got two complete somewhat and decided I needed expert advice which Si provided. The internal ribs all fell off as I was trying to bend the PE which is going to be fun putting them back, 9 tubs and 10 internal ribs each..oh yea!!
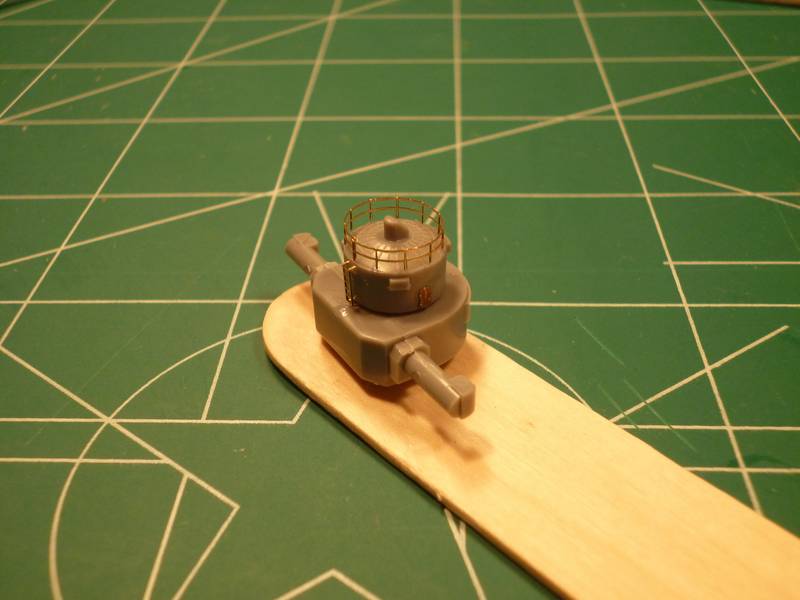
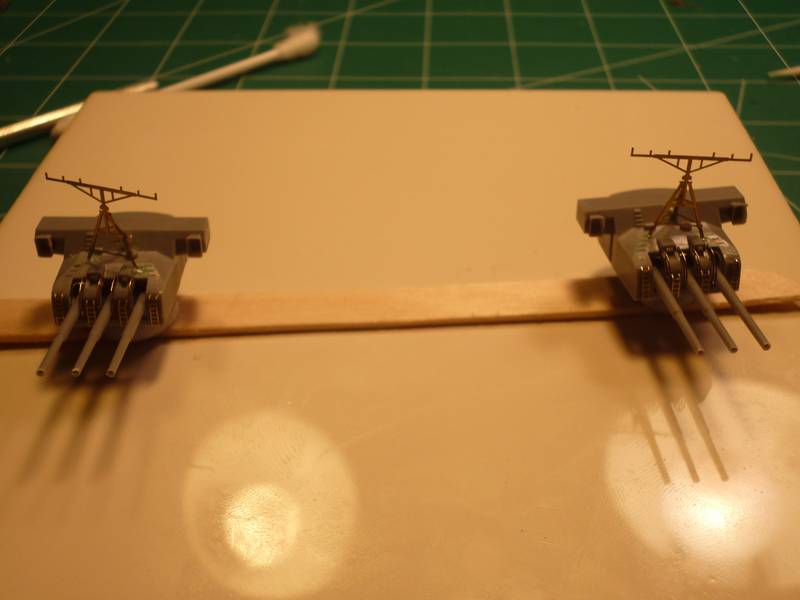
I finally completed the 12.7 cm guns
and started on one main gun controller
and finished the tower for the rear gun controller.
I started using a different camera and now that I have I see it picks up the flaws a lot better. Guess I will be going back and doing some touch up. I definitely need to work on my glue applications as I have piles of glue all over the ship..at least the Gator Grip glue is working well..
As soon as my shipment of Kure Arsenal arrives Ill move on to painting some more..hopefully this week I can get the wooden deck onto the main hull..
hope everyones build is going well. Cant wait to see some updated photos..
Dave
RedDuster
Joined: March 01, 2010
KitMaker: 7,078 posts
Model Shipwrights: 6,649 posts
Posted: Monday, July 14, 2014 - 04:06 AM UTC
Looking good Dave,
The 25mm tubs look pretty good.
On with the 20mm production line, literally

Getting the cradle for the barrels on, the instructions are slightly confusing, and I managed to fold four of the cradles slightly wrong, they still fitted so no real disaster, I shall just hide those guns on the superstructure.
The guns without barrels sprayed light grey.
The barrels sprayed semi gloss black,

The funnels given a coat of light grey whilst I was at it, in the process one the cap bases came a bit loose, no issue to fix.
The first 20mm fitted. Looking at the pictures in Raven & Roberts there are depression rails on these tubs, so they will have to be scratched as non are provided in the Pontos set.
20mm fitted to the port side of the lower bridge deck.
An overview of where I am at. Non of the superstructure or funnels are glued down as they all have further painting / details to be added.
Si
The 25mm tubs look pretty good.
On with the 20mm production line, literally

Getting the cradle for the barrels on, the instructions are slightly confusing, and I managed to fold four of the cradles slightly wrong, they still fitted so no real disaster, I shall just hide those guns on the superstructure.

The guns without barrels sprayed light grey.

The barrels sprayed semi gloss black,

The funnels given a coat of light grey whilst I was at it, in the process one the cap bases came a bit loose, no issue to fix.

The first 20mm fitted. Looking at the pictures in Raven & Roberts there are depression rails on these tubs, so they will have to be scratched as non are provided in the Pontos set.

20mm fitted to the port side of the lower bridge deck.

An overview of where I am at. Non of the superstructure or funnels are glued down as they all have further painting / details to be added.

Si

beefy66

Joined: October 22, 2007
KitMaker: 971 posts
Model Shipwrights: 645 posts

Posted: Monday, July 14, 2014 - 05:31 AM UTC
Simon and Dave your builds are really starting to take shape now will have to try and get some work done on mine soon  when I can get some time off for good behavior from doing up the old house
  .
.
Keith
when I can get some time off for good behavior from doing up the old house .Keith

Ah3000mk1
Joined: August 01, 2008
KitMaker: 17 posts
Model Shipwrights: 17 posts

Posted: Tuesday, July 22, 2014 - 05:05 AM UTC
Hey, guys, how do you post photos to a campaign thread?

Aurora-7
#360
Joined: June 18, 2003
KitMaker: 1,020 posts
Model Shipwrights: 630 posts

Posted: Tuesday, July 22, 2014 - 10:11 AM UTC

rolltide31
#377
Joined: June 27, 2010
KitMaker: 1,481 posts
Model Shipwrights: 1,332 posts
Posted: Tuesday, July 22, 2014 - 12:12 PM UTC
Quoted Text
Hey, guys, how do you post photos to a campaign thread?
Bryan, if your posting your pictures in the Kit Maker Album you do the following.
Open the picture and midway down the screen you will see an area that states linked thumbnail. to the right of that you will see what appears to be a chain. Click that and below the thumbnail link will be another link address. Copy and past that into your post window. When your done with your post click the ready to reply and the pictures will appear in the thread.
Dave
Ah3000mk1
Joined: August 01, 2008
KitMaker: 17 posts
Model Shipwrights: 17 posts
Posted: Tuesday, July 22, 2014 - 03:55 PM UTC

Ah3000mk1
Joined: August 01, 2008
KitMaker: 17 posts
Model Shipwrights: 17 posts
Posted: Tuesday, July 22, 2014 - 03:57 PM UTC
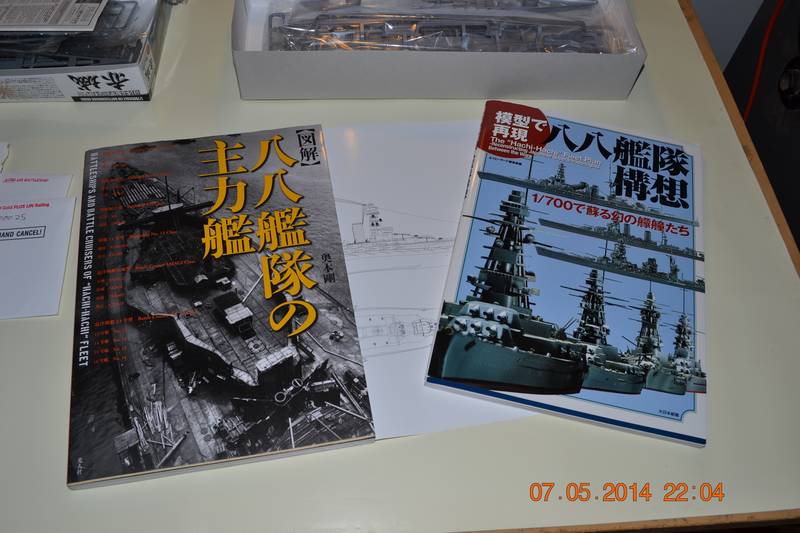
Greetings! This is my first campaign, and I'm getting a late start! The first pic is of a couple of references, both obtained from HLJ. 'Battleships and Battlecruisers of the "Hachi-Hachi" Fleet',and 'The "Hachi-Hachi" Fleet Plan- Reconstructing Japanese Superdreadnaughts Between the Wars" are both Japanese-language publications, IMHO well worth the price due to the excellent photos, tabulated data, and line drawings in the former, and the pics of a wide range of 1/700 builds in the latter. I son't know exactly where this is taking me, but the next pic shows the kits I'll throw into the build- a pair of Fujimi Amagi's and a pair of Aoshima 1927 Nagatos. This sacrifice, no doubt, will spur the Waterline Deities and Murphy to release one or more 8-8 fleet subjects before I finish...
rolltide31
#377
Joined: June 27, 2010
KitMaker: 1,481 posts
Model Shipwrights: 1,332 posts
Posted: Wednesday, July 23, 2014 - 09:07 AM UTC
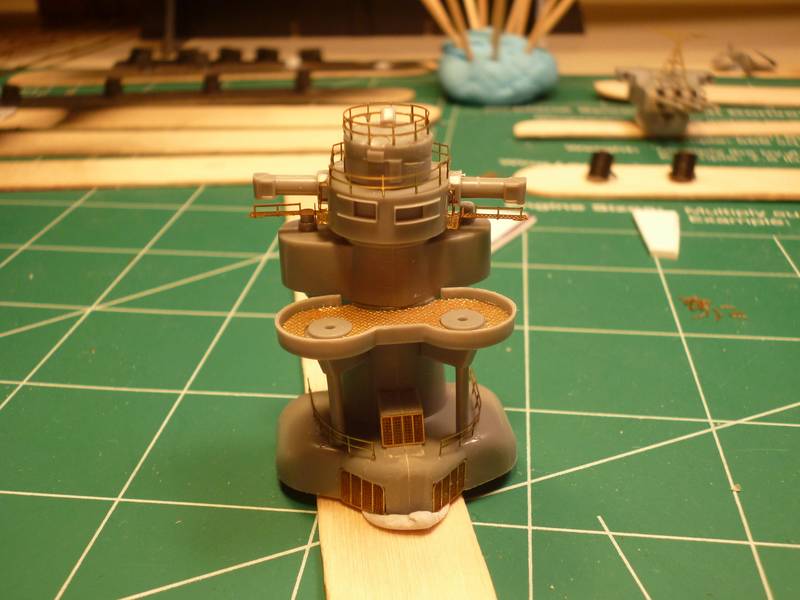
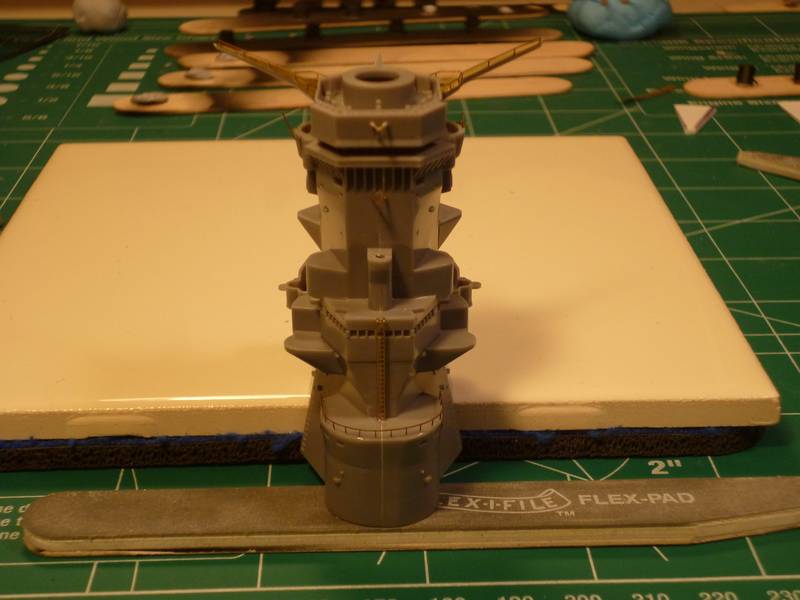
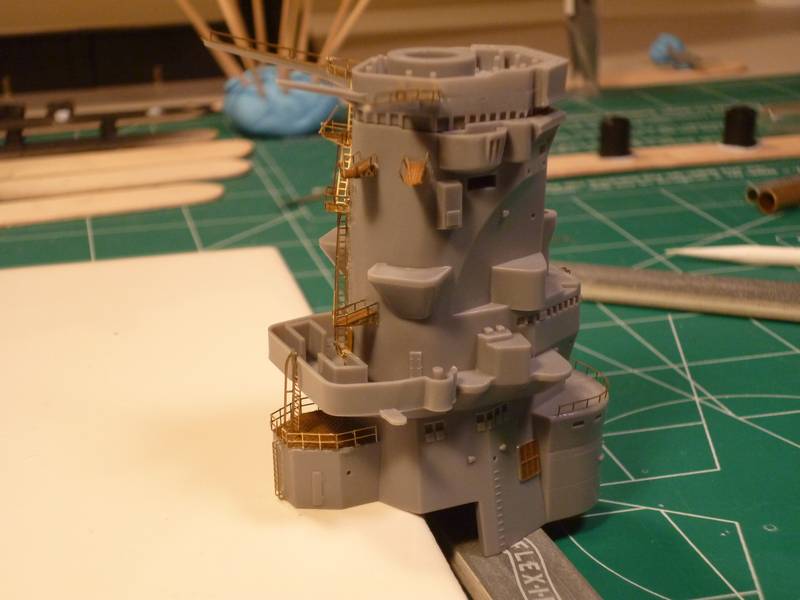
hey all, unfortunately I don't have a lot on updates this week. Been a long weekend of doing other around the house projects. I was able to complete the Musashi's 155mm secondary guns.
I was torn between the kit aerials and the PE as the PE ones didn't provide the roundness of the real thing. In the end as you can see I went with the PE version.
Also I finished the main stack. The cover of the funnel is on I just didn't get a picture of it.
and finally I finished one off the gun directors. The lower railing proved to be challenging as it was not cut to provide for a clear area to bend so I ended up bending it a few times and in the end had to make some slight modifications as I didn't place it correctly. Hopefully priming it this weekend will cover the blemishes that are clearly apparent in the picture.
So far I am learning a lot with this build and I know it will help me in future builds. I have the Yamato on the shelf but since I am not impressed with the Eduard PE set for the Yamatao / Musashi I think I will hold off on that monster until I can get my hands on either the Pontos or Gold Medal set. Maybe there will be another campaign that the Yamato will fit into nicely...
well that's all for this week.
Simon your build is looking great. Looking forward to seeing other builds and their updates. Take care all
Dave

TankSGT
Joined: July 25, 2006
KitMaker: 1,139 posts
Model Shipwrights: 84 posts

Posted: Thursday, July 24, 2014 - 02:50 AM UTC
Damn you folks are moving along, I have got to get moving. A foot injury has slowed me down some, got one of those darn boots.
Simon DoY looking great. Bryan welcome aboard.
Also very excited about the Texas in 1/350.
Tom
Simon DoY looking great. Bryan welcome aboard.
Also very excited about the Texas in 1/350.
Tom


RussellE
#306

Joined: June 27, 2010
KitMaker: 3,959 posts
Model Shipwrights: 2,777 posts
Posted: Friday, July 25, 2014 - 12:30 AM UTC
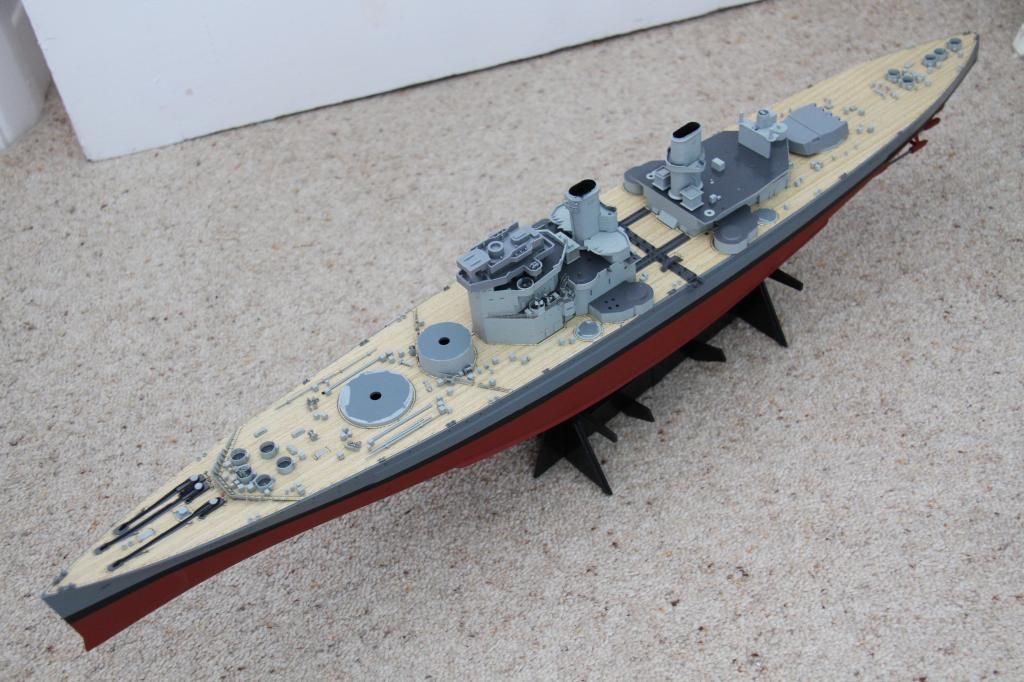
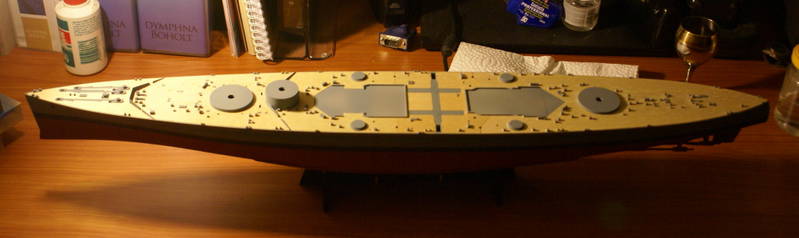
Well the wood deck's on... 

rolltide31
#377
Joined: June 27, 2010
KitMaker: 1,481 posts
Model Shipwrights: 1,332 posts
Posted: Friday, July 25, 2014 - 09:34 AM UTC
hi all, it is time for me to ask for some more advice. I am almost to the point that I can add the wooden deck to the Musashi and since I am replicating the Musashi on her final voyage I need to replicate the darkened wood. According to the history books, the Admiral had the Sailors darken the wood by using the ash from the boilers..so my question is this...would you recommend dying the wood using black pastel chalk or would painting it be better? If painting, how would you recommend I go about it and to what degree of darkness would you recommend.
Thanks in advance for your input and advice.
Dave
Thanks in advance for your input and advice.
Dave
RussellE
#306
Joined: June 27, 2010
KitMaker: 3,959 posts
Model Shipwrights: 2,777 posts
Posted: Friday, July 25, 2014 - 10:49 AM UTC
Hi Dave 
if it were me I would definitely be trialling some different techniques on some scrap pieces before committing to the real thing. Remember at this scale, the effect needs to be a little more subtle, so try not to go too heavy handed.
Another possible technique that may work quite well before you attach the decks is to give them a few coats of gloss clear, making sure that it does come up very shiny, then a sooty coloured wash. The gloss will allow the wash to run freely over the deck, then you can wipe off the excess leaving the ridges cleaner than the valleys. Then after you've attached them to the deck you can give the whole thing a matt clear coat to tie it all together.
Of course the above technique will depend on the type of deck you're working with and trialling various techniques on scrap to find what works best for you is a must!
Dade has a great blog here on how to achieve a 'sooty' deck.
TankSGT
Joined: July 25, 2006
KitMaker: 1,139 posts
Model Shipwrights: 84 posts
Posted: Friday, July 25, 2014 - 06:34 PM UTC
Also very excited about the Texas in 1/350.
Sorry meant New York Still very interested.
Tom
Sorry meant New York Still very interested.
Tom

Longshanks8

Joined: July 04, 2013
KitMaker: 430 posts
Model Shipwrights: 390 posts

Posted: Friday, July 25, 2014 - 07:53 PM UTC
I'm watching you 'Big Boys ' with interest . . .
Love the on going work
Cheers Kev
Love the on going work
Cheers Kev
rolltide31
#377
Joined: June 27, 2010
KitMaker: 1,481 posts
Model Shipwrights: 1,332 posts
Posted: Saturday, July 26, 2014 - 07:14 AM UTC
Russel, thanks for the tip, the blog was very helpful
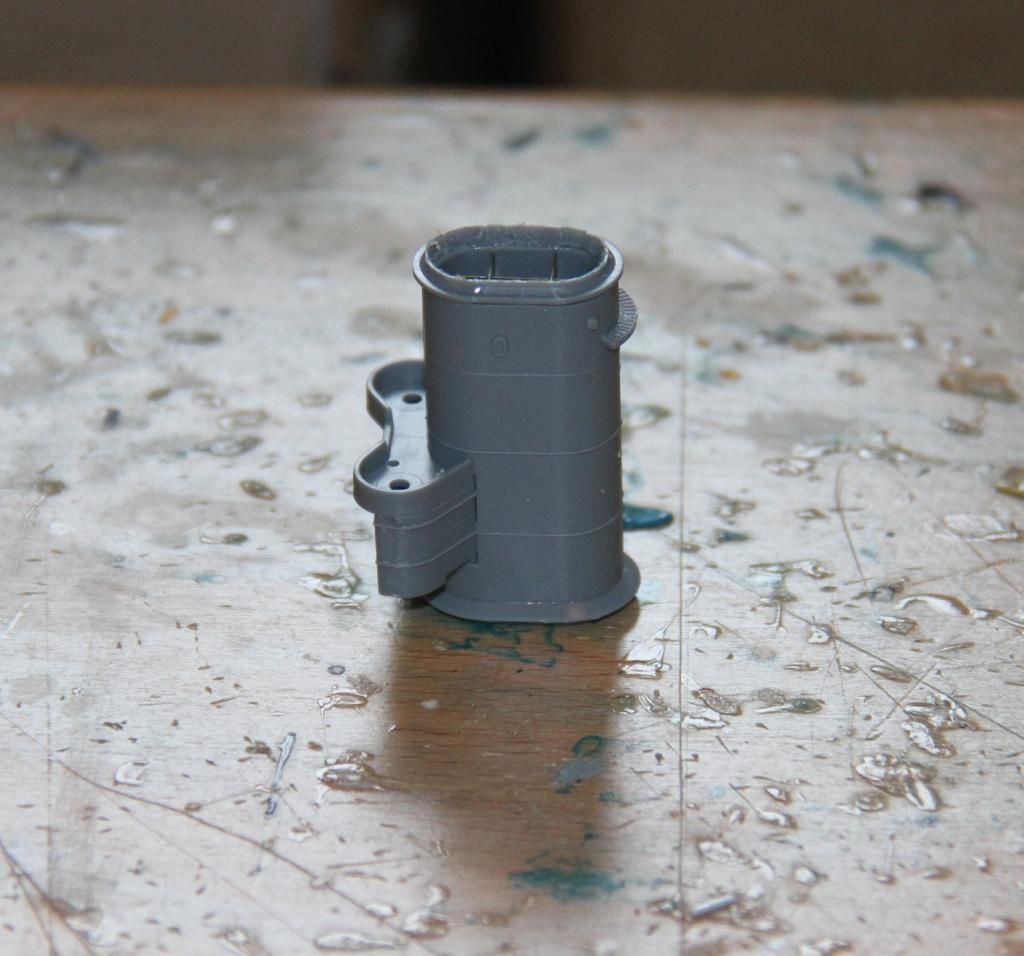
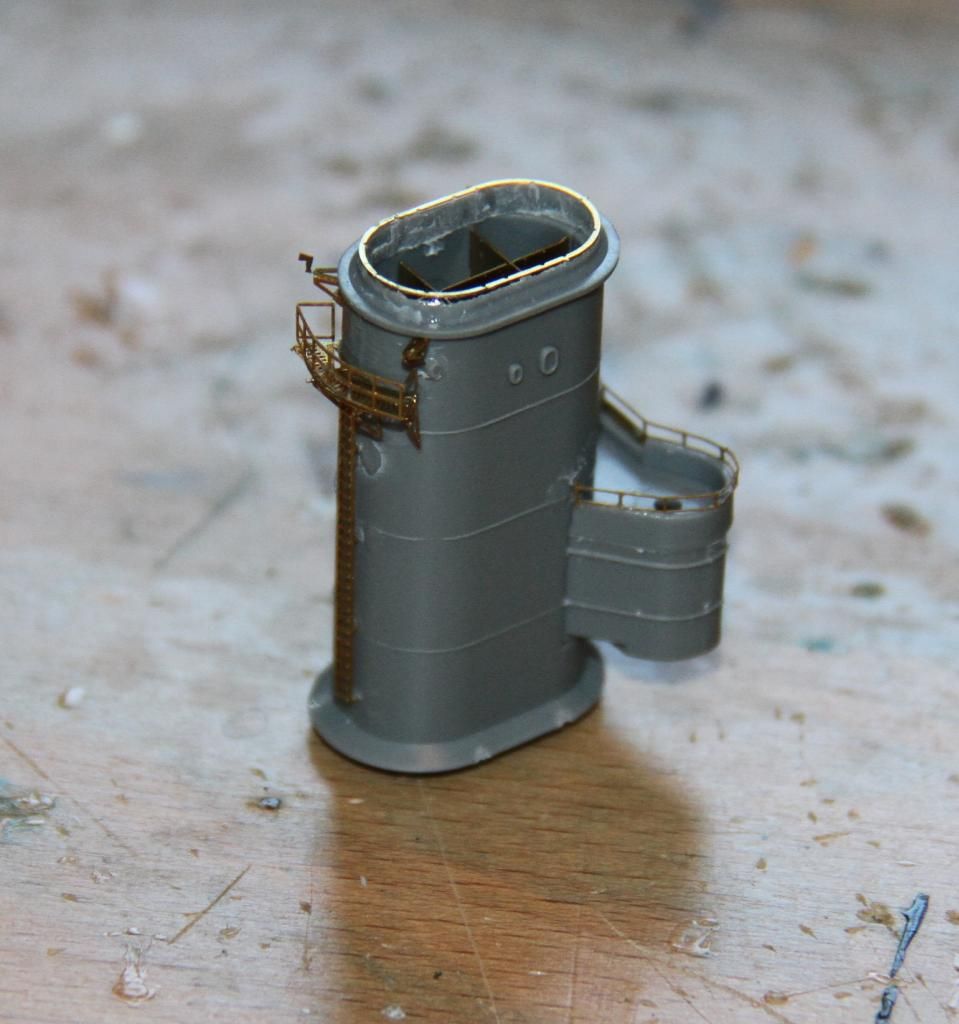
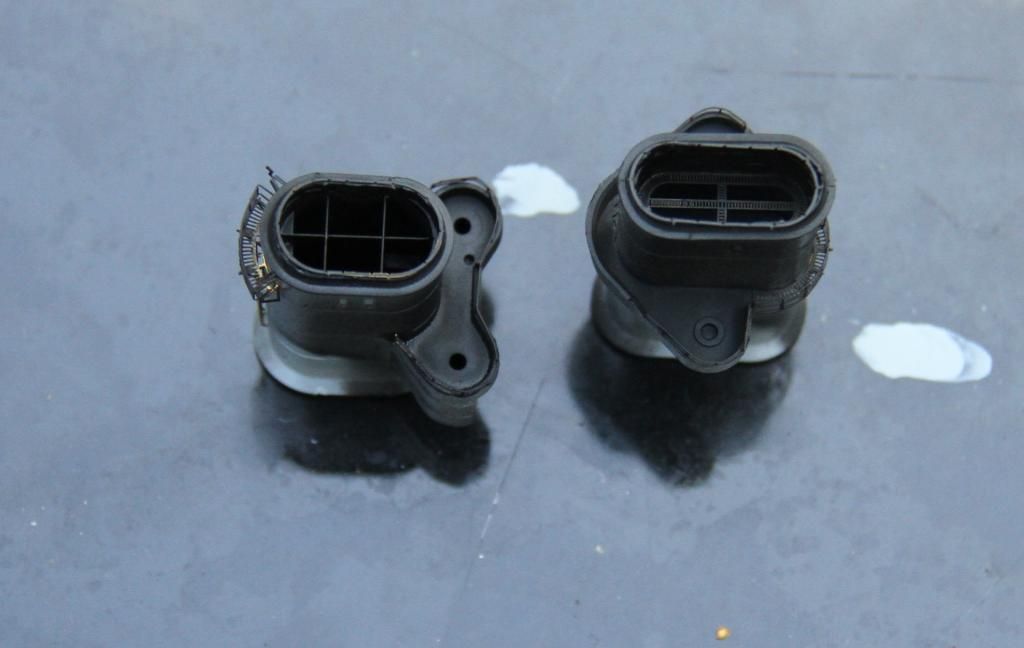
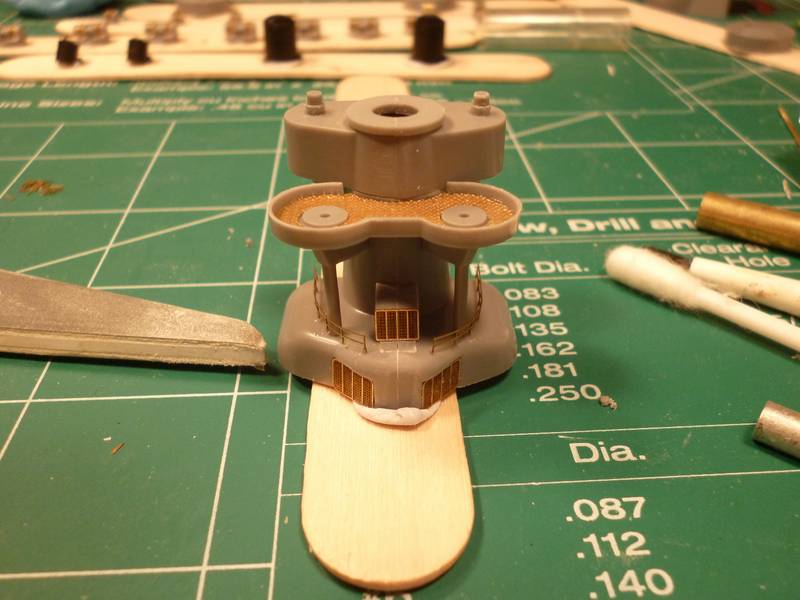
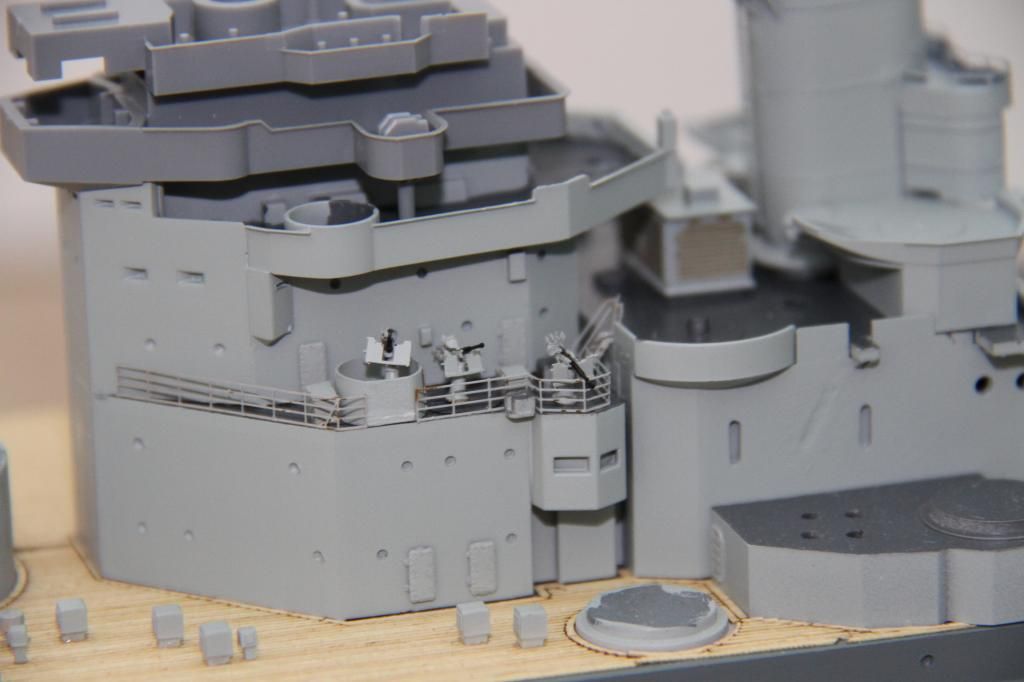
wanted to provide this one update, been working on the nridge tower all week and well I finally finished.
before
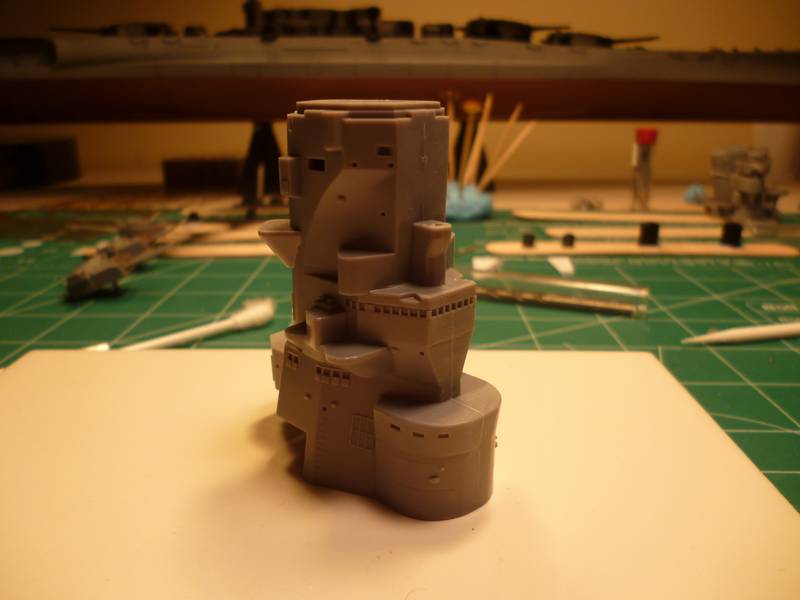
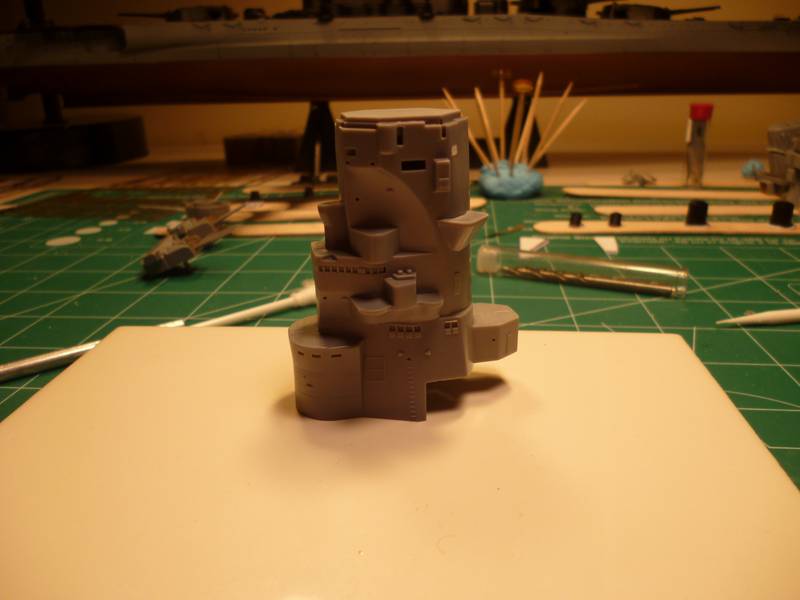
and after

I did a large primer paint today but unfortunately didn't have this done in time to include, guess I will work on some more major assemblies before I primer again. Should be ready to do a major base color paint before too long and start adding the major assemblies to the main body. Can't wait.
thanks again all for the help and advice.
Dave
wanted to provide this one update, been working on the nridge tower all week and well I finally finished.
before
and after
I did a large primer paint today but unfortunately didn't have this done in time to include, guess I will work on some more major assemblies before I primer again. Should be ready to do a major base color paint before too long and start adding the major assemblies to the main body. Can't wait.
thanks again all for the help and advice.
Dave
TankSGT
Joined: July 25, 2006
KitMaker: 1,139 posts
Model Shipwrights: 84 posts
Posted: Sunday, July 27, 2014 - 09:15 AM UTC
Man all the fidely bits are giving me pause but I will drive on.I got quite a bit done pictures later. Will probably prime the hull and metal parts today.
Musashi looking good.
Tom
Musashi looking good.
Tom
rolltide31
#377
Joined: June 27, 2010
KitMaker: 1,481 posts
Model Shipwrights: 1,332 posts
Posted: Wednesday, July 30, 2014 - 12:09 PM UTC
woo hoo I scored a Hasagawa IJN Nagato for less than $100 on evilbay...ok sorry, I digress.
Hope eveyones build is going well, look forward to seeing your progress
Hope eveyones build is going well, look forward to seeing your progress
 |

WEB HOSTING BY


Copyright ©2021 Model Shipwrights and Kitmaker Network, a subsidiary of Silver Star Enterprises
All Rights Reserved. Please read our Conditions of Use and Privacy Policy.
All Rights Reserved. Please read our Conditions of Use and Privacy Policy.