

looking good Russell,
Another one of us with a big Tiffy, looks like airfix are doing well with that one!
Si


Go to modelshipwrights.com for the current dynamic site!
Hosted by Steve Joyce
The King! - HMS King George V, May 41

RedDuster

Joined: March 01, 2010
KitMaker: 7,078 posts
Model Shipwrights: 6,649 posts

Posted: Saturday, August 23, 2014 - 09:15 PM UTC

Dangeroo

#023

Joined: March 13, 2009
KitMaker: 2,058 posts
Model Shipwrights: 163 posts

Posted: Saturday, August 23, 2014 - 11:07 PM UTC
Impressive work Russel. Lots of goodies on that one. Has there ever been a more modern release of the KGV?
Cheers!
Stefan
Cheers!
Stefan

Gremlin56
Joined: October 30, 2005
KitMaker: 3,897 posts
Model Shipwrights: 3,301 posts
KitMaker: 3,897 posts
Model Shipwrights: 3,301 posts

Posted: Saturday, August 23, 2014 - 11:17 PM UTC
Beautiful job you are doing on the King Russell, love the base you are fitting the ship to,


RussellE

#306

Joined: June 27, 2010
KitMaker: 3,959 posts
Model Shipwrights: 2,777 posts
Posted: Saturday, August 23, 2014 - 11:40 PM UTC
Thank you Si  Airfix deserve to do well! I am loving their new tool 1/72 aircraft kits and am slowly collecting a fair stash of them. & building them too of course!
Thank you Stefan! the Tamiya offering is the latest, but its mid 80's tooling sure deserves consideration by Tamiya for some updated sprues 
Thank you Julian I have guy who makes the bases for me as you see here. I then add custom sized blocks later on in the build.
Airfix deserve to do well! I am loving their new tool 1/72 aircraft kits and am slowly collecting a fair stash of them. & building them too of course! Thank you Stefan!
the Tamiya offering is the latest, but its mid 80's tooling sure deserves consideration by Tamiya for some updated sprues Thank you Julian
I have guy who makes the bases for me as you see here. I then add custom sized blocks later on in the build. 

SqzMyLemon

Joined: December 10, 2007
KitMaker: 66 posts
Model Shipwrights: 60 posts

Posted: Sunday, August 24, 2014 - 01:23 PM UTC
Great progress Russell. What do you use for putty? I've never seen one that is red before.
RussellE
#306
Joined: June 27, 2010
KitMaker: 3,959 posts
Model Shipwrights: 2,777 posts
Posted: Sunday, August 24, 2014 - 10:06 PM UTC
Quoted Text
Great progress Russell. What do you use for putty? I've never seen one that is red before.
Thanks Joseph
believe it or not I use a tube of automotive stop putty that's sold here in Australia by K+H! It works the same way as the stuff sold by model putty companies, but i get a big tube of the K+H for around the same price as a little jar of the model putty... In other words I've taken the cheaper route...


TimReynaga

Joined: May 03, 2006
KitMaker: 2,500 posts
Model Shipwrights: 1,830 posts
Posted: Monday, August 25, 2014 - 01:23 AM UTC
Quoted Text
Quoted TextGreat progress Russell. What do you use for putty? I've never seen one that is red before.
Thanks Joseph
In other words I've taken the cheaper route...
That's cool Russell; and if any spots of the putty show through your paintwork, it will look like good old fashioned red lead primer!
Seriously though, your KGV is looking terrific! I like the super neat paintwork.


Aurora-7
#360
Joined: June 18, 2003
KitMaker: 1,020 posts
Model Shipwrights: 630 posts

Posted: Monday, August 25, 2014 - 03:45 AM UTC
She's looking fine, Russel. Can't wait to see more superstructure attached to the hull.


Fordboy

Joined: July 13, 2004
KitMaker: 2,169 posts
Model Shipwrights: 1,597 posts

Posted: Monday, August 25, 2014 - 09:38 AM UTC
Ahoy Russell
Just caught up with this build.
I love the little building tips you are sharing as you are going along.
Oh boy I share your pain with the compressor and paint issues.
Despite these issues the build looks great thus far.
Cheers
Sean
Just caught up with this build.
I love the little building tips you are sharing as you are going along.
Oh boy I share your pain with the compressor and paint issues.
Despite these issues the build looks great thus far.
Cheers
Sean
RussellE
#306
Joined: June 27, 2010
KitMaker: 3,959 posts
Model Shipwrights: 2,777 posts
Posted: Monday, August 25, 2014 - 10:00 AM UTC
Quoted Text
That's cool Russell; and if any spots of the putty show through your paintwork, it will look like good old fashioned red lead primer!
Seriously though, your KGV is looking terrific! I like the super neat paintwork.
Thank you Tim for the kind words... if I can come close to the quality of your builds then I am happy...
 mmm... red lead primer-delicious, but deadly!
  Speaking of toxins, I'm a bit old school and still using enamels, so a shot coat of primer combined with the top coat seems to cover the red pretty well.
 Quoted Text
She's looking fine, Russel. Can't wait to see more superstructure attached to the hull.
Thank you Michael
I am keen also to get some superstructure up, but I fear it may not happen for a while yet-my garage is being replaced in a couple of weeks and, there goes my ability to paint!!! 
Quoted Text
Ahoy Russell
Just caught up with this build.
I love the little building tips you are sharing as you are going along.
Oh boy I share your pain with the compressor and paint issues.
Despite these issues the build looks great thus far.
Cheers
Sean
Hi Sean! Welcome aboard!
thank you... yes, us modellers are strange bunch aren't we? Toiling away for hours striving for perfection when it can all go wrong in an instant as soon as the paint hits the deck, yet, we still go back for more... 
The new compressor sure has nipped the paint problems in the butt... now I just have dust problems..., whilst the garage is out of action I hope to build a spray booth big enough to fit 1/350 vessels up to the size of the Titanic that I have in my stash to combat the problem...
Russ
Aurora-7
#360
Joined: June 18, 2003
KitMaker: 1,020 posts
Model Shipwrights: 630 posts
Posted: Monday, August 25, 2014 - 10:38 AM UTC
Quoted Text
I am keen also to get some superstructure up, but I fear it may not happen for a while yet-my garage is being replaced in a couple of weeks and, there goes my ability to paint!!!
Curse that real world.
RussellE
#306
Joined: June 27, 2010
KitMaker: 3,959 posts
Model Shipwrights: 2,777 posts
Posted: Monday, August 25, 2014 - 11:50 AM UTC
Aye, true that, Michael
RussellE
#306
Joined: June 27, 2010
KitMaker: 3,959 posts
Model Shipwrights: 2,777 posts
Posted: Wednesday, October 01, 2014 - 12:02 AM UTC
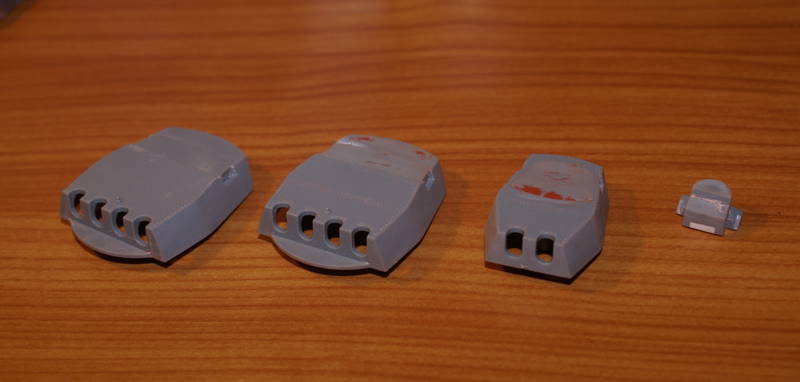
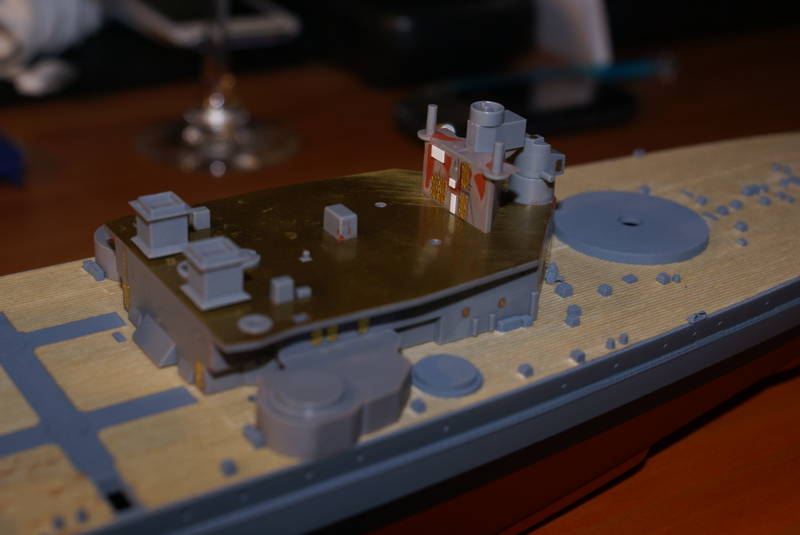
October 1st, 2014 update...
Well it's been a while so I thought i should post a few progress pics. Not much to show though, as the man-cave is being re-built at the moment...
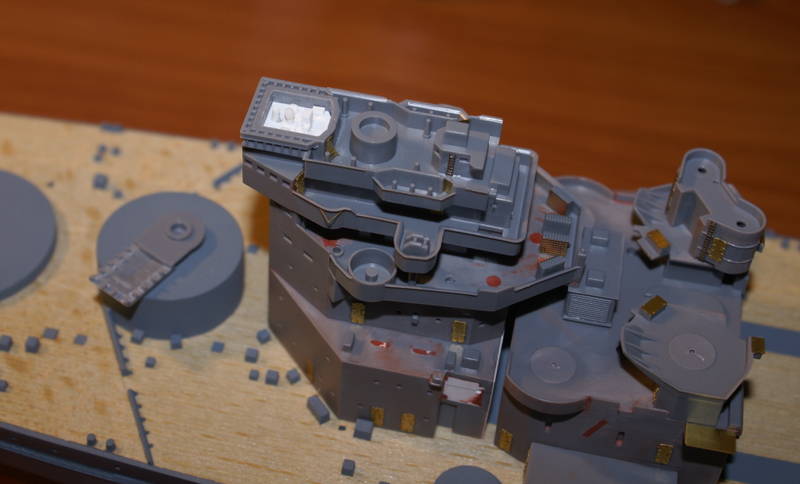
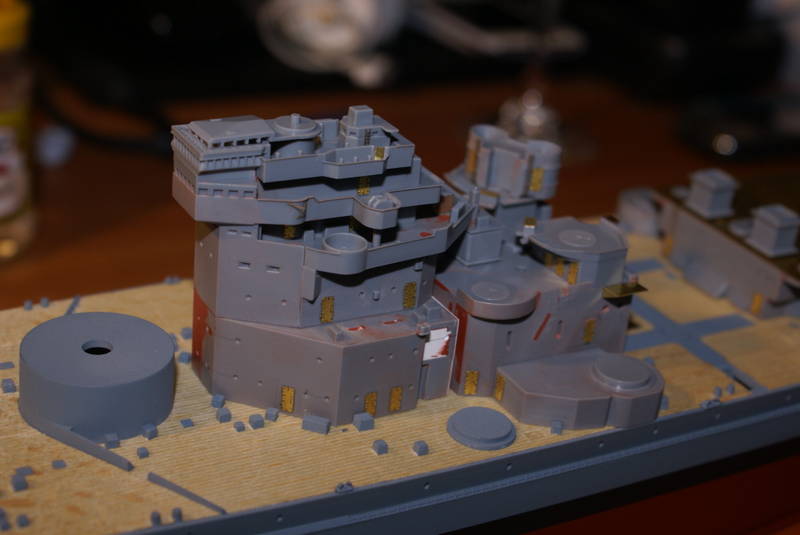
At the time of the Bismarck episode there were no out riggers on the bridge so these have been removed.
and filled in
some extra features added to the aft of the bridge
and dry fit
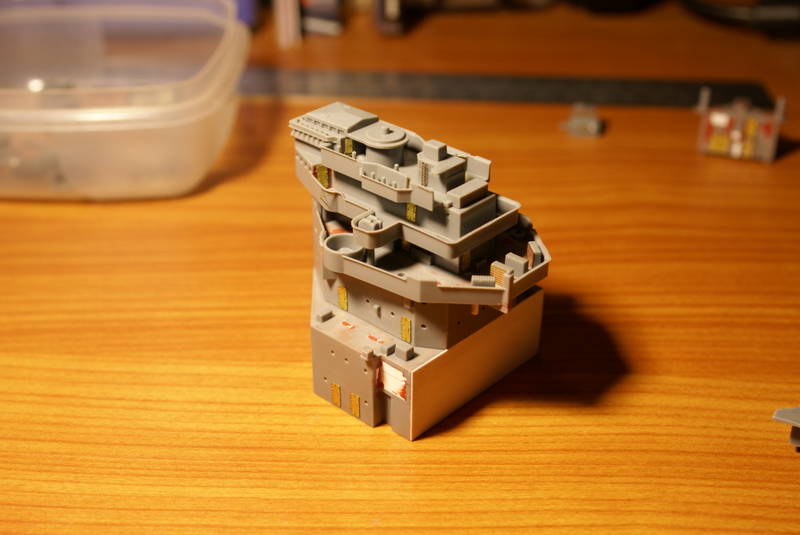
i decided to bite the bullet and purchase the Eduard PE to supplement the WEM
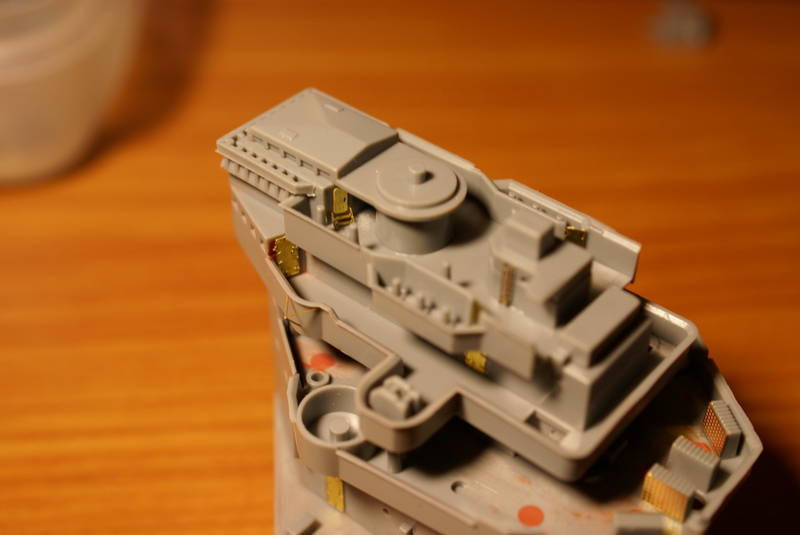
the secondary director
the secondary director platform
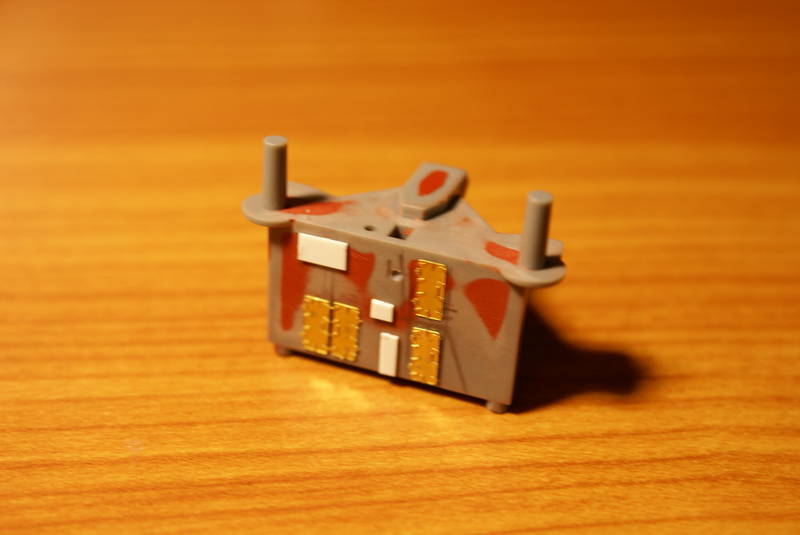
5.25" gun platforms
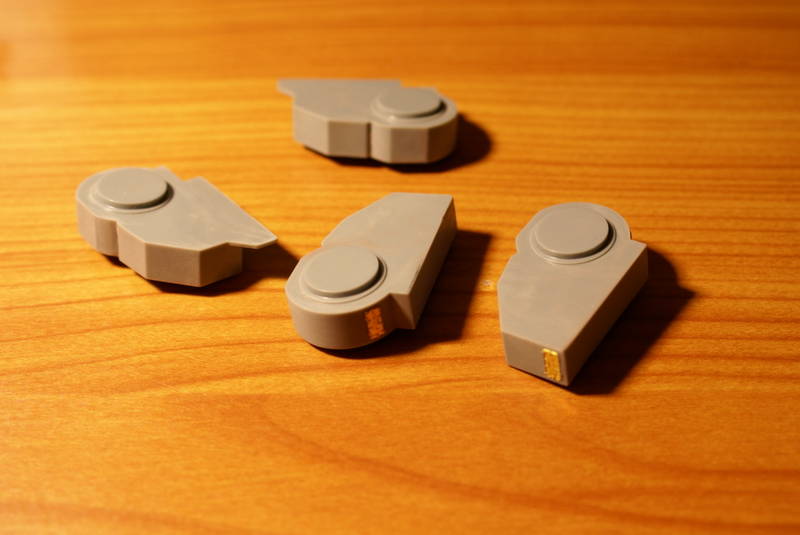
pom pom platforms
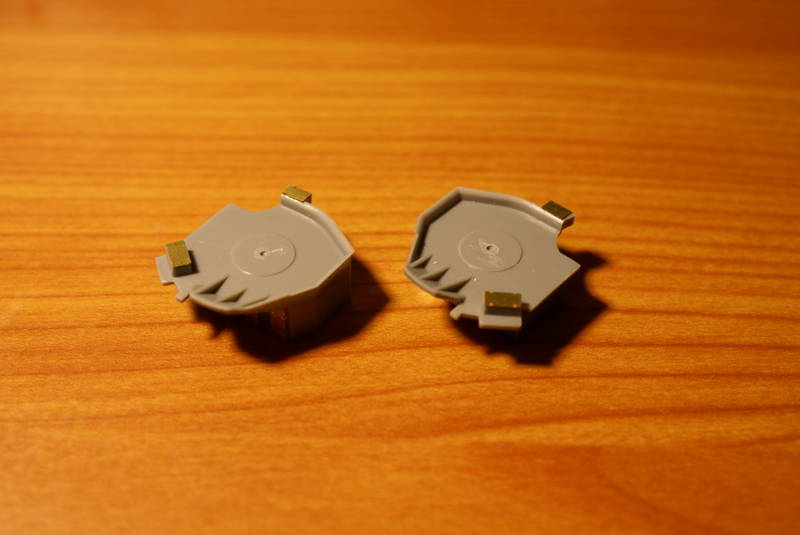
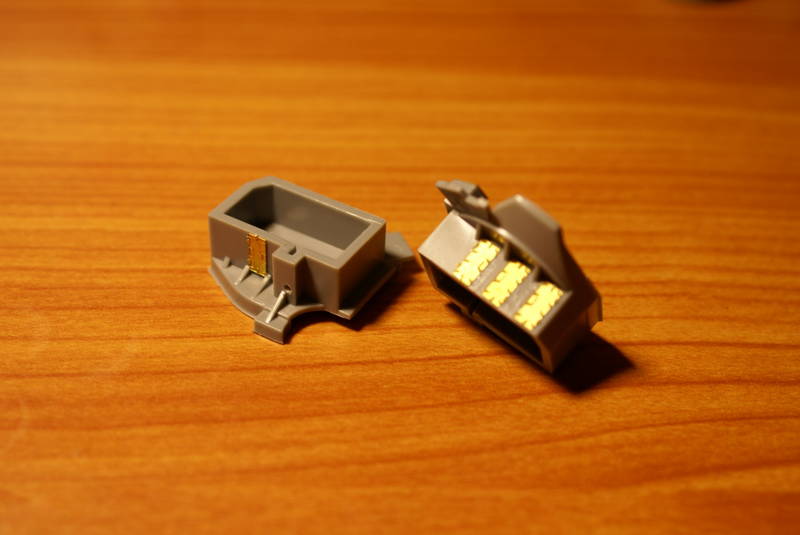
boat deck
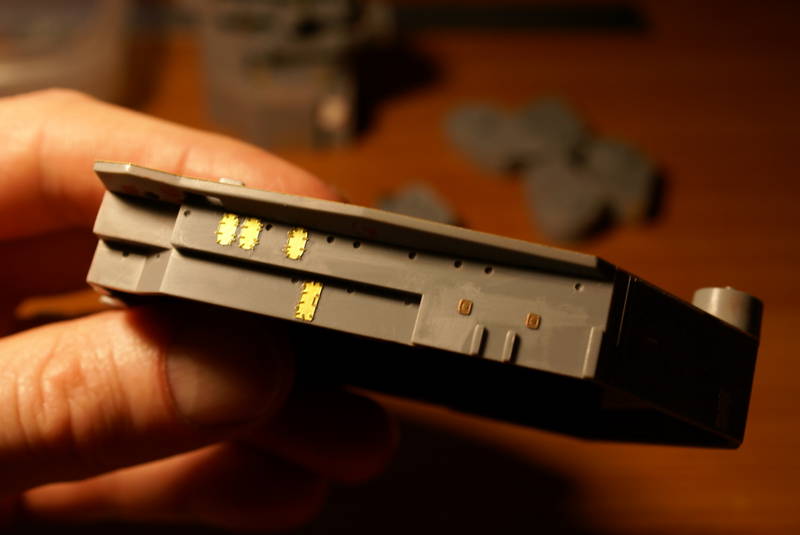
the hangar still has a bit of work yet to do, but it's getting there
more soon...
thanks for looking
Russ
Well it's been a while so I thought i should post a few progress pics. Not much to show though, as the man-cave is being re-built at the moment...
At the time of the Bismarck episode there were no out riggers on the bridge so these have been removed.
and filled in
some extra features added to the aft of the bridge
and dry fit
i decided to bite the bullet and purchase the Eduard PE to supplement the WEM
the secondary director
the secondary director platform
5.25" gun platforms
pom pom platforms
boat deck
the hangar still has a bit of work yet to do, but it's getting there
more soon...
thanks for looking
Russ

JJ1973
#345

Joined: August 22, 2011
KitMaker: 1,835 posts
Model Shipwrights: 1,832 posts
Posted: Wednesday, October 01, 2014 - 06:50 AM UTC
Russ,
very happy to see work progressing here on the King - great job!
You are putting great effort in this one, I like very much that you divide the hangar from the forward superstructure, as it was. One of the few downs of the Tamiya kit that I like very much.
You mentioned you have a copy of Tarrant's book - did you check the picture on page 109, to me it seems that the compass platform above the bridge actually was a very light, almost open structure manly providing protection from the weather, while it looks pretty bulky and solid in the kit. I'm not sure if I'm correct, but I completely opened it on my PoW to resemble a light structure. If you like, I could post a picture.
I hope you're making good progress with your mans cave, I know very well the feeling whenever too much real life things keep you away form the workbench - looking forward to your next update!
Cheers,
Jan
RussellE
#306
Joined: June 27, 2010
KitMaker: 3,959 posts
Model Shipwrights: 2,777 posts
Posted: Wednesday, October 01, 2014 - 09:45 AM UTC
Quoted Text
Russ,
very happy to see work progressing here on the King - great job!
You are putting great effort in this one, I like very much that you divide the hangar from the forward superstructure, as it was. One of the few downs of the Tamiya kit that I like very much.
You mentioned you have a copy of Tarrant's book - did you check the picture on page 109, to me it seems that the compass platform above the bridge actually was a very light, almost open structure manly providing protection from the weather, while it looks pretty bulky and solid in the kit. I'm not sure if I'm correct, but I completely opened it on my PoW to resemble a light structure. If you like, I could post a picture.
I hope you're making good progress with your mans cave, I know very well the feeling whenever too much real life things keep you away form the workbench - looking forward to your next update!
Cheers,
Jan
Thank you Jan!
You are making great progress with the Repulse and am looking forward to more updates

Yes, I have a great soft spot for the KGV and her sisters, so I am going the extra mile.
Although I have to say that usually once I get into a ship build I usually can't help myself and end up getting a little carried away with the details I think you're right about the compass platform. The picture on page 109 does show an 'open air' type structure. I think it was only covered in canvas, but I could be wrong.
But there doesn't seem to be a lot of information available on that area of the ship so it would be great if you could post up a picture of what you have done...
Hopefully the man-cave will be up and running next week which will allow me to push on
Russ

Gremlin56
Joined: October 30, 2005
KitMaker: 3,897 posts
Model Shipwrights: 3,301 posts
KitMaker: 3,897 posts
Model Shipwrights: 3,301 posts
Posted: Thursday, October 02, 2014 - 06:40 PM UTC
Good to see an update Russell, the PE set is a wise choice. The flag racks on the signals deck benefit enormously from the PE as do the watertight doors etc

warreni
Joined: August 14, 2007
KitMaker: 5,926 posts
Model Shipwrights: 2,624 posts

Posted: Friday, October 03, 2014 - 09:20 AM UTC
Greetings Russell.
I actually have a house in Adelaide now and the removals is being being done in Brisbane in a few weeks so the time of the new hobby cave is getting closer..
Nice work on the boat, sorry ship... Just a quick question though, you had a reference photo of the stern of the ship early on in the blog and what you had done with the kit, the square portholes etc. The picture doesn't show a raised plinth for the ships name yet you applied it. Is your ship from a different era where the ship had the plinth? Not criticising at all just wondering.
Cheers mate
Warren
RussellE
#306
Joined: June 27, 2010
KitMaker: 3,959 posts
Model Shipwrights: 2,777 posts
Posted: Friday, October 03, 2014 - 01:09 PM UTC
Quoted Text
Greetings Russell.
I actually have a house in Adelaide now and the removals is being being done in Brisbane in a few weeks so the time of the new hobby cave is getting closer..
Nice work on the boat, sorry ship... Just a quick question though, you had a reference photo of the stern of the ship early on in the blog and what you had done with the kit, the square portholes etc. The picture doesn't show a raised plinth for the ships name yet you applied it. Is your ship from a different era where the ship had the plinth? Not criticising at all just wondering.
Cheers mate
Warren
G'day Warren!
good to see you back on line mate Yes, she's coming along nicely. I'm happy with the way it's coming together so far.
You are right: the picture is of a later time in the ship's career after the degaussing cable was relocated internally. KGV was the only ship of her class to have it fitted externally and the name was on the cable as you noted. In the picture, you can still see the faint lines of weld where it has been cut off, running around the stern as it has rusted through the paint.
Look forward to seeing some builds from you soon
Russ
RussellE
#306
Joined: June 27, 2010
KitMaker: 3,959 posts
Model Shipwrights: 2,777 posts
Posted: Friday, October 03, 2014 - 07:58 PM UTC
Quoted Text
Good to see an update Russell, the PE set is a wise choice. The flag racks on the signals deck benefit enormously from the PE as do the watertight doors etc
Thank you, Julian
Slow going for sure at the moment-hope I'll finish before the battleship campaign does
The Eduard PE seems to compliment the WEM PE quite nicely. The thing with theWEM PE is they haven't supplied watertight doors as you mentioned so I've had to buy a few sets of their watertight door sheets as well
Russ

allycat

Joined: October 03, 2004
KitMaker: 942 posts
Model Shipwrights: 278 posts

Posted: Saturday, October 04, 2014 - 04:08 AM UTC
Russell,
Here's a link to some pics of POW's compass platform. It looks pretty cluttered but should be similar to KGV's
http://www.hmshood.com/history/denmarkstrait/pofw_damage1.htm
and
http://www.kbismarck.org/forum/viewtopic.php?f=1&t=6276&start=30
you need to scroll down a bit there's also a plan of the compass platform a little further down the page.
Tom
JJ1973
#345
Joined: August 22, 2011
KitMaker: 1,835 posts
Model Shipwrights: 1,832 posts
Posted: Sunday, October 05, 2014 - 04:14 AM UTC
I've seen Tom's pictures as well before - can't recall exactly where, though, may have been the very same site...
The way the 15"er passed through it indicates that it was indeed a very light structure. Not that a light armoring, let's say around 1", would have detonated the shell necessarily but I would imagine that there would have been more damage.
Russ, I put a few pictures of 'my' PoW's compass platform in a separate topic,
http://modelshipwrights.kitmaker.net/forums/226933&page=1
Cheers,
Jan
RussellE
#306
Joined: June 27, 2010
KitMaker: 3,959 posts
Model Shipwrights: 2,777 posts
Posted: Sunday, October 05, 2014 - 11:35 AM UTC
Hi Tom, Jan!
Thanks for the great info!&:) Jan your bridge looks great, and Tom, I didn't think plans were available for compass platform, outside of the NMM!
Now the big question-should i open it up and risk damaging what i've done so far, and if i do, then how far should i go?
Russ
Thanks for the great info!&:) Jan your bridge looks great, and Tom, I didn't think plans were available for compass platform, outside of the NMM!
Now the big question-should i open it up and risk damaging what i've done so far, and if i do, then how far should i go?
Russ
allycat
Joined: October 03, 2004
KitMaker: 942 posts
Model Shipwrights: 278 posts
Posted: Wednesday, October 15, 2014 - 03:24 AM UTC
It look thin sheet metal. Only meant to keep the weather out.
Tom
Tom
RussellE
#306
Joined: June 27, 2010
KitMaker: 3,959 posts
Model Shipwrights: 2,777 posts
Posted: Sunday, October 19, 2014 - 10:29 PM UTC
I think you're right Tom
I've opened up the compass platform, (pics soon) and working on some other components now before painting.
The main hold up at the moment is waiting for the garage to be finished so i have somewhere to paint!
Thanks for looking
Russ
I've opened up the compass platform, (pics soon) and working on some other components now before painting.
The main hold up at the moment is waiting for the garage to be finished so i have somewhere to paint!
Thanks for looking
Russ
RussellE
#306
Joined: June 27, 2010
KitMaker: 3,959 posts
Model Shipwrights: 2,777 posts
Posted: Saturday, November 01, 2014 - 11:20 PM UTC
2nd November update...
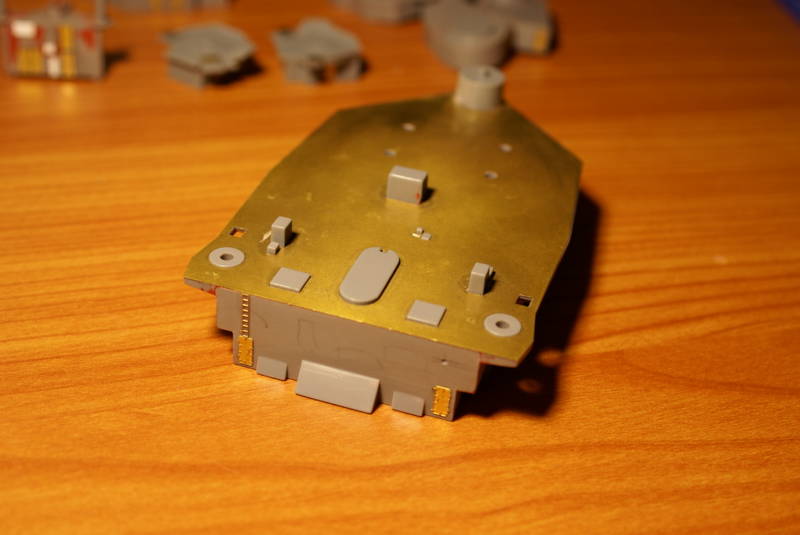
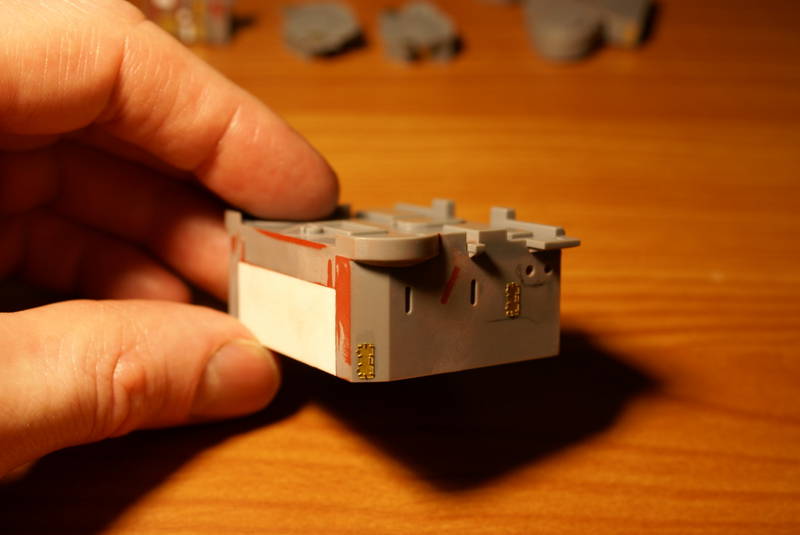
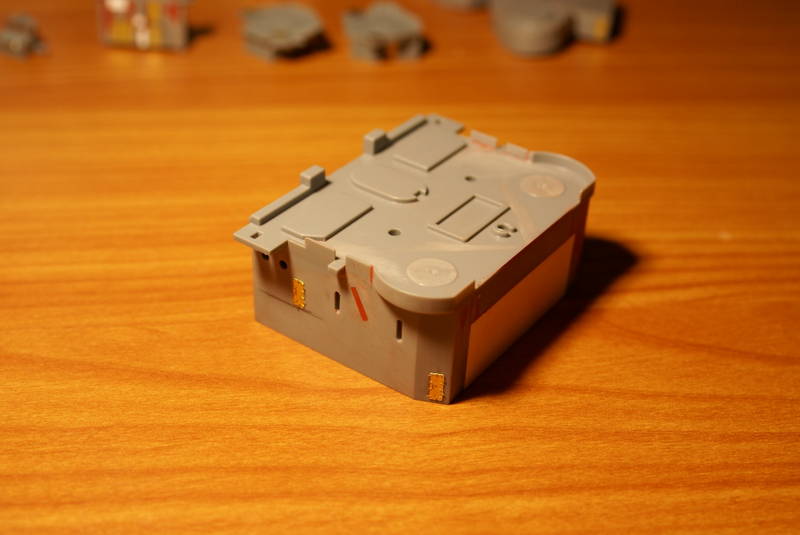
Well it's been awhile and I thought it's time to put up some progress shots. The garage/man cave is still not finished so basically it's just a matter of getting as much ready for painting as i can.
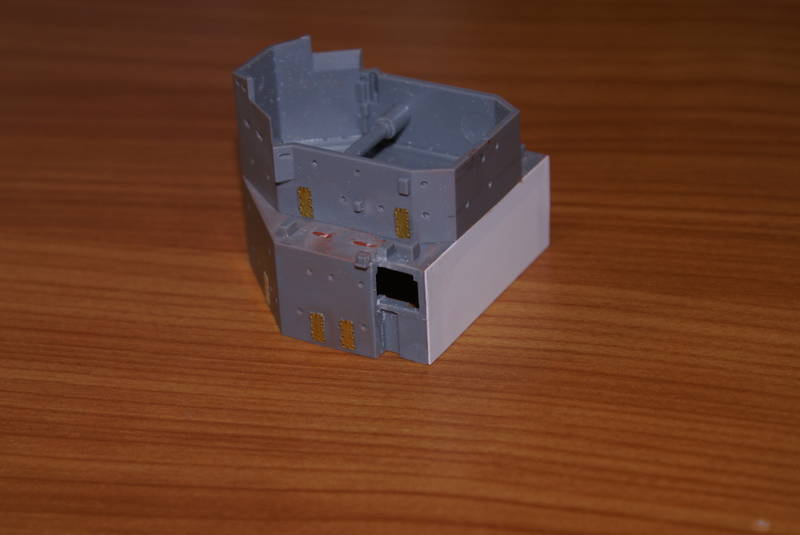
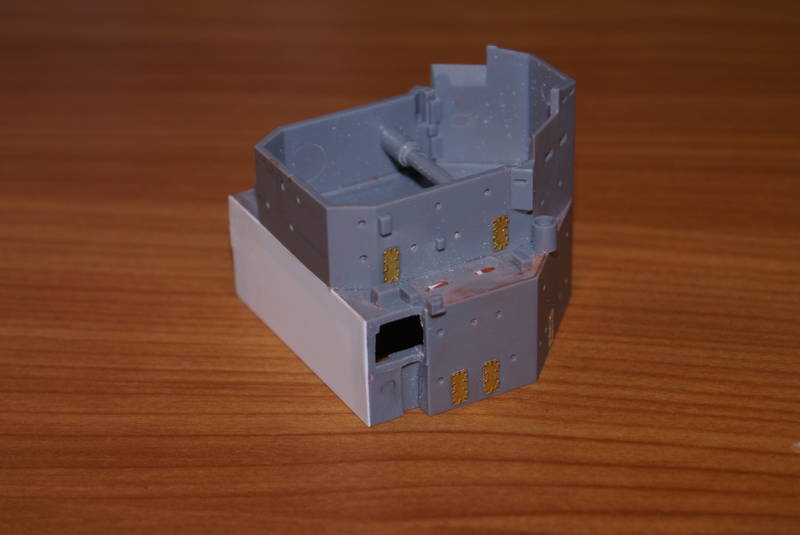
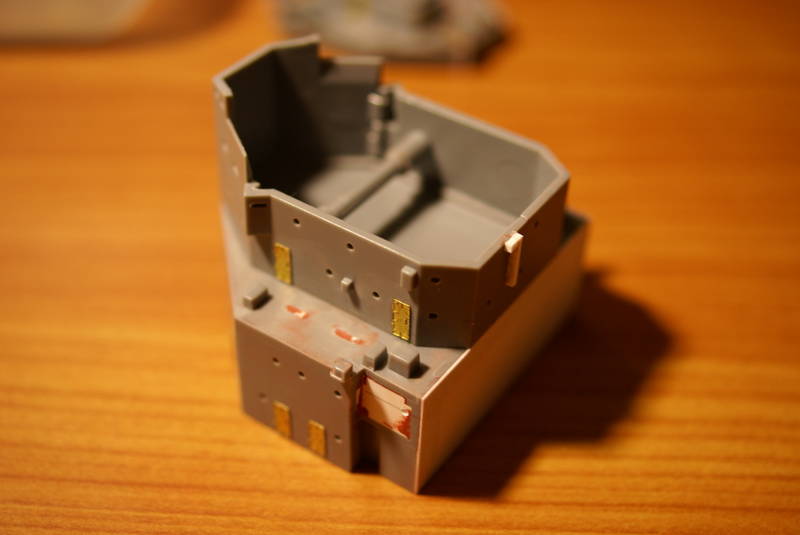
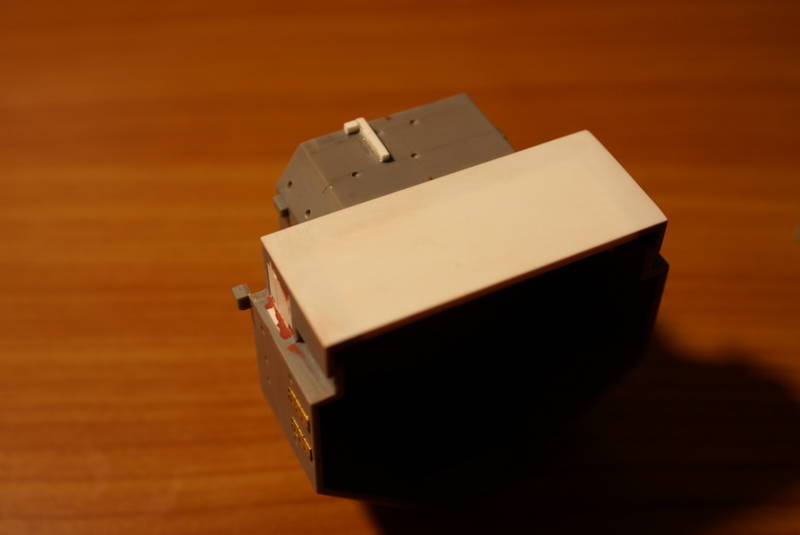
The main armament and director is now underway. I have removed the ammo boxes that were added for the pom poms, as the UP launchers will be taking their place. Lots of sanding too, to get everything square and ship shape before adding PE!
Finished components are now dry fitted waiting paint
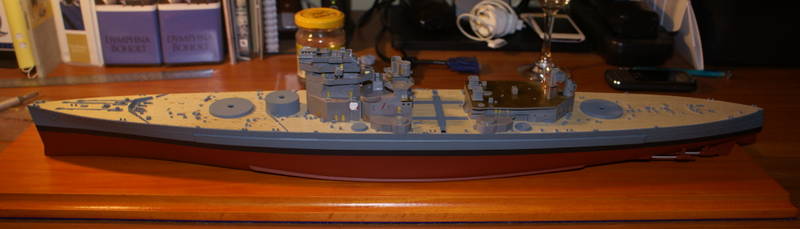
I've taken Tom and Jan's advice and opened up the compass platform and added a very simple bridge. Most of it wont be seen so i wasn't fussed if it wasn't 100% accurate.
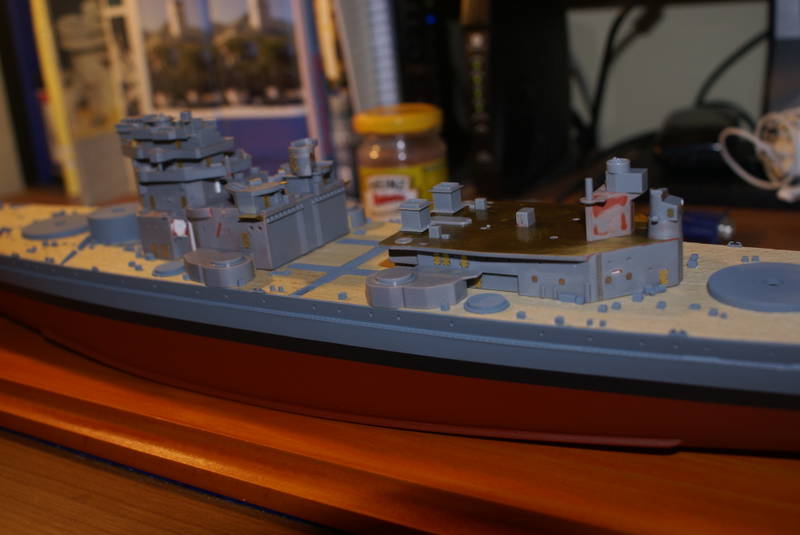
Thanks for looking
Russ
Well it's been awhile and I thought it's time to put up some progress shots.
The garage/man cave is still not finished so basically it's just a matter of getting as much ready for painting as i can.The main armament and director is now underway. I have removed the ammo boxes that were added for the pom poms, as the UP launchers will be taking their place. Lots of sanding too, to get everything square and ship shape before adding PE!
Finished components are now dry fitted waiting paint
I've taken Tom and Jan's advice and opened up the compass platform and added a very simple bridge. Most of it wont be seen so i wasn't fussed if it wasn't 100% accurate.
Thanks for looking
Russ
 |

WEB HOSTING BY


Copyright ©2021 Model Shipwrights and Kitmaker Network, a subsidiary of Silver Star Enterprises
All Rights Reserved. Please read our Conditions of Use and Privacy Policy.
All Rights Reserved. Please read our Conditions of Use and Privacy Policy.