Campaigns
Want to be part of a group build? This is where to start, plan, and meet about them.
Official Campaign: Battle of Leyte Gulf
RedDuster
Visit this Community
England - South East, United Kingdom
Joined: March 01, 2010
KitMaker: 7,078 posts
Model Shipwrights: 6,649 posts
Posted: Monday, January 26, 2015 - 01:24 AM UTC
Nice work on the Dace Dave, the bow tubes and single 40mm.

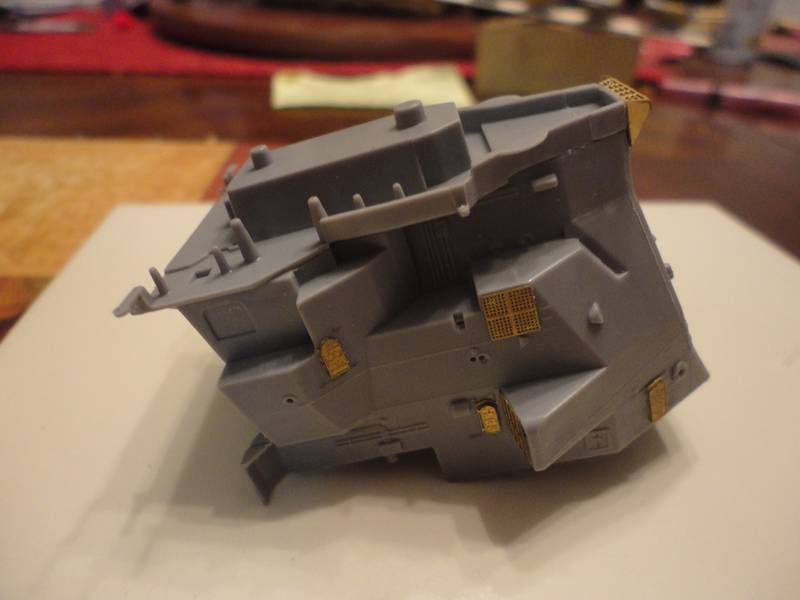
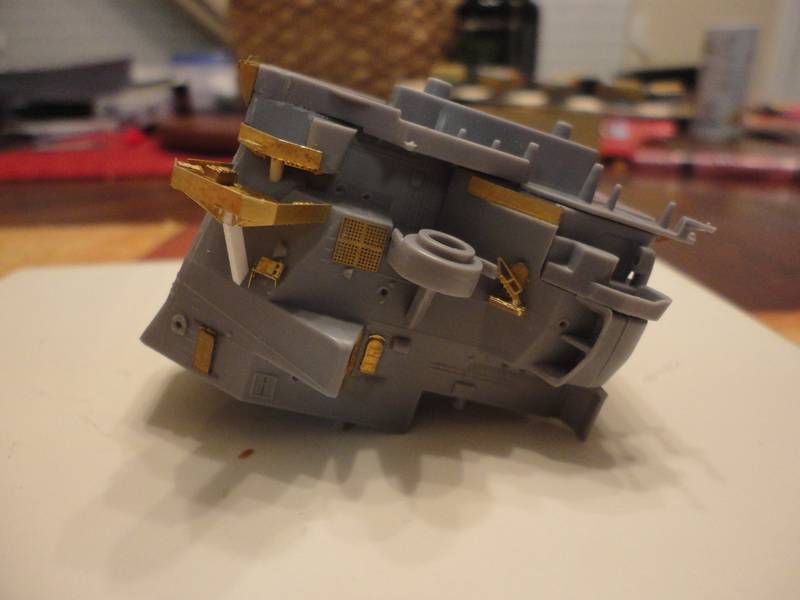
The etched surrounds added to Indy's elevators


On with the first hellcat this one will have folded wings as it will sit on an elevator, also the WEM etch for the airwing.


The etched cockpit for the Hellcat, consists of fold up rear bulkhead, floor and instrument panel with separate seat and microscopic control column.


Fitted and almost invisible.


The main airframe sans outer wing panels and drop tank ready for painting,


I am not convinced by the etch for the cockpits, might do one or two more of the aircraft going on deck opened up, but the rest will be closed.

Si
Rugbyhead
Visit this Community
New South Wales, Australia
Joined: November 23, 2013
KitMaker: 39 posts
Model Shipwrights: 36 posts
Posted: Monday, January 26, 2015 - 02:55 PM UTC
Cockpit inserts for 1/350 aircraft - the world is going mad!! Modellers seem to be leading the way!
RedDuster
Visit this Community
England - South East, United Kingdom
Joined: March 01, 2010
KitMaker: 7,078 posts
Model Shipwrights: 6,649 posts
Posted: Tuesday, January 27, 2015 - 04:37 AM UTC
Hi Andrew,

You are not wrong, I have found the effort verses return, certainly on the small WW2 cockpit is to high.

But if we weren't at least slightly batty would we be modellers?

Cheers

Si
TRM5150
Visit this Community
Massachusetts, United States
Joined: January 03, 2010
KitMaker: 2,159 posts
Model Shipwrights: 1,400 posts
Posted: Tuesday, January 27, 2015 - 05:05 AM UTC
LOL...etch for the office? Okay then!! Looking great Simon!!

Luciano, Kirk and Dave....equally stunning work fellas!!

Keep up the great work ALL!!
RussellE
#306
Visit this Community
Victoria, Australia
Joined: June 27, 2010
KitMaker: 3,959 posts
Model Shipwrights: 2,777 posts
Posted: Tuesday, January 27, 2015 - 01:58 PM UTC

Quoted Text

Hi Andrew,

You are not wrong, I have found the effort verses return, certainly on the small WW2 cockpit is to high.

But if we weren't at least slightly batty would we be modellers?

Cheers

Si


My gosh Si!

I knew we are all a bit batty,but that cockpit etch brings it to new heights

Russ
Rugbyhead
Visit this Community
New South Wales, Australia
Joined: November 23, 2013
KitMaker: 39 posts
Model Shipwrights: 36 posts
Posted: Tuesday, January 27, 2015 - 03:19 PM UTC

Quoted Text

Hi Andrew,

You are not wrong, I have found the effort verses return, certainly on the small WW2 cockpit is to high.

But if we weren't at least slightly batty would we be modellers?

Cheers

Si


Funnily enough Simon, with the Gambier Bay i'm working on(yes it's happening, even though I can't get photos to upload) I built one of the Avengers on the weekend and with a fine drill bit was able to hollow out the canopoy piece enough to put in a trimmed down 1/350 pre painted carrier deck crew figure. I thought "no that's bloody ridiculous" and then I saw your post!

cheers,

Andrew
BravoTwoZero
Visit this Community
California, United States
Joined: June 11, 2009
KitMaker: 461 posts
Model Shipwrights: 80 posts
Posted: Tuesday, January 27, 2015 - 11:41 PM UTC
Si, great job on your progress. Your updates are just what I need when I work on my CVL-22, Independence. I have the same photo-etch sets. You are trailblazing the way for me.

Here are some picture heavy updates on my Mogami. I have been putting in some time with building sub-assemblies and adding photo-etch. I'll be posting pictures according to their position in the structure. Here's what I have so far (please pardon the non-technical or misnamed descriptions):

1) Here is the base of the Pagoda structure.


2) The second floor


3) Structure body


4) Bridge


5) Roof


6) Gun director


7) Radar


Here's how it looks with everything stacked up:


Thanks for looking.

Joseph

dioman13
Visit this Community
Indiana, United States
Joined: August 19, 2007
KitMaker: 2,184 posts
Model Shipwrights: 204 posts
Posted: Tuesday, January 27, 2015 - 11:48 PM UTC
I've been watching the progress of this campaign as I model the Pacific but in 1/35th. I can't work on stuff so small anymore but you guts are all doing a fantastic jod. I had considered joining with the 1/72nd Gato but I still need to P/U extra stuff to bring it in to a better state and am collecting stuff for the big 109 kit and have the Pacific campaign coming up and my build time is slow from health reasons. I do look forward to seeing more as you fellow modelers continue.The P/E work I see here is amasing. Best of luck to all as I watch from the side lines here. bob d.
TRM5150
Visit this Community
Massachusetts, United States
Joined: January 03, 2010
KitMaker: 2,159 posts
Model Shipwrights: 1,400 posts
Posted: Wednesday, January 28, 2015 - 12:03 AM UTC
Fantastic work Joesph!!
kirkus2269
Visit this Community
Ontario, Canada
Joined: September 06, 2014
KitMaker: 42 posts
Model Shipwrights: 38 posts
Posted: Wednesday, January 28, 2015 - 03:06 AM UTC
joseph- wow- very nice clean, neat work- great reference for when i build my version of that awesome boat.
simon- yeah! i love doing ridiculous tasks that no one will ever see!

to everyone else- thanks very much for the comments. this is the first time i have shared my modelling publicly- so it was with a bit of trepidation that i posted my pics.
all the work being done on this campaign build is top notch- a lot of fun to participate in. i will endeavour to post more pics by the end of the weekend.

keep those updates coming!!
TimReynaga
Staff MemberAssociate Editor
MODEL SHIPWRIGHTS
Visit this Community
California, United States
Joined: May 03, 2006
KitMaker: 2,500 posts
Model Shipwrights: 1,830 posts
Posted: Wednesday, January 28, 2015 - 09:47 AM UTC
Joseph,

Your Mogami is coming along splendidly! The photo etch looks great - and thanks for the many pictures, they really tell the story!

rolltide31
#377
Visit this Community
Texas, United States
Joined: June 27, 2010
KitMaker: 1,481 posts
Model Shipwrights: 1,332 posts
Posted: Wednesday, January 28, 2015 - 05:09 PM UTC
@Si - cockpit details for 1/350 aircraft is incredible. Not sure my eyes could handle something so small but I do love the idea that the ability to add such detail exists. Great work. Look forward to seeing more as you continue

@Joe - Your Mogami looks great. Nice clean detail with the PE work. Only hope I can build the IJN Maya as well as you are

Great work everyone

Dave
BravoTwoZero
Visit this Community
California, United States
Joined: June 11, 2009
KitMaker: 461 posts
Model Shipwrights: 80 posts
Posted: Thursday, January 29, 2015 - 01:13 AM UTC
Thanks everyone for the comments. I'm am happy that I can join a group build. Thanks for having me here. I just wish I can build it at a much faster pace.


Quoted Text

Joseph,

Your Mogami is coming along splendidly! The photo etch looks great - and thanks for the many pictures, they really tell the story!


Hey Tim, Thanks very much. This means a lot to me because this is my second ship. My first one was the USS Olympia which I built because I followed your build log. I have yet to post pictures of it because I still need to add the last four boat davits on each side. But, yeah, you explained everything in your thread that I got inspired to build one.


Quoted Text

Fantastic work Joesph!!


Todd, your comment is also much appreciated, because I was also inspired with your Yukikaze build. You made it look to easy!
RedDuster
Visit this Community
England - South East, United Kingdom
Joined: March 01, 2010
KitMaker: 7,078 posts
Model Shipwrights: 6,649 posts
Posted: Thursday, January 29, 2015 - 01:53 AM UTC
Always a pleasure to be of assistance, Mogami is looking great Joseph.

Hi Andrew, it does go to show you can push the envelope to far with detail, but it is fun.

Hi Russ, well in my case more than a bit batty

Cheers all


Si
RedDuster
Visit this Community
England - South East, United Kingdom
Joined: March 01, 2010
KitMaker: 7,078 posts
Model Shipwrights: 6,649 posts
Posted: Monday, February 02, 2015 - 03:19 AM UTC
More work on the aircraft for the hanger and the elevator.

Another Hellcat and a couple of Avengers. The interiors painted.


All four ready for painting.


the underside painted white, a rough coat put on ltop as a base for the blues.


The intermediate blue on.


Sea blue over the top.


Some of the smaller parts painted on the sprue.


Decals next.

Si

TRM5150
Visit this Community
Massachusetts, United States
Joined: January 03, 2010
KitMaker: 2,159 posts
Model Shipwrights: 1,400 posts
Posted: Monday, February 02, 2015 - 03:27 AM UTC
Hats off to you Si with the mini airwing!! Looking good!!
RedDuster
Visit this Community
England - South East, United Kingdom
Joined: March 01, 2010
KitMaker: 7,078 posts
Model Shipwrights: 6,649 posts
Posted: Tuesday, February 03, 2015 - 02:53 AM UTC
Thanks Todd,

In this scale I would rather the whole aircraft wasn't moulded in clear, but the moulding is nice, and the options like open bomb bays for the Avengers I really like.

Si
rolltide31
#377
Visit this Community
Texas, United States
Joined: June 27, 2010
KitMaker: 1,481 posts
Model Shipwrights: 1,332 posts
Posted: Tuesday, February 03, 2015 - 05:50 AM UTC
Si - The Airwing is looking great. I like the option of having the bomb bay doors open, that's pretty cool. Definitely can see some detailing opportunities with that and brass torpedoes

OK so here is a little update about the IJN Maya. The rest of the update will be on the Maya build log.

Here is the Bridge before:


and after


Here is the Flight Deck dry fitted to the hull


Have not continued work on the USS Dace as of yet. Waiting on the parts from 2D Click to arrive. Once I have those I should be able to move forward at a pretty good pace.

Everyones build is looking great. Cant wait to see more progress.

Dave
rolltide31
#377
Visit this Community
Texas, United States
Joined: June 27, 2010
KitMaker: 1,481 posts
Model Shipwrights: 1,332 posts
Posted: Saturday, February 07, 2015 - 11:29 PM UTC
Hey all,

Well another good weekend for some progress, this time on the Dace. I have finished with the front bow by adding the torpedo tube outer doors.


Still not sure how I am going to tackle the torpedo tubes themselves. The thickness of the boat is problematic.

Anyway, I started transforming the bridge from the standard Gato to the Dace.

From this


to this


to finally this


Not perfect but I think once I apply some paint it will work out well.

A little more work and then it is on to the starboard side.

Well that's it for this week. I should get my parts from the 3d printer this week which will get the ball rolling faster.

Dave
Littorio
Visit this Community
England - South East, United Kingdom
Joined: September 15, 2004
KitMaker: 4,728 posts
Model Shipwrights: 1,080 posts
Posted: Monday, February 09, 2015 - 12:15 AM UTC
Nice progress guy's, very little progress has been made my side just a couple of floater nets baskets and the mast.

I'm blaming Simon for my lack of progress after seeing his little birds I dug out a pack of Trumpeters Hellcats just to see how they go together before I dive into either the Princeton or the big Tico latter this year.

Oh while things were drying I dug out the AFV Club 1942 Gato class which will be finished as the Flying Fish, also almost finished reading 'The Last Stand of the Tin Can Sailors' I now want to build the Johnston and Heermann once I get the Hoel done and of course the plucky little Roberts that fought like a battleship.

If any of you guy's in the campaign want some background into the ship your building read that book.
TRM5150
Visit this Community
Massachusetts, United States
Joined: January 03, 2010
KitMaker: 2,159 posts
Model Shipwrights: 1,400 posts
Posted: Monday, February 09, 2015 - 12:52 AM UTC
Nice job Dave...on both fronts!! That PE deck is off the hook!! Loving the detail work on the sub as well!! Keep this stuff coming!!
rolltide31
#377
Visit this Community
Texas, United States
Joined: June 27, 2010
KitMaker: 1,481 posts
Model Shipwrights: 1,332 posts
Posted: Monday, February 09, 2015 - 06:33 AM UTC
@Luciano. I know what you mean about the book. Very inspiring

@Todd. Thanks for the kind words. If your interested there is more of the IJN Maya build posted to my build log

Dave
TRM5150
Visit this Community
Massachusetts, United States
Joined: January 03, 2010
KitMaker: 2,159 posts
Model Shipwrights: 1,400 posts
Posted: Monday, February 09, 2015 - 06:53 AM UTC
Thanks Dave!! I will head out now and have a peek for it!!
BravoTwoZero
Visit this Community
California, United States
Joined: June 11, 2009
KitMaker: 461 posts
Model Shipwrights: 80 posts
Posted: Tuesday, February 10, 2015 - 05:03 AM UTC
Okay folks, be forewarned, this is going to be another picture heavy post. Thanks for your patience. Hit Ctrl-End if you want to skip to the bottom of the thread.

Just an update on my Mogami. I have started completing the hull so I can proceed with applying a primer on it. Aside from the railings under the deck, you can see the screw guards and one of the eight small davits I have affixed.

So tiny!


Further in the middle, I have also glued 12 additional davit brackets. This was not straight on gluing, I had to fill in gaps where the tabs from molded davits were supposed to plug in.


Four of these gun shields were completed. Barely visible are access ladders on the left side of the shield.


I have completed assembly of the smoke stacks. Here's how it looks dry fitted with the AA platform.


I actually had to hold my breath as I glue the screens on top of the funnels.


The forward mast was also completed.


Here's the view of the aft bridge, awaiting installment of rear mast.


And finally, shots of the ship with dry fitted sub-assemblies


rolltide31
#377
Visit this Community
Texas, United States
Joined: June 27, 2010
KitMaker: 1,481 posts
Model Shipwrights: 1,332 posts
Posted: Tuesday, February 10, 2015 - 05:40 AM UTC
Joe

Your Mogami is looking great. Such a clean build. You definitely have some skill working with PE. Can't wait to see more

Dave