
You are viewing the archived version of the site.
Go to modelshipwrights.com for the current dynamic site!
Go to modelshipwrights.com for the current dynamic site!
General Ship Modeling
Discuss modeling techniques, experiences, and ship modeling in general.
Discuss modeling techniques, experiences, and ship modeling in general.
Hosted by Jim Starkweather
Build blog for Heller's HMS Victory
timmyp

Joined: May 18, 2008
KitMaker: 496 posts
Model Shipwrights: 404 posts

Posted: Friday, June 07, 2019 - 09:23 AM UTC
Thanks! An extra set of eyes is always handy! 

timmyp

Joined: May 18, 2008
KitMaker: 496 posts
Model Shipwrights: 404 posts

Posted: Sunday, June 09, 2019 - 07:33 AM UTC
Hello, and welcome to Crazytown!
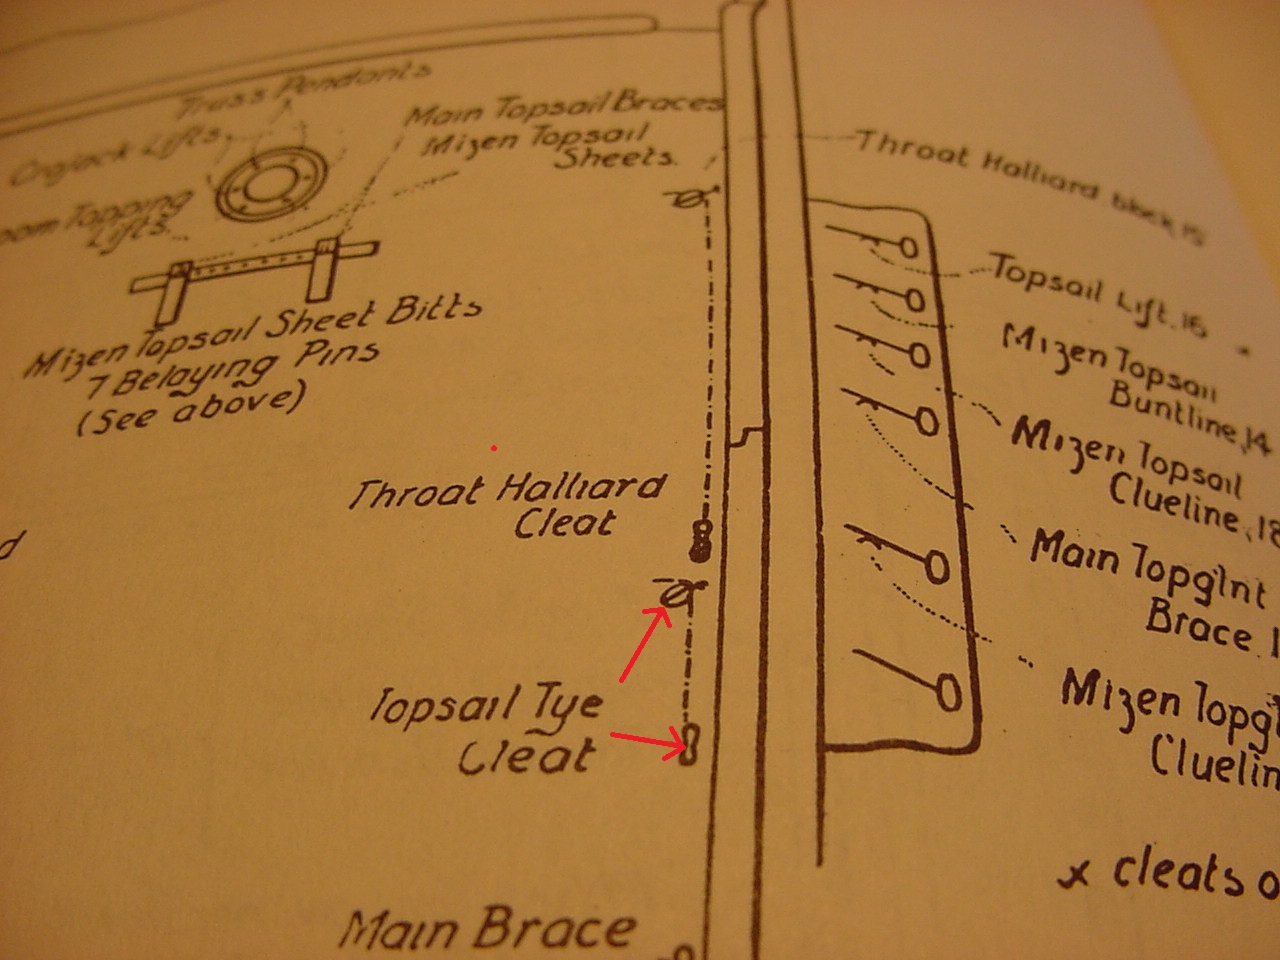
Boy, you could go crazy trying to reconcile the differences in belay points (as well as starting points) between Heller's instructions and Longridge's book. In particular, I'm talking about the "mizzen top yard tye", which is listed as line V36 in Heller's instructions. Longridge states that the tye "clinches around topmast head above the rigging, down the mast to a 13" single block on the yard, up through the sheave hole in the hounds of the mast. The lower end is seized around a 13" double block connected by its fall to a 13" single block with a long strop which hooks to an eyebolt on the starboard channel. The fall belays to a cleat on the starboard size of the deck, on the fore side of the main brace cleat" (not the exact quote, but close).
So, going a bit backwards, this is a pic of where Longridge says V36 should belay to:

 " BORDER="0">
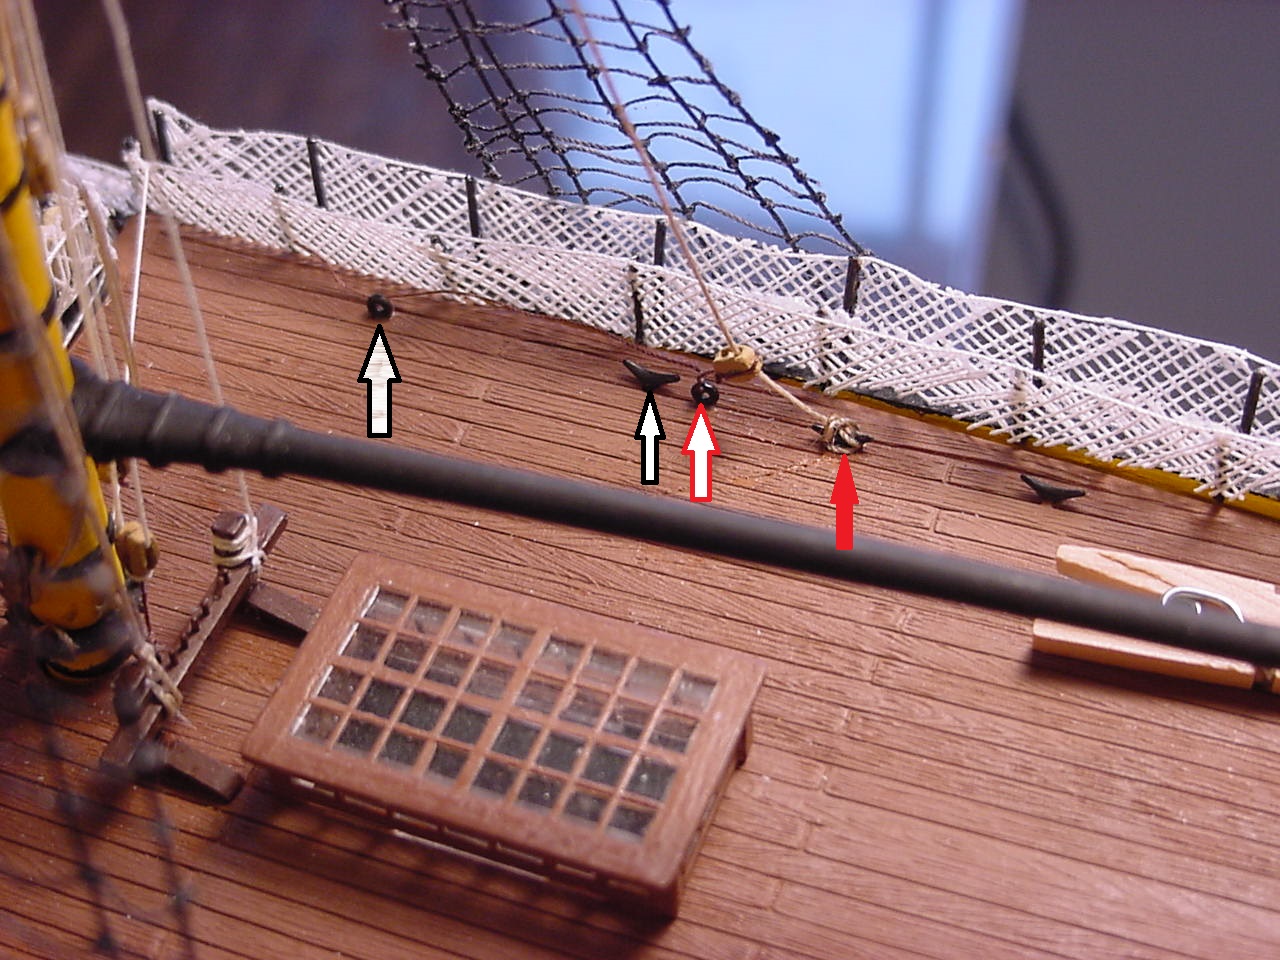
And this is a pic of the model, corresponding to the previous pic. I can't use the eyebolt & cleat that Longridge calls for, as it's been used for the rigging on the mizzen horn, and the unused eyebolt & cleat, Heller indicates that that is the location for a single pully, in which a staysail's (sail B7)sheet line gets roved through, and then belayed to the cleat.

 " BORDER="0">
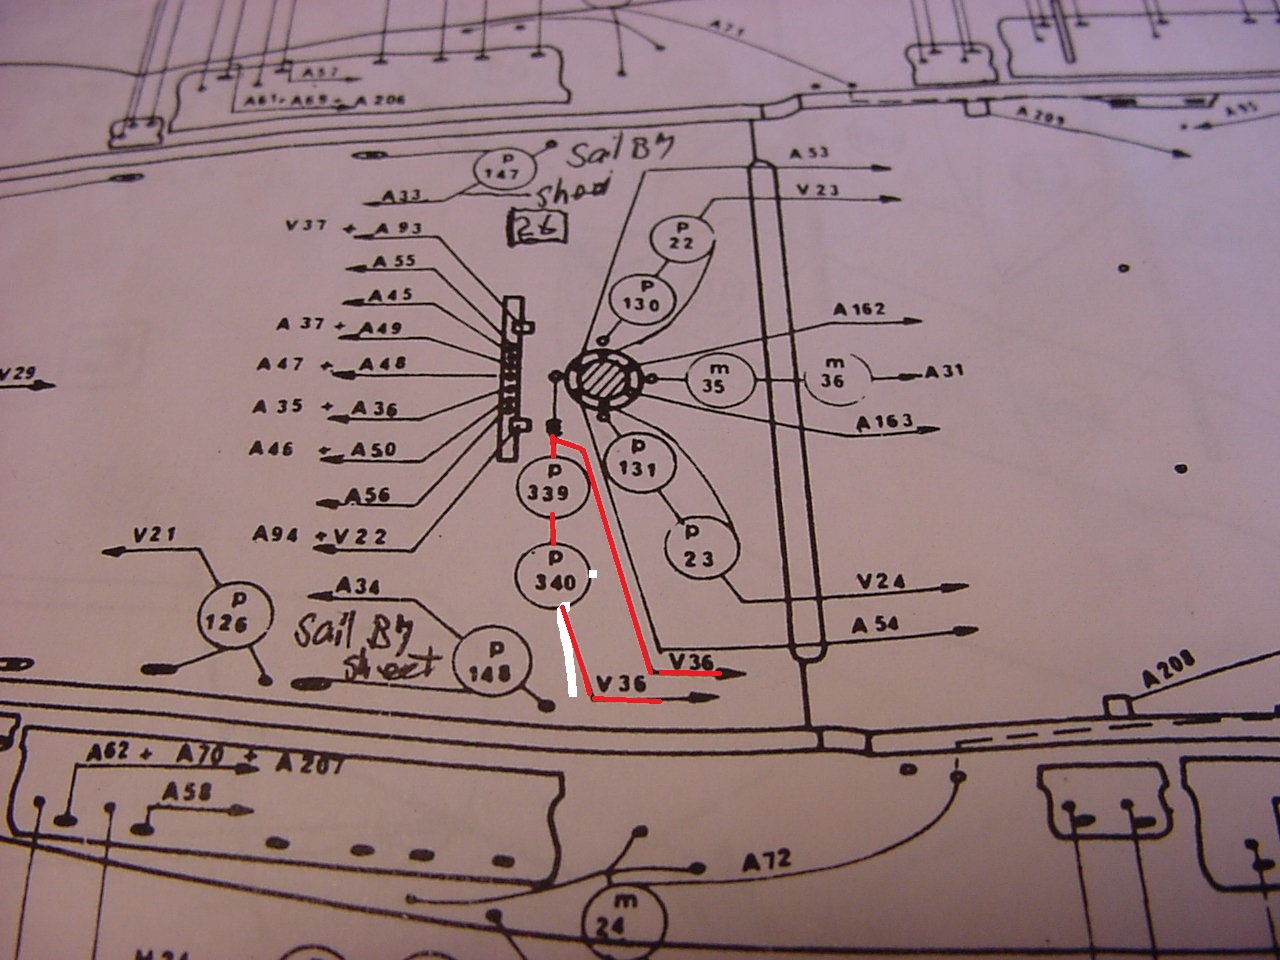
This picture is a close-up of Heller's instructions, which show line V36 starts and stops around the mizzenmast:

 " BORDER="0">
And this pic is Heller's instruction on how the V36 gets rove through some pullies at the topyard:
[img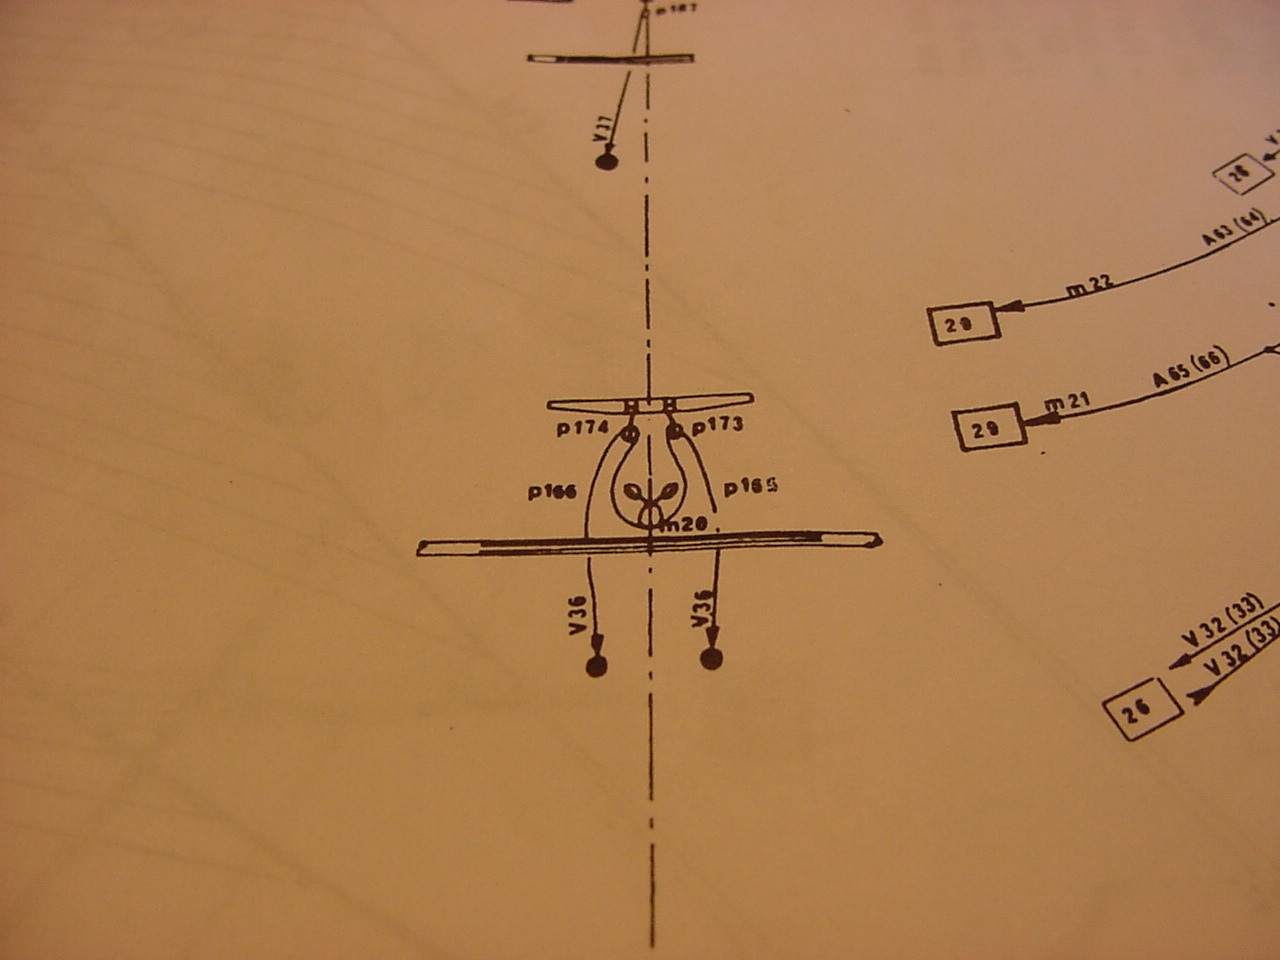 [/img]
So finally, here's the way I constructed the thing. The first picture is down at the poop deck, with the beginning of V36 tied to the strop of p339, which is attached to an eyebolt in the deck:

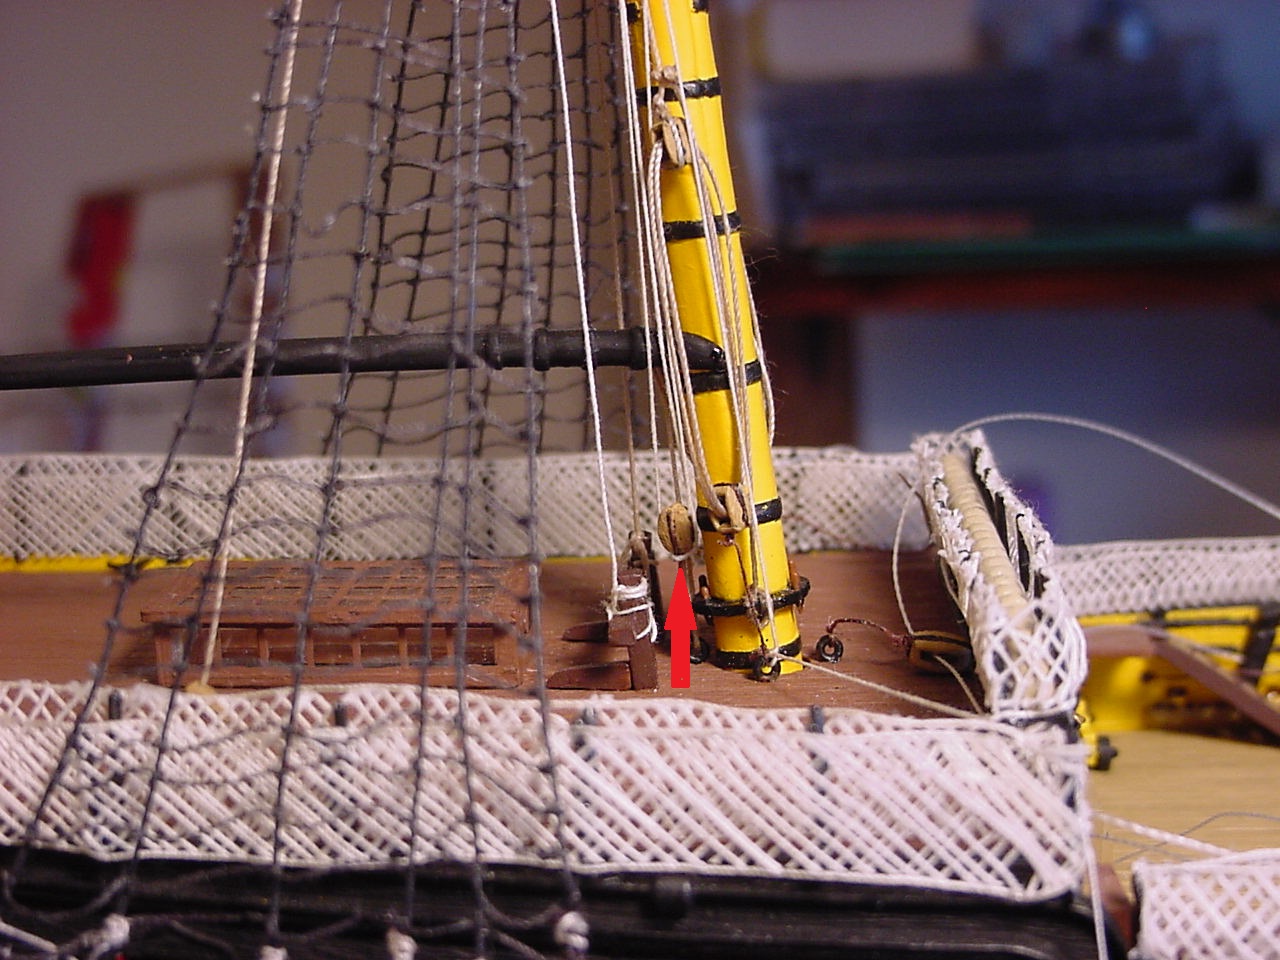 " BORDER="0">
And then it goes up into the mast, and roves through 3 blocks - hard to tell in this picure, though.

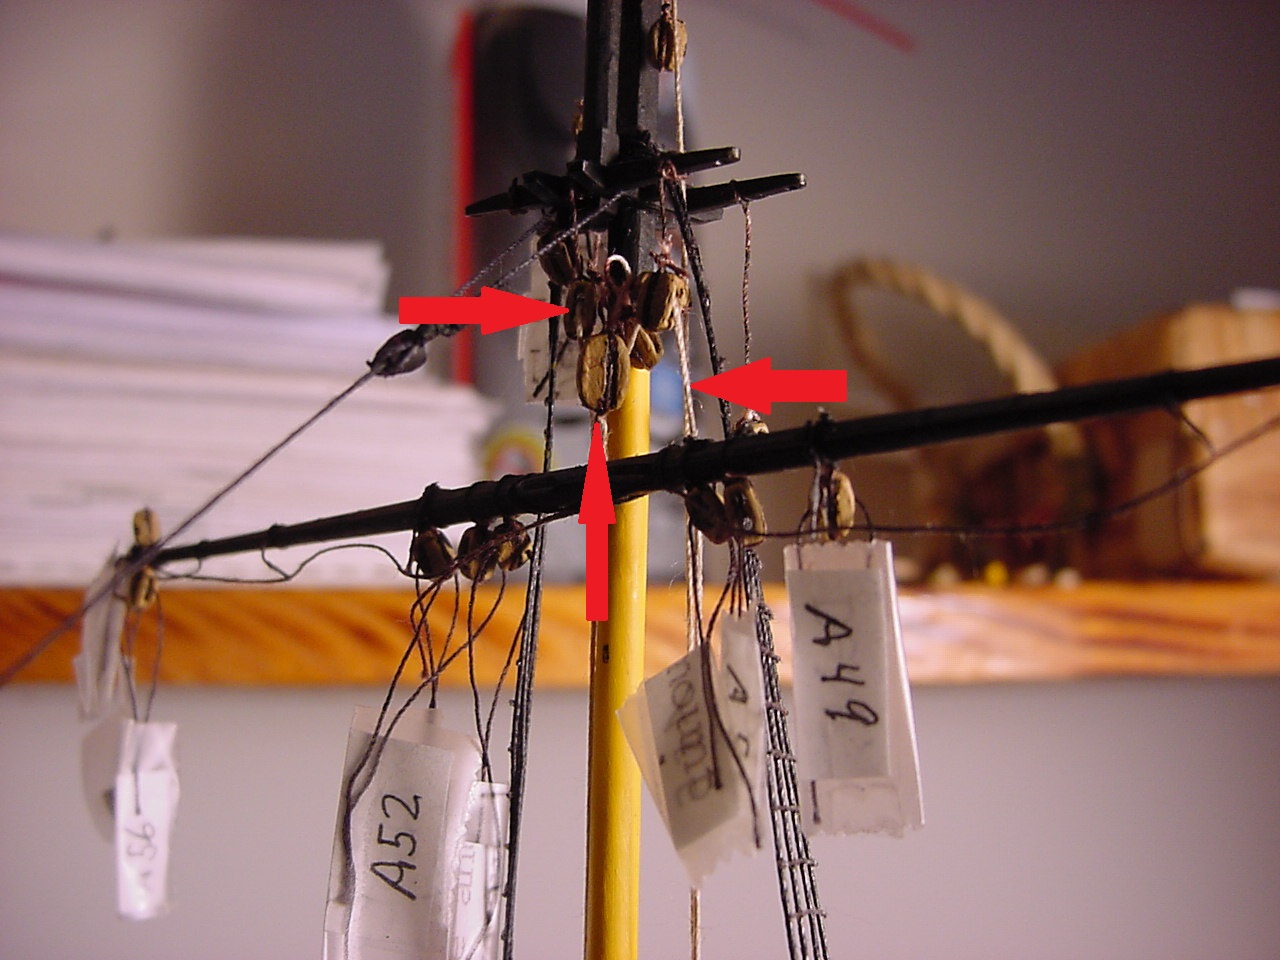 " BORDER="0">
And here is V36, after I tied it to block P340:

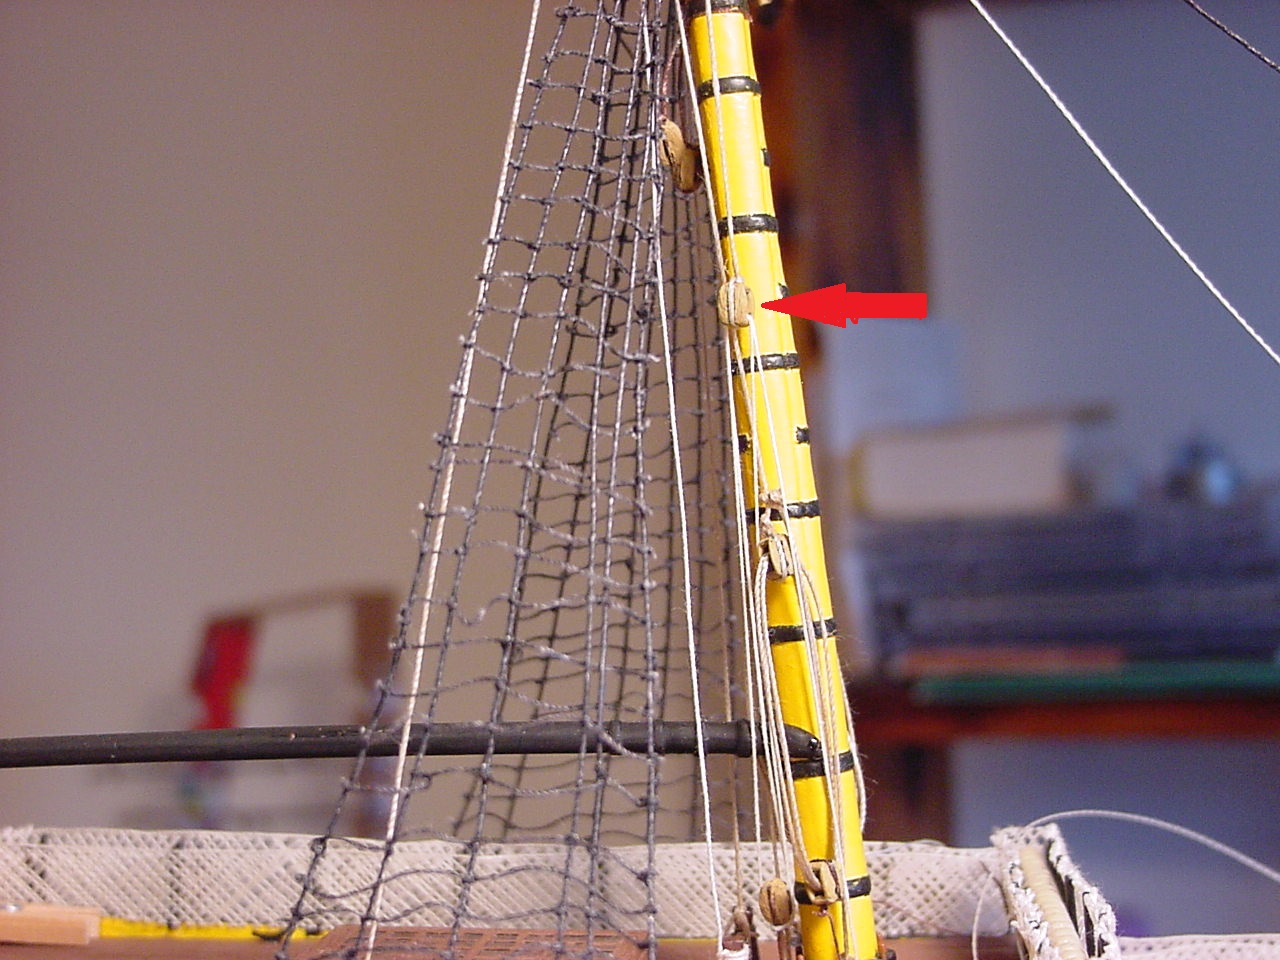 " BORDER="0">
And finally, V36 is tied off. I was going to use one of the pins on the fife collard going around the mizzenmast, but I see Heller has it reserved for another line altogether, so I decided to make life easy for myself and just tie it off to a deck eyebolt:

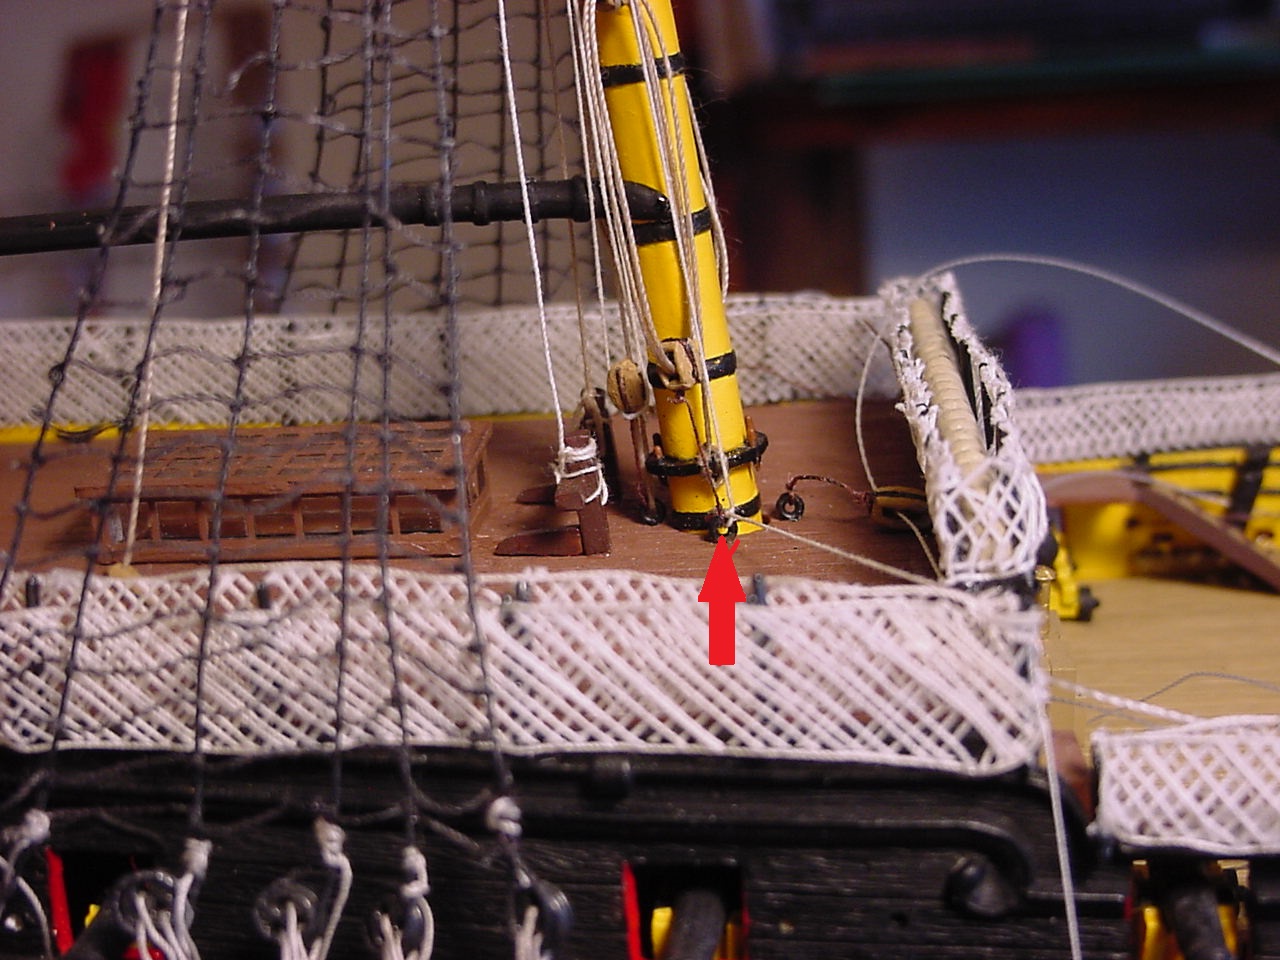 " BORDER="0">
Now, if you're curious as to how long all this took, I'd say about 80 or 90 minutes - about 60 minutes researching it, 10 minutes making a decision, and the rest was actually installing the line. I broke the installation of the line into 2 parts: last night, I tied it off around the p339 block and let the glue dry overnight, then today, finished putting the thread between the upper (P340) block and the lower block (p339)and getting it tied off. Oh yeah, that time doesn't include time spent preparing the P340 block for attachment.
So for now, I can easily install another line of the mizzen topgallant yard, then start with the topping lifts on the mizzen top yard.
I've also been thinking about "coloring" my sails. I was thinking of taking a set amount of water (like 2 or 4 ounces), adding "x" number of coffee granules (I use instant coffee), then seeing what kind of color that turns out to be. The only downside to that, is that I don't have any spare sail material to spray the coffee-colored liquid onto, so if I go this route, then once I start spraying, I'm gonna be pretty be committed. I suppose I could start with an extremely light colored fluid, and the work my up to a color I like. We'll see.
As always, thanks for tuning in!!
Boy, you could go crazy trying to reconcile the differences in belay points (as well as starting points) between Heller's instructions and Longridge's book. In particular, I'm talking about the "mizzen top yard tye", which is listed as line V36 in Heller's instructions. Longridge states that the tye "clinches around topmast head above the rigging, down the mast to a 13" single block on the yard, up through the sheave hole in the hounds of the mast. The lower end is seized around a 13" double block connected by its fall to a 13" single block with a long strop which hooks to an eyebolt on the starboard channel. The fall belays to a cleat on the starboard size of the deck, on the fore side of the main brace cleat" (not the exact quote, but close).
So, going a bit backwards, this is a pic of where Longridge says V36 should belay to:
 " BORDER="0">
 And this is a pic of the model, corresponding to the previous pic. I can't use the eyebolt & cleat that Longridge calls for, as it's been used for the rigging on the mizzen horn, and the unused eyebolt & cleat, Heller indicates that that is the location for a single pully, in which a staysail's (sail B7)sheet line gets roved through, and then belayed to the cleat.
 " BORDER="0">
 This picture is a close-up of Heller's instructions, which show line V36 starts and stops around the mizzenmast:
 " BORDER="0">
 And this pic is Heller's instruction on how the V36 gets rove through some pullies at the topyard:
[img
 [/img]
So finally, here's the way I constructed the thing. The first picture is down at the poop deck, with the beginning of V36 tied to the strop of p339, which is attached to an eyebolt in the deck:
 " BORDER="0">
 And then it goes up into the mast, and roves through 3 blocks - hard to tell in this picure, though.
 " BORDER="0">
 And here is V36, after I tied it to block P340:
 " BORDER="0">
 And finally, V36 is tied off. I was going to use one of the pins on the fife collard going around the mizzenmast, but I see Heller has it reserved for another line altogether, so I decided to make life easy for myself and just tie it off to a deck eyebolt:
 " BORDER="0">
 Now, if you're curious as to how long all this took, I'd say about 80 or 90 minutes - about 60 minutes researching it, 10 minutes making a decision, and the rest was actually installing the line. I broke the installation of the line into 2 parts: last night, I tied it off around the p339 block and let the glue dry overnight, then today, finished putting the thread between the upper (P340) block and the lower block (p339)and getting it tied off. Oh yeah, that time doesn't include time spent preparing the P340 block for attachment.
So for now, I can easily install another line of the mizzen topgallant yard, then start with the topping lifts on the mizzen top yard.
I've also been thinking about "coloring" my sails. I was thinking of taking a set amount of water (like 2 or 4 ounces), adding "x" number of coffee granules (I use instant coffee), then seeing what kind of color that turns out to be. The only downside to that, is that I don't have any spare sail material to spray the coffee-colored liquid onto, so if I go this route, then once I start spraying, I'm gonna be pretty be committed. I suppose I could start with an extremely light colored fluid, and the work my up to a color I like. We'll see.
As always, thanks for tuning in!!

Posted: Sunday, June 09, 2019 - 11:34 AM UTC
I thought you have to be a member of crazy town before you could start a build like that....LOL.
Mark
Mark

timmyp

Joined: May 18, 2008
KitMaker: 496 posts
Model Shipwrights: 404 posts

Posted: Monday, June 10, 2019 - 12:33 AM UTC
Quoted Text
I thought you have to be a member of crazy town before you could start a build like that....LOL.
Mark
Mark,
No, not really - everyone is so nice here! Plus, they let you come and go as you please!!


timmyp

Joined: May 18, 2008
KitMaker: 496 posts
Model Shipwrights: 404 posts

Posted: Thursday, July 25, 2019 - 07:23 PM UTC
Well, I got the lifts installed on the mizzen yard, and I felt it would be a good thing to try and install the mizzen sail before I got too far along with some of the other rigging. However, when I started to test-fit the sail between the mast & the gaff and spanker, it seems the sail is a little more than an inch (28 mm, to be sorta precise) too long. So I wrote back to HiSmodel.com, and I just got a reply today, in which Radimir (I think that's his name!) says he will make a new sail for me...if I understand his e-mail. I have to write him back, asking he hold off on that undertaking, so that I can take a few pictures and let him know the situation that I'm facing, so whatever actions are taken, we won't have to repeat them.
In other news, I did mix some water and a couple of instant coffee crystals together. I think it was 2 ounces of water, mixed with maybe 3 or 4 individual coffee crystals. I first mixed just 2 crystals with the water, and it didn't really change color; but when I added the next 2 crystals, it turned the water a light brown color - even though it was on the light side of brown, it reminded me of tobacco spit for some reason. I still have to experiment using tea and some tobacco.
Along those same lines, I was looking at pictures of paintings of sailing ships from the 18th & 19th century...to get an idea of how sails might have looked back then. I concluded that in the paintings, the color of the sails seemed to be a result of how the light from the sun was striking them, and a result of how the artist interpreted things. So in other words, not much help!
So as always, thanks to everyone for taking a look at this blog. I hope, too, that everyone is enjoying their summer, and are staying safe & sound.
Tim
Posted: Friday, July 26, 2019 - 12:21 AM UTC
Timothy,
Sounds like you are making forward progress on your build. Do you have any photos to share?
Mark
Sounds like you are making forward progress on your build. Do you have any photos to share?
Mark

Posted: Saturday, July 27, 2019 - 07:54 AM UTC
Tim,
I missed out on some of your updates, but I'm still with you!
I keep seeing amazed ans stunned by your rigging and in general rope work, I could never do that (but think I mentioned that more than once).
Keep up your spirit, she's looking great!!
Cheers,
Jan
I missed out on some of your updates, but I'm still with you!
I keep seeing amazed ans stunned by your rigging and in general rope work, I could never do that (but think I mentioned that more than once).
Keep up your spirit, she's looking great!!
Cheers,
Jan
timmyp

Joined: May 18, 2008
KitMaker: 496 posts
Model Shipwrights: 404 posts

Posted: Saturday, July 27, 2019 - 01:29 PM UTC
Thanks, Jan. I've been slacking off on doing anything with her lately, but I'm getting back into the spirit.
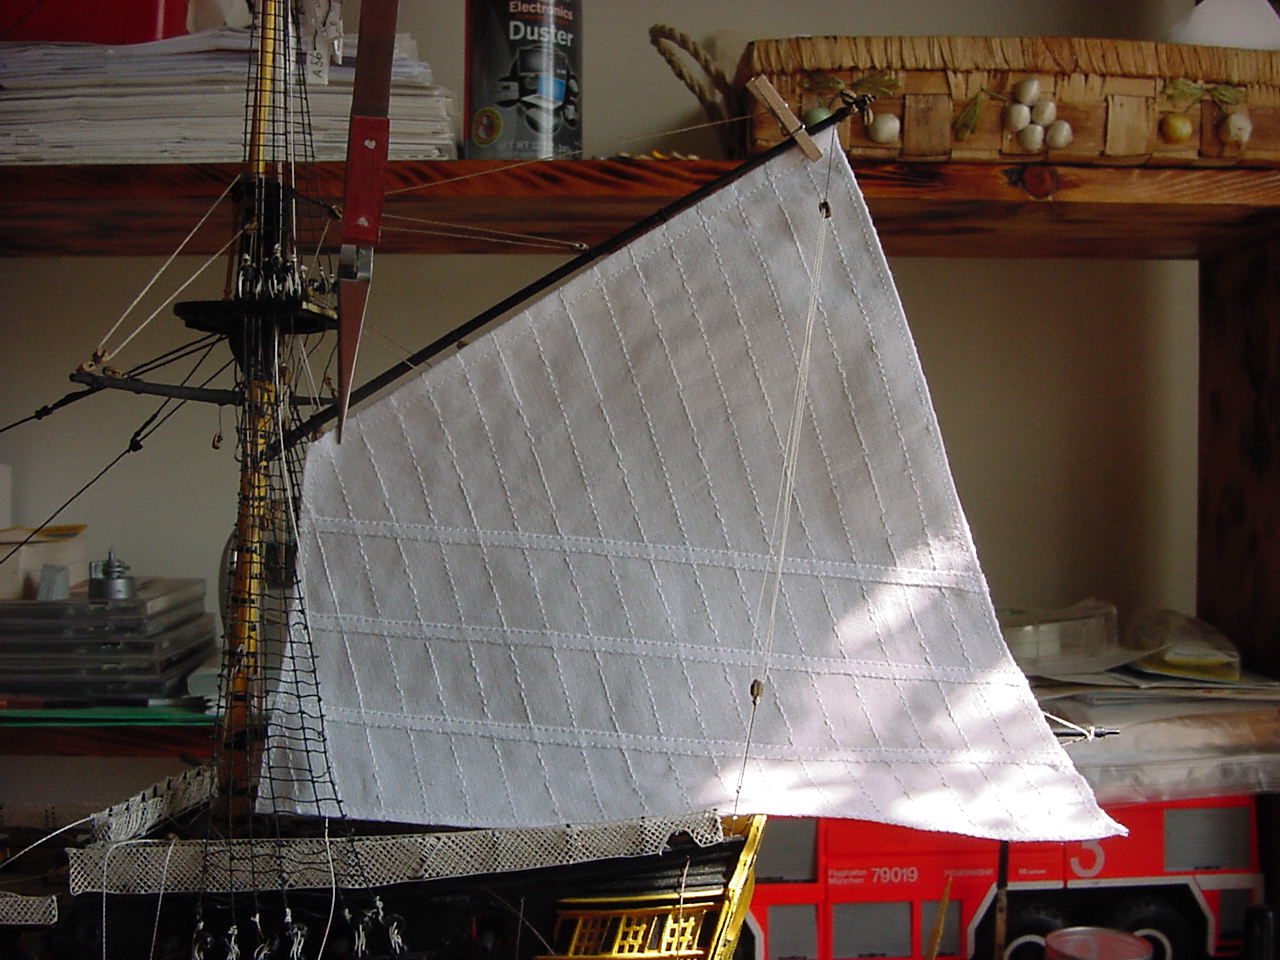
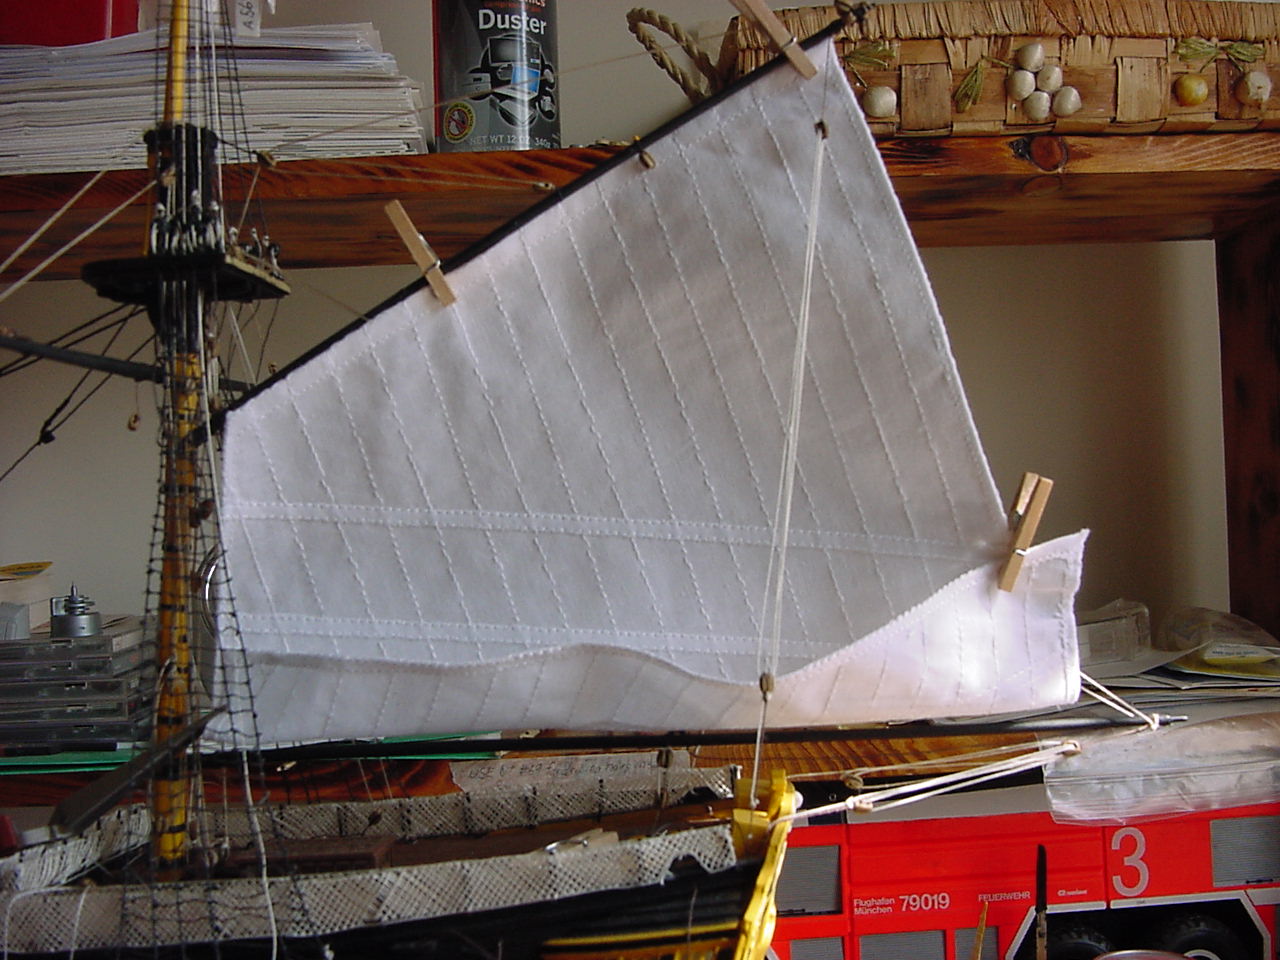
Mark, not really much progress to photograph - it's been a matter of just tying a knot here, pushing the thread through a block, and then tying another knot over there. But here's a couple of pix showing the problem I have with the mizzen sail - the first shows how long the sail is, and the second photo shows how much I folded it up to the right size. I have to send these photos to HiSmodel.com to get a replacement made.

 " BORDER="0">

 " BORDER="0">
In both photos, especially the first one, on the upper left of the photo, you can see the lift line (or some times called topping lift), which starts at the mast cap, runs out to a block on the end of the yardarm, then runs back to a block just below the mast cap. The important thing here, is to be sure to run the line into the block from the top of the block, not the underside. Otherwise, the line would be crossing over itself, and wouldn't look right, nor would it be correct.
The guy at HiSmodel.com sent me a nice excel spreadsheet, with images of where the sails go, and they're keyed to a table with the dimensions of the scale sails, so I'll know which sail goes where. From the measurements I took today, the width of the sails seems ok, but I might have some trouble with the length of one of the topsails - have to wait and see, until I get to that point in construction. Even if that sail is a bit long, I can maybe use the clew lines to actually pull up the corners of that sail, and have things fit. But that's a future concern.
Thanks!!
Tim
Mark, not really much progress to photograph - it's been a matter of just tying a knot here, pushing the thread through a block, and then tying another knot over there. But here's a couple of pix showing the problem I have with the mizzen sail - the first shows how long the sail is, and the second photo shows how much I folded it up to the right size. I have to send these photos to HiSmodel.com to get a replacement made.
 " BORDER="0">
  " BORDER="0">
 In both photos, especially the first one, on the upper left of the photo, you can see the lift line (or some times called topping lift), which starts at the mast cap, runs out to a block on the end of the yardarm, then runs back to a block just below the mast cap. The important thing here, is to be sure to run the line into the block from the top of the block, not the underside. Otherwise, the line would be crossing over itself, and wouldn't look right, nor would it be correct.
The guy at HiSmodel.com sent me a nice excel spreadsheet, with images of where the sails go, and they're keyed to a table with the dimensions of the scale sails, so I'll know which sail goes where. From the measurements I took today, the width of the sails seems ok, but I might have some trouble with the length of one of the topsails - have to wait and see, until I get to that point in construction. Even if that sail is a bit long, I can maybe use the clew lines to actually pull up the corners of that sail, and have things fit. But that's a future concern.
Thanks!!
Tim
Posted: Saturday, July 27, 2019 - 09:56 PM UTC
Tim,
I am not a expert in sailing ships but the Gaff looks like its to low and should be raised higher.
Mark
I am not a expert in sailing ships but the Gaff looks like its to low and should be raised higher.
Mark

timmyp

Joined: May 18, 2008
KitMaker: 496 posts
Model Shipwrights: 404 posts

Posted: Sunday, July 28, 2019 - 04:35 AM UTC
Quoted Text
Tim,
I am not a expert in sailing ships but the Gaff looks like its to low and should be raised higher.
Mark
Well Mark, that might be, but in looking at Heller's instructions & Longridge's book, it seems to be in the right place. So far as Heller's instructions go, there isn't anything specific that says "glue this part, here". I just had to use the various drawings that shows the gaff already in place, and make an educated guess. And after looking at Longridge's book, I could only conclude that the gaff (or horn, as it's generally called on Victory), either goes here or goes there.
So what's done, is done!!

Posted: Sunday, July 28, 2019 - 07:23 AM UTC
That's pretty sad with that sail. I hope you'll get a right one soon. Anyway - I would assume that to is very difficult to produce a perfectly fitting sail only from photographs, without getting your hand on the model... I wish you luck!!
Cheers,
Jan
Cheers,
Jan
Posted: Sunday, July 28, 2019 - 11:42 PM UTC
Timothy,
Looking at photos of the HMS Victory the horn is attached higher on the mast. It seems to me that they would want as large of sail as possible to assist with steering. That sail may look out of place due to it's smaller size, just saying.
Mark
Looking at photos of the HMS Victory the horn is attached higher on the mast. It seems to me that they would want as large of sail as possible to assist with steering. That sail may look out of place due to it's smaller size, just saying.
Mark

timmyp

Joined: May 18, 2008
KitMaker: 496 posts
Model Shipwrights: 404 posts

Posted: Monday, July 29, 2019 - 08:38 PM UTC
Quoted Text
That's pretty sad with that sail. I hope you'll get a right one soon. Anyway - I would assume that to is very difficult to produce a perfectly fitting sail only from photographs, without getting your hand on the model... I wish you luck!!
Cheers,
Jan
The good news, Jan, is that HiSmodel.com is willing to work with me...they've already sent a paper sail to me, asking me to check the fit, before they go ahead and sew a new sail. All the other sails seem like they're going to fit ok, so I'm not overly worried about them.
The reason why this problem with the size of the sail has come up, is because I was thinking of installing the sail, before I install the yardarm braces. This way, I wouldn't be fighting for space when trying to attach the mizzen sail to the gaff & spanker, and there would also be less chance of snagging my fingers on the braces, and perhaps consequently, yanking off one of the yardarms. Overall, I'm just trying to save myself some frustration.
Tim
timmyp

Joined: May 18, 2008
KitMaker: 496 posts
Model Shipwrights: 404 posts

Posted: Monday, July 29, 2019 - 08:44 PM UTC
Quoted Text
Timothy,
Looking at photos of the HMS Victory the horn is attached higher on the mast. It seems to me that they would want as large of sail as possible to assist with steering. That sail may look out of place due to it's smaller size, just saying.
Mark
Hi Mark,
Yeah, you're probably right about the horn placement. Chances are good I took a bit of artistic license in placing it where I did. But from Heller's instructions, it looks to be in the right place. With regard to the sail, though, even if I did place the horn higher up, it wouldn't be high enough to still get the sail to fit properly (the sail is about 28 mm too long, or 1.1 inches). So for now, this is the way it is.

Tim
timmyp

Joined: May 18, 2008
KitMaker: 496 posts
Model Shipwrights: 404 posts

Posted: Sunday, August 11, 2019 - 08:35 PM UTC
After some back-and-forth with HiSmodel.com, we finally got the dimensions correct for the mizzen sail. HiSmodel says he should be able to ship the new sail some time this week. So depending on when the sail arrives, I might be able to put some time in on the workbench this weekend, if not before. I'm going to ask HisModel, also, about his suggestion of using a "coffee leachate" to color the sails, and technique for coloring the sails (i.e., dunking the whole sail in the solution, or using a spray bottle to spray it on, and if I do dunk them, should I wring them out, or just lay them flat on a paper towel or something to absorb the excess). More to come!! 

timmyp

Joined: May 18, 2008
KitMaker: 496 posts
Model Shipwrights: 404 posts

Posted: Thursday, August 22, 2019 - 06:47 AM UTC
Good news! I finally heard back from the sailmaker, and I should have the new sail within the next 10 days.
Posted: Thursday, August 22, 2019 - 07:39 PM UTC
That's good new indeed, Tim - I really hope it fits and am looking forward to see some pictures!
Cheers,
Jan
Cheers,
Jan
Posted: Thursday, August 22, 2019 - 11:37 PM UTC
Quoted Text
That's good new indeed, Tim - I really hope it fits and am looking forward to see some pictures!
Cheers,
Jan
Ditto!
Mark

timmyp

Joined: May 18, 2008
KitMaker: 496 posts
Model Shipwrights: 404 posts

Posted: Monday, August 26, 2019 - 07:10 AM UTC
Quoted Text
Quoted TextThat's good new indeed, Tim - I really hope it fits and am looking forward to see some pictures!
Cheers,
Jan
Ditto!
Mark
Thanks, guys!! I can't wait to get this sail either...but then once I get it, I have to install the reef lines, figure out how to dye it a little bit, then get it installed. So stay tuned!!
timmyp

Joined: May 18, 2008
KitMaker: 496 posts
Model Shipwrights: 404 posts

Posted: Tuesday, September 10, 2019 - 06:10 AM UTC
I finally got the mizzen sail a week ago this past Saturday...had to go to the post office to retrieve it, which is odd, because there was no signed receipt needed.
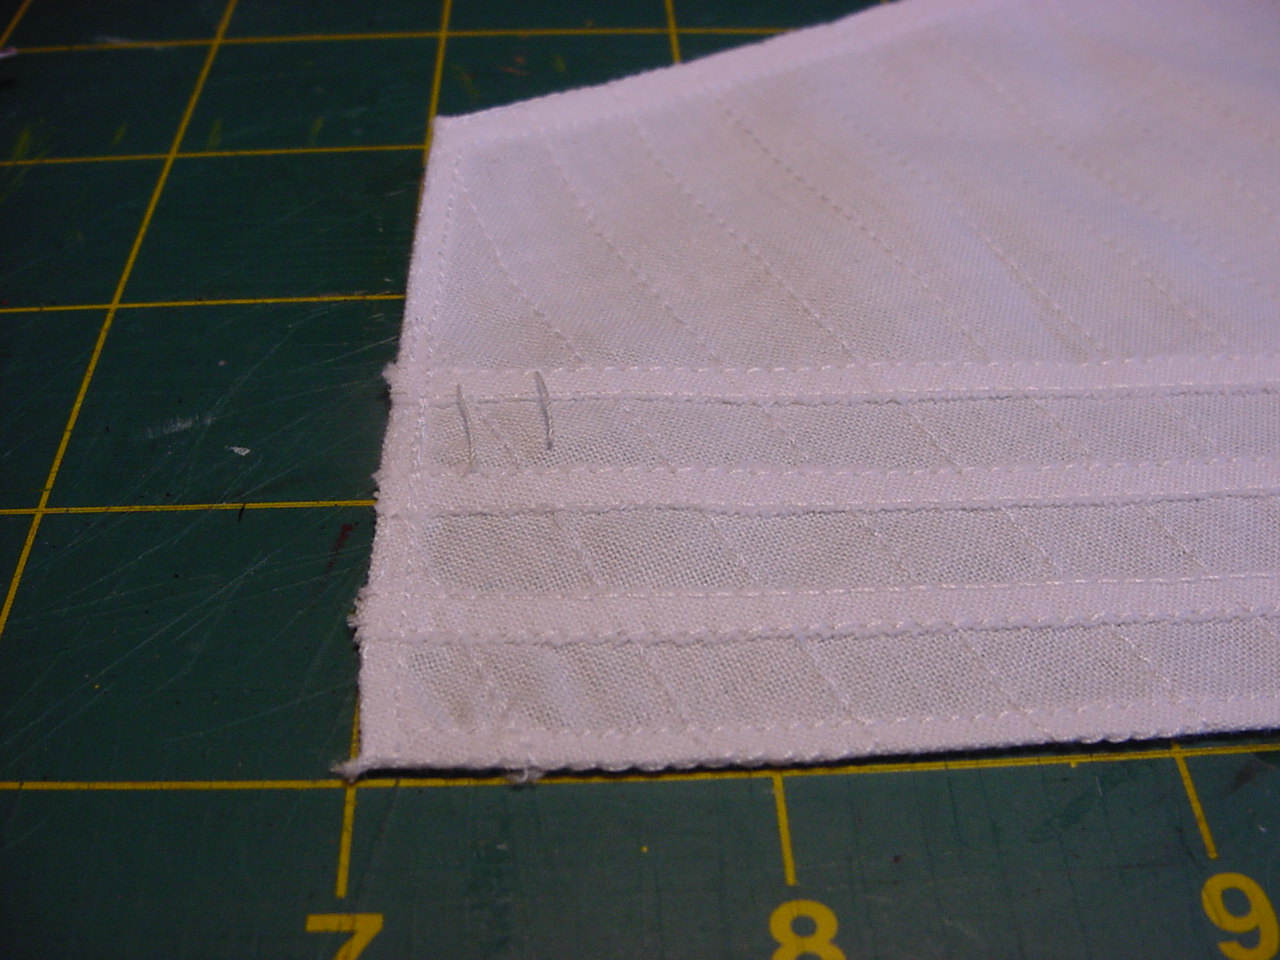
Anyway, the sail was folded in half, so I had to iron out that crease (I finally dampened it with some water, then the crease ironed out quite easily). I've started to put some reef lines into the sail (ok, just 2). Heller's instructions indicate that the reef lines should be 30 mm on each side, but with the sail's sizes having bee adjusted, 30 mm would be just too long, so I've made the reef lines to be 10 mm each side.
The downside to the reef lines is that, I have no reference as to how many are used, and their placement. So for the 2 lines I've installed, one is matched to the stitch lines in the sail, and the other is located between the seam lines. I will try to get a picture or two posted soon, but my clothes washer has gone bonkers, and I need to tear it apart and do some troubleshooting on it. Maybe, if things go well this evening, I'll be able to get some pics posted.
Thanks for checking things out!
Tim
timmyp

Joined: May 18, 2008
KitMaker: 496 posts
Model Shipwrights: 404 posts

Posted: Tuesday, September 10, 2019 - 10:40 AM UTC
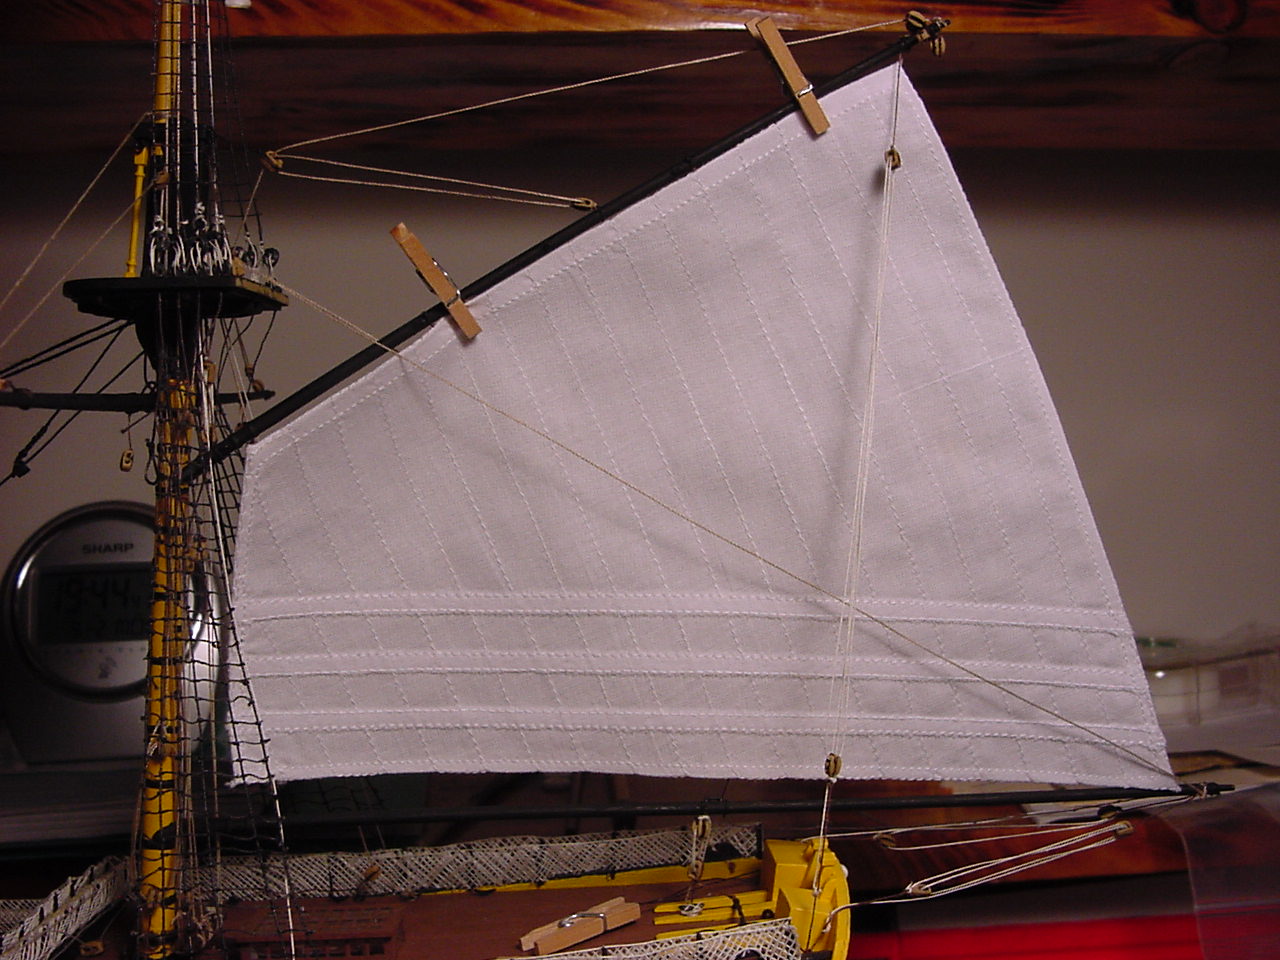
So here's the mizzen sail temporarily emplaced:

 " BORDER="0">
And if you look carefully in the next picture, you can see the 2 reef lines I've installed:

 " BORDER="0">
Plus, I got my washing machine fixed - no parts needed, just had to slip a suspension rod back into place.
So, hopefully, I can get back to working on Victory in the next coming weeks; waiting on the sail to arrive has put a lot of stuff on hold.
Cheerios!
Tim
 " BORDER="0">
And if you look carefully in the next picture, you can see the 2 reef lines I've installed:
 " BORDER="0">
 Plus, I got my washing machine fixed - no parts needed, just had to slip a suspension rod back into place.
So, hopefully, I can get back to working on Victory in the next coming weeks; waiting on the sail to arrive has put a lot of stuff on hold.
Cheerios!
Tim
Posted: Tuesday, September 10, 2019 - 12:50 PM UTC
Sweet, very nice looking sail.
Mark
Mark

timmyp

Joined: May 18, 2008
KitMaker: 496 posts
Model Shipwrights: 404 posts

Posted: Friday, September 13, 2019 - 05:37 AM UTC
Thanks Mark!
I managed to get another row of reef lines installed the other night. I noticed that on some of those lines, the ends are starting to unravel. I don't yet want to put glue on the ends to prevent their unraveling, as I'm afraid the glue will prevent any colorant I apply to the sail will not be absorbed on the ends of the reef lines. I'll put my thinking cap on and give it some thought.
Another question that came to mind, was just exactly how many reef lines should I put on any of the sails, without the sail becoming overwhelmed with reef lines. I did a search of paintings of 18th century ships, and on a lot of them, the sails would show that there are a lot (maybe "immense" is a better word)of reef lines. And of course, I can't find any ready reference that would give me an idea of how many reef lines would go on any one of the sails.
Something will get figured out!!
Tim
Posted: Friday, September 13, 2019 - 07:07 AM UTC
Well reef lines are critical more so on mizzen sails during stormy weather. I am sure the crew would like to have a few options on setting that mizzen when the wind can't make up its mind on how hard to blow.
Mark
Mark

Posted: Thursday, October 10, 2019 - 06:04 AM UTC
Hi Tim,
good to see the new mizzen sail - looks spot on now! That's certainly a good step in the right direction!
Cheers
Jan
good to see the new mizzen sail - looks spot on now! That's certainly a good step in the right direction!
Cheers
Jan
 |


