Mark, Jan, and Russell,
Thanks for your kind words & encouragement.
If I find the time this weekend, I hope to get the majority of the mizzen sails rigged this weekend. Fingers crossed!!
Tim
You are viewing the archived version of the site.
Go to modelshipwrights.com for the current dynamic site!
Go to modelshipwrights.com for the current dynamic site!
General Ship Modeling
Discuss modeling techniques, experiences, and ship modeling in general.
Discuss modeling techniques, experiences, and ship modeling in general.
Hosted by Jim Starkweather
Build blog for Heller's HMS Victory
timmyp

Joined: May 18, 2008
KitMaker: 496 posts
Model Shipwrights: 404 posts

Posted: Thursday, January 09, 2020 - 07:54 PM UTC
timmyp

Joined: May 18, 2008
KitMaker: 496 posts
Model Shipwrights: 404 posts

Posted: Wednesday, January 15, 2020 - 06:51 PM UTC
Well, I really wanted to get the sheet & clew lines strung up today, but before I started, I told myself I should install the buntlines, so that I wouldn't be competing with the other lines for space. So as I was trying to get the buntline between the sail and the yard, and was putting a fair amount of pressure on the yard, I told myself that even with the manipulation I was putting on the yard, it was still attached to the mast.
That thought lasted about 3 seconds.
So yes, the yardarm became detached from the mast, but the buntlines are in place, and I re-glued the yardarm, and stopped for the day, to let the glue cure for 24 hours (it's regular Testor's glue in a tube). So tomorrow, I'll take another stab at getting the sheet & clew lines put in.
I didn't do any work on the ship this past weekend, even though I had hoped to, but I woke up Saturday morning, feeling rather "blah" and hurting all over. And rather than sit at home and wasting the day, I went to the movie theater and saw "1917". Well made movie, got a little sappy at the end, but I'll give it two thumbs up.
More later! And thanks for checking in!
Tim
Posted: Thursday, January 16, 2020 - 03:49 AM UTC
Tim,
One step forward two steps back, I know the feeling. The crane on my IJN Kirishima build is sitting there without any lines between the pulleys because they kept popping off when I tried to attach the line to the other pulley. After a dozen attempts I reattached the pulleys and said the hell with it and left them be.
Of course I will make another attempt just because I refuse to be beaten--LOL
Mark

timmyp

Joined: May 18, 2008
KitMaker: 496 posts
Model Shipwrights: 404 posts

Posted: Thursday, January 16, 2020 - 08:52 PM UTC
[quote
Of course I will make another attempt just because I refuse to be beaten--LOL
Mark [/quote]
That's the spirit!!


[quote
]Tim,
One step forward two steps back, I know the feeling. The crane on my IJN Kirishima build is sitting there without any lines between the pulleys because they kept popping off when I tried to attach the line to the other pulley. After a dozen attempts I reattached the pulleys and said the hell with it and left them be.[/quote]
Are those pulleys for raising and lowering the boom, or are they the lifting pulleys? I took a peek at your blog, the crane looked good!
Tim
Of course I will make another attempt just because I refuse to be beaten--LOL
Mark
 [/quote]
That's the spirit!!


[quote
]Tim,
One step forward two steps back, I know the feeling. The crane on my IJN Kirishima build is sitting there without any lines between the pulleys because they kept popping off when I tried to attach the line to the other pulley. After a dozen attempts I reattached the pulleys and said the hell with it and left them be.[/quote]
Are those pulleys for raising and lowering the boom, or are they the lifting pulleys? I took a peek at your blog, the crane looked good!
Tim
Posted: Friday, January 17, 2020 - 12:24 AM UTC
Quoted Text
[quote
Of course I will make another attempt just because I refuse to be beaten--LOL
Mark
That's the spirit!!


Quoted Text
Tim,
One step forward two steps back, I know the feeling. The crane on my IJN Kirishima build is sitting there without any lines between the pulleys because they kept popping off when I tried to attach the line to the other pulley. After a dozen attempts I reattached the pulleys and said the hell with it and left them be.
Are those pulleys for raising and lowering the boom, or are they the lifting pulleys? I took a peek at your blog, the crane looked good!
Tim[/quote]
Tim,
They are for raising and lowering the boom.
Mark

timmyp

Joined: May 18, 2008
KitMaker: 496 posts
Model Shipwrights: 404 posts

Posted: Sunday, January 19, 2020 - 02:47 AM UTC
Quoted Text
Quoted Text[quote
Of course I will make another attempt just because I refuse to be beaten--LOL
Mark
That's the spirit!!

 Quoted Text
Tim,
One step forward two steps back, I know the feeling. The crane on my IJN Kirishima build is sitting there without any lines between the pulleys because they kept popping off when I tried to attach the line to the other pulley. After a dozen attempts I reattached the pulleys and said the hell with it and left them be.
Are those pulleys for raising and lowering the boom, or are they the lifting pulleys? I took a peek at your blog, the crane looked good!
Tim
Tim,
They are for raising and lowering the boom.
Mark
 [/quote]
And I think I read the crane is PE? I would think it wouldn't be that difficult, but then, I've never worked with any PE parts.
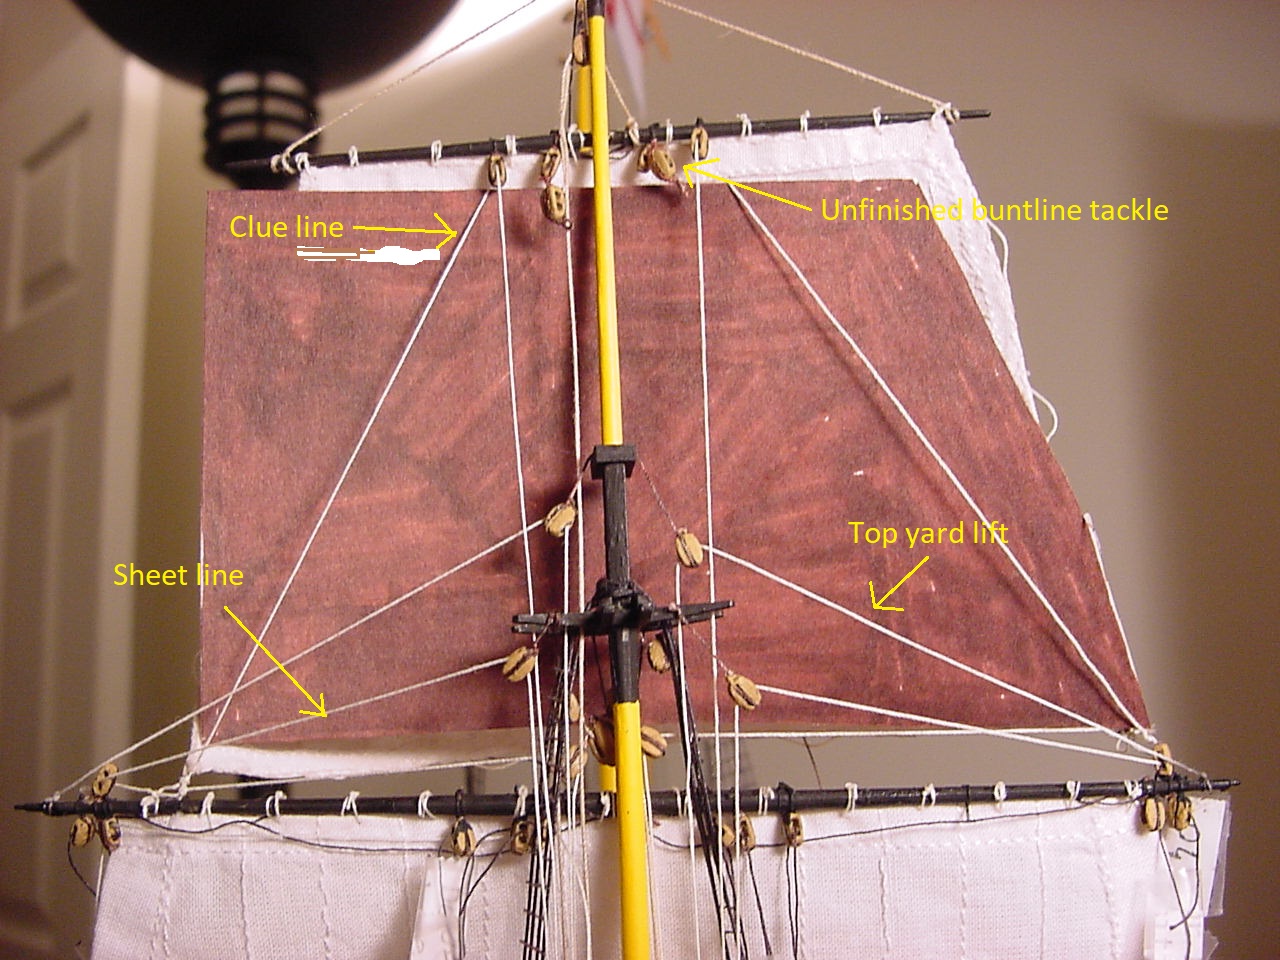
In other news, I got around to putting some rigging in place on the mizzen mast:
 " BORDER="0">
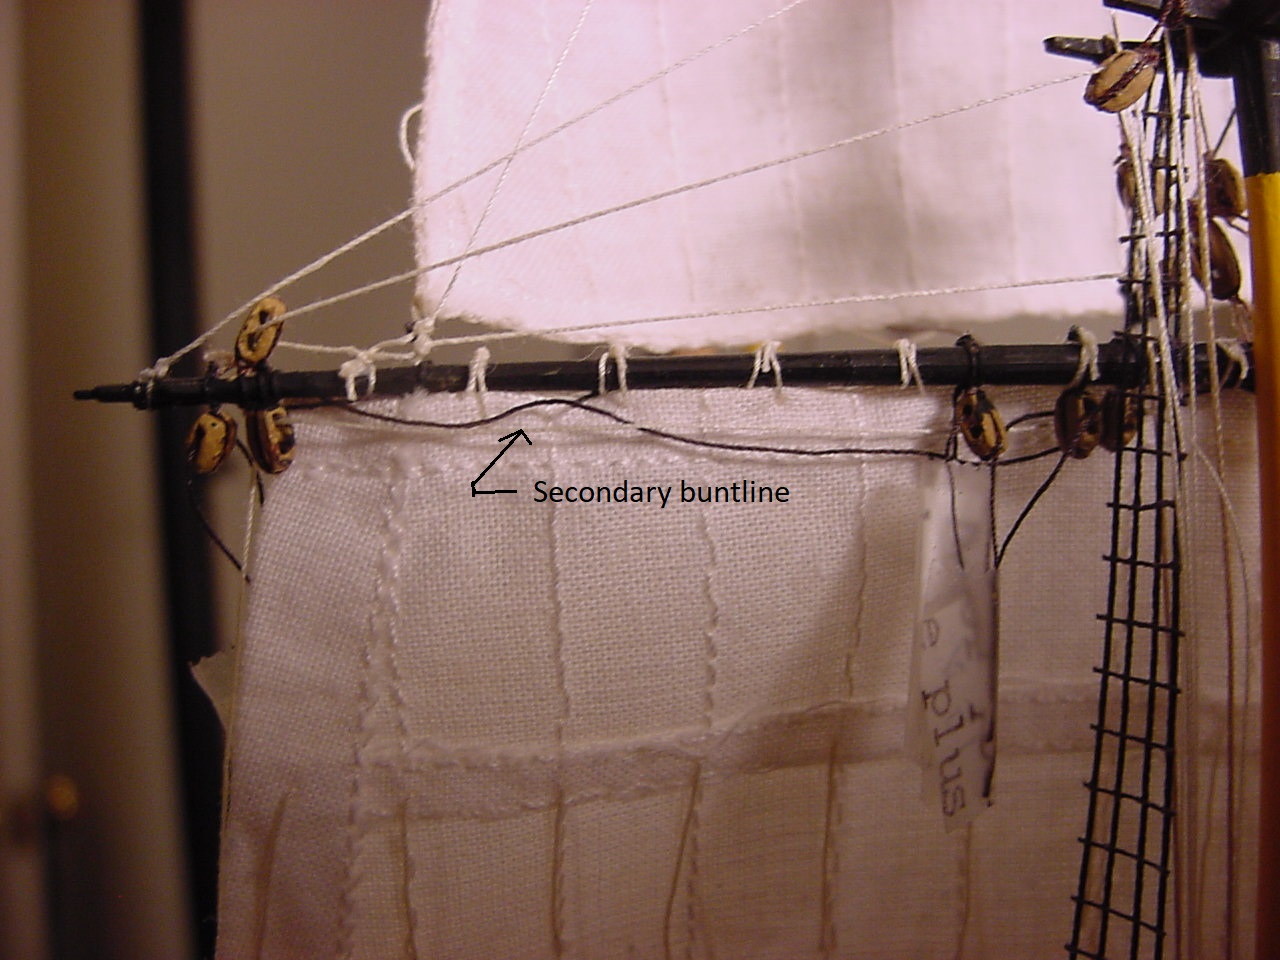
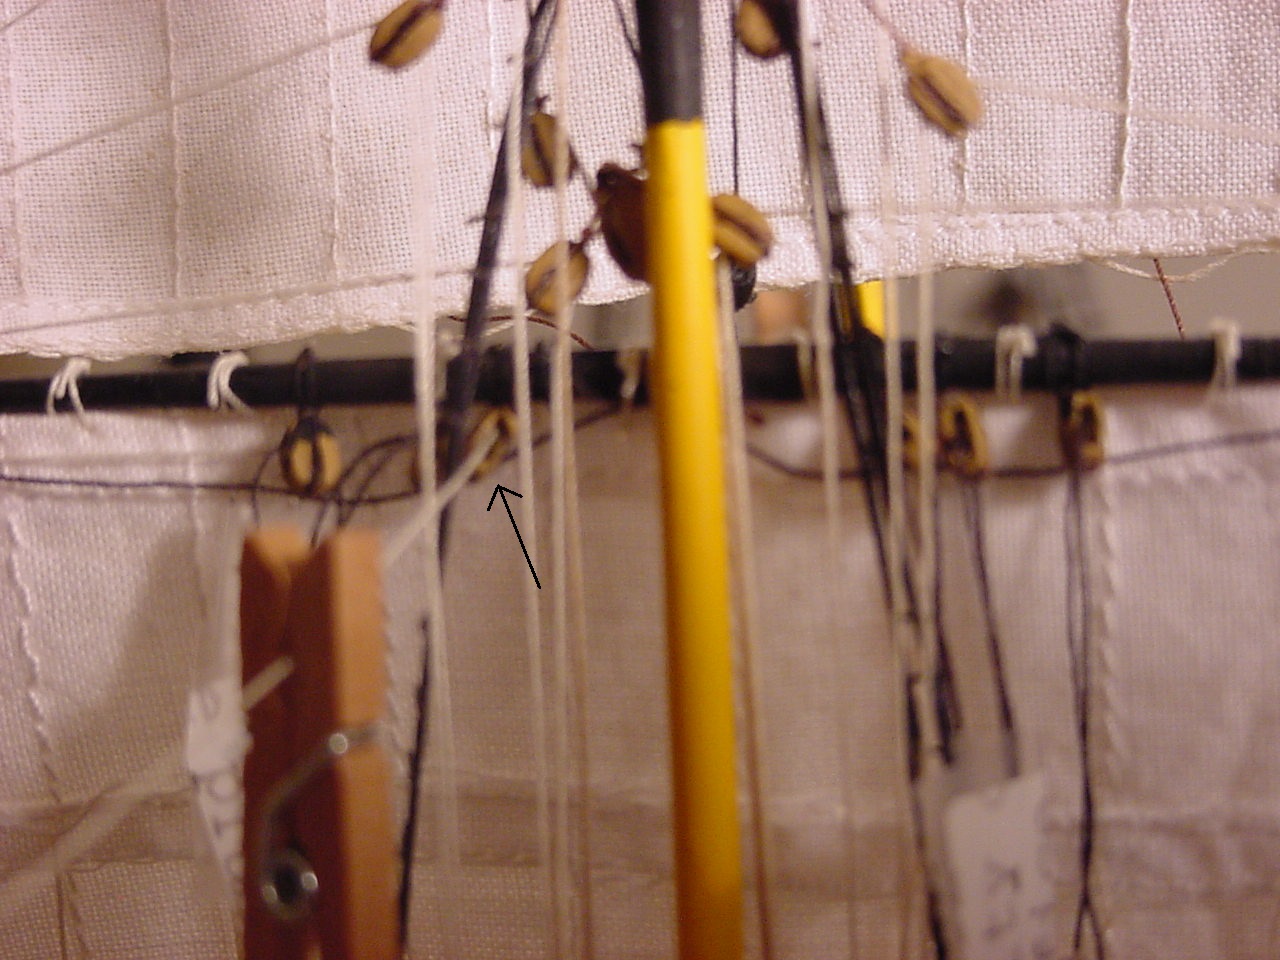
I started work on the top sail rigging, and I saw that there is another line (A55), that, for lack of a phrase, I'm calling the secondary buntline. The problem here was, the block that this line goes through, was tight against the sail, and I didn't have much room to try to get the thread through it. So I used a short piece of excess thread, and pushed the thread through the block, to use it was a "puller" thread for A55. It took a while to get the excess thread pushed through! But once I got it through, I glued it to the actual thread and managed to pull it through. Here's a couple of pics:
 " BORDER="0">
  " BORDER="0">
Sorry that last photo is a bit out of focus. Another hazard I've found is that, when attaching the sail to the yardarm, I managed to get the footrope caught in the thread I used to bend the sail to the yard; in the previous picture, you might be able to see, right around the mast, how the footrope was caught.
See ya soon!
timmyp

Joined: May 18, 2008
KitMaker: 496 posts
Model Shipwrights: 404 posts

Posted: Thursday, January 30, 2020 - 04:40 AM UTC
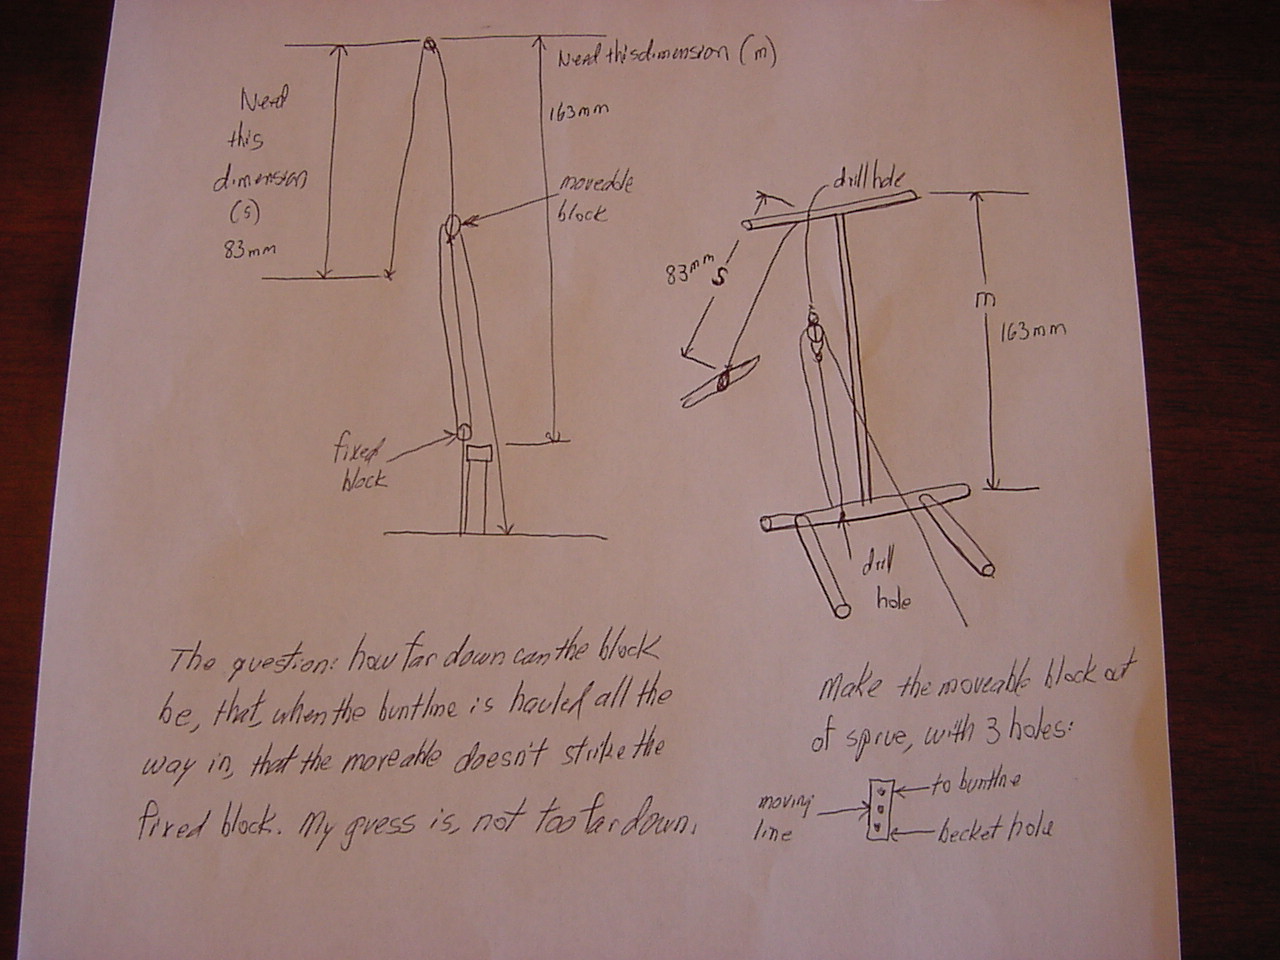
So the current problem is, how far down from the yardarm should the upper pulley be, so that when the hauling line is pulled in, it pulls the buntline up, as well as pulls that upper pulley closer to the fixed pulley, which is down on the mizzen top. The first thing I did was make a diagram as to some of the dimensions.

 " BORDER="0">
(Sorry if it's hard to read!)
So once I got the basic dimensions, I made a test rig for it:

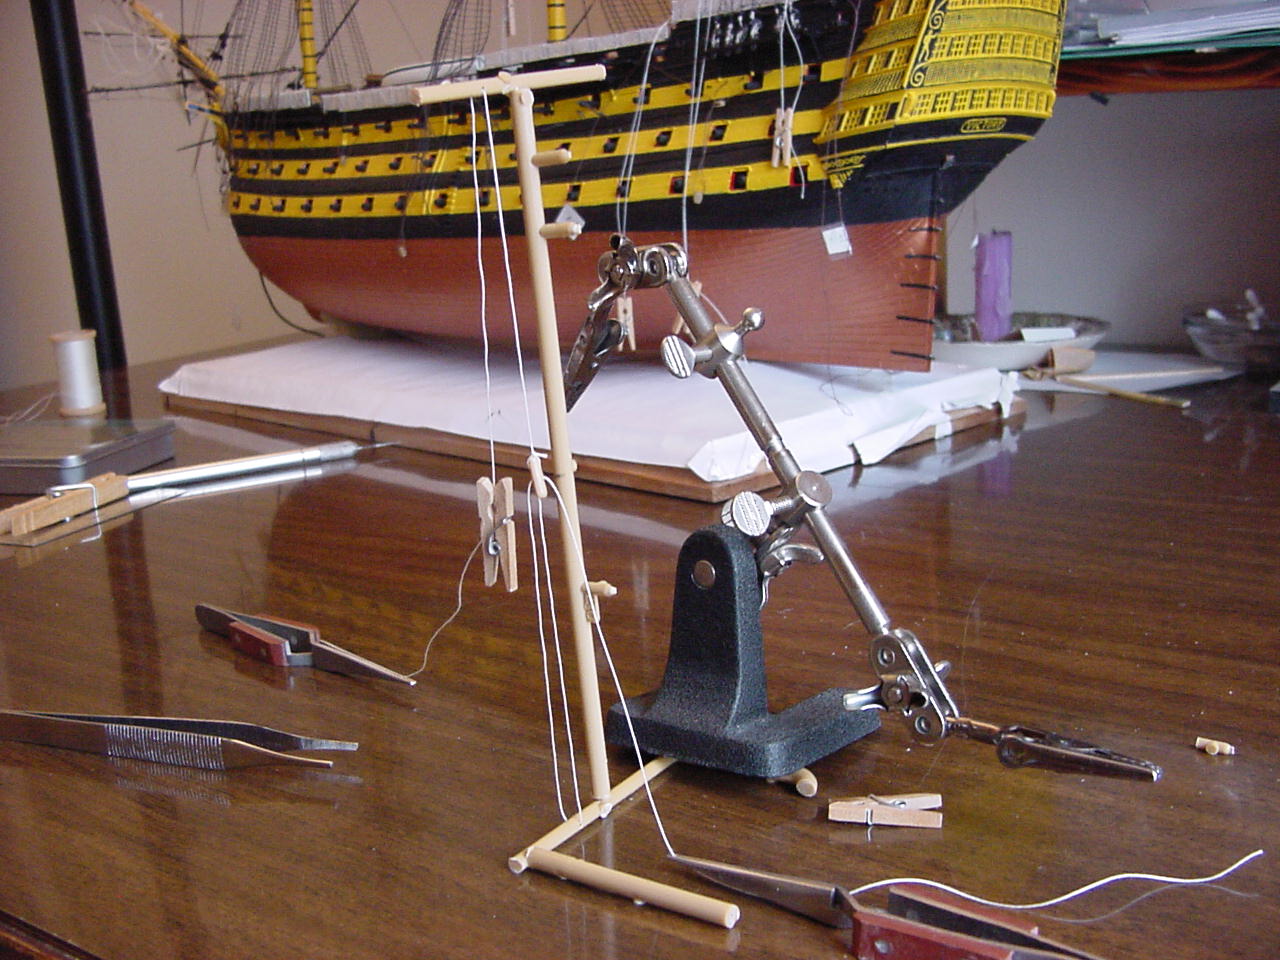 " BORDER="0">
It looks like the upper pulley should be about 15 - 20 mm below the yardarm (it could probably be more, as I don't think anyone will the know the difference).
And lastly, a close-up of my mark of 83 mm down from the top of the test which is the length of the sail at where the buntline is attached to the sail:

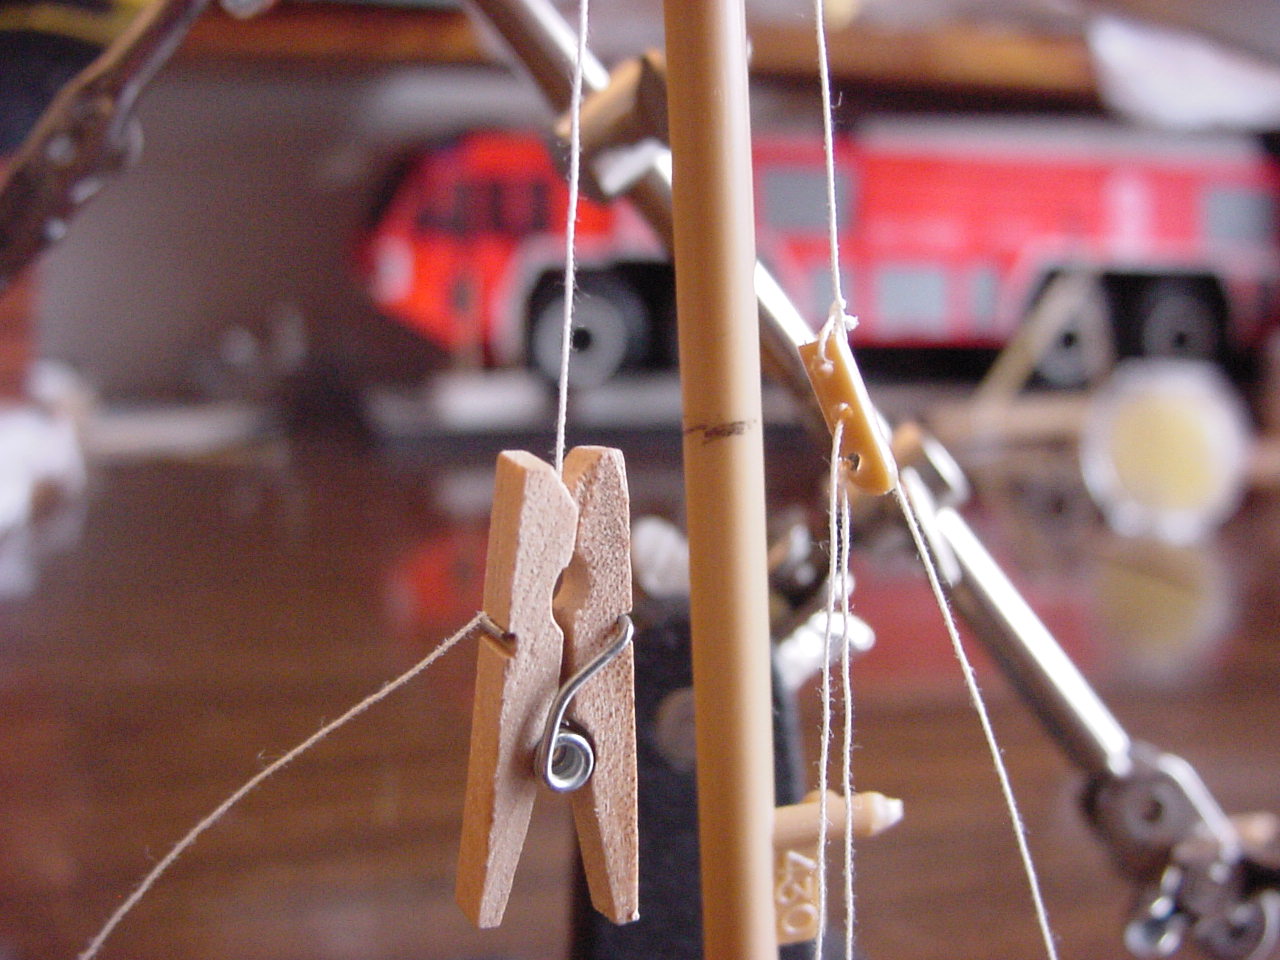 " BORDER="0">
So now, I just have to go and rig this on the ship.
Cheers!
Tim
 " BORDER="0">
 (Sorry if it's hard to read!)
So once I got the basic dimensions, I made a test rig for it:
 " BORDER="0">
 It looks like the upper pulley should be about 15 - 20 mm below the yardarm (it could probably be more, as I don't think anyone will the know the difference).
And lastly, a close-up of my mark of 83 mm down from the top of the test which is the length of the sail at where the buntline is attached to the sail:
 " BORDER="0">
 So now, I just have to go and rig this on the ship.
Cheers!

Tim
Posted: Thursday, January 30, 2020 - 05:45 AM UTC
Timothy,
You lost me at "buntline", so I wait for the after photos to see how it worked out you... Good luck!
Mark
You lost me at "buntline", so I wait for the after photos to see how it worked out you... Good luck!
Mark

Posted: Sunday, February 02, 2020 - 06:57 AM UTC
Tim,
your patience with all the lines and the rigging continues to amaze me. I said it before - I couldn't do it. Great work, keep up your patience and motivation!
Cheers
Jan
your patience with all the lines and the rigging continues to amaze me. I said it before - I couldn't do it. Great work, keep up your patience and motivation!
Cheers
Jan
Posted: Monday, February 03, 2020 - 08:36 AM UTC
Tim, your persistence and patience with this model is just amazing! 
As Jan said, not something I could do, but I definitely appreciate the high standards you've set here!
She'll be a show piece for sure when completed

As Jan said, not something I could do, but I definitely appreciate the high standards you've set here!
She'll be a show piece for sure when completed

timmyp

Joined: May 18, 2008
KitMaker: 496 posts
Model Shipwrights: 404 posts

Posted: Tuesday, February 04, 2020 - 12:37 PM UTC
Thanks Mark, Jan, and Russell.
I took some pictures of the finished buntlines tonight, but for some reason, my PC isn't reading any of the image files, either on the memory stick or on the hard drive. Not sure what the problem is, I just get a cryptic error message.
So I'll post those pix once I get things figured out; the next step will be to prepare the buntline tackle for the mizzen top sail.
Tim


brekinapez

Joined: July 26, 2013
KitMaker: 2,272 posts
Model Shipwrights: 26 posts

Posted: Tuesday, February 04, 2020 - 01:04 PM UTC
Quoted Text
Thanks Mark, Jan, and Russell.
I took some pictures of the finished buntlines tonight, but for some reason, my PC isn't reading any of the image files, either on the memory stick or on the hard drive. Not sure what the problem is, I just get a cryptic error message.
Do you recall what the error was?
timmyp

Joined: May 18, 2008
KitMaker: 496 posts
Model Shipwrights: 404 posts

Posted: Wednesday, February 05, 2020 - 06:41 AM UTC
B. -
No, I don't recall there being a specific error message, just the error window had the complete path to the image, then something like "system error", and with a large multiple digit negative number (something like "-1234567890"), and nothing more. This happened on images both on my memory stick and on my hard drive. The good news is, this morning, I was able to open an image that was on my desktop, so maybe now, everything's ok...I'll know more later this afternoon, once I get home.
Thanks for asking, and fingers crossed for success!
timmyp

Joined: May 18, 2008
KitMaker: 496 posts
Model Shipwrights: 404 posts

Posted: Wednesday, February 05, 2020 - 12:38 PM UTC
Well hooray! Everything seems to be working again.
So here's the pictures. The first one is of the buntlines themselves, which are on the forward side of the sail, and are used to help haul in the sail (similar to the cluelines [or clewlines] on the back side of the sail. I like the contrast of the brown thread against the white of the sail:

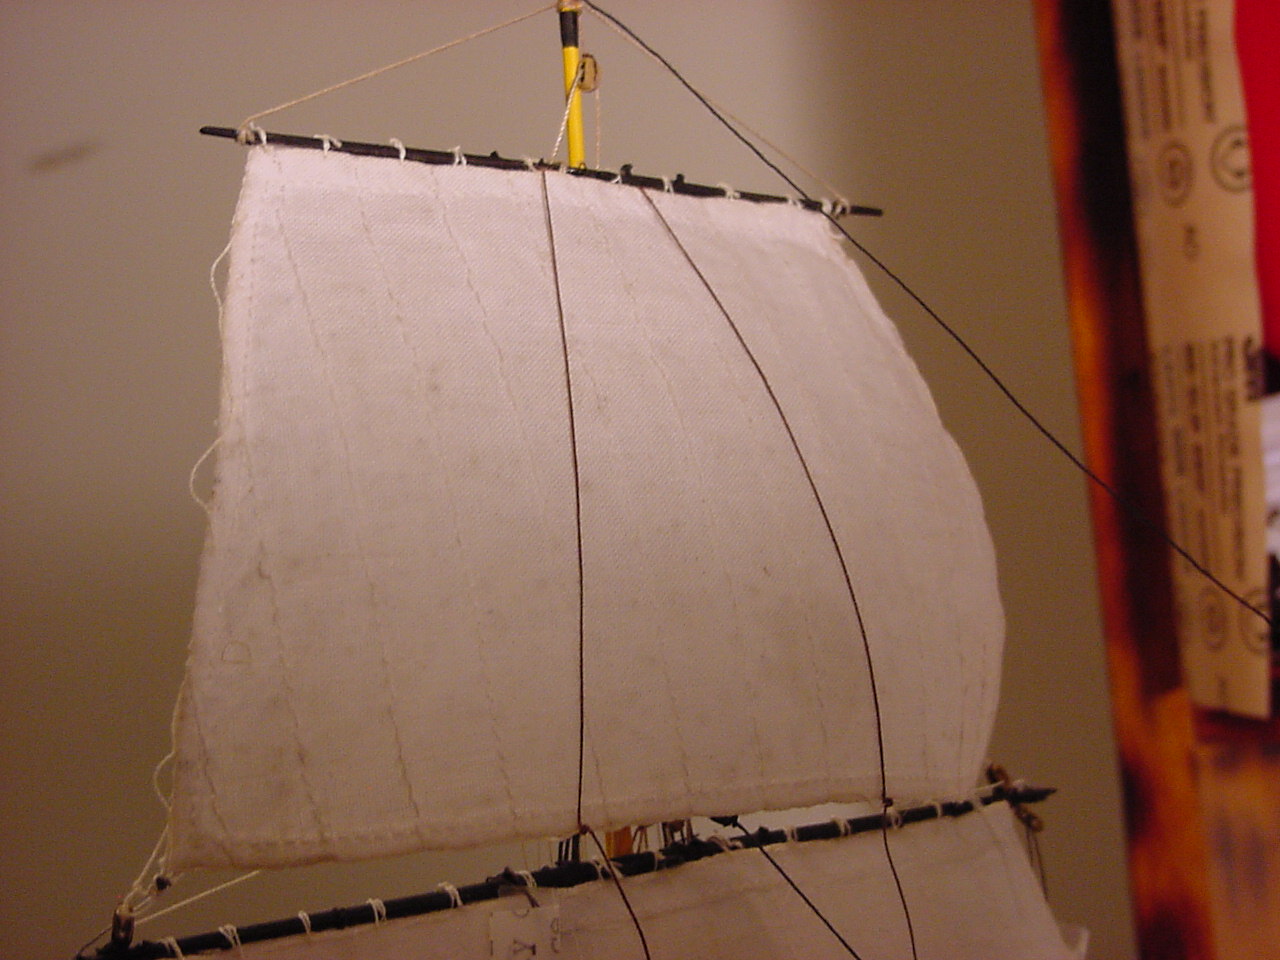 " BORDER="0">
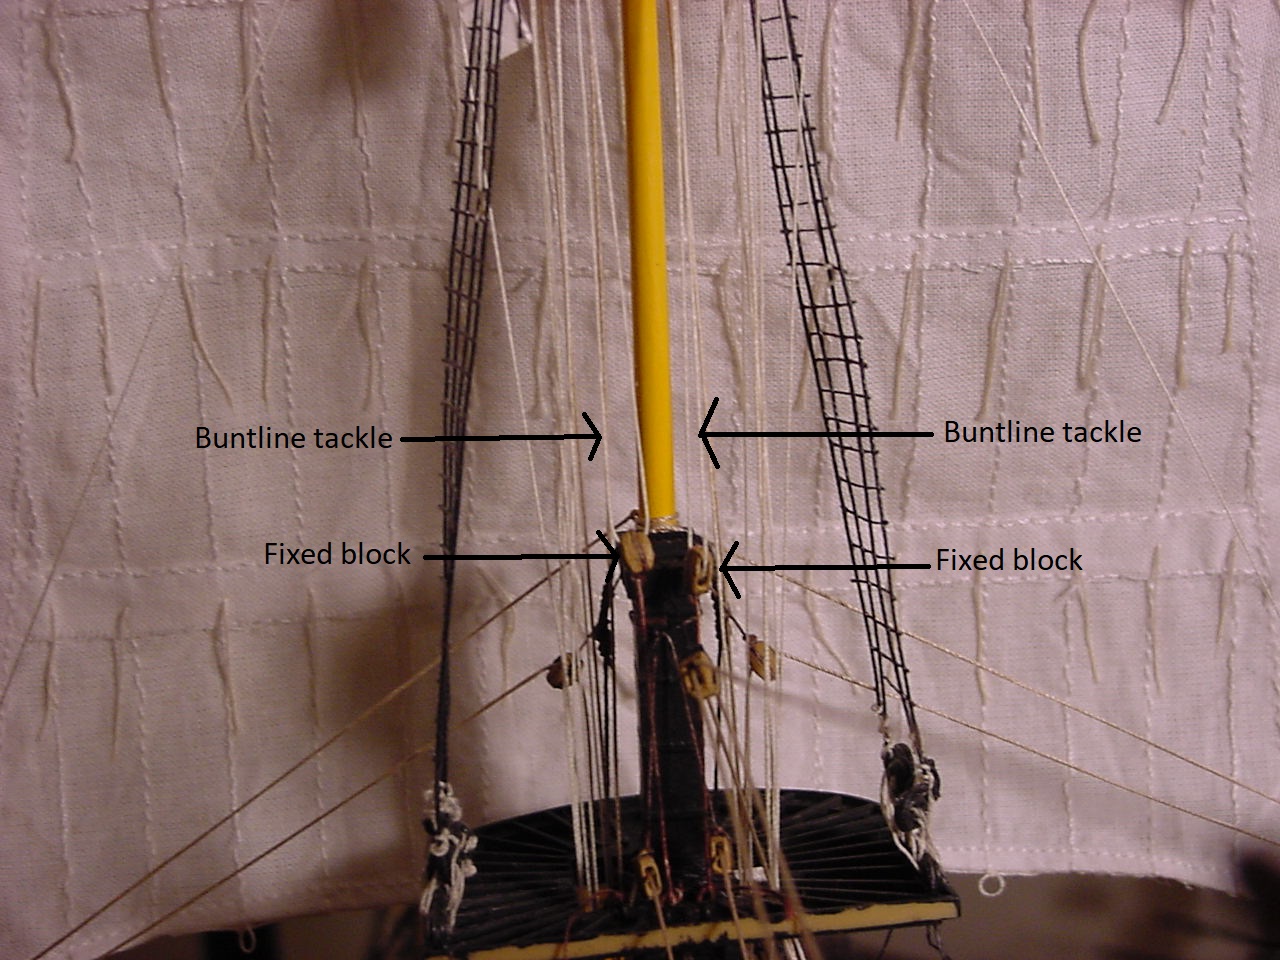
So once the buntline goes through its respective pulley on the yardarm, it was attached to another pulley. This second pulley, along with a third pulley that I attached to the mizzen top, makes up what is called a "gun tackle", wherein one pulley is fixed, and the other is moveable. So in the next pic, I've marked-up a few things on the upper pulley:

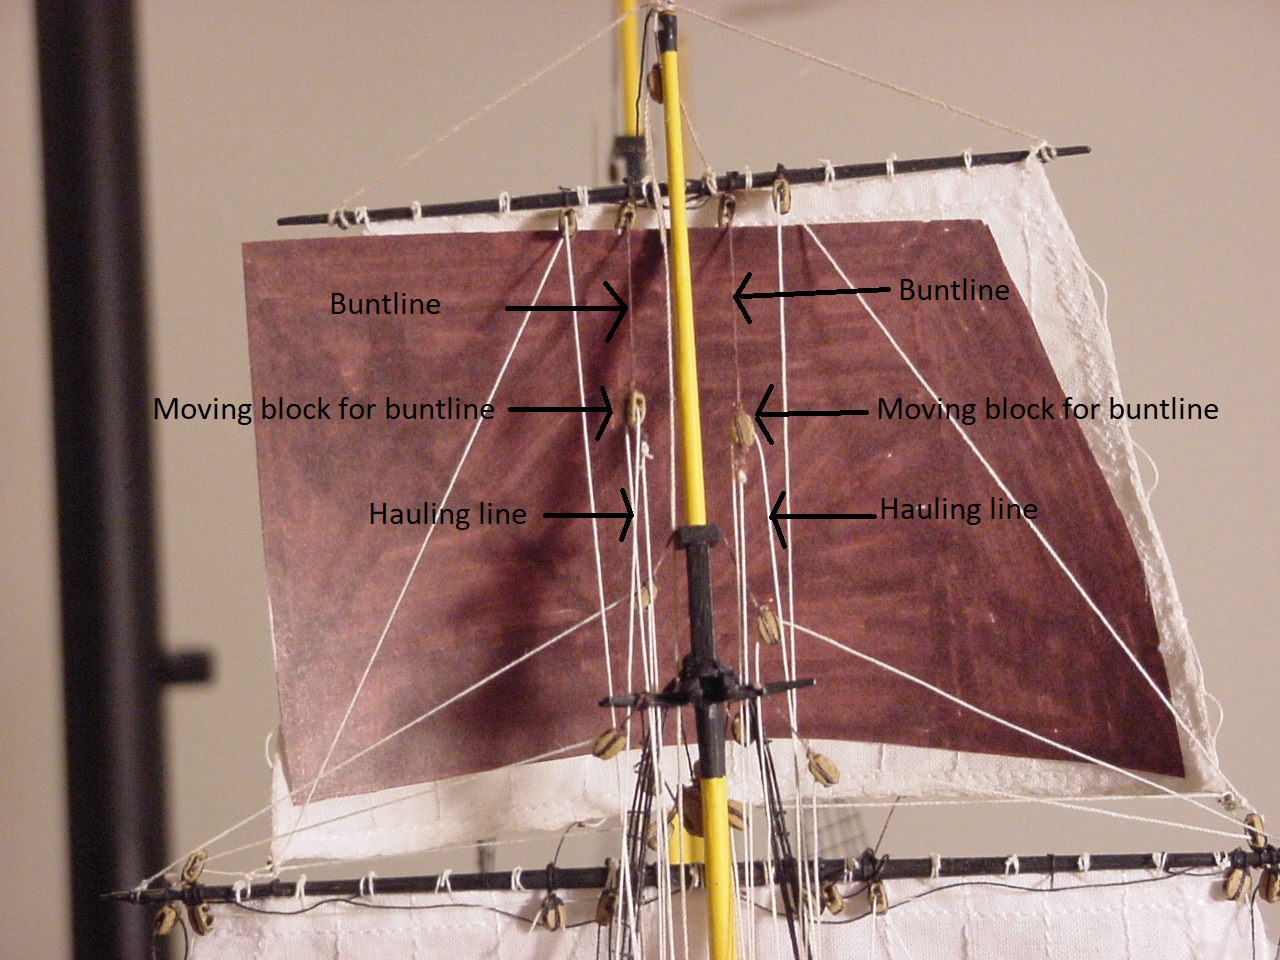 " BORDER="0">
And this pic shows some details down around the fixed pulley. The approximate distance between the fixed pulley and the moveable pulley is somewhere around 130 mm, or 5.118 (close to 5 and one-eight) inches.

 " BORDER="0">
Unfortunately, in neither of the last 2 photos, can you see where the hauling line of all this stuff is belayed to (or, where it's tied off). Of course, Heller doesn't give any indication, and Longridge writes that it is belayed "to the second lower shroud"...which doesn't help either. So, in this case, I had previously cut some white thread (guestimating its length), and that length wasn't long enough to tie off the end around the fixed pulley, so I just decided to belay about halfway down the upper set of shrouds...that way, it sort of goes along with Longridge, and it gave me a lot of excess thread to tie the knot!
So no,w on to the mizzen topsail buntline stuff, and then on to rigging stuff on the mainmast.
For those of you out in mid-west of the U.S., I hope the storms haven't hit you too hard, and you're keeping yourself safe and warm.
And "The Caine Mutiny" is on TCM right now, so I might finish watching it.
Thanks!!
Tim
So here's the pictures. The first one is of the buntlines themselves, which are on the forward side of the sail, and are used to help haul in the sail (similar to the cluelines [or clewlines] on the back side of the sail. I like the contrast of the brown thread against the white of the sail:
 " BORDER="0">
So once the buntline goes through its respective pulley on the yardarm, it was attached to another pulley. This second pulley, along with a third pulley that I attached to the mizzen top, makes up what is called a "gun tackle", wherein one pulley is fixed, and the other is moveable. So in the next pic, I've marked-up a few things on the upper pulley:
 " BORDER="0">
 And this pic shows some details down around the fixed pulley. The approximate distance between the fixed pulley and the moveable pulley is somewhere around 130 mm, or 5.118 (close to 5 and one-eight) inches.
 " BORDER="0">
Unfortunately, in neither of the last 2 photos, can you see where the hauling line of all this stuff is belayed to (or, where it's tied off). Of course, Heller doesn't give any indication, and Longridge writes that it is belayed "to the second lower shroud"...which doesn't help either. So, in this case, I had previously cut some white thread (guestimating its length), and that length wasn't long enough to tie off the end around the fixed pulley, so I just decided to belay about halfway down the upper set of shrouds...that way, it sort of goes along with Longridge, and it gave me a lot of excess thread to tie the knot!
So no,w on to the mizzen topsail buntline stuff, and then on to rigging stuff on the mainmast.
For those of you out in mid-west of the U.S., I hope the storms haven't hit you too hard, and you're keeping yourself safe and warm.
And "The Caine Mutiny" is on TCM right now, so I might finish watching it.
Thanks!!
Tim
Posted: Wednesday, February 05, 2020 - 02:04 PM UTC
Timothy,
Glad you were able to resolve your issue with the photos.
Now I know what a Buntline is for and why the movable and fix pulleys. It good that you were able to work through the lack of instructions on placement.
The Cain Mutiny is one my favorite Bogart movies.
Mark
Glad you were able to resolve your issue with the photos.
Now I know what a Buntline is for and why the movable and fix pulleys. It good that you were able to work through the lack of instructions on placement.
The Cain Mutiny is one my favorite Bogart movies.
Mark

timmyp

Joined: May 18, 2008
KitMaker: 496 posts
Model Shipwrights: 404 posts

Posted: Thursday, February 06, 2020 - 02:16 AM UTC
Thanks Mark. Heller is just full of a lack of instructions!!
Posted: Sunday, March 08, 2020 - 02:48 AM UTC
Tim,
you simply continue to amaze me with your persistence, but it pays, your sails and the rigging looks awesome, as if it all would be really working in the end. Fantastic work!
Cheers
Jan
you simply continue to amaze me with your persistence, but it pays, your sails and the rigging looks awesome, as if it all would be really working in the end. Fantastic work!
Cheers
Jan
timmyp

Joined: May 18, 2008
KitMaker: 496 posts
Model Shipwrights: 404 posts

Posted: Monday, March 09, 2020 - 11:01 AM UTC
Quoted Text
Tim,
you simply continue to amaze me with your persistence, but it pays, your sails and the rigging looks awesome, as if it all would be really working in the end. Fantastic work!
Cheers
Jan
Thanks, Jan. I've been wanting to get back to work on Victory, but I received a vaccination for shingles last week, and it's made me sick. But before I got sick, I managed to glue the main topgallant yard to the main mast, and I was stringing the threads for the yardarm lifts, and I thought I had pulled the threads too hard, and had caused the yardarm to become un-glued from the mast. However, today, I un-strung those yardarm lifts, and the yardarm stayed in place!! I guess I was just pulling too tight on the yardarm lift threads, making me think the thing had come un-done.
Anyway, thanks for stopping by, and I hope by the next post, I have plenty of updates.

timmyp

Joined: May 18, 2008
KitMaker: 496 posts
Model Shipwrights: 404 posts

Posted: Sunday, March 22, 2020 - 12:45 PM UTC
Well, I think my illness has passed, and I was able to do some more work on Victory. So in my last post, I was talking about stringing the main topgallant lifts:

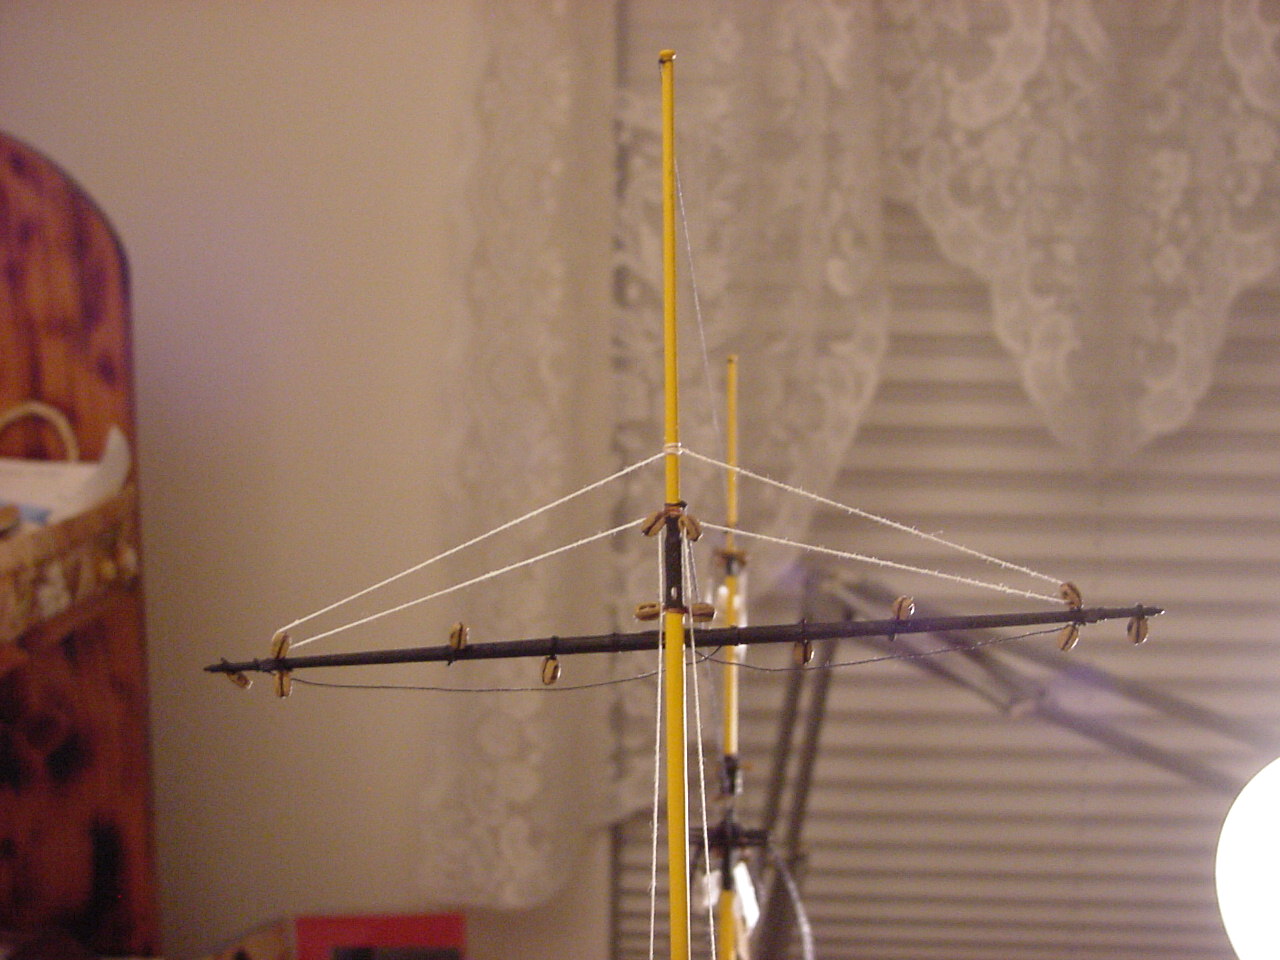 " BORDER="0">
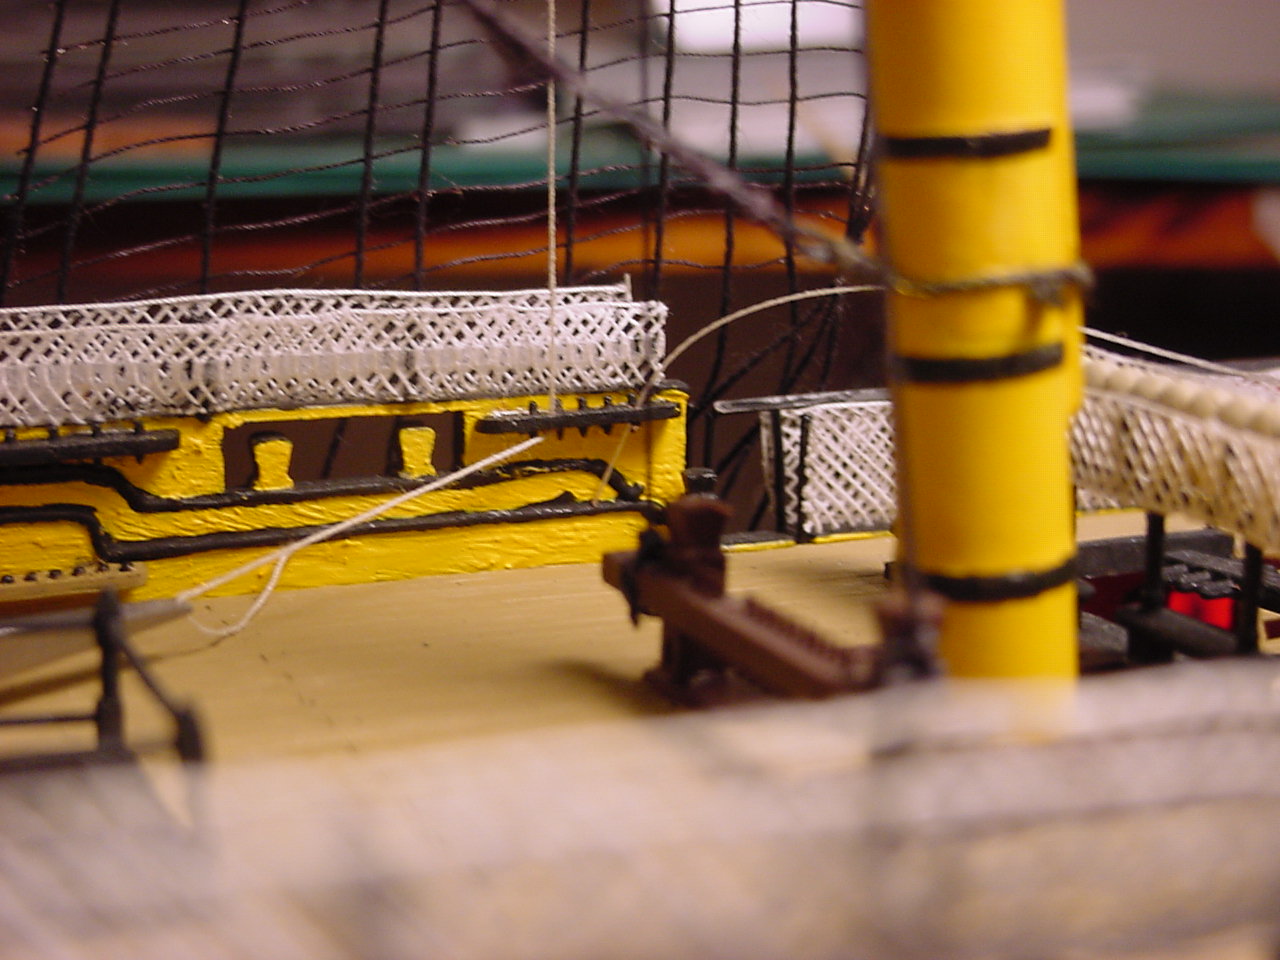
So that was all fine and good, and for once, Heller's instructions and Longridge's book matched in regards to where these lines get belayed - to the fife rail that is in-line with the main mast. However, the belaying pins on these rails are very small, and there is hardly any room to try and slip the thread onto and around the bottom pin, so that you can finish the knot with a figure 8. So initially, I spend probably 40 minutes trying to get the tread to slip around the bottom part of the pin, and finally gave up. Taking some time to think it over, I had the idea of using my dental scrapers to try and push the thread under the pin, and then grab it with some tweezers and pull the thread tight. Well, after many attempts at that, I still couldn't get the thread to stay put so I could secure it. Then, I had the fantastic idea of drilling a hole into the fife rail, adjacent to the belaying pin, and then I'd push the thread down through the top of the fife rail, and then around the belaying pin. And - surprise!! - it worked. I figured as long as I was drilling holes, I'd go ahead and drill a hole around the other belying pins on that fife rail (no sense in trying to drill the rest of the holes when I have a line or two already secured). I did the same on the starboard fife rail, figuring I was in "the groove" for drilling holes.
So here's the port side fife rail, with the topgallant lift thread threaded into the hole:

 " BORDER="0">
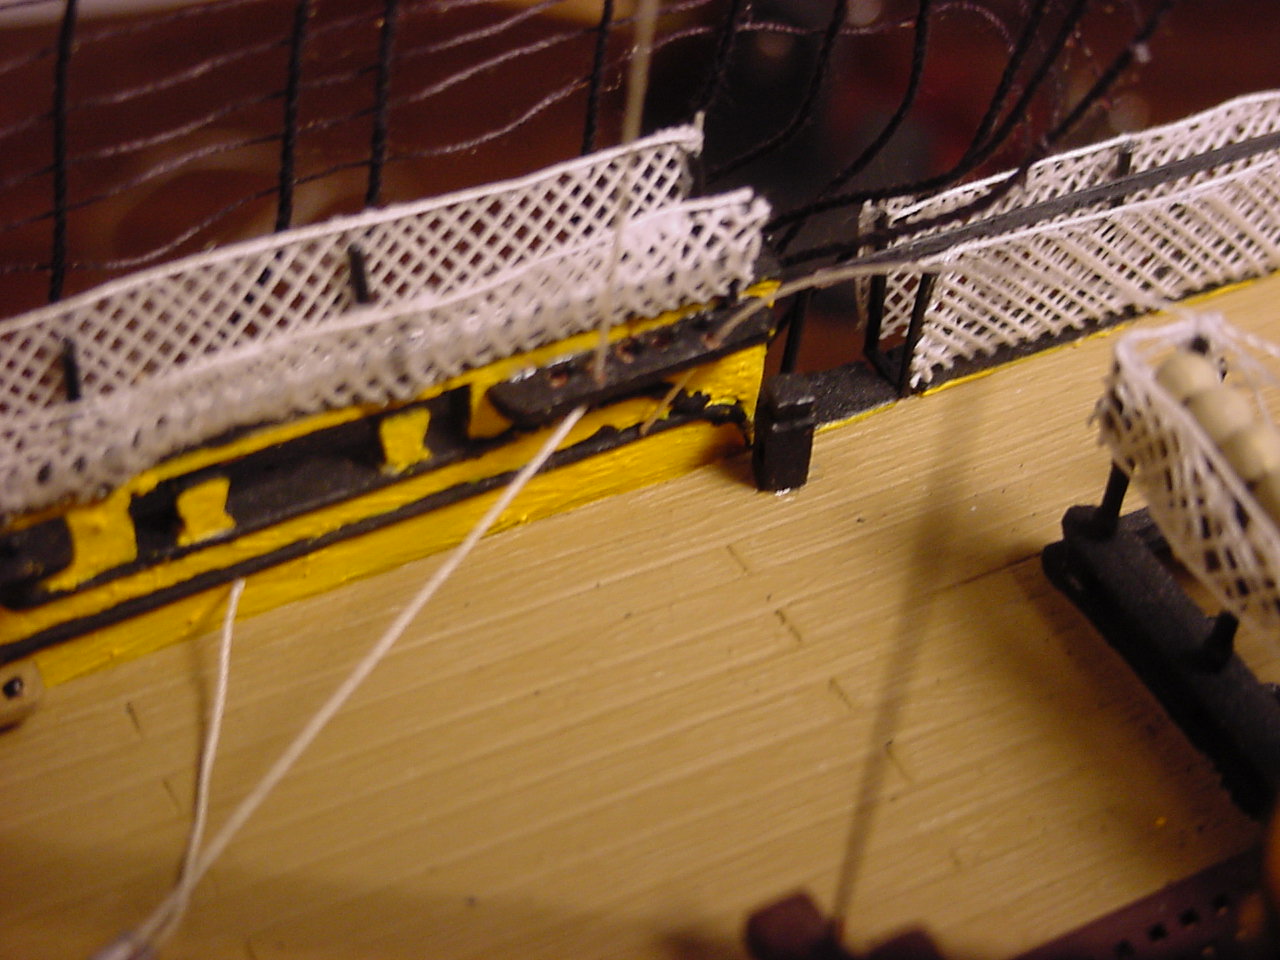
And here's a view from above of the same fife rail, with all the holes drilled (it's a bit out of focus):

 " BORDER="0">
So after taking these pictures, I installed the topgallant tye line (A109), which is a single thread attached to the topgallant yard, through a hole in the mast, then down to one of the middle belaying pins on the fife rail at the base of the mainmast (Haven't secured it to the fife rail yet, as I wanted the glue on the knot around the yardarm to dry). I also finished putting on the cringles and eyes on the topgallant sail, and using the vacuum formed sails, smeared it with a watered down solution of white glue and water, to give it some shape.
So, not really a whole lot done, but a lot got done! Thanks for looking, and a shout out to all the other modellers on here displaying their fantastic work!
Until next time,
Tim
 " BORDER="0">
 So that was all fine and good, and for once, Heller's instructions and Longridge's book matched in regards to where these lines get belayed - to the fife rail that is in-line with the main mast. However, the belaying pins on these rails are very small, and there is hardly any room to try and slip the thread onto and around the bottom pin, so that you can finish the knot with a figure 8. So initially, I spend probably 40 minutes trying to get the tread to slip around the bottom part of the pin, and finally gave up. Taking some time to think it over, I had the idea of using my dental scrapers to try and push the thread under the pin, and then grab it with some tweezers and pull the thread tight. Well, after many attempts at that, I still couldn't get the thread to stay put so I could secure it. Then, I had the fantastic idea of drilling a hole into the fife rail, adjacent to the belaying pin, and then I'd push the thread down through the top of the fife rail, and then around the belaying pin. And - surprise!! - it worked. I figured as long as I was drilling holes, I'd go ahead and drill a hole around the other belying pins on that fife rail (no sense in trying to drill the rest of the holes when I have a line or two already secured). I did the same on the starboard fife rail, figuring I was in "the groove" for drilling holes.
So here's the port side fife rail, with the topgallant lift thread threaded into the hole:
 " BORDER="0">
 And here's a view from above of the same fife rail, with all the holes drilled (it's a bit out of focus):
 " BORDER="0">
So after taking these pictures, I installed the topgallant tye line (A109), which is a single thread attached to the topgallant yard, through a hole in the mast, then down to one of the middle belaying pins on the fife rail at the base of the mainmast (Haven't secured it to the fife rail yet, as I wanted the glue on the knot around the yardarm to dry). I also finished putting on the cringles and eyes on the topgallant sail, and using the vacuum formed sails, smeared it with a watered down solution of white glue and water, to give it some shape.
So, not really a whole lot done, but a lot got done! Thanks for looking, and a shout out to all the other modellers on here displaying their fantastic work!
Until next time,
Tim

Posted: Sunday, March 22, 2020 - 08:21 PM UTC
Just amazing work Timmy!
Good to hear your over the shingles. What an insidious thing that is. Saw what it did to my dad. Not good.
Meanwhile your Victory keeps getting better n better!
Good to hear your over the shingles. What an insidious thing that is. Saw what it did to my dad. Not good.
Meanwhile your Victory keeps getting better n better!

Posted: Sunday, March 22, 2020 - 11:22 PM UTC
Timothy,
Glad to hear you are on the up and up.
Like your solution, any idea that makes can't be all bad.
Mark
Glad to hear you are on the up and up.
Like your solution, any idea that makes can't be all bad.
Mark

timmyp

Joined: May 18, 2008
KitMaker: 496 posts
Model Shipwrights: 404 posts

Posted: Monday, March 23, 2020 - 02:42 AM UTC
Quoted Text
Just amazing work Timmy!
Good to hear your over the shingles. What an insidious thing that is. Saw what it did to my dad. Not good.
Meanwhile your Victory keeps getting better n better!
Russell,
Fortunately, I didn't have the shingles, I just got the vaccination. Actually, I think I got injected with some "this is going to kick your ass!" My wife had shingles, and it was ugly for her.
Right now, with Victory, it's pretty much lather, rinse, repeat - inasmuch it's install the sail, add lifts, clues, and sheet lines, move to the next sail. I'm really looking forward to attaching the fore & main yards, and installing the lifts for those yards - it's not overly involved, just massive looking!
Thanks for taking a look, and I hope all is well with you down south!

timmyp

Joined: May 18, 2008
KitMaker: 496 posts
Model Shipwrights: 404 posts

Posted: Monday, March 23, 2020 - 02:47 AM UTC
Quoted Text
Timothy,
Glad to hear you are on the up and up.
Like your solution, any idea that makes can't be all bad.
Mark
Thanks, Mark. I'm feeling back to normal now.
I was really having a hard time trying to get the one thread around the belaying pin - I've noticed, compared to other ships I've built, the belying pins are really small on this version of Victory. I'm just glad I didn't do any damage to the fife rail itself, while I was drilling those holes.
Cheers,
Tim


Fright

Joined: December 26, 2015
KitMaker: 200 posts
Model Shipwrights: 186 posts

Posted: Tuesday, March 24, 2020 - 07:34 AM UTC
Tim - You are doing a really fine job with your ship. Rigging can certainly get confusing but you're doing a great job with it.
timmyp

Joined: May 18, 2008
KitMaker: 496 posts
Model Shipwrights: 404 posts

Posted: Tuesday, March 24, 2020 - 11:30 AM UTC
Quoted Text
Tim - You are doing a really fine job with your ship. Rigging can certainly get confusing but you're doing a great job with it.
Thanks, Fright. That rigging can be confusing, but at the same time, exciting.
Tim
 |


