General Ship Modeling
Discuss modeling techniques, experiences, and ship modeling in general.
Build blog for Heller's HMS Victory
RussellE
#306
Visit this Community
Victoria, Australia
Joined: June 27, 2010
KitMaker: 3,959 posts
Model Shipwrights: 2,777 posts
Posted: Friday, March 27, 2020 - 12:06 AM UTC

Quoted Text


Quoted Text

Just amazing work Timmy!

Good to hear your over the shingles. What an insidious thing that is. Saw what it did to my dad. Not good.

Meanwhile your Victory keeps getting better n better!


Russell,

Fortunately, I didn't have the shingles, I just got the vaccination. Actually, I think I got injected with some "this is going to kick your ass!" My wife had shingles, and it was ugly for her.

Right now, with Victory, it's pretty much lather, rinse, repeat - inasmuch it's install the sail, add lifts, clues, and sheet lines, move to the next sail. I'm really looking forward to attaching the fore & main yards, and installing the lifts for those yards - it's not overly involved, just massive looking!

Thanks for taking a look, and I hope all is well with you down south!


Hi Timothy! Sorry to hear your wife had it so bad. Hope she's back to good health now!

Sometimes the vaccinations can almost feel as bad as the disease. Still, they're preferable to the real thing.

Meanwhile, your persistence with Victory is reaping the rewards on what is surely going to be a stunning display when finished!
timmyp
Visit this Community
Virginia, United States
Joined: May 18, 2008
KitMaker: 496 posts
Model Shipwrights: 404 posts
Posted: Friday, March 27, 2020 - 10:37 AM UTC

Quoted Text


Quoted Text


Quoted Text

Just amazing work Timmy!

Good to hear your over the shingles. What an insidious thing that is. Saw what it did to my dad. Not good.

Meanwhile your Victory keeps getting better n better!


Russell,

Fortunately, I didn't have the shingles, I just got the vaccination. Actually, I think I got injected with some "this is going to kick your ass!" My wife had shingles, and it was ugly for her.

Right now, with Victory, it's pretty much lather, rinse, repeat - inasmuch it's install the sail, add lifts, clues, and sheet lines, move to the next sail. I'm really looking forward to attaching the fore & main yards, and installing the lifts for those yards - it's not overly involved, just massive looking!

Thanks for taking a look, and I hope all is well with you down south!


Hi Timothy! Sorry to hear your wife had it so bad. Hope she's back to good health now!

Sometimes the vaccinations can almost feel as bad as the disease. Still, they're preferable to the real thing.

Meanwhile, your persistence with Victory is reaping the rewards on what is surely going to be a stunning display when finished!


Hi Russell,

She recovered from the shingles - it happened a couple of years ago. On a down note, today (the 27th) marks the 7th year of her passing. Oddly enough, one of my workmates came down with shingles this past week! I talked to him yesterday, and he's doing better.

Thanks for following my blog on Victory - I hope you're enjoying my posts. Currently, I ironed the main topgallant sail, and got most of the puckers out, and today, I put the first of the threads that bend the sail to the yardarm into the sail (only 13 more to go!) Hopefully I can get the sail fully attached this weekend.

Cheers,

Tim
JJ1973
#345
Visit this Community
Niedersachsen, Germany
Joined: August 22, 2011
KitMaker: 1,835 posts
Model Shipwrights: 1,832 posts
Posted: Sunday, March 29, 2020 - 05:02 AM UTC
Tim,

sorry to hear about your illness and good that you are doing better!!

Keep up the good work, your work continues to amaze me. She will be a great ship!

Cheers
Jan
timmyp
Visit this Community
Virginia, United States
Joined: May 18, 2008
KitMaker: 496 posts
Model Shipwrights: 404 posts
Posted: Sunday, March 29, 2020 - 08:45 PM UTC

Quoted Text

Tim,

sorry to hear about your illness and good that you are doing better!!

Keep up the good work, your work continues to amaze me. She will be a great ship!

Cheers
Jan


Thanks, Jan. Of course, the on-going worry now is Covid-19.

I got about halfway through attaching the main topgallant sail to the yardarm...and somewhere along there, in a case of absent-mindedness, I managed to lose the sewing needle I was using to push the threads through. I found another needle I can use, but it's longer than the previous one, so it's a bit more difficult to use than the previous needle. I hope, when I get home this morning, I'll find the time to finish attaching the sail.

Tim
RussellE
#306
Visit this Community
Victoria, Australia
Joined: June 27, 2010
KitMaker: 3,959 posts
Model Shipwrights: 2,777 posts
Posted: Wednesday, April 08, 2020 - 09:27 AM UTC
Hi Tim

How is this beautiful build going? Attaching the fore & main yards, and installing the lifts for those yards would be major milestones. I hope they're not too difficult!
I am of course sorry to hear of your wife's passing, albeit, 7 years ago.
Following your blog on Victory has been a viewing pleasure. Although I don't receive email notifications of new posts (I think it's the apostrophe in the title that stops them going out) I always try to scroll through the latest posts to see if there's been an update
I guess what I found amusing was that you've ironed the sails! I never would have dreamed that I would ever get the iron out of storage to use in modelling! Nonetheless, once the sails go in she'll be looking ever more majestic!
As always, thanks for sharing!
timmyp
Visit this Community
Virginia, United States
Joined: May 18, 2008
KitMaker: 496 posts
Model Shipwrights: 404 posts
Posted: Wednesday, April 08, 2020 - 08:56 PM UTC
Hi Russ,


Quoted Text

Hi Tim

How is this beautiful build going?


Slow, but sure!!


Quoted Text

Attaching the fore & main yards, and installing the lifts for those yards would be major milestones. I hope they're not too difficult!

With some proper planning, I don't think it will turn into a disaster!


Quoted Text

I am of course sorry to hear of your wife's passing, albeit, 7 years ago.

Thanks.


Quoted Text

Following your blog on Victory has been a viewing pleasure. Although I don't receive email notifications of new posts (I think it's the apostrophe in the title that stops them going out) I always try to scroll through the latest posts to see if there's been an update


Thanks for following along. Not sure why you don't get any e-mail notices, maybe it's something you should mention to the administrators.


Quoted Text

I guess what I found amusing was that you've ironed the sails! I never would have dreamed that I would ever get the iron out of storage to use in modelling! Nonetheless, once the sails go in she'll be looking ever more majestic!
As always, thanks for sharing!


Well, you know, it takes all kinds of tools to work on our hobbies! If I didn't iron the sails, what with the coffee solution to color the sails, and the glue & water solution to try to give them some shape, a lot of puckering happens to the sails. If I didn't iron some of those puckers out, the sails would look terrible.

So in the latest update, I managed to find the original sewing needle I was using to attach the sails to the yardarm. My problem nowadays is, when I'm trying to tie off a rigging line for the main mast, I keep leaning my hand on the hammock netting, and I'm trashing the netting & its uprights. I have to remember to put a thick book on the worktable, to rest my elbow on, before I try to tie off any more of that rigging.

Thanks again for taking a peek - it's much appreciated!
TimReynaga
Staff MemberAssociate Editor
MODEL SHIPWRIGHTS
Visit this Community
California, United States
Joined: May 03, 2006
KitMaker: 2,500 posts
Model Shipwrights: 1,830 posts
Posted: Friday, April 10, 2020 - 04:06 AM UTC

Quoted Text

My problem nowadays is, when I'm trying to tie off a rigging line for the main mast, I keep leaning my hand on the hammock netting, and I'm trashing the netting & its uprights. I have to remember to put a thick book on the worktable, to rest my elbow on, before I try to tie off any more of that rigging.


I too have had that experience in a minor way building the old Revell plastic Constitution... I can only imagine the complexity and difficulties with your much larger HMS Victory. Keep up the good work, and keep those images coming!
timmyp
Visit this Community
Virginia, United States
Joined: May 18, 2008
KitMaker: 496 posts
Model Shipwrights: 404 posts
Posted: Sunday, April 12, 2020 - 08:58 PM UTC

Quoted Text


Quoted Text

My problem nowadays is, when I'm trying to tie off a rigging line for the main mast, I keep leaning my hand on the hammock netting, and I'm trashing the netting & its uprights. I have to remember to put a thick book on the worktable, to rest my elbow on, before I try to tie off any more of that rigging.


I too have had that experience in a minor way building the old Revell plastic Constitution... I can only imagine the complexity and difficulties with your much larger HMS Victory. Keep up the good work, and keep those images coming!


Yeah,it's a real pisser having to go back and fix things, especiallly when it's the same thing you're fixing. Like I said, I think my solution is to put a thick book on the worktable, so I can support my elbow, which allows me to work over and above the hammock netting.


Quoted Text

Keep up the good work, and keep those images coming!

So, people are only reading this for the pictures, and not the story?
RussellE
#306
Visit this Community
Victoria, Australia
Joined: June 27, 2010
KitMaker: 3,959 posts
Model Shipwrights: 2,777 posts
Posted: Monday, April 13, 2020 - 09:54 AM UTC

Quoted Text


Quoted Text

My problem nowadays is, when I'm trying to tie off a rigging line for the main mast, I keep leaning my hand on the hammock netting, and I'm trashing the netting & its uprights. I have to remember to put a thick book on the worktable, to rest my elbow on, before I try to tie off any more of that rigging.


I too have had that experience in a minor way building the old Revell plastic Constitution... I can only imagine the complexity and difficulties with your much larger HMS Victory. Keep up the good work, and keep those images coming!


Yup, agreed, our hands are the arbiters of destruction on our own builds! Rule #1 for me: always provide hand support when working above deck! Be it a box, or book or even a block of wood!
timmyp
Visit this Community
Virginia, United States
Joined: May 18, 2008
KitMaker: 496 posts
Model Shipwrights: 404 posts
Posted: Tuesday, May 05, 2020 - 12:34 PM UTC
Moving forward: I cemented the main top yard in place the other day, and have started installing the reef lines on the top sail. Holy cow - if I counted right, there's 84 reef lines on this sail! I got about 60 of them installed this evening - maybe the rest get installed in a day or two.
JannerKebab
Visit this Community
Wales, United Kingdom
Joined: May 27, 2020
KitMaker: 9 posts
Model Shipwrights: 9 posts
Posted: Wednesday, May 27, 2020 - 07:07 AM UTC
I have just purchased this kit and I am waiting for parts from HISmodel before I start. I have poured all over the supplied instructions and have scoured the internet for build logs. Your build log and model are a great inspiration for me and if you don’t mind I will be referring to your build log on a regular basis
timmyp
Visit this Community
Virginia, United States
Joined: May 18, 2008
KitMaker: 496 posts
Model Shipwrights: 404 posts
Posted: Thursday, May 28, 2020 - 01:37 PM UTC

Quoted Text

I have just purchased this kit and I am waiting for parts from HISmodel before I start. I have poured all over the supplied instructions and have scoured the internet for build logs. Your build log and model are a great inspiration for me and if you don’t mind I will be referring to your build log on a regular basis


Hi Lee!

Your kinds words are downright flattering! Feel free to refer to my blog for help, and of course, if you have a question, just ask away, either here in the public forum or via a private e-mail.

A couple of questions for you: How much did your kit cost?

When it comes to painting the kit, will you be primarily using an airbrush, or brushes, or a combination?

What all parts are you waiting for from HisModel? I bought my sails from him, and while I'm very happy with the product, some of his sails are over-size, because he uses the vacuum-formed sails as his template, and some of those (actually, several) are oversized.

So thanks for the post, and I look forward to seeing your progress!

Tim
JannerKebab
Visit this Community
Wales, United Kingdom
Joined: May 27, 2020
KitMaker: 9 posts
Model Shipwrights: 9 posts
Posted: Friday, May 29, 2020 - 07:02 AM UTC
Hi Tim

The Kit cost £150

I am waiting for wooden deck veneers, standing rigging and the running rigging.

I may get the sails after Christmas, will wait and see.

I will be hand painting, I have purchased the paints they use in the part kit from the magazine dasgitino did, better yellow and red, I last went round Victory about 10 years ago, the humbrol yellow they recommend seems too bright.
timmyp
Visit this Community
Virginia, United States
Joined: May 18, 2008
KitMaker: 496 posts
Model Shipwrights: 404 posts
Posted: Friday, May 29, 2020 - 07:52 AM UTC

Quoted Text

Hi Tim

The Kit cost £150

I am waiting for wooden deck veneers, standing rigging and the running rigging.

I may get the sails after Christmas, will wait and see.

I will be hand painting, I have purchased the paints they use in the part kit from the magazine dasgitino did, better yellow and red, I last went round Victory about 10 years ago, the humbrol yellow they recommend seems too bright.


Hi Lee,

Well, it looks like the price of the kit hasn't changed much over the years -if I did the math right, your price is only a little bit higher than the 160 USD I paid...over a decade ago!

I used Testor's "Insignia Yellow" on my Victory, and I think it's too bright. Perhaps a better color would something like yellow ochre.

Cheers,

Tim
JannerKebab
Visit this Community
Wales, United Kingdom
Joined: May 27, 2020
KitMaker: 9 posts
Model Shipwrights: 9 posts
Posted: Friday, May 29, 2020 - 07:59 AM UTC
I’m going with the yellow ochre and red ochre as that’s not too bright. I ve also order the Amati cordage especially after seeing how much it takes to make the hammock netting and the shrouds. Will be starting in a few weeks but after following your build the first few months will be taken up by painting.

Did you reinforce the masts at all when you built them?
timmyp
Visit this Community
Virginia, United States
Joined: May 18, 2008
KitMaker: 496 posts
Model Shipwrights: 404 posts
Posted: Monday, June 01, 2020 - 12:32 AM UTC
I didn't put any reinforcement on the mizzen mast, but the main & fore masts I put a wooden dowel on the inside. And that reinforcement only went in on the lower part of the masts, as they are two-part masts. The upper components of the masts are single-piece parts.
JannerKebab
Visit this Community
Wales, United Kingdom
Joined: May 27, 2020
KitMaker: 9 posts
Model Shipwrights: 9 posts
Posted: Monday, June 01, 2020 - 05:31 AM UTC
Thanks Tim, I have some doweling I can use. I’ve been going through the instructions, not the best in some places, I have a copy of the Imai plans for this kit, they are not in English but at least the cordage dimensions are in mm and are double the length of the other plans, will use both to build.
timmyp
Visit this Community
Virginia, United States
Joined: May 18, 2008
KitMaker: 496 posts
Model Shipwrights: 404 posts
Posted: Tuesday, June 02, 2020 - 11:03 AM UTC

Quoted Text

Thanks Tim, I have some doweling I can use. I’ve been going through the instructions, not the best in some places, I have a copy of the Imai plans for this kit, they are not in English but at least the cordage dimensions are in mm and are double the length of the other plans, will use both to build.


I have a spreadsheet that has scale dimensions for the diameter of the various rigging lines - it's pretty handy, but the trick is "translating" the names of the lines in the spreadsheet, to the actual line on the ship. Some are easy to figure out, some are not. Let me know if you'd like a copy of the spreadsheet.

And while you're waiting for the stuff from HiSmodel to arrive, I'd say go ahead and get started on the painting. There's a lot to paint! I think I've already gone through 3 or 4 jars of the insignia yellow, and at least 2 big jars of (Tamiya acrylic) flat black.

Cheers,

Tim
JannerKebab
Visit this Community
Wales, United Kingdom
Joined: May 27, 2020
KitMaker: 9 posts
Model Shipwrights: 9 posts
Posted: Tuesday, June 02, 2020 - 11:31 PM UTC
Hi Tim, that spreadsheet would be great.
timmyp
Visit this Community
Virginia, United States
Joined: May 18, 2008
KitMaker: 496 posts
Model Shipwrights: 404 posts
Posted: Sunday, June 07, 2020 - 12:17 PM UTC
Heller strikes again:

The rebel stronghold has been vanquished by the Emperor's Deathst

Whoops! Wrong blog!

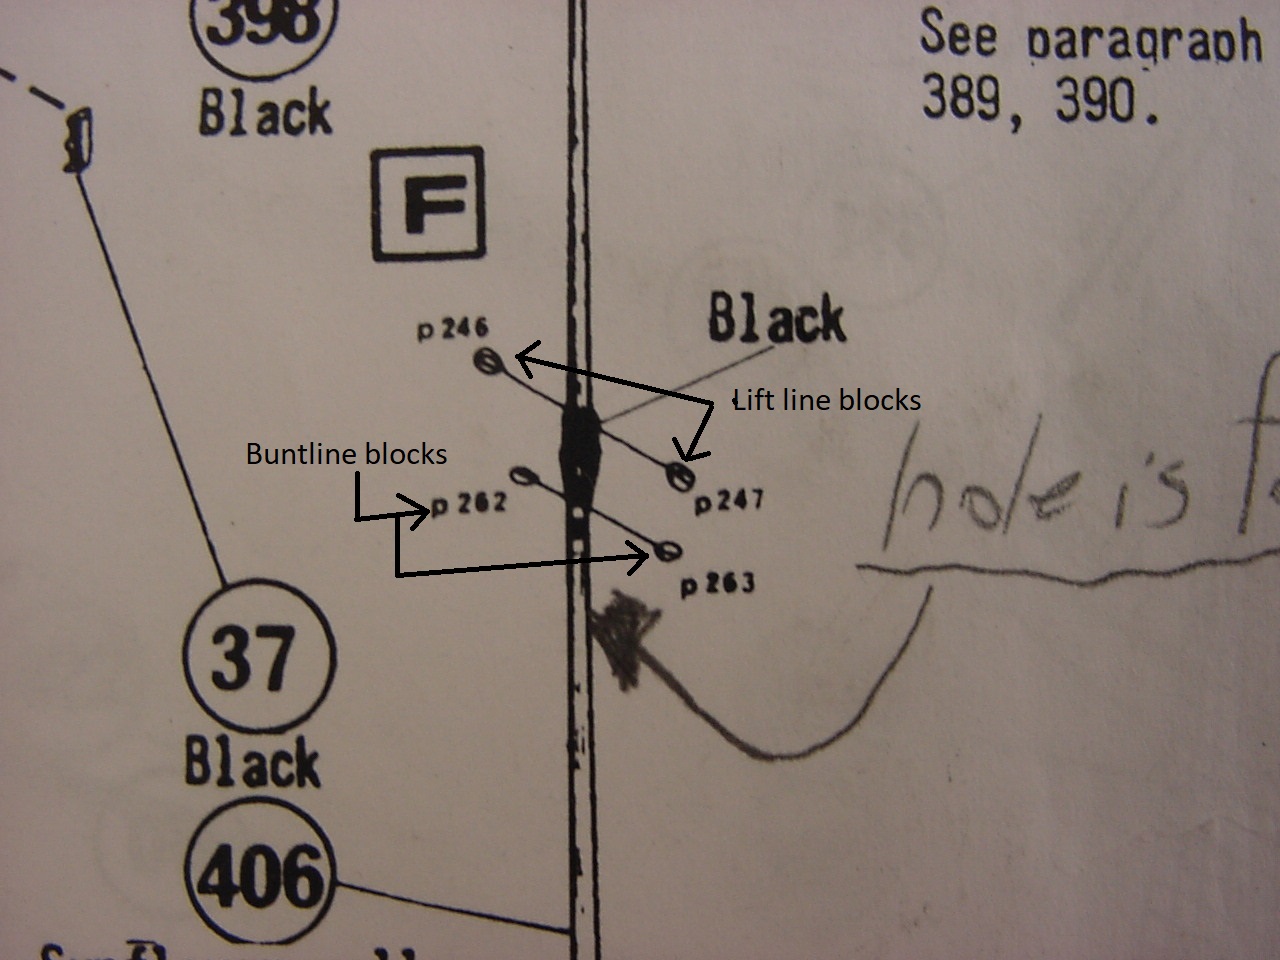
So what I found, is that Heller's instructions for placing of the buntline blocks and the lift blocks for the main top sail don't "work". In the photo below, which is from instruction 21, "Main Mast Composition Preparation" it clearly shows the lift & buntline blocks being installed above and below the section that gets painted black:

" BORDER="0">

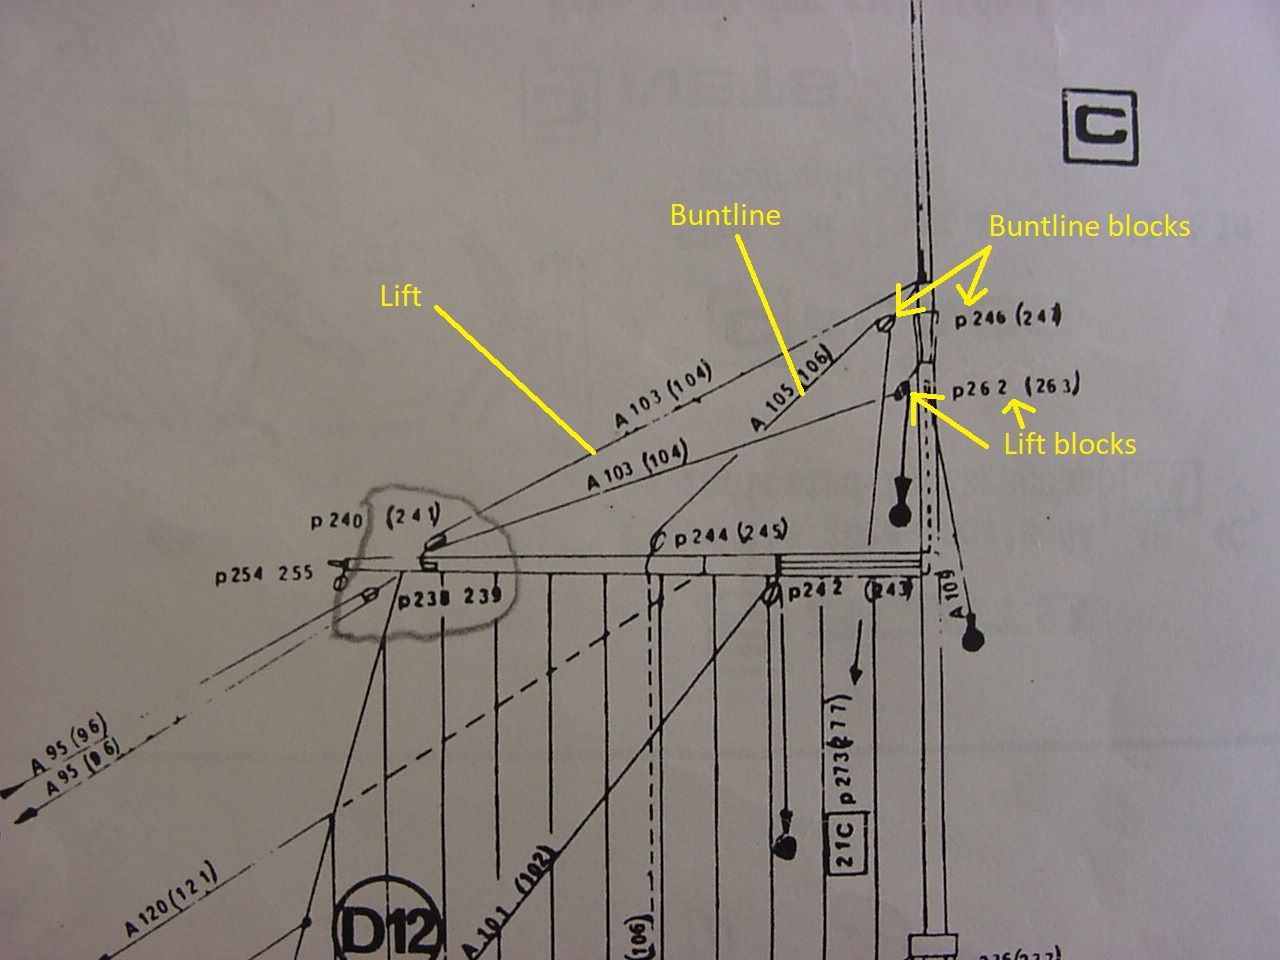
This next image, from instruction 29, "Sails on the Main Mast", shows again the blocks in question are above and below the black-painted section of the mast; however, it shows the yardarm to be significantly below the blocks:

" BORDER="0">

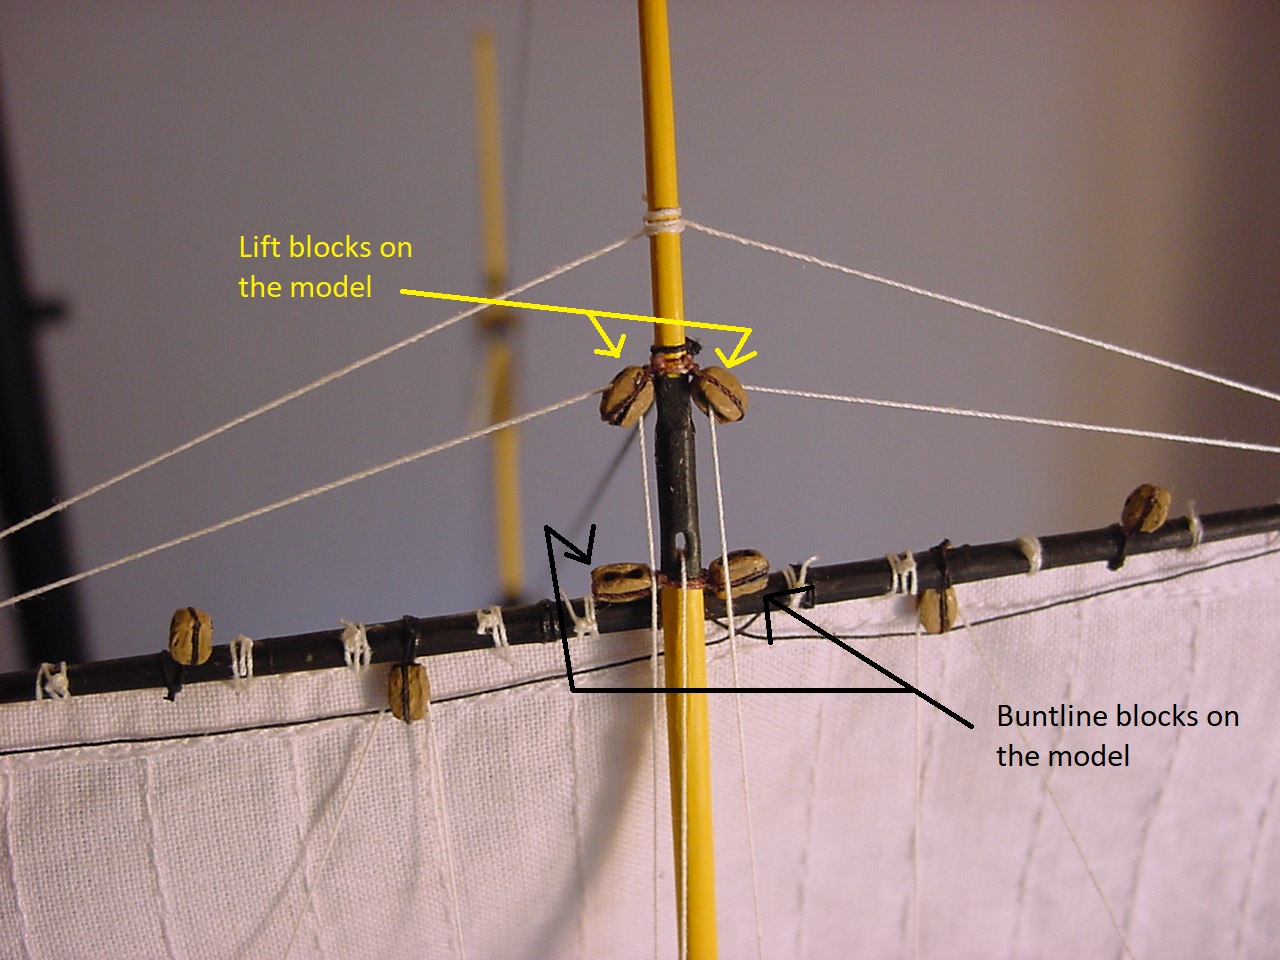
However, when I installed the yardarm, I used the dimensions that are indicated in instruction 23, "Principles for fitting a mast", and using that dimension, it puts the yardarm right underneath the black painted section of the mast, and also immediately below the buntline blocks (and just to be sure, I re-measured the distance before I took all these pictures):

" BORDER="0">

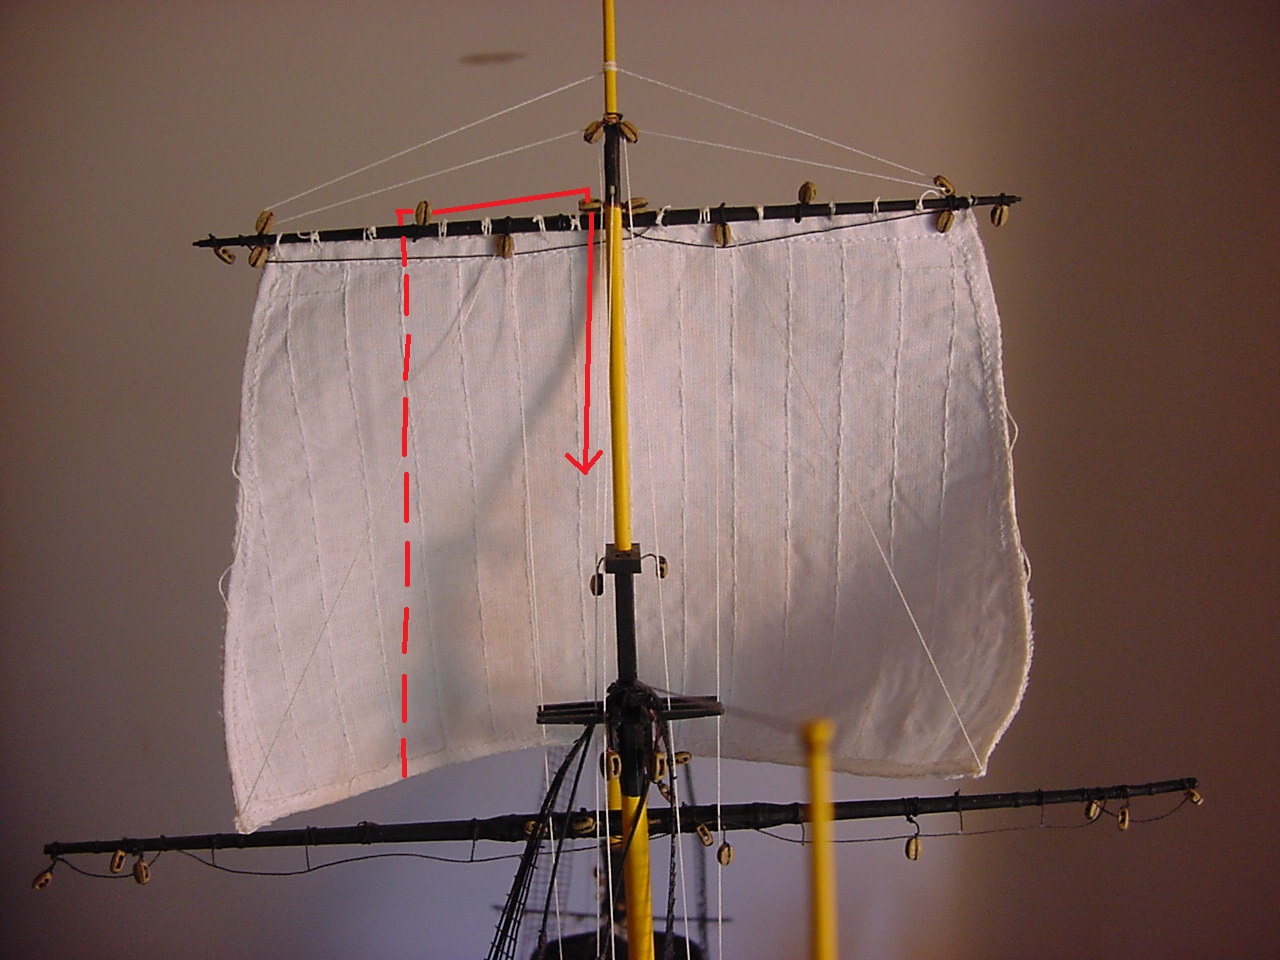
So what this means is, I won't have a pair of lines coming from the yardarms up to the upper reaches of the main mast (which means the "ooooooh! aahhhhh!" factor will be lessened). So here's how I anticipate the buntline will flow:

" BORDER="0">

The dashed line means that the buntline is on the front of the sail.

So I guess, the tip here is, put all 4 blocks above the black painted part of the mast, or put the lift line blocks above the black painted section, and then put the buntline blocks above those blocks.

Next steps: I'm going to install the main topgallant tye rigging (lines V42 and V43) this week, and when that's done, I'll install the topgallant sail. Well, that's the plan, anyways.

Thanks for looking, and I hope no one has come down with Covid-19, and that everyone is weathering their stay-at-home guidelines. And of course, with social distancing, I would guess that leads to a lot of safe sex practices - unless you can "couple" from six feet away!
d6mst0
#453
Visit this Community
Texas, United States
Joined: August 28, 2016
KitMaker: 1,925 posts
Model Shipwrights: 1,298 posts
Posted: Monday, June 08, 2020 - 07:36 AM UTC
Timothy,

Well that sucks having to the assembly twice. Those buntline pulleys do look out of place. Good luck with the move.

Mark
timmyp
Visit this Community
Virginia, United States
Joined: May 18, 2008
KitMaker: 496 posts
Model Shipwrights: 404 posts
Posted: Wednesday, June 10, 2020 - 02:51 AM UTC

Quoted Text

Timothy,

Well that sucks having to the assembly twice. Those buntline pulleys do look out of place. Good luck with the move.

Mark


Hi Mark,

Well, in a case of leaving sleeping dogs lie, I'm not going to try and move those pullies - I'd probably do more damage than good. I guess it'll just be a lesson for future modelers to learn. I'm not sure if I will have the same problem when I start to rig the foremast yards- but if I do, maybe I can salvage things on the foremast before assembly gets too far along.

Tim
timmyp
Visit this Community
Virginia, United States
Joined: May 18, 2008
KitMaker: 496 posts
Model Shipwrights: 404 posts
Posted: Wednesday, June 10, 2020 - 03:17 AM UTC
So when I was installing what is called the tye line, in my first attempt at running the line through the correct pulley, I managed to run it through the hole made by a buntline pulley attachment, which is attached to a large double block on the yardarm. In the picture, the yellow circle is where I managed to initially push the thread through (now, if I had actually wanted the thread to go through there, I'd probably still be working on that!). In order to keep the bunline pullies out of the way, I used some spare thread and a clothespin to pull them out of the way. Once I did that, it was easier to see what I was doing. In the picture, the light blue line is one of the tye lines

In attaching the tye line to the mast, Heller vaguely indicates it is attached to the trestletree, but in looking at Longridge's book, the tye line actually is tied to the mast, just above where all the shrouds go around the mast, and that's where the tye lines got attached (and where it "starts" - the other end ending at the fife rail).

" BORDER="0">
JJ1973
#345
Visit this Community
Niedersachsen, Germany
Joined: August 22, 2011
KitMaker: 1,835 posts
Model Shipwrights: 1,832 posts
Posted: Saturday, June 13, 2020 - 05:44 AM UTC
Tim,

just looking on all your rigging and the explanations with awe and I know I couldn't do it!! The way you are getting into all of this and how you are building it leaves the impression that it actually could work right there on your model!

I'm just amazed!

Cheers
Jan
timmyp
Visit this Community
Virginia, United States
Joined: May 18, 2008
KitMaker: 496 posts
Model Shipwrights: 404 posts
Posted: Tuesday, June 16, 2020 - 11:37 AM UTC

Quoted Text

Tim,

just looking on all your rigging and the explanations with awe and I know I couldn't do it!! The way you are getting into all of this and how you are building it leaves the impression that it actually could work right there on your model!

I'm just amazed!

Cheers
Jan


Thanks, Jan.

And yes, some of that rigging actually works! In the photo in the previous post, you'll note that the sail is curved backwards and a bit upwards...this happened when I was tying the clue line off to the fife rail - I didn't realize I was pulling so hard on the thread, it actually caused the sail to start being pulled upwards!

Anyways, glad you stopped by and took a look. I hope you're doing well, what with all covid-19 things going on.

Cheers,

Tim