Joined: October 30, 2005
KitMaker: 3,897 posts
Model Shipwrights: 3,301 posts
Posted: Wednesday, February 22, 2012 - 07:08 AM UTC
Nice build and a nice build log there Al. The Breda looks good !
Julian

Kentucky, United States
Joined: October 05, 2010
KitMaker: 205 posts
Model Shipwrights: 163 posts
Posted: Friday, February 24, 2012 - 02:38 AM UTC
Al, watching your build thread has convinced me that I have to add this Vosper to my stash. I love these 1/35 Italieri MTB kits. Well engineered, great cast on detail (the molded on detail on my P.T. 596 has proved so good that I have foregone a good deal of the PE in the LionRoar set simply because it just doesn't add anything real to the build - it would just be using PE for PE's own sake, which I don't do). I think that Vosper would make a great display next to the 596 (and maybe the upcoming 103 Class Elco). Now, if I can just figure out how to slip it past the C-in-C! I've already been forbidden till I build down some of my stash!
Bob
Building: Revell 1/72 S-100 Schnelboot
Dragon 1/350 U.S.S. Laffey
Just Launched: Hasegawa IJN Yakakuze (1940)
New York, United States
Joined: January 21, 2008
KitMaker: 2,531 posts
Model Shipwrights: 1,244 posts
Posted: Friday, February 24, 2012 - 07:05 AM UTC
Warning! There is a mistake in Step #19 of the instructions. It would have you install part 33E and two parts 10D upside down! It shows them with the slanted side up. They should be the other way around, flat side up. If you look at the photo of the turret on page 20 in the information booklet, you'll see the way they should be. I think they probably are steps used for climbing up into the turret.

Al
Zuid-Holland, Netherlands
Joined: December 17, 2004
KitMaker: 100 posts
Model Shipwrights: 99 posts
Posted: Friday, February 24, 2012 - 07:38 AM UTC
Totaly correct there steps and i found out to late so i had to make 1 new cause it died on taking it of,should have warned you,but i forgot to.
Today i bought the kay,so thats another one for my stash.
Happy building,
TDK.
chaos alway's win's,because it's better organized (terry pratchett)
New York, United States
Joined: January 21, 2008
KitMaker: 2,531 posts
Model Shipwrights: 1,244 posts
Posted: Friday, February 24, 2012 - 07:43 AM UTC
This is a photo of the turret with the parts 33E & 10D installed:

I'm surprised that I caught the mistake in the instructions before I glued them on.

Al
England - East Anglia, United Kingdom
Joined: August 12, 2005
KitMaker: 14,499 posts
Model Shipwrights: 1,919 posts
Posted: Saturday, February 25, 2012 - 07:34 PM UTC
Thanks Al
Alan

'Action this Day'
Winston Spencer Churchill
New York, United States
Joined: January 21, 2008
KitMaker: 2,531 posts
Model Shipwrights: 1,244 posts
Posted: Tuesday, February 28, 2012 - 03:49 AM UTC
A quick update, I masked and painted the waterline yesterday, my least favorite task when building a ship model. I find it so hard to get it right the first time. It will require some re-masking and touching up. When it's done, I'll post some pics. Did I mention how much I dislike painting the waterline? I did the weathering of the upper hull before painting the lower hull, I felt it would be easier that way. Have I mentioned I loathe painting the waterline? While masking the hull I managed to break off, and repair, one of the rudders, twice. Damn that waterline!
Al
England - East Anglia, United Kingdom
Joined: August 12, 2005
KitMaker: 14,499 posts
Model Shipwrights: 1,919 posts
Posted: Tuesday, February 28, 2012 - 04:48 AM UTC
'Action this Day'
Winston Spencer Churchill
New York, United States
Joined: January 21, 2008
KitMaker: 2,531 posts
Model Shipwrights: 1,244 posts
Posted: Tuesday, February 28, 2012 - 05:13 AM UTC
Hello Alan, I'm glad to see that I'm not the only one who finds painting the waterline a bit of a challenge, and a somewhat less than pleasant experience.
Al
Zuid-Holland, Netherlands
Joined: December 17, 2004
KitMaker: 100 posts
Model Shipwrights: 99 posts
Posted: Tuesday, February 28, 2012 - 06:57 AM UTC
HI Al's,
For me the waterline wasn't the problem.
The problem is my twotone hull,did it twice but luckly no major broken parts.Only the skeg under the hull came off. I haven't put the screws on for the same reason.I hope to glue them on only once.
Looking forward to see your paintwork.
TDK
chaos alway's win's,because it's better organized (terry pratchett)
New York, United States
Joined: January 21, 2008
KitMaker: 2,531 posts
Model Shipwrights: 1,244 posts
Posted: Tuesday, February 28, 2012 - 02:56 PM UTC
Hello Tom, I know masking those curves for the second color on the sides of your hull must have been a real bear to do.
Al
New York, United States
Joined: January 21, 2008
KitMaker: 2,531 posts
Model Shipwrights: 1,244 posts
Posted: Thursday, March 01, 2012 - 08:18 AM UTC
Zuid-Holland, Netherlands
Joined: December 17, 2004
KitMaker: 100 posts
Model Shipwrights: 99 posts
Posted: Thursday, March 01, 2012 - 09:09 AM UTC
Nice wheathering ,it's going to look well lived.
One thing i'm not completly sure of is your waterline.
It looks like your boat is a bit high in the water at the stern.
When i did mine i checked it against drawings i bought from marine modelling int. desgined by John Lambert.
And there it seemed that at the stern the wl was 2 and 2/3 of a feet
which i think is about 21mm in 1/35 i know that Italeri has it as 13mm.
But i can't be sure because it looks in the photo's there are diferences .
TDK
chaos alway's win's,because it's better organized (terry pratchett)
New York, United States
Joined: January 21, 2008
KitMaker: 2,531 posts
Model Shipwrights: 1,244 posts
Posted: Thursday, March 01, 2012 - 11:24 AM UTC
Thanks Tom, I did use Italeri's measurement (13mm) when doing the waterline. I'll have to look into whether or not I'll need to change it.
England - East Anglia, United Kingdom
Joined: August 12, 2005
KitMaker: 14,499 posts
Model Shipwrights: 1,919 posts
Posted: Friday, March 02, 2012 - 03:59 AM UTC
Hi,
Nice progress, looking good.
Al
'Action this Day'
Winston Spencer Churchill
Indiana, United States
Joined: August 19, 2007
KitMaker: 2,184 posts
Model Shipwrights: 204 posts
Posted: Friday, March 02, 2012 - 09:05 AM UTC
Hey Al, finally got this thing going again; had to drop kick it twice. This vosper is looking real good, as your usual habit of gluing and painting me under the table, lol. I like the weathering on this one, looks like she's been around awhile, kind of look I like. Maybe when you and the other guys are done with their vospers, we can get someone to post them in a gallery for a side by side. And it just wouldn't be the same if you didn't break something off during the process, by the way, burn any styrene to the model god lately? Joking aside, good job and hope to see the rest soon.
There is no return policy on time spent
Joined: October 30, 2005
KitMaker: 3,897 posts
Model Shipwrights: 3,301 posts
Posted: Saturday, March 03, 2012 - 05:46 PM UTC
Coming along nicely there Al. The Vosper looks the epitome of British cleaning and maintenance

Just out of curiosity: what sort of paint did you use for the hull and what did you use for the weathering?
Cheers,
Julian
New York, United States
Joined: January 21, 2008
KitMaker: 2,531 posts
Model Shipwrights: 1,244 posts
Posted: Sunday, March 04, 2012 - 02:25 AM UTC
Hello Julian, I guess that like their American counterparts, British Coastal forces were at the short end of the supply chain. Painting would probably be the least of their operational concerns. To answer your question, I used Testors' Flat Gull Grey sprayed from a 'rattle can' for the upper hull, and their Flat Black for the lower. The weathering was done with several different shades of Grey acrylic paints. I thin the paint almost like a wash, starting at the top, streaking it downward, and fading it out towards the bottom. Or, the other way 'round, starting the bottom and streaking it upward. If I have too much paint where I want to end the 'streak' I gently wipe it with a piece of tissue, or a cotton swab. I also use the dry-brushing technique, starting lightly and adding more color as I go. The nice thing about using acrylics is that you can wipe them off and start again if you're not happy with the way it looks.
Al
Joined: October 30, 2005
KitMaker: 3,897 posts
Model Shipwrights: 3,301 posts
Posted: Sunday, March 04, 2012 - 08:14 AM UTC
Got you there Al, okay, nice to see how you get those effects,
cheers,
Julian
New York, United States
Joined: January 21, 2008
KitMaker: 2,531 posts
Model Shipwrights: 1,244 posts
Posted: Sunday, March 04, 2012 - 09:17 AM UTC
Hello Julian, I hope I explained it clearly, I find it is hard to put how I do something into words.
Here are a few photos of the Bridge lockers painted and installed. They are glued to the sides of the bridge, but the bridge itself isn't glued in place yet. I glued some bits and pieces of plastic stock inside the lockers to reinforce the joints.


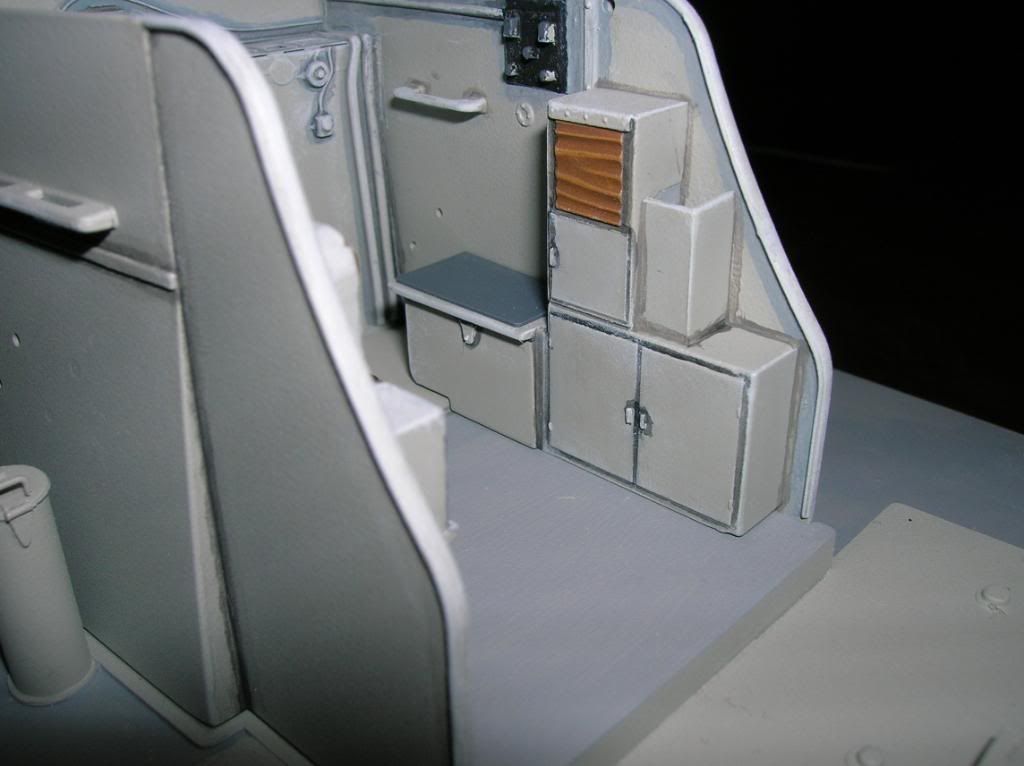
In a photo on page 17 of the Info Booklet, there is a picture of the starboard lockers. The lid of the large locker is raised and appears to me to have a non-skid surface. I replicated this by gluing a thin piece of plastic to the lid and painting it Gunship Grey.
Al
England - East Anglia, United Kingdom
Joined: August 12, 2005
KitMaker: 14,499 posts
Model Shipwrights: 1,919 posts
Posted: Sunday, March 04, 2012 - 11:00 PM UTC
Nice work Al,
Alan

'Action this Day'
Winston Spencer Churchill
New York, United States
Joined: January 21, 2008
KitMaker: 2,531 posts
Model Shipwrights: 1,244 posts
Posted: Monday, March 05, 2012 - 01:01 AM UTC
Thanks Alan. Do you, or anyone else, know what that canvas covering on top of the port side locker is for? Am I correct in assuming that the large canvas drape on the port side is covering the flag locker? If so, what is behind curtain #2 (smaller one, starboard side)?
Al
New York, United States
Joined: January 21, 2008
KitMaker: 2,531 posts
Model Shipwrights: 1,244 posts
Posted: Tuesday, March 06, 2012 - 01:41 AM UTC
Here are the compass housings, the motors for the wheelhouse windows' 'clear-view' screens, and the bridge voice-pipe. I drilled out the opening in the compass housings and used a slice of tubing for the rims. I'll add the 'glass' after painting.

Al
New York, United States
Joined: January 21, 2008
KitMaker: 2,531 posts
Model Shipwrights: 1,244 posts
Posted: Tuesday, March 06, 2012 - 06:14 AM UTC
The compass housing, bridge controls, ship's wheel, and voice pipe painted and installed:


I used a drop of epoxy to simulate the 'glass' in the compass housing, it looks better than painting a black spot on it as the instructions would have you do.
Al
England - East Anglia, United Kingdom
Joined: August 12, 2005
KitMaker: 14,499 posts
Model Shipwrights: 1,919 posts
Posted: Tuesday, March 06, 2012 - 10:07 AM UTC
Hi Al,
Nice work, looking good.
Al
'Action this Day'
Winston Spencer Churchill