New York, United States
Joined: January 21, 2008
KitMaker: 2,531 posts
Model Shipwrights: 1,244 posts
Posted: Thursday, March 08, 2012 - 01:42 AM UTC
England - East Anglia, United Kingdom
Joined: August 12, 2005
KitMaker: 14,499 posts
Model Shipwrights: 1,919 posts
Posted: Thursday, March 08, 2012 - 10:02 PM UTC
Coming on a treat Al.
Cheers
Alan

'Action this Day'
Winston Spencer Churchill
New York, United States
Joined: January 21, 2008
KitMaker: 2,531 posts
Model Shipwrights: 1,244 posts
Posted: Saturday, March 10, 2012 - 04:58 AM UTC
The spray shield with the PE supports and navigation lights in place. For extra strength, I used small pieces of thin plastic rod to reinforce the joints on the inside edge, where they will be impossible to see.
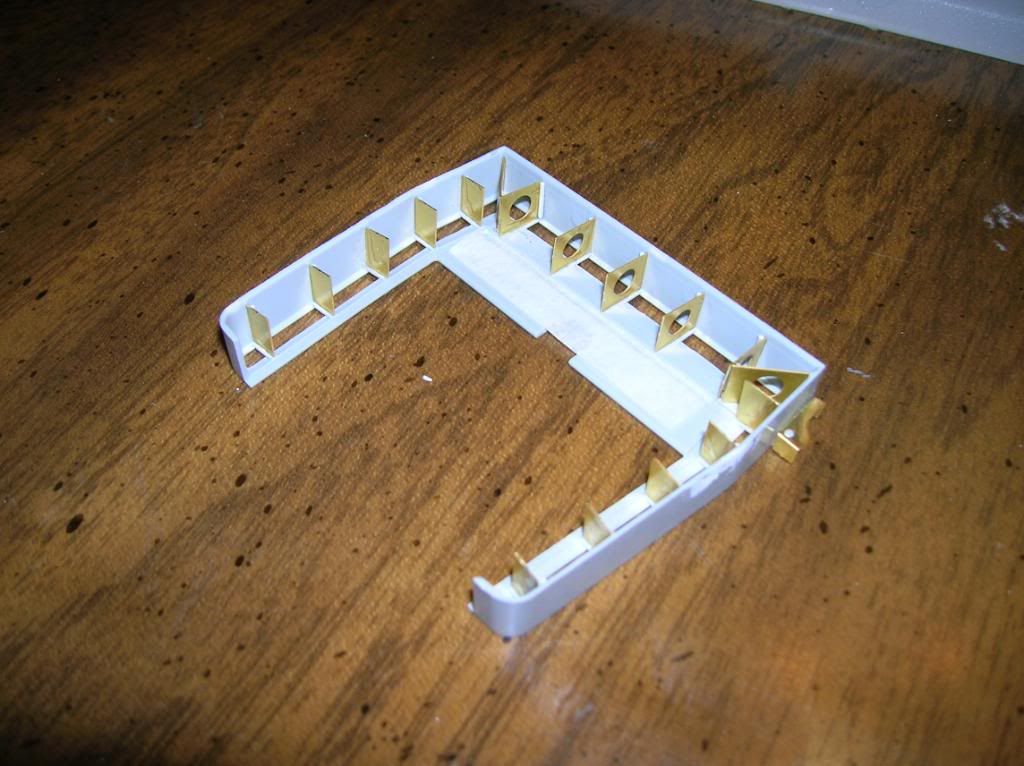
The shield painted and installed:


Little by little, it is starting to look like a Vosper.

Al
Zuid-Holland, Netherlands
Joined: December 17, 2004
KitMaker: 100 posts
Model Shipwrights: 99 posts
Posted: Saturday, March 10, 2012 - 05:57 AM UTC
Looking very good!
You might already have noticed ,but a word of caution regarding the livebuoys.The way Italeri has them on there frames they can never be used.
The bottom part of the "cross" has to be cut away.

Your working faster then mein awhile i can copy your ideas.


TDK
chaos alway's win's,because it's better organized (terry pratchett)
England - East Anglia, United Kingdom
Joined: August 12, 2005
KitMaker: 14,499 posts
Model Shipwrights: 1,919 posts
Posted: Saturday, March 10, 2012 - 11:07 AM UTC
Nice work Al, lots of useful things to note.
Cheers
Alan


'Action this Day'
Winston Spencer Churchill
Kentucky, United States
Joined: October 05, 2010
KitMaker: 205 posts
Model Shipwrights: 163 posts
Posted: Sunday, March 11, 2012 - 08:26 AM UTC
Boy, I'm watching this with great interest. I just picked up the Vosper kit last weekend at my LHS. I'm starting to get addicted to these big scale builds, first Revell's 1/144 Fletcher (about 90% done), then Italieri's 1/35 P.T. 596, and now the Vosper, with the prospect of an Italieri 103 class P.T. boat in 1/35 on the horizon. If this is as good as their P.T. 596 kit, it will be a great build I'll throughly enjoy!
Bob
Building: Revell 1/72 S-100 Schnelboot
Dragon 1/350 U.S.S. Laffey
Just Launched: Hasegawa IJN Yakakuze (1940)
New York, United States
Joined: January 21, 2008
KitMaker: 2,531 posts
Model Shipwrights: 1,244 posts
Posted: Sunday, March 11, 2012 - 08:56 AM UTC
I sometimes get ahead of myself and find I have to go back and address a problem or area that I overlooked. Such is the case with the cleats molded onto the starboard side of the bridge. Why they weren't included as separate pieces only God and Italeri know. I shaved off both ends of the molded-on cleats, leaving the small section in the center. I then filed and flattened the edges and glued a piece of styrene rod to each one. Now I have a proper 'cleat' to tie my halyards to.


Al
New York, United States
Joined: January 21, 2008
KitMaker: 2,531 posts
Model Shipwrights: 1,244 posts
Posted: Monday, March 12, 2012 - 08:59 AM UTC
Here are a few more photos:
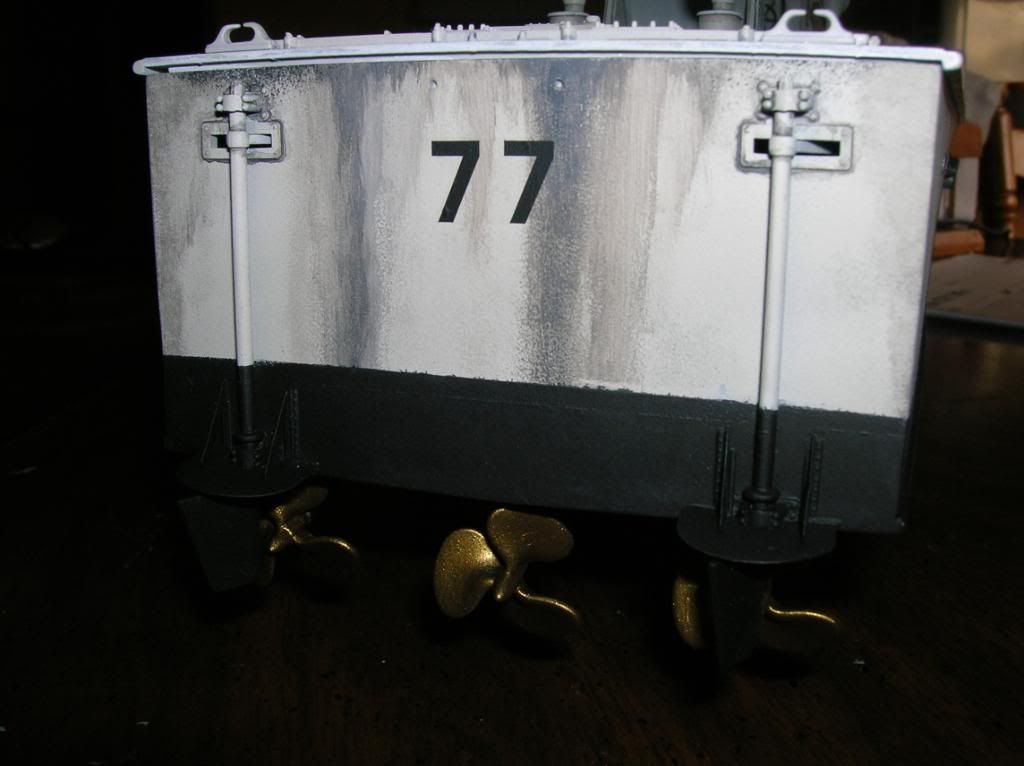
Here is a view of the stern. I realized TDK was right about the waterline being too low, so I re-shot it a little higher. The decal was applied and the props painted.
The 'Carley' float painted and installed. The top 'rope' was poorly molded, so I removed it and replaced it with pieces of wire.
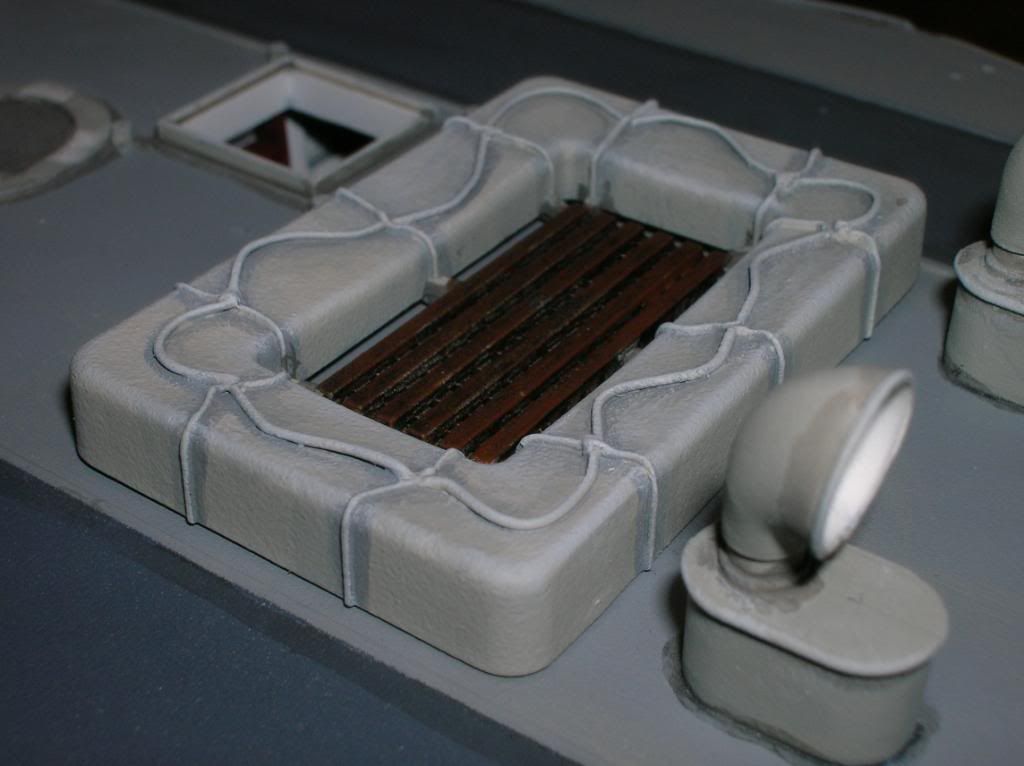
The ammo locker done.

Decals applied to the bow.

One quibble I have with Italeri, is the flimsiness of some of the attachment points. In particular, the Torpedo tubes, which have very fragile and miniscule locating pins (that I plan on replacing). I find that when the locator pins aren't sturdy enough it affects the strength of the joint when mounting such a large assembly. They are in a very exposed position on deck, and I would prefer to have a strong, positive joint. One that can withstand any minor mishaps or a little rough handling, like when transporting to a show.

Al
England - East Anglia, United Kingdom
Joined: August 12, 2005
KitMaker: 14,499 posts
Model Shipwrights: 1,919 posts
Posted: Monday, March 12, 2012 - 06:04 PM UTC
'Action this Day'
Winston Spencer Churchill
Queensland, Australia
Joined: May 20, 2010
KitMaker: 1,230 posts
Model Shipwrights: 1,212 posts
Posted: Monday, March 12, 2012 - 07:38 PM UTC
Very nice work indeed.....Cheers mark
If I was your Wife I would Poison your Tea
If I was your Husband, I would drink it.
New York, United States
Joined: January 21, 2008
KitMaker: 2,531 posts
Model Shipwrights: 1,244 posts
Posted: Monday, March 12, 2012 - 11:05 PM UTC
Thanks for the kind words guys. I'm waiting for a replacement part so I can complete the torpedo tubes. Once they're finished and installed, I will finally be able to glue and screw the deck in place.

Al
Joined: October 30, 2005
KitMaker: 3,897 posts
Model Shipwrights: 3,301 posts
Posted: Tuesday, March 13, 2012 - 06:21 AM UTC
Nice going Al, thanks for the tip on the halyard cleats.
Cheers,
Julian

New York, United States
Joined: January 21, 2008
KitMaker: 2,531 posts
Model Shipwrights: 1,244 posts
Posted: Wednesday, March 14, 2012 - 03:49 AM UTC
I did a little work on the torpedo tubes, I added some of the PE bits and beefed up the locating pins. I also replaced the plastic handles on the end caps with brass wire.


Folding the little PE anchor for the life-line on the top of the tube was fun. Thanks to my '5-Speed' Hold & Fold tool it wasn't as bad as I had feared it would be. I tip my hat to anyone working with 1/350 PE parts, and I am convinced that those who work in 1/700 must be on some serious medication.

You may notice that the tops of the securing screw bolts are missing from the end caps. As careful as I tried to be, one by one they disappeared into the 'Twilight Zone'. I haven't figured out how I am going to replace them yet. I do have a few ideas though.

Al
New York, United States
Joined: January 21, 2008
KitMaker: 2,531 posts
Model Shipwrights: 1,244 posts
Posted: Wednesday, March 14, 2012 - 06:44 AM UTC
Some 'canvas' covers for the torpedo tubes made from tissue paper. I used several strips of tissue for each 'cover'. They were applied using thinned white glue, one piece at a time. I use an old brush to apply more glue as needed to blend the pieces together.

It was common practice to cover the tubes to keep out salt spray. I didn't want to hide those lovely torpedoes in their tubes, but I didn't want to have empty tubes either. Anybody have any idea what color they might have been? I'm leaning towards a dark tan or khaki.

Al
England - East Anglia, United Kingdom
Joined: August 12, 2005
KitMaker: 14,499 posts
Model Shipwrights: 1,919 posts
Posted: Wednesday, March 14, 2012 - 07:23 PM UTC
Hi Al,
More nice work and tips. I like your covers.
Alan
'Action this Day'
Winston Spencer Churchill
New York, United States
Joined: January 21, 2008
KitMaker: 2,531 posts
Model Shipwrights: 1,244 posts
Posted: Sunday, March 18, 2012 - 08:30 AM UTC
The torpedo loading cradles, the PE part wasn't that hard to bend, the trouble came trying to line them up with the plastic part, glue 'em, and keep 'em straight. Why wasn't I born an octopus? I only used two per side, instead of four. Here they are painted and installed.

The bottles for the fire suppression system are shown on page 15 of the handy little info booklet. In the photo, they are a darker color on the upper half. I'm assuming that the lower half is just a holder and the tank slides it. There are also a couple of hoses, which I added. Not knowing where they went I just 'disappeared' them behind the tanks.

That's all for now.

Al
Joined: October 30, 2005
KitMaker: 3,897 posts
Model Shipwrights: 3,301 posts
Posted: Monday, March 19, 2012 - 06:13 AM UTC
Nice progress Al, I'm very impressed with the canvas tube covers

Julian

New York, United States
Joined: January 21, 2008
KitMaker: 2,531 posts
Model Shipwrights: 1,244 posts
Posted: Monday, March 19, 2012 - 07:02 AM UTC
Quoted Text
Nice progress Al, I'm very impressed with the canvas tube covers 
Julian 
Thanks Julian, They are easy to make, just pieces of tissue paper and thin white glue. When the glue dries, the tissue looks as if it was all one piece. Starting with the edge of the 'cover', I folded a narrow strip of tissue and wrapped it around the tube, applying the glue with an old brush. Then I glued a strip over the opening of the tube, and filled in the rest of the 'cover' in between, one piece at a time. They look very baggy in the photo, but they shrink up a little when dry.

Al
New York, United States
Joined: January 21, 2008
KitMaker: 2,531 posts
Model Shipwrights: 1,244 posts
Posted: Monday, March 19, 2012 - 07:09 AM UTC
England - East Anglia, United Kingdom
Joined: August 12, 2005
KitMaker: 14,499 posts
Model Shipwrights: 1,919 posts
Posted: Tuesday, March 20, 2012 - 07:31 AM UTC
'Action this Day'
Winston Spencer Churchill
New York, United States
Joined: January 21, 2008
KitMaker: 2,531 posts
Model Shipwrights: 1,244 posts
Posted: Friday, March 23, 2012 - 08:31 AM UTC
This is the completed cockpit, I added the small auxiliary panel to the right of the main instruments. The 'charts' are just pieces of thinned down plastic tube.
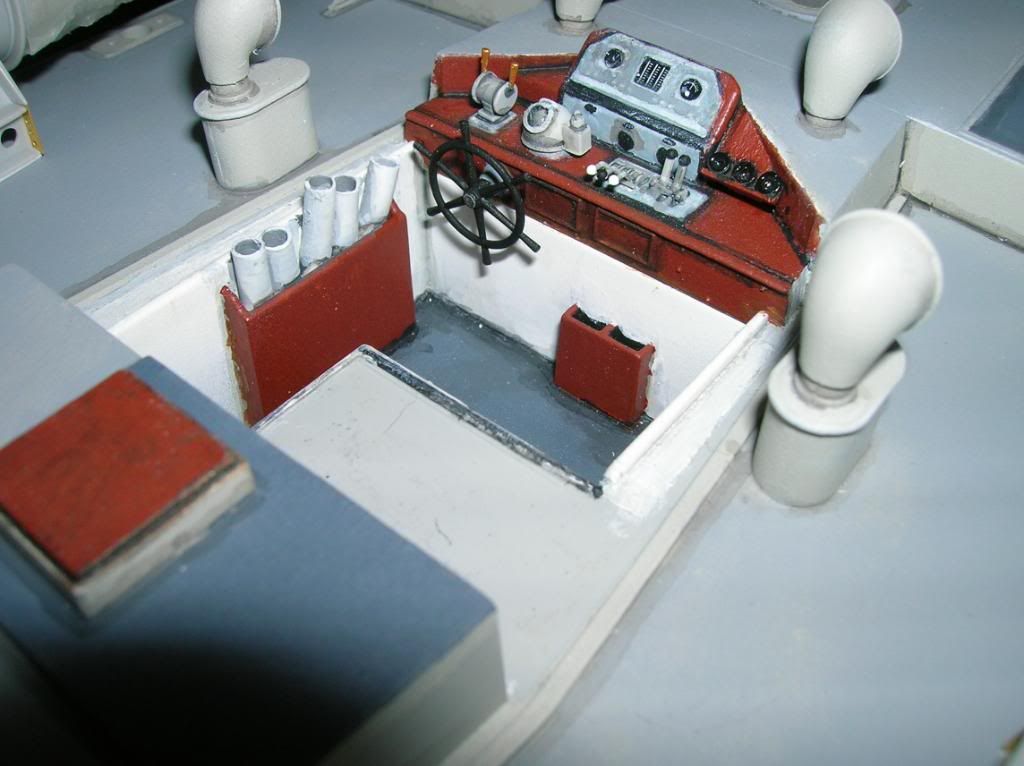
I inadvertently removed some of the photos posted on the previous pages. I deleted those pictures from the file in Photobucket, not realizing that that would remove them from here also. Live and learn, I guess.

Al
New York, United States
Joined: January 21, 2008
KitMaker: 2,531 posts
Model Shipwrights: 1,244 posts
Posted: Tuesday, March 27, 2012 - 07:26 AM UTC
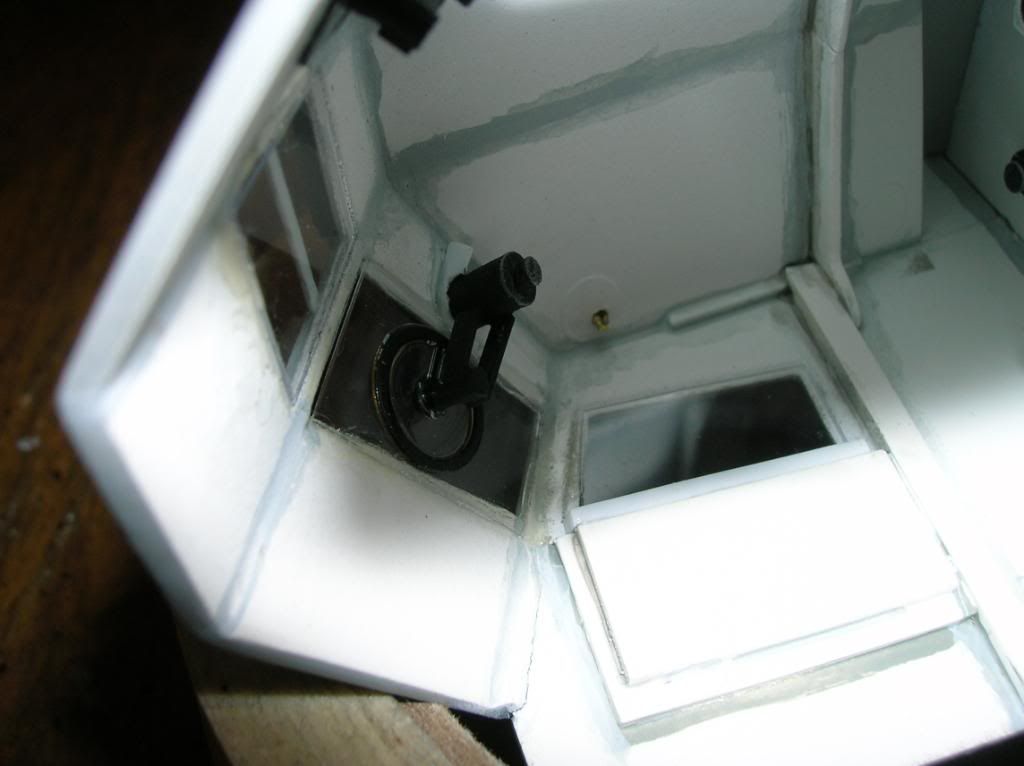
I installed the wheelhouse windows with their 'clear-view' screens. It involved my least favorite combination of things, clear parts, PE, & super glue.
I replaced the molded on side curtains with some home-made ones.

The two side windows fit okay, as did the center one in front, but the two outer front windows are just barely big enough and require care when fitting. If I had it to do over, I would have made some replacements that were a little larger. I didn't use the PE piece provided for the horizontal bar in the center window, I glued a piece of plastic across the opening before adding the clear piece. The instructions would have you glue the PE piece to the mounted window, and that's asking for trouble IMHO.

I also added the drive motors and their belts for the 'clear-view' screens to the inside of the wheelhouse.
Italeri gives you some tiny PE parts that are to be applied to the front and top of the wheelhouse. They are the anchor points for the bow lifeline and some rigging. I felt that their tiny area of attachment would make a weak joint and would cause a problem. I could see them coming right off as soon as I tried to tie a line to them. So, I replaced them with some loops made of brass wire. Except for some touch-ups, I think the wheelhouse is about done and soon will be mounted to the deck.

Al
New South Wales, Australia
Joined: April 15, 2006
KitMaker: 158 posts
Model Shipwrights: 50 posts
Posted: Tuesday, March 27, 2012 - 01:32 PM UTC
Wow
Great Work there Al!
Looks very realistic. The extra detail you have added really shows
Looking forward to more
Anthony
New York, United States
Joined: January 21, 2008
KitMaker: 2,531 posts
Model Shipwrights: 1,244 posts
Posted: Tuesday, March 27, 2012 - 02:47 PM UTC
Thanks Anthony, It's a great kit, but there is a lot of room for adding extra detail, especially in the wheelhouse and the turret.

Al
Zuid-Holland, Netherlands
Joined: December 17, 2004
KitMaker: 100 posts
Model Shipwrights: 99 posts
Posted: Tuesday, March 27, 2012 - 06:51 PM UTC
Nice going,
Love the mug in the wheelhouse wish i thought of that.

I would check the rolled up window blinds,i think there is still some flash showing.
See that you replaced the side ones with better items.I had that planned to.
That's one of the thinks i don't understand of Italeri for 3 of the windos they do it right and then they make a small mess of the 2 side ones.I think the same with the cleats.
But then again only minor foul ups still love the Vosper.Have been away for the week so nothing done to mine.


TDK
chaos alway's win's,because it's better organized (terry pratchett)


 Al
Al


 Al
Al


 Al
Al


 TDK
TDK




 Al
Al


 Al
Al


 Al
Al


 You may notice that the tops of the securing screw bolts are missing from the end caps. As careful as I tried to be, one by one they disappeared into the 'Twilight Zone'. I haven't figured out how I am going to replace them yet. I do have a few ideas though.
  Al
Al


 Al
Al


 Al
Al 


 Al
Al


 Al
Al


 Al
Al


 Al
Al


 Al
Al


 TDK
TDK