Maine, United States
Joined: May 18, 2006
KitMaker: 317 posts
Model Shipwrights: 308 posts
Posted: Sunday, April 29, 2012 - 12:39 PM UTC
Thought you guys might enjoy this. I was rummaging around through some files and found a letter from Peter Dickens (CO MTB234, SO 21st MTB) dated 30JUN79. We had been corresponding on MTB234 at the time that I was doing the drawing of her. What I found particularly useful was his explanation of the markings on the torpedo director.

Al
New York, United States
Joined: January 21, 2008
KitMaker: 2,531 posts
Model Shipwrights: 1,244 posts
Posted: Monday, April 30, 2012 - 02:54 AM UTC
Thanks for the info Al, do you have a photo of the sight? It would be an interesting detail to add.

Al B
Zuid-Holland, Netherlands
Joined: December 17, 2004
KitMaker: 100 posts
Model Shipwrights: 99 posts
Posted: Monday, April 30, 2012 - 03:49 AM UTC

Well it isn't a photo but thats what i used to make mine
Your build is loking better and better Al.

TDK. (Tom)
chaos alway's win's,because it's better organized (terry pratchett)
New York, United States
Joined: January 21, 2008
KitMaker: 2,531 posts
Model Shipwrights: 1,244 posts
Posted: Monday, April 30, 2012 - 06:51 AM UTC
Thanks Tom, that drawing will do just fine.
Al
New York, United States
Joined: January 21, 2008
KitMaker: 2,531 posts
Model Shipwrights: 1,244 posts
Posted: Monday, April 30, 2012 - 07:02 AM UTC
The deck is attached to the hull with 7 small screws. They will be hidden under various deck fittings, like these bitts.

The two screws amidships, next to the Torpedo tubes, are to be hidden by two small mushroom vents. The instructions would have you glue the vents directly to the head of the screw. I didn't care for that idea. So instead, I cut out two small discs from thin plastic, glued them in, drilled a hole for the locating pin on each of the vents, and then glued the vents in place.
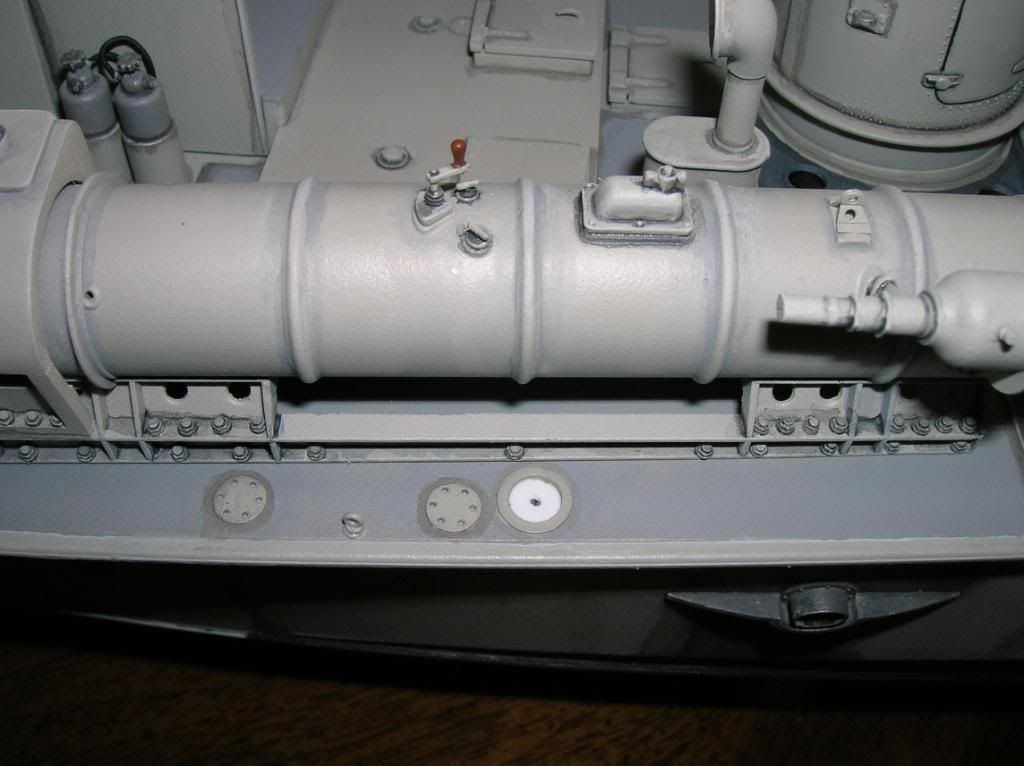

I think this looks better than the way the kit would have you do it.
Al
Joined: October 30, 2005
KitMaker: 3,897 posts
Model Shipwrights: 3,301 posts
Posted: Monday, April 30, 2012 - 06:08 PM UTC
You are really going to town on this build Al

Lots of scratch building going on too it appears, (my Vosper is in the attic with the rest of my stash so I don't have the instructions at hand). Did you add all the levers on the torpedo tubes?
Julian
England - South East, United Kingdom
Joined: March 01, 2010
KitMaker: 7,078 posts
Model Shipwrights: 6,649 posts
Posted: Monday, April 30, 2012 - 08:37 PM UTC
Looking really great Al, following with much interest.
Si
New York, United States
Joined: January 21, 2008
KitMaker: 2,531 posts
Model Shipwrights: 1,244 posts
Posted: Tuesday, May 01, 2012 - 05:07 AM UTC
[quoted text] Did you add all the levers on the torpedo tubes?
Thanks Julian, the only thing I added to the tubes were the covers, the Vickers MG saddle mounts, and the nuts & bolts. The controls on the tubes came with the kit, and are quite fragile. I had to replace one of the small 'T' handles that had disappeared, and repair both of those cranks. There were 2 'eye' bolts on the back cover of each tube, they vanished one by one. I couldn't find anything to replace them with, so that is one detail that will remain missing.
Al
New York, United States
Joined: January 21, 2008
KitMaker: 2,531 posts
Model Shipwrights: 1,244 posts
Posted: Tuesday, May 01, 2012 - 05:10 AM UTC
Hello Simon, Thanks, I'm glad you're enjoying the build.
Al
Joined: October 30, 2005
KitMaker: 3,897 posts
Model Shipwrights: 3,301 posts
Posted: Tuesday, May 01, 2012 - 06:10 AM UTC
Quoted Text
[quoted text] Did you add all the levers on the torpedo tubes?
Thanks Julian, the only thing I added to the tubes were the covers, the Vickers MG saddle mounts, and the nuts & bolts. The controls on the tubes came with the kit, and are quite fragile. I had to replace one of the small 'T' handles that had disappeared, and repair both of those cranks. There were 2 'eye' bolts on the back cover of each tube, they vanished one by one. I couldn't find anything to replace them with, so that is one detail that will remain missing. Al
Couldn't remember that Al. Looks magic
Maybe after the Wasp I will pick "shorter run projects"

Cheers Al
New York, United States
Joined: January 21, 2008
KitMaker: 2,531 posts
Model Shipwrights: 1,244 posts
Posted: Tuesday, May 01, 2012 - 07:16 AM UTC
[Quoted text] Maybe after the Wasp I will pick "shorter run projects"
Whenever someone says that I must have a lot of patience, I usually reply, "No, I'm just stubborn". When I opened the box for the Elco, my first thought was this is gonna take forever. But, I made myself do something every day, even if was only to remove a part and clean it up. I tried to see each sub-assembly as an individual model. So, in my mind, I was building a bunch of smaller projects instead of one massive one. Before I knew it, I was making progress by leaps and bounds. I try to maintain this mindset for each build. But I still usually need a 'quick & easy' build between projects. Though for a few projects it does seem that the only light at the end of the tunnel, is an oncoming train!

Al
New York, United States
Joined: January 21, 2008
KitMaker: 2,531 posts
Model Shipwrights: 1,244 posts
Posted: Tuesday, May 01, 2012 - 03:45 PM UTC
While test fitting the mast I noticed that it leaned slightly to port. To correct this I shaved off the rim around the bottom locating hole on the side of the bridge.

I also had to shave a little off of the bottom locating pin on the mast itself, this corrected the problem. Here's a pic with the mast temporarily in place.

In the picture you can also see the modified and corrected IFF antenna relocated to the bridge spray shield. Below is a another view of that antenna.

You might notice that the PE lower yardarm has been replaced by a plastic one. I'm working on the replacement for the upper yardarm with its aerials. I still can't help but wonder what the designers were thinking when they chose to make those parts out of PE material.

Al
New York, United States
Joined: January 21, 2008
KitMaker: 2,531 posts
Model Shipwrights: 1,244 posts
Posted: Thursday, May 03, 2012 - 05:40 AM UTC
Here's the mast with its replacement yardarms and radar antennae.

At our club meeting last night, I was talking with a friend who builds beautiful 1/350 scale ships. He said that he strengthens, and adds dimension to, some PE parts by gluing small thin pieces of plastic to them. Something I hadn't thought of. Evergreen has several different sizes of 1/2 round that could have been glued top and bottom to the kit supplied PE. An option worth considering if thinking about building this kit.
Al
England - East Anglia, United Kingdom
Joined: August 12, 2005
KitMaker: 14,499 posts
Model Shipwrights: 1,919 posts
Posted: Thursday, May 03, 2012 - 06:32 AM UTC
Hi Al,
Things are looking excellent, nice work.
Al
'Action this Day'
Winston Spencer Churchill
New York, United States
Joined: January 21, 2008
KitMaker: 2,531 posts
Model Shipwrights: 1,244 posts
Posted: Thursday, May 03, 2012 - 08:09 AM UTC
Thanks Alan, She's really starting to take shape.
Al
Joined: October 30, 2005
KitMaker: 3,897 posts
Model Shipwrights: 3,301 posts
Posted: Friday, May 04, 2012 - 05:55 AM UTC
Quoted Text
Here's the mast with its replacement yardarms and radar antennae.
At our club meeting last night, I was talking with a friend who builds beautiful 1/350 scale ships. He said that he strengthens, and adds dimension to, some PE parts by gluing small thin pieces of plastic to them. Something I hadn't thought of. Evergreen has several different sizes of 1/2 round that could have been glued top and bottom to the kit supplied PE. An option worth considering if thinking about building this kit. Al
That looks a lot better than the "plain Jane" PE Al
I'll remember your tip when I get around to my Vosper.
Cheers,
Julian
New York, United States
Joined: January 21, 2008
KitMaker: 2,531 posts
Model Shipwrights: 1,244 posts
Posted: Friday, May 04, 2012 - 07:22 AM UTC
Thanks Julian, I'm quite happy with how it came out, and it was a little easier than I thought it would be.
Al
New York, United States
Joined: January 21, 2008
KitMaker: 2,531 posts
Model Shipwrights: 1,244 posts
Posted: Friday, May 04, 2012 - 02:33 PM UTC
Here is the mast painted and installed.


The photo of MTB 77 in the included info booklet shows the upper mast to be a much darker color. I used RLM Schwarzgrau, a very dark grey. It's darker than it looks in the pictures. Is it sacrilege to use a German color on an English boat?
Al
New York, United States
Joined: January 21, 2008
KitMaker: 2,531 posts
Model Shipwrights: 1,244 posts
Posted: Monday, May 07, 2012 - 10:09 AM UTC
After a very busy weekend, I was able to get a little more work done today. Started painting the 20mm Breda cannon.


And the Vickers turret.

TTFN
Al
Joined: October 30, 2005
KitMaker: 3,897 posts
Model Shipwrights: 3,301 posts
Posted: Tuesday, May 08, 2012 - 05:08 AM UTC
That Vickers dustbin must have been a cramped and nasty place to sit

Looking good though Al
Cheers,
Julian
New York, United States
Joined: January 21, 2008
KitMaker: 2,531 posts
Model Shipwrights: 1,244 posts
Posted: Tuesday, May 08, 2012 - 07:12 AM UTC
I just spent 45 minutes (that seemed like 4.5years) cleaning up a jar of spilled paint from our kitchen floor. If you don't hear from me in the next couple of days, please notify the authorities, and tell them that my wife did it.
Al
New York, United States
Joined: January 21, 2008
KitMaker: 2,531 posts
Model Shipwrights: 1,244 posts
Posted: Tuesday, May 08, 2012 - 07:14 AM UTC
Quoted Text
That Vickers dustbin must have been a cramped and nasty place to sit
Looking good though Al
Cheers,
Julian
Better than in the Ball Turret of a B-17, or B-24.
Al
New York, United States
Joined: January 21, 2008
KitMaker: 2,531 posts
Model Shipwrights: 1,244 posts
Posted: Thursday, May 10, 2012 - 08:34 AM UTC
The Breda is finished, it just needs to be locked and loaded, I'm working on the ammo clip now. Here's a couple of pics.


I also did some more work on the turret, mounting the control column and the spent shell boxes.

I added the stanchions for the lifeline, as well as the jackstaff, to the foredeck. I figured it would be easier to tie off the line before mounting the Breda. In one picture the instructions show the line tied to the staff, in another, it is tied to a ring fitting on the deck. I'll have to check some photos, either way could be correct.
Al
England - East Anglia, United Kingdom
Joined: August 12, 2005
KitMaker: 14,499 posts
Model Shipwrights: 1,919 posts
Posted: Thursday, May 10, 2012 - 08:46 AM UTC
Hi Al,
Things are looking good, excellent work. I think the sight on the Breda mgiht have been metalic in colour and if you want to add some interest paint the elevating handles red lol.
Excellent stuff.
Alan
'Action this Day'
Winston Spencer Churchill
New York, United States
Joined: January 21, 2008
KitMaker: 2,531 posts
Model Shipwrights: 1,244 posts
Posted: Thursday, May 10, 2012 - 09:07 AM UTC
Quoted Text
Hi Al,
Things are looking good, excellent work. I think the sight on the Breda mgiht have been metalic in colour and if you want to add some interest paint the elevating handles red lol.
Excellent stuff.
Alan
Thanks Alan, I've seen pictures of the sight that looked black, and some that were gray. I've also seen a completely different type of sight on the Breda mounted on MTB 84. It looked to be a reflector sight of some kind. I think I'll just leave it as is.
Al


