Campaigns
Want to be part of a group build? This is where to start, plan, and meet about them.
Official Thread: Mighty Battleship
warreni
Visit this Community
South Australia, Australia
Joined: August 14, 2007
KitMaker: 5,926 posts
Model Shipwrights: 2,624 posts
Posted: Monday, January 12, 2015 - 12:36 AM UTC
Thanks Simon.

Build it looking great by the way...

Cheers
Warren
RussellE
#306
Visit this Community
Victoria, Australia
Joined: June 27, 2010
KitMaker: 3,959 posts
Model Shipwrights: 2,777 posts
Posted: Monday, January 12, 2015 - 01:28 AM UTC
Happy new year everyone!!

Great to see so many updates over the festive season, even though I've been on the go slow myself

Si, Your DoY is coming along great & Warren those are too very interesting subjects you've chosen

It will be exciting to see how this campaign progresses as it gets closer to the pointy end

Russ
RedDuster
Visit this Community
England - South East, United Kingdom
Joined: March 01, 2010
KitMaker: 7,078 posts
Model Shipwrights: 6,649 posts
Posted: Monday, January 12, 2015 - 01:49 PM UTC
Thanks Warren, Russ.

getting there steadily.

Si
warreni
Visit this Community
South Australia, Australia
Joined: August 14, 2007
KitMaker: 5,926 posts
Model Shipwrights: 2,624 posts
Posted: Monday, January 12, 2015 - 02:24 PM UTC
Sprayed the Dreadnought with Tamiya XF-75 and that's the end of that debate.

Oops that reminds me I forgot to empty the syringe of paint back into the jar.

Back again.

I also got the deck on the Sevastopol. Fitted beautifully with no problems at all.

RedDuster
Visit this Community
England - South East, United Kingdom
Joined: March 01, 2010
KitMaker: 7,078 posts
Model Shipwrights: 6,649 posts
Posted: Monday, January 12, 2015 - 11:27 PM UTC
Hi Warren,

Hope your happy with colour on the Dreadnought. Sevastapol is looking good.

Short update on the Duke,

Foremast starfish with radar completed.


fitted to the foremast, along with the foretopmast.


I have managed to mislay both of the upper pair of Bridge pompom director mounts, so a replacement pair are being made from a couple of spare gun tubs.


more soon.

Si
RedDuster
Visit this Community
England - South East, United Kingdom
Joined: March 01, 2010
KitMaker: 7,078 posts
Model Shipwrights: 6,649 posts
Posted: Wednesday, January 14, 2015 - 04:28 AM UTC
Construction on the replacement pompom directors done.


Lower foremast yardarm fitted, the mounting swivel for the yardarm is a well thought out piece of etch.


Etched topmast stays fitted, the upper yard arm sits above these, therefore it seemed logical to fit them first.


The foremast complete, except for the radar and a ladder.


Eight pompom ammunition boxes folded up (two for B turret, two for the upper midships mounts and four for Y turret.


Foremast and pompom directors sprayed.


Along with the ammo boxes.


More soon

Si

RedDuster
Visit this Community
England - South East, United Kingdom
Joined: March 01, 2010
KitMaker: 7,078 posts
Model Shipwrights: 6,649 posts
Posted: Thursday, January 15, 2015 - 03:23 AM UTC
Today's progress.

Ladders from the flag deck to the Admiral's bridge and the Admirals Bridge to the Upper Bridge in place along with the ammo boxes on the pompom deck.


pompom directors either side of the compass platform fitted.


And finally the foremast in place.


railings and ammo boxes on B and Y turrets, Y turret still needs one double and three single carley floats.


And also the grill for the after funnel.

Cranes and walrus next.

Si
RedDuster
Visit this Community
England - South East, United Kingdom
Joined: March 01, 2010
KitMaker: 7,078 posts
Model Shipwrights: 6,649 posts
Posted: Friday, January 16, 2015 - 01:53 AM UTC
a start on the Walrus, the solid kit engine mounts removed to be replaced with etched parts. The parts are mounted on blue tacky cocktail sticks ready to have Tamiya AS29 IJN green grey (Erzatz sky type s) shot at them.


Three of the four carley floats on Y turret have some sort of what looks like bundles or timber in them. These have been made from square section plastic rod.


One piece has been left longer to use as handle for painting.

Painted, washed and fixed into the floats, work on the lashings has started.


Three out of the four fitted, one has escaped onto the workroom floor somewhere, it will turn up, I hope before I finish.


The Walrus ready for decals and etch, after the gunners positions have been painted in black.


A General overview of where I am at.


Still needs 12 20mm, cranes, radars, railings and rigging,

Si
warreni
Visit this Community
South Australia, Australia
Joined: August 14, 2007
KitMaker: 5,926 posts
Model Shipwrights: 2,624 posts
Posted: Friday, January 16, 2015 - 11:33 AM UTC
Don't forget the props!!
warreni
Visit this Community
South Australia, Australia
Joined: August 14, 2007
KitMaker: 5,926 posts
Model Shipwrights: 2,624 posts
Posted: Friday, January 16, 2015 - 12:34 PM UTC
Hello again.

I finally got the Dreadnought's hull painted. It too a few goes as the boot line masking was interferred with by the PE bits for the booms. Had to remask a few times but I got there in the end.


That's the Sevastopol in the background.


And a little closer. Notice that this colour is much lighter than the original Gunze H-333 I used and was recommended by Trumpeter.

Cheers
Warren
RedDuster
Visit this Community
England - South East, United Kingdom
Joined: March 01, 2010
KitMaker: 7,078 posts
Model Shipwrights: 6,649 posts
Posted: Friday, January 16, 2015 - 01:59 PM UTC
Thanks for reminding me Warren,

Always forget something!

Couple of good looking builds you have there.

Si
RedDuster
Visit this Community
England - South East, United Kingdom
Joined: March 01, 2010
KitMaker: 7,078 posts
Model Shipwrights: 6,649 posts
Posted: Saturday, January 17, 2015 - 01:48 AM UTC
Today's project, the shagbat, decals on.


All the etched struts in place.


and sat on the catapult turntable.


More soon.

Si
warreni
Visit this Community
South Australia, Australia
Joined: August 14, 2007
KitMaker: 5,926 posts
Model Shipwrights: 2,624 posts
Posted: Saturday, January 17, 2015 - 01:50 PM UTC
The Dreadnought is starting to look more and more like the real ship did look now. Fitting the wooden deck and installing most of the deck hardware seems to lift the model from just a hulk to the next level.

Again, this is Zvezda's Dreadnought and Pontos's Detail Set.


As seems to be par for the course Pontos's instructions are missing lots of information about where many of the Detail Set's parts go. Bit of a pain in the butt and some of the stairways etc will be left until the end to see what I have left over to put the correct part in the correct place.

Wish they would take a leaf out of Eduard's or Hasegawa books re instructions.

Cheers
Warren
RedDuster
Visit this Community
England - South East, United Kingdom
Joined: March 01, 2010
KitMaker: 7,078 posts
Model Shipwrights: 6,649 posts
Posted: Sunday, January 18, 2015 - 01:49 AM UTC
Looking good Warren,

I agree Pontos instructions are not the best, to say the very least, same issues with the Duke, and that has 6 sides of instructions, but they are in a confusingly random order and there seem to be etched parts that do not appear in the instructions.

Having said that I still love Pontos sets.

Si
warreni
Visit this Community
South Australia, Australia
Joined: August 14, 2007
KitMaker: 5,926 posts
Model Shipwrights: 2,624 posts
Posted: Sunday, January 18, 2015 - 02:18 AM UTC
Thanks Simon.

I agree re Pontos, etch etc is excellent, instructions not so good. I did find a correction sheet for the Dready on the Pontos site so they have at least recognized that they stuffed up...
TankSGT
Visit this Community
New Jersey, United States
Joined: July 25, 2006
KitMaker: 1,139 posts
Model Shipwrights: 84 posts
Posted: Sunday, January 18, 2015 - 03:33 AM UTC
Si, Warren great stuff, I have both of those ships and I am watcthing for tips.

I picked up the Belfast for Christmas and was surprised to see that she was as long as the Warspite.

Well I have made progress should be able to post pictures tomorrow. The superstructure is painted and now I have to place all the little dodads on it and attach them.

Tom
warreni
Visit this Community
South Australia, Australia
Joined: August 14, 2007
KitMaker: 5,926 posts
Model Shipwrights: 2,624 posts
Posted: Sunday, January 18, 2015 - 06:27 AM UTC
It is always the 'doo-dads' that take all the time..
RussellE
#306
Visit this Community
Victoria, Australia
Joined: June 27, 2010
KitMaker: 3,959 posts
Model Shipwrights: 2,777 posts
Posted: Sunday, January 18, 2015 - 04:37 PM UTC
Great progress everyone!

Well, I think it's high time I put up some evidence that I have been active too, though maybe not as much as some

Here's an overall shot of where I'm at.

Much more to do of course, and all the little doo-dads now to paint and fit.

More images here

Russ
TankSGT
Visit this Community
New Jersey, United States
Joined: July 25, 2006
KitMaker: 1,139 posts
Model Shipwrights: 84 posts
Posted: Sunday, January 18, 2015 - 05:38 PM UTC
Well I just gone home from work at 0700, I work the night shift so here are the pictures with the doo-dads yet to be added. The super structure is still not glued on easier to add doo-dads.
Question what adhesive do you photo etched gods use on the railings?


Tom
warreni
Visit this Community
South Australia, Australia
Joined: August 14, 2007
KitMaker: 5,926 posts
Model Shipwrights: 2,624 posts
Posted: Monday, January 19, 2015 - 12:57 AM UTC
Depends on what type of railing. For small runs I use Gator Glue, but for larger ones I use Tamiya Gel Super Glue. The Super Glue has very good initial bite but you can still move parts for a few seconds.
RedDuster
Visit this Community
England - South East, United Kingdom
Joined: March 01, 2010
KitMaker: 7,078 posts
Model Shipwrights: 6,649 posts
Posted: Monday, January 19, 2015 - 02:05 AM UTC
Nice Progress guys, some great builds coming on.

Very small progress on the Duke, work started on the cranes.


Si
warreni
Visit this Community
South Australia, Australia
Joined: August 14, 2007
KitMaker: 5,926 posts
Model Shipwrights: 2,624 posts
Posted: Monday, January 19, 2015 - 12:23 PM UTC
Looking good Russell, Thomas and Simon.

Thomas, I was not implying anything when I answered your railing glue question. I didn't see until later that you asked the PE Gods to help you and I ain't one of them!

OK. I have been busy but haven;t really had that much to show for all the work. Currently at the stage where you are putting lots of fiddly bits together.

First up, I was considering whether or not I really needed to make 12 searchlights from resin and PE as supplied by Pontos. Preparing resin parts has always been seen as a pain to me with their massive pour stubs and the necessary cleanup when it is removed from the part, but after I put one together I had to do them as it is chalk and cheese..

Each searchlight is made up of two resin pieces and one PE part. They don't mention the clear part supplied by Zvezda for the lens but I am going to try and use it. The two resin parts look like this after the 'massive pour stubs' are removed..


Then I glued the two parts together and took a few piccies with the Zvezda one for comaprison purposes..


I think you can see why just from these few photos why I need to use the Pontos lights..

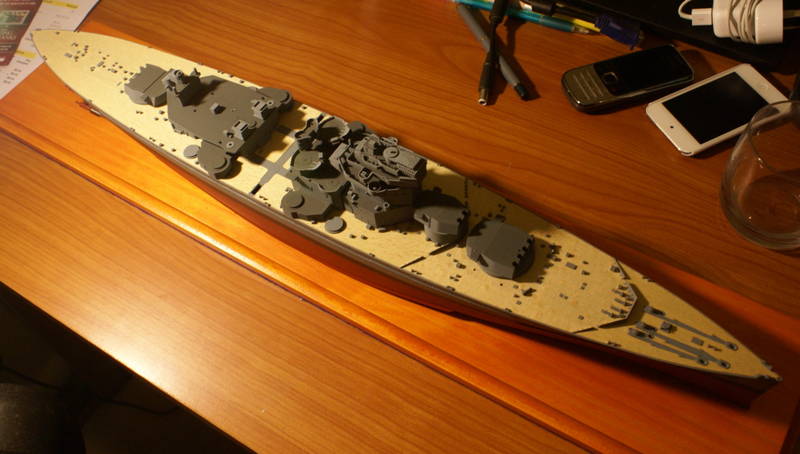
Over the past week or so I have also been working on the gun turrets and finished them today.


Well maybe not.. the macro lens on a camera seems to highlight all the faults in any part and that bare brass bit is not good enough I say!!

Oh well, a touch of paint and it should be fine.
That's it for now
Cheers
Warren
TankSGT
Visit this Community
New Jersey, United States
Joined: July 25, 2006
KitMaker: 1,139 posts
Model Shipwrights: 84 posts
Posted: Monday, January 19, 2015 - 02:43 PM UTC
Warren you are way beyond me as far as ship PE goes. So if not god maybe demi god. Thanks for the info. This is my first 350 scale ship. I build mostly armor.

Tom
warreni
Visit this Community
South Australia, Australia
Joined: August 14, 2007
KitMaker: 5,926 posts
Model Shipwrights: 2,624 posts
Posted: Monday, January 19, 2015 - 03:17 PM UTC

Quoted Text

Warren you are way beyond me as far as ship PE goes. So if not god maybe demi god. Thanks for the info. This is my first 350 scale ship. I build mostly armor.

Tom


Ah yes, I used to build land-based targets as well..

I am now build model ships and I like the PE work at the moment while my eyes can still do it.
rolltide31
#377
Visit this Community
Texas, United States
Joined: June 27, 2010
KitMaker: 1,481 posts
Model Shipwrights: 1,332 posts
Posted: Tuesday, January 20, 2015 - 04:13 AM UTC
@Si, The DoY is looking great. As always I am amazed at your skill with PE. I need to clean out my stash but I am looking forward to acquiring the KGV at some point.

@Warren, your Dreadnaught is looking great. I like the look of the main guns. Nice clean paint job also. The wood deck looks incredible.

@Russell - your KGV looks splendid and is coming along nicely. I look forward to seeing more as your dock workers get back to work.

Dave