

Go to modelshipwrights.com for the current dynamic site!


General Ship Modeling
Discuss modeling techniques, experiences, and ship modeling in general.
Discuss modeling techniques, experiences, and ship modeling in general.
Hosted by Jim Starkweather
1/200 HMS Rodney with Pontos Stuff
Removed by original poster on 06/28/18 - 23:37:57 (GMT).
Removed by original poster on 06/29/18 - 02:58:37 (GMT).

RussellE

#306

Joined: June 27, 2010
KitMaker: 3,959 posts
Model Shipwrights: 2,777 posts

Posted: Thursday, June 28, 2018 - 02:08 PM UTC
excellent winch work, Warren
BTW did you receive my email?
BTW did you receive my email?


warreni
Joined: August 14, 2007
KitMaker: 5,926 posts
Model Shipwrights: 2,624 posts

Posted: Thursday, June 28, 2018 - 02:59 PM UTC
Yes mate I received it. I thought I had replied.. sorry.
Big update tonight as the site wasn't working properly.
Big update tonight as the site wasn't working properly.
warreni
Joined: August 14, 2007
KitMaker: 5,926 posts
Model Shipwrights: 2,624 posts
Posted: Thursday, June 28, 2018 - 05:59 PM UTC
Thanks guys. Simon, I was wondering why they included the o.5in Vickers when they had the 20mm Oerlikons mounted. Oh well, I have ordered four 3D printed versions that look extremely good on the Shapeways website. The kit ones lack most detail and the shield looks totally crap.
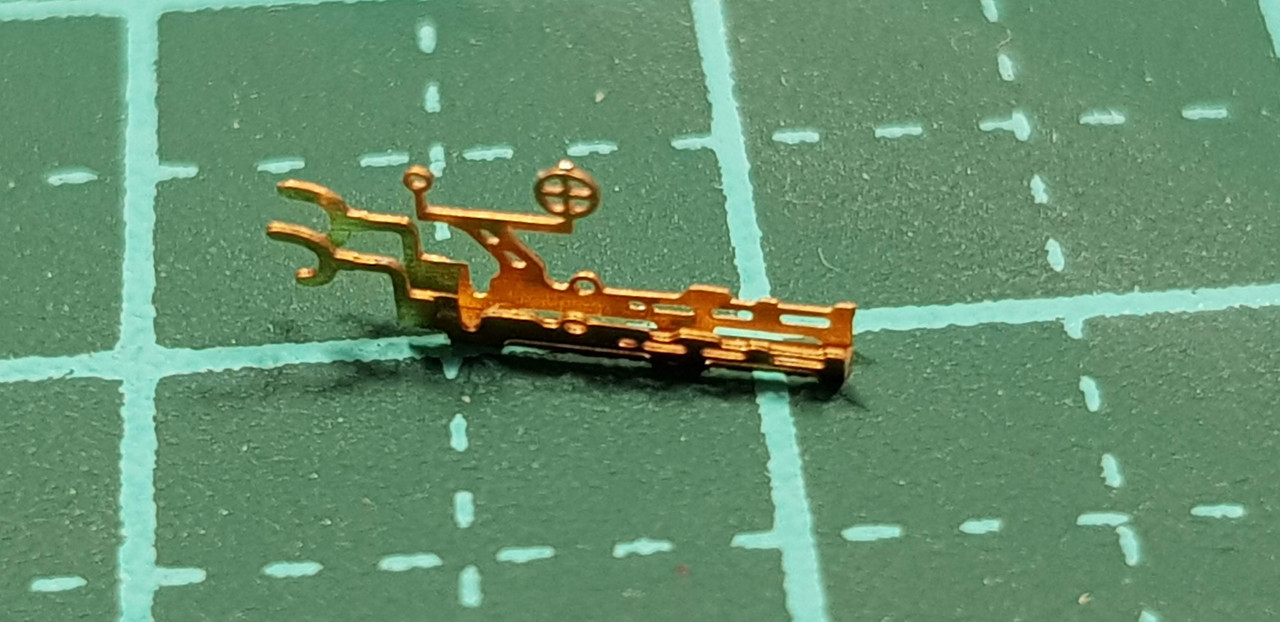
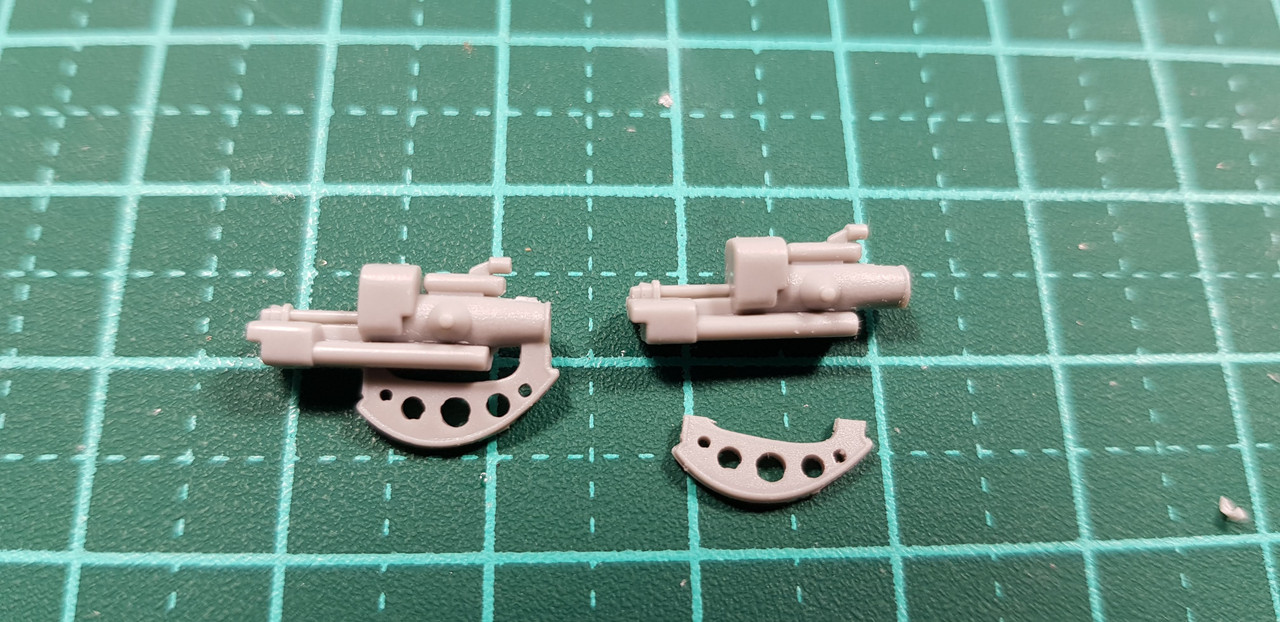
Anyway, next are the thirteen 20mm cannons. The basic parts are as shown here..
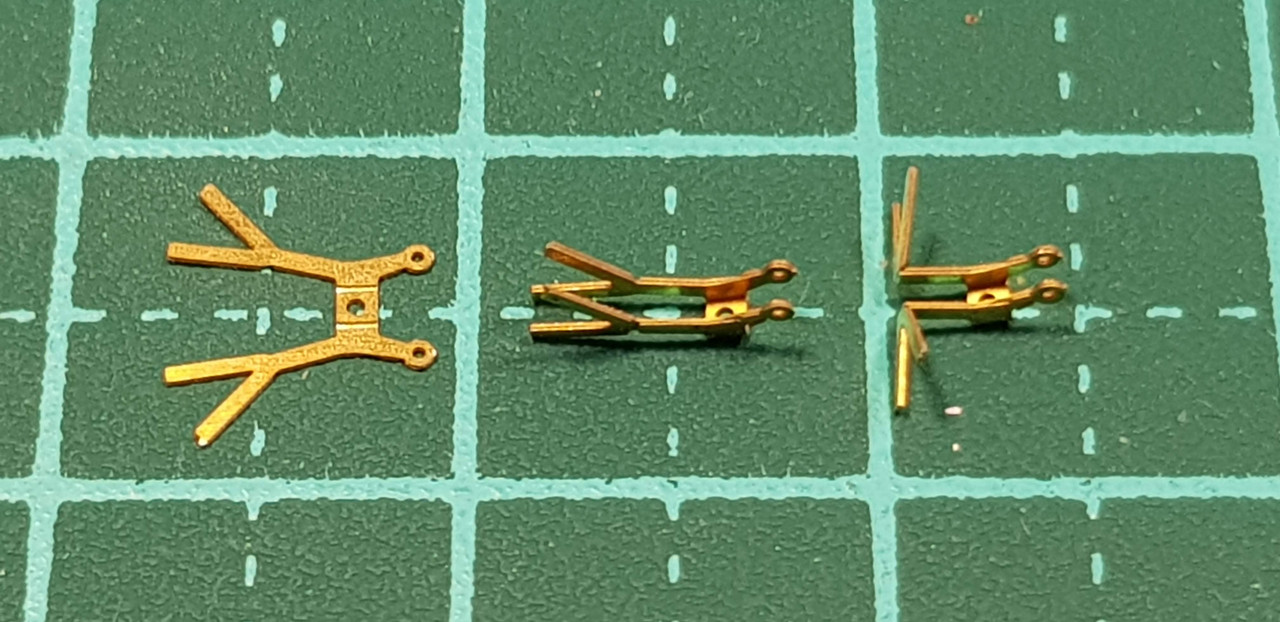
But there are a further three parts you attach to the base of the gun..
I started with the cradle and shield..
I added the shield to the support arms like so.

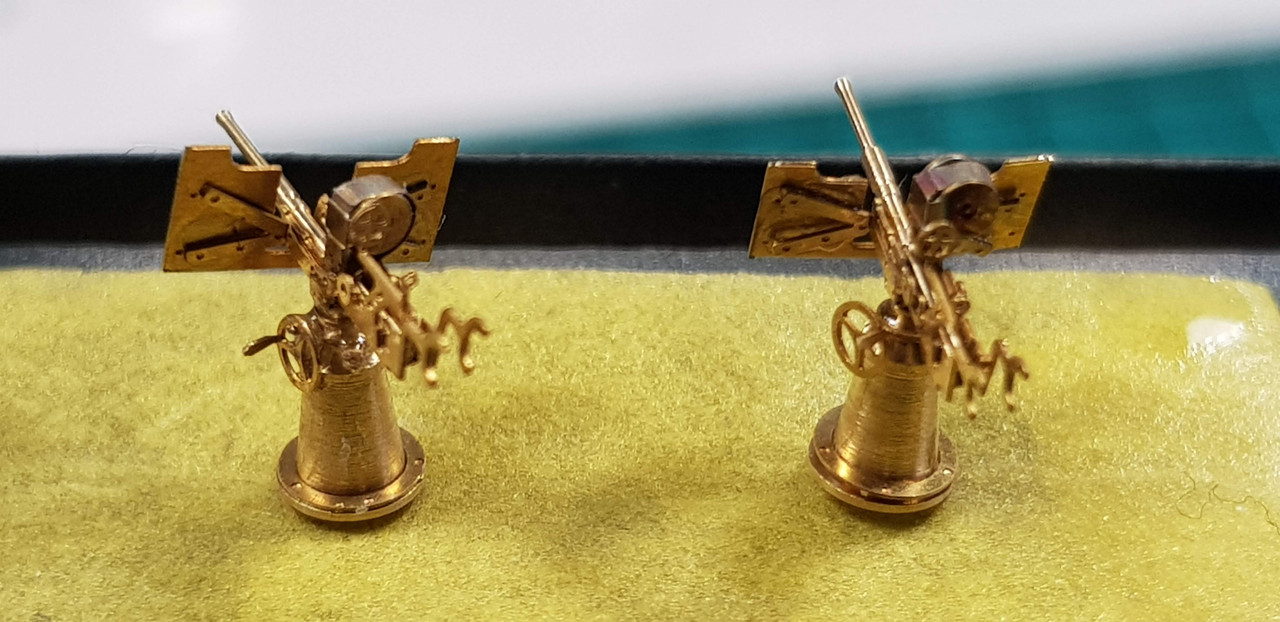
Then it was the gun's turn.There are a few really tight bends that require a bit of lateral thinking to get them right, like using a knife as a support..

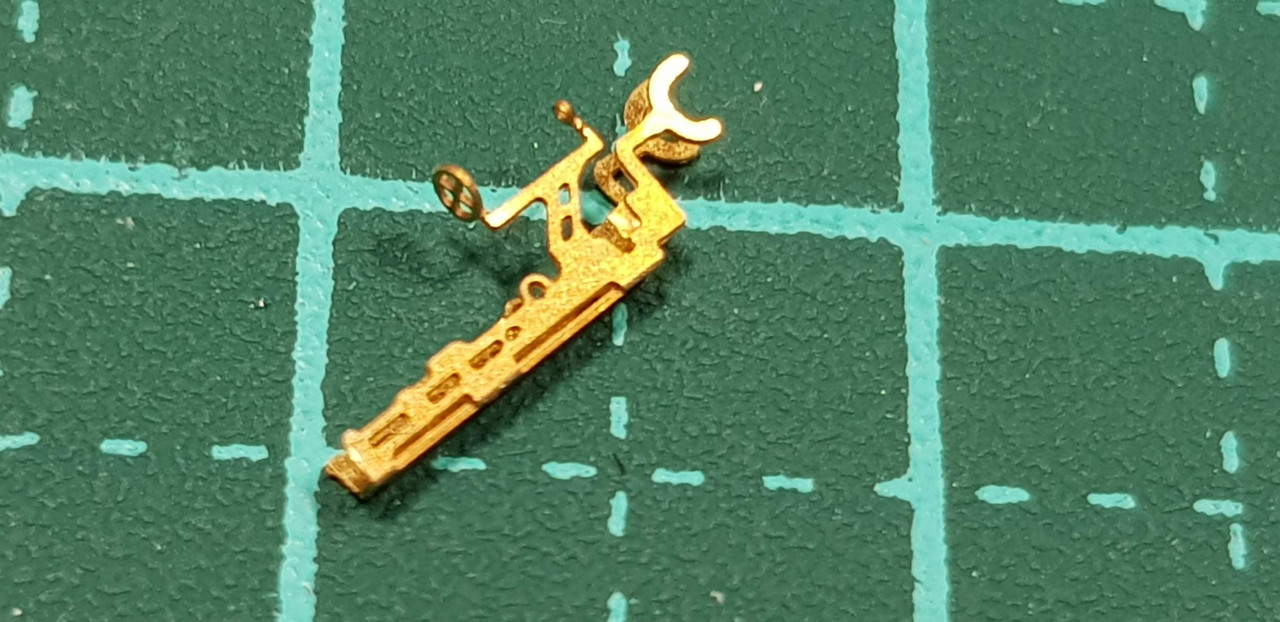
Next you add the barrel, which is actually hollow..
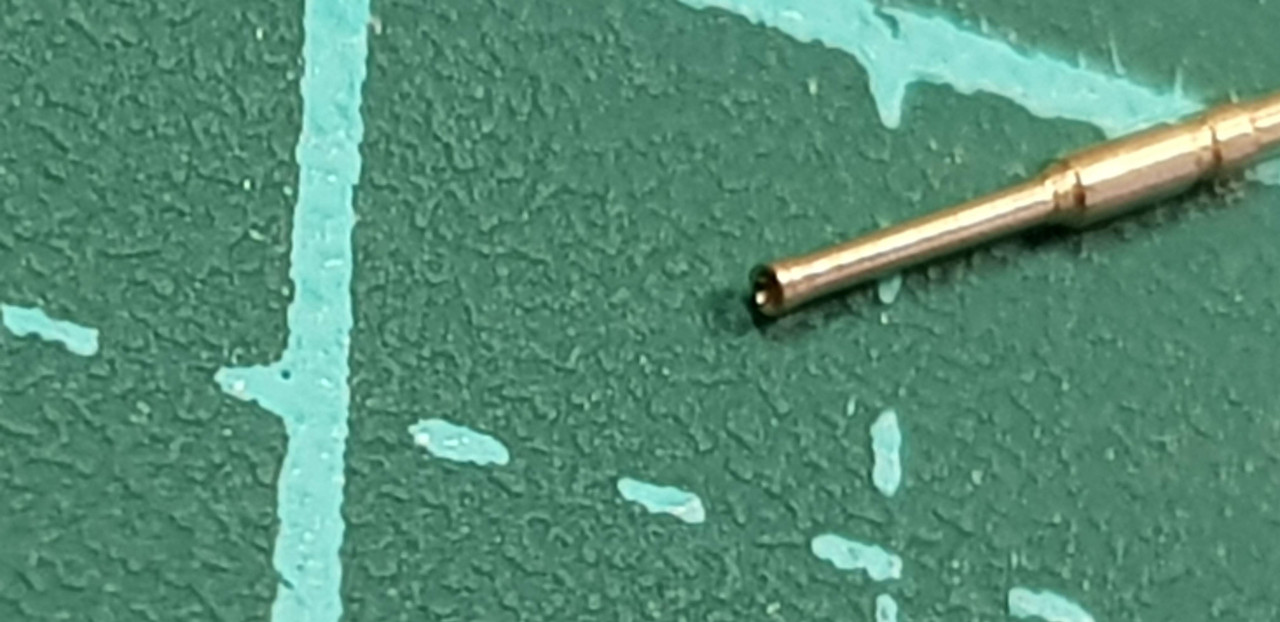
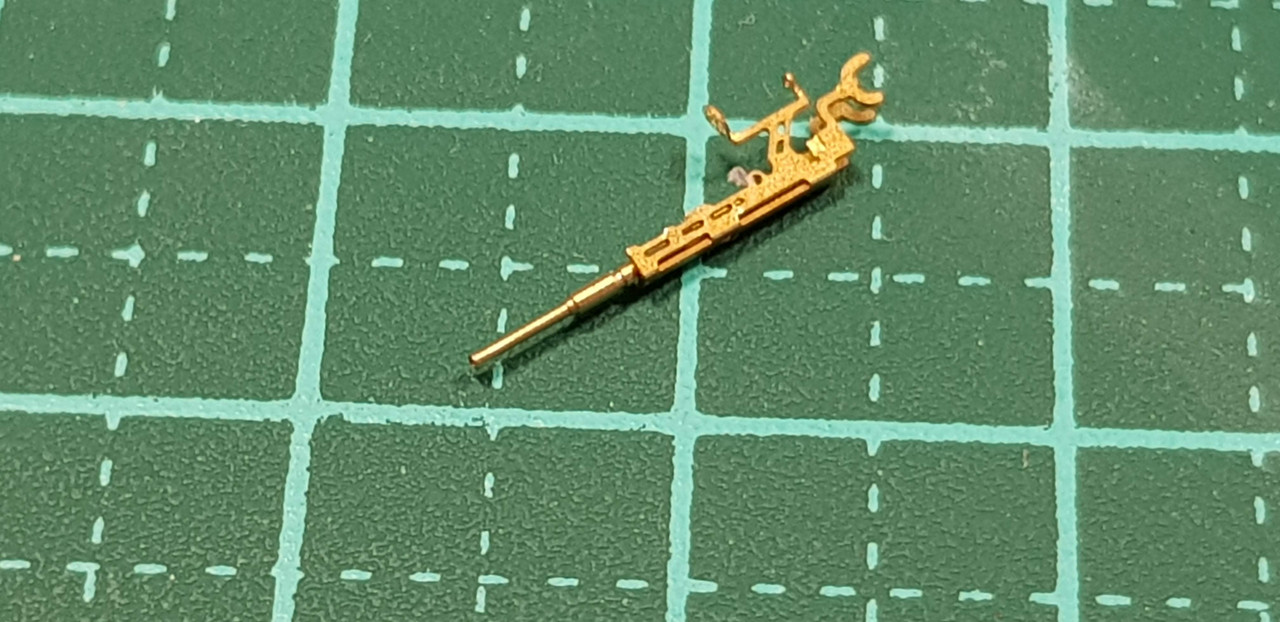
Then the base assembly was added to the cradle and left to dry thoroughly.
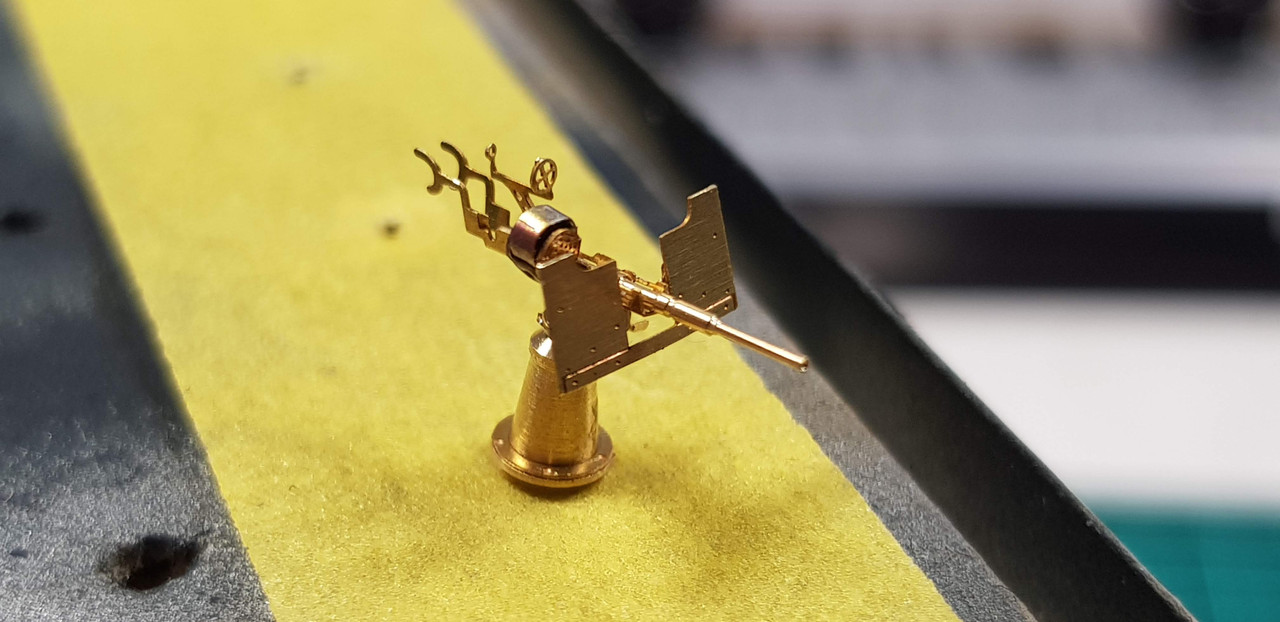
After that the gun assy was added to the cradle.

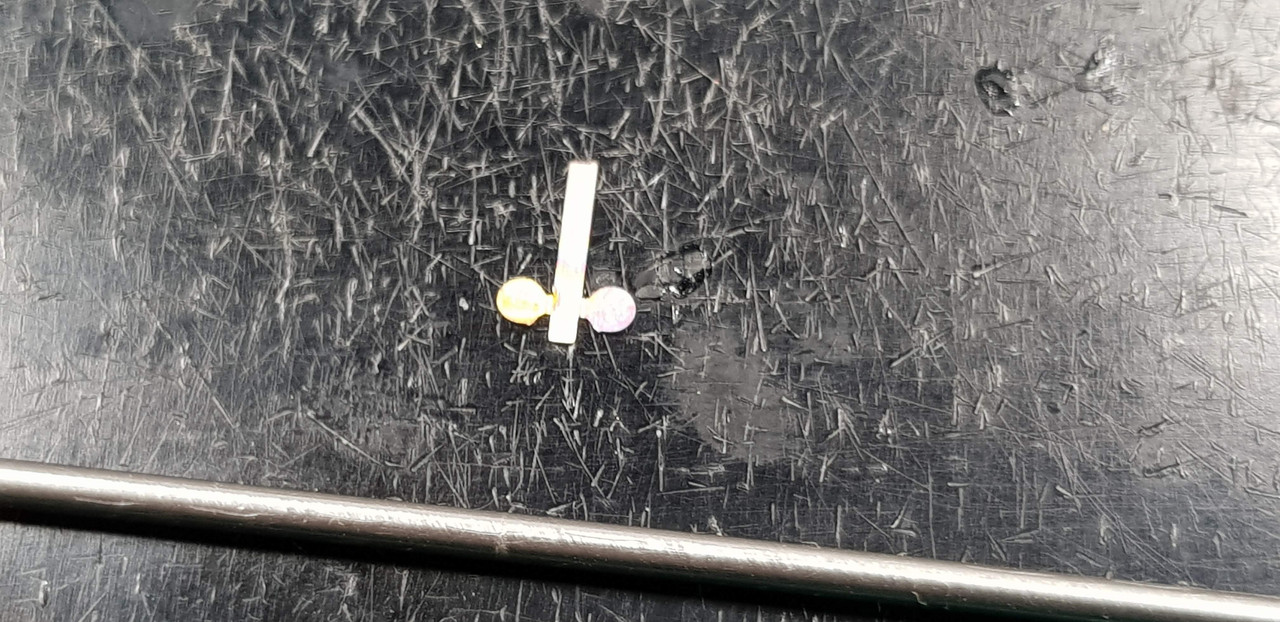
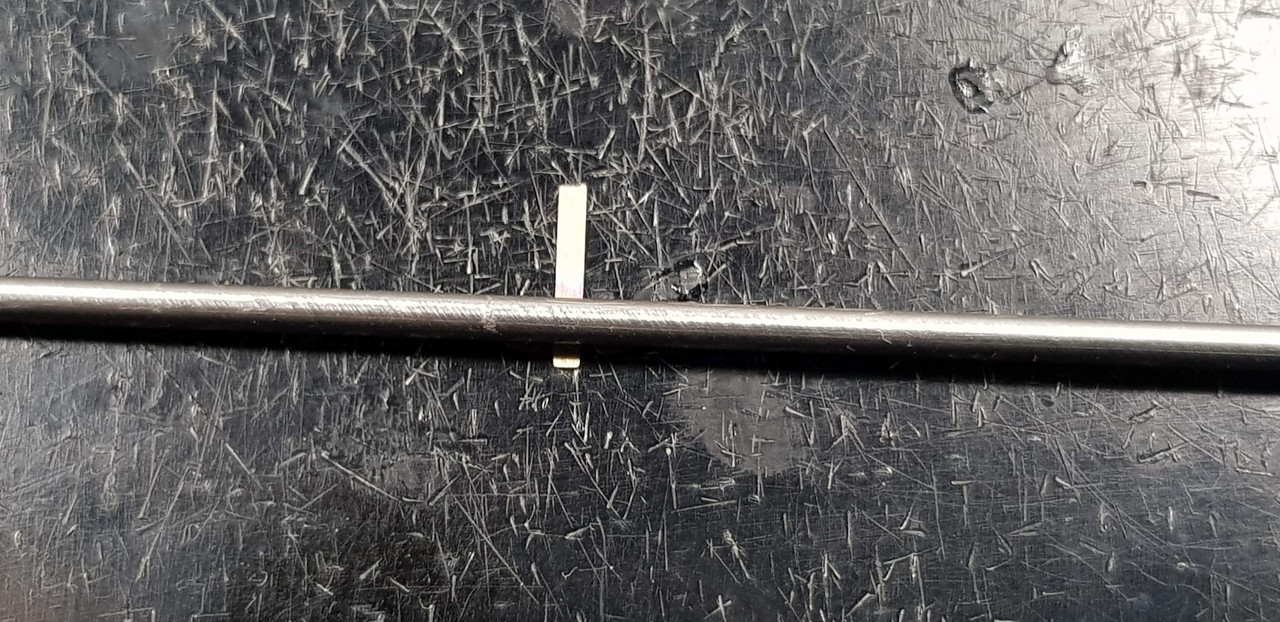
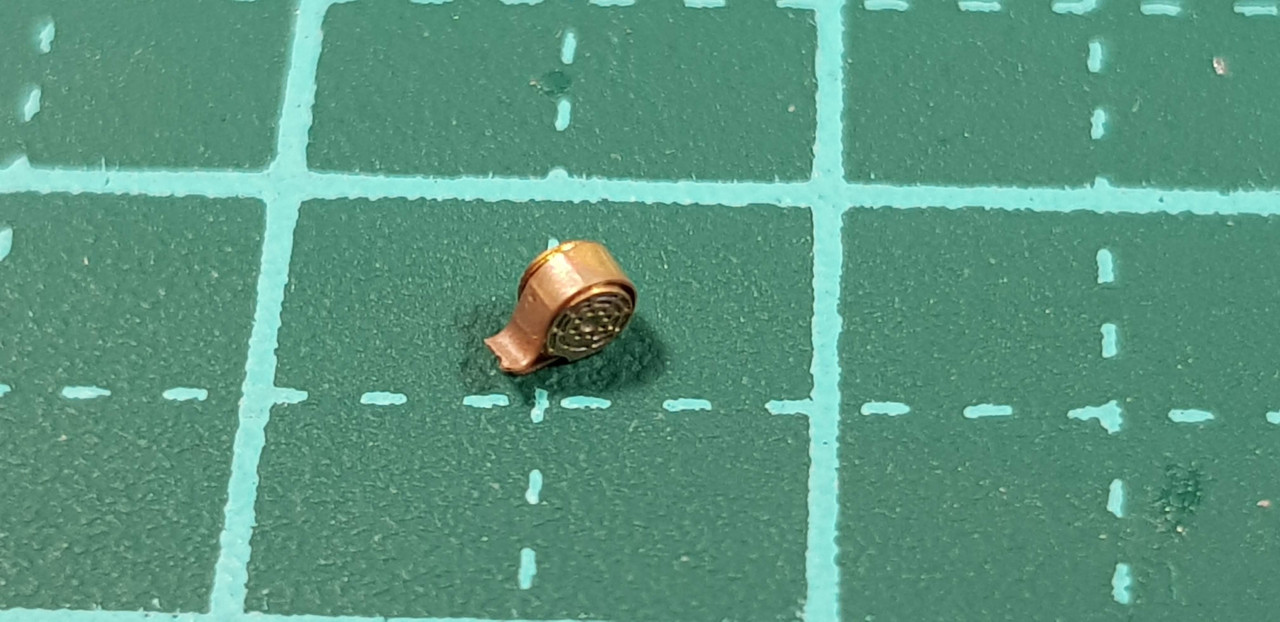
Last but not least was the magazines. This required annealing to make it easier to curve. After annealing it it was curved using a steel rod from my bending kit..
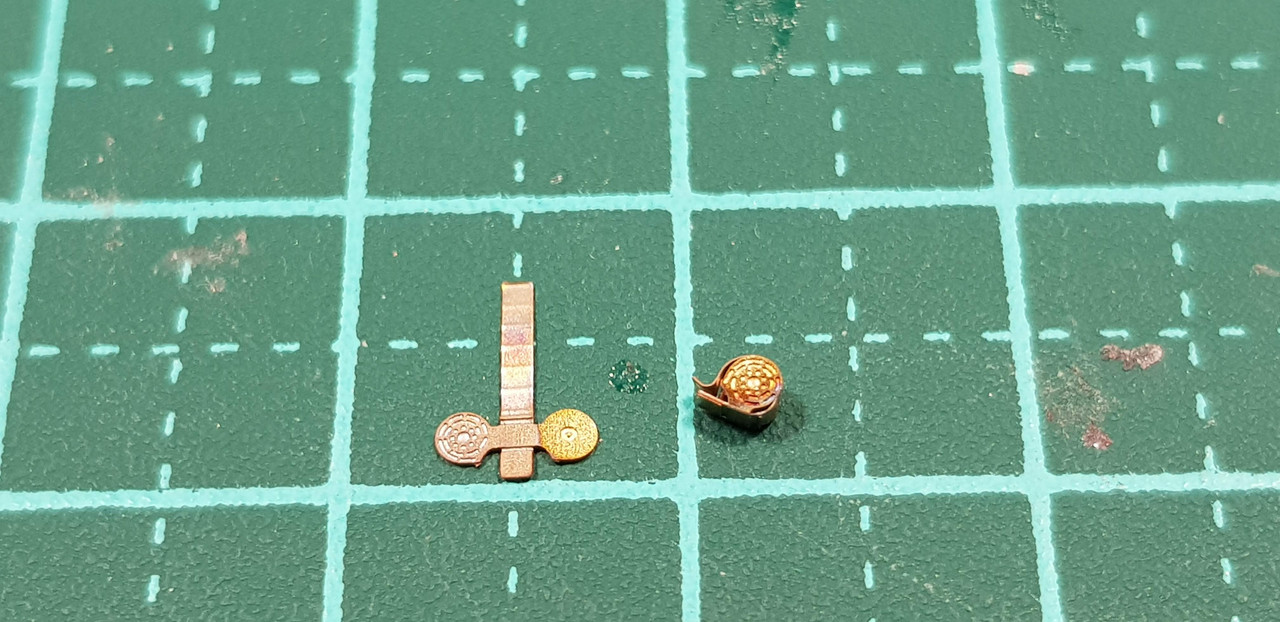
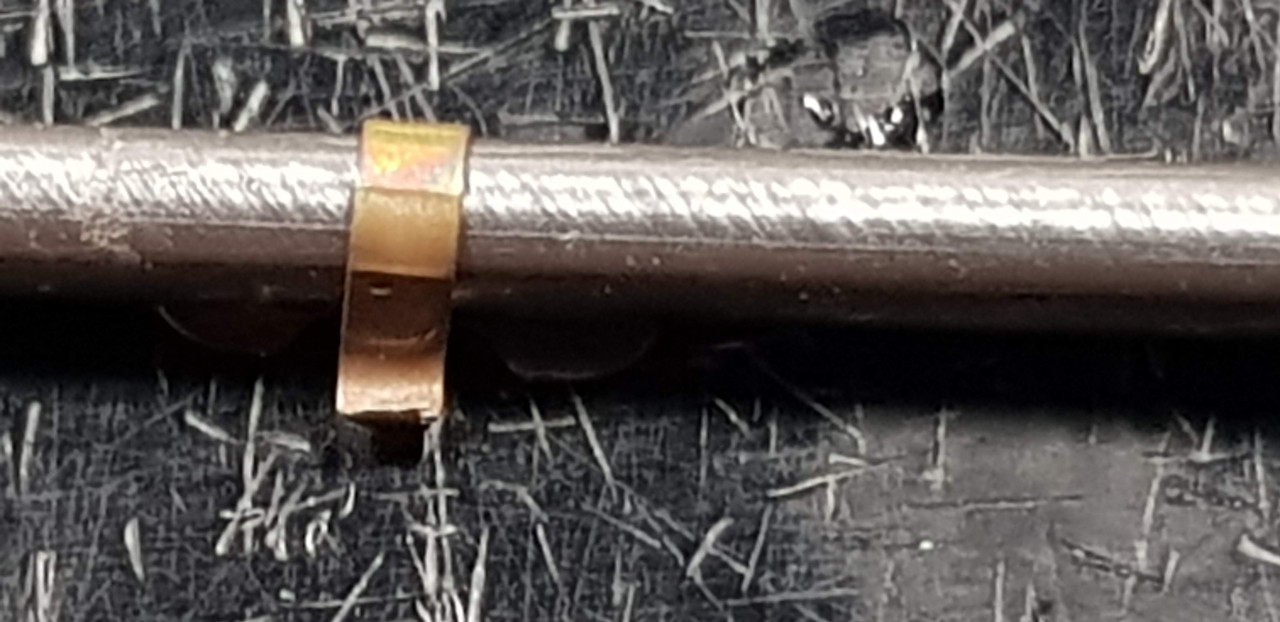
And you end up with 13 little snails..
With that done I started on the4.9 inch guns. First you modify the kits plastic breech assy..
.. and base assy..
Then you glue the Pontos brass barrels in the hole provided by Pontos.
I wish all plastic manufacturers would do this with all their guns. Makes it easy to line them up correctly. Then you bend and attach some more PE to the gun..
And yet some more PE is glued together to replace the plastic piece you removed before.

Cheers
Warren
Anyway, next are the thirteen 20mm cannons. The basic parts are as shown here..
But there are a further three parts you attach to the base of the gun..
I started with the cradle and shield..
I added the shield to the support arms like so.
Then it was the gun's turn.There are a few really tight bends that require a bit of lateral thinking to get them right, like using a knife as a support..
Next you add the barrel, which is actually hollow..
Then the base assembly was added to the cradle and left to dry thoroughly.
After that the gun assy was added to the cradle.
Last but not least was the magazines. This required annealing to make it easier to curve. After annealing it it was curved using a steel rod from my bending kit..
And you end up with 13 little snails..
With that done I started on the4.9 inch guns. First you modify the kits plastic breech assy..
.. and base assy..
Then you glue the Pontos brass barrels in the hole provided by Pontos.
I wish all plastic manufacturers would do this with all their guns. Makes it easy to line them up correctly. Then you bend and attach some more PE to the gun..
And yet some more PE is glued together to replace the plastic piece you removed before.
Cheers
Warren

RedDuster

Joined: March 01, 2010
KitMaker: 7,078 posts
Model Shipwrights: 6,649 posts

Posted: Friday, June 29, 2018 - 05:54 AM UTC
Very nice Warren,
The 20mm look really good indeed, did you remove the ends before rolling up the snails and refit them?
Cheers
Si
The 20mm look really good indeed, did you remove the ends before rolling up the snails and refit them?
Cheers
Si
warreni
Joined: August 14, 2007
KitMaker: 5,926 posts
Model Shipwrights: 2,624 posts
Posted: Friday, June 29, 2018 - 09:45 AM UTC
Quoted Text
Very nice Warren,
The 20mm look really good indeed, did you remove the ends before rolling up the snails and refit them?
Cheers
Si
No need for that using my method mate.

RedDuster
Joined: March 01, 2010
KitMaker: 7,078 posts
Model Shipwrights: 6,649 posts
Posted: Friday, June 29, 2018 - 10:36 PM UTC
Quoted Text
Quoted TextVery nice Warren,
The 20mm look really good indeed, did you remove the ends before rolling up the snails and refit them?
Cheers
Si
No need for that using my method mate.
Thanks Wareen,
Then, when I get onto one the really big beasts I give your method a go.
Cheers for the tip
Si

d6mst0
#453

Joined: August 28, 2016
KitMaker: 1,925 posts
Model Shipwrights: 1,298 posts

Posted: Saturday, June 30, 2018 - 12:34 AM UTC
Warren,
Nice work on the 20 mm and winches. The 20mm PE seems to be just like a set I assembled in 1/350 scale. It was a struggle for me to get them correct at that small scale. I hope at 1/200 scale they were easier to handle and assemble.
Mark
Nice work on the 20 mm and winches. The 20mm PE seems to be just like a set I assembled in 1/350 scale. It was a struggle for me to get them correct at that small scale. I hope at 1/200 scale they were easier to handle and assemble.
Mark
warreni
Joined: August 14, 2007
KitMaker: 5,926 posts
Model Shipwrights: 2,624 posts
Posted: Saturday, June 30, 2018 - 09:52 AM UTC
Quoted Text
Warren,
Nice work on the 20 mm and winches. The 20mm PE seems to be just like a set I assembled in 1/350 scale. It was a struggle for me to get them correct at that small scale. I hope at 1/200 scale they were easier to handle and assemble.
Mark
1/200 is much easier Mark. I remember building sixty one 1/350 version for my North Carolina. Urgh...
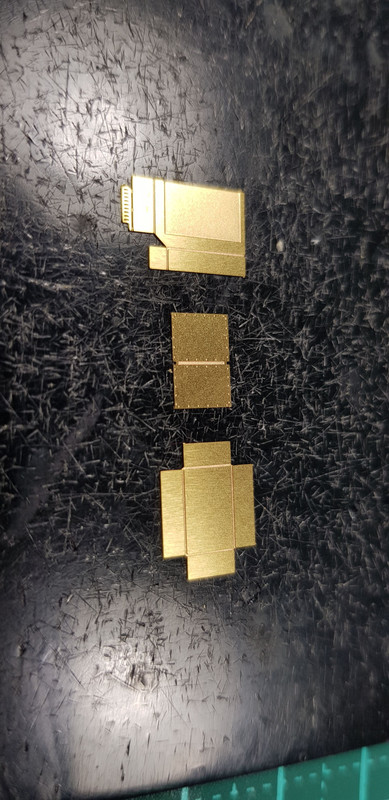
Got a bit more done yesterday on the 4.7in mounts. Here is the gun cradle bent as required and the side panels fitted,
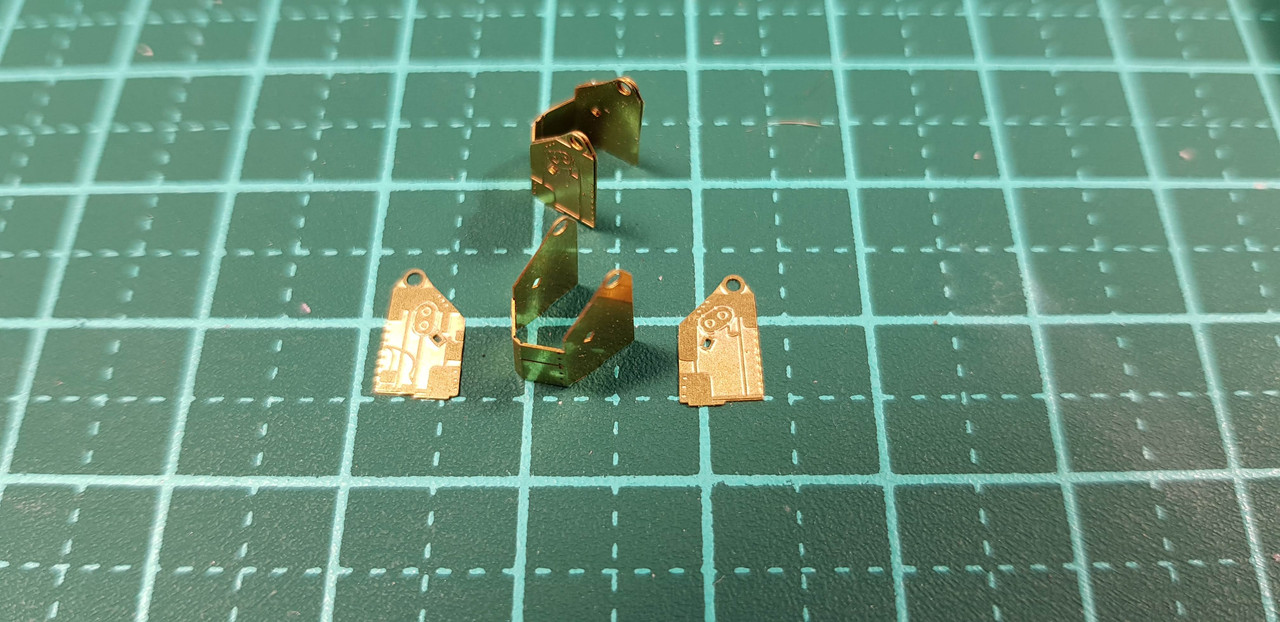
Then I attached what looks like a motor to the front of the base.
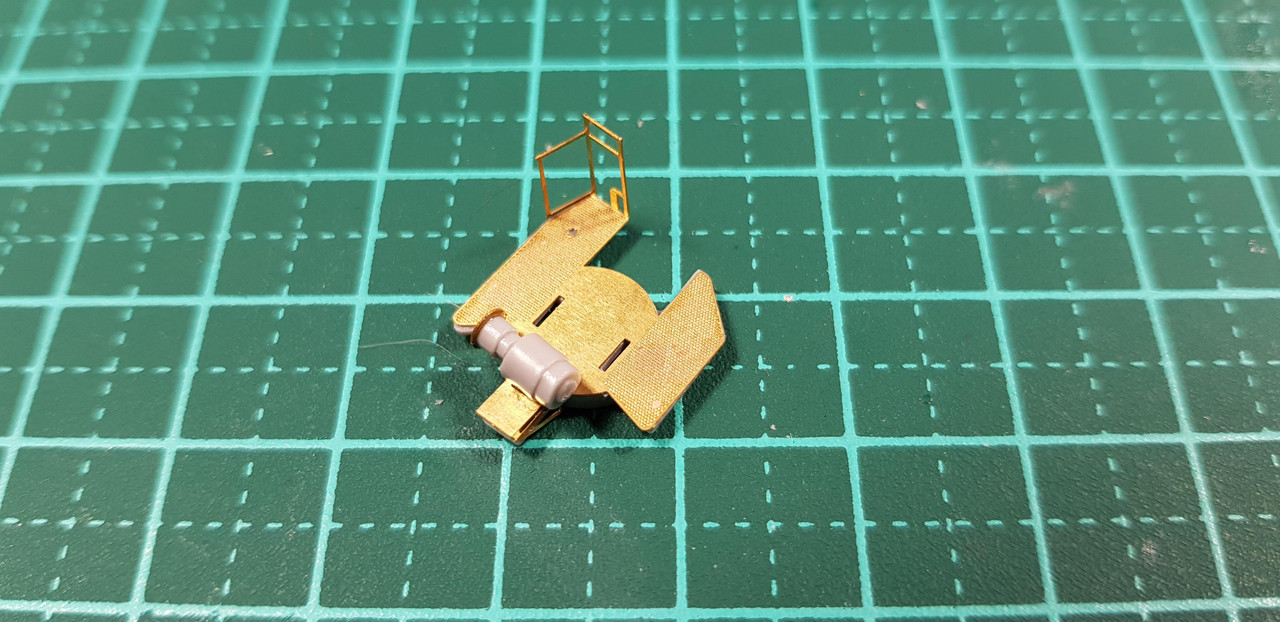
And attached another couple of parts to the cradle, the 'L' shaped parts.

I also attached a few more pieces which are too small to really take good photos of, then I found a mistake in the Pontos instructions. They show pictures of this mount with some sort of turret around it whereas the Rodney didn't have the turret assembly IIRC. Maybe they just copied the Nelson instructions for this part.
Anyway, until later today,.
Warren
warreni
Joined: August 14, 2007
KitMaker: 5,926 posts
Model Shipwrights: 2,624 posts
Posted: Saturday, June 30, 2018 - 06:06 PM UTC
OK it is your turn for some input.
The 45 ft motor launches used on the Rodney, and probably lots of other large ships as well, were the thwarts wooden finish or painted?
The 45 ft motor launches used on the Rodney, and probably lots of other large ships as well, were the thwarts wooden finish or painted?
RedDuster
Joined: March 01, 2010
KitMaker: 7,078 posts
Model Shipwrights: 6,649 posts
Posted: Saturday, June 30, 2018 - 09:06 PM UTC
Hi Warren,
Had a dig through my references, Only one clear overhead shot of Rodney,(Raven & Roberts p271). The interior of the open boats appear to one light colour so I would assume they are painted one colour.
Note on the gun shields on the 4.7", they were fitted to Rodney, but sometime between Mid '42 August 43 Looking at the fit in the kit I would assume it certainly post Boston refit. sept 41 and before the August 43 refit.
Hope that helps.
Cheers
Si
warreni
Joined: August 14, 2007
KitMaker: 5,926 posts
Model Shipwrights: 2,624 posts
Posted: Saturday, June 30, 2018 - 10:54 PM UTC
Thanks heaps for that Simon. Wood they are then!
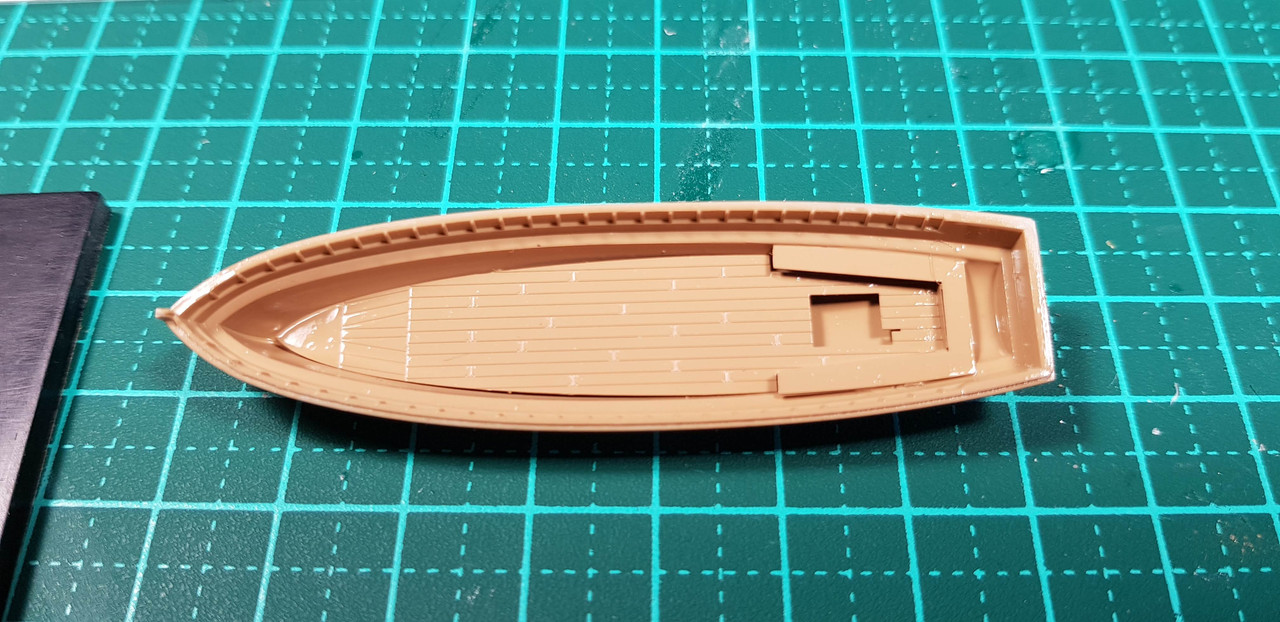
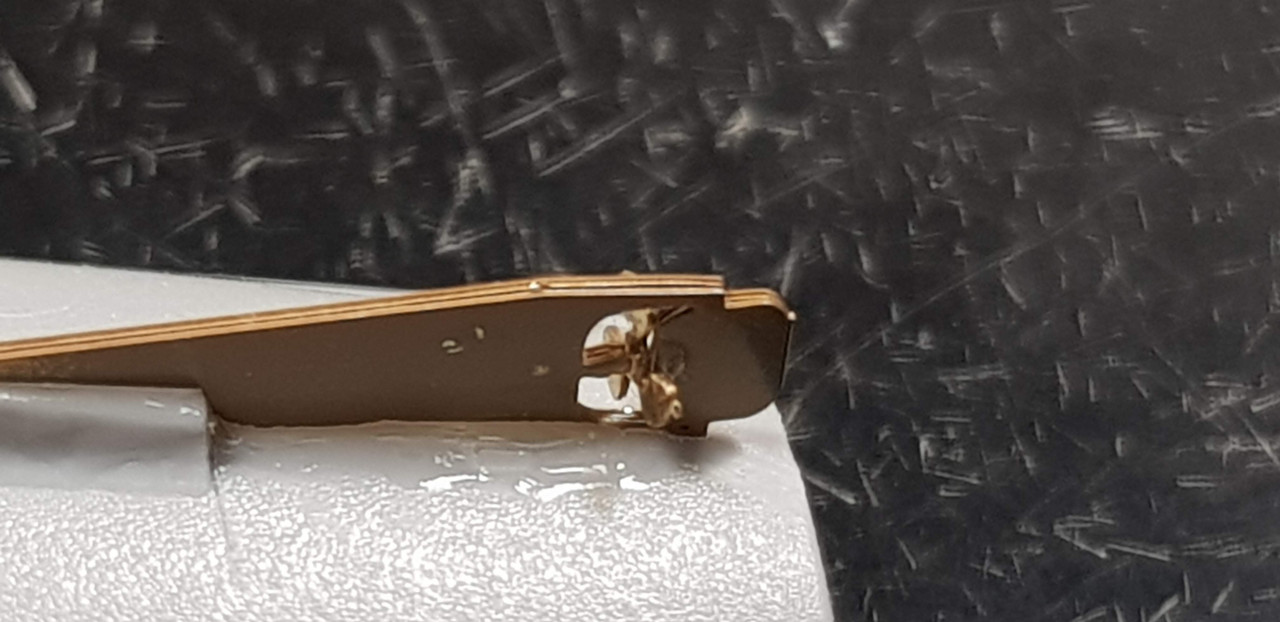
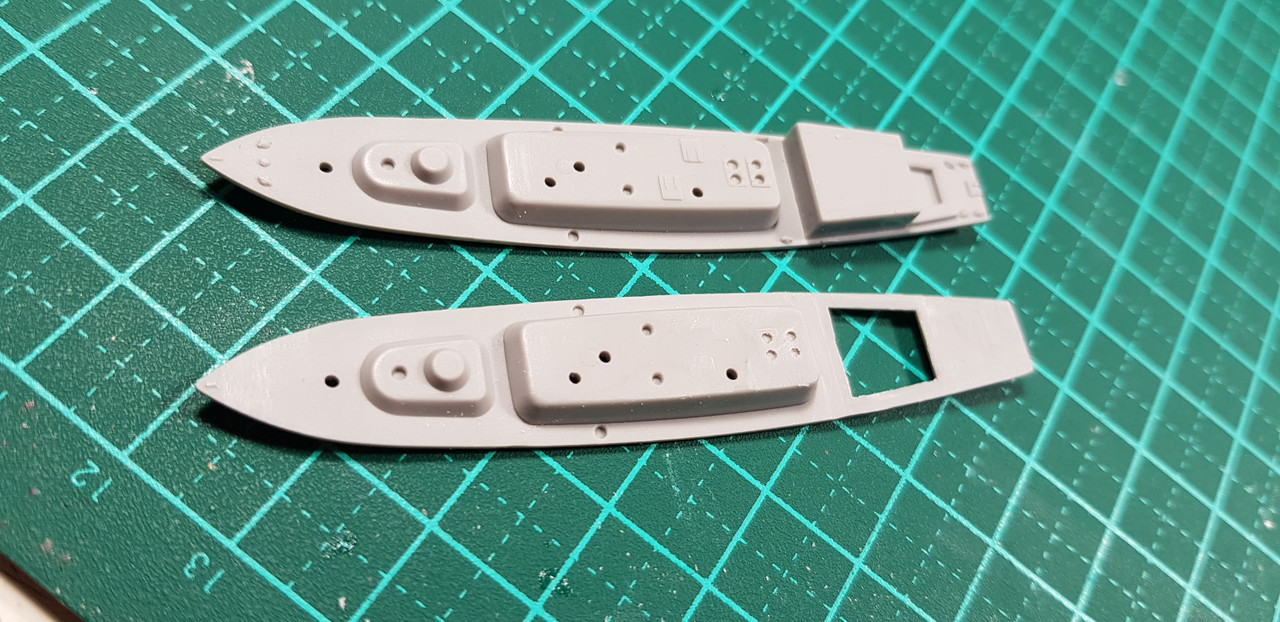
I was going to put up a video but I think it may be too large for the site. Oh well. I started on the ship's boats and began with the 45' launches. Each had to have a few small pieces removed from the top of the boat and the rudder and prop removed from the bottom..
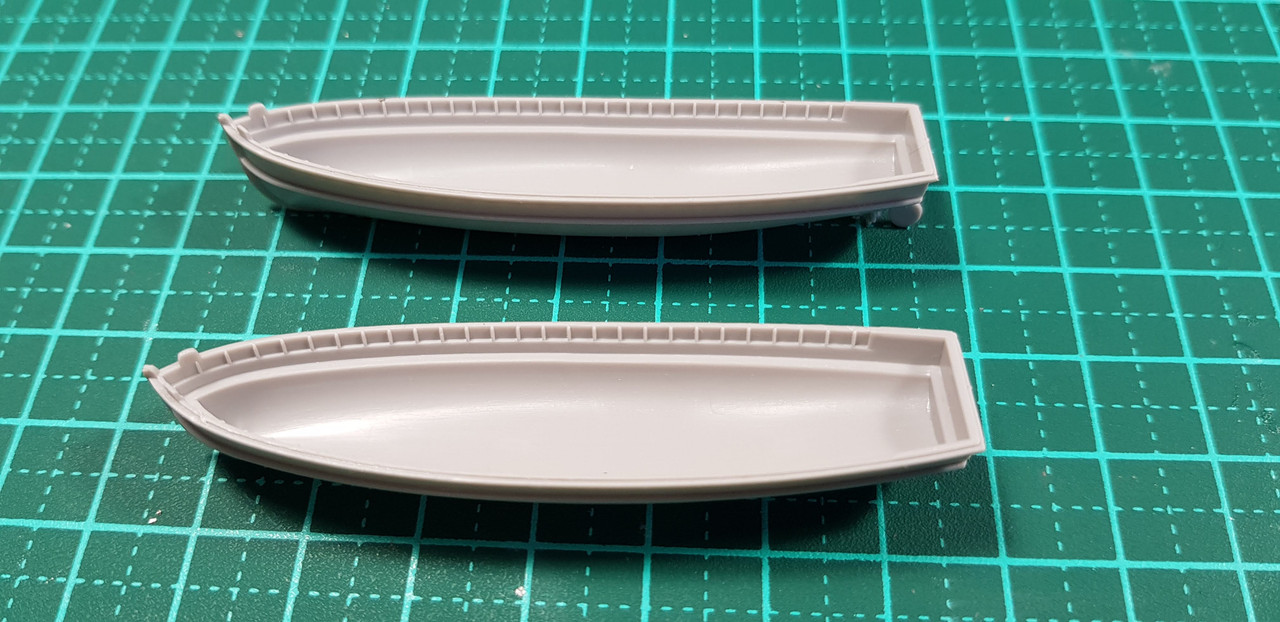
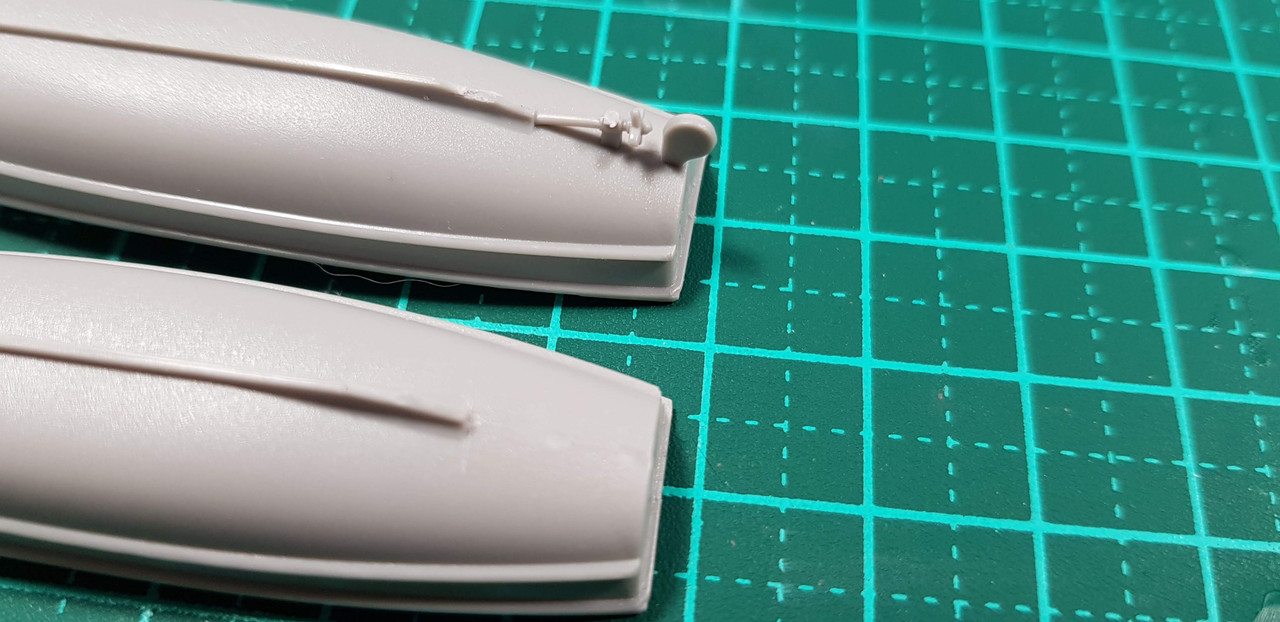
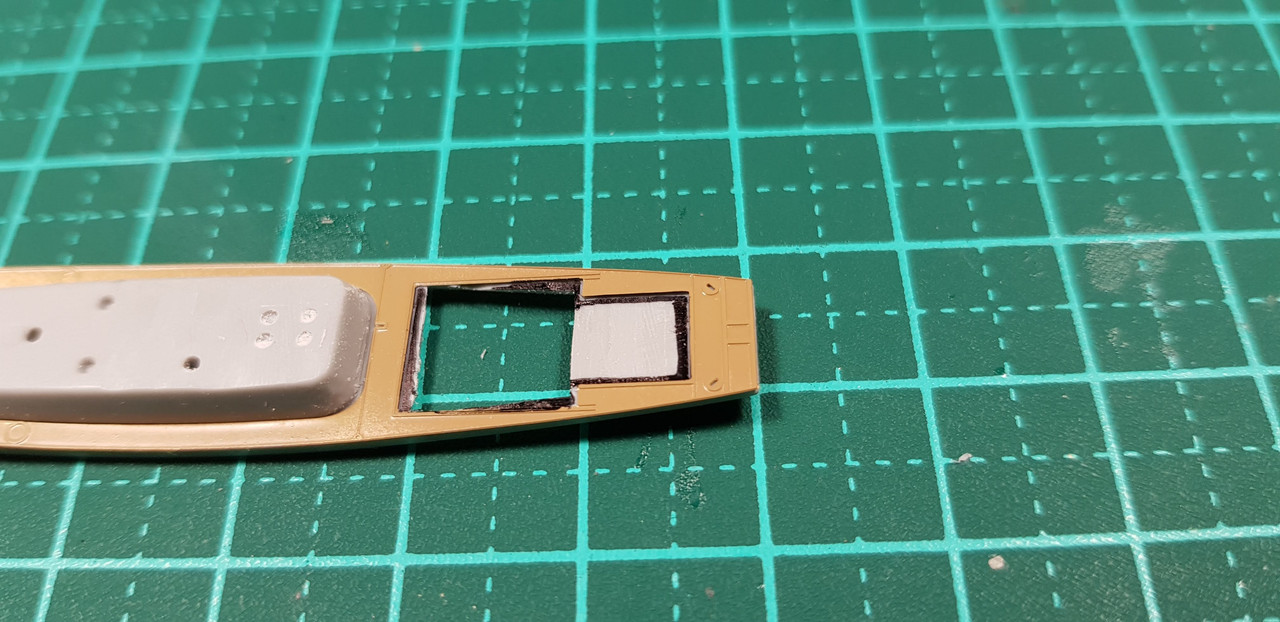
Then the PE started and I bent up the floor as directed..
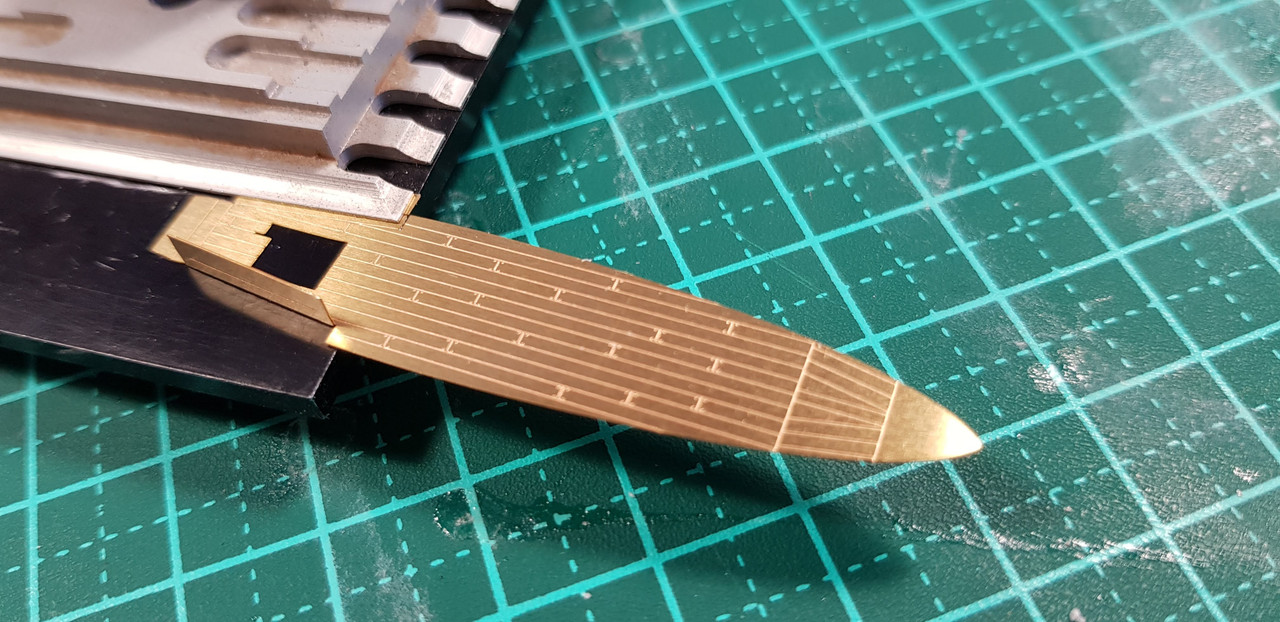
One of the side pieces broke off bu that was OK as you won't see it after everything else goes on. Then I placed the thwarts assembly in place..
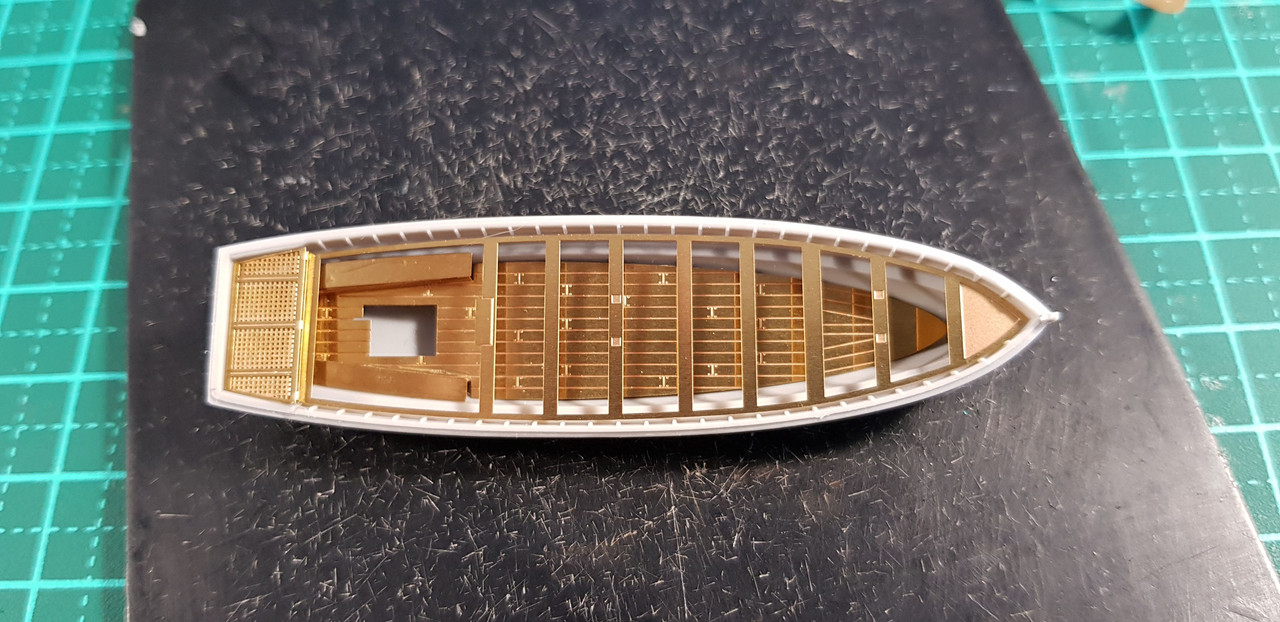
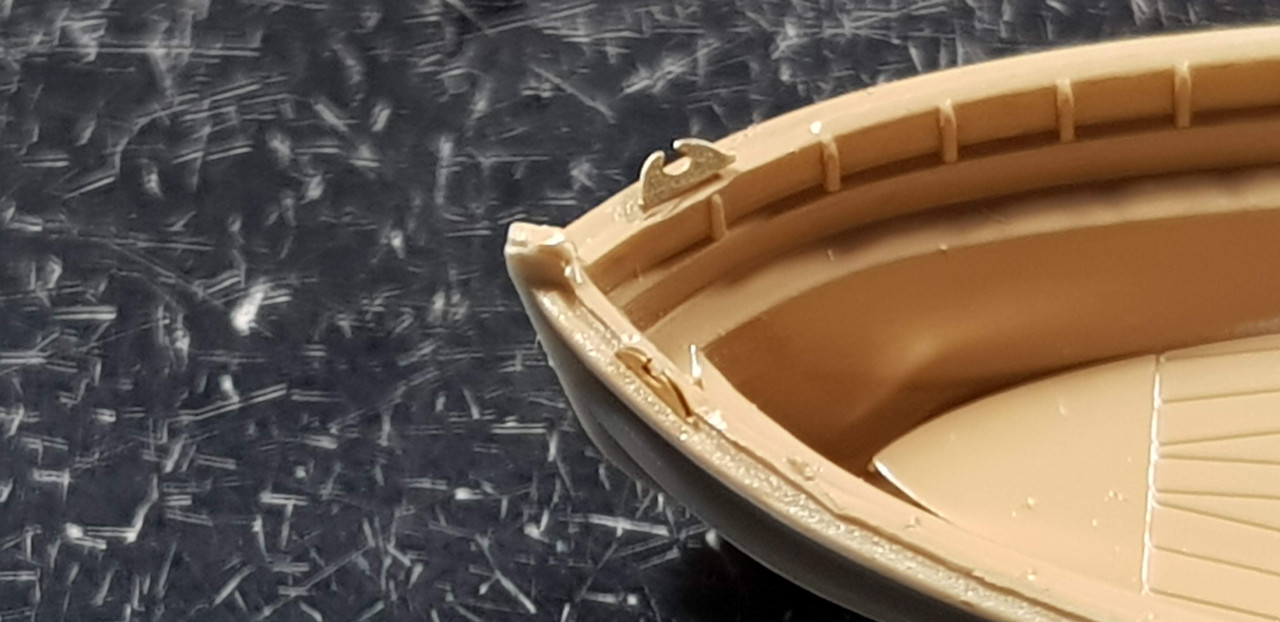
These are the bits I was asking about, whether painted or stained timber. Then I painted what I think are the wooden parts of the boat pieces..

And this is how they one looks with the floor and interior of the boat painted.
That's it for this weekend.
Cheers
Warren
I was going to put up a video but I think it may be too large for the site. Oh well. I started on the ship's boats and began with the 45' launches. Each had to have a few small pieces removed from the top of the boat and the rudder and prop removed from the bottom..
Then the PE started and I bent up the floor as directed..
One of the side pieces broke off bu that was OK as you won't see it after everything else goes on. Then I placed the thwarts assembly in place..
These are the bits I was asking about, whether painted or stained timber. Then I painted what I think are the wooden parts of the boat pieces..
And this is how they one looks with the floor and interior of the boat painted.
That's it for this weekend.
Cheers
Warren

JJ1973
#345

Joined: August 22, 2011
KitMaker: 1,835 posts
Model Shipwrights: 1,832 posts
Posted: Sunday, July 01, 2018 - 06:34 AM UTC
Hi Warren!
I'm joining late, but I'm in and following, of course!!
Great to see you posting here again, and back with such a fantastic build! That's great! And the kit and the Pontos stuff look really cool. Lot's of those things look a bit like upscaled from 1/350 but with much more detail. Those winches are awesome. And the PomPoms - wow. Those weapons are really special, the amount of detail that goes into them in the big scale is amazing!! And the Oerlikons... and...
Well, silly put, a great start and I am looking forward to following your build!!
Cheers,
Jan
warreni
Joined: August 14, 2007
KitMaker: 5,926 posts
Model Shipwrights: 2,624 posts
Posted: Sunday, July 01, 2018 - 12:14 PM UTC
Hi Jan.
Thanks for the welcome back.
I was just looking at Google and there is a nice, clear picture of the Rodney with the camo scheme but lovely wooden decks! SOlves that problem si I can use the lovely wooden deck with the camo scheme, but not the one in the painting guide as it is a bit inaccurate... or maybe I will just take a little artistic licence..
Cheers
Warren
JJ1973
#345
Joined: August 22, 2011
KitMaker: 1,835 posts
Model Shipwrights: 1,832 posts
Posted: Sunday, July 01, 2018 - 04:44 PM UTC
Hi Warren,
I'm more and more becoming a fan of some artistic license myself - after struggling with getting HMS Hood as accurate as I possibly could I realized that I was struggling more and more, almost to the point of stalling. I know that for HMS Hood there are fantastic references out there, books and really good advice from the HMS Hood association. However, it's too much to contemplate all. So I lowered the bar just a little - fairly accurate and correct to the sources yes, but just some artistic license where it seems reasonable or just looks smart or the effort of getting it 100% correct is just overwhelming my abilities
I'd go for the paint scheme you are considering, it looks really good, and leave the deck unpainted (pretty much for the same reason).
Cheers,
Jan
warreni
Joined: August 14, 2007
KitMaker: 5,926 posts
Model Shipwrights: 2,624 posts
Posted: Sunday, July 01, 2018 - 10:51 PM UTC
Quoted Text
Hi Warren,
I'm more and more becoming a fan of some artistic license myself - after struggling with getting HMS Hood as accurate as I possibly could I realized that I was struggling more and more, almost to the point of stalling. I know that for HMS Hood there are fantastic references out there, books and really good advice from the HMS Hood association. However, it's too much to contemplate all. So I lowered the bar just a little - fairly accurate and correct to the sources yes, but just some artistic license where it seems reasonable or just looks smart or the effort of getting it 100% correct is just overwhelming my abilities
I'd go for the paint scheme you are considering, it looks really good, and leave the deck unpainted (pretty much for the same reason).
Cheers,
Jan
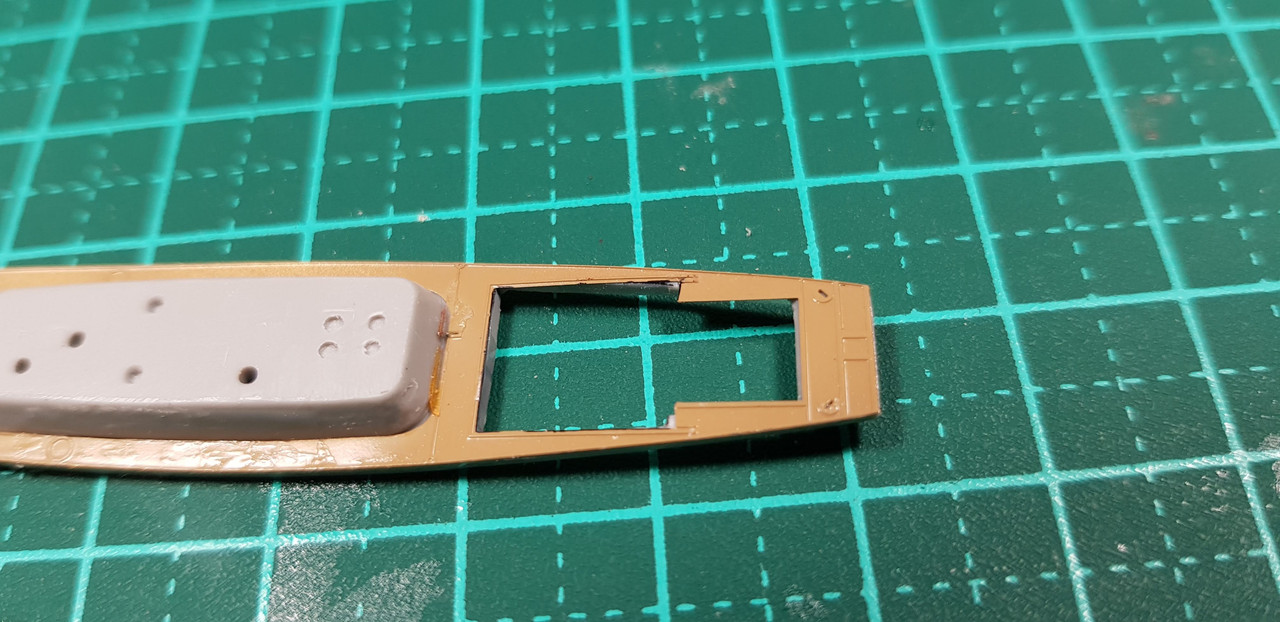
Agree 100% Jan. No one else is going to see my models except friends. I tried a competition once but won't be doing that again as there was just no feedback on the model. I build for me and the enjoyment I get in the build therefore I am in no way a rivet counter as life is just too short.
Anyway, a quick update.. Did some more work on the 45' launches..
Only got a few minutes this afternoon as I had house work to do before my Wife got home from work.
Cheers
Warren
RussellE
#306
Joined: June 27, 2010
KitMaker: 3,959 posts
Model Shipwrights: 2,777 posts
Posted: Monday, July 02, 2018 - 01:06 PM UTC
Quoted Text
Yes mate I received it. I thought I had replied.. sorry.
Big update tonight as the site wasn't working properly.
Nah, no reply yet, but that's ok. As long as you got them

Quoted Text
Quoted TextHi Jan.
Thanks for the welcome back.
I was just looking at Google and there is a nice, clear picture of the Rodney with the camo scheme but lovely wooden decks! SOlves that problem si I can use the lovely wooden deck with the camo scheme, but not the one in the painting guide as it is a bit inaccurate... or maybe I will just take a little artistic licence..
Cheers
Warren
The RN were notorious for random acts of deck darkening (not sure I'd call it painting) and so there is very little info on when/or if decks were dark or natural. Some pics show dark, but they could be just wet, where others if full sun appear natural (although not scrubbed as in peacetime). So I say go with your own gut/personal preference.
To me IMHO natural always looks more appealing on a model
Quoted Text
Quoted TextQuoted TextHi Warren,
I'm more and more becoming a fan of some artistic license myself - after struggling with getting HMS Hood as accurate as I possibly could I realized that I was struggling more and more, almost to the point of stalling. I know that for HMS Hood there are fantastic references out there, books and really good advice from the HMS Hood association. However, it's too much to contemplate all. So I lowered the bar just a little - fairly accurate and correct to the sources yes, but just some artistic license where it seems reasonable or just looks smart or the effort of getting it 100% correct is just overwhelming my abilities
I'd go for the paint scheme you are considering, it looks really good, and leave the deck unpainted (pretty much for the same reason).
Cheers,
Jan
Agree 100% Jan. No one else is going to see my models except friends. I tried a competition once but won't be doing that again as there was just no feedback on the model. I build for me and the enjoyment I get in the build therefore I am in no way a rivet counter as life is just too short.
Anyway, a quick update.. Did some more work on the 45' launches..
Only got a few minutes this afternoon as I had house work to do before my Wife got home from work.
Cheers
Warren
Couldn't agree more: Artistic license on accuracy is fine if there is no available information at hand and most importantly of all, if making your model 100% accurate is sucking the fun out of it, then what's the point?
Besides, if we can't find out what's correct, how is average Joe Blogs going to know?

housework? pffftt!!!


RedDuster
Joined: March 01, 2010
KitMaker: 7,078 posts
Model Shipwrights: 6,649 posts
Posted: Tuesday, July 03, 2018 - 07:04 AM UTC
Hi Warren,
Nice work, the boats look great nice so far.
I do like an unpainted / unstained wood deck, but if camo it is, nothing wrong with a bit of freestyle.
Cheers
Si
Nice work, the boats look great nice so far.
I do like an unpainted / unstained wood deck, but if camo it is, nothing wrong with a bit of freestyle.
Cheers
Si
warreni
Joined: August 14, 2007
KitMaker: 5,926 posts
Model Shipwrights: 2,624 posts
Posted: Wednesday, July 04, 2018 - 08:25 PM UTC
Thanks Russell and Simon.
I believe I am over thinking the painting of the boats. It looks like they are supposed to be light grey on the top surfaces and dark grey on the sides. I am going to use the Hataka paints and see how it all goes.
Will upload photos etc tomorrow.
Cheers
Warren
I believe I am over thinking the painting of the boats. It looks like they are supposed to be light grey on the top surfaces and dark grey on the sides. I am going to use the Hataka paints and see how it all goes.
Will upload photos etc tomorrow.
Cheers
Warren
warreni
Joined: August 14, 2007
KitMaker: 5,926 posts
Model Shipwrights: 2,624 posts
Posted: Monday, July 09, 2018 - 07:10 PM UTC
Hello everyone.
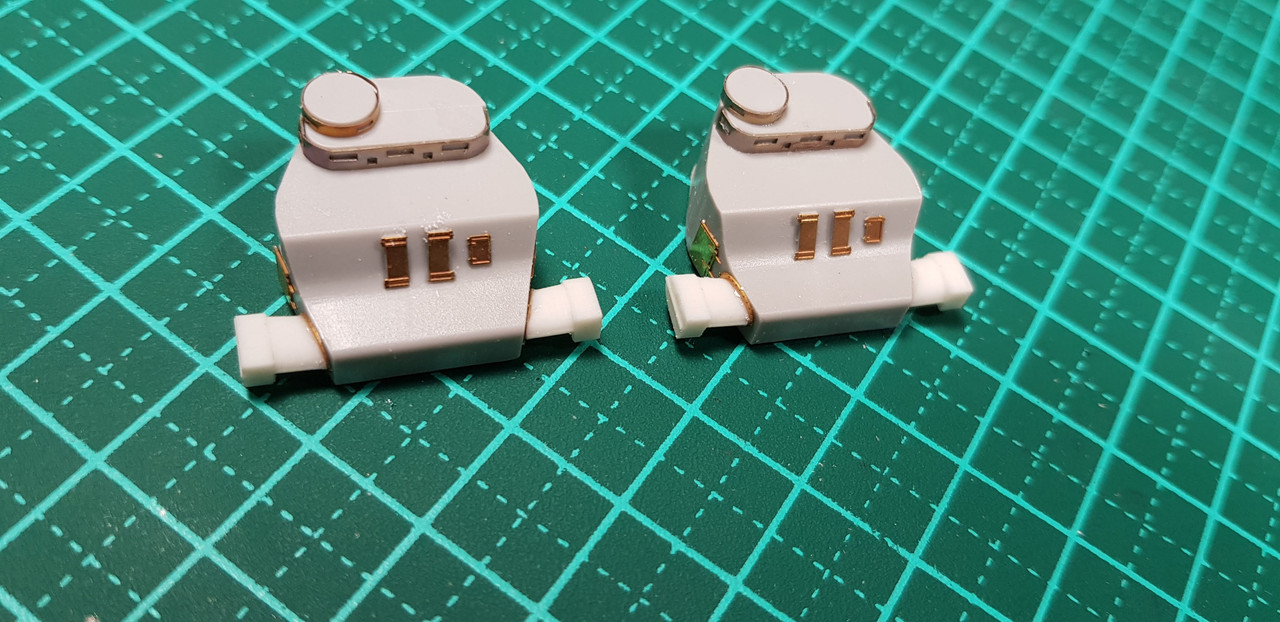
Sorry for the lack of updates but much of the build has been concentrating on getting little things done that were not very exciting to describe. So I am going to give some overall photos of completed stuff, like steam pinnaces and lifeboats, and then get back to the more in-depth stuff as various people have requested.
Just to go against all I just typed here are some piccies of the steam pinnace construction. First you need to remove quite a bit of detail from the deck including the aft cabin..
Then I placed the PE deck on the plastic piece and found I had to remove even more plastic. I highlighted the excess with a black marker then cut it out.

Then I glued the deck to the deck and trimmed some more plastic..
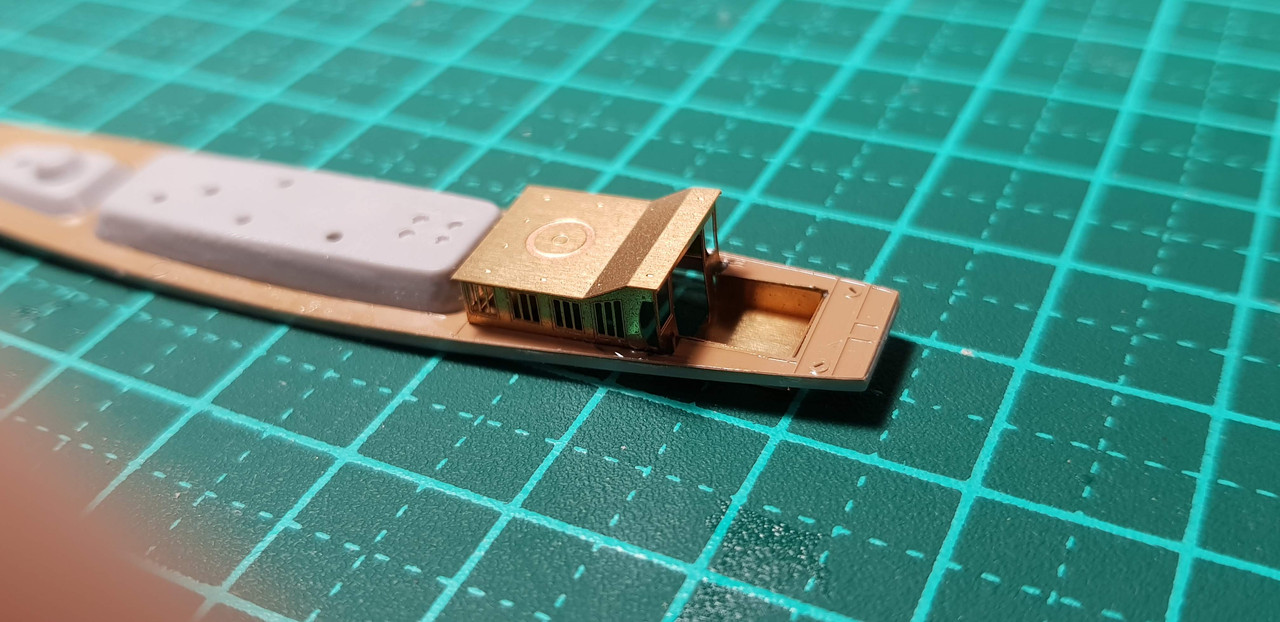
After that I started folding the PE that makes up the rear cabin,
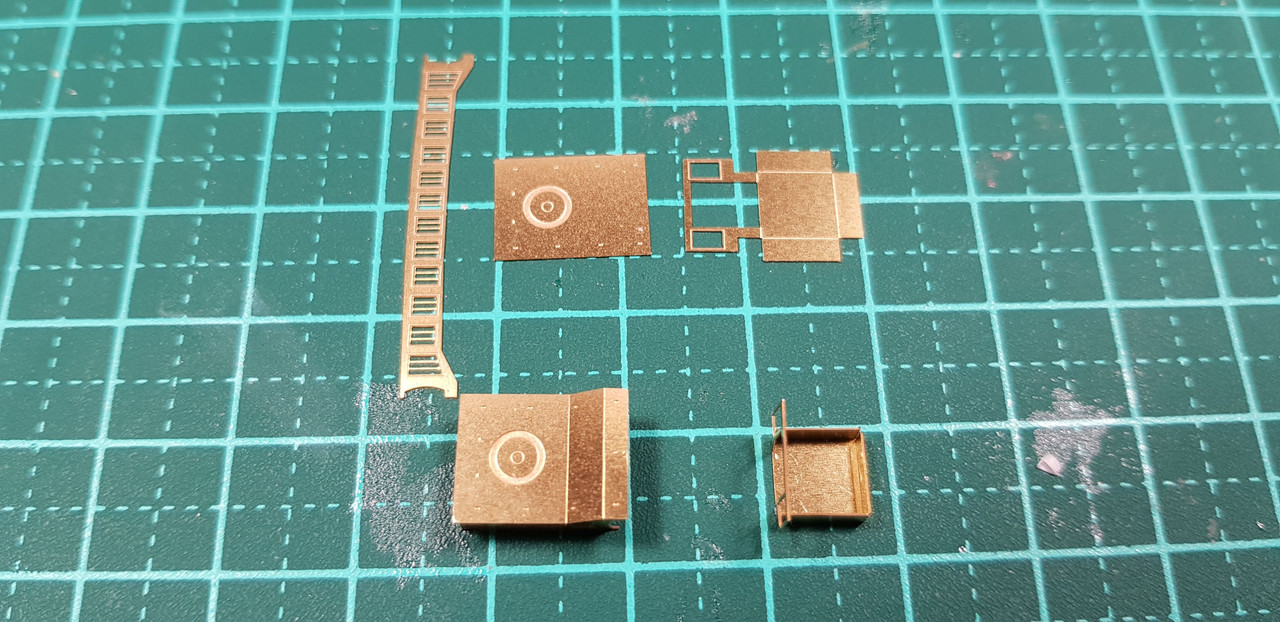
And glued it to the PE deck..
While I let that harden I decided to constuct part of one type of gun directors used on the Rodney..
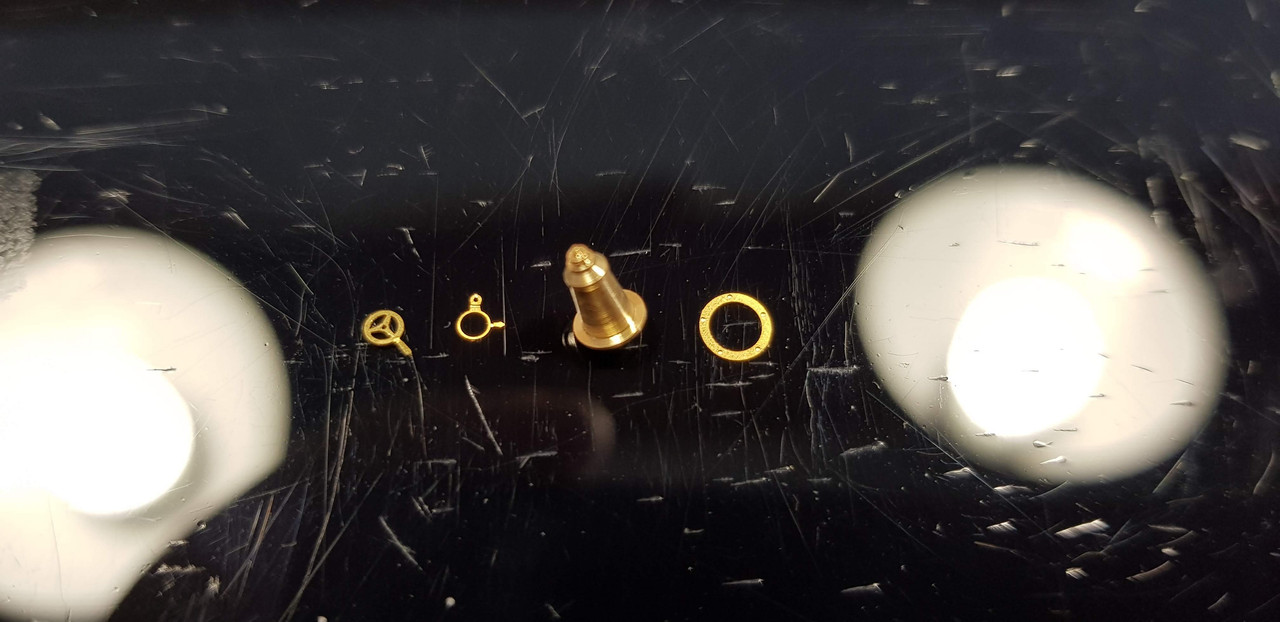
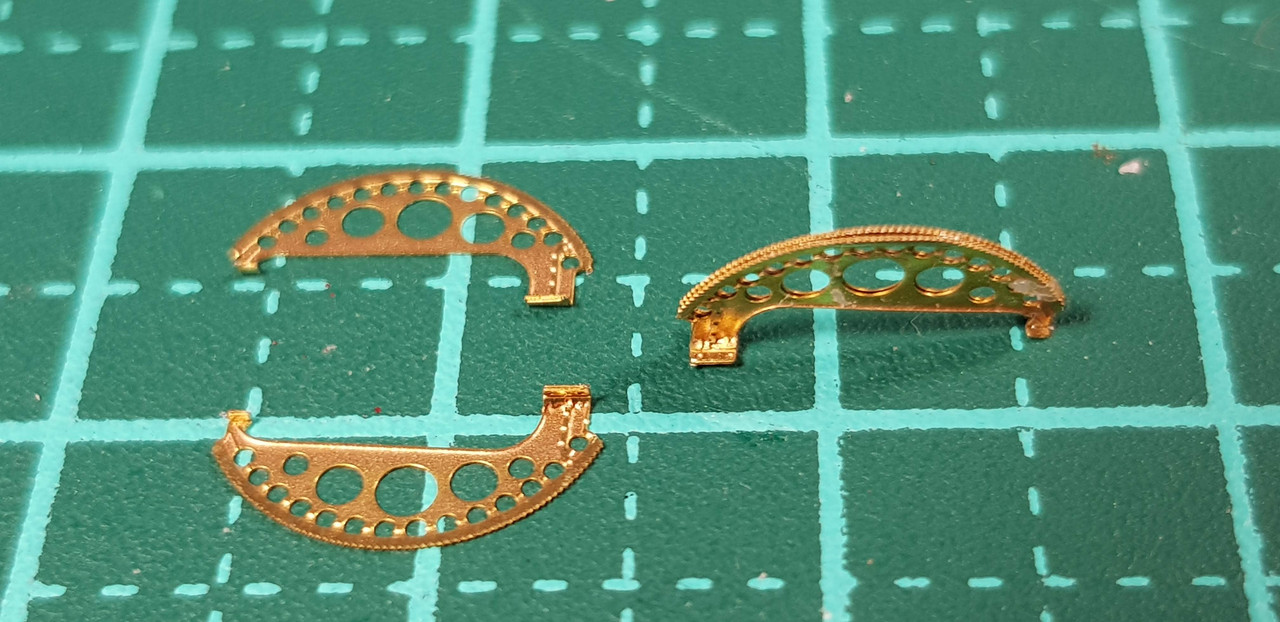
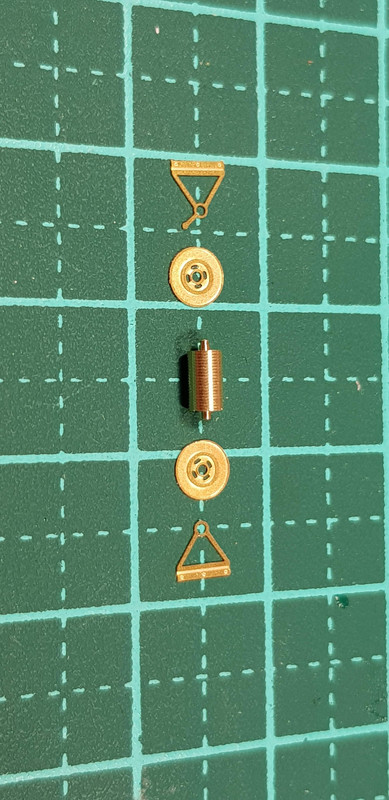
Then after that the instructions suggest you build some hose reels. These are supplied in the Pontos set using turned brass and PE for the end pieces and frames.
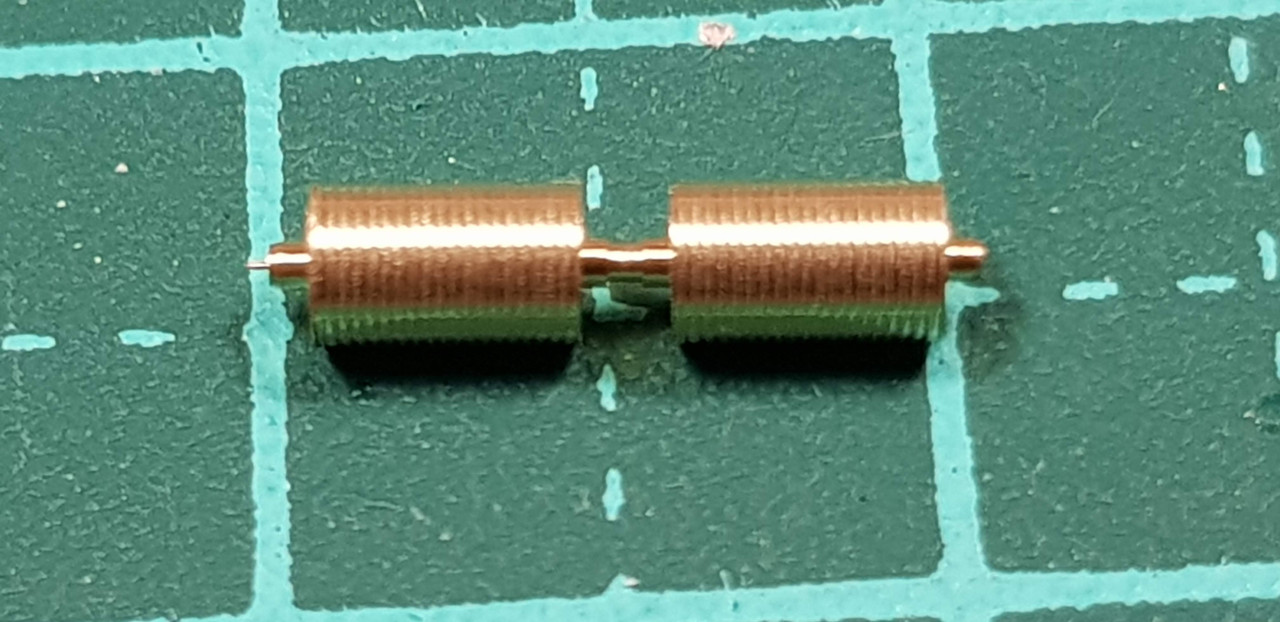
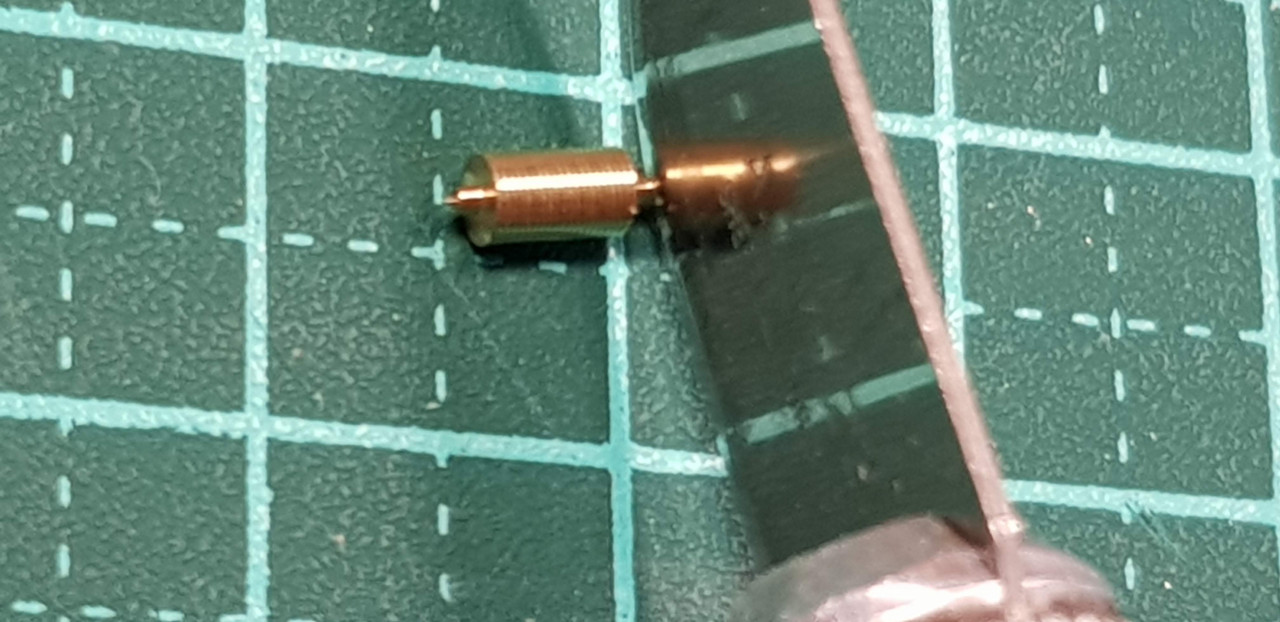
To cut the turned brass pieces I used my trusty No2 knife and just rolled the reel putting downward pressure on the reel until the blade sliced through. No dags that way you would get using end cutters.
Each of the reels is made up of five pieces
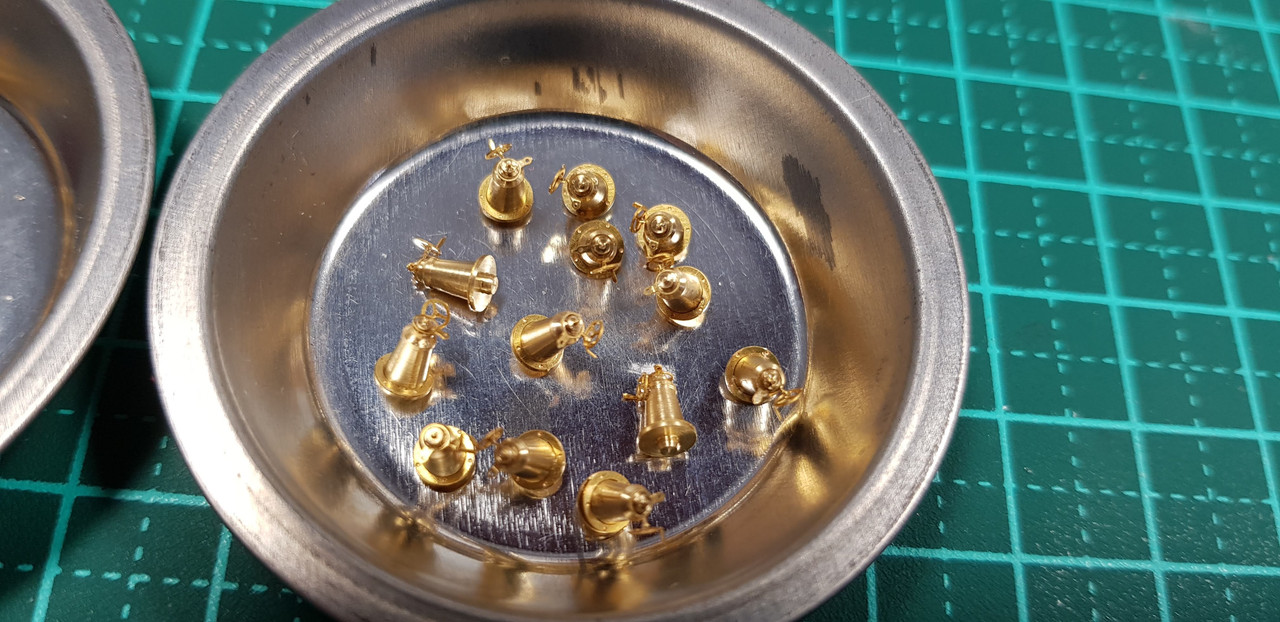
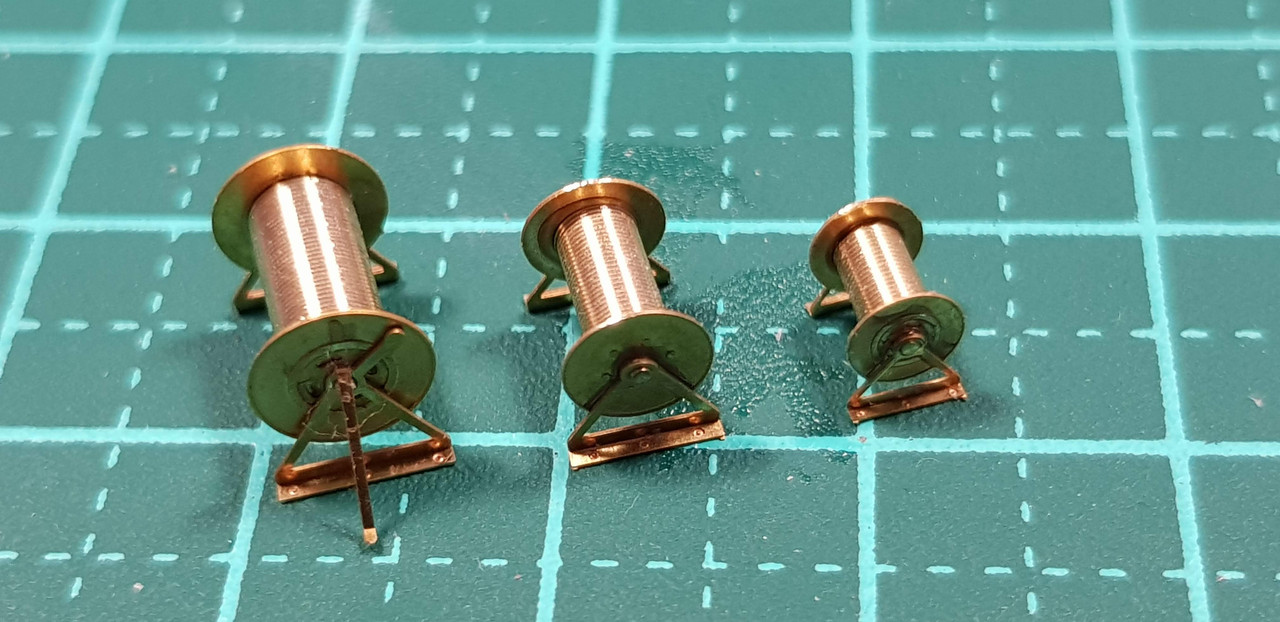
And there are three sizes that use the turned brass parts.
There are other PE parts to make further reels but you have to use plastic for the spools of the reels and there is no indication as yet as to how many of the smaller reels you need in either the Pontos or Trumpeter instructions so they can wait until I get to that part.
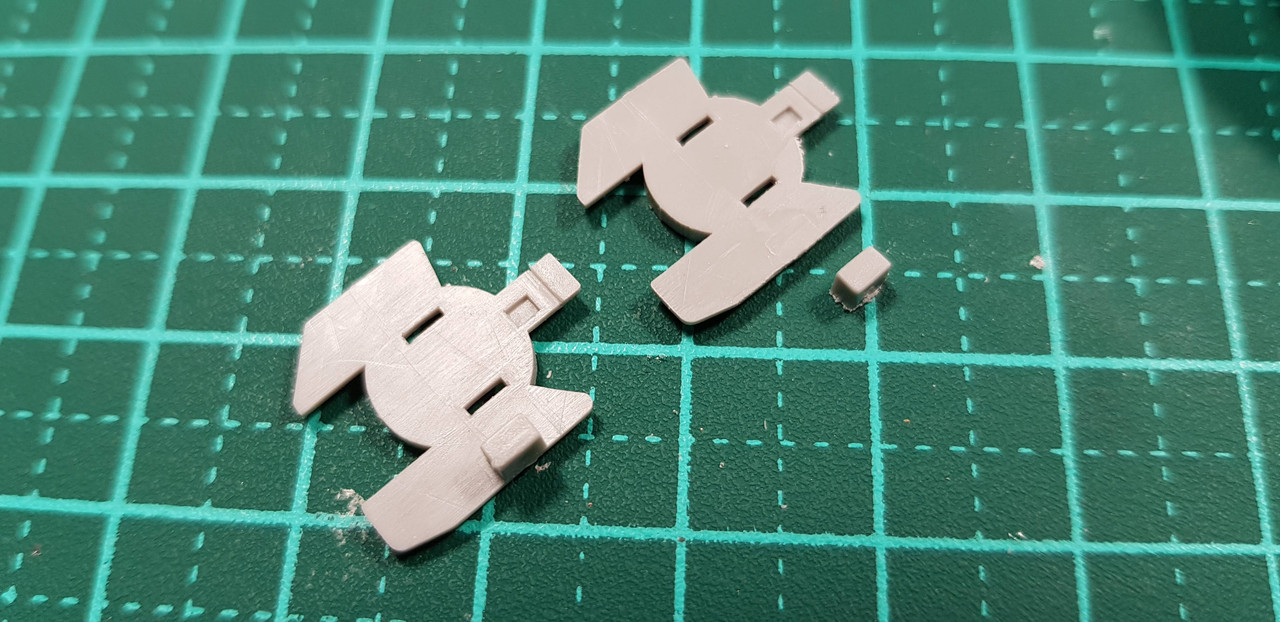
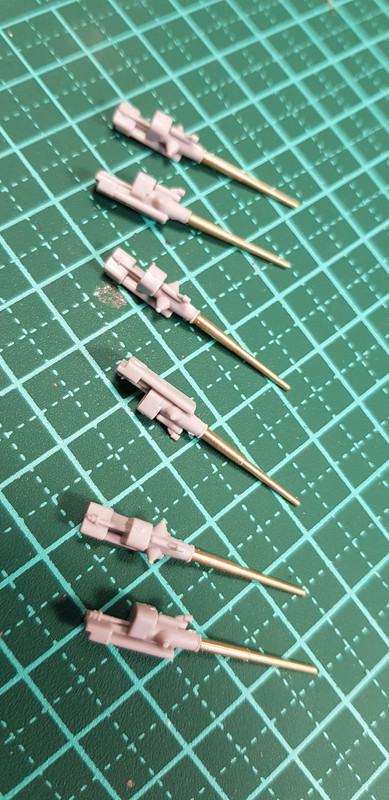
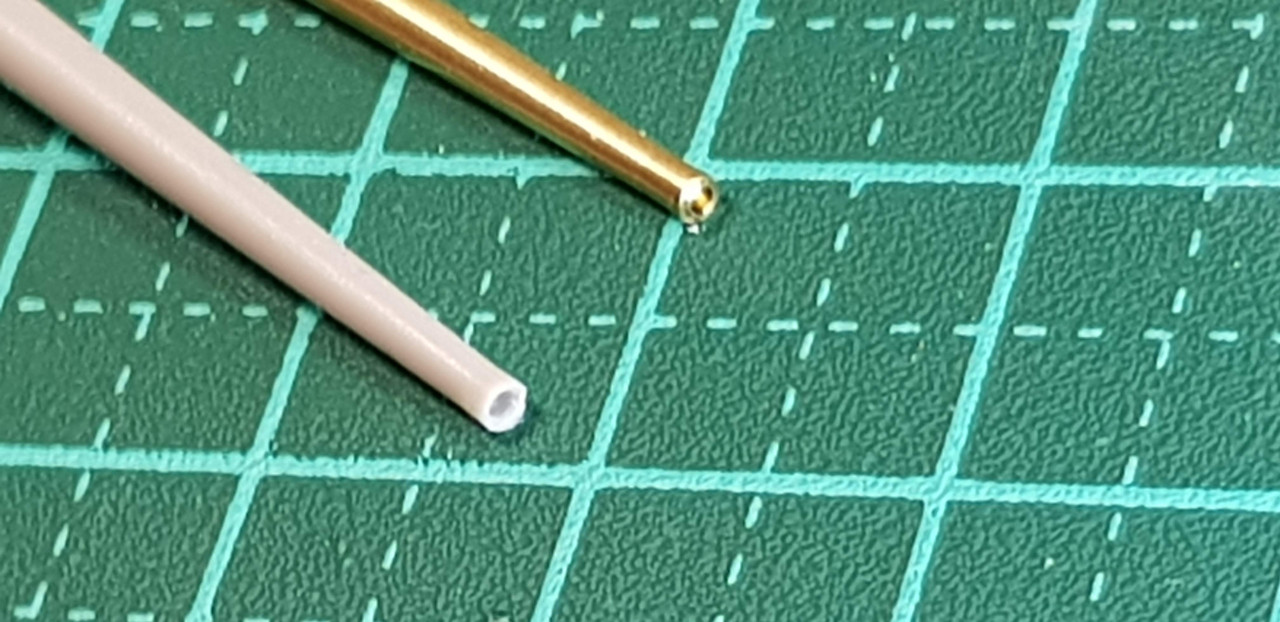
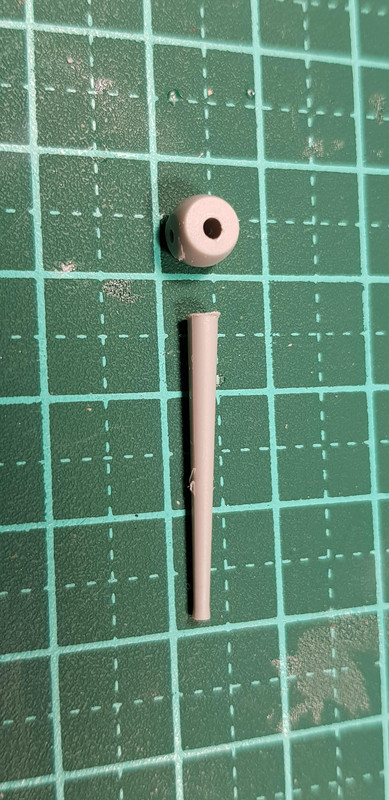
Next up I started on the six 5 inch turrets clustered at the rear of the model. Both the plastic and brass parts are almost identical, but the brass parts are slightly longer.
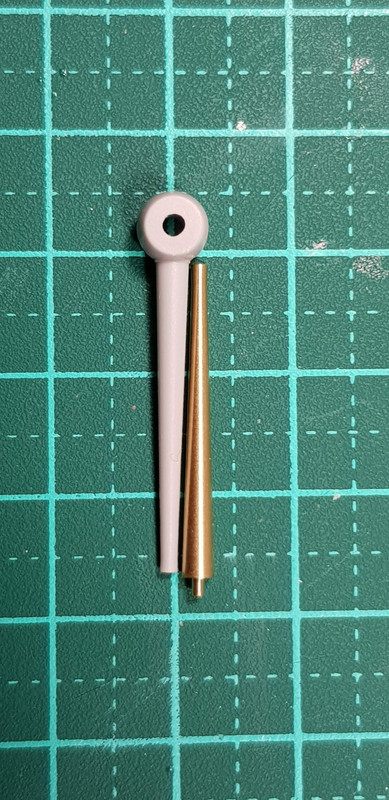
I debated as to whether to bother using the brass barrels as I really dislike adding the barrels to plastic bits as it is rather difficult to get everything lined up properly. But I said to myself, "Self, this is the only HMS Rodney you are going to build so why waste good brass barrels?" So I sliced off the plastic barrels very carefully,
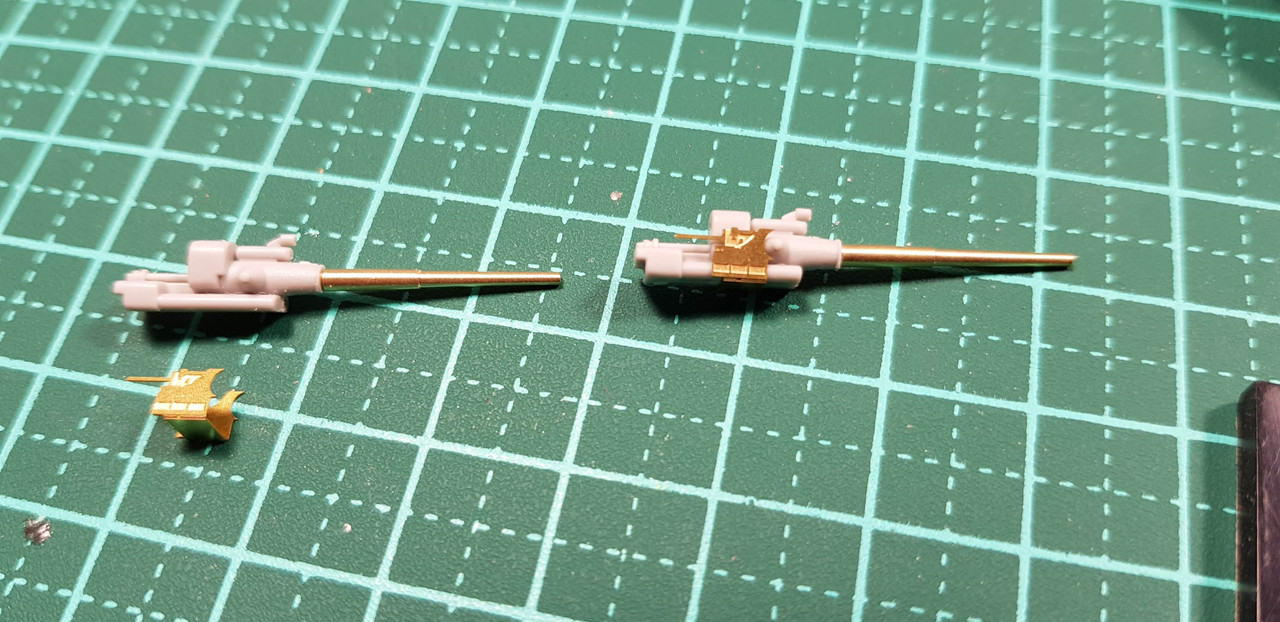
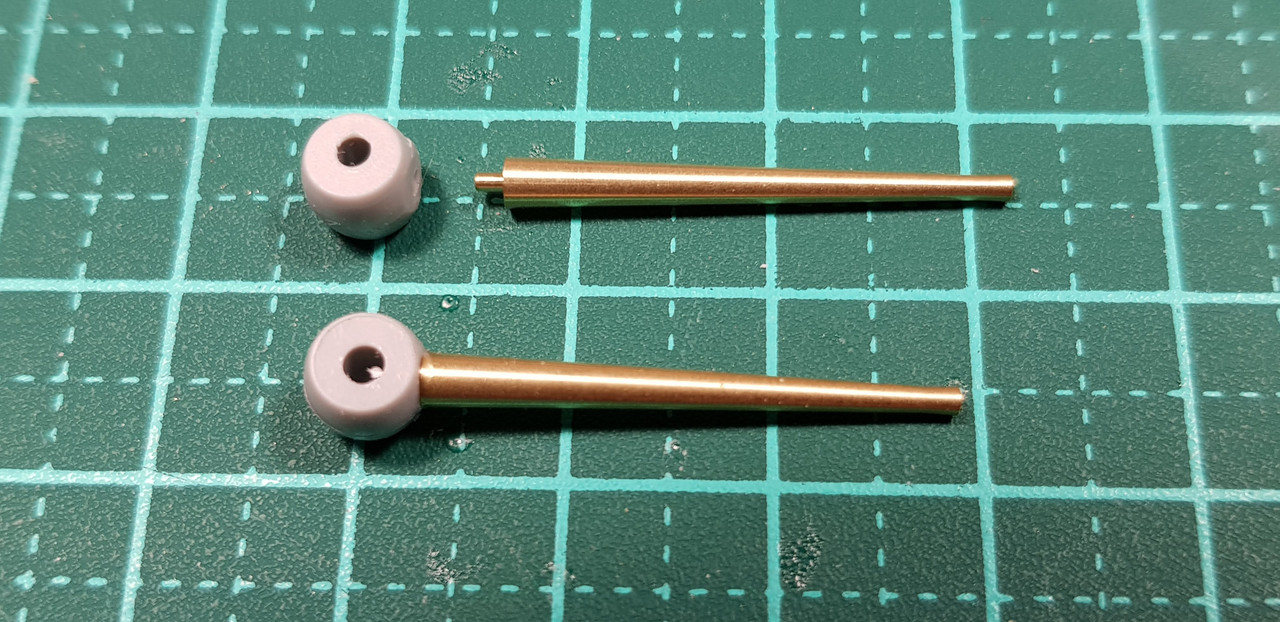
Drilled holes in the plastic to receive the brass barrels,
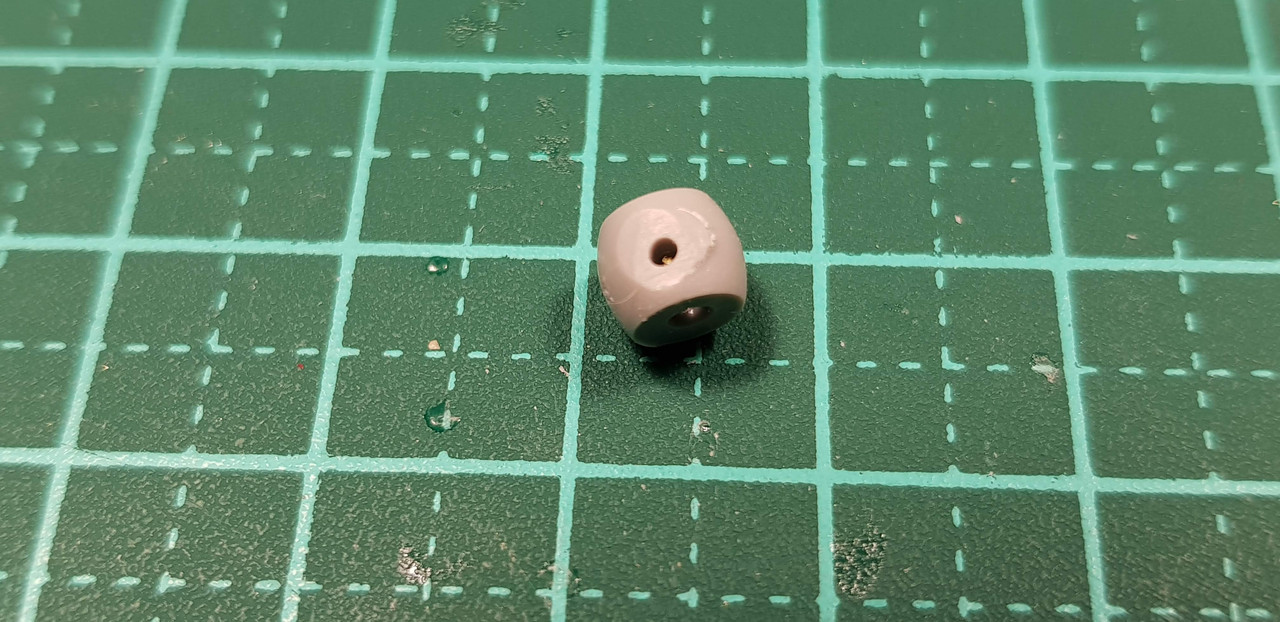
And glued the brass to the plastic.
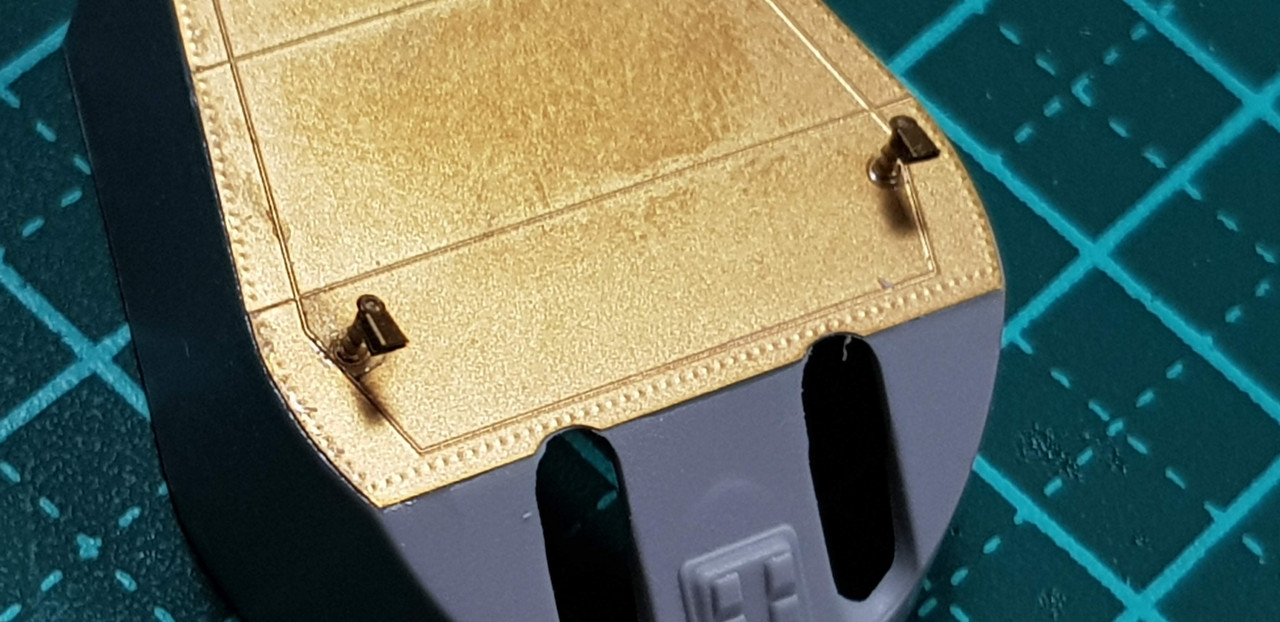
I set them aside to harden and started on the turrets themselves. First up you needed to remove fine plastic detail from the roofs of the turret.
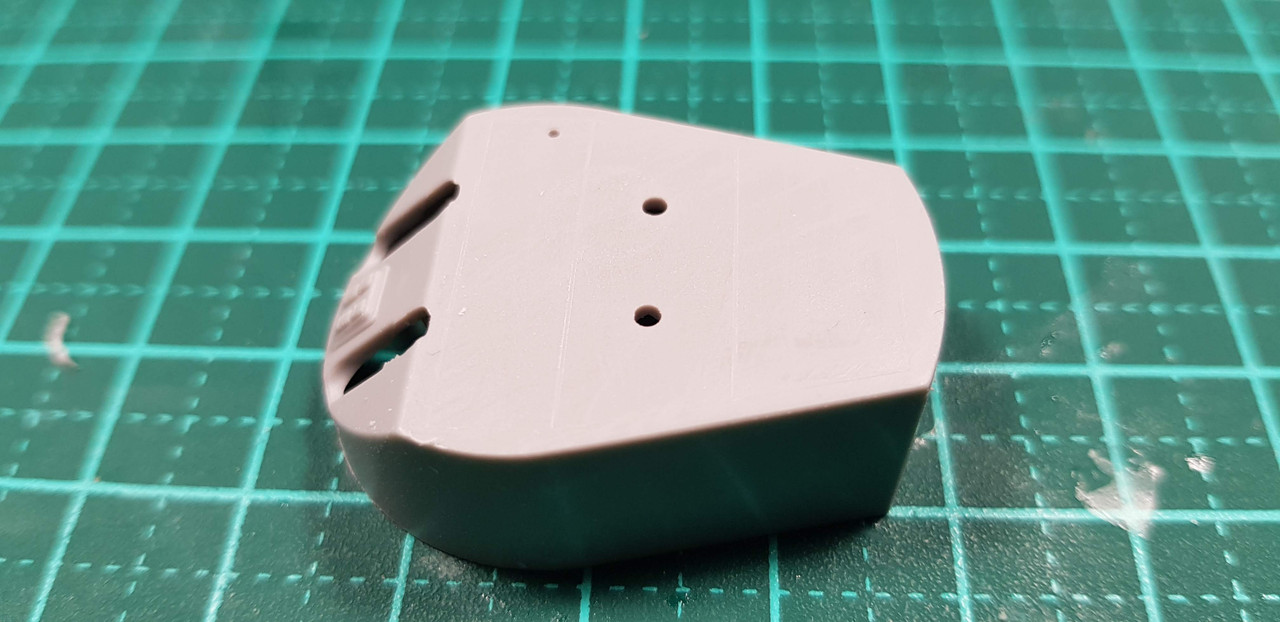
Then I added the PE roof to the turrets,
.. drilled 0.5mm holes in the plastic through the holes in the brass and then added the PE doors to the back of the turrets.
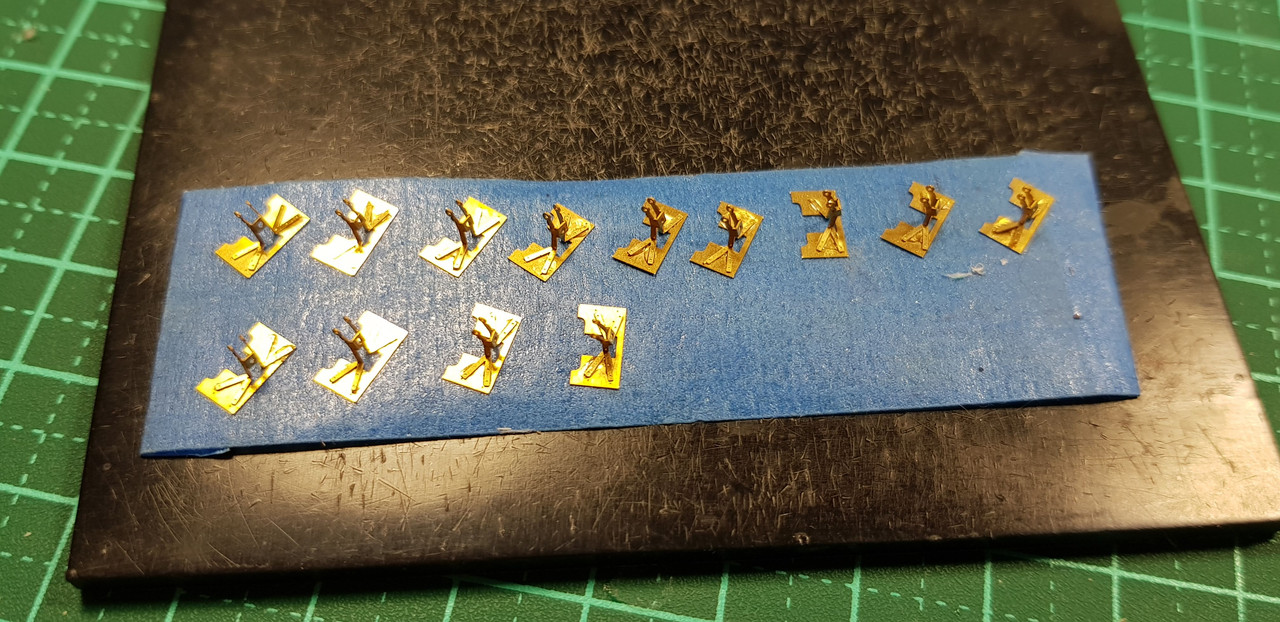
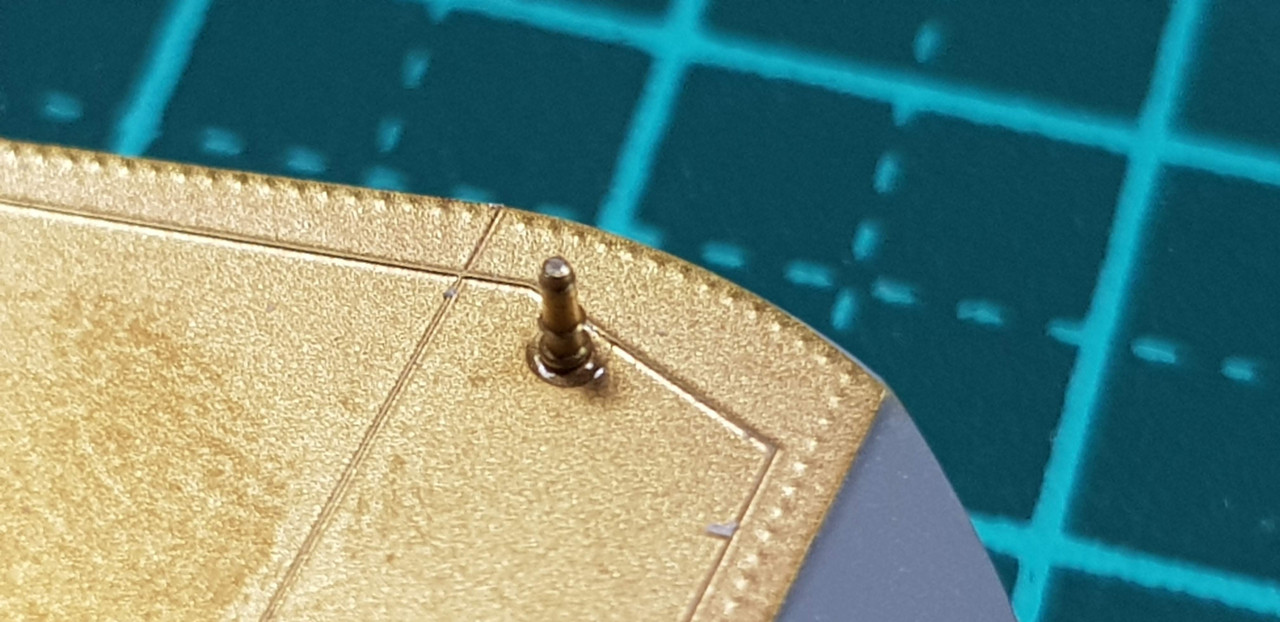
I separated the periscope poles using the same knife method I used for the hose reels (there are 6 on each turned piece of rod) and then folded up the PE periscope parts that attach to the poles.
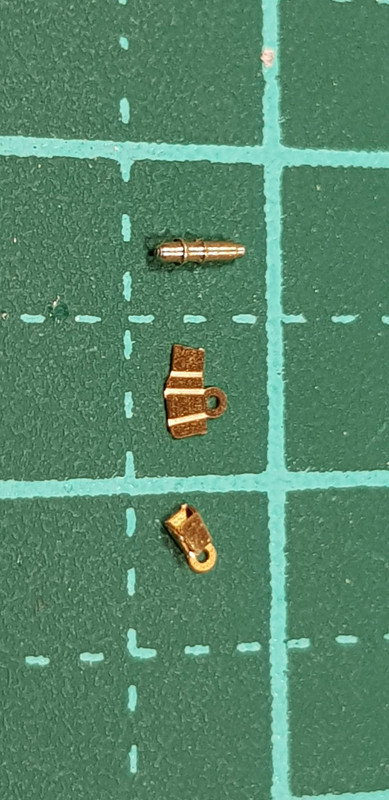
These are about 1 mm in size after bending and to allow easier bending I annealed them before trying to bend them. Pontos supply extras of all these tiny parts in case you stuff one of them up, or the floor monster spirits one away.
That's all for now.
Cheers
Warren
Sorry for the lack of updates but much of the build has been concentrating on getting little things done that were not very exciting to describe. So I am going to give some overall photos of completed stuff, like steam pinnaces and lifeboats, and then get back to the more in-depth stuff as various people have requested.
Just to go against all I just typed here are some piccies of the steam pinnace construction. First you need to remove quite a bit of detail from the deck including the aft cabin..
Then I placed the PE deck on the plastic piece and found I had to remove even more plastic. I highlighted the excess with a black marker then cut it out.
Then I glued the deck to the deck and trimmed some more plastic..
After that I started folding the PE that makes up the rear cabin,
And glued it to the PE deck..
While I let that harden I decided to constuct part of one type of gun directors used on the Rodney..
Then after that the instructions suggest you build some hose reels. These are supplied in the Pontos set using turned brass and PE for the end pieces and frames.
To cut the turned brass pieces I used my trusty No2 knife and just rolled the reel putting downward pressure on the reel until the blade sliced through. No dags that way you would get using end cutters.
Each of the reels is made up of five pieces
And there are three sizes that use the turned brass parts.
There are other PE parts to make further reels but you have to use plastic for the spools of the reels and there is no indication as yet as to how many of the smaller reels you need in either the Pontos or Trumpeter instructions so they can wait until I get to that part.
Next up I started on the six 5 inch turrets clustered at the rear of the model. Both the plastic and brass parts are almost identical, but the brass parts are slightly longer.
I debated as to whether to bother using the brass barrels as I really dislike adding the barrels to plastic bits as it is rather difficult to get everything lined up properly. But I said to myself, "Self, this is the only HMS Rodney you are going to build so why waste good brass barrels?" So I sliced off the plastic barrels very carefully,
Drilled holes in the plastic to receive the brass barrels,
And glued the brass to the plastic.
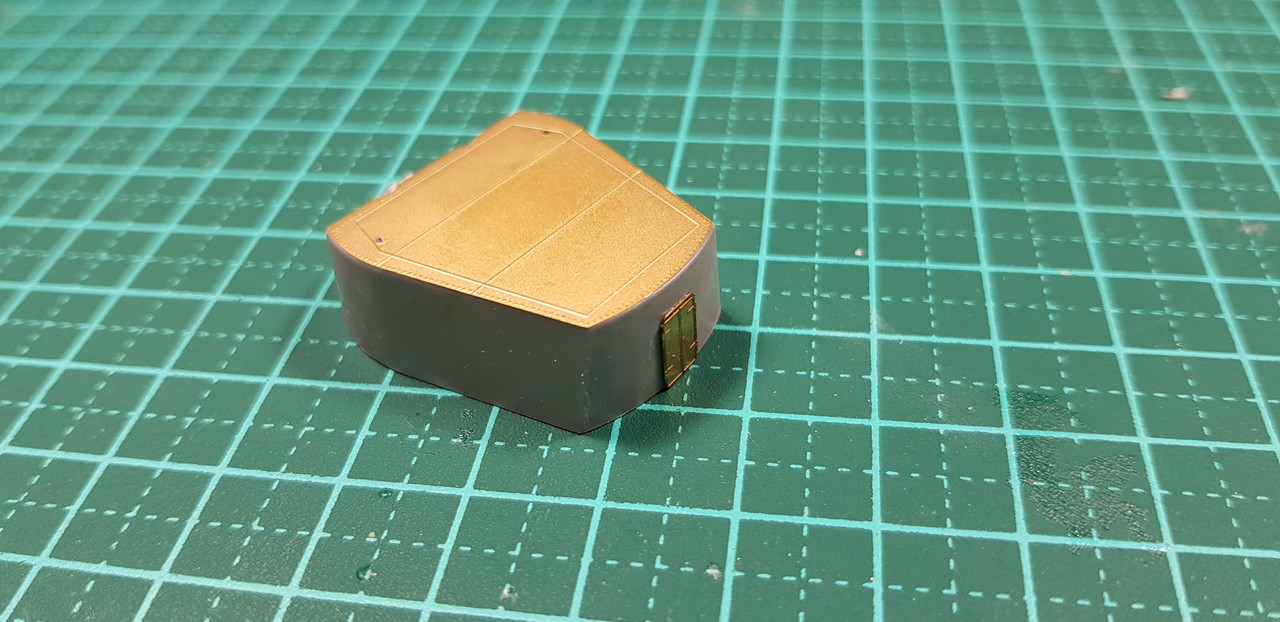
I set them aside to harden and started on the turrets themselves. First up you needed to remove fine plastic detail from the roofs of the turret.
Then I added the PE roof to the turrets,
.. drilled 0.5mm holes in the plastic through the holes in the brass and then added the PE doors to the back of the turrets.
I separated the periscope poles using the same knife method I used for the hose reels (there are 6 on each turned piece of rod) and then folded up the PE periscope parts that attach to the poles.
These are about 1 mm in size after bending and to allow easier bending I annealed them before trying to bend them. Pontos supply extras of all these tiny parts in case you stuff one of them up, or the floor monster spirits one away.
That's all for now.
Cheers
Warren
d6mst0
#453
Joined: August 28, 2016
KitMaker: 1,925 posts
Model Shipwrights: 1,298 posts
Posted: Tuesday, July 10, 2018 - 01:19 PM UTC
Warren,
Nice progress pictures, you been real busy with the PE and brass work. Very nice indeed. Looking forward to the next progress report.
Mark
Nice progress pictures, you been real busy with the PE and brass work. Very nice indeed. Looking forward to the next progress report.
Mark
RussellE
#306
Joined: June 27, 2010
KitMaker: 3,959 posts
Model Shipwrights: 2,777 posts
Posted: Tuesday, July 10, 2018 - 10:18 PM UTC
fantastic details in the Pontos set Warren
doing it justice!
doing it justice!
warreni
Joined: August 14, 2007
KitMaker: 5,926 posts
Model Shipwrights: 2,624 posts
Posted: Saturday, July 14, 2018 - 05:53 PM UTC
Hi All.
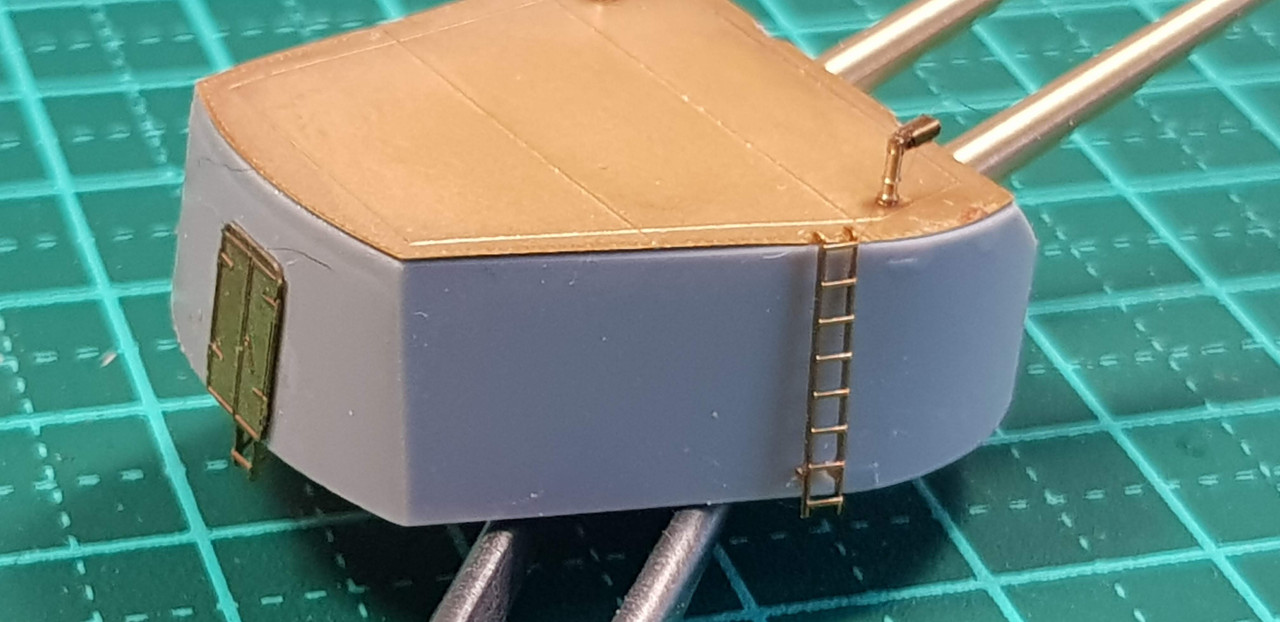
Time to continue the blog. First up I continue with the six smaller turrets. Each has a couple of periscopes on the roof. The mast looks like this..
And after you have added the top parts..
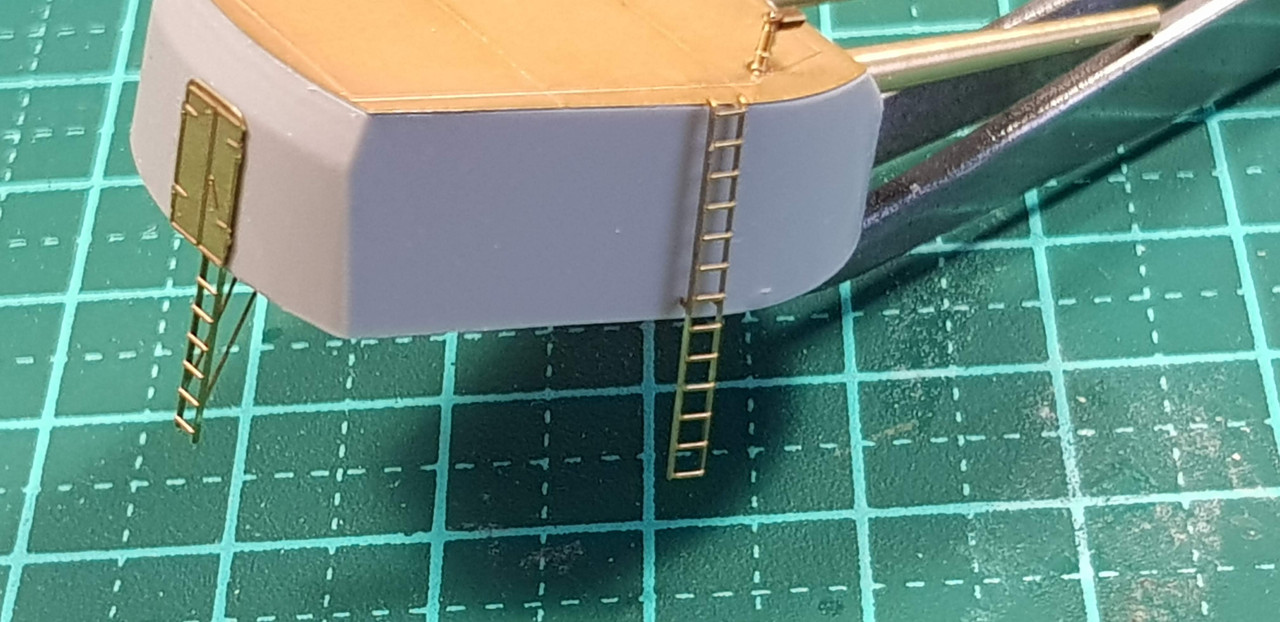
After that some doors on the back of the turrets and a couple of different types of ladders, depending on where the turret is located..
Then each of the rear turrets have railings around the top. To bend the feet I used my larger bending tool//
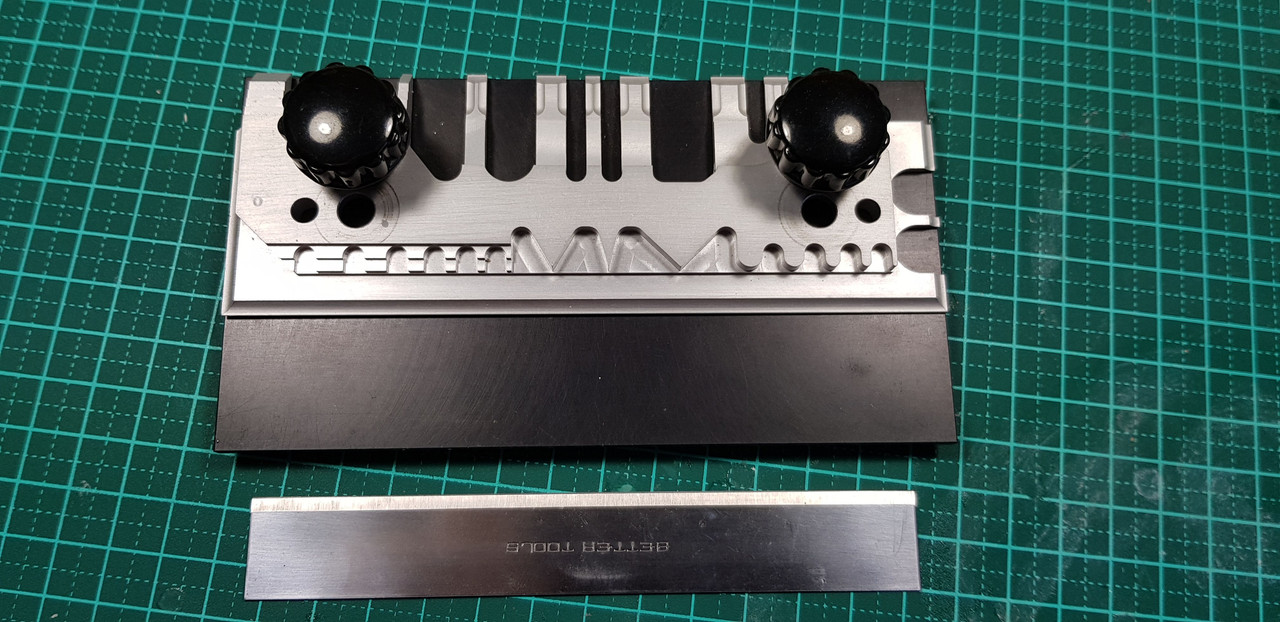
That also comes with a large blade for bending long things. After bending they got placed on the tops of the turrets..
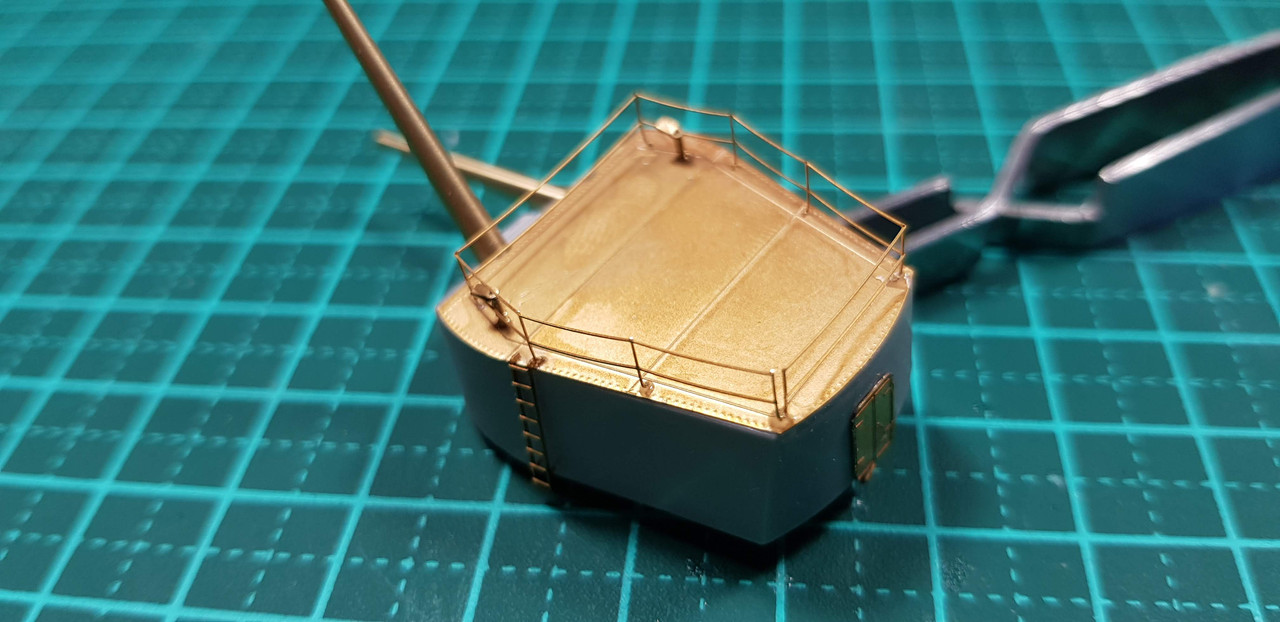
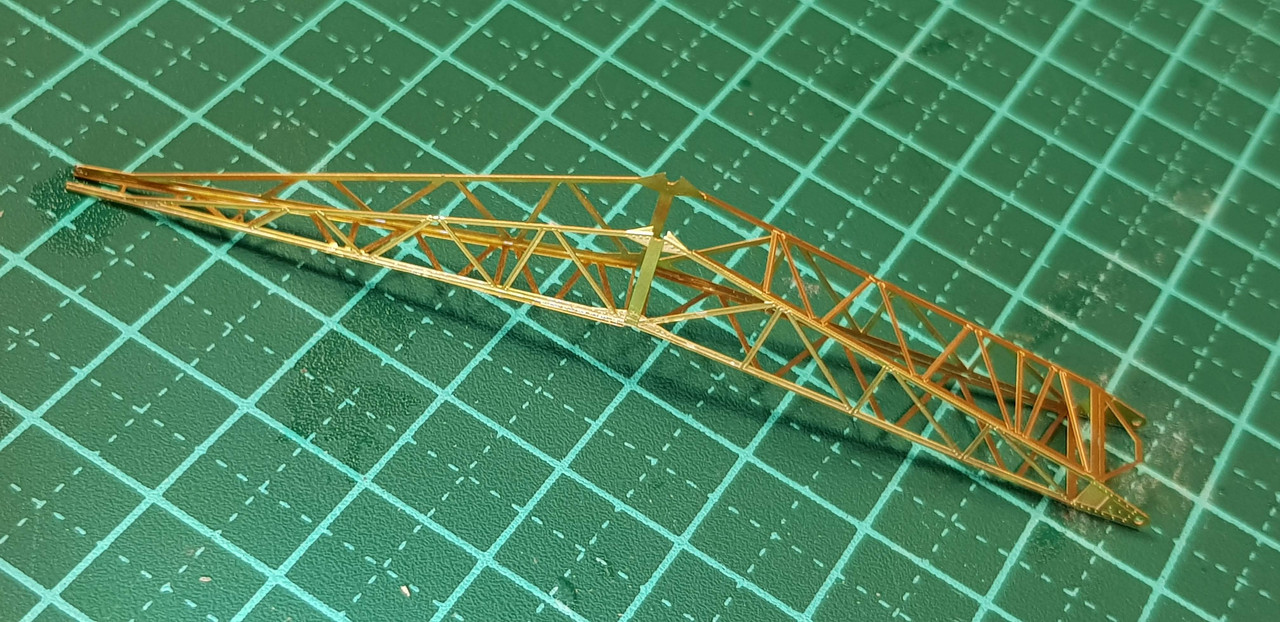
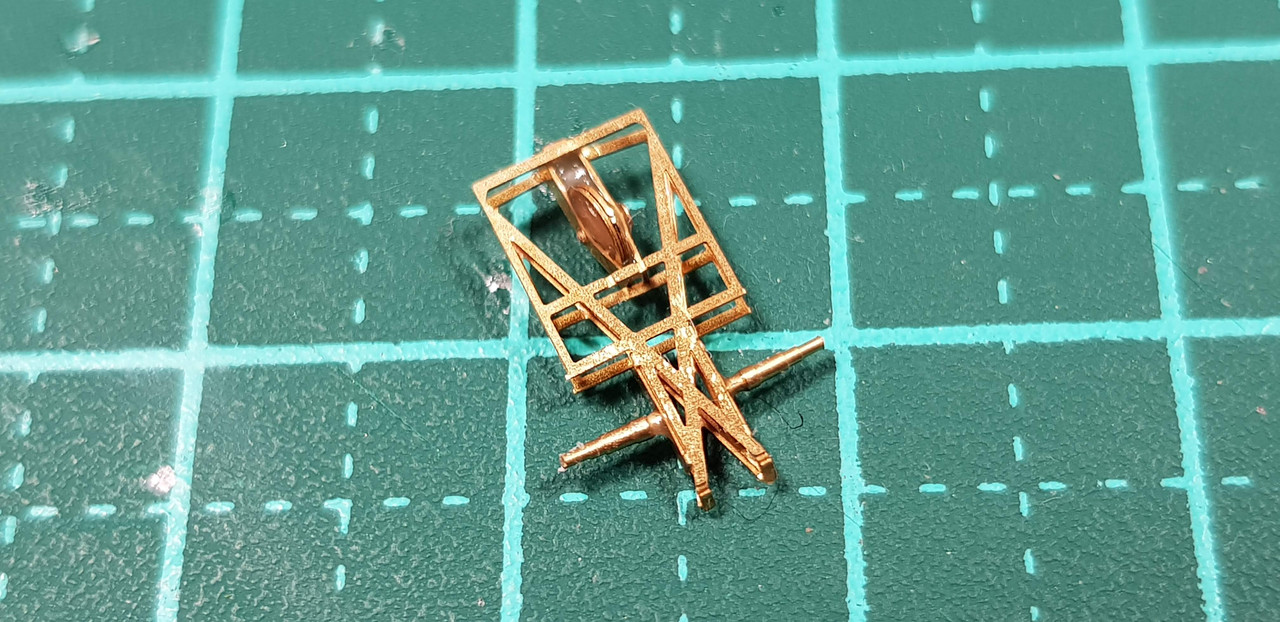
Next on the agenda is the crane used for lifting the Walrus's onto and off the catapult. This is the sprue all the crane bits comes on..
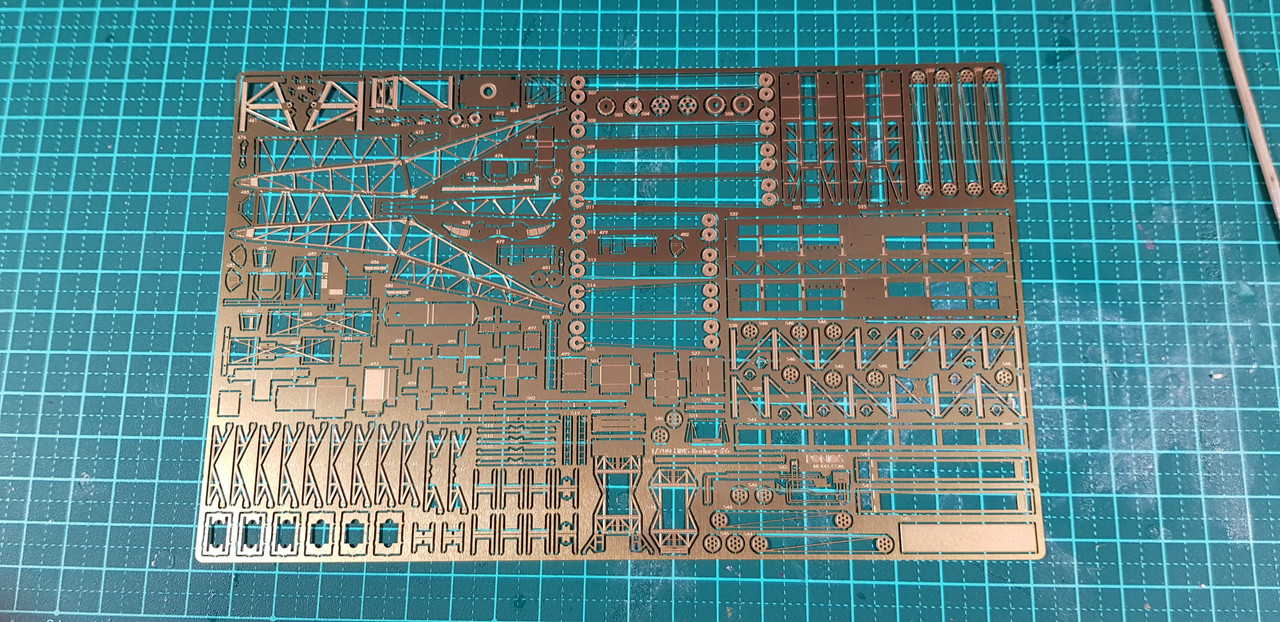
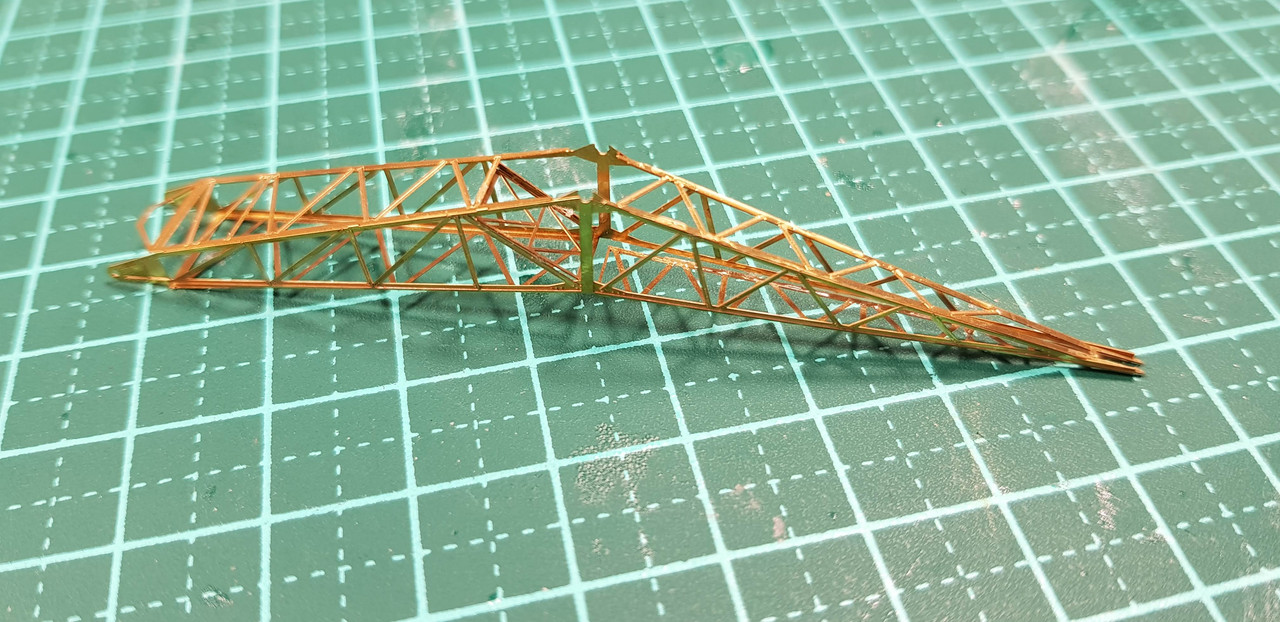
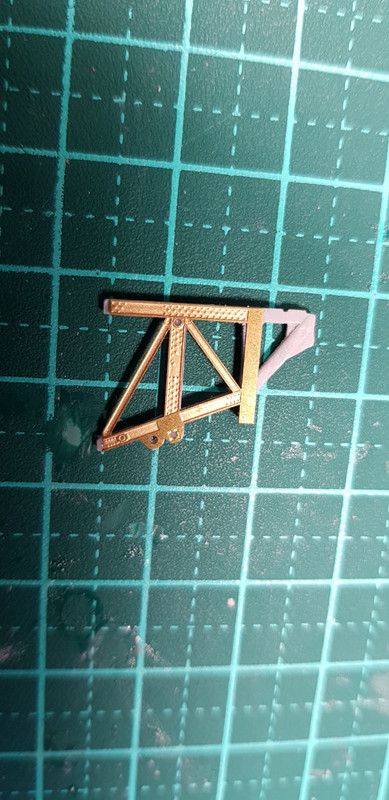
After removing the crane I started on the bending process..
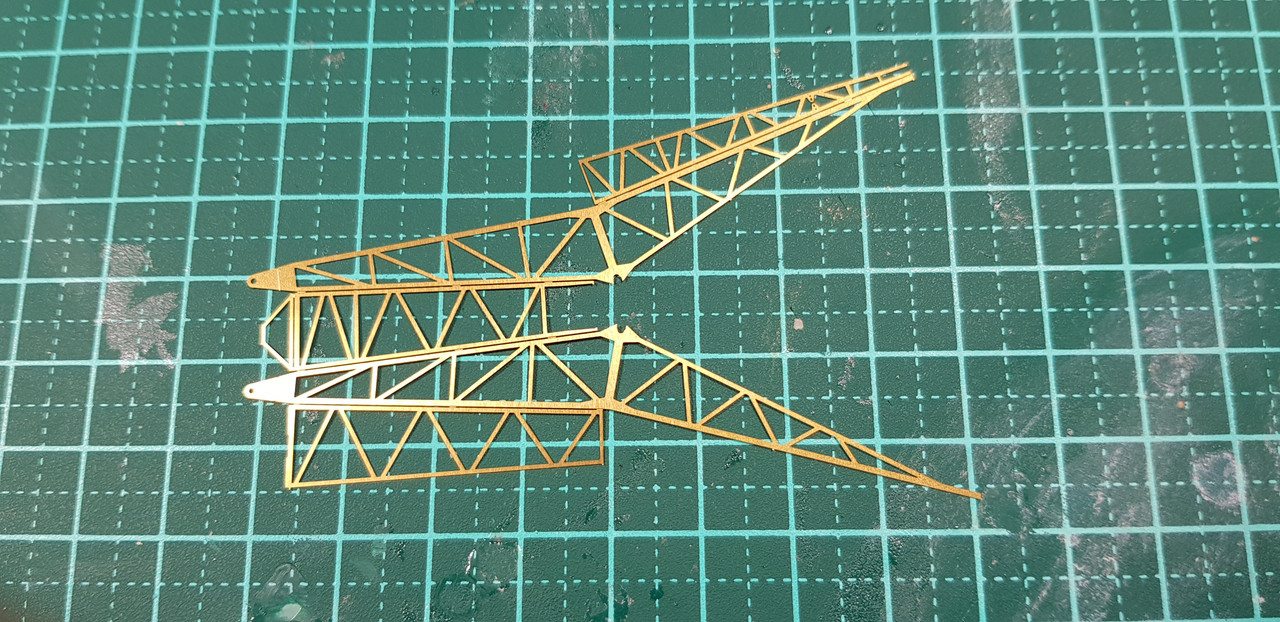
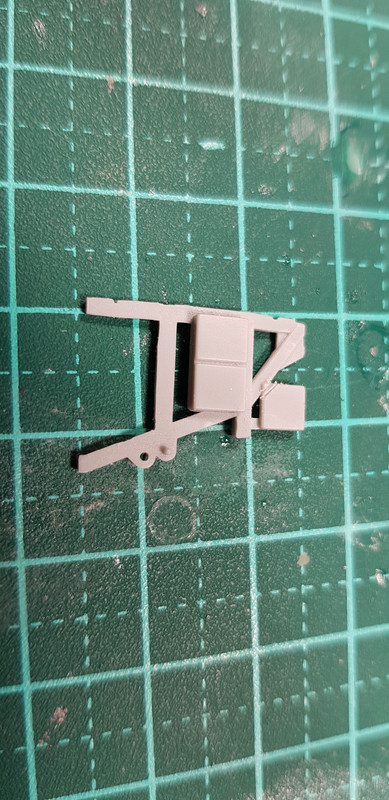
After that you need to construct the base of the crane..
.. modifying plastic parts and attaching PE as you go..
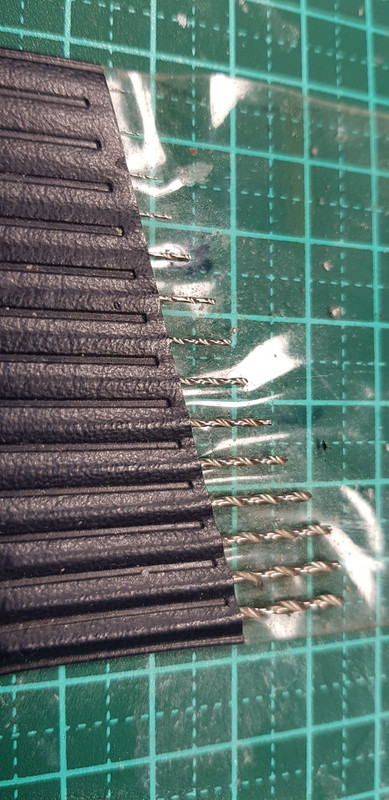
One more set of tools I forgot were my set of drills ranging from 0.1mm to a bit over 1mm in 0.1mm increments.
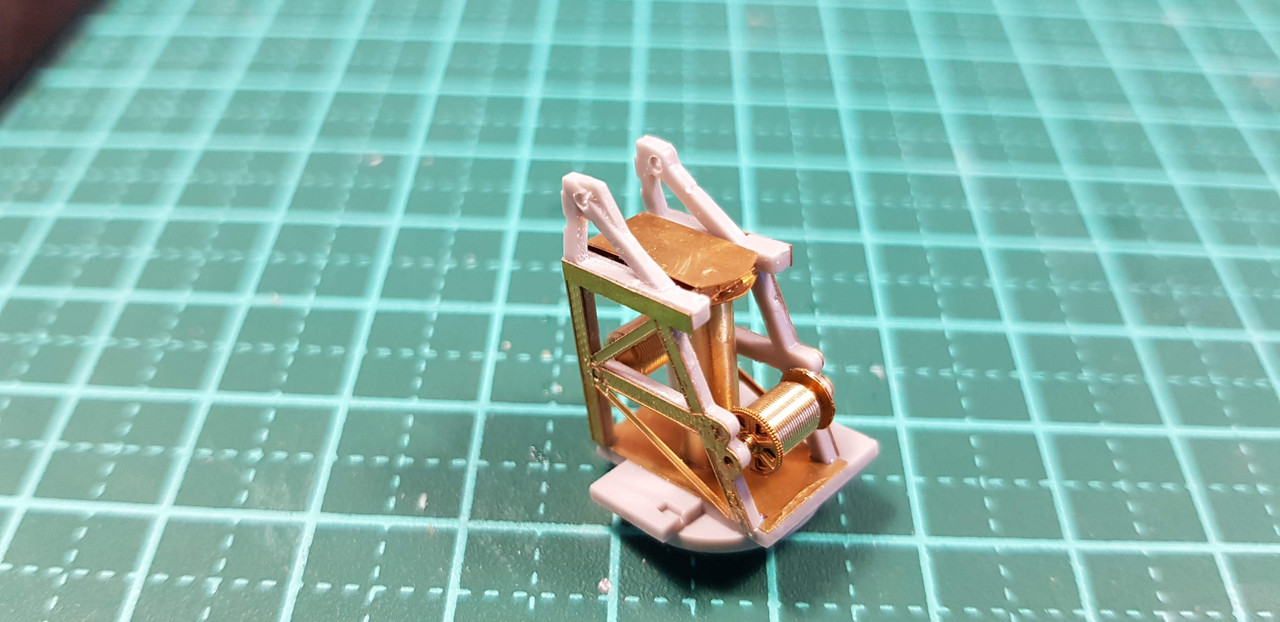
Very useful. Then you started attching the plastic bits to the crane's base..

And some drums and the centrla support..
After that you start with the rigging for the jib you constructed earlier..

Then all was going smoothly until a mini disaster.. I dropped the crane body and these bits decided to eject themselves..
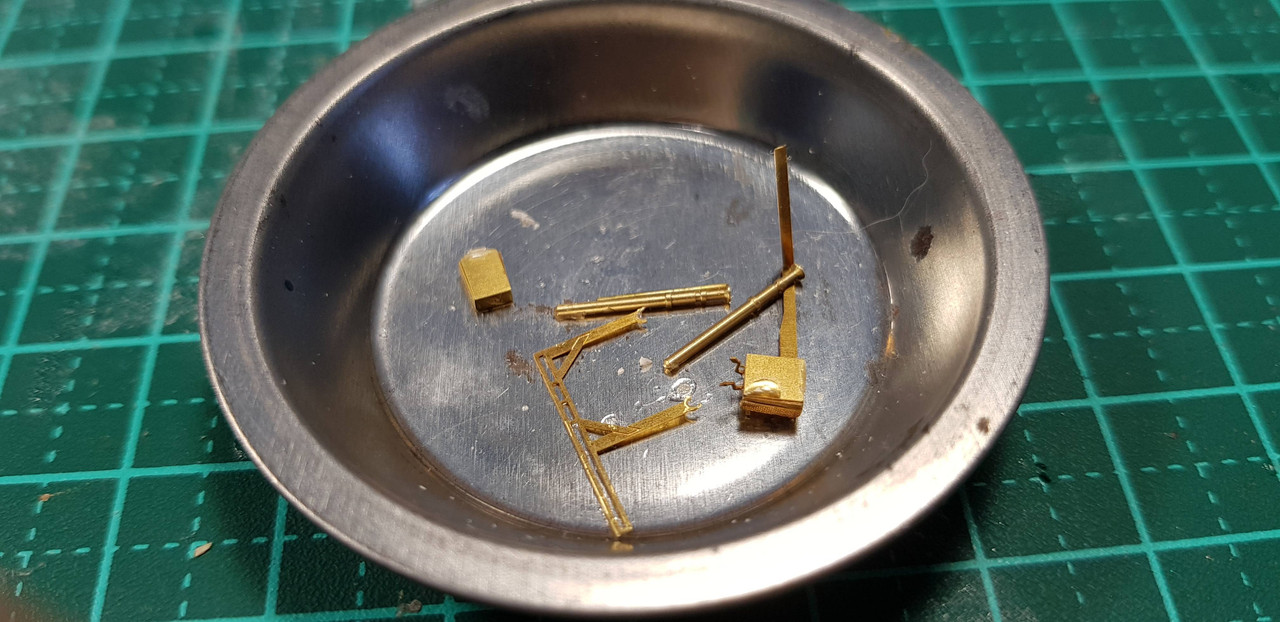
I got a bit surly after that as it had taken me ages to do the rigging and I didn't seem to be getting anywhere with it. But after about three hours of fiddling I finally got the crane to the point where I could attach the jib..
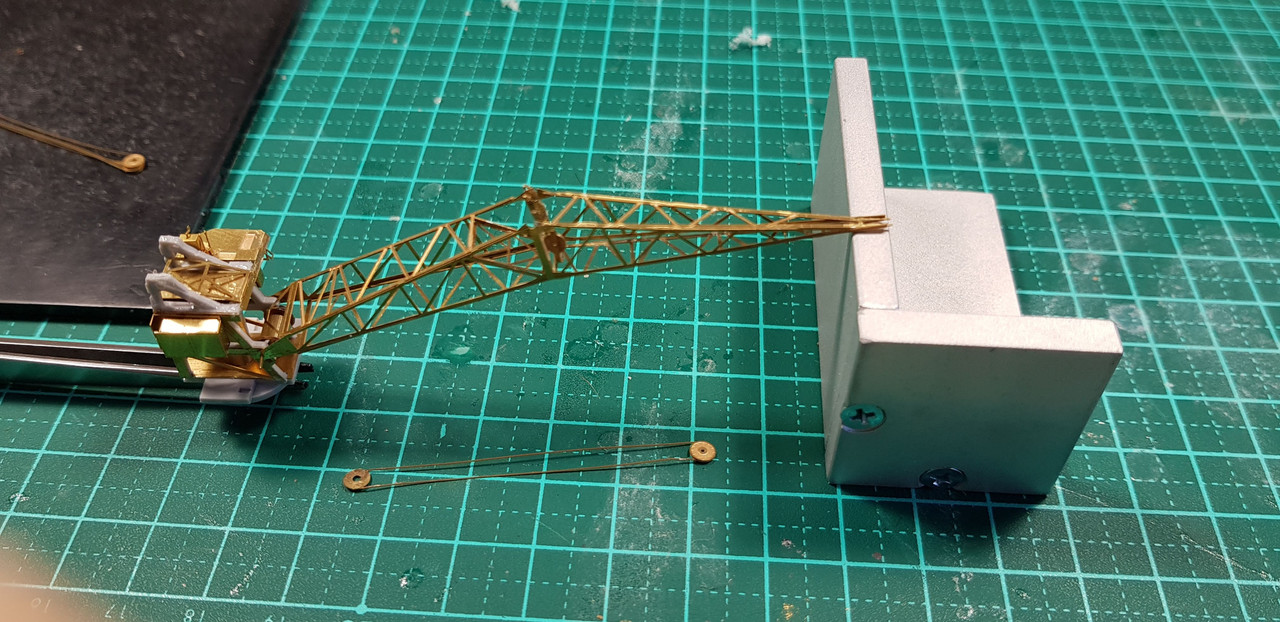
Then I installed all the rest of the bits and ended up with..

.. which isn't exactly as it is in the instructions but I found it almost impossible to do some of the rigging the way described, or shown at least, so I did it my way and kept my sanity instead. Probably give me another one to build and it would go together without a hitch.
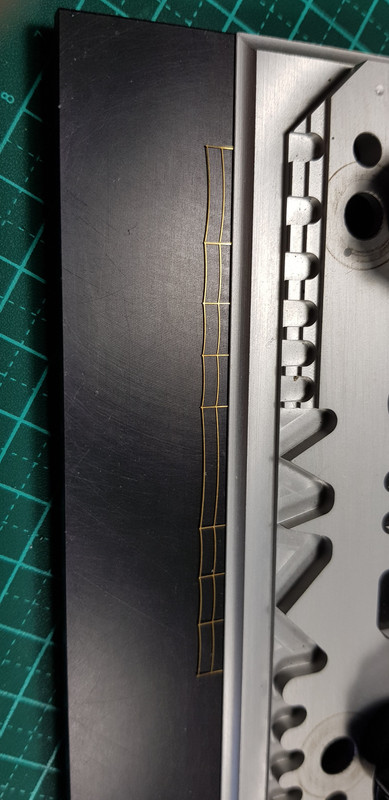
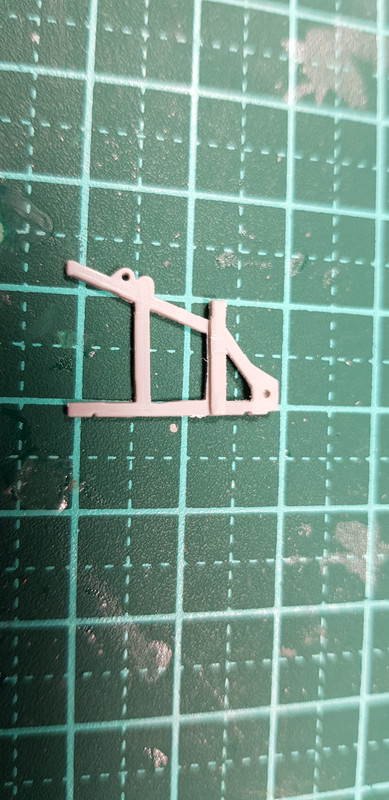
Next job is to build the catapault located on one of the main turrets starting with this..
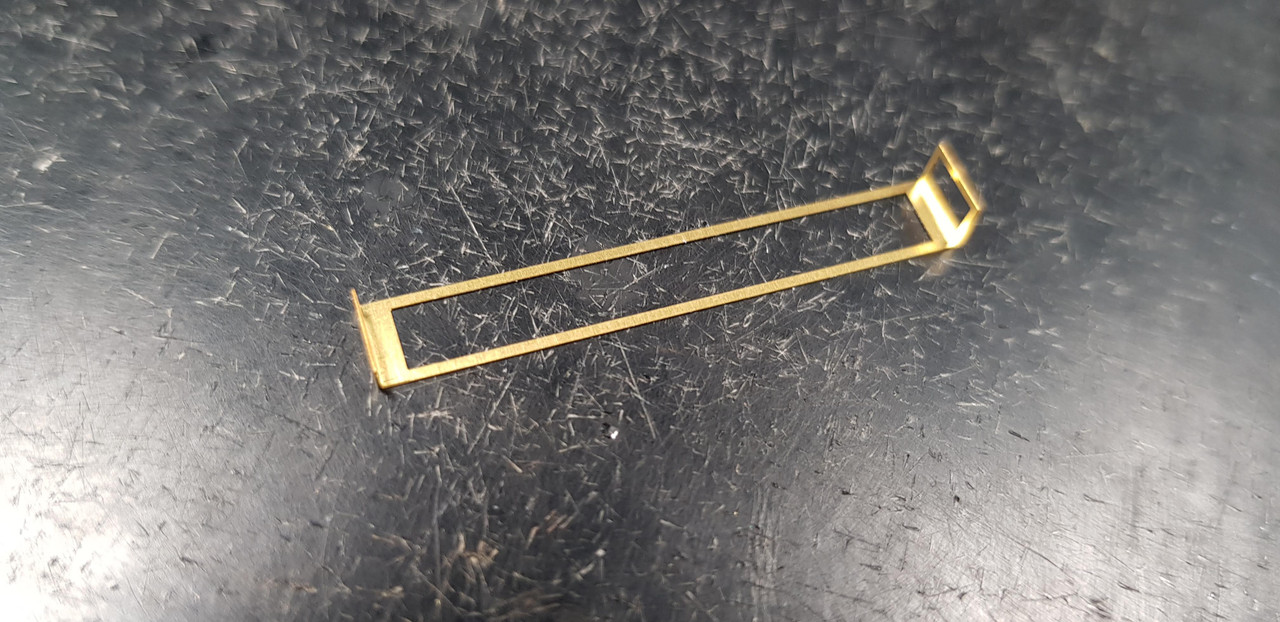

And that's all he wrote for the moment..
Cheers all
Warren
Time to continue the blog. First up I continue with the six smaller turrets. Each has a couple of periscopes on the roof. The mast looks like this..
And after you have added the top parts..
After that some doors on the back of the turrets and a couple of different types of ladders, depending on where the turret is located..
Then each of the rear turrets have railings around the top. To bend the feet I used my larger bending tool//
That also comes with a large blade for bending long things. After bending they got placed on the tops of the turrets..
Next on the agenda is the crane used for lifting the Walrus's onto and off the catapult. This is the sprue all the crane bits comes on..
After removing the crane I started on the bending process..
After that you need to construct the base of the crane..
.. modifying plastic parts and attaching PE as you go..
One more set of tools I forgot were my set of drills ranging from 0.1mm to a bit over 1mm in 0.1mm increments.
Very useful. Then you started attching the plastic bits to the crane's base..
And some drums and the centrla support..
After that you start with the rigging for the jib you constructed earlier..
Then all was going smoothly until a mini disaster.. I dropped the crane body and these bits decided to eject themselves..
I got a bit surly after that as it had taken me ages to do the rigging and I didn't seem to be getting anywhere with it. But after about three hours of fiddling I finally got the crane to the point where I could attach the jib..
Then I installed all the rest of the bits and ended up with..
.. which isn't exactly as it is in the instructions but I found it almost impossible to do some of the rigging the way described, or shown at least, so I did it my way and kept my sanity instead. Probably give me another one to build and it would go together without a hitch.
Next job is to build the catapault located on one of the main turrets starting with this..
And that's all he wrote for the moment..
Cheers all
Warren
d6mst0
#453
Joined: August 28, 2016
KitMaker: 1,925 posts
Model Shipwrights: 1,298 posts
Posted: Saturday, July 14, 2018 - 10:15 PM UTC
Warren,
Too bad about your near disaster but it looks like you made a nice recovery. Your PE work is looking sweet. I really like the detail on those ladders, they look very solid and strong.
Mark
Too bad about your near disaster but it looks like you made a nice recovery. Your PE work is looking sweet. I really like the detail on those ladders, they look very solid and strong.
Mark
 |

WEB HOSTING BY


Copyright ©2021 Model Shipwrights and Kitmaker Network, a subsidiary of Silver Star Enterprises
All Rights Reserved. Please read our Conditions of Use and Privacy Policy.
All Rights Reserved. Please read our Conditions of Use and Privacy Policy.