1/200 HMS Rodney with Pontos Stuff

#306
Victoria, Australia
Joined: June 27, 2010
KitMaker: 3,959 posts
Model Shipwrights: 2,777 posts
Posted: Tuesday, September 04, 2018 - 10:13 AM UTC
very impressive Warren
you've made up for a lack of updates with some really great progress

Stay home and build models!
In 1/72
Gloster Gladiator MkII for the Bi-planes Campaign
In 1/350
Airfix 1:350 Type 45 Destroyer
#453
Texas, United States
Joined: August 28, 2016
KitMaker: 1,925 posts
Model Shipwrights: 1,298 posts
Posted: Friday, September 07, 2018 - 01:09 PM UTC
Warren,
Wow, those pictures make quite a statement on their own.
Mark

Indiana, United States
Joined: September 01, 2015
KitMaker: 144 posts
Model Shipwrights: 139 posts
Posted: Saturday, September 08, 2018 - 06:07 AM UTC
I know Ive said this before but Warren your work is outstanding and always fun to watch your progress. If I could get my PE half as good as yours Id be a happy man. Still here following along and keep it up, looks amazing.
England - South East, United Kingdom
Joined: March 01, 2010
KitMaker: 7,078 posts
Model Shipwrights: 6,649 posts
Posted: Sunday, September 09, 2018 - 08:39 AM UTC
Great progress mate,
Your etch work is immaculate. I have missed the updates but this make s up for it,
Cheers
Si
TimReynaga
 Associate Editor
California, United States
Joined: May 03, 2006
KitMaker: 2,500 posts
Model Shipwrights: 1,830 posts
Posted: Wednesday, September 12, 2018 - 01:03 AM UTC
Warren,
That etch work is impressive!
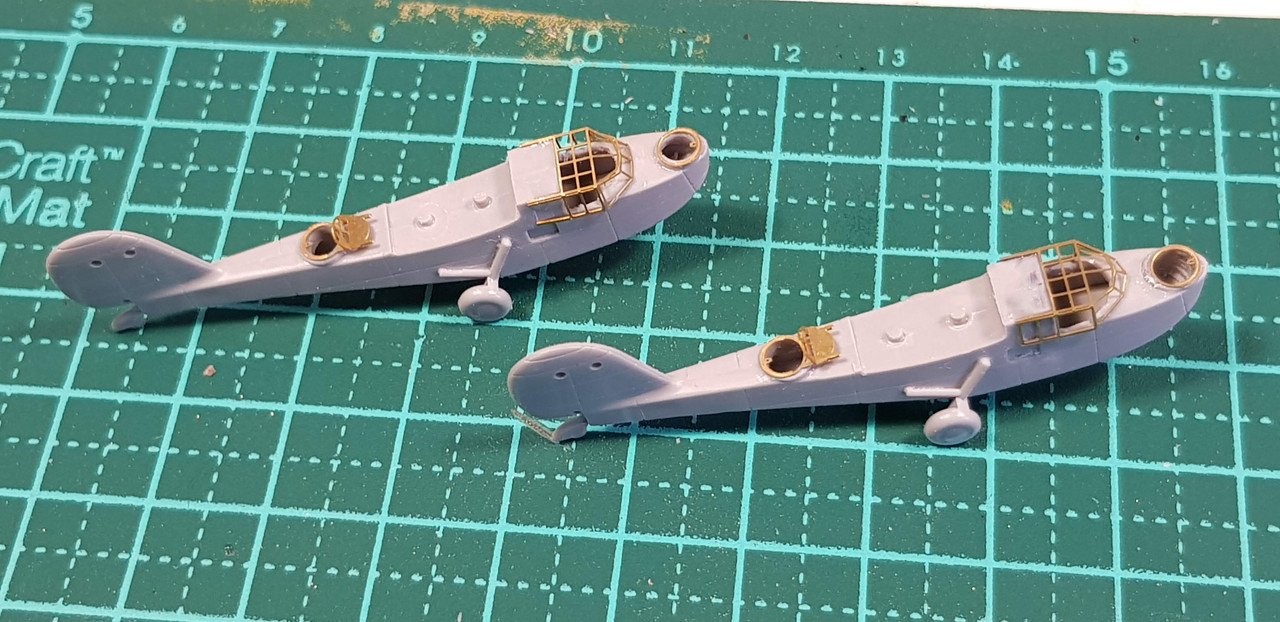
The Walrus aircraft are little kits in themselves. Way cool!
South Australia, Australia
Joined: August 14, 2007
KitMaker: 5,926 posts
Model Shipwrights: 2,624 posts
Posted: Tuesday, September 18, 2018 - 03:33 PM UTC
Thanks for the praise everyone.
Sorry for the break in transmission (again) but other things beside modelling have been taking all my time lately, those things being a new puppy and driving from Adelaide to Sydney and flying back last weekend.
Should have more time from now on.
Cheers
Warren
You may be right, I may be crazy.
South Australia, Australia
Joined: August 14, 2007
KitMaker: 5,926 posts
Model Shipwrights: 2,624 posts
Posted: Sunday, September 23, 2018 - 05:53 PM UTC
Got a fair bit done over the past week or so.
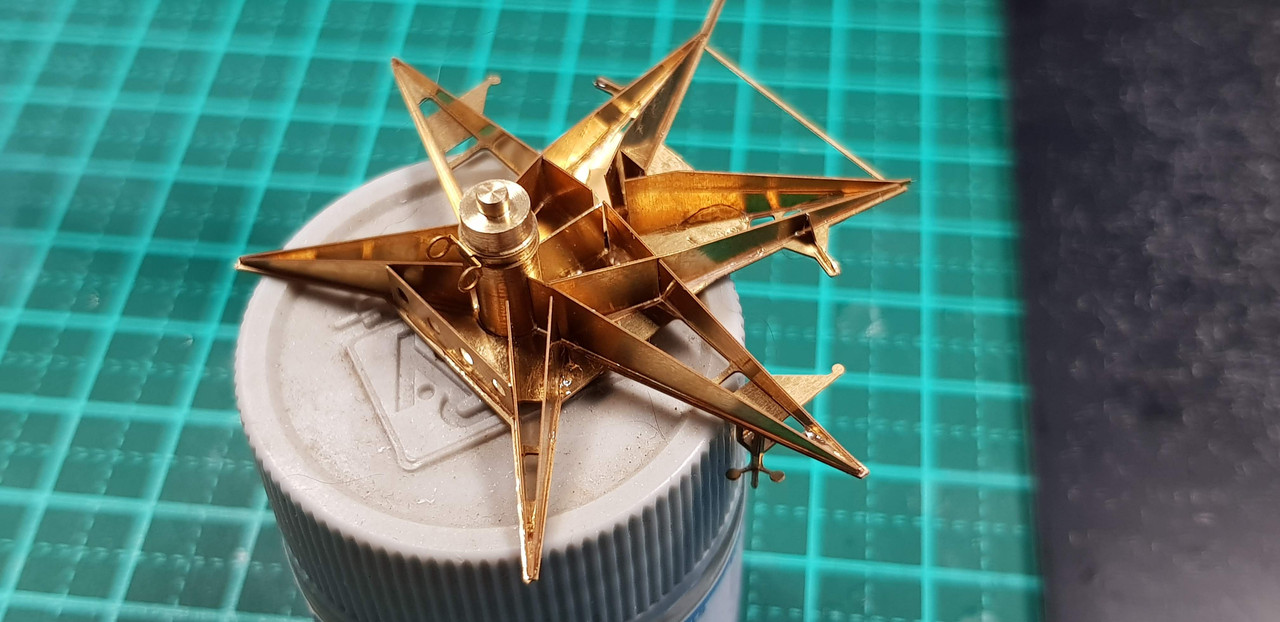
First I started the multimedia main mast with brass and resin pieces (so far)..

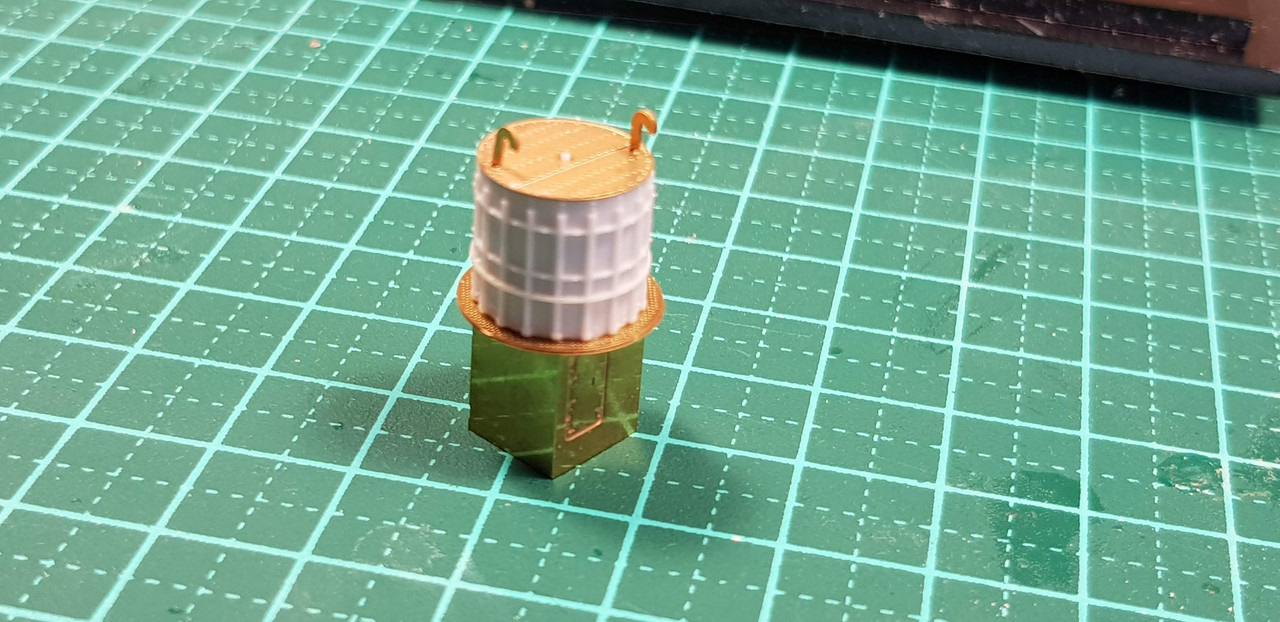
Then the platform for that mast...

and what looks like a little weather station off to the side..

Then the lower half..
Next up was constructing the things that go on the starfish platform, the radar lantern..
and then with the lantern glued in place..
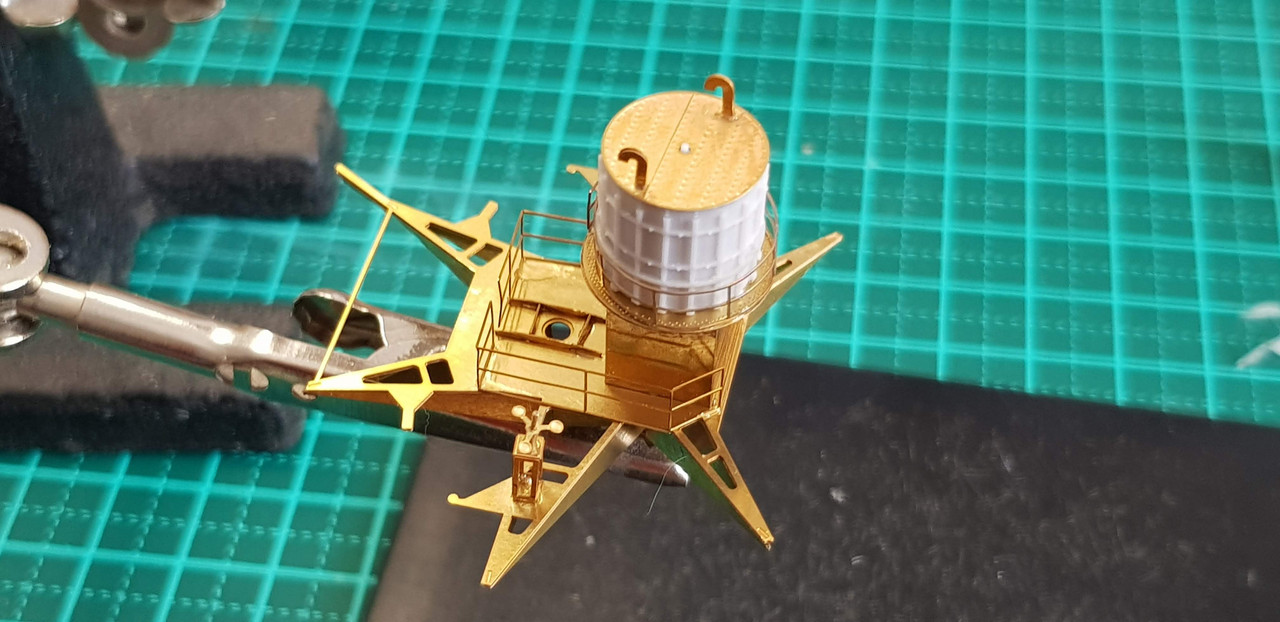
Then I continued with the upper part of the main mast.

Radar still to be installed.
Cheers
Warren
You may be right, I may be crazy.
TimReynaga
Associate Editor California, United States
Joined: May 03, 2006
KitMaker: 2,500 posts
Model Shipwrights: 1,830 posts
Posted: Monday, September 24, 2018 - 12:26 AM UTC
Great progress, Warren, and that etch looks fantastic!
A small suggestion; the three pronged device with the spoon-like ends appears to be an anemometer; should the ends be rotated 90 degrees?

#306
Victoria, Australia
Joined: June 27, 2010
KitMaker: 3,959 posts
Model Shipwrights: 2,777 posts
Posted: Monday, September 24, 2018 - 11:51 PM UTC
Stay home and build models!
In 1/72
Gloster Gladiator MkII for the Bi-planes Campaign
In 1/350
Airfix 1:350 Type 45 Destroyer
#453
Texas, United States
Joined: August 28, 2016
KitMaker: 1,925 posts
Model Shipwrights: 1,298 posts
Posted: Wednesday, September 26, 2018 - 08:13 AM UTC
Warren,
That is some mighty, mighty fine PE work.
Mark
South Australia, Australia
Joined: August 14, 2007
KitMaker: 5,926 posts
Model Shipwrights: 2,624 posts
Posted: Saturday, September 29, 2018 - 04:05 AM UTC
Quoted Text
Great progress, Warren, and that etch looks fantastic!
A small suggestion; the three pronged device with the spoon-like ends appears to be an anemometer; should the ends be rotated 90 degrees?
Quite possibly. Didn't dawn on me that an anemometer would be that big in 1/200.
You may be right, I may be crazy.
Drama, Greece / Ελλάδα
Joined: December 14, 2008
KitMaker: 154 posts
Model Shipwrights: 149 posts
Posted: Saturday, September 29, 2018 - 08:08 PM UTC
Am building the 1/200 Nelson also with Pontos set and after i installed the metal barrels i noticed that the last turret (closest to the bridge) cannot rotate freely anymore as the barrels are touching the middle barbette, they are either too long or something else in wrong with the dimensions of the parts.Have you noticed that yet?
England - South East, United Kingdom
Joined: March 01, 2010
KitMaker: 7,078 posts
Model Shipwrights: 6,649 posts
Posted: Sunday, October 07, 2018 - 10:16 AM UTC
Hi Warren.
Very nice work, I am impressed by the extra level of detail in 1/200th.
Cheers
Si
South Australia, Australia
Joined: August 14, 2007
KitMaker: 5,926 posts
Model Shipwrights: 2,624 posts
Posted: Sunday, October 07, 2018 - 05:52 PM UTC
Quoted Text
Am building the 1/200 Nelson also with Pontos set and after i installed the metal barrels i noticed that the last turret (closest to the bridge) cannot rotate freely anymore as the barrels are touching the middle barbette, they are either too long or something else in wrong with the dimensions of the parts.Have you noticed that yet?
Hi Kostas.
I have been admiring your work for many years. Do you do it as a full time job as you seem to pump them out!
Back to your question, no, I haven't moticed it yet as I haven'y got that far just yet. The turrets are all built and waiting paint and I don't want to touch them and get oily fingerprint on them. I will keep an eye out.
Cheers
Warren
You may be right, I may be crazy.
South Australia, Australia
Joined: August 14, 2007
KitMaker: 5,926 posts
Model Shipwrights: 2,624 posts
Posted: Sunday, October 07, 2018 - 06:12 PM UTC
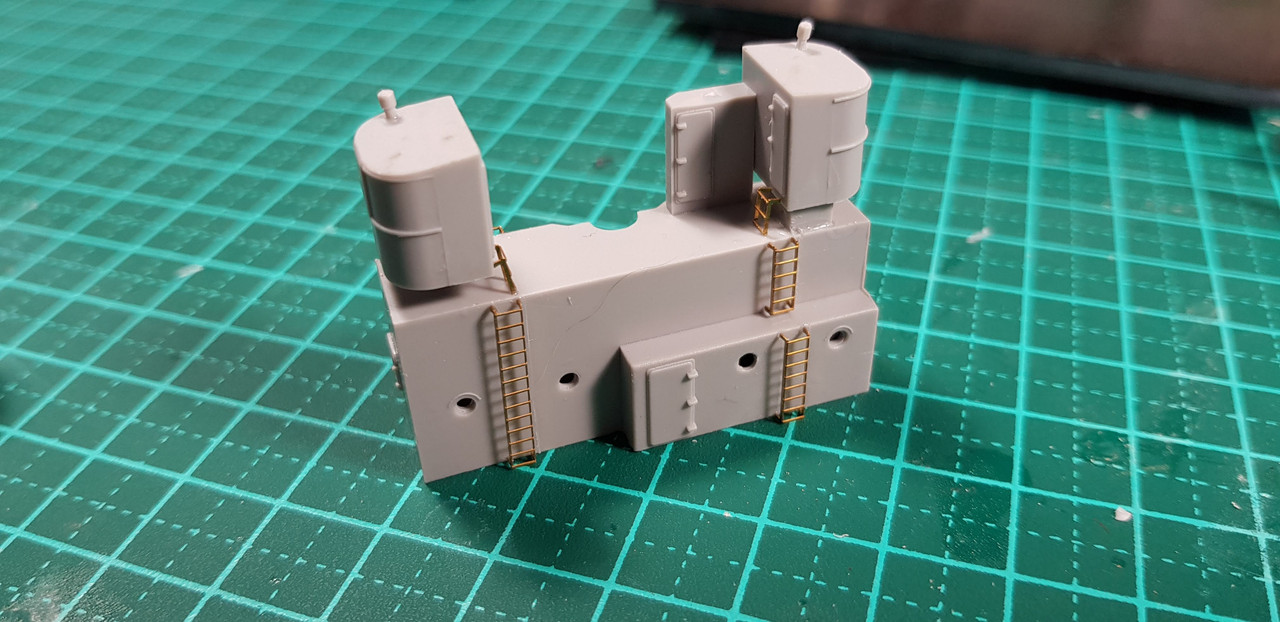
OK. Time for a quick update. I have got the following superstructure bits finished..

And there are other pieces as well but I just didn't get around to photographing them. Then, for the first time in months I fired up the compressor and applied some paint to the metal decks in preparation for applying the wooden deck. I also painted the vents etc that festoon the deck.

Now for a question the the people who know more about RN colours than I will ever need or want to know..

As Soverign Colorcoats are too expensive here in Australia (try $6.50 per tin plus p[ostage) and they are enamels, and I have given up on Hataka as I can't seem to get an answer on how to thin them properly (and they don't dry matt) I am looking for rations to mix Gunze or Tamiya acrylics to get the four colours I need;
507C
MS1
MS2
B5
Any help would be most appreciated.
Cheers
Warren
You may be right, I may be crazy.
#453
Texas, United States
Joined: August 28, 2016
KitMaker: 1,925 posts
Model Shipwrights: 1,298 posts
Posted: Monday, October 08, 2018 - 12:27 AM UTC
Warren,
Nice progress. Like how the ladders are off-set from the walls. A lot of modelers will just lay the ladder on the wall removing the 3D effect.
Sorry I can't help you with your paint question. Sounds like to don't like enamel paints. I prefer enamels over acrylics on ship models.
Mark
South Australia, Australia
Joined: August 14, 2007
KitMaker: 5,926 posts
Model Shipwrights: 2,624 posts
Posted: Monday, October 08, 2018 - 11:48 AM UTC
Quoted Text
Warren,
Nice progress. Like how the ladders are off-set from the walls. A lot of modelers will just lay the ladder on the wall removing the 3D effect.
Sorry I can't help you with your paint question. Sounds like to don't like enamel paints. I prefer enamels over acrylics on ship models.
Mark
A PE bending tool, tweezers or fine pliers make it an easy job to bend ladders, especially in 1/200 scale.
You may be right, I may be crazy.
#306
Victoria, Australia
Joined: June 27, 2010
KitMaker: 3,959 posts
Model Shipwrights: 2,777 posts
Posted: Monday, October 08, 2018 - 10:53 PM UTC
Hi Warren
nice progress.
Sorry I can't help with the paints either.
I too use enamels. Colourcoats in fact.
I stocked up before WEM went bust a few years back. Of course they're now run by Sovereign hobbies.
IMHO you can't go past em! Yes, they may be expensive, but I use 2 parts paint to 1 part thinner in the airbrush and can complete an entire 1/350 battle wagon with around 2~3 pots of grey, depending on the complexity and one pot of antifouling.
Their quality is 2nd to none and the colours are spot on.
How's that for a promo? And I don't even work for them!

I should though. Seriously.


Stay home and build models!
In 1/72
Gloster Gladiator MkII for the Bi-planes Campaign
In 1/350
Airfix 1:350 Type 45 Destroyer
England - South East, United Kingdom
Joined: March 01, 2010
KitMaker: 7,078 posts
Model Shipwrights: 6,649 posts
Posted: Tuesday, October 09, 2018 - 08:52 AM UTC
Nice work Warren.
I blag my way around RN camo with Tamiya acrylics, I am not totally precious about the exact shade, it looks about right, I'll take it.
I would use:-
AP505C - XF80 RN light grey.
MS1 - XF69 Nato Black
MS2 -XF58 olive green, toned down with some XF80, or white.
B5 - XF18 Medium blue mixed with a little XF20 medium grey.
I can't give you exact proportions because I just stir it till I am happy.
Frankly I do it the hard way because I have never got the hang of airbrushing enamels.
Hope that helps Mate.
Cheers
Si
South Australia, Australia
Joined: August 14, 2007
KitMaker: 5,926 posts
Model Shipwrights: 2,624 posts
Posted: Thursday, October 11, 2018 - 02:09 PM UTC
Quoted Text
Nice work Warren.
I blag my way around RN camo with Tamiya acrylics, I am not totally precious about the exact shade, it looks about right, I'll take it.
I would use:-
AP505C - XF80 RN light grey.
MS1 - XF69 Nato Black
MS2 -XF58 olive green, toned down with some XF80, or white.
B5 - XF18 Medium blue mixed with a little XF20 medium grey.
I can't give you exact proportions because I just stir it till I am happy.
Frankly I do it the hard way because I have never got the hang of airbrushing enamels.
Hope that helps Mate.
Cheers
Si
Thanks for that Simon.
I am with you re exactitude of colours. They would have varied almost day-to-day especially in the tropics.
I actually sprayed some Hakata paints successfully last night but there is still a deafening silence after I asked them a question via Facebook about thinning ratios.
I have no trouble with Enamels, except for the clean up which I hate, but Tamiya paints are extremely easy to get locally but I think I have all the colours you listed in my collection.
Cheers
Warren
You may be right, I may be crazy.
South Australia, Australia
Joined: August 14, 2007
KitMaker: 5,926 posts
Model Shipwrights: 2,624 posts
Posted: Thursday, October 11, 2018 - 02:10 PM UTC
Quoted Text
Nice work Warren.
I blag my way around RN camo with Tamiya acrylics, I am not totally precious about the exact shade, it looks about right, I'll take it.
I would use:-
AP505C - XF80 RN light grey.
MS1 - XF69 Nato Black
MS2 -XF58 olive green, toned down with some XF80, or white.
B5 - XF18 Medium blue mixed with a little XF20 medium grey.
I can't give you exact proportions because I just stir it till I am happy.
Frankly I do it the hard way because I have never got the hang of airbrushing enamels.
Hope that helps Mate.
Cheers
Si
You may be right, I may be crazy.
England - South East, United Kingdom
Joined: March 01, 2010
KitMaker: 7,078 posts
Model Shipwrights: 6,649 posts
Posted: Thursday, October 11, 2018 - 07:31 PM UTC
No worries Warren,
Good luck, and really enjoying following this build.
Cheers
Si
South Australia, Australia
Joined: August 14, 2007
KitMaker: 5,926 posts
Model Shipwrights: 2,624 posts
Posted: Sunday, October 14, 2018 - 11:12 AM UTC
Greetings from Australia.
I have finally worked out how to successfully spray the Hataka paints I bought for the Wodney. I have been doing that , or working on my old cars, over the past week or so. Looking at pictures of painting is just like watching paint dry to me, ezpecially when the colour grey you are currently usinf is the same colour as the plastic you are painting (well so close it is difficult to tell the difference).
When I start spraying some different colours to build up the camo pattern I will start posting pictures again. Sound fair?
Cheers
Warren
You may be right, I may be crazy.
South Australia, Australia
Joined: August 14, 2007
KitMaker: 5,926 posts
Model Shipwrights: 2,624 posts
Posted: Sunday, October 14, 2018 - 06:07 PM UTC
I think I have been pondering this camo scheme for too long. There is a much easier solution than tring to get accurate colours etc and try to paint superstructure in the camo scheme, and that is to paint her as she was when she was following the Bismarck... all over grey..
Comments?
You may be right, I may be crazy.
England - South East, United Kingdom
Joined: March 01, 2010
KitMaker: 7,078 posts
Model Shipwrights: 6,649 posts
Posted: Monday, October 15, 2018 - 05:02 AM UTC
Hi Warren,
Your model mate. At the time of the Bismarck chase I think the hull was AP507B and the superstructure was 505C.
Not sure when she was repainted, sometime in 1942, the shields weren't added to the 4.7 until august '43 - give or take the kit fit will be close for mid / late 42, at which tme she could have still been in grey.
But as I said it is your model.
If I get the puppy I will be backdating to the Bismarck chase fit.
Cheers
Si


