

Hi Warren,
Excellent work.
I've been following along in the background but thought I would finally chime in. That PE work is outstanding. I didn't realize that there were many kits in 1/200 before. I dread hitting the PE work on the Alaska. Lots of it is just way too small for me.
Steve


Go to modelshipwrights.com for the current dynamic site!
General Ship Modeling
Discuss modeling techniques, experiences, and ship modeling in general.
Discuss modeling techniques, experiences, and ship modeling in general.
Hosted by Jim Starkweather
1/200 HMS Rodney with Pontos Stuff
sdk10159

Joined: December 08, 2005
KitMaker: 556 posts
Model Shipwrights: 110 posts

Posted: Sunday, July 15, 2018 - 02:01 AM UTC

RussellE

#306

Joined: June 27, 2010
KitMaker: 3,959 posts
Model Shipwrights: 2,777 posts

Posted: Sunday, July 15, 2018 - 09:56 AM UTC
setting a cracking pace Warren and nice save on the crane! 


RedDuster

Joined: March 01, 2010
KitMaker: 7,078 posts
Model Shipwrights: 6,649 posts

Posted: Monday, July 16, 2018 - 07:50 AM UTC
What Russ said,
And the Crane does look superb.
Cheers
Si
And the Crane does look superb.
Cheers
Si

JJ1973
#345

Joined: August 22, 2011
KitMaker: 1,835 posts
Model Shipwrights: 1,832 posts
Posted: Tuesday, July 17, 2018 - 04:16 PM UTC
Warren,
great etch work, and very nice progress! This looks really tasty - actually makes me want to try one of those 1/200 beasts...if only they were not that big...
the 6" and the crane look really good!!
Cheers,
Jan
great etch work, and very nice progress! This looks really tasty - actually makes me want to try one of those 1/200 beasts...if only they were not that big...
the 6" and the crane look really good!!
Cheers,
Jan

warreni
Joined: August 14, 2007
KitMaker: 5,926 posts
Model Shipwrights: 2,624 posts

Posted: Thursday, July 19, 2018 - 06:42 PM UTC
Thanks everyone 
Now for an update on the week that was..
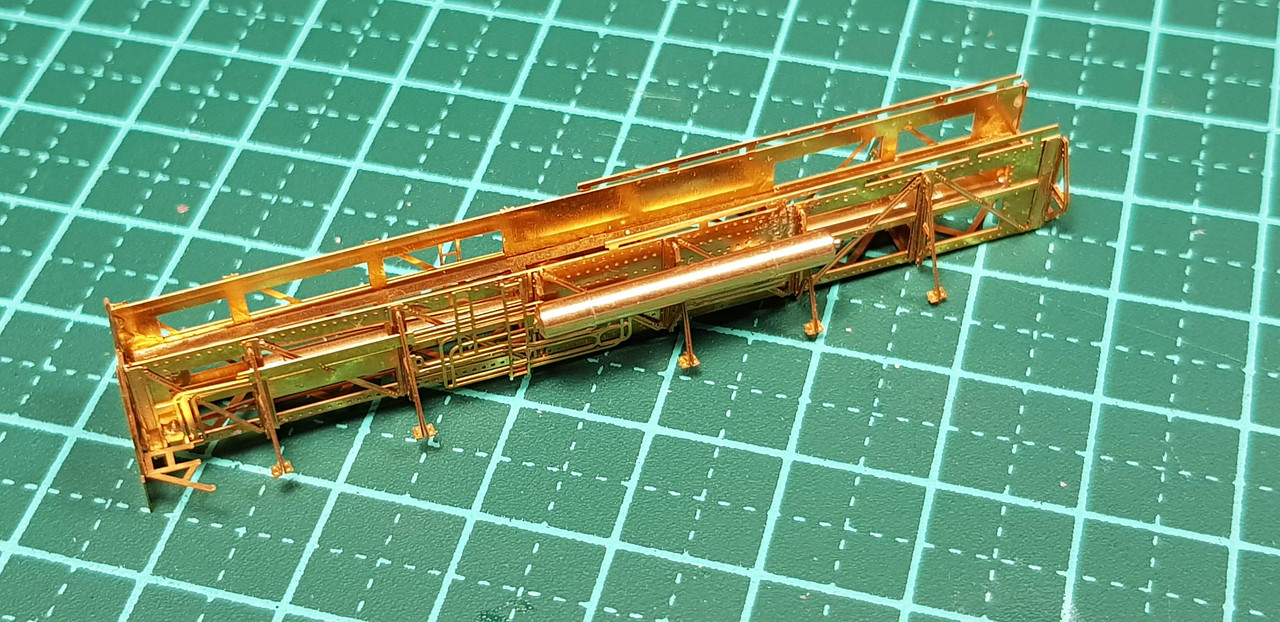
I continued with the catapault and the first thing I did was finish the two ends..
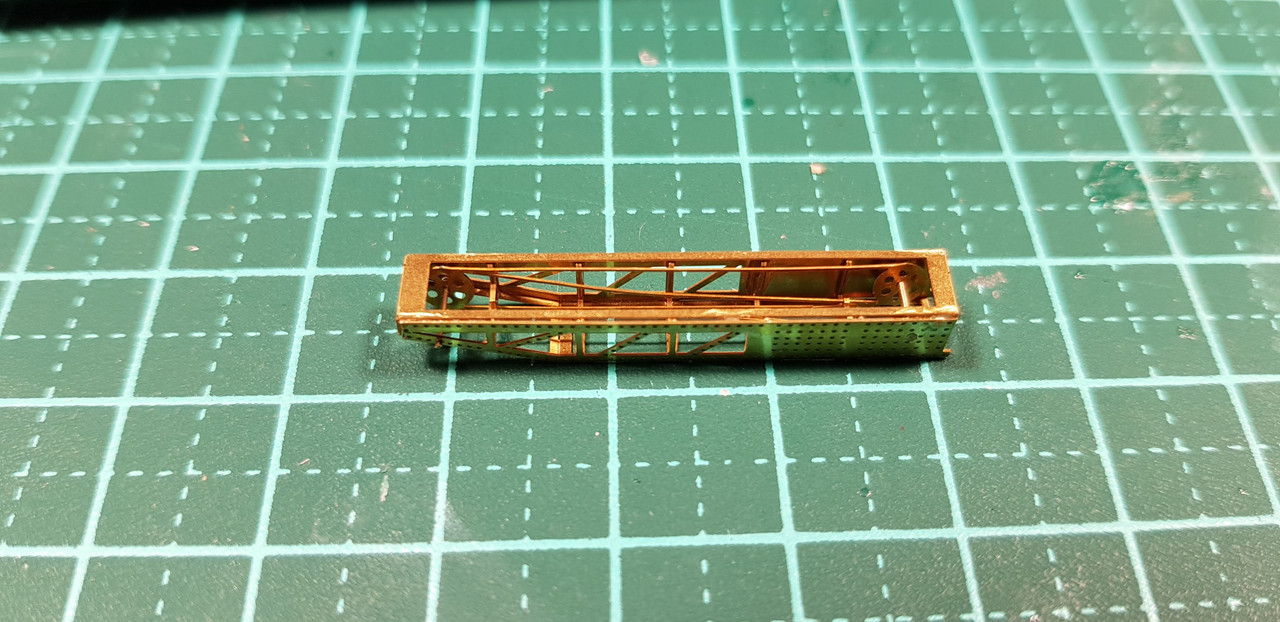
Fundly enough the Pontos instructions don't show the ends fited to the catapault. I assume they might go elsewhere. Next I started on the catapault body..
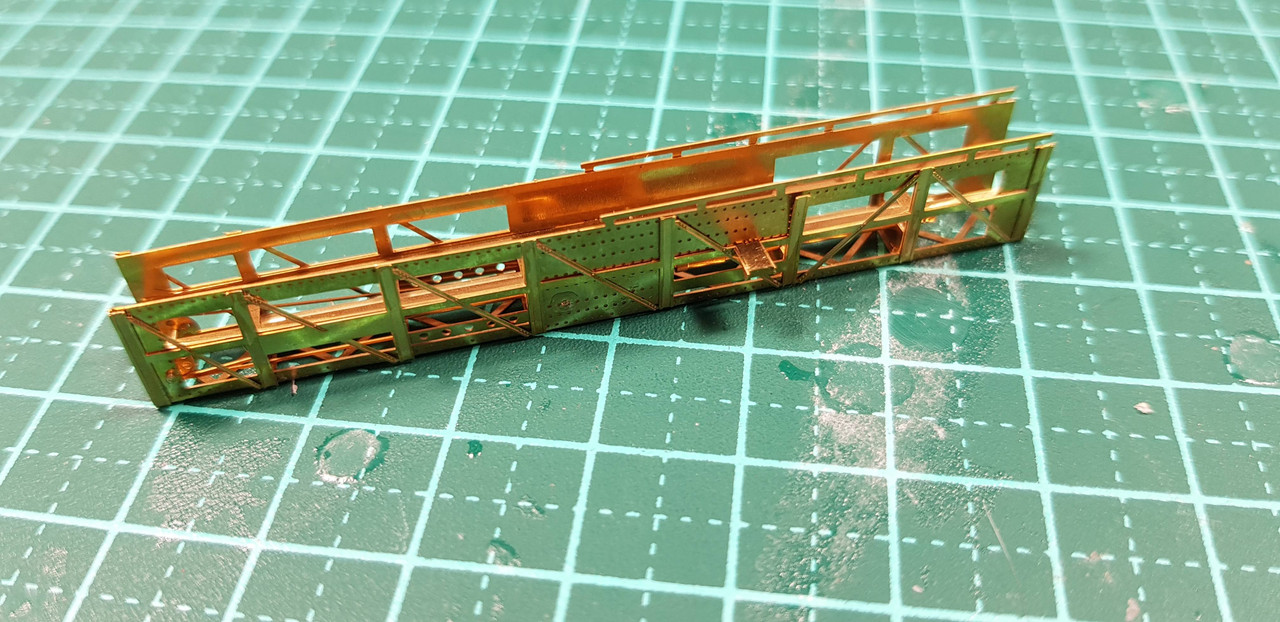
Then started adding bits and bobs..
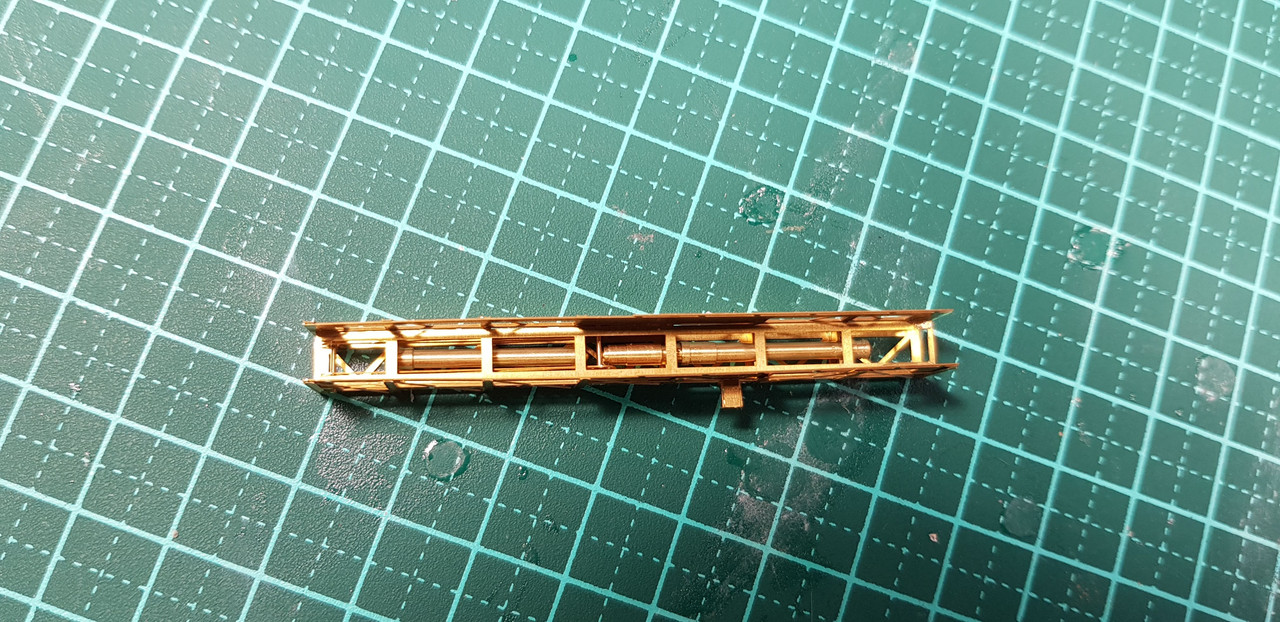
Until I ended up with this ..
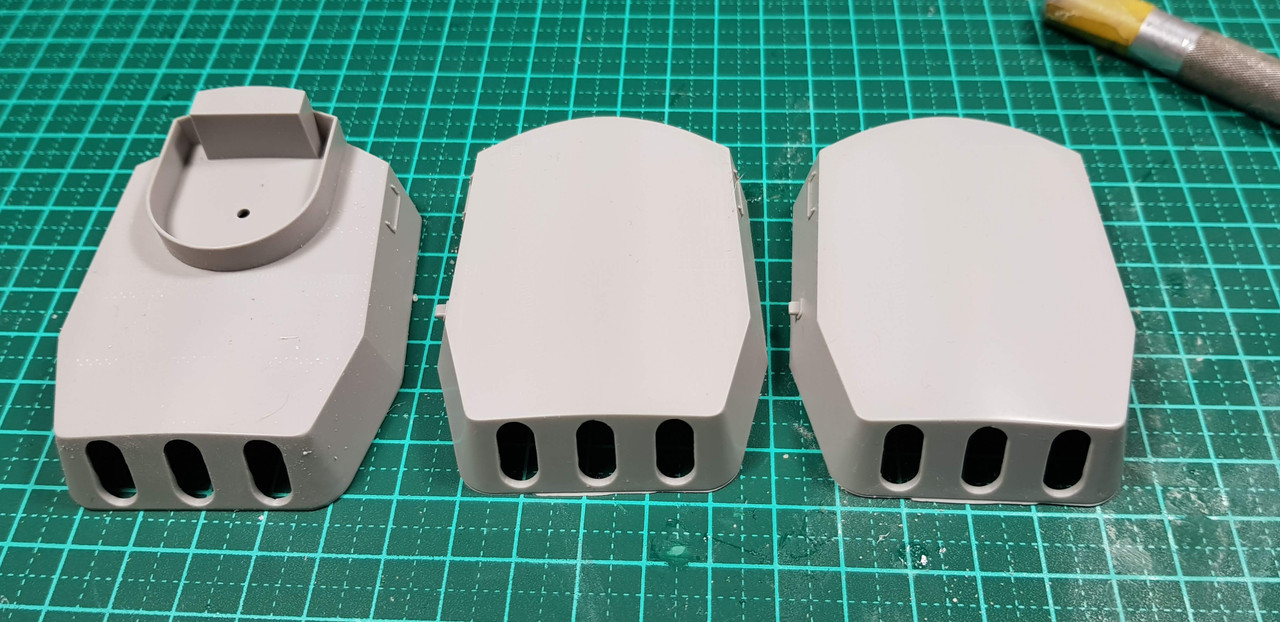
Then it was on to the next part of the instructions which cover the construction of the main turrets. These are nice and satisfying to build in 1/200 as they are nice and chunky. Again, the Trumpeter barrels are awesome for plastic barrels but I will be using the brass ones from Pontos. As you can see the brass barrel is notably longer than the Trumpeter barrel..
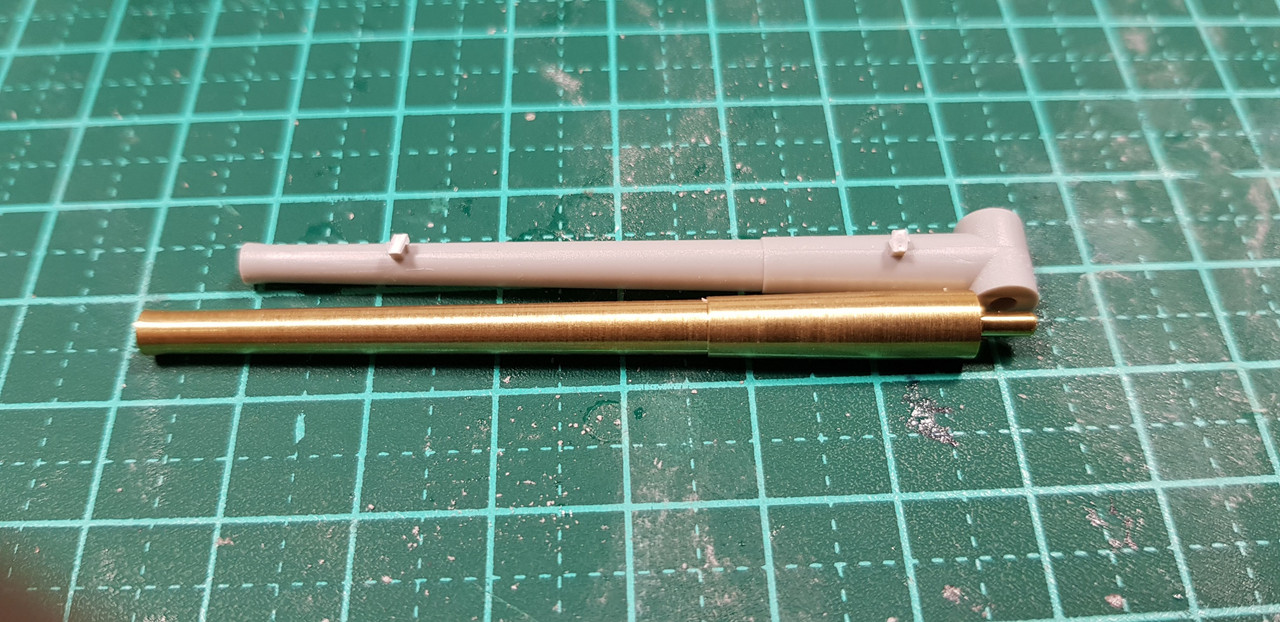
I cut off the plastic barrels..

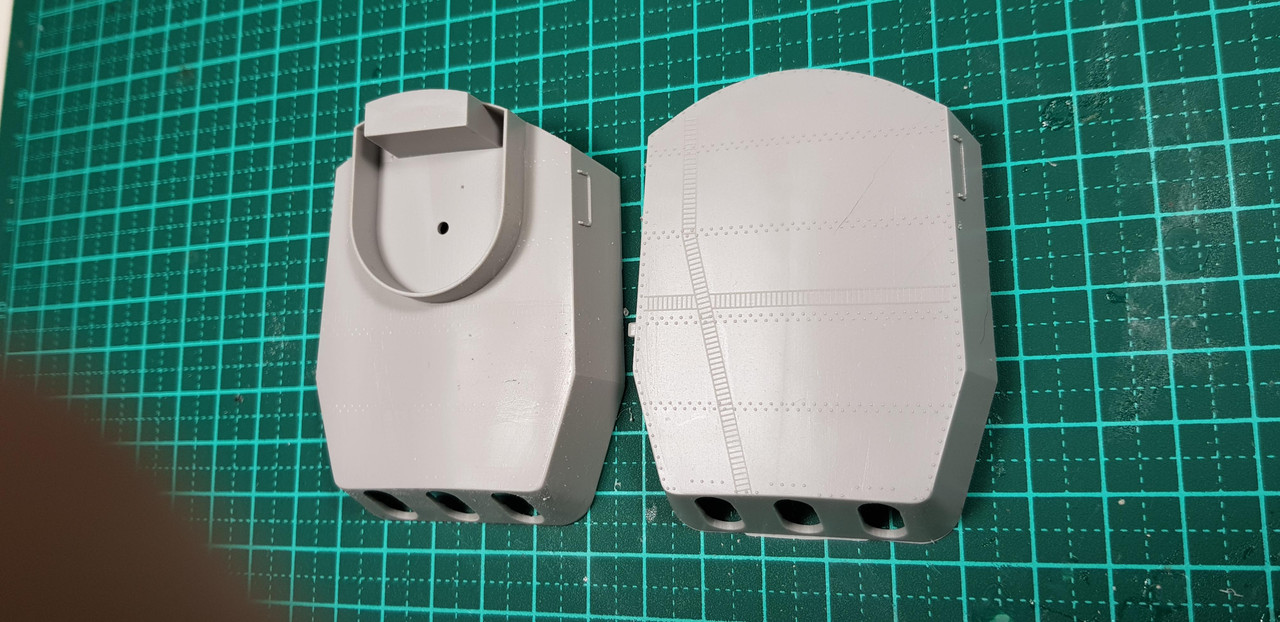
.. but when I went to drill the holes in the plastic parts for the brass barrels I found I had no 2mm drill bits. Will have to buy a few tomorrow. Next up I started preparing the turrets for brass. First I removed the plastic pieces on the turret base that needed removing..
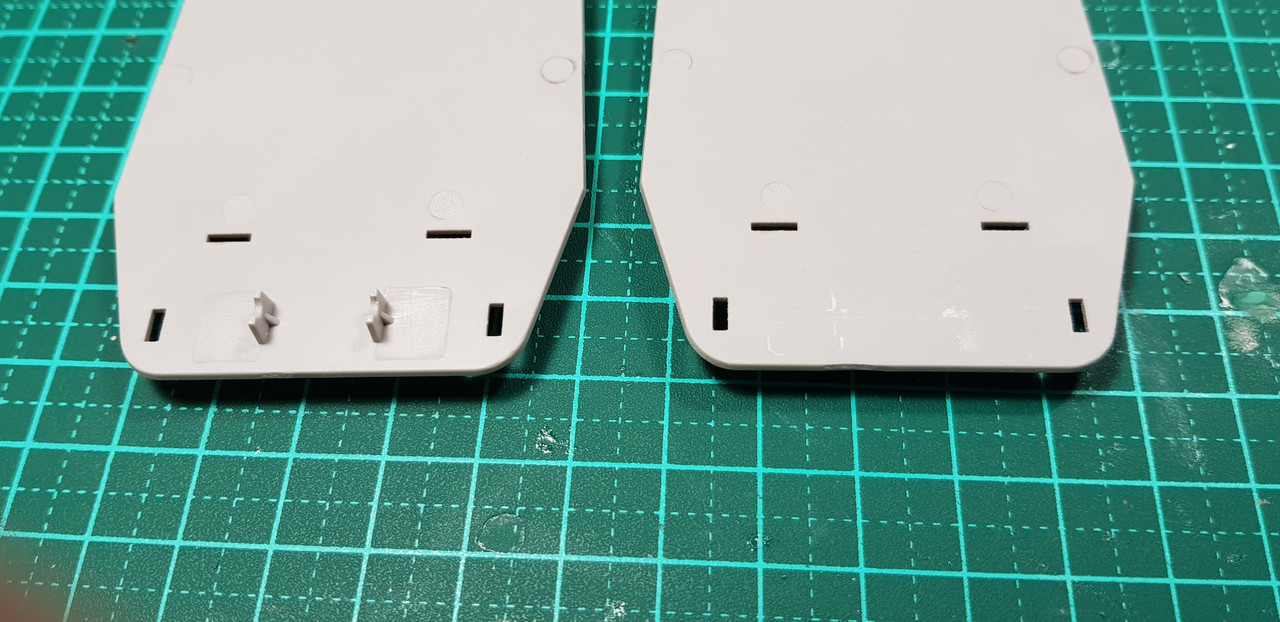
The plastic detail on the roof of the turrets is as good as the brass details, but there are a few items missing from the roofs so I sanded all the details up the polished the plastic to give the CA glue a nice smooth surface to attach too...
All done..
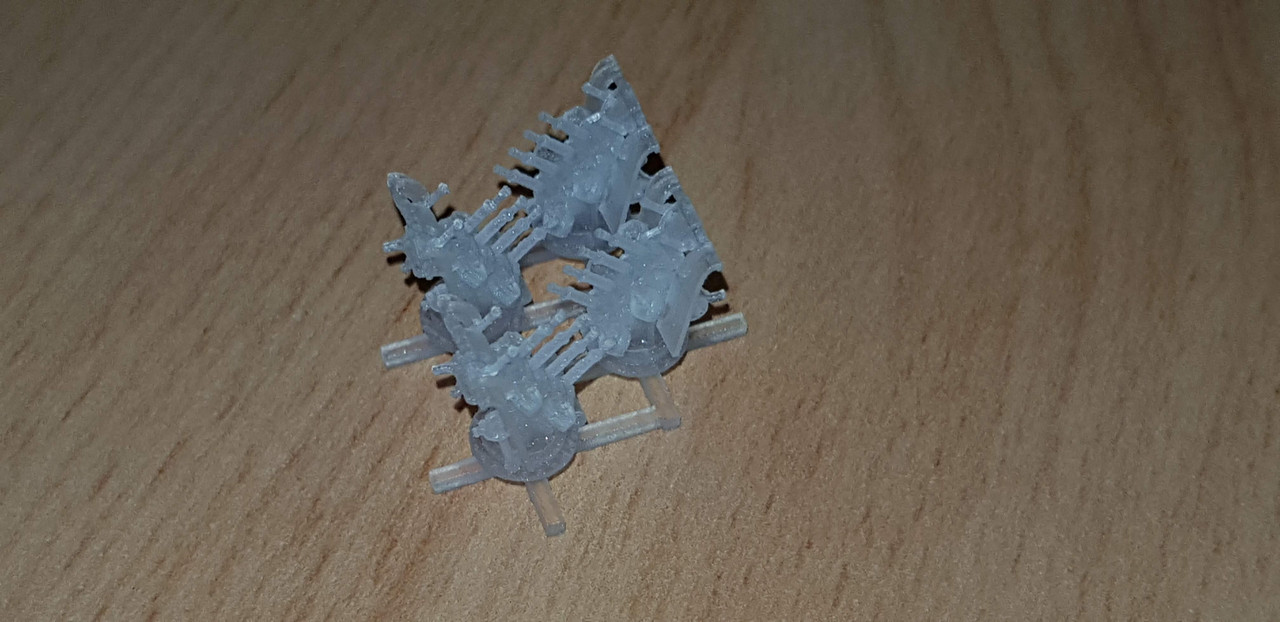
Then When I went to the post Office this afternoon there was a box from Shapeways waiting for me and four quad Vickers guns were waiting for me..
 ]
]
Can't see much detail yet but should be fine after a coat of paint.
That's it for now.
Cheers
Warren
Now for an update on the week that was..
I continued with the catapault and the first thing I did was finish the two ends..
Fundly enough the Pontos instructions don't show the ends fited to the catapault. I assume they might go elsewhere. Next I started on the catapault body..
Then started adding bits and bobs..
Until I ended up with this ..
Then it was on to the next part of the instructions which cover the construction of the main turrets. These are nice and satisfying to build in 1/200 as they are nice and chunky. Again, the Trumpeter barrels are awesome for plastic barrels but I will be using the brass ones from Pontos. As you can see the brass barrel is notably longer than the Trumpeter barrel..
I cut off the plastic barrels..
.. but when I went to drill the holes in the plastic parts for the brass barrels I found I had no 2mm drill bits. Will have to buy a few tomorrow. Next up I started preparing the turrets for brass. First I removed the plastic pieces on the turret base that needed removing..
The plastic detail on the roof of the turrets is as good as the brass details, but there are a few items missing from the roofs so I sanded all the details up the polished the plastic to give the CA glue a nice smooth surface to attach too...
All done..
Then When I went to the post Office this afternoon there was a box from Shapeways waiting for me and four quad Vickers guns were waiting for me..
]Can't see much detail yet but should be fine after a coat of paint.
That's it for now.
Cheers
Warren
RedDuster
Joined: March 01, 2010
KitMaker: 7,078 posts
Model Shipwrights: 6,649 posts
Posted: Friday, July 20, 2018 - 04:17 AM UTC
Catapult looks great Warren.
Looking forwarding seeing progress on those big guns.
Cheers
Si
Looking forwarding seeing progress on those big guns.
Cheers
Si

d6mst0
#453
Joined: August 28, 2016
KitMaker: 1,925 posts
Model Shipwrights: 1,298 posts

Posted: Friday, July 20, 2018 - 10:48 AM UTC
Warren,
That catapult look wonderful, great detail.
I seen those Quads from Shapeways the other day and thought those are some good looking items.
Mark
That catapult look wonderful, great detail.
I seen those Quads from Shapeways the other day and thought those are some good looking items.
Mark
warreni
Joined: August 14, 2007
KitMaker: 5,926 posts
Model Shipwrights: 2,624 posts
Posted: Tuesday, July 24, 2018 - 08:15 PM UTC
Thanks Simon and Mark.
Well it has been a little while but you would think I had done nothing going on the five pictures I have to upload. I got this for my Birthday from my lovely Wife..

I also got a 1/1 scale VW Golf Cabrio but I won't post a picture of that.
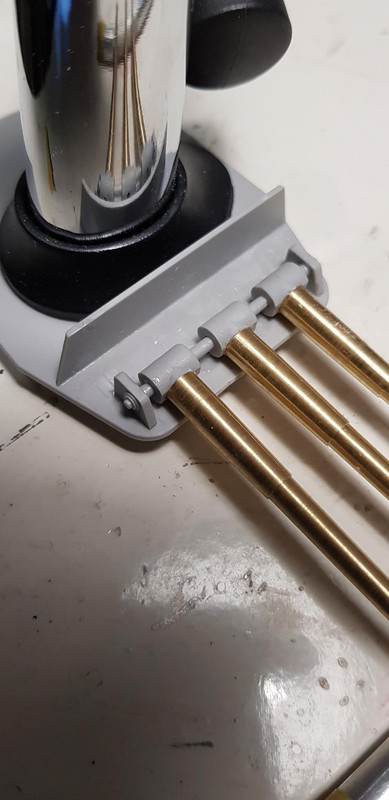
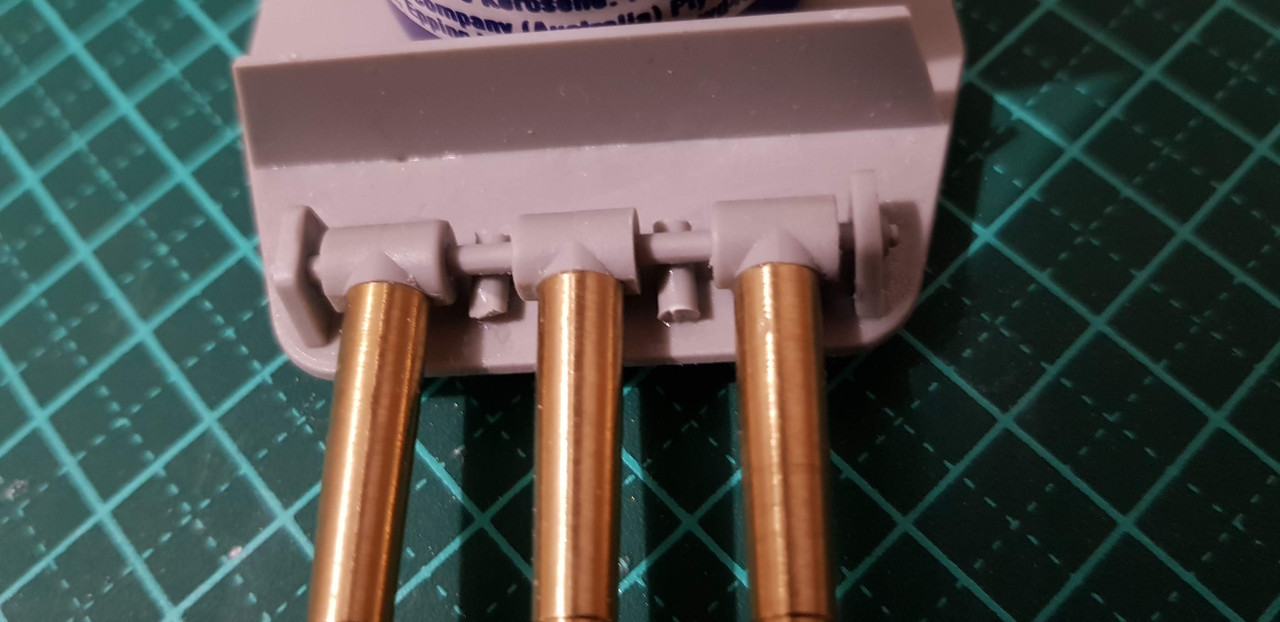
Anyway, I have one important thing to say before anything else, Mr Kim at Pontos, your barrel support solution is hopeless in reality. Try slipping a small brass rod through at least four thin pieces of brass and one breaks away everytime. It looks lovely..

.. but it isn't workable. One solution maybe to make the attaching part of the brass barrels smaller and thus allow you to pass a single length of brass rod through the brass. Better still make a resin [art to replace the brass.. or something milled from a solid block of some material. So I removed all that lovely brass and decided to iuse a hybrid of kit plastic and the brass barrels. Here are the plastic bits minus the one that goes on the end AFTER you put the plastic rod through all the barrel holders..

And it comes out looking like this..
Here the plastic cement is drying to hopefully line up the barrels. I used some other brass parts that were supposed to be for something else but it hides the interior of the turrets..

So that's all for the moment.. but it may not be the end of the turret saga as I might have a go at soldering those pieces together.. but not today..
Cheers
Warren
Well it has been a little while but you would think I had done nothing going on the five pictures I have to upload. I got this for my Birthday from my lovely Wife..
I also got a 1/1 scale VW Golf Cabrio but I won't post a picture of that.
Anyway, I have one important thing to say before anything else, Mr Kim at Pontos, your barrel support solution is hopeless in reality. Try slipping a small brass rod through at least four thin pieces of brass and one breaks away everytime. It looks lovely..
.. but it isn't workable. One solution maybe to make the attaching part of the brass barrels smaller and thus allow you to pass a single length of brass rod through the brass. Better still make a resin [art to replace the brass.. or something milled from a solid block of some material. So I removed all that lovely brass and decided to iuse a hybrid of kit plastic and the brass barrels. Here are the plastic bits minus the one that goes on the end AFTER you put the plastic rod through all the barrel holders..
And it comes out looking like this..
Here the plastic cement is drying to hopefully line up the barrels. I used some other brass parts that were supposed to be for something else but it hides the interior of the turrets..
So that's all for the moment.. but it may not be the end of the turret saga as I might have a go at soldering those pieces together.. but not today..
Cheers
Warren

TimReynaga
Joined: May 03, 2006
KitMaker: 2,500 posts
Model Shipwrights: 1,830 posts
Posted: Wednesday, July 25, 2018 - 12:50 AM UTC
Hi Warren,
I too find that etch manufacturers sometimes overthink their solutions and come up with elaborate but elegantly impractical constructions - your barrel mounting solution looks good so far, though!

I too find that etch manufacturers sometimes overthink their solutions and come up with elaborate but elegantly impractical constructions - your barrel mounting solution looks good so far, though!

RussellE
#306
Joined: June 27, 2010
KitMaker: 3,959 posts
Model Shipwrights: 2,777 posts
Posted: Wednesday, July 25, 2018 - 09:09 AM UTC
Agree with Tim, Warren.
Sometimes the PE is more hassle than it's worth!
Meanwhile, nice score on the Dremel! Best power tool I've ever bought!
Sometimes the PE is more hassle than it's worth!
Meanwhile, nice score on the Dremel! Best power tool I've ever bought!
RedDuster
Joined: March 01, 2010
KitMaker: 7,078 posts
Model Shipwrights: 6,649 posts
Posted: Wednesday, July 25, 2018 - 07:57 PM UTC
Make that unanimous.
Good tip, I shall remember this for the Nel, when I finally get round to her.
Cheers
Si
Good tip, I shall remember this for the Nel, when I finally get round to her.
Cheers
Si
warreni
Joined: August 14, 2007
KitMaker: 5,926 posts
Model Shipwrights: 2,624 posts
Posted: Wednesday, July 25, 2018 - 08:20 PM UTC
Quoted Text
Hi Warren,
I too find that etch manufacturers sometimes overthink their solutions and come up with elaborate but elegantly impractical constructions - your barrel mounting solution looks good so far, though!
Too right Tim. I have found this to be the case quite often, and even with 15 years of using PE it can be just not worth the hassle.
warreni
Joined: August 14, 2007
KitMaker: 5,926 posts
Model Shipwrights: 2,624 posts
Posted: Wednesday, July 25, 2018 - 08:22 PM UTC
Quoted Text
Agree with Tim, Warren.
Sometimes the PE is more hassle than it's worth!
Meanwhile, nice score on the Dremel! Best power tool I've ever bought!
Yes Russell. I have found a few instances over the years of PE designers going for too much detail and making parts unuseable. Not very common but still a hassle.
Cheers
Warren
warreni
Joined: August 14, 2007
KitMaker: 5,926 posts
Model Shipwrights: 2,624 posts
Posted: Wednesday, July 25, 2018 - 08:23 PM UTC
Quoted Text
Make that unanimous.
Good tip, I shall remember this for the Nel, when I finally get round to her.
Cheers
Si
I am thinking more and more of doing the Nelson OOB... But I probably won't. I am too used to PE etc now.
Cheers
Warren
warreni
Joined: August 14, 2007
KitMaker: 5,926 posts
Model Shipwrights: 2,624 posts
Posted: Wednesday, July 25, 2018 - 08:36 PM UTC
Okey dokey.
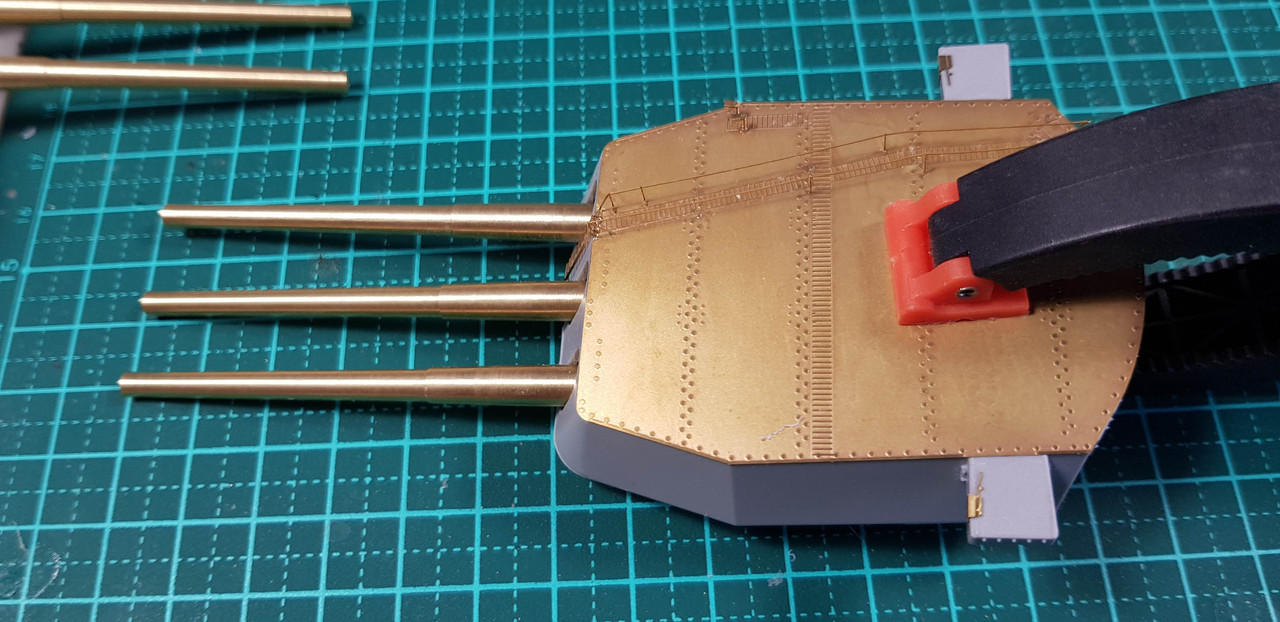
I went back to the bench today and was busily gluing PE to the main turrets when I realised Pontos had failed to point out that the 6 in turrets only had one periscope each. I found this out after going to build six more periscopes only to find I could only build one more with the parts I had left. The other thing that got me is that Pontos showed you had to drill two holes in each turret which is incorrect. Only one hole is needed on the outside of the turrets depending on what side of the ship they are on. There are small caps supplied to cover the holes so I attached them and this is how they look now..
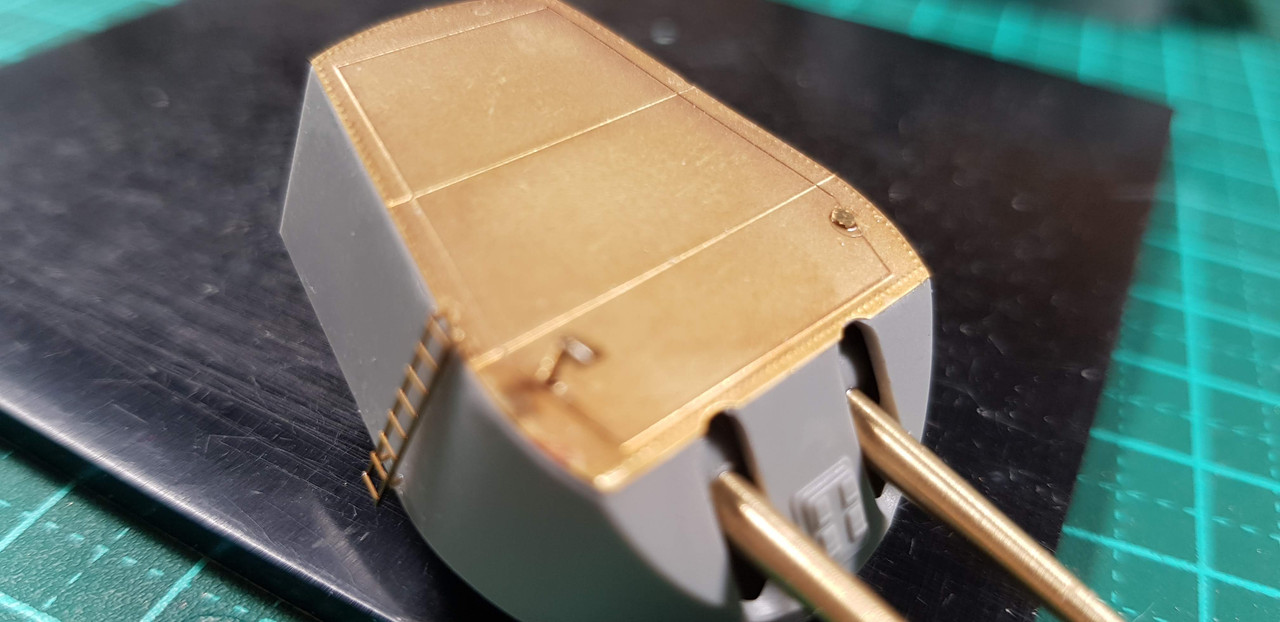
Then I got around to doing the other two barrel installations. If you remember I posted a picture of how the method looked I used, but I then decided to add some pieces of sprue between the guns for added support..
Some pieces of sprue from the kit just happened to be the right size and I flowed extra thin cement into the nooks and crannies to make sure the bar it immobile. Don't worry the barrels can still be moved, but I don't think I have ever intentionally moved a barrel in 30 years so I may just glue them as well. We shall see..
Cheers everyone
Warren
I went back to the bench today and was busily gluing PE to the main turrets when I realised Pontos had failed to point out that the 6 in turrets only had one periscope each. I found this out after going to build six more periscopes only to find I could only build one more with the parts I had left. The other thing that got me is that Pontos showed you had to drill two holes in each turret which is incorrect. Only one hole is needed on the outside of the turrets depending on what side of the ship they are on. There are small caps supplied to cover the holes so I attached them and this is how they look now..
Then I got around to doing the other two barrel installations. If you remember I posted a picture of how the method looked I used, but I then decided to add some pieces of sprue between the guns for added support..
Some pieces of sprue from the kit just happened to be the right size and I flowed extra thin cement into the nooks and crannies to make sure the bar it immobile. Don't worry the barrels can still be moved, but I don't think I have ever intentionally moved a barrel in 30 years so I may just glue them as well. We shall see..
Cheers everyone
Warren

Cadeus
Joined: September 01, 2015
KitMaker: 144 posts
Model Shipwrights: 139 posts

Posted: Thursday, July 26, 2018 - 12:49 PM UTC
Love watching your work Warren, your etch skills amaze me. Following along but will be in the background. Cant wait to see the commission youll do her proper as with all your work.
warreni
Joined: August 14, 2007
KitMaker: 5,926 posts
Model Shipwrights: 2,624 posts
Posted: Friday, July 27, 2018 - 06:01 AM UTC
Quoted Text
Love watching your work Warren, your etch skills amaze me. Following along but will be in the background. Cant wait to see the commission youll do her proper as with all your work.
Thanks Norman.
RedDuster
Joined: March 01, 2010
KitMaker: 7,078 posts
Model Shipwrights: 6,649 posts
Posted: Saturday, July 28, 2018 - 09:20 PM UTC
Hi Warren,
Nice progress, 6" mount looks good. I see Pontos instructions still have their little foibles. Mind they are an improvement on the original Dreadnought and Warspite sets.
Cheers
Si
Nice progress, 6" mount looks good. I see Pontos instructions still have their little foibles. Mind they are an improvement on the original Dreadnought and Warspite sets.
Cheers
Si
warreni
Joined: August 14, 2007
KitMaker: 5,926 posts
Model Shipwrights: 2,624 posts
Posted: Sunday, July 29, 2018 - 02:58 PM UTC
Quoted Text
Hi Warren,
Nice progress, 6" mount looks good. I see Pontos instructions still have their little foibles. Mind they are an improvement on the original Dreadnought and Warspite sets.
Cheers
Si
But I didn't have any trouble with either of those..
warreni
Joined: August 14, 2007
KitMaker: 5,926 posts
Model Shipwrights: 2,624 posts
Posted: Sunday, July 29, 2018 - 08:18 PM UTC
Back again.
I finished off the basics of the main turrets..
1...
2...

3...

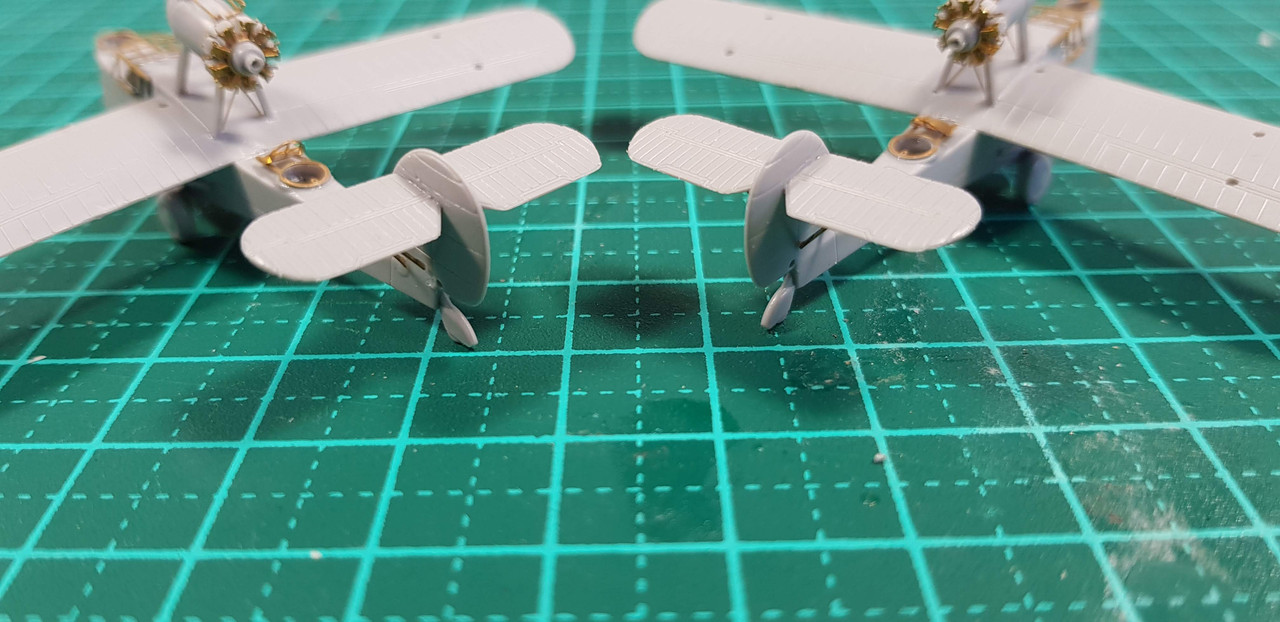
I know they might be A, B and Z but that is not important. Then I continued on the Walruses (Walri?)
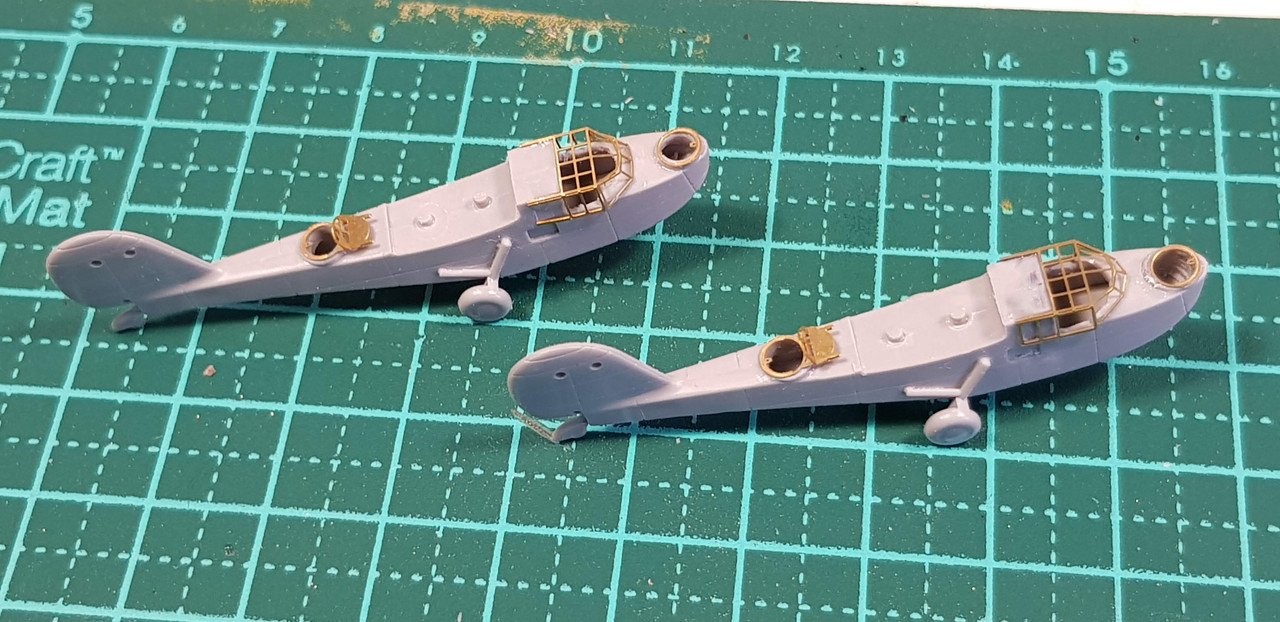
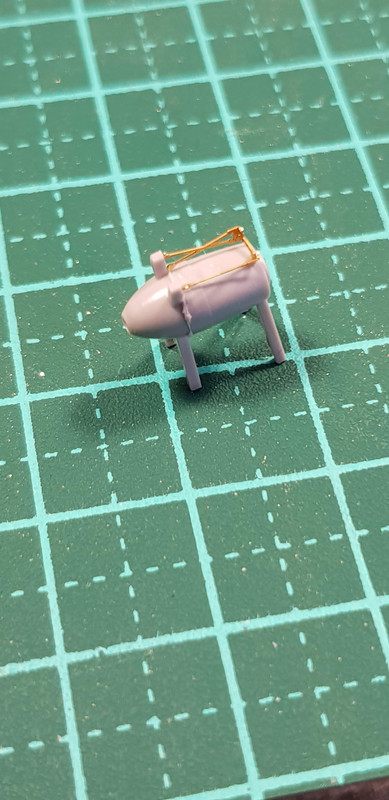
and the engine pods. Looks a bit like a piglet..

Next it was on to the hull. First drilled out over two hundred port holes and then I removed a few mould seams and attached the hull strakes..
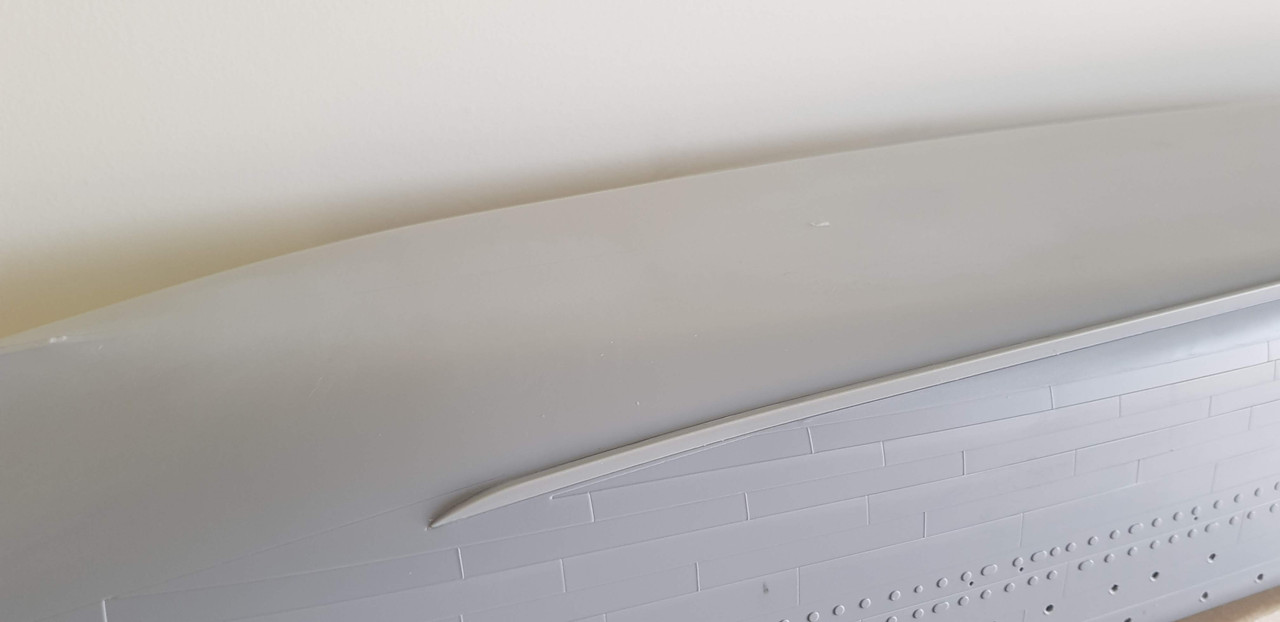
Big but not too hard using Tamiya Extra Thin cement. Lastly I attached the prop shafy supports and rudder..

That's all for now.
Cheers
Warren
I finished off the basics of the main turrets..
1...
2...
3...
I know they might be A, B and Z but that is not important. Then I continued on the Walruses (Walri?)
and the engine pods. Looks a bit like a piglet..
Next it was on to the hull. First drilled out over two hundred port holes and then I removed a few mould seams and attached the hull strakes..
Big but not too hard using Tamiya Extra Thin cement. Lastly I attached the prop shafy supports and rudder..
That's all for now.
Cheers
Warren
RussellE
#306
Joined: June 27, 2010
KitMaker: 3,959 posts
Model Shipwrights: 2,777 posts
Posted: Monday, July 30, 2018 - 12:09 AM UTC
200 port holes!
I think you're crazy


I think you're crazy
warreni
Joined: August 14, 2007
KitMaker: 5,926 posts
Model Shipwrights: 2,624 posts
Posted: Monday, July 30, 2018 - 11:35 AM UTC
Quoted Text
200 port holes!
I think you're crazy
Please note my signature... and I haven't put all the brass port hole bits in place yet..
RussellE
#306
Joined: June 27, 2010
KitMaker: 3,959 posts
Model Shipwrights: 2,777 posts
Posted: Tuesday, July 31, 2018 - 12:35 AM UTC
Quoted Text
Quoted Text200 port holes!
I think you're crazy
Please note my signature... and I haven't put all the brass port hole bits in place yet..
oh lord!
RedDuster
Joined: March 01, 2010
KitMaker: 7,078 posts
Model Shipwrights: 6,649 posts
Posted: Thursday, August 09, 2018 - 08:25 AM UTC
Hi Warren,
Walrus's (Walri??) look good, as does the brass on the main turrets.
good luck with all the port holes.
Cheers
Si
Walrus's (Walri??) look good, as does the brass on the main turrets.
good luck with all the port holes.
Cheers
Si
warreni
Joined: August 14, 2007
KitMaker: 5,926 posts
Model Shipwrights: 2,624 posts
Posted: Tuesday, September 04, 2018 - 08:14 AM UTC
Hello again.
Sorry for the lack of updates but I have been otherwise occupied for about a month. First going to Vietnam and then having my parents stay with us.
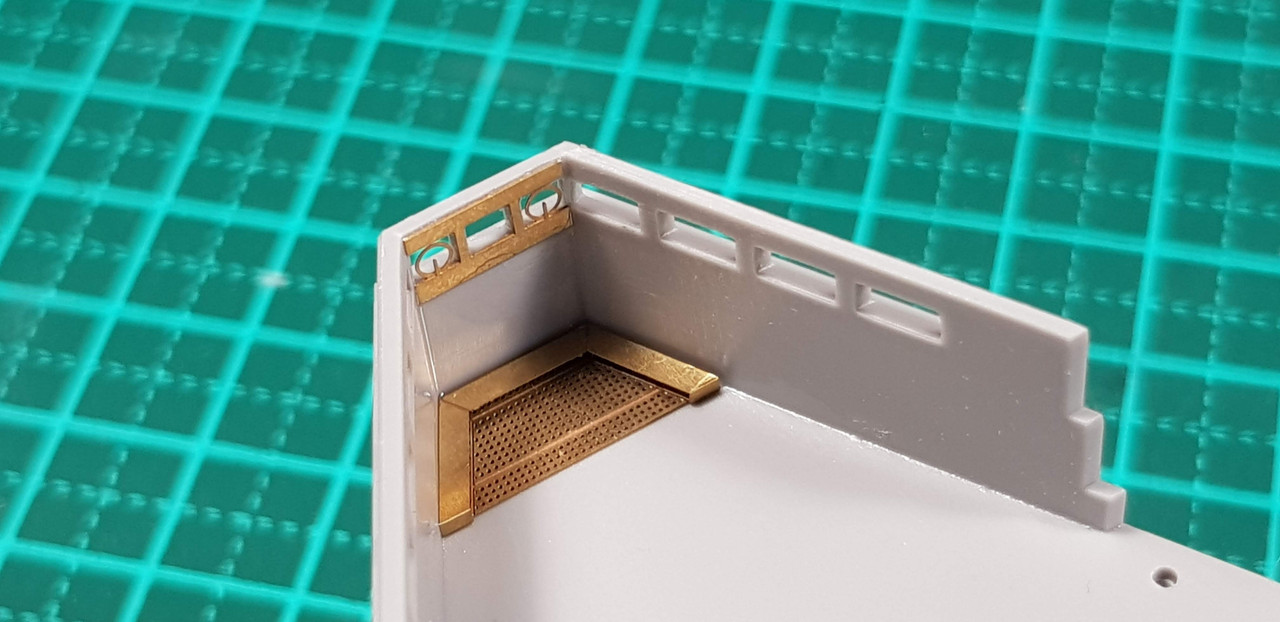
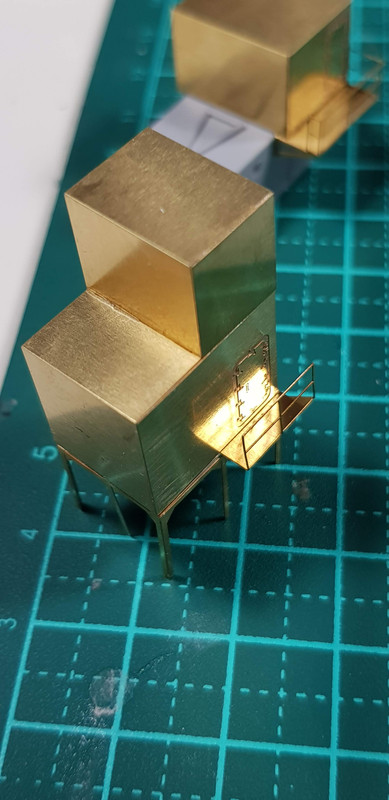
There is not going to be much text in this update but lots of piccies. First up are some of the PE wind deflectors around the bridge ..

Then more shots showing the superstructure under construction..
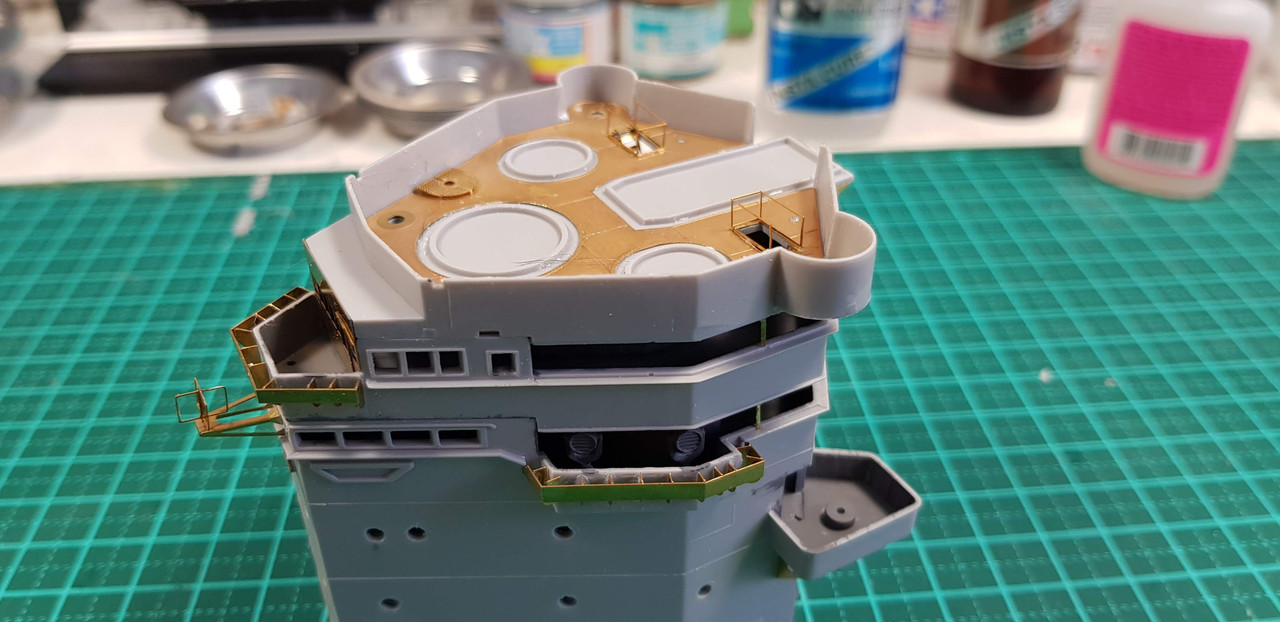

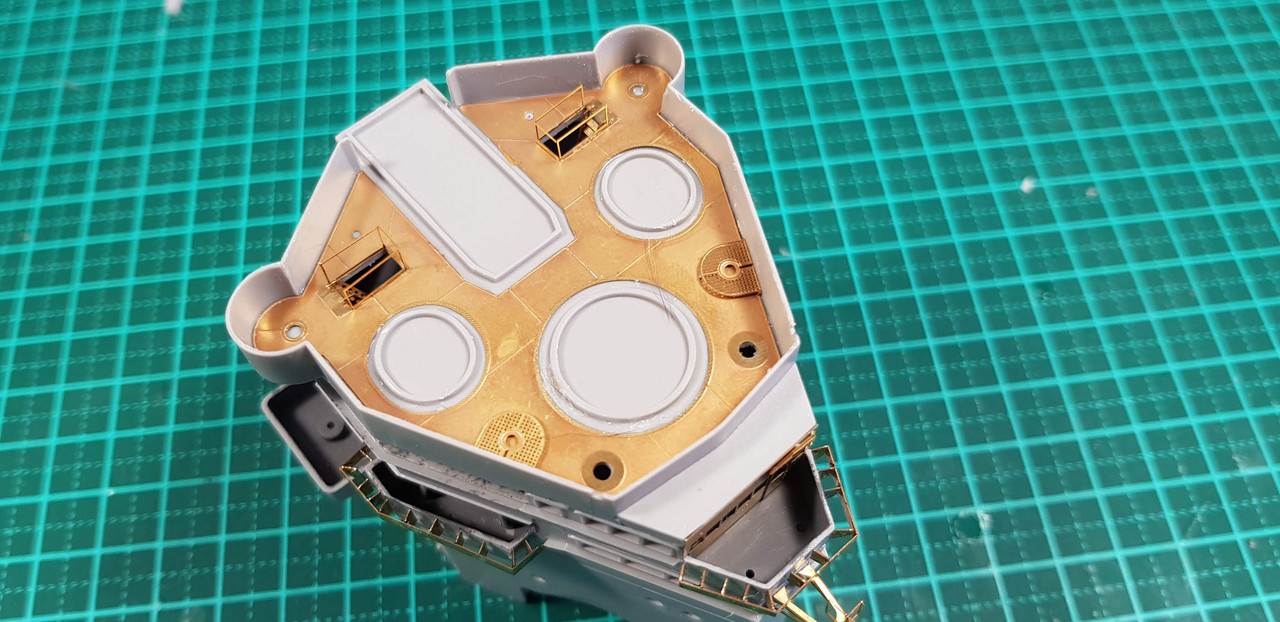
And a structure with a platform that goes on top of the bridge area..
This is actually completely different to the one supplied in the kit. Then another view of the slowly growing Walrii..
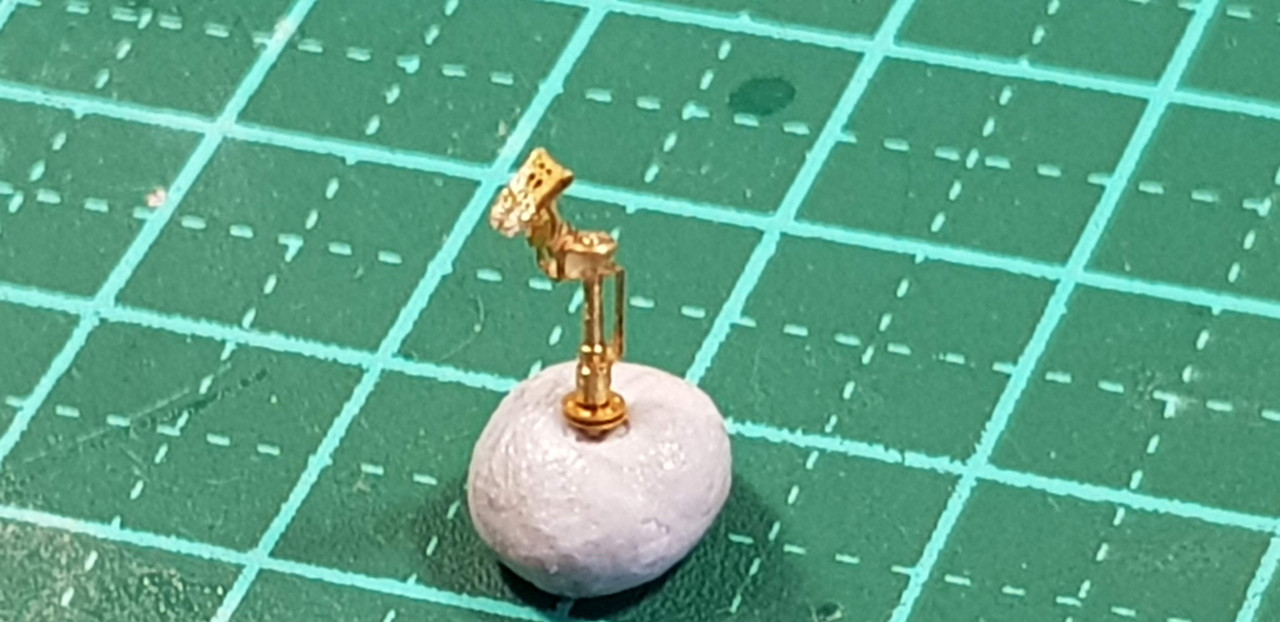
A signaling light
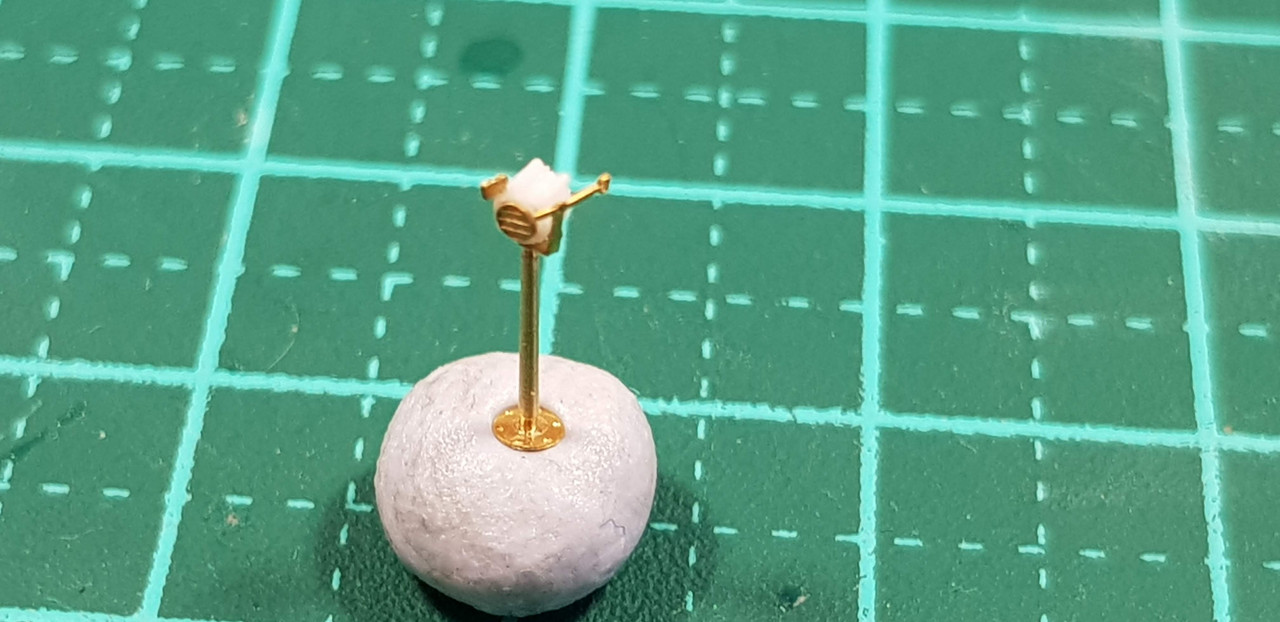
Some binoculars (just squint a bit)
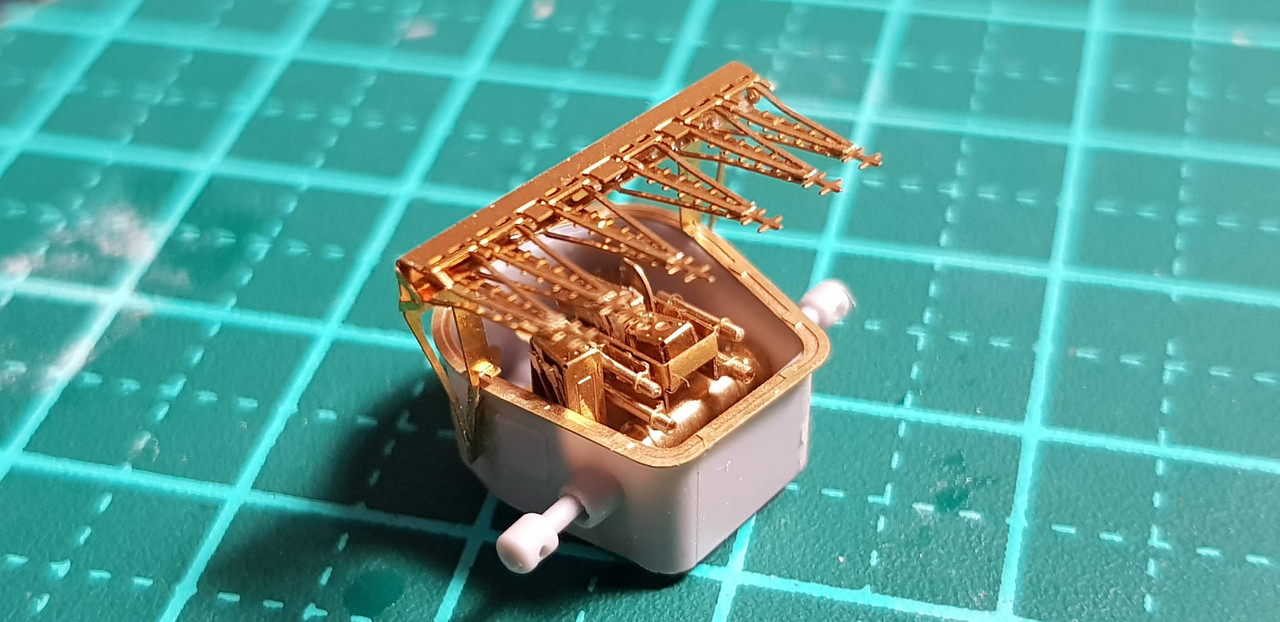
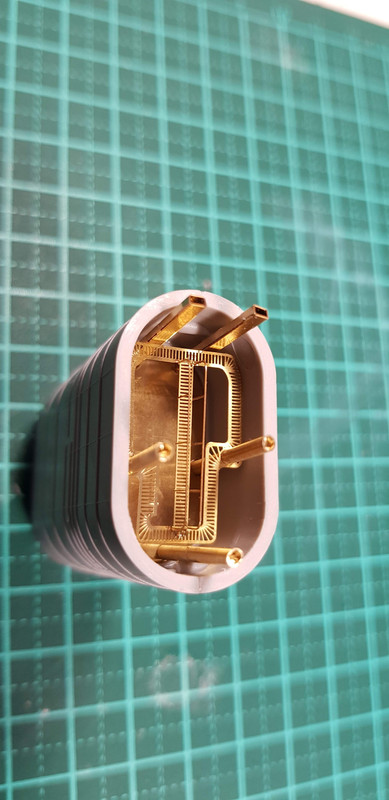
One of the radars..
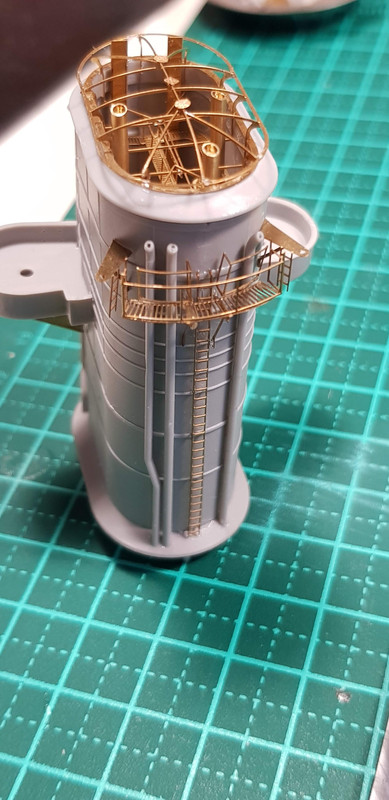
Detail inside the funnel..
More funnel..
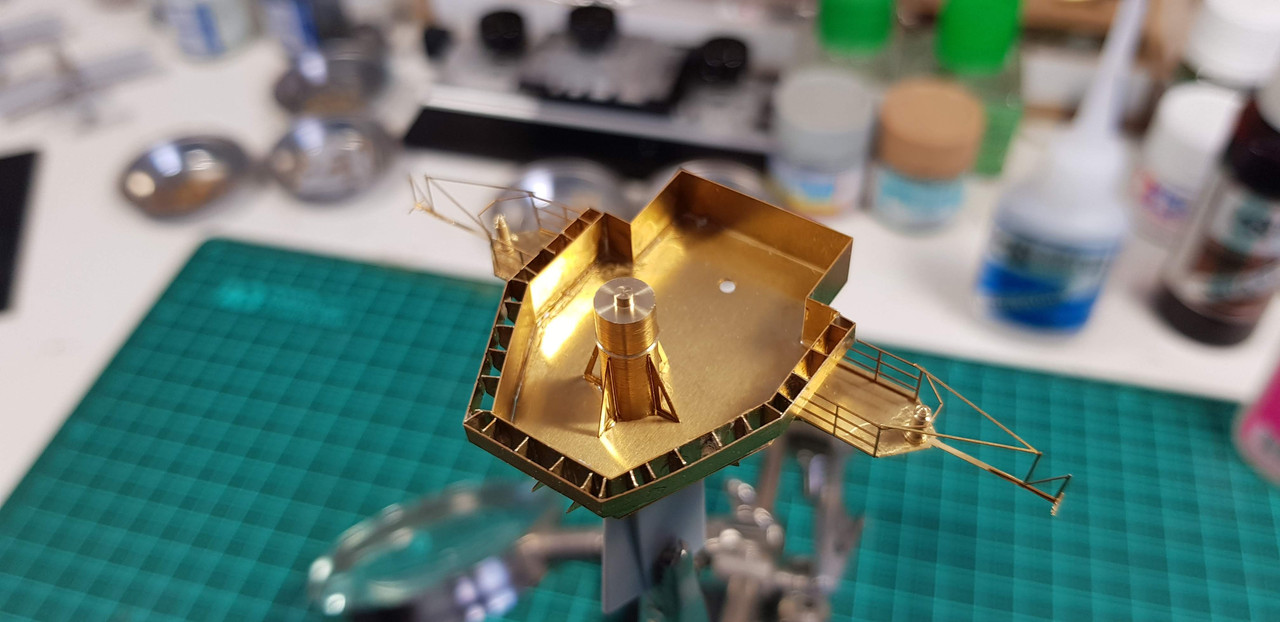
A gun director

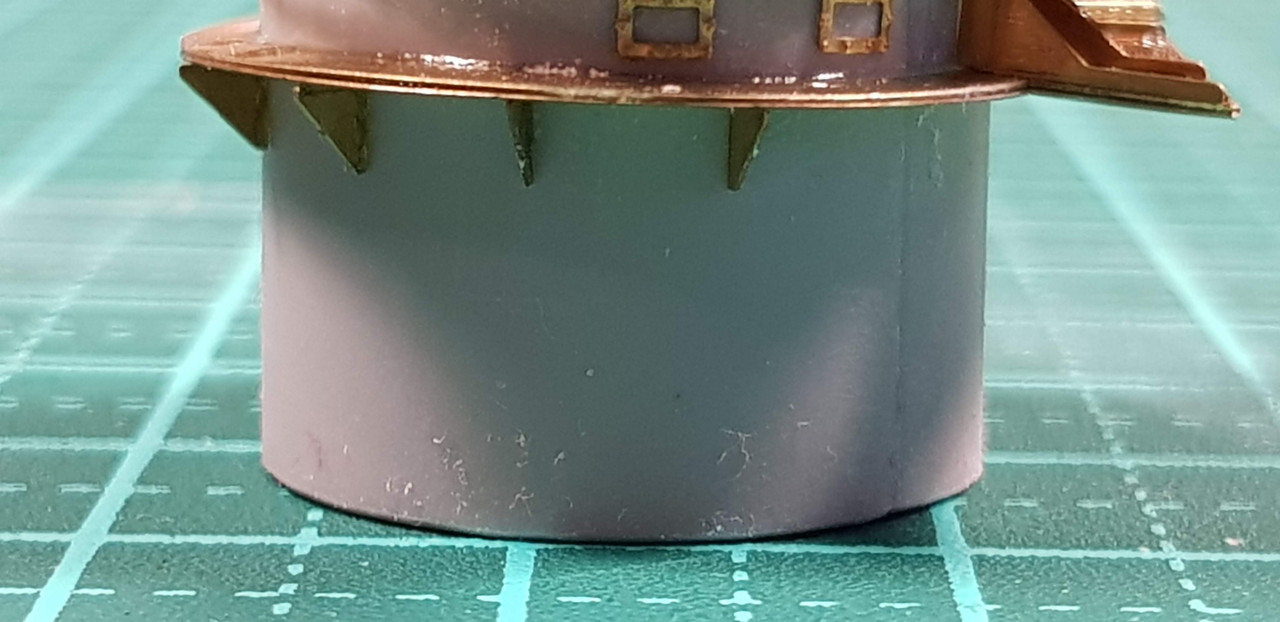
Some structures on the base of the funnel

Nav lights on the funnel

The superstructure base finished..

And that's it for the moment.
Will post more frequent updates from now on.. I hope!
Cheers
Warren
Sorry for the lack of updates but I have been otherwise occupied for about a month. First going to Vietnam and then having my parents stay with us.
There is not going to be much text in this update but lots of piccies. First up are some of the PE wind deflectors around the bridge ..
Then more shots showing the superstructure under construction..
And a structure with a platform that goes on top of the bridge area..
This is actually completely different to the one supplied in the kit. Then another view of the slowly growing Walrii..
A signaling light
Some binoculars (just squint a bit)
One of the radars..
Detail inside the funnel..
More funnel..
A gun director
Some structures on the base of the funnel
Nav lights on the funnel
The superstructure base finished..
And that's it for the moment.
Will post more frequent updates from now on.. I hope!
Cheers
Warren
 |

WEB HOSTING BY


Copyright ©2021 Model Shipwrights and Kitmaker Network, a subsidiary of Silver Star Enterprises
All Rights Reserved. Please read our Conditions of Use and Privacy Policy.
All Rights Reserved. Please read our Conditions of Use and Privacy Policy.