Official Military Small Craft Campaign Thread
California, United States
Joined: February 15, 2005
KitMaker: 114 posts
Model Shipwrights: 56 posts
Posted: Friday, July 06, 2007 - 05:15 PM UTC
Quoted Text
Hey All,
So here is my first build in my first campaign;
I can now start on my Vosper MTB 
Frank,
Congradulations on the first finish. Your MTB looks very good ... and your building speed is like a MTB, ... fast. My S-100 comes along with sanpain speed or maybe turtle speed ... shame on me, I just cut 4 pieces of cockpit from the spru and stop there ...

... but you are ready for the 2nd one.
Good work and thak you for sharing.
Steven
Michigan, United States
Joined: April 03, 2007
KitMaker: 960 posts
Model Shipwrights: 901 posts
Posted: Friday, July 06, 2007 - 05:20 PM UTC
Vulcan20,
Ya, I'm kinda excited about starting the Vosper, I'm going to model mine along the lines of the American version. These boats have some great history and part of the fun of these campaigns is learning the history of the boats and the people that operated them.
It is not a sin to fall.......It is a sin not too get up......
Pennsylvania, United States
Joined: July 13, 2004
KitMaker: 6,705 posts
Model Shipwrights: 4,704 posts
Posted: Friday, July 06, 2007 - 09:56 PM UTC
Quoted Text
Hey All,
So here is my first build in my first campaign;
I can now start on my Vosper MTB
Ahh YES, mate, congrat's on completeing your very first campaign entry (and SOTQ

...bet you can breathe a bit easier now, eh? )
Looks good, Frank...
Keep Modeling!
~Gunny

"And all I ask is a tall ship and a star to steer her by..."
Scotland, United Kingdom
Joined: February 04, 2006
KitMaker: 884 posts
Model Shipwrights: 135 posts
Posted: Saturday, July 07, 2007 - 09:37 AM UTC
Hi Ed
Yeh mine started as the Italeri PT596 kit. I used a backdating plan set from Coastal Force Plans they cover a lot of detail & also list the major work required for backdating to a 103 series of 80ft PT boat.
You might also want to check out the guy's at PT Boats Inc. They have been a very helpfull bunch of guy's ( some are veteren's ) . Hope you have as much fun as I've had.
Building for My pleasure & hoping others like what I build.
Being built at the moment
Way too many unfinished.
Centurian MKIII Tamiya
MinenRaumer
Type 95 Ha Go
Luzon, Philippines
Joined: May 15, 2004
KitMaker: 1,086 posts
Model Shipwrights: 93 posts
Posted: Sunday, July 08, 2007 - 04:27 PM UTC
thanks shaun, i'll check them later as soon as i finished work. it's monday and we're scrambling on scheduled orders and deliveries. thanks again.

Auckland, New Zealand
Joined: July 13, 2004
KitMaker: 2,169 posts
Model Shipwrights: 1,597 posts
Posted: Monday, July 09, 2007 - 08:04 AM UTC
Here is a tongue in cheek update.
My small craft campaign entry is now ready for paint LOL


Just kidding I got kinda bored so I jumped around and started an inflatable dinghy.
Regards
Sean 
#027
Louisiana, United States
Joined: April 13, 2005
KitMaker: 5,422 posts
Model Shipwrights: 5,079 posts
Posted: Monday, July 09, 2007 - 02:19 PM UTC

Dare ya to stick a .50 on it.
"Hark, now hear the sailors cry
Smell the sea and feel the sky
Let your soul and spirit fly into the mystic
Michigan, United States
Joined: April 03, 2007
KitMaker: 960 posts
Model Shipwrights: 901 posts
Posted: Monday, July 09, 2007 - 02:37 PM UTC
Ya have to have some depth charges, maybe only a single roll off rack though......
It is not a sin to fall.......It is a sin not too get up......
Pennsylvania, United States
Joined: July 13, 2004
KitMaker: 6,705 posts
Model Shipwrights: 4,704 posts
Posted: Wednesday, July 18, 2007 - 11:02 PM UTC
Aye, mates, ye been a bit quiet on this thread lately...I guess that everyone is busy building their entry's then, eh?

How about a sound off and a SITREP, so I know yer all still alive and well, ye scurvy dogs! Yeargggghhhhhhhh!
"And all I ask is a tall ship and a star to steer her by..."
#027
Louisiana, United States
Joined: April 13, 2005
KitMaker: 5,422 posts
Model Shipwrights: 5,079 posts
Posted: Thursday, July 19, 2007 - 01:22 AM UTC
I'll be working more on the David this weekend. I've got a little work to do on the GPM sight Friday morning, but then my weekend should be free. I've got some wonderful tips on how to do the wood grain on the hull, so it should be full speed ahead!
"Hark, now hear the sailors cry
Smell the sea and feel the sky
Let your soul and spirit fly into the mystic
Pennsylvania, United States
Joined: June 06, 2005
KitMaker: 1,602 posts
Model Shipwrights: 665 posts
Posted: Tuesday, July 24, 2007 - 06:59 AM UTC
Ok I'll try this in the right topic this time.
Well Im finally at it. Ive got my entry on the table.
Revells 1/72 PT117.
Im expecting a nightmare when it comes to fit but well see.
I figure since the first step in the instructions is the bottom of the boat Ill go that way as well. So Ive started with the stand that comes with it. However with the stand listing the PT109 (couldnt they have at least changed that?) Ive started shaving off the number.
Well first I used a #11 blade (I know not the right one for the job but I had it out.) That was soon stuck in my left pointer finger. So then I went with the right tool. A #4. It soon made a 2nd and larger hole in said finger. After that I got out the #22 that ended up taking out a chunk of my left thumb.
So with one more side to scrap off I decided to take a break.
California, United States
Joined: February 15, 2005
KitMaker: 114 posts
Model Shipwrights: 56 posts
Posted: Tuesday, July 24, 2007 - 07:30 AM UTC
Quoted Text
Ive started shaving off the number.
Well first I used a #11 blade (I know not the right one for the job but I had it out.) That was soon stuck in my left pointer finger. So then I went with the right tool. A #4. It soon made a 2nd and larger hole in said finger. After that I got out the #22 that ended up taking out a chunk of my left thumb.
So with one more side to scrap off I decided to take a break.
Jacob,
Sorry to hear your hole punching experience on your fingers. What I usually do is to use dremel with a bur bit to shave down the number to the close to surface level and then use a chisel type of blade (forget which #, but not #11) to shave off the rest of the number to flat.
Best Regards,
Steven Lu
#027
Louisiana, United States
Joined: April 13, 2005
KitMaker: 5,422 posts
Model Shipwrights: 5,079 posts
Posted: Tuesday, July 24, 2007 - 07:37 AM UTC
Jacob, Jacob, Jacob.
Haven't I taught you anything about working with sharp objects?

"Hark, now hear the sailors cry
Smell the sea and feel the sky
Let your soul and spirit fly into the mystic
Pennsylvania, United States
Joined: June 06, 2005
KitMaker: 1,602 posts
Model Shipwrights: 665 posts
Posted: Tuesday, July 24, 2007 - 08:29 AM UTC
Steven thanks for the advice. I may just have to get the dremel out next time.
The #4 is a chisel type blade. I just think I ran into trouble with it trying to take off more in one pass then I should of.
Kenny by the looks of things Ild say you taught me a good bit.
Ive given the other side a try and managed not to draw any blood this time. The stands together now and just needs a little putty to even the face plates out some.
Next Ill be sticking the top on the hull. I think that will be easier to do it now then after anything glued on. Of course the test fitting shows it doesnt fit well.
Auckland, New Zealand
Joined: July 13, 2004
KitMaker: 2,169 posts
Model Shipwrights: 1,597 posts
Posted: Thursday, July 26, 2007 - 10:22 AM UTC
Did someone say depth charges?
I am working away on the depth charges.
I know there is much discussion/opinion over whether or not they were used etc
But hey I reckon they look pretty cool.
So here is some pictures of progress:


Whats everyone else up to?
Regards
Sean Pennsylvania, United States
Joined: July 13, 2004
KitMaker: 6,705 posts
Model Shipwrights: 4,704 posts
Posted: Thursday, July 26, 2007 - 10:41 AM UTC
Quoted Text
Did someone say depth charges?
So here is some pictures of progress:
Whats everyone else up to?
Regards
Sean
Hi Sean!
It's been quiet around the site lately, and not much activity about...must be summer and vacations, I presume! That's OK, we have lots of time to build this fall and winter, mate!!
Keep Modeling,
~Gunny
"And all I ask is a tall ship and a star to steer her by..."
#027
Louisiana, United States
Joined: April 13, 2005
KitMaker: 5,422 posts
Model Shipwrights: 5,079 posts
Posted: Thursday, July 26, 2007 - 02:25 PM UTC
"Hark, now hear the sailors cry
Smell the sea and feel the sky
Let your soul and spirit fly into the mystic
England - South East, United Kingdom
Joined: September 15, 2004
KitMaker: 4,728 posts
Model Shipwrights: 1,080 posts
Posted: Saturday, July 28, 2007 - 09:47 AM UTC
Yes...
My two little 1/350 S-100 klass S-boats have arrived from WEM very nice looking kits with minimal pe

Working all weekend so will make a start during the week, will also post a pre build photo.
I can't wait to make a start

Ciao
Luciano
On the bench...
Italeri A129 Mangusta
British Bulldog Spitfire theme build
Pennsylvania, United States
Joined: July 13, 2004
KitMaker: 6,705 posts
Model Shipwrights: 4,704 posts
Posted: Saturday, July 28, 2007 - 10:35 PM UTC
Quoted Text
Yes...
My two little 1/350 S-100 klass S-boats have arrived from WEM very nice looking kits with minimal pe
Working all weekend so will make a start during the week, will also post a pre build photo.
I can't wait to make a start
Ciao
Luciano
That's GREAT news, Luciano!
Sometimes things like this happen with suppliers, and the more specialized the product, the longer the back-order...I deal with this daily in my business, some of my customers have been waiting for orders since last year at this time!
Anyhow, glad to see they made it, get busy, and show us some work!
Cheers,
~Gunny
"And all I ask is a tall ship and a star to steer her by..."
Auckland, New Zealand
Joined: July 13, 2004
KitMaker: 2,169 posts
Model Shipwrights: 1,597 posts
Posted: Wednesday, August 01, 2007 - 08:39 AM UTC
Ahoy Shipmates
Here is some further progress shots.
Its winter time right now hence plenty of building.
She is starting to look like a real ship/boat now I am pretty pleased thus far. Still a fair bit to do but shes taking shape.
Deck & wheelhouse mocked up in place
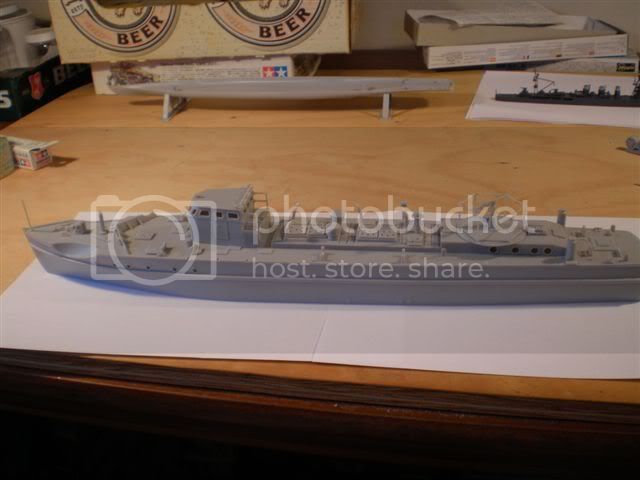

Aerial/mast in place


Regards
Fordboy Pennsylvania, United States
Joined: July 13, 2004
KitMaker: 6,705 posts
Model Shipwrights: 4,704 posts
Posted: Wednesday, August 01, 2007 - 11:34 AM UTC
Ahoy, Sean!
She's starting to take shape now, mate! Keep up the good work!!
Cheers,
~Gunny
"And all I ask is a tall ship and a star to steer her by..."
#027
Louisiana, United States
Joined: April 13, 2005
KitMaker: 5,422 posts
Model Shipwrights: 5,079 posts
Posted: Wednesday, August 01, 2007 - 01:19 PM UTC
Looking great Sean! Keep it coming.
"Hark, now hear the sailors cry
Smell the sea and feel the sky
Let your soul and spirit fly into the mystic
England - South East, United Kingdom
Joined: September 15, 2004
KitMaker: 4,728 posts
Model Shipwrights: 1,080 posts
Posted: Thursday, August 02, 2007 - 06:01 AM UTC
Wow Sean coming along in leaps and bounds.
Sort a.. off topic, but does any one have any information on the experimental S-boats with rear firing tubes?
Ciao
Luciano
On the bench...
Italeri A129 Mangusta
British Bulldog Spitfire theme build
Pennsylvania, United States
Joined: June 06, 2005
KitMaker: 1,602 posts
Model Shipwrights: 665 posts
Posted: Friday, August 03, 2007 - 10:59 AM UTC
Looking good Sean.
After a few days of glueing and putty work Ive got the deck glued to the hull.
Also managed to get everything attached to the bottom.

Now heres a question for you guys.

The kit lists that the rectangles on the front are to be painted aluminum. is this in any way right? I believe these are to be windows correct?
If so any idea what to do with them? I would cut them out but theres nothing to see inside.
The windows at the top I plan on chopping off and scratch building something to replace them.
Pennsylvania, United States
Joined: July 13, 2004
KitMaker: 6,705 posts
Model Shipwrights: 4,704 posts
Posted: Saturday, August 04, 2007 - 12:06 AM UTC
Looks good so far, Jacob! Steady as she goes, and thanks for the update!
~Gunny
"And all I ask is a tall ship and a star to steer her by..."


