Campaigns: Flattops!
This campaign is dedicated to the memory of Garry Beebe.
Garry Beebe's Flattop's Campaign Thread
Clanky44
Visit this Community
Ontario, Canada
Joined: September 15, 2005
KitMaker: 1,901 posts
Model Shipwrights: 934 posts
Posted: Thursday, March 02, 2006 - 12:53 AM UTC
Hi Jean-Luc,

After some careful searching, I'm afraid that there is no option but the old metal and wood finish for your flight deck.

I found that the D4Y served abourd the following carriers.....Chitose, Chiyoda, Hiyo, Junyo, Shinyo, Shokaku, Zuikaku, Soryu, Taiyo, Urnyu, and Unyo.

Based on the shape of the elevator, you can count out all but the following.... Zuikaku, Junyo, Soryu, Hiyo and Shinyo. As far as the flight deck elevator area, these carriers where all painted in the traditional grey (steel elevator) and wood planking). Profile Morskie Nr.41 (Junyo) has a colour guide for these two colours.... Wood decking H103, Elevator H128 (6.5) H105 (2.5) and H35 (1.0). (Considering the shortage of materials in 1943, 1944, any similar paint would do)

Frank

MY EDIT The Zuikaku did change over to a green camo on the flight deck, but only on certain sections, and not on the elevator areas.
TedMamere
Visit this Community
Moselle, France
Joined: May 15, 2005
KitMaker: 5,653 posts
Model Shipwrights: 0 posts
Posted: Thursday, March 02, 2006 - 01:49 AM UTC
Hi all!

Wow! Thanks for all your help! I'll go for the grey/wood paint sheme then (sorry Rui!). I think the green plane will look better on those colors anyway... more contrast!

Thanks again Frank, Jacob and Rui!

Jean-Luc
VonCuda
Visit this Community
North Carolina, United States
Joined: November 28, 2005
KitMaker: 2,216 posts
Model Shipwrights: 0 posts
Posted: Thursday, March 02, 2006 - 08:15 AM UTC
Hi guys. Just wanted to post a couple of pictures of my F4F-4 Wildcat. Mostly assembled now and the first coat of natural metal paint is drying. Should be able to start laying on some blue/white paint by the weekend and maybe have the decals on and ready for final pictures by next week.


The base coat of natural metal is there so that after the final painting is done I can scratch away some of the blue to simulate chipped paint and normal wear and tear from Pacific duty.

Jean_Luc, is your flight deck the same as the one advertised in Squadron? That is similar to the one I want to order for my Wildcat (U.S. carrier of course) but they also offer a "sheet" of printed paper that looks like a section of flight deck and is much cheaper. Anyone ever used the sheet kind? Should I stay away from them or what?

Thanks,
Hermon
TedMamere
Visit this Community
Moselle, France
Joined: May 15, 2005
KitMaker: 5,653 posts
Model Shipwrights: 0 posts
Posted: Thursday, March 02, 2006 - 11:17 AM UTC

Quoted Text

Jean_Luc, is your flight deck the same as the one advertised in Squadron? That is similar to the one I want to order for my Wildcat (U.S. carrier of course) but they also offer a "sheet" of printed paper that looks like a section of flight deck and is much cheaper. Anyone ever used the sheet kind? Should I stay away from them or what?


Hi Hermon!

This is a personal opinion but I would stay away from the printed ones. The are good enough for taking pictures of your model but aren't realistic as all the detail appear flat. Eduard's ones, though not perfect (there's no textures but only "clean" engraved lines), can be really seen as bases. They are more rigid and, in the end, will look closer to the real thing. To sum up:
- Printed "base" = good for pictures (taken from top)
- Eduard base = good for making dioramas
By the way, your F4F looks great... but take care with the decals. They will need a lot of work and additional products to go on your model because of all the rivets! Especially on the fuselage sides. Good luck!

Jean-Luc
Gunny
Visit this Community
Pennsylvania, United States
Joined: July 13, 2004
KitMaker: 6,705 posts
Model Shipwrights: 4,704 posts
Posted: Thursday, March 02, 2006 - 03:45 PM UTC

Quoted Text

Hi guys. Just wanted to post a couple of pictures of my F4F-4 Wildcat. Mostly assembled now and the first coat of natural metal paint is drying.

Thanks,
Hermon


Well hello, Hermon!
The F4F looks great, my friend...nice detail, shall make a fine entry! Thanks for the update, and keep us posted with your progress, mate!
Gunny
MartinJQuinn
Visit this Community
New Jersey, United States
Joined: January 19, 2005
KitMaker: 574 posts
Model Shipwrights: 530 posts
Posted: Thursday, March 02, 2006 - 08:58 PM UTC

Quoted Text

Here's few photos of where my Hornet stands. I'm planning on leaving off the majority of the cross members until the end, to allow the placement of the air wing. The interior details are scratchbuilt using the templates that WEM gives you in their hanger deck detail set.


Very nice - I like the way it's coming together.
VonCuda
Visit this Community
North Carolina, United States
Joined: November 28, 2005
KitMaker: 2,216 posts
Model Shipwrights: 0 posts
Posted: Friday, March 03, 2006 - 08:40 AM UTC
Hi guys,
Jean-Luc, thanks for that advice. I'll be asking about some painting tips for this deck in the future. I've ordered the Eduard deck and a set of PE tiedowns to go along with the diorama as well as some U.S. Navy flight deck figures.
You brought up a good point about the decals and rivets. I'd been worrying about that for a while. I was going to use Micro-set and Micro-sol (after Future of course). Another thought was to carefully file away the rivets on the areas to be decaled but I'm hesitant to do that as it may look goofy after being done. Any other ideas?

Ok, time to add some paint
Hermon
Silantra
Visit this Community
Putrajaya, Malaysia
Joined: March 04, 2004
KitMaker: 2,511 posts
Model Shipwrights: 89 posts
Posted: Monday, March 06, 2006 - 06:40 AM UTC
Howdy shipmates!!!

another update on my 1/350 enterprise...

the hull are completely assembled.

in the photo, i already prime the model with flat white. I use BOSNI spray . it took almost one spray can to get complete and get an even coverage.
next i spray with MrColor 29 Hull Red. I use spray can also.

Next, i masked the hull with masking tape and newspaper
this is how it look like after the masking bussiness:


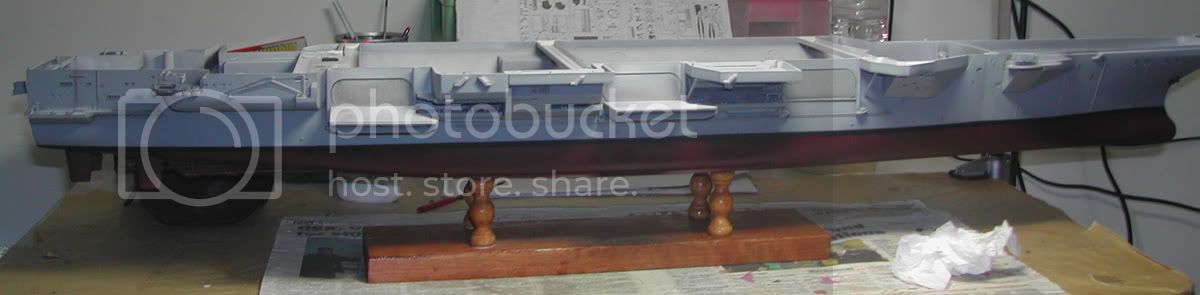
next i airbursh the waterline with mix of tamiya X-1 and XF-1 (1:2) mixture. At this point my Aztek Airbursh suddenly was out of service due some technical prob which i will further invistigate. So i used my Tamiya SF to paint the black waterline stripe. Such a long airbrushing job for this scale.
I give the island the same black 'treatment' to get the preshading effect.

Then, after a day, i mask the black line with masking tape.
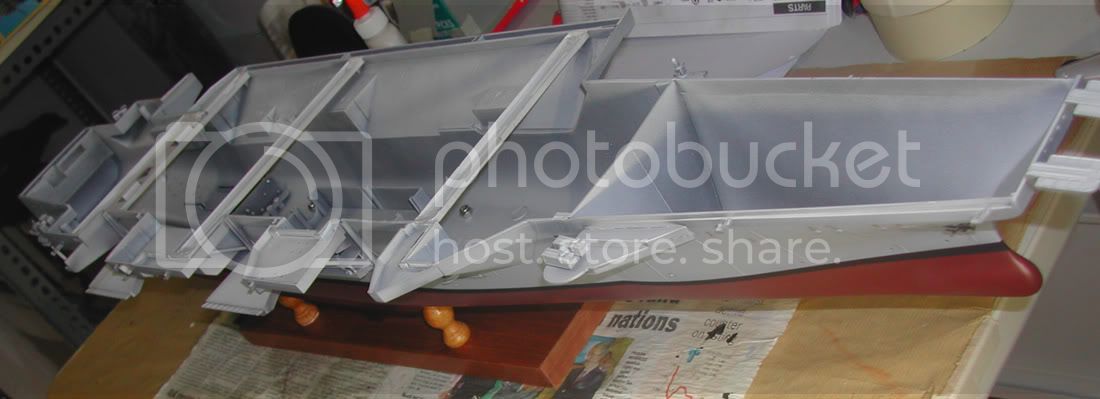
Next, i spray with MrColor Dark Ghost Grey . After a few hours, it's time to remove the mask.

and nothing can take away the feeling of a modeller when peeling away the masking tape.

this is how it look after the masking is remove


but nothing can explain the nightmare, when the masking tape pull also the paint beneath it...


the masking tape also pull the paint at the front hull.
so much frustation, after calming my self down with a puff of dunhill (another health hazard- bad example), i decided to give the affected area a light sanding of 1500 grit sandpaper. then i handbrush the black color with vallejo black (weird ??)


after taking close investigation, i remember that in the area where the paint is pull by the tape, is the area which i polished with polsihing compound. Maybe it's the cause for this phenomenon...


ahh....I forgot to mentioned that i already drill 4 holes at the bottom of the hull so that i can screw the hull to the wooden base that i build.

watch out for next............

and thanks for looking
#027
Visit this Community
Louisiana, United States
Joined: April 13, 2005
KitMaker: 5,422 posts
Model Shipwrights: 5,079 posts
Posted: Monday, March 06, 2006 - 08:39 AM UTC
Hey Silantra....

Here's a trick from an old sign painter (after the fact, I know). I wipe everything down with rubbing alcohol before applying a primer coat. The alcohol removes any residues and because it evaporates quickly, leaves none of its own. Never had a problem making paint stick to slick surfaces.

Kenny
Silantra
Visit this Community
Putrajaya, Malaysia
Joined: March 04, 2004
KitMaker: 2,511 posts
Model Shipwrights: 89 posts
Posted: Monday, March 06, 2006 - 08:58 AM UTC

Quoted Text

Hey Silantra....

Here's a trick from an old sign painter (after the fact, I know). I wipe everything down with rubbing alcohol before applying a primer coat. The alcohol removes any residues and because it evaporates quickly, leaves none of its own. Never had a problem making paint stick to slick surfaces.

Kenny


hey kenny, thanks for the advice...

actually, i did wash the ship entirely prior to priming. I put it in my bath tub....play with it a while then a give it a bubble wash...even lightly scrub the hull....

must be the remaining polishing compound that stubborn to leave the hull...

later, i redo the paint job. i sand give the affected area a light sand of 1500 grit sandpaper and repaint again...........
Gunny
Visit this Community
Pennsylvania, United States
Joined: July 13, 2004
KitMaker: 6,705 posts
Model Shipwrights: 4,704 posts
Posted: Monday, March 06, 2006 - 04:15 PM UTC
Ahmad, looking good, mate!
Even with the most unfortunate unwanted removal of the waterline strip (stuff like this seems to ALWAYS happen to ME TOO!) your entry is looking very good! keep up the fine work, and keep us all posted...How about the rest of ye? Without Armorama around yesterday, did you get anything done on YOUR entry's???
Gunny
redneck
Visit this Community
Pennsylvania, United States
Joined: June 06, 2005
KitMaker: 1,602 posts
Model Shipwrights: 665 posts
Posted: Monday, March 06, 2006 - 05:33 PM UTC
Sadly the hornet hasn’t come very far after the hulls paint job.
I did get some of the guns mounted but that’s about it.
I’ve been spending a lot of my time working on my entry for the modern armor campaign and building myself a modeling room. I should sone be out of material for the room so I may get some work done on the hornet then.
My next big step on her will be painting the flight deck I’m thinking of spraying it wood and then after that drys wiping on a few very thin coats of Deck Blue. I’m just not positive how it will turn out yet.
Phil73805
Visit this Community
England - South East, United Kingdom
Joined: April 19, 2005
KitMaker: 59 posts
Model Shipwrights: 0 posts
Posted: Tuesday, March 07, 2006 - 04:58 AM UTC
Hi all, just a quick update as to my progress or lack thereof.
You may remember that I had planned to do Trumpeter's 1/700 Kuznetsov with WEM's upcoming PE set. I spoke to them today only to be told that it is unlikely that I'll see the set this year!!!

So much for that plan, D'OH! Anyhoo I had a look in the model shop today for a carrier that caught my eye as a replacement project and sadly nothing stood out. My only options now are to a) Drop out, or, b) Build Tamiya's 1/48 F4U-1D on Eduards carrier deck base. I'm as yet undecided.

I've almost finished my first ship a 1/700 USS Franklin but since I began it in late November it isn't for this campaign, still looking good though

Phil
#027
Visit this Community
Louisiana, United States
Joined: April 13, 2005
KitMaker: 5,422 posts
Model Shipwrights: 5,079 posts
Posted: Tuesday, March 07, 2006 - 05:23 AM UTC

Quoted Text

.....and building myself a modeling room. I should sone be out of material for the room so I may get some work done.....


Hey Jacob, you sound like me. :-) :-) I finally got my Tomcats in for my Nimitz build....one problem....I've started working converting a study in to my modeling room and have a my new airbrush coming in Friday (guess I shouldn't have given my old one to my nephew so quickly)

Anyhoo....I'll be getting back to it soon.

Kenny
Gunny
Visit this Community
Pennsylvania, United States
Joined: July 13, 2004
KitMaker: 6,705 posts
Model Shipwrights: 4,704 posts
Posted: Tuesday, March 07, 2006 - 05:50 AM UTC

Quoted Text


You may remember that I had planned to do Trumpeter's 1/700 Kuznetsov with WEM's upcoming PE set. I spoke to them today only to be told that it is unlikely that I'll see the set this year!!!

So much for that plan, D'OH! Anyhoo I had a look in the model shop today for a carrier that caught my eye as a replacement project and sadly nothing stood out. My only options now are to a) Drop out, or, b) Build Tamiya's 1/48 F4U-1D on Eduards carrier deck base. I'm as yet undecided.


Phil


Phil, hello, mate, and I'm sorry that you've had the setback that you have had...I really hope that you plan to stay in the water with us, and not drop out...Why don't you do the Tamiya Corsair for the entry, Bro?? It would be a great entry! C'mon, man, don't quit on us now!!!
Gunny
VonCuda
Visit this Community
North Carolina, United States
Joined: November 28, 2005
KitMaker: 2,216 posts
Model Shipwrights: 0 posts
Posted: Tuesday, March 07, 2006 - 10:18 AM UTC
Hi guys,
Finally finished my F4F-4 Wildcat today......and wouldn't ya know it, the kitmaker sight is down so I can't download my pictures here.
I'm still waiting on my carrier deck display base and some deck crew figures to arrive in the mail but I'm pretty well on schedule at this point.
Soon as I can get some pictures downloaded of my Wildcat I'll post them here.

Hermon
Gunny
Visit this Community
Pennsylvania, United States
Joined: July 13, 2004
KitMaker: 6,705 posts
Model Shipwrights: 4,704 posts
Posted: Tuesday, March 07, 2006 - 02:28 PM UTC

Quoted Text

Hi guys,
Finally finished my F4F-4 Wildcat today......and wouldn't ya know it, the kitmaker sight is down so I can't download my pictures here.
I'm still waiting on my carrier deck display base and some deck crew figures to arrive in the mail but I'm pretty well on schedule at this point.
Soon as I can get some pictures downloaded of my Wildcat I'll post them here.

Hermon


Greetings, Hermon!
Sounds GREAT, and I can't wait to see your finished dio...just a temporary set back with the gallery down, Jim will have 'er back up and runnin' strong soon, I'm sure. Keep me posted, mate!
Gunny
Silantra
Visit this Community
Putrajaya, Malaysia
Joined: March 04, 2004
KitMaker: 2,511 posts
Model Shipwrights: 89 posts
Posted: Tuesday, March 07, 2006 - 02:35 PM UTC

Quoted Text

Zaidi, looking good, mate!
Even with the most unfortunate unwanted removal of the waterline strip (stuff like this seems to ALWAYS happen to ME TOO!) your entry is looking very good! keep up the fine work, and keep us all posted...How about the rest of ye? Without Armorama around yesterday, did you get anything done on YOUR entry's???
Gunny


thanks Gunny for the kind words...

as for todays, i have completed the 'recovering' work on the hull. Now i just need to finish the wooden base before i assemble the deck.

and maybe i think to replace the aircraft for the newer trumpeter offering....
Gunny
Visit this Community
Pennsylvania, United States
Joined: July 13, 2004
KitMaker: 6,705 posts
Model Shipwrights: 4,704 posts
Posted: Tuesday, March 07, 2006 - 03:58 PM UTC

Quoted Text


and maybe i think to replace the aircraft for the newer trumpeter offering....


Greetings, Ahmad!
I do think that MUST agree with you completely on this one, mate! I think that you'll do so much better with the A/M aircraft...keep up the good work!
Gunny
Gaucho
Visit this Community
Rio Grande do Sul, Brazil
Joined: April 13, 2003
KitMaker: 416 posts
Model Shipwrights: 0 posts
Posted: Tuesday, March 07, 2006 - 08:04 PM UTC
Sorry for my absence, but please, I need a license until the end of April, to finish my Fulcrum and to do my entry for OIF campaign.


thanks

PS: I'll do the same in the dreadnought campaign.
Silantra
Visit this Community
Putrajaya, Malaysia
Joined: March 04, 2004
KitMaker: 2,511 posts
Model Shipwrights: 89 posts
Posted: Wednesday, March 08, 2006 - 07:06 AM UTC

Quoted Text


Quoted Text


and maybe i think to replace the aircraft for the newer trumpeter offering....


Greetings, Zaidi!
I do think that MUST agree with you completely on this one, mate! I think that you'll do so much better with the A/M aircraft...keep up the good work!
Gunny


Hey Gunny,

yeah..that's right mate...
the only problem here is to get them at LHS...i still dont know if LHS has the stock...should be able to go there maybe this weekend


another updates

i have complete the wooden base made from section of 1" wood stock. I use wood shellac to the base.
this is the wooden base


i use 3 " screw to attached the hull to the base. I lost my tiny washers so i replace with nuts.

this is how it looks after being fixed on the base:


now it's time to assemble the deck....

comments are welcome...

Gunny
Visit this Community
Pennsylvania, United States
Joined: July 13, 2004
KitMaker: 6,705 posts
Model Shipwrights: 4,704 posts
Posted: Wednesday, March 08, 2006 - 04:36 PM UTC
Silantra,
Looking VERY good, mate! I like your wooden base...it will really add the finishing touch to the final overall appearance of the build. Progress is great (so much greater than MINE!) but we have alot of time left. Keep the discussions and pics coming in! Good luck at the LHS!
Gunny
VonCuda
Visit this Community
North Carolina, United States
Joined: November 28, 2005
KitMaker: 2,216 posts
Model Shipwrights: 0 posts
Posted: Wednesday, March 08, 2006 - 10:46 PM UTC
Hey guys,
Here is where my Wildcat is at right now. Still a little weathering to do yet and I'm waiting on the carrier deck base and figures to arrive. I'll take some better pic's for the final dio since the "blue" in these pictures turned out way brighter than it is in reality.
Thanks for looking,
Hermon


Any comments or helpful tips are appreciated. This is my first attempt at a Navy plane and I'll need some advice.
skipper
Visit this Community
Lisboa, Portugal
Joined: February 28, 2002
KitMaker: 5,182 posts
Model Shipwrights: 4,070 posts
Posted: Wednesday, March 08, 2006 - 11:53 PM UTC
Hi Hermon

Your Wildcat looks very good, and although I am not a Aviator I think I can give you some tips and hints:
- For the period your making your Wildcat it would be carrier based, so I think the propeler shouldn't be that scratched; Some situations like this would happen to Corsairs (mainly used by Marines) on airfields that were paved with smashed coral - the available material in some islands
- The wethering you have made to show the Aluminium, should be a little smaller and mainly around movable parts and maintenace areas, like engine panels, wing gun reloading hatches/panels so the root of the tail big chunk and the one near the cockpit, should be corrected (try and find some real F4F images for reference of weathering - if you can't find them, send me an email or PM)
- Don't forget to make the gun smoke trails bellow the wing - You have made them beautifully on the top!
- Make some wear to the Landing Gear. You can make it look a little greasy and with with a pencil mark out some of that black - it looks too neat compared with the rest of the plane.

I think you have made a terrific model and if you pay attention to these little details it would be a Winner!
You already have made the most difficult part

As far as I can see, the construction is perfect (no seams, no injection marks, no issues), the painting looks well done and accurate and the "artistic part of modeling" (read weathering ) is almost there.

I am really looking forward to see it manned in the carrier deck!!!!

Congratulations and keep us posted on your progress!

Skipper
VonCuda
Visit this Community
North Carolina, United States
Joined: November 28, 2005
KitMaker: 2,216 posts
Model Shipwrights: 0 posts
Posted: Thursday, March 09, 2006 - 12:29 AM UTC
HI Skipper, and thanks for the great advice.
I was trying to replicate the Wildcat I found on another site http://modelingmadness.com/reviews/allies/us/laskodif4f.htm
I didn't realize that the plane I was useing as reference was a land based plane so that's were all the paint chipping and wear came from. Shouldn't take me long to fix those problems. Also, if you have any reference pictures I'd be glad to use them.
Thanks for the help and I'll get to work fixing the problem areas.
Hermon

EDITED by Skipper: Working link